
Don't wanna be here? Send us removal request.
Statistics
We looked inside some of the posts by group4projectdevelopment and here's what we found interesting.
Average Info
Notes Per Post
8
Likes Per Post
5
Reblog Per Post
3
Reply Per Post
0
Time Between Posts
1 day
Number of Posts By Type
Text
17
Last Seen Tumblr Blogs


Fun Fact
Tumblr has 411 employees.
Text
Personal Group Contribution Update (Part 4)
Poster– Ana Cristina Pacheco Romo de Vivar
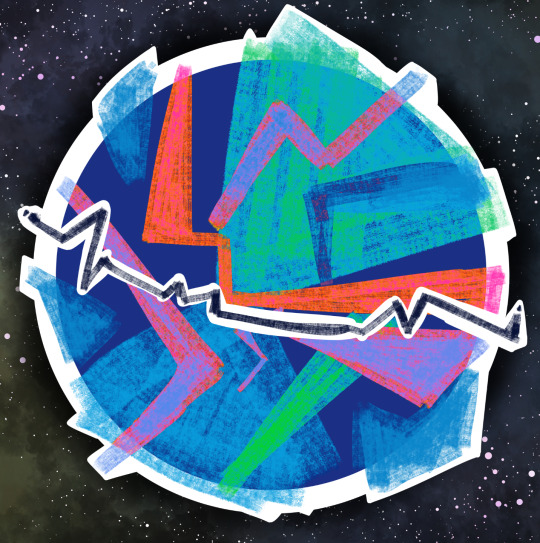
I wanted to create something chaotic as possible. for this I thought first on doing the project in photoshop and from there put png to make the composition. But I decided against it because I wanted to put a lot of pngs randomly so at that point I consider better to use blender so I could scatter the 3D models at the same time I can scatter the 2D images.
The scattering will be also helped by blender as it has already a function to scatter images around a mesh. The problem with this method is that the mesh is very consistent it would not me a lot of changes of perspective for the meshes to move, so for my first step.
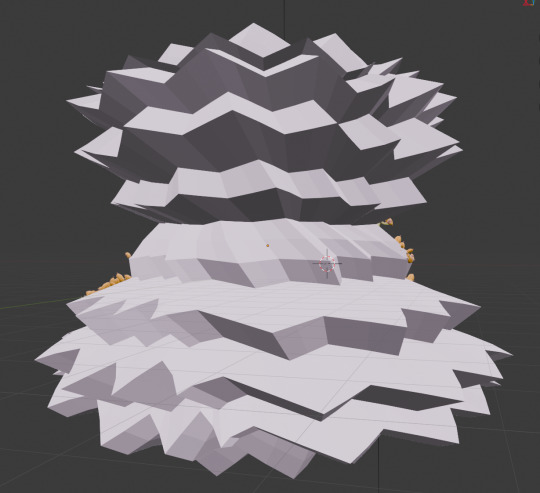
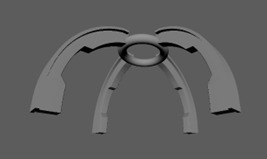
1- I designed this weird contraction so I could start having some variations
2- After this I scatter first the 3d objects covering the mesh with the 3 cats.

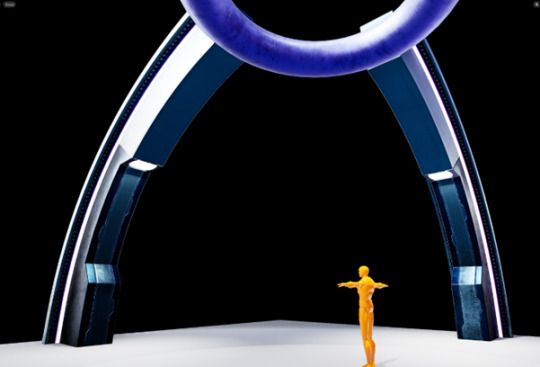
3- For this step I searched for an interesting camera view, it has to have some space that could show the other part of the world, I didn't care if not all the cats appear in the final shot as I wanted to do this to find different camera angles. (For this step I also hide the contraption as it already helps its purpose) And this is the result.
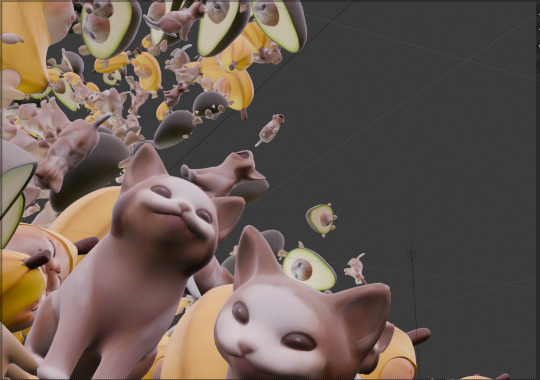
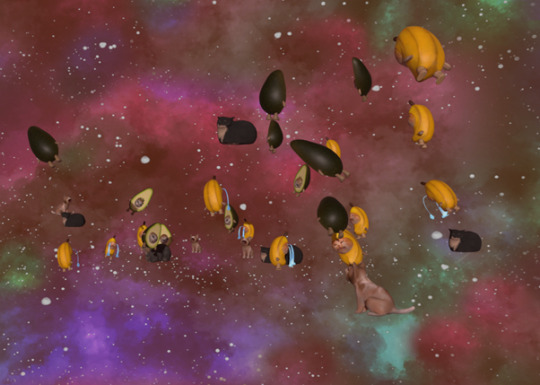
4-Then I put the margin, to give the idea that we are in the same spaceship as in the video, also in this step I also put all our faces I wanted that the faces aren't so big, just for a funny cameo. I left space in the middle so I could put the planets and meteors of the other planet.
5-By this time also I was able to put this image spreading them but in a duplicate of this sphere as to make the image seem to be all around us. So, I continue putting the meteors and planets using the same method.
6- The last step here was putting the ambient light and the ceiling and with that the blender document was done.

7- Then all the editing was in photoshop, as it was missing a lot of things mainly something like a fog for distance, to better separate the elements as they are so many and to bring a little of order to this chaos. So, after a lot of tweaking in photoshop this is the result.

0 notes
Text
Personal Contribution Update (Part 2)
-Yu Jie, Huang
After completing my tasks from Part 1, I wanted to lighten the workload for the team, so I also helped find sound effects and meme sounds for the video editing phase. I used two websites:https://freesound.org/ and https://www.myinstants.com/en/index/gb/. By entering keywords, I could quickly find what we needed. I also categorized all the sounds and included their sources.
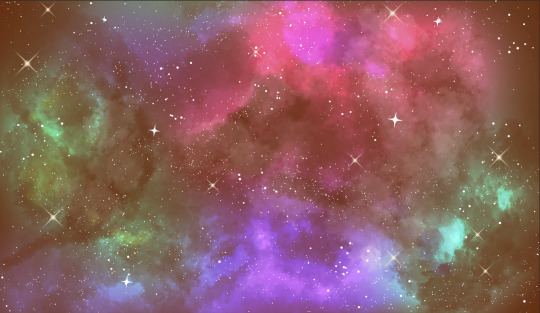
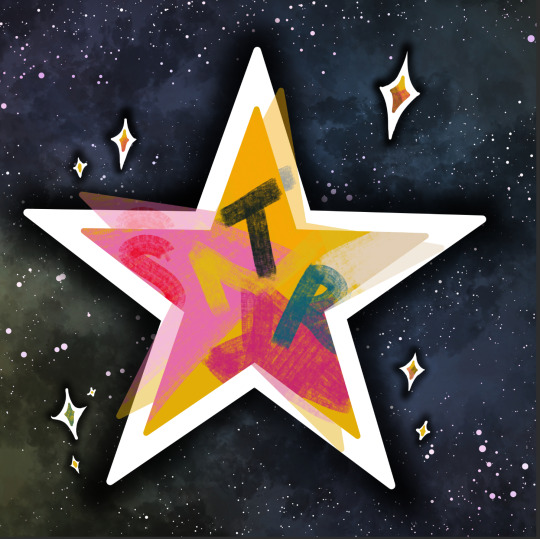
To make the background of the Papercut Universe feel more cohesive, I combined my star and starry sky designs. I adjusted the colors, saturation, and other details to make the overall visual look more intricate. For the starry sky, I added a crumpled paper texture to the background layer to create a more 2D, paper-like effect. This background was then passed to other team members to be used in the video.

When reviewing the first draft of the edited video, we noticed that the background of the Cat Meme Universe didn’t match the vibe of the cat. Instead of a cool color tone, I suggested that it should be warmer and more magical. I also created a new background accordingly and passed it to the team for use in the video.
Overall, my role in this project was mostly behind-the-scenes support. I focused on concept art and then handed my work over to others for further refinement. For example, in our first presentation, I created a storyboard-like visual to help the professor understand our artistic direction. I also designed elements like the Papercut Universe background, planets, and stars.
I often feel like I haven’t done enough, but I’m grateful that my teammates told me the opposite. I truly appreciate everyone's contributions, and I believe each person did their best in their own way. Thank you for all your hard work.
Reference
Freesound (2012). Freesound. [online] Freesound.org. Available at: https://freesound.org/.
Myinstants (n.d.). Myinstants - Trending Funny Sounds of United Kingdom. [online] myinstants. Available at: https://www.myinstants.com/en/index/gb/.
0 notes
Text
Personal Group Contribution Update (Part 3)
Animation Sticker – Ana Cristina Pacheco Romo de Vivar
Then after the cats the other animation that I did was the sticker of a meteor in the paper planet.
For here my task were three things:
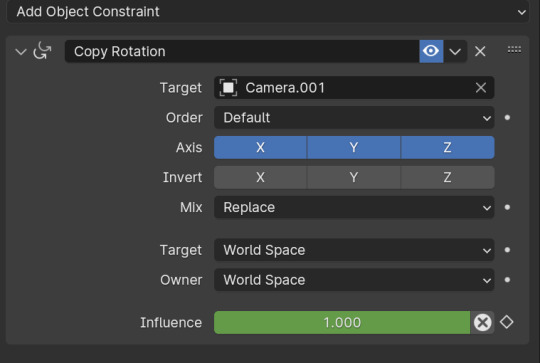
1- To make it the meteor look flat, like paper. For this I use a constrain of rotation, as the meteor was already following the camera. So, for the effect it needed a push in the rotation.
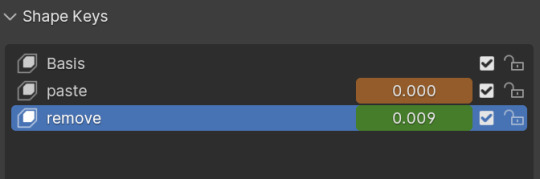
2-A transition, for it to be a movement like a sticker being pasted in the screen, for this I use a shape key.
3- And for the third thing I also needed to do a second shape key but this time to remove the sticker so it appears to the audience that it was in fact just a sticker and you can see as flat.
And with that I was able to create the effect for the animation.
0 notes
Text
Personal Group Contribution Update (Part 2)
Animation Cat – Ana Cristina Pacheco Romo de Vivar
I also did two animations, first for the Pop cat and then for the paper planet.
The most important feature of the pop cat is that it has to pop. So, I wanted to make it move but for the time constrains I didn't want to make a rigg for just one easy movement that will not be seen for a max of 20 seconds.
So, I arrived at the conclusion of using blender shapes to deform its mouth and thus being able to have a control of the mouth of the cat.
6 notes
·
View notes
Text
Personal Group Contribution Update (Part 1)
Cats making – Ana Cristina Pacheco Romo de Vivar
In this blog I will elaborate what I did in the making of the 3D cats for the meme planet.
The cats that I did was first the banana cat, second the pop cat and lastly the avocado cat.
My process was the following:
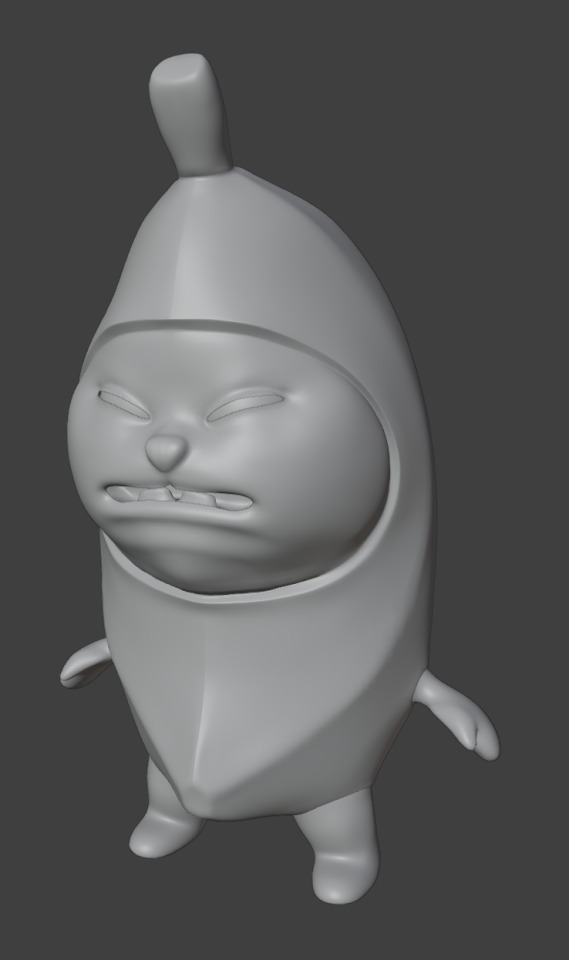
1- I did first a very basic sculpture in Zbrush of the cat in question, the example I will put is about the banana cat. I don't search perfection as I want more an easy lookalike to start doing fast the retopology process.
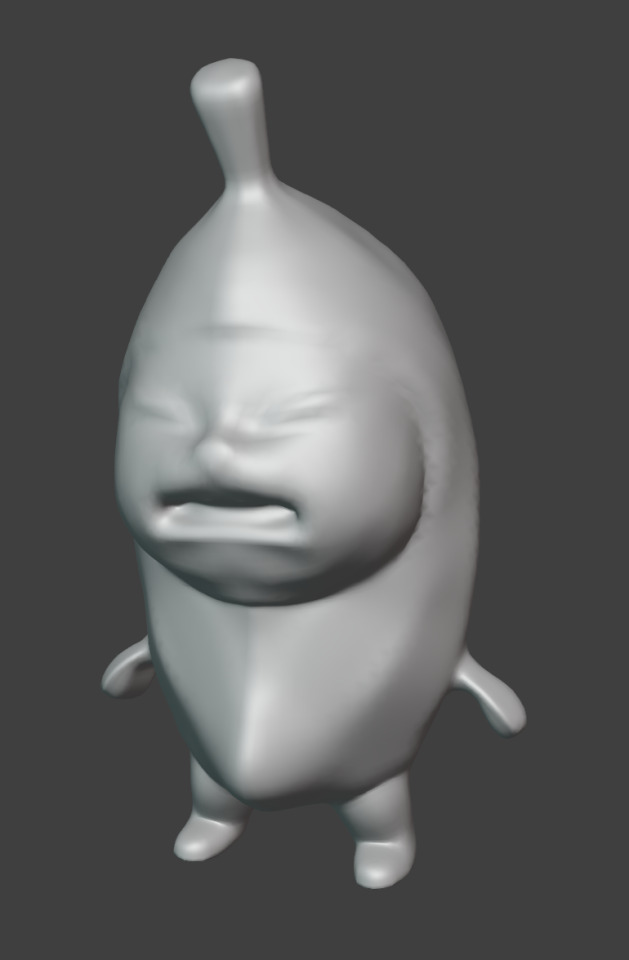
Photos of a very early-stage banana cat
2- I will start the retopology process and here I will modify a little bit of the sculpture in Blender if necessary if I later see it could be on need of a modify to look more accurate.
As you can see this stage not only consist of creating the topology but also adding details, like making the mount leaving the space for the eyes and also refining a little bit of the already topology in Zbrush.
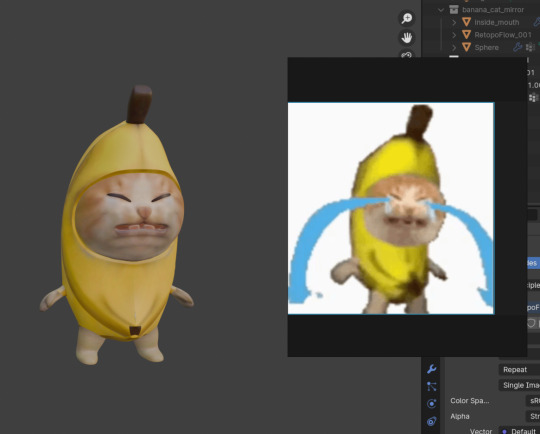
3- Next step is the texture, as we want to have an easy lookalike, I make the base of the texture in photoshop, kind of doing a projection.

What I did is that first I make the image of the original meme fit the uv space that they supposed to go, using photoshop here thanks of its liquify tools and clone stamp to make everything fit together.

Photo of the meme used for the base of the painting.
After this the cat look like this:
5- As one can see the details aren't complete as some transitions from one texture to another needs refinement, so I use blender to finish up to add those small details.
And that was mostly the same process that I use for the three cats.
2 notes
·
View notes
Text
Third party Resources
This blog contains all the third party resources used in our project. While we have almost completely handcrafted resources in our project, the sound effects we used were definitely from stock or copy-right free sources as none of us had the equipment nor the expertise to create them. Apart from that the only thing which was used as third party resources was a Wavy Colorful effect in the Space Jump Transition or some minor 3D assets. Mentioned Below are the sources from where we used our third party resources. Bibliography:
3D Model assets: bean(alwayshasbean). (2022). Maxwell the cat (Dingus). Available at: https://sketchfab.com/3d-models/maxwell-the-cat-dingus-2ca7f3c1957847d6a145fc35de9046b0. (Accessed: 11 February 2025) Zhuier. (2024). Oiiaioooooiai Cat. Available at: https://sketchfab.com/3d-models/oiiaioooooiai-cat-30d27bf7fb224849b76e208a6eccdb36. [Accessed: 11 February 2025]
Planet Textures: INOVE. (n.d.). Solar Textures. Solar System Scope. Available at: https://www.solarsystemscope.com/textures/. [Accessed: 8 February 2025]
Video effects: Colorful wormhole through space Free Stock Video Footage (no date). Available at: https://www.freepik.com/free-video/colorful-wormhole-through-space_3544913#fromView=search&page=1&position=8&uuid=b2f6a2a1-30e5-470e-85a2-5293a6058a35. [Accessed: 11 February 2025] Audio/ Sound:
Myinstants (no date) Michael Scott No - Sound button. https://www.myinstants.com/en/instant/michael-scott-no-16428/?utm_source=copy&utm_medium=share. [Accessed: 10 February 2025]. Pixabay (2025) Pixabay.com. Available at: https://pixabay.com/sound-effects/search/fireball-whoosh/ [Accessed: 10 February 2025].
freesound.org. (n.d.). Freesound - low pulsating hum.flac by Timbre. [online] Available at: https://freesound.org/people/Timbre/sounds/169859/.
Freesound.org. (2015). Freesound - Energy Charging by nightcraftsounds. [online] Available at: https://freesound.org/people/nightcraftsounds/sounds/266170/ [Accessed 11 Feb. 2025].
Freesound.org. (2025). Freesound - 04527 slow blowing whoosh.wav by Robinhood76. [online] Available at: https://freesound.org/people/Robinhood76/sounds/195999/ [Accessed 11 Feb. 2025].
Freesound.org. (2025). Freesound - Teleport High by GameAudio. [online] Available at: https://freesound.org/people/GameAudio/sounds/220162/ [Accessed 11 Feb. 2025].
Freesound.org. (2025). Freesound - Cartoon_10’’ Boing.mp3 by CGEffex. [online] Available at: https://freesound.org/people/CGEffex/sounds/89539/ [Accessed 11 Feb. 2025].
Freesound.org. (2016). Freesound - Cat01.wav by Michael-DB. [online] Available at: https://freesound.org/people/Michael-DB/sounds/343069/ [Accessed 11 Feb. 2025].
Freesound.org. (2016). Freesound - Cat Call (Meow) by Jofae. [online] Available at: https://freesound.org/people/Jofae/sounds/362953/ [Accessed 11 Feb. 2025].
Freesound.org. (2021). Freesound - Activated button by BloodPixelHero. [online] Available at: https://freesound.org/people/BloodPixelHero/sounds/580858/ [Accessed 11 Feb. 2025].
Freesound. (n.d.). 01818 start beeps.wav by Robinhood76. [online] Available at: https://freesound.org/people/Robinhood76/sounds/97879/.
Freesound.org. (2025). Freesound - Beeps.wav by ThompsonMan. [online] Available at: https://freesound.org/people/ThompsonMan/sounds/107341/ [Accessed 11 Feb. 2025].
Freesound.org. (2025). Freesound - Time distortion_northern87 by northern87. [online] Available at: https://freesound.org/people/northern87/sounds/131100/ [Accessed 11 Feb. 2025].
Freesound.org. (2025). Freesound - 04390 passing whoosh with blow.wav by Robinhood76. [online] Available at: https://freesound.org/people/Robinhood76/sounds/188415/ [Accessed 11 Feb. 2025].
Freesound.org. (2025). Freesound - Glass Drop 7 by qubodup. [online] Available at: https://freesound.org/people/qubodup/sounds/219842/ [Accessed 11 Feb. 2025].
Myinstants.com. (2025). Blocked. [online] Available at: https://www.myinstants.com/en/instant/michael-scott-no-16428/?utm_source=copy&utm_medium=share [Accessed 11 Feb. 2025].
Freesound.org. (2015). Freesound - Paper Flutter .wav by mickdow. [online] Available at: https://freesound.org/people/mickdow/sounds/320913/ [Accessed 11 Feb. 2025].
Freesound.org. (2021). Freesound - SFX_STICKERRIPPER_docket_03.wav by MrFossy. [online] Available at: https://freesound.org/people/MrFossy/sounds/590277/ [Accessed 11 Feb. 2025].
Freesound.org. (2017). Freesound - Tearing paper by Poligonstudio. [online] Available at: https://freesound.org/people/Poligonstudio/sounds/392616/ [Accessed 11 Feb. 2025].
Freesound.org. (n.d.). Freesound - EXPLDsgn_Engine Ignition Burst.Engine Start.Nitro.Flare.Blast.Explosion 1-3_EM by newlocknew. [online] Available at: https://freesound.org/people/newlocknew/sounds/716972/.
Freesound.org. (2025). Freesound - Data and static_clip.wav by AlienXXX. [online] Available at: https://freesound.org/people/AlienXXX/sounds/243738/ [Accessed 11 Feb. 2025].
Freesound.org. (2025). Available at: https://freesound.org/people/acclivity/sounds/30302/ [Accessed 11 Feb. 2025].
Freesound.org. (2025). Freesound - Ambient_Alienated.mp3 by AniCator. [online] Available at: https://freesound.org/people/AniCator/sounds/100483/ [Accessed 11 Feb. 2025].
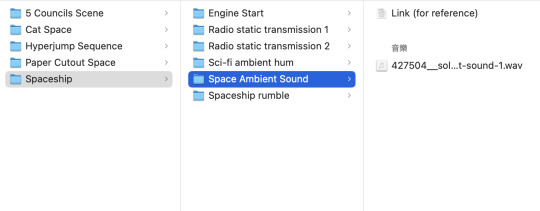
Freesound.org. (2018). Freesound - Industrial Noises Ambient Sound 1.wav by SolarPhasing. [online] Available at: https://freesound.org/people/SolarPhasing/sounds/427504/ [Accessed 11 Feb. 2025].
Freesound.org. (2025). Freesound - Tunnel ambience 150Hz (like spaceship corridor)_WC5025.wav by Timbre. [online] Available at: https://freesound.org/people/Timbre/sounds/75521/ [Accessed 11 Feb. 2025].
0 notes
Text
Group Progress and My Contributions/ Self Reflection (Part 2) - Yash Kunder
My Contributions / Self Reflection : In this blog I shall elaborate my role as a member of Group 4, the contributions I made and the value I tried to generate using my abilities to achieve our goal.
I am the Animator of the group because of which my primary role is animation. I specialize in 2D and have created animations from scratch before. My secondary skills are pre-production, graphic designing, layouts and Compositing. Keeping these things in mind, my approach was to provide assistance to the group whenever and wherever it was required. Our Group had 3 members from Game Design, each with unique skillsets, 1 concept artist and 1 Animator(me). Since we had a specialist in pre-production (Nita) I did not have to work on creating assets, storyboard, backgrounds or concept arts. Which meant my primary roles would be Animating and Compositing. Reflecting back to my Belbin test results, it also felt the most natural thing for me to do (Since my roles were Specialist/Shaper and Finisher). I worked closely with the Concept Artist of our group to achieve the desired results. Below are the Frame by frame animations I came up with , using the concept art and resources provided to me by our Concept artist.
Meteor Animation Loops
There were 4 Meteor Animation Loops as well as 4 Unique Planets Animations in 2D. I used Toon-boom to animate them. The link to the Planet animation is given below:
However that my responsibilities were not limited to that. I was also the bridge from 2D to 3D. The most efficient approach was to put the 2D elements in a 3D space to show the contrasting effect of experiencing both spaces together. Hence i was also working closely with member who was setting up the space in 3D (Gautham). I was responsible for making sure things behaved in 3D space as we planned and directed, while Gautham was handling the technical side as well as helping me with understanding Blender since its a software I'm unfamiliar with. I was also Assisted by Ana to create a very realistic sticker effect in Blender. ( Also Thanks to this project i was able to learn the basics of managing and manipulating assets in Blender)
Snippets of my workspace in Blender
Lastly, I was responsible for getting the final composite of all our hardwork together and Sync the sound effects / Audio. This is not my forte but i volunteered because the group needed one and we did not have someone who was a specialist at editing or had more experience with it.
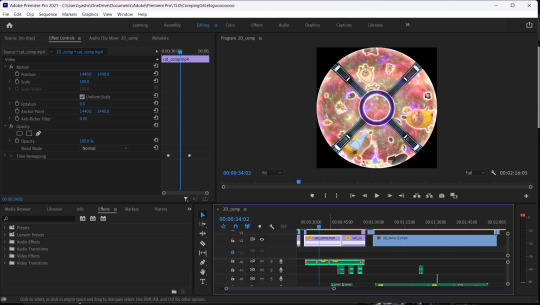
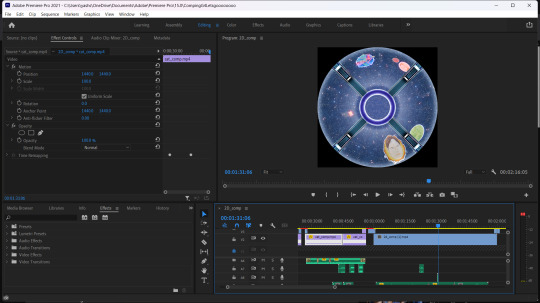
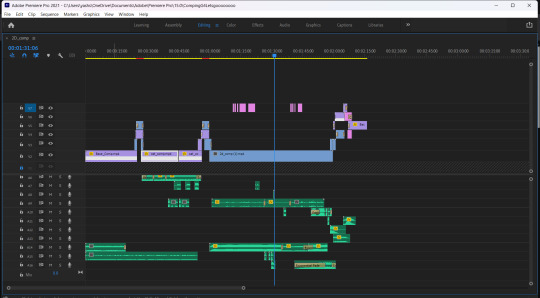
Snippets of my source files in Premiere Pro
To Sum it up, I find myself coming out of this experience as a happy artist who contributed what he could and had teammates to rely on for the parts which are not my strengths. I felt this is what a Group is supposed to do and we had no loose ends in any area. As much as i like what we created together, the creative and collaborative atmosphere we had is what I will carry with me moving forward.
#group assignment update#self reflecting#my contribution#creative process#animation#compositing#digital 2d#Dome
0 notes
Text
Group Progress and My Contributions/ Self Reflection (Part 1) - Yash Kunder
Group Progress: As of today ie the 10th of Feb, Group 4 has managed to complete and test a functional and well constructed Dome 360 video which is a day ahead of our deadlines. We were successfully able to setup an extreme synchronized process where every member took responsibility and performed to the best of their ability.
We started by first knowing each other, our strengths, our likes and dislikes etc. Next, we shared our previous work in order to get a clear picture of what we can all achieve together and that its realistic. It helped us avoid over expecting from each other and also to be in the same page. Based on this information, we decided to play to our strengths. Everyone had a role and everyone loved their roles due to which, we were proactively taking initiatives to progress with the project. Every member genuinely believed in what we wanted to create which reflected in our work too. Our Idea consists of having a 2D space and 3D spaces. For smoother functioning, we split into subgroups of respected mediums ie 2D (Me and Nita) and 3D ( Dylan, Gautham and Ana) to come up with events and ideas which are interesting and also practically achievable in the given deadline. We trusted each other and were confident with our skillsets to do whats best for our group. The First Phase of our project depended heavily on conceptualizing and scripting and communicating with absolute transparency to find out what works and what doesn't. We organized discord meetings and used Miro boards to collect our ideas, references etc. There was no unnecessary debates involved as we just went with a poll and each member voted for their favorite ideas without any bias or personal interest. We went with the ideas which had the most votes. The Second Phase was stitching all the ideas into one compelling narrative and we mutually decided that we would go for a humorous one. To do that we looked at our own experiences and found that Memes were the core aspect of our sense of humor ( and also the people with whom we hang out). We decided to craft a piece of artefact that would extend our sense of humor into multiple Universes. Despite being skeptical since it was a crazy yet effective idea, during our pitch we found that it did worked and people could relate very well to our idea. With that, the decision was made. The Final Phase of our project was straightforward. It was all about execution. Everyone was clear about what we wanted to do, and it was just a matter of managing time, sticking to deadlines, playing to our strengths and covering each other's weaknesses. I Feel this is what really made our group function at its peak. To put it simply, We adhered to a pipeline which had the following steps: > Brainstorming : Deciding Ideas, Knowing each other and our abilities, Fixing our respective roles.
> Pre-production : Concept art, Storyboards, Scripting and setting deadlines
> Production : Designing resources, backgrounds and Animation, Audio and Sound library , Recording voice lines. > Post-Production : Grasping the technicalities of accurately translating our Idea into a Dome, Editing, Compositing and Stitching everything into a final render. We also take pride in creating 97% of all the assets by ourselves that are used in the video. Other 5% include Sound effects and a single wave effect used in time leap which were all from stock resources or copyright free. The Output works as intended and We only need to adjust a few minor details before we present it on the 12th of Feb.
0 notes
Text
Personal Progress - Gautham Venkatesh
Part 02
As the teams Director I was tasked with working as the bridge between the 2D and 3D part of work as well as decide on some crucial visuals which would change the experience of audience, but this part of the work was made easier thanks to my teammates who co-operated very well together and make something which we are all satisfied with.
As for one of the individual works I had with this was to setup the 3D spaceship image which was overplayed in after effects. I modelled the mesh in Maya and textured in Substance Painter according to the photo bash concept from Yu Jei which was later rendered in Unreal Engine.

Initial Design brainstorming
Testing of the scene with mannequin to ensure proper height and measurements
I also worked on the cat scene setup after Ana P worked on the models of the cats. The scene setup was done using instances of the models of the cats which was offset animated using a noise modifier to give it a subtle floating and rotation animation. We also worked on a new sky sphere so it better sets in with the cats around it. The sky sphere was painted in Photoshop by Yu Jie which I later turned into a repeatable using Stamp Tools in Photoshop. The artwork was later projected on to the sky sphere in Blender.
Scene setup with the background.
I also worked the composition of the final renders for all the scenes to give it the look of being inside the ship with glass around it. This was done in After effects where I used multiple adjustment layers and nested composition layers to blend in elements into the environment with the glass effect.
Here is a before and after of the comp for comparison.
0 notes
Text
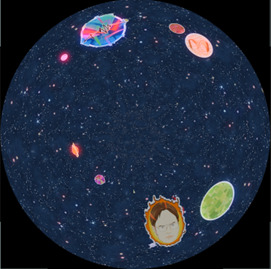
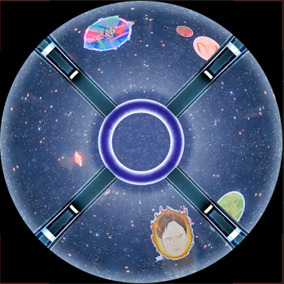
Personal Group Contribution Update (5 Council Planets) - Ong Jian Wei
I jokingly voiced an idea during our brainstorming phase about having our heads float like planets, as if we were the celestial space council guardians of the realm, gazing upon the audience. The concept was that our faces would be projected onto a spherical planet shape, creating a distorted and humorous effect. To further emphasise that we are heavenly beings, our eyes will glow white. Surprisingly, all the members agreed, and we had a good laugh about the idea. This not only added to the fun but also reinforced the comedy element and theme we had agreed and established in our video. It also serves as a watermark, subtly showing the audience that the video is a product of our group.
These planets would float and interrupt in the final hyperjump sequence as a way to subtly tell the audience that the video is ending soon. It was decided to create the scene in Blender as it would be displayed on top of a 2D animation of the spacecraft hyper jumping. Hence, the background needed to be transparent. Blender has this feature to solve the situation, unlike Unreal Engine.
After completing each planet, I privately messaged each team member to ensure they were comfortable with the outcome. I wanted to be mindful of the potential for excessive distortion of anyone’s face, as it could be perceived negatively, especially since the scene would be viewed and most probably laughed at by many strangers. While I aimed to create humorous content, I prioritised respect for my groupmates and their comfort throughout the process.
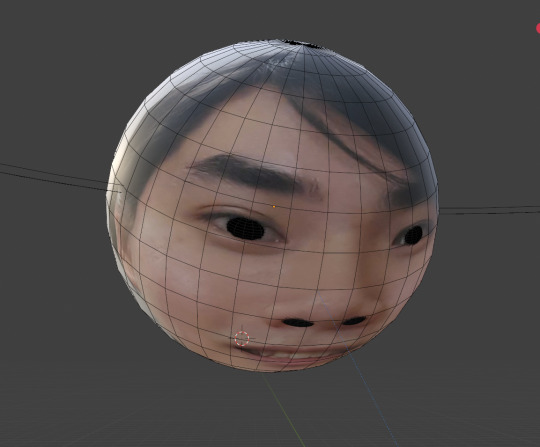
Figure 1: Example planet (myself)
The model started with a UV sphere, onto which an image of a group member was applied as a material. Smaller UV spheres were placed at the iris and pupil to make it easier to control the eyes, which would eventually glow white. The material was given a bit of emission by using the same image to light up.
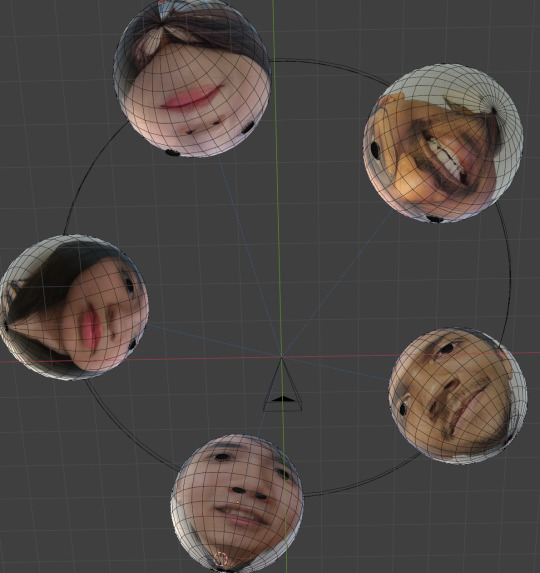
Figure 2: The 5 Council Planets.
After each head were created, they were parented to an empty and assigned to their respective circle part for orbiting animation around the camera. The speed for the orbiting was placed slow to allow audience to properly see the faces of these planets. A Track To constraint was applied to each planet to constantly face the camera to ensure that the planets are always looking at the audience.
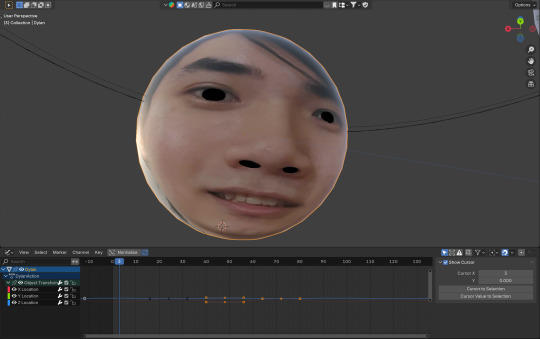
Figure 3: Levitation Animation of the the planets.
The planet's location transform keyframed to slightly moved then the returned back to its original position. These changes were then applied a cycle modifier in the graph editor to repeat the animation through the timeline. Each planet head was given an unique value for its movement.
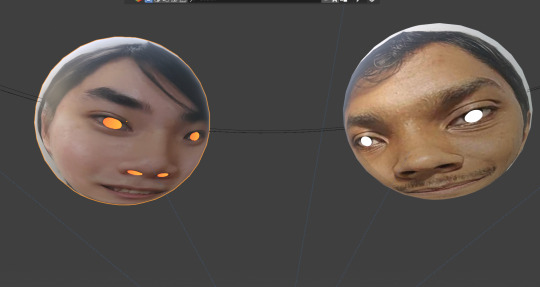
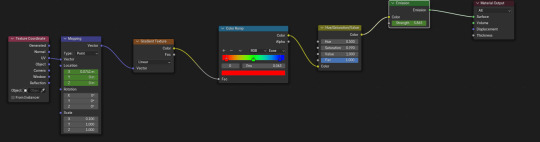
Figure 4: Glowing eyes. [Top] Figure 5: Flashing rainbow colours texture nodes for eyes and nostril of my planet's face. [Bottom]
All the eyes' material were changed to emission surface type. Similar to the repeating levitating technique explain earlier, the same principle was applied to create flashing white light emitting from the eyeballs.
As an additional layer of comedy, I decided to also make my planet's nostrils to light up too. Not only that but instead of flashing white, it would flash rainbow colours. This done with the help of an YouTube Tutorial (Deayan Studios, 2023). However, what the video taught was not what I wanted. Hence, I took parts and pieces from the tutorial video and experiment until the desired outcome where as my planet orbits, the colours flashes back and forth in a slightly fast pace.

Figure 6: Final Render
By turning off transparency in the film settings and rendering the scene in equirectangular format, my work was completed. The rendered images were compiled in Blender into an MP4 video, which was then passed to Gautham for inclusion in the main video.
I have learned new and efficient Blender knowledge during the creation of this funny scene.
Reference
Deayan Studios. (2023). Smooth Gradient Neon RGB (rainbow) Shader - Blender Tutorial. [YouTube]. Available at: https://youtu.be/bW5BEz01_C4?si=M12qNeQ_y8CBhYlc. [Accessed: 9 February 2025]
0 notes
Text
Personal Group Contribution Update (Earth Solar System) - Ong Jian Wei
One of the task that was assigned to me was the creation of the 3D Earth Solar System.
After discussing and agreeing with the other team members handling 3D tasks, I decided to create this environment in Unreal Engine. This choice was driven by my desire to deepen my understanding of Unreal Engine's features while also taking advantage of its powerful rendering system to enhance the scene.
Since I had never created anything related to space or science fiction before, I began by researching online image references of the Earth's Solar System. To accurately position the planets, I used NASA's Eyes on the Solar System, which allows users to view planetary placements at specific times.
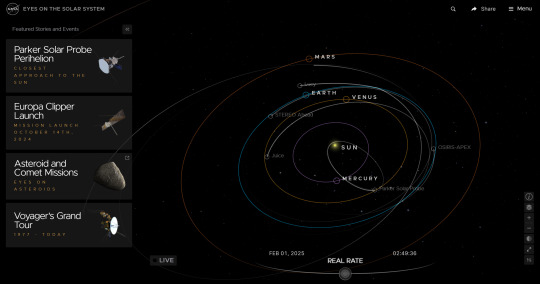
Figure 1: Eyes on the Solar System website. (NASA, n.d.)
After discussions among the 3D environment members, it was decided that Mars would be the closest planet to the audience. Based on Figure 1, Earth, the Moon, Venus, and the Sun would also be visible within the audience's view due to the projection onto the dome setting. Therefore, these planets were needed to be created as assets. Additionally, an asteroid belt exists beyond Mars (NASA, 2024), which was considered for inclusion. To enhance immersion, a background image resembling the vastness of space was required. Furthermore, the atmospheres of certain planets, appearing as glowing lights around them, were also incorporated.
In short:
Planets (Mars, Earth, Moon, Venus, and Sun).
Asteroid Belt (An asteroid Model).
A background image to be used on a Skysphere.
Planet Atmosphere effect.
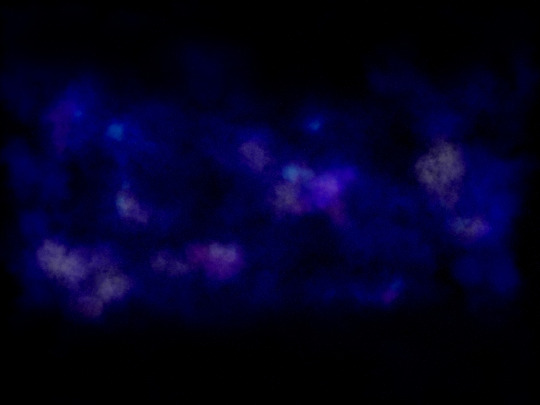
Figure 2: Digitally drawn image for the background.
To minimise the use of online assets, I created the space background using Clip Studio Paint. I intentionally avoided drawing large stars digitally because, when displayed on the Skysphere in Unreal Engine, they appeared unrealistic due to their lack of blinking or flickering. Instead, they stood out too much from the environment, potentially drawing the audience’s attention and making them expect something significant to happen. This could lead to disappointment when nothing actually occurs. This image was then converted into HDRI file format and inputted into Unreal Engine's Skysphere, as final appearance is shown in figure 3 and 4's background. Emission was also emitted from the Skysphere.
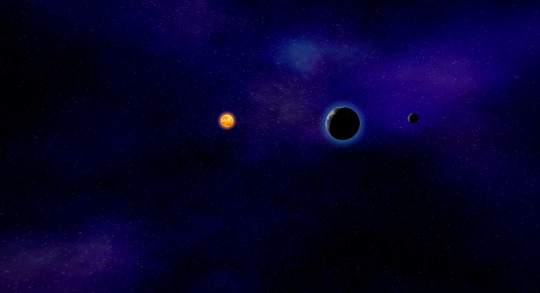

Figure 3-4: Render screenshot of the planets.
Following the instructions of Youtuber, I see 3D (2021), on the creation of planets, I created planets for Earth, the Moon, Venus, Mars and the sun. A directional light was applied to light up the planets. The free online planet textures were taken from Solar System Scope (n.d.).
As seen in Figure 4, Mars has an atmospheric effect. This was created using Unreal Engine’s advanced particle system, Niagara. By adjusting the particle system’s values, I generated a subtle light glow around the planet that dynamically follows the camera. I referenced Arghanion's Puzzlebox's (2022) tutorial on planet atmosphere creation as a guide while learning and experimenting with Unreal Engine’s particle system, making this a valuable learning experience."
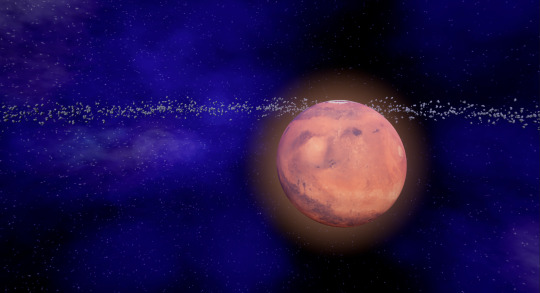
Figure 5: Asteroid Belt behind Mars.
I struggled for a while to find an effective and optimised way to create the asteroid belt. As I experimented and followed various online guides, I repeatedly encountered issues until I discovered an amazing tutorial by Arghanion's Puzzlebox (2024) on creating an asteroid field in Unreal Engine 5. The tutorial demonstrated how to use the Niagara particle system to emit asteroid meshes in a ring and animate them to flow forward within the belt. While the tutorial focused on creating an asteroid field for close-up views, I adapted the technique for a distant perspective by scaling up the ring, mesh size, and velocity force as shown in figure 5.
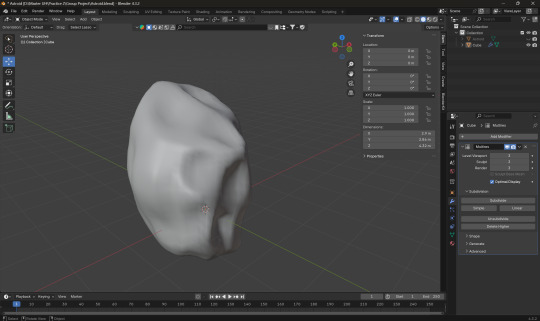
Figure 6: Low-poly asteroid model.
A low-poly asteroid model was created as the mesh to be emitted in the particle system. The model was designed to be low-poly because it would appear far from the audience, making high detail unnecessary. Additionally, this approach helps optimise performance and ensures faster rendering in Unreal Engine.
To also help with optimising and speeding up the rendering process, lighting was baked to optimise performance and improve visual quality by pre-computing how light interacts with surfaces.
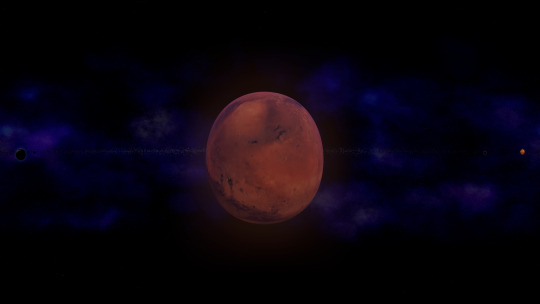
Figure 7: Final render in desired format.
The entire scene was then rendered in the format of panoramic render that would later be converted into Dome format in Adobe After Effects by Gautham.
I have learned many new features and gained valuable knowledge during the development of this environment. As a result, I now feel more confident in assembling environments in Unreal Engine than I did before.
Reference
Arghanion's Puzzlebox. (2024). How to use the Asteroid Field for Unreal Engine 5. [YouTube] Available at: https://youtu.be/b1xAhz8v6OY?si=L-vOOo-DBpL2VL8_. [Accessed: 8 February 2025]
Arghanion's Puzzlebox. (2022). Unreal Engine 5 Tutorial: Planet Atmosphere Creation Made Easy. [YouTube] Available at: https://youtu.be/GJBZFqAvZv4?si=E2MyFKFqv2OWV2nY. [Accessed: 8 February 2025]
I see 3D. (2021). Unreal Engine 5 - Create Planets. [YouTube] Available at: https://youtu.be/nxEluE1s3Xk?si=tlLo2AJuq3EgqZzA. [Accessed: 8 February 2025]
NASA. (2024). Asteroid Facts. [online] Available at: https://science.nasa.gov/solar-system/asteroids/facts/. [Accessed: 8 February 2025]
NASA. (n.d.) Eyes on the Solar System. [online] Available at: https://eyes.nasa.gov/apps/solar-system/#/home. [Accessed: 8 February 2025]
INOVE. (n.d.). Solar Textures. Solar System Scope. Available at: https://www.solarsystemscope.com/textures/. [Accessed: 8 February 2025]
0 notes
Text
Personal Group Contribution Update (Tour Guide Voice Acting & Editing) - Ong Jian Wei
I was also given the task of recording and editing the voice for the tour guide in our final video. The narration will help explain and guide the viewer through the virtual environment. I decided to take this part as I had previously learned about audio editing and recording back in my computer games development degree.
After several discussions with team members, we decided to add comedy to the narration to make it stand out from typical informative tour guides. One of our main inspirations is The Narrator from The Stanley Parable. In the video game, if the player does something unexpected, the narrator goes off script, questioning the player or making funny comments.
Gautham and I wrote the script for the 3D environment. We went through several versions of the script to ensure we stayed within the video's time limit while conveying verbally as much context as possible to the audience. Some parts of the text were highlighted in green and orange. The green sections would only be recorded if there was enough time, while the orange sections were given first priority if time allowed. The 2D environment section then provided their part of the script, which was reviewed and rewritten to better match the overall tone and script structure.
Figure 1: Naming convention for voice acting.
Each line of dialogue was given a number code to ensure that the group member that is tasked with compiling the final video would know which voice lines belongs to which part of the video.
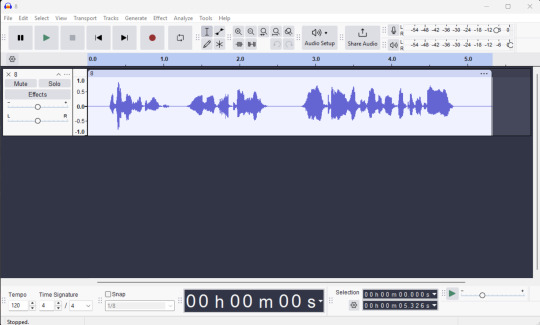
Figure 2: Audacity source file for voice line number 8.
Since none of us had professional recording equipment, I recorded the voice acting on my mobile phone and then transferred it to my computer for editing. I used the free audio software Audacity to edit the audio. Some of the audio has some undesired background noises and it was remove using the software's noise reduction feature. After that, the audio was normalised to ensure the overall volume of the audio is adjusted to a standard level. Followed by a compressor that would automatically reducing the volume of loud parts of the voice acting while keeping the quiet parts audible. Since my natural voice sounds a bit child-like, I decided to lower the pitch of the audio to make it sound deeper, as a deeper voice helps convey the professionalism and trustworthiness (Sorokowski et al., 2019) that are essential qualities for a reliable tour guide.
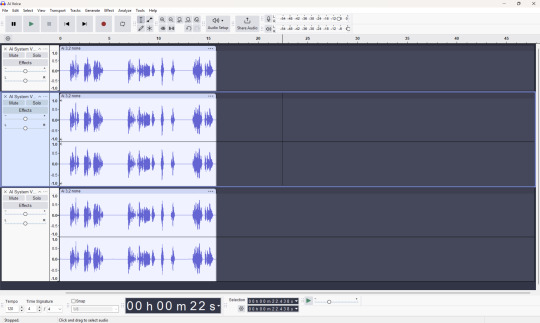
Figure 3: AI spaceship voices source file.
The AI spaceship system voices were also done by me as an additional funny element, as it almost sounds like everything is coming from me. Another reason for doing this is that I personally don't feel it's ethical to use artificially generated voice audio, even if it is properly credited. The audio was created by first normalising it and then applying compression. Following Mike Russell's (2022) robot effect tutorial in Audacity, I duplicated the audio two more times. The second copy was moved slightly to start earlier, while the third copy was shifted slightly to start later. These three voices were then played together, creating a robotic sound.
After all the voice acting were recorded, it was given to the group members to get feedbacks to ensure the desired expression and information were delivered to the audience properly. Several group members given their input and I change or record the affected voice lines to ensure the best quality is presented to the audience. Then finally, the voice lines were passed to the member (Yash) who was tasked with compiling the final video.
References:
Galactic Cafe (2013). The Stanley Parable. [Video Game] Galactic Cafe.
Russell, M., (2022). How to Create a Robot Voice Effect in Audacity | Audacity Tutorial. [online] YouTube. Available at: https://youtu.be/9cJSn8utwgY?si=g9-lpHZOxUSM18MD. [Accessed: 9 February 2025].
Sorokowski, P., Puts, D., Johnson, J., Żółkiewicz, O., Oleszkiewicz, A., Sorokowska, A., Kowal, M., Borkowska, B. and Pisanski, K. (2019). Voice of Authority: Professionals Lower Their Vocal Frequencies When Giving Expert Advice. Journal of Nonverbal Behavior, 43(2), 257–269. Available at: https://doi.org/10.1007/s10919-019-00307-0. [Accessed: 9 February 2025].
0 notes
Text
Group Progress - Gautham Venkatesh
Part 01
We as a group first thought of all things what ideas we can think of when it comes to meeting the brief of the project which is ‘delightful’ and ‘surprising’ aswell as implement in an immersive environment, for which we are using a dome projection, so it comes naturally.
For the Initial Ideas we had made up ideas of our own and posted it in single shared document, later we met up in discord and discussed the ideas. Although we initially landed on a single idea through voting and decision making, in the later class after looking at the previous years works, we decided to come with a different idea as the initial idea wouldn’t work as it did not fit to the idea of how the dome works.
We decided to work on a space focused story where the audience are taken around the space with narrated backed humour. As for the space it was not just your everyday space, we implemented some of our creative ideas such as a space filled with celestial cat memes and even 2D space!
As for the work delegation it was obvious that we each pick the work which is best suited for our background and skillsets. As for me (Gautham V) , Ong Jian Wei and Ana P decided to work on the 3D part of the spaces and as for the 2D part of the space Yash Kunder and Yu Jie worked together.
Initially Yu Jie’s fantastic pre-production art (concept art) gave us all teammates a very good idea of how the finished video and renders would look like and acted like a good benchmark for all of us to meet.
The group decided to appoint directors for each 2D and 3D part of the work so there is a unified idea for which everyone is working for. I (Gautham V) was the Director for the 3D parts and overall production and Yash Kunder was voted as Director for the 2D part of the project.
The Pipeline we had setup for the dome output was a bit complicated as we had a quite complex idea which involves multiple mediums and art styles, we had to resort to using different software’s to achieve the end result. Even for the 3D part of the space we had to use Unreal Engine for out solar system but for the requirements we had setup for the cat space and council space we had to resort to using Blender for the render.
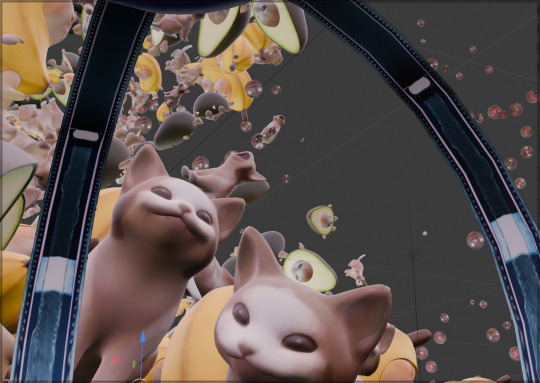
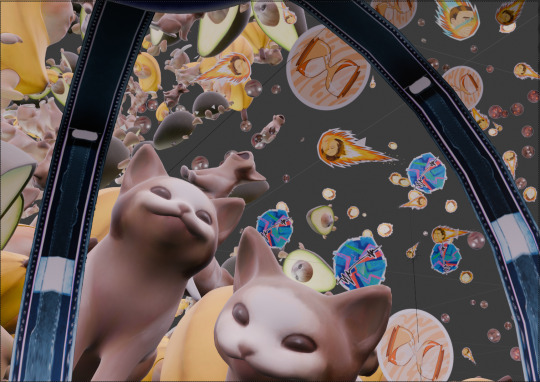
For the entire space journey, we wanted to look like we are in a spaceship so I designed a 3D model and textured it according to initial concept art from Yu Jie. The spaceship part was separately rendered with an alpha backdrop which would be later overlayed on top of other renders in composition part of the pipeline.
The amazing first space which we are greeted to by the narrator (Ong Jian Wei) first was done by Ong Jian, which was done in Unreal Engine which is mentioned in detail more in below posts.
Cat Space part was hugely possible because of the amazing cat models from Ana P which set the tone of the cute space creatures floating in space we all had in mind. I did the setup of the set layout in blender with subtle float animation for all the cats and associated animations which is relevant to the cat according to the memes of which it was based off.
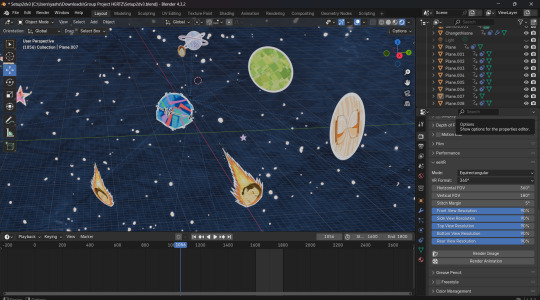
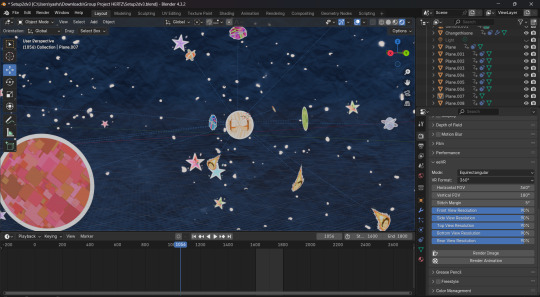
Paper cut space part was made in mix of mediums as the initial sprite/ textures were made in Photoshop by Yu Jie which was animated in Toon Boom by Yash Kunder. For this part of the space, we all wanted an accurate representation of how a 2D space would look and didn’t want to show any shape curvature of the planets so we decided to use animated image sequence which was projected on planes in Blender. The planes were tracked to the camera in a way that they are always front facing the camera, no matter the location of the camera which would give it the appropriate 2D look and also keep the animation proportion correct as we wanted the correct distortion for the conversion later in after effects for the full dome vr convertor. The planes were animated again to show transformation changes in space. Ana P hugely helped us out here aswell doing the one of the hardest parts of the 2D space we were confused about, which was one of the paper cut meteors hitting one of the windows of the spaceship, she effectively addressed this with a plane with shape key and sticker animation.
The council part of the space was done in Blender as well by Ong Jian which is mentioned in more detail in below posts.
I worked on the compositing the shots in after effects and giving it off to Yash Kunder who worked on the final edit of the render in Premiere Pro
With this our adventurous space journey comes to an end. I am happy to say that I and all my teammates are very satisfied with the final output which we have been able to get a demo of in one of the early testing on 10/02/2025. With most of the assets made by us as a team we are all proud of what we have been able to make in this limited amount we got to work together.
0 notes
Text
Personal Contribution Update
-Yu Jie, Huang
After being assigned different tasks, Yash and I discussed the script for 2D Paper cutout universe. As we all want the theme to be delightful, the elements of memes are also in this universe. Then, I started to draw what is needed for the visuals.
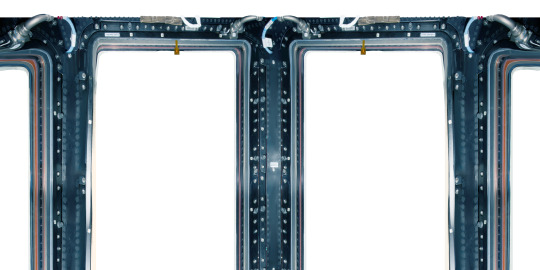
I am responsible for 2D artwork and the photobash for the spaceship in the early stages of production.
Since the spaceship is viewed from the inside looking out, it needs to have a realistic, 3D-like texture. To find suitable references, I searched NASA’s image library, as their official photos are usually free to use. I used the keyword “window”and successfully found images that could be used for photobashing. I imported the images into my drawing software, removed the unnecessary background, and used the liquify tool to adjust and straighten the frame. I also painted missing parts, such as pipes and structural details.
During testing, my teammates noticed that the handles on the window frame looked too large when projected into the dome, which broke the sense of immersion. To fix this, I removed the handles and focused on keeping the metallic texture of the main frame.
I also created two paper cutout universe planets/stars:
Hourglass Planet – I found the idea of time flowing like sand interesting and thought it would look great as an animation. The design has two layers: the front layer is an hourglass (with different shapes of falling sand to show movement), and the background layer is a soft, flowing planet to represent the passage of time.

Punk Planet – This was inspired by Spider-Punk from Spider-Man: Across the Spider-Verse. His bold, sharp lines and cutout animation style were key influences. To match this style, I used textured brushes with sharp edges and highly saturated colors to create a punk-like energy. The outer ring of the planet has a radio wave effect, adding a dynamic visual element. Another group member later animated these planets, and the final effect looks great!
Stars: Similar to the art styles of two planets, I created two kinds of stars to use in the background of the universe.

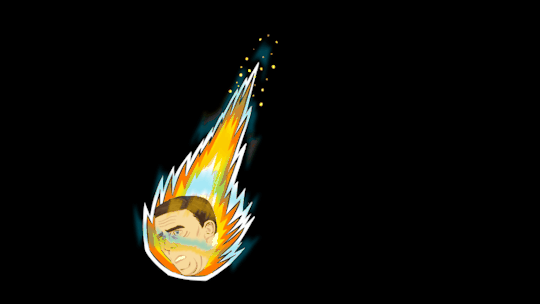
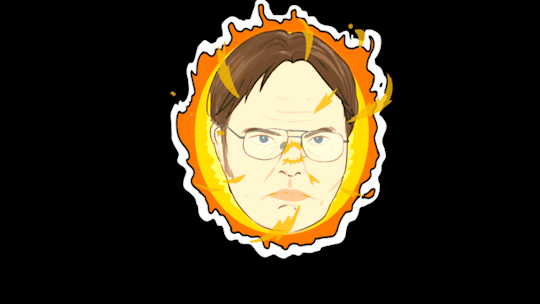
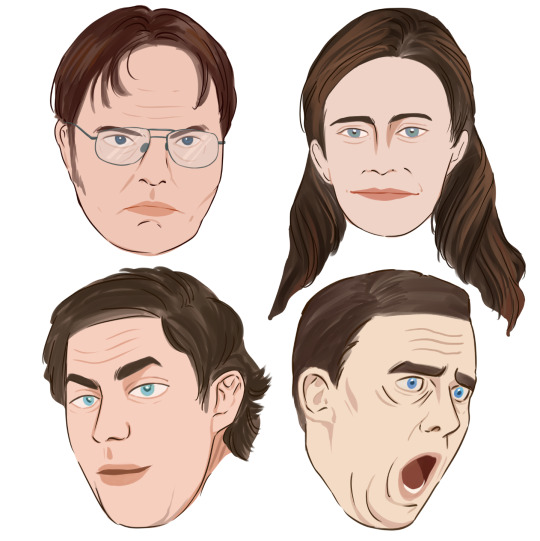
I also worked on character heads for a meme sequence based on The Office. We chose four main characters (Michael, Jim, Pam, Dwight) and designed their faces using simple colors and lines to highlight their most recognizable features.
Finally, I created the text effects that appear as speech from the character heads. My computer and Photoshop unexpectedly crashed during the process, but I was able to recreate the effect using Clip Studio Paint’s blur tools to add a glowing outline. We decided to keep the text black and white for clarity, since it will flash quickly across the screen and should remain easy to read.
Overall, I am happy with my contributions so far, and I look forward to seeing everything come together in the final animation!
Reference:
Nasa.gov. (2020). {{ngMeta.title}}. [online] Available at: https://images.nasa.gov.
0 notes
Text
Belbin & Myers-Briggs result - Gautham Venkatesh
Belbin Test:
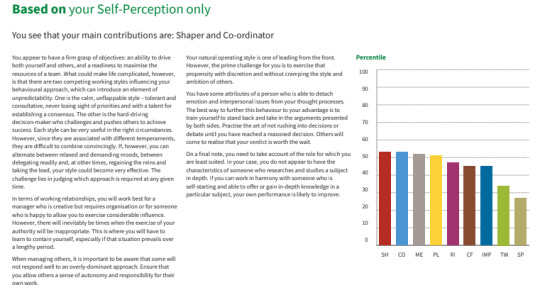
I completed my Belbin test and received very interesting results. It gave me a look into what kind of decisions I might make and mainly how I would fair in a group work.
The main contribution factors Belbin test identified in me were shaper and coordinator which is to say that I have a fair grasp of the main objectives of the project and drive to complete the tasks delegated to me as well as promote and encourage others to get the work and goals completed and satisfied on time.
Although my test does show two main contributors, overall, my graph is pretty much a flat line, which may say that I am adaptable and can pick any of the roles as needed
Myers Briggs Test:
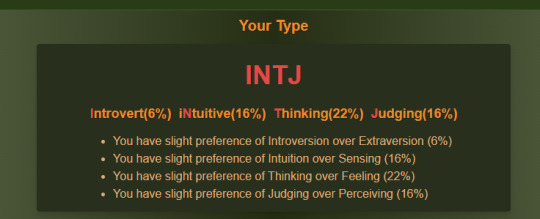
After completing the test which had a lot more questions than I thought would be there, the results show INTJ (Introverted iNtuitive Thinking Judging)
It defines that people with such personalities have more self confidence and have specialized knowledge in certain aspects.
Egg Activity:
When it comes to the group activity where we were supposed to make a transport vehicle for an egg which is to be dropped from the first floor to the ground, I will try to analyze how my personality and group working skills came in play.
The hardest part of the activity was that we, the group hadn’t yet communicated before so it being our first meet, and we already had to collaborate and come up with an idea, all of us team members were quick to exchange pleasantries and made ourselves familiar with each other.
We soon began planning out the vehicles design, although my personality test reveals I am self-confident, that is in sense true, but I am only confident with skills which I have proven before, as for this where I had never done anything similar I was a bit tensed to say the least.
I was able to communicate with group properly about the objective and sometimes pointed out design choices which were against the rules which helped us stay fair with other groups. I was able to stay encouraged and promoted my team members throughout the activity to successfully drop the egg without any damage to it.
In the end we were able to successfully complete the task with no damage to the egg.
This was a very good learning experience for me to know more about myself from an outside perspective.
0 notes
Text
Group Progression Meeting Update 3.0 - Ong Jian Wei
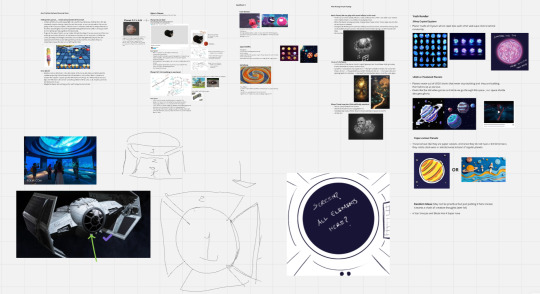
Figure 1: Group's Collaborative MIRO Board
On the 27th of January 2025 (Monday), we began our meeting to present out planet/space environment ideas. Each members presented their environment along with their respective description and possible ways to make fun out of it. Similar to a situation before where we have more content proposal than manpower to make it a reality, we started another vote to pick the top few planet/space environment ideas.
However, this took too much time in discussing and democratically inputting every member's ideas into the final idea that it took 2 hours and yet we do not have a solid development plan for the group assignment. Gautham voice out his concerns and propose a hierarchy pipeline where one environment will have one director and those under a director will listen to their input to carry out the development which drastically decreases the decision making time as there are lesser oppositions/factors. Eventually majority of the members agreed with this idea. Gautham was made director for the 3D environment and overall production while Yash was made director for the 2D environment.
After discussing about several more specifics, 3D and 2D environment sections were split into their respective voice calls to discuss further about the scripting and flow of the environment. After completing the script, Jian Wei drafted out a workload matrix and get the other members to view it then sign it if they are ok with it. This is done to ensure everyone is clear about their designated work.
0 notes
Text
Self Reflection based on Belbin Report and Humanmetrics Jung and Briggs Typology Test
-Yu-Jie Huang
Based on my Belbin Report and INFJ personality analysis, I know better of my role within a team. In this post, I summarise my strengths and weaknesses according to these reports, and try to reflect on the egg experiment in the first class.
Belbin Report
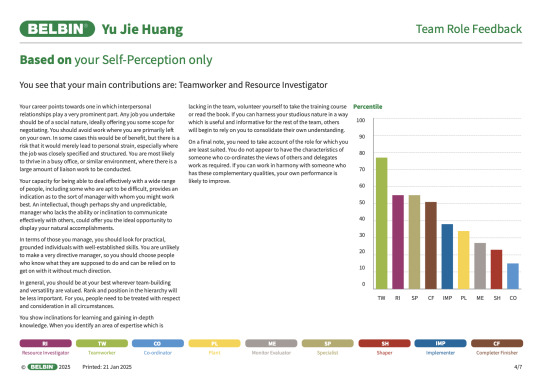
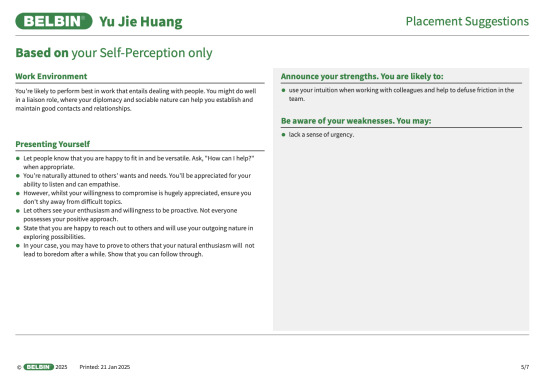
Primary Role: My main team role is teamworker. This means I like promoting collaboration, maintaining harmony, and ensuring everyone’s voice is heard.
Strengths:
I am good at listening and supporting others, with a strong sense of empathy.
I tend to create a positive and conflict-less team environment.
I enjoy working as a team and adapting to its needs.
Weaknesses:
I may act indecisive when quick decisions need to be made.
I tend to avoid conflicts, which may hinder decision-making in tense situations.
I may lack a sense of urgency.
INFJ Personality Analysis
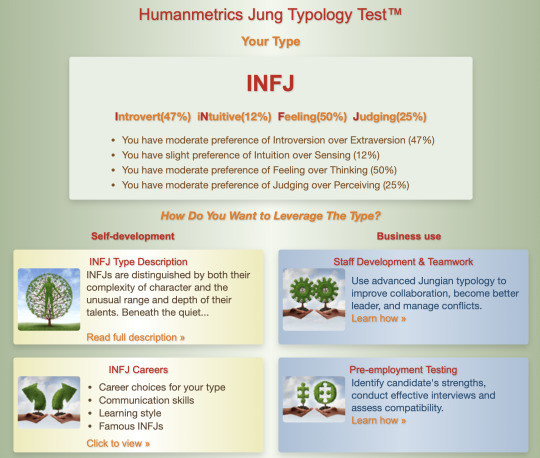
Team Role: Being an INFJ makes me a member who values emotions and common goals. I tend to build emotional connections with teammates. In addition, I often have unique insights when it comes to problem-solving.
Strengths:
I support others in achieving goals and prioritize team success.
I have a strong sense of empathy and awareness of other people’s needs.
I am responsible and goal-oriented, looking for best outcomes.
Weaknesses:
I may feel overwhelmed in high-pressure situations.
I overthink too much due to perfectionism.
In the egg-drop experiment, our team showed excellent collaboration. The Belbin Report predicts my role as a teamworker pretty accurately since during the experiment, I was responsible for recording the process while observing the progress closely and providing support in time. As my Belbin Report and INFJ personality traits suggest, I worked as a listener and mediator. For example, when teammates proposed different ideas, I showed respect and support for their contribution. Then, we came up with a solution that everyone could agree on. I appreciated this peaceful atmosphere and collaborative approach in our team since it could enhance efficiency while making everyone feel valued. This experiment exposed both my strengths and weaknesses. Whereas I am good at supporting and building connections, I react slowly when quick decisions are needed. This aligns with my INFJ tendency to seek balance and harmony. Also, I was not fully aware of the time limit and was acting real slow, which shows my lack of urgency. This caters to my challenges shown in the Belbin Report. In the future, I will try my best to improve my decision-making skills and confidence in dynamic situations. This experience reminded me of the essential value of every role within a team. As a teamworker, my main dedication is (and should be for the rest of the project) building communication and collaboration, which are crucial to a team’s success. Therefore, I hope to apply these strengths to concept art and various different projects, as I believe combining my empathy and coordination skills can create impactful results.
0 notes