
Don't wanna be here? Send us removal request.
Statistics
We looked inside some of the posts by gwgamesterm1 and here's what we found interesting.
Average Info
Notes Per Post
1
Likes Per Post
1
Reblog Per Post
0
Reply Per Post
0
Time Between Posts
2 days
Number of Posts By Type
Text
17
Last Seen Tumblr Blogs


Fun Fact
Tumblr has a low social media market share in South America.
Text
Creating a Tutorial Level
Moving Level Segments:


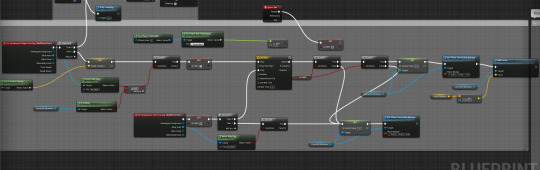
To create the moving architecture I used a similar system to the lifts and moving platforms that we created in an earlier lesson where the movement of the object is controlled by a combination of a timeline and a lerp. I encountered an issue where it was overly complicated and time consuming to have the architecture stop where I wanted it to, so I had to modify the script a little to make the process easier.
I started off by setting the Actors location in the construction script and promoted it to a variable, this variable would later become the end point for the actors movement. Because the Actor was spawning at it’s end point, I had to add a BeginPlay Event along with a SetRelativeLocation node to move the actor into the distance once the game started. To bring it back to the actor’s placed location, I created a Custom Event that would be initiated by a Box trigger, this then ran into a timeline that would control the duration of the Actors movement. From here I used a lerp with the actor’s location after being moved at the beginning of the game as the starting position and the Actor’s location before being moved as the end position, then I used another SetRelativeLocation node to update the Actor’s position.

The trigger works by casting the Blueprint of the actor I want to move, then triggered the Custom Event which causes the Actor to change position.
in hindsight this was not the most efficient way of coding this, since I have to cast to individual pieces of architecture with their own variables inside of the triggers blueprint, a better way to have done it would probably be to create a blueprint with a floor and two walls, then code them to move within the blueprint itself, this way I could have triggered the movement of three pieces of architecture or more with just one cast.
0 notes
Text
Current FPS Progress
At the time of writing this post, all of the code that will be used in the game is finished and all I need to do is put it together, so the game should be functional by the 13th of December. However I’m not sure about the visual side of the game; my assets aren’t quite finished at his point, which is due some mismanagement on my part and overly focusing on the coding side of things. To fix this problem I just need to focus on making a few models.
0 notes
Text
Researching and Implementing Wall-running
Games that use Wall-running:
Star Wars Jedi: Fallen Order:
It was playing Jedi: Fallen Order that I actually had the idea to implement wall-running into my game. I feel like moving from place to place in many games, especially exploration games, can become rather stale since it doesn’t take much player engagement to wander around. Adding a wall-running mechanic creates more opportunities for the player to interact with the game, it also raises the skill ceiling with less skilled players being able to engage with the mechanic while more skilled players can perfect their technique and make traversal more efficient.
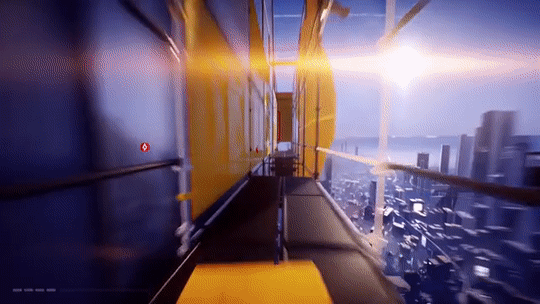
In the game wall-running acts as a skill that you earn after the tutorial planet and is used constantly throughout the game. Besides the obvious use of level traversal, the mechanic is used with different player abilities to find hidden areas and collectibles, yet another way to keep the player engaged and paying attention to the world around them.
Function wise the mechanic sticks the player to the wall and propels them forward for around two seconds before the player eventually starts to give into gravity.
Despite the game being in the third person, I'm fairly sure it functions in a similar manner to the other games in this list and could easily be implemented into a first person game.
Mirror’s Edge:
Mirror's Edge is a game entirely based around parkour and finishing levels as quickly as possible by finding more efficient paths. Due to it's approach to gameplay and its focus on traversal, Mirror's Edge's movement system is refined to practical perfection.
Compared to many other First Person games that incorporate parkour mechanics, the movement in Mirror's Edge feels very weighty and realistic; where other games would give you perfect control in the air and allow you to jump 15 feet vertically, in Mirror's Edge you bairly get off the ground from a standing jump and all your moment is carried over from before you jump. It's a very physics heavy system. All this makes the game's movement rather clunky in the hands of someone who doesn't know what they're doing, and extremely fluid in the hands of a skilled player.
While I really like the game's movement system and find it rather enjoyable, I want my own game's movement to be a lot more fluid and user friendly, as well as being a lot faster.
Titanfall:

While Jedi: Fallen Order inspired me to add a wall-running mechanic into my game, it is Titanfall that I derived the mechanic's function from. Titanfall's movement is similar to Mirror Edge's, but throws the realism out of the window.
You play a pilot with a jump jet that allows the player to jump relatively high as well as granting them a double jump. The movement feels like its built to be accessible, where players are able to pick up the controller and easily move across the map with just a few minutes of practice.
Since the game is a First Person Shooter, it makes sense that the wall running wouldn’t be the main source of challenge and difficulty for the player, it’s mostly a means for traversing the map which means the movement itself doesn’t have a particularly high skill ceiling. The progression in skill actually comes from combining other actions with the wall running, like shooting; it’s surprisingly difficult to have good aim whilst running on a wall and is immensely satisfying when you’re first able to get your first kill while quickly zipping across a wall.
Titanfall actually have an interesting feature that I haven’t seen in other games that use wall running and that is actually the ability to reverse direction. In most game’s once you start to run on a wall, you’re locked in and can’t change your direction without first getting off that wall, but in Titanfall, all you have to do is look behind you and your direction is changed with only a minor decrease in speed. I really like this part of Ttianfall’s movement system, it gives the player just bit more control that other game’s just don’t, though it wouldn’t exactly mack sense to be able to do this sort of redirect in Mirror’s Edge for example because you’re not some super soldier with a jet pack holding them to the wall.
Coding Wall-Running:
The wall-running mechanic that I added to my game works by constraining the player’s movement along the Z axis and adding a forward force whenever the “Wall Detection” collision detects an overlap with a tagged wall.
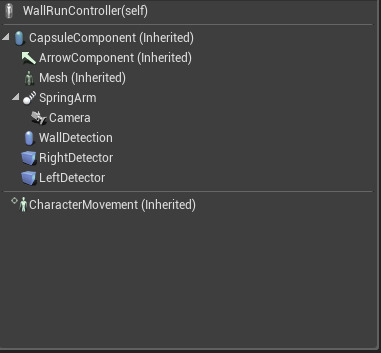
First of all, a capsule collision needs to be added to the player’s blueprint and with it’s collision preset set to OverlapAllDynamic, this will be used to actually detect when the player is touching the wall, so the scale of this detector collision needs to be slightly bigger than the player’s block collision.

Next we actually need to enable the ability to constrain the player’s movement to a specific plane and this needs to be enabled from the beginning, so we need an event BeginPlay to trigger the Set Plane Constraint Enable.
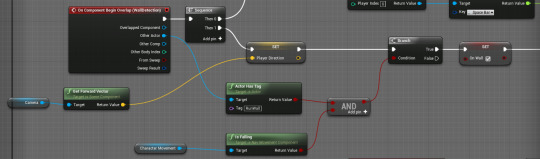
This first section of the code is used to detect whether the overlap collision of the capsule is interacting with a wall that is tagged for wall running and if the player is in the air, together these two conditions make it so the player can only run on specific walls when they jump at it, instead of accidentally triggering the wall running condition whenever they walk past a wall. This part of the code also sets a vector that will be used to propel the character forwards when they start running on the wall. A boolean that indicates that the player is alos on the wall is set to true, this is used in branches later in the blueprint to check if the player is still running on the wall.

A timeline is used to determine how long the player can run on the wall, the duration of such varies across video games that use the mechanic, for example in titanfall 2 you can run on the wall for around 5 seconds, while you can only run on the wall for 3 seconds in mirrors edge.
After the timeline I created a branch to make sure the player was still running on the wall, there is another branch which was originally used to make sure the player was holding down a button, but i decided to remove that condition since I found it to be too finicky. Next I used a gravity scale node to set the player’s gravity to zero, this maybe a little redundant since I’m constraining the player’s movement along the Z axis, but it’s nice to have just in case. After setting the gravity, I used a Set Plane Constraint Normal node with a Z value of one, this meant that it was impossible for the player to move up or down whilst attached to the wall. Finally, I used an Add Force node, using the player direction multiplied by a float as the force input, this propels the player forwards when they interact with the wall.

The last thing that needed to be done in order to make the wall running to be fully functional was to give the player the ability to get off of the wall. The part of the code that allows the player to disembark is essentially the mirror opposite of the code that allows the player to jump onto the wall.
Rotating the Player During Wall Run:

I needed a way to visually signal to the player that they were running on the wall, most games do this by tilting the camera to the side and since this works pretty well, so I thought I’d follow suit.
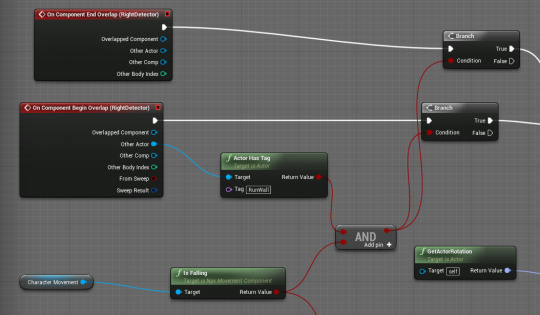
The beginning of the rotation script is very similar to the beginning of the actual wall running script, using a collision to check whether the player is in contact with a tagged wall while also being in the air. The difference in the rotation is that it uses two small box collisions, one on each side of the player.
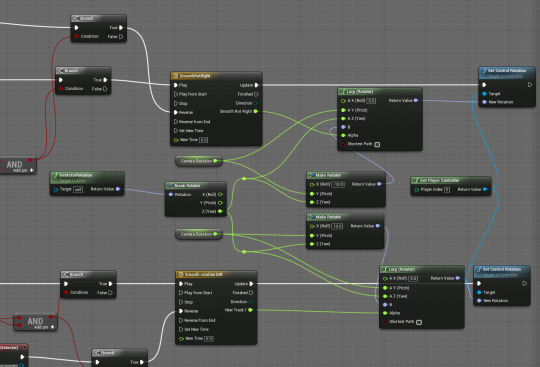
A timeline is used to determine how long it takes for the camera to rotate and the timeline’s track is used for the lerp’s alpha, this is part of the code because it was rather jarring for the player when the camera suddenly snapped to an angle, so the lerp is there to give it a transition.
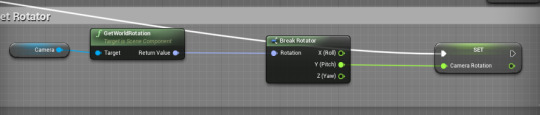
Now we need values to actually lerp between, I encountered a problem with the original method that I used that caused the camera to snap to a Y value of 0 whenever the player would run on the wall; this happened because I was using the actor’s rotation values, but since the actor’s rotation always stayed at zero, the camera’s Y would use that value. To get around this I set the Camera’s Y rotation as a value with an event tick so it was constantly being updated.
Since I was only using the camera’s Y value and the X and Z of the Actor, I needed to break the lerp’s A input into separate values, which can be done by righting clicking the input and clicking Slit Struct Pin. To get the lerp’s B input as well as the rest of the Z value for the A input, I got the actor’s rotation and used a break rotator to split up the values, then got the actor’s Z rotation and combined it with the camera’s Y rotation with a Make Rotator node, I then changed the X value of the Make Rotator and these values then became the Lerps B input. Finally I used the the Lerp as a rotational value of a Set Control Rotation
Encountered Issues:
Most of the issues I encountered were with the rotation part of the script, like I mentioned before I had a problem where the camera would snap forwards whenever the player engaged the wall running mechanic. Thankfully I found a work around for this with the help of Sam, considering it was the most noticeable and jarring issue.
Another annoying problem that I encountered was the fact that whenever the player character experienced an overlap event that wasn’t related to a wall the player could run on, like a box trigger for instance, it would reset the character’s rotation and the player wouldn’t rotated when they next ran on a wall after the overlap. I found that this was caused by the rotation timelines using the start from beginning and reverse from end, so I just switched it to the regular start and reverse.
This one maybe less of an issue and more me not noticing that I selected the wrong option, but I noticed that you run on walls for as long you wanted, when in fact you were meant to fall off after a certain duration of time. I realised this was because I’d accidentally set the timeline that controls the wall run duration to loop.
Another issue I encountered, yet again caused by the player’s rotation, is that sometimes the rotation wouldn't reverse and I’m still unsure as to what is causing it or how to fix it. I’ll have to take another look at the blueprint to see if I can determine the root cause of the issue.
Comparing the Wall Running:
0 notes
Text
Timelines and Lerps
How they work:

The Unreal Engine websites says that Timeline nodes are special nodes that allow for simple time-based animation to be quickly designed and played back based on ingame events. They are specifically built for handling simple, non-cinematic tasks such as opening doors, altering lights, or performing other time-centric manipulations to Actors within a scene.

Once a timeline is inside of the graph editor, you can double click it to view and edit it’s tracks, these track come in four forms: Float, Vector, Event Track and Colour. For Lerps we use the Float track, but if you wish to do something like change the colour of a light, you would use the Colour track for example.
The lerp node has four varients, each accomplishment the same task with a different kind of value, these are Floats, Rotator, Vector and Transform. Lerps work by gradually changing the A input value into the B transform value along an alpha.

The timeline’s float track can be used as an alpha for a Lerp, this translates to a 0 on the track being the Lerps A input and a 1 on the track being the Lerps B input.
Using the Lerp and Timeline with Construction Graph:
A practical example of how Lerps work is an a blueprint of an elevator or moving platform, these moving objects require both a timeline and a Lerp or otherwise they would simply teleport from their beginning position to their end position.

After making a new actor blueprint and adding in a cube to act as the elevator, you need to add in a box trigger that will trigger the Actor’s movement. Inside of the elevator’s blueprint we need to set the Actor’s starting position, so inside of the construction graph we need to get the actors location and promote the output value to a variable; since it’s in the construction script, the Start Location variable is set before the game is played and will stay the same no matter what is done in the event graph.

Inside the lift’s event graph we need the trigger we placed earlier to actually trigger something, so we need an ActorBeginOverlap that will trigger a timeline. This timeline has a track that is five seconds long, at zero seconds the float’s value is zero and at five seconds the value is at one. The timeline’s update then needs to trigger the SetActorRelativeLocation node and the Timeline’s track need to go into a Lerp (vector)’s Alpha. Now the Lerp’s A and B values, this is done by getting the Start Location variable we set in the construction graph and plugging the raw value into the Lerp’s A, making it the Lerp’s start point. Next we need the Lerp’s end point, this is done by getting the Star Location’s value and breaking it with a Break Vector, this will split the Vector into three individual values, the X, Y, Z. Since We’re coding the Lift, we only want to modify the Z axis, so the X and Y can go straight into the Make Vector, the node that recombines three values into a Vector3. How we modify the Z value depends on which direction you want the lift to go, we want it to go up, so we need to use a Float + Float to add to the already existing Z value. After placing the Make Vector Value into the Lerp’s B input, the Lerp’s output just needs to be put in the SetActorRelativeLocation’s new location.
While the lift is now functional, I wanted it to return to it’s starting location once the player stepped off of the lift, so I added in an ActorEndOverlap that would cause the timeline to reverse. I also found that having the lift move as soon as you stepped on or off of the lift was a bit too sudden, so I added a delay.
Moving an Object with External Trigger Blueprint:
I had a more difficult time with this than I expected to, I wanted to be able to move a piece of level geometry when the player stepped in the a trigger. To accomplish this I tried a similar technique to how we used to take health away from the player, what I did was try to cast to the object then change it’s values inside of the trigger blueprint, but this just didn’t work and my research on a solution was less than fruitful.

Eventually Sam was able to come up with a solution, this solution still used casting, but instead of changing the Objects values inside of the Trigger Blueprint, we used a custom event. This custom event was triggered inside of the of Trigger, which would then play the script inside of the moving object.
A lingering issue was actually an inalienability to cast to the Object, the way around this was to create an actor variable inside of the Triggered blueprint. This variable allows you to use an eyedropper tool, when public, to select an Actor you wish to be represented by the variable. This Actor variable then need to be placed into the Cast To’s Object.
0 notes

Text
Creating a HUD and Timer
Creating the Assets:
Instead of using Photoshop like most of the class, I decided that I wanted to use illustrator, specifically I wanted to use the pen tool to ensure that the elements would be clean and precise. After creating a Health and Armour Bar that was far more Sci-fi in design than I intended, I copied the elements into Photoshop where I had a canvas that was the same size as our games resolution, I did this so I could see how the HUD would look before importing it into Unreal.
Once I had imported the PNG versions of the assets into Unreal, I used the “Apply Paper2D Texture Settings” Sprite Action so the assets would have the transparent background instead of the default black box that occurs when you import PNGs into Unreal.
Implementing HUD Assets:
I have used three different methods to program the the HUD, two for text and the other for health bars, this is because the integer based health system isn't compatible with progress bars. On the note of a progress bar functioning as a healthy bar, I've already created a post about that as well as the float health system.
In regards to the two text based methods, I've already written about one of them and its very similar to the progress bar, the other which I'm going to write about now involves actually changing the text inside the player blueprint instead of just binding the widget to a variable.
To start this process we need to create a Widget Blueprint for the HUD and place a text box inside of it, then promote the Text to variable by simplifying ticking the box inside of the details panel. We then need to go into the Player Character Blueprint where we'll turn the HUD Widget Blueprint into a variable, this is done by way of creating a Variable inside of the Player Blueprint with a HUD Variable type, then we need to Set that variable by dragging out from a BeginPlay event we want to make a Create Widget Node where well choose our Widget Blueprint class, then that shall run into our Set variant of our HUD variable that, turning the Blueprint into a variable inside our Player Blueprint, then to make the HUD appear on the screen we want to use a Add to Viewport node.
Now we have a variable, we need to actually use it to change the text. For a text based Health system, its incredibly easy, all you need is an EventTick so the Health is being constantly and then that must be connected to SetText node with the target of the Text box from the Widget Blueprint as well as the Widget blueprint itself, we can do this because we have already promoted these two to variables. Finally, we just need to connect the Health integer to the SetText's In Text.
Making and Changing Crosshair:
The Crosshair is the HUD element that resides in the centre of the screen in most shooters, it’s purpose is to help the player aim without them having to aim down the sights of their gun. Some game’s like Call of Duty or Battlefield use a dynamic Crosshair that is affected by the character’s movement and the player firing their weapon. We went the static Crosshair route, which is more akin to older FPS’s like Half-Life and since the default Unreal FPS project uses a static Crosshair, all we had to do was design a new asset and swap out the old one.

The original Crosshair that comes with the project has a resolution of 16 x 16 pixels, so to keep it the same size the new asset would need to have the same resolution. This necessitated the use of the pencil tool while designing the asset in Photoshop because the default brush doesn’t create clean lines at such low resolutions.
Creating a Timer:

Adding a timer can add an interesting aspect to a game, usually by creating a sense of urgency for the player and it is relatively simple to accomplish with some simple maths.
First we need to create two integer variables, one for seconds and another for minutes. Next we need a system that will add one minute every time the seconds hit 60 then the seconds would reset to 0. To start this we need an Event Tick with a delay of one second, this will slow the Event Tick down so instead of getting an input every frame, we will only get an input every second. In order to turn those inputs into a usable value we need to add in a Set Node for the Seconds integer along with an Integer + Integer with the Get Seconds node in one input and set the other input to a value of one, this system causes the Seconds integer to go up by one every time the input is fired. From here we need to detect whether the seconds have ticked over into minutes, this is done by plugging the Seconds integer into an Integer >= Integer Node and making it the condition of the branch. If the branch is True we need to Set the Minutes integer and add to the variable by creating an Integer + Integer with the Get Minutes node in one of the values and the other value set to one then this needs to be plugged into the Set Minutes value, this will add one to the current value of the Minutes integer, allowing it to increase every sixty seconds. In it’s current state, the seconds will continue to count up over sixty even though it needs to reset to 0, so to use a Set Seconds not with a value of 0, this will set the seconds back to 0 every time it’s triggered.
Displaying the Timer:
Getting the Timer onto the HUD is a near identical process to the one earlier in the post, but with one difference and that difference is that we're now trying to display two variable instead of one which necessitates the use of the Append node. This node combines multiple text inputs and allows them to be displayed by one text block, at least in this instance, I'm sure it has a variety of different uses. For this use, we need to add a third pin to the Node, then place the Minutes into the first slot, type a colon into the second slot and place the Seconds into the third slot. We now have a functioning timer.
Uses for Timers:
0 notes
Text
UV Mapping, Trim Sheets and HyperShade
What is a UV Map:

A UV map is a flat representation of a 3D model which is used to wrap textures around that model, hence why the process of creating a UV Map is called UV Unwrapping.
The term "UV" comes from U and V being used to represent the horizontal and vertical axes in 2D space since X, Y and Z are already used in 3D space.
A good way to look at UV maps is like the paper nets that can be used to make simple shapes like cubes or pyramids.
UVs aren't just used for textures however, they're also used for light baking inside of real time engines like Unreal, which means your model will need a functional UV map if you want them to interact with light and shadow properly.
Creating a UV Map:
First you need to have a finished polygonal mesh and during the process of building the model you need to keep in mind how complex it is, natural the simpler a mesh, the easier it is to unwrap.
Unwrapping an object is usually a similar process in whatever 3D modelling software you use, though some might have extra features that make the process simpler. I'll use Maya as the example since we're using it as part of the course.

From my own experience it's best to start with the program's automatic unwrap then work from there, since it seems to be able to make a decent UV Map on it's own, however its ability to make something useful diminished as the objects complexity increases.

While Unwrapping the object, it's a good idea to place a chequered texture onto the model so you can see any distortion that might have occurred so it can quickly be fixed.

Once the UV map is finished, you can export it out of Maya as a PNG at the resolution you would like and take it into photoshop or any other editing software. This is where you can paint the objects texture onto the UV and after the textures are painted, you can import the UV back into the modelling software to check how it looks.
During UV Unwrapping and Wrapping process, two rather irritating issues can occur besides the already existing distortion process, these are overlapping UVs and seams. Seams are an unfortunate inevitability when flattening a 3D object because the mesh has to be cut somewhere in order to turn it 2D and this generally results in textures not lining up properly at this seam. The best thing to do is hide the seem somewhere the player wont see it, like under the hair of a character for example or on part of a wall that the player wouldn't ever be able to see.
Overlapping UVs are a slightly less obvious problem, but just as annoying. You generally want to avoid Overlapping UVs to keep you textures varied as well as make sure they can be wrapped onto the object properly. The most problematic thing about overlapping UVs occurs when you import the model into a real time engine like Unreal. I mentioned earlier that the UV maps were also used for light baking and when they're overlapping the engine has difficulty figuring out where lights and shadow should go, for example overlapping cam cause shadows to appear on an object even though there is nothing to cast them.
However overlapping UVs can be a useful technique allowing you to repeat a basic texture across a single object, this can help by keeping texture sizes down which is incredibly useful when creating things for weaker machinery. I imagine this technique would mean you'd have to manually make a light map yourself though, instead of allowing the engine to generate one for you, which is where UV channels come in.
UV channels allow an object to have more than one UV map, for instance you would have a UV channel for your texture and another for lighting, which would allow you to have as many overlapping textures as you'd like while making sure the lighting functioned normally.
UV Toolkit:

The Toolkit is essential to creating an efficient UV map, it gives you access to the move, scale and rotation tool, the automatic unwrap presets, as well as the rest of the tools that allow you to manipulate the UV. Many of these tools have very specific uses and I've only really used the cut and sew tools along side the basic transform tools.
Due to only being able to utilise the space of the first square in the UV editor, space is at a premium and the cut tool allows you slice up the UV map into individual UV shells that gives you the ability to use the space more efficiently, since the automatic unwrap feature isn't the best at using the area it is given.
The Difference Between UV Maps and Trim Sheets:

Where UV maps are created by painting an object onto an unwrapped UV, trim maps are created by placing a UV onto an already existing texture, essentially make them the opposite of a UV map.
From my own experience, trim sheets are much easier to work with the UV maps, but they don't always produce results that are as good as UV maps. It all depends, Trim sheets, by their vary nature, are best for objects that do not need a dedicated UV map texture, for example if you have 5 different vases you could probably get away with using the same tile map on each of them due to their similar shape.
Maya's Hypershade:

Hypershade is the main area of Maya for rendering, creating materials an shaders. Like many other 3D softwares like Blender or Unreal, materials use a node based system, however Maya's materials seem to deviate from the norm and for whatever reason decided to not use the traditional names for different material types.
A good example of Maya's uniqueness is the Lambert material. This material is best for flat, smooth surfaces like chalk, pottery, matte paint and so forth, this is because it doesn't produce highlights and calculates without taking surface reflectivity into account; in any other software this would be called the diffuse. There are different materials, like Phong and Blinn which have different speculations values to the default Lambert.
With names like Phong, Blinn, and Lambert, it can be a bit confusing to move from one piece of software to Maya.
Creating a Material and Adding Textures:


Under the create menu, you can select material which will give you an few options for which material you'd like to create. For the basic example of Unwrapping the Cube, it's best to go with Lambert since it's the simplest material. Its best to create new materials instead of using the present ones that are creating along with the scene, because that way you have the default back up.

To get an image texture into to the material is just a simple matter of dragging the image out of the file explorer into the workspace, then you just have to connect the texture Out Colour into the Lambert's Colour input.
0 notes
Text
Health, Score and End States
Integer Health System:

Creating a basic Health system with an integer turned out to be relatively simple with only a handful of nodes across two Blueprints. The first blueprint that needed to be modified was the Player Blueprint itself, which is where the Health information was going to be stored as well as the Death state. An integer needed to be created so we could have a number to use and it's default value was set to 100 which is the standard when it comes to Player Health in video games. We used an Event Tick as the event for the health because it’s a relatively constant trigger for Health and meant it was consistently being referenced and it meant the Health Integer could be changed quickly. So we could see what the Player’s Health was in the moment we used a Print String node which had the Health Integer connected to it, this printed the Health onto the viewport, but it would print the number every frame, to slow this down we just placed a delay between the Event Tick and the Print String.
Now that we actually had health, we needed a consequence for losing Health, so we set it up so the level would restart if the Player’s Health were to reach zero. To do restart the level we added a Branch after the Health Print String and in the condition of this Branch we placed an Integer <= Integer Node which connected to the Health Integer, this meant that when the Health integer hit zero the branch would be set to true. From the True output, we used an Open Level Node, this Node starts the level that is typed into it. As it was, the level would be immediately restarted as soon as the the Player’s Health hit zero and it was rather confusing to player what happened, so we needed to show that they did instead of teleporting, so we added a short delay between the Health hitting zero as well as a Print String that told them they died.
Damaging the Player:

After the Health System was set up, we needed something that would damage the Player. As a proof of concept and/or demonstration we created a Box Trigger that would cause damage when it was walked into, but the code would be applied to objects into the world as well as things like enemy projectiles.
To start we dragged a Box Trigger into the world space and converted it into a Blueprint, in the Event Graph we used the BeginOverlap Event and used a Cast to FPSCharacter Node with a Get Player Character Node plugged into the Object Wildcard, then we set up a small system that would set the new value of the Health integer by subtracting from it. This was done by using a Get Health node, attached to a Integer - Integer Node which then wired into a Set Health Node.
Point System and Giving the Player Points:

The system for Points is almost identical to the Health system, with a few different integer nodes that relate to an increasing value instead of a decreasing one. The other main difference is that you’d want the Points system to load a different level instead of the current one.
Using Destructible Objects to give the Player Points:

Creating a projectile that destroys Actors is rather easy, but to complicate it a bit we want it to only be able to destroy the Actors that we want to be destructible, in order to do this we need to tag our desired objects.
To first create a tagged object, we took a random cube in the world space and converted it to a blueprint, then searched “tags” in the details panel and simply added a tag with a simple and memorable name. A blueprint isn't necessary for this part, but it prevents you from having to click every object individually to give them a tag.
Inside of the projectile Blueprint, we separated the Event Hit from the already existing script, then created a Branch which connected on to two Destroy Actor Nodes; one would be used to destroy the object, the other would destroy the projectile, both of them were connected the Branch’s True output and only the Destroy Self node was connected to the false. At the moment, it would only destroy the projectile, so we added in an Actor Has Tag Node from the Event Hit’s other slot, this slot was also connected to the first Destroy Actor’s Object wildcard. The only thing left to do was to add the script that would give the player points for destroying the object, so we just copied the Point giving code from the previous trigger and added it in between the Destroy Actor that would destroy the object and the Destroy Actor that would destroy the projectile.
Displaying Health and Score using Widgets:

Unfortunately it seems that Integers aren’t compatible with the Progress Bar widget, which is what I used when I created a Health and Armour system using floats, so instead of using a bar I decided to go with text since they were seemingly compatible.
I created a Widget Blueprint and in the lower left of the design tab I added four text boxes, two of them were displaying the Health and Score values, the other two were used to inform the player about what the two values actually meant. To actually show the values of the Health and Score, I just had to bind them and add a little bit of script which was a Get text node that was connected to a Cast to FPSCharacter which in turn had a Get Player Character node attached to the Cast’s wildcard. And then I simply had to wire in a Get health/score node then just attached the Get node and the Cast node to the Return node.
Finally in the FPSCharacter Blueprint, I just needed to add a create widget node and a add to viewport node to the Event BeginPlay, however this event was already in use, so I placed a sequence node just after the Event node and then placed the widget nodes in the Sequence’s second slot.
0 notes
Text
Experimenting in Unreal 4
Implementing a Health and Armour System:
Adding a working Health and Armour system was a lot easier than I expected, though I haven't been able to add death just yet.
I first started off by creating two floats inside the Player Blueprint that would represent the Health and Armour. Next I created a Widget Blueprint which would be used for the health and armour bars. After adding the bars I created a small function for the both of them that would cast to the Player Blueprint and reference the previously made floats so they could be used to update the Health and Armour on the HUD in real time. Back inside of the Player Blueprint, I used the BeginPlayEvent with a Create Widget Node that used the class of the Widget Blueprint that I made before, I then connected this to an Add To Viewpoint node, which would take the Widget out of the memory and display it in game.

After having the HUD linked with the actual health value, I moved on to making the armour rechargeable. I added an Event Tick to the Blueprint to be the driving force behind the regeneration, this was then wired through a somewhat redundant sequence node into a delay node, the delay node was used to space out every burst of regeneration of the armour. To make sure the regen wouldnt go over the armour's maximum, I added in a branch after the delay with a Less Than Float plugged into the conditions. Finally, I ended the node block with a Set node for the armour which had a Float Plus Float connected to the node's value.

The last thing I needed to do was create a function that would allow the health and armour to be taken away.
First the functions needed to remove the Player's armour, so I added a Set Armour variable connected to a Float Minus Float with a Get Amour variable and set the Float Minus Float to 0.05. So it would take away 5% of the player's armour with each hit.
True First Person Camera:
Slow Motion:

I half expected creating a Slow Motion mechanic would be extremely complicated, however it can be done in less than a minute with seven nodes and a little bit of maths.
inside the Level Blueprint
1 note
·
View note
Text
PEGI - Pan European Game Information.
Information on PEGI:
PEGI is a European video game content rating system that was established to help European consumers make informed decisions when buying video games or apps by providing age recommendations and content descriptions. A PEGI rating is required by law for any physical distribution of a video game.
A score is chosen for a game is based on specific elements within the game, such as realistic violence, drugs, fear and sex. Each of these elements also have various degrees of severity that also affect the age rating.
PEGI 3 - This rating is acceptable for everyone and should not contain any bad language or contain images that may frighten young children, while a very mild form of violence that is childish or comical in nature is allowed.
PEGI 7 - Game content that could frighten young children fall within this category, very mild violence that is implied, not detailed or not realistic is also allowed by a PEGI 7 rating.
PEGI 12 - Video games that show violence of a slightly more graphic nature towards fantasy characters or non-realistic violence towards human-like characters would fall in this age category. Sexual innuendo or sexual posturing can be present, while any bad language in this category must be mild. Gambling as it is normally carried out in real life in casinos or gambling halls can also be allowed by this rating.
PEGI 16 - This rating is applied once the depiction of violence (or sexual activity) reaches a stage that looks the same as would be expected in real life. The use of bad language in games with a PEGI 16 rating can be more extreme, while games of chance, and the use of tobacco, alcohol or illegal drugs can also be present.
PEGI 18 - The adult classification is applied when the level of violence reaches a stage where it becomes a depiction of gross violence, apparently motiveless killing, or violence towards defenceless characters. The glamorisation of the use of illegal drugs and explicit sexual activity should also fall into this age category.
Content Descriptors:
Violence - The game contains depictions of violence. In games rated PEGI 7 this can only be non-realistic or non-detailed violence. Games rated PEGI 12 can include violence in a fantasy environmentor non-realistic violence towards human-like characters, whereas games rated PEGI 16 or 18 have increasingly more realistic-looking violence.
Bad Language - The game contains bad language. This descriptor can be found on games with a PEGI 12 (mild swearing), PEGI 16 (e.g. sexual expletives or blasphemy) or PEGI 18 rating (e.g. sexual expletives or blasphemy).
Fear - This descriptor may appear on games with a PEGI 7 if it contains pictures or sounds that may be frightening or scary to young children, or on PEGI 12 games with horrific sounds or horror effects (but without any violent content).
Gambling - The game contains elements that encourage or teach gambling. These simulations of gambling refer to games of chance that are normally carried out in casinos or gambling halls. Games with this sort of content are PEGI 12, PEGI 16 or PEGI 18.
Sex - This content descriptor can accompany a PEGI 12 rating if the game includes sexual posturing or innuendo, a PEGI 16 rating if there is erotic nudity or sexual intercourse without visible genitals or a PEGI 18 rating if there is explicit sexual activity in the game. Depictions of nudity in a non-sexual content do not require a specific age rating, and this descriptor would not be necessary.
Drugs - The game refers to or depicts the use of illegal drugs, alcohol or tobacco. Games with this content descriptor are always PEGI 16 or PEGI 18.
Discrimination - The game contains depictions of ethnic, religious, nationalistic or other stereotypes likely to encourage hatred. This content is always restricted to a PEGI 18 rating.
PEGI and My Game:
I’ll most likely try to make my game a PEGI 12
0 notes
Text
Unreal 4 - Player Movement and Projectiles:
Changing the Players Movement Speed and Jump Height:

In Unreal’s First Person preset, all of the player’s movement is already coded and it can be tweaked inside of the Blueprint’s detail panel when the Character Movement Component is selected. Everything from the Movement speed, to Jump Height, To acceleration, Friction and even how the player gravity can be changed. The Blueprint even comes with options for crouching and other features without those features actually being in the blueprint, so we have to set that up inside the blueprint ourselves.

Adding a sprint function is a very easy affair, all you need is to change the maximum movement speed when you press a button and all it takes to do that is four node. I chose Left shift because that is a common button for sprinting in many games, from there all you need to do is create two Set Max Walk Speed nodes, one from the Pressed Execute and the other from the released and finally you need a target, which will be the character;s movement.
In the future I want to see if i can create a system that will gradually increase the player’s speed as they ran forwards, simulating a gain in momentum.

Crouching is another easy thing to code, since Unreal has two inbuilt nodes for crouching, one for crouching and the other for getting the player out of crouch. Since I prefer games with a toggle crouch, I used a flip flop node, which node flips between two outputs when it is triggered.
Changing the Projectile:

Given that the project is already set up and functional from the get go, all that’s is to adjust what’s already there. Like the character movement, the projectile has plenty of options to change. I wanted to create something that functioned in a similar way to a laser bolt, so I unticked the “should bounce” option, increased the initial and max speed then turned the gravity scale down to zero so the projectile wouldn’t fall.

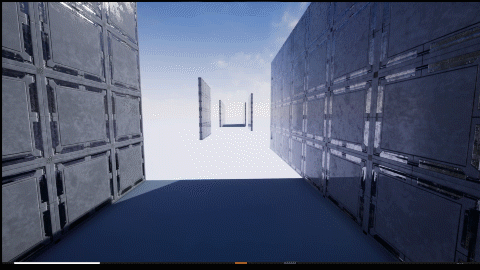
The default projectile model, which is just a bouncy yellow ball isn’t particularly appealing, but I didn’t really know what I wanted the projectile to look like, so I added a Tie Fighter as a place holder, which is done by dragging the mesh into the Blueprint and deleting the original sphere
0 notes