
Don't wanna be here? Send us removal request.
Statistics
We looked inside some of the posts by hellyear86-blog and here's what we found interesting.
Average Info
Notes Per Post
1
Likes Per Post
0
Reblog Per Post
0
Reply Per Post
1
Time Between Posts
3 days
Number of Posts By Type
Text
17
Last Seen Tumblr Blogs


Fun Fact
Post activity is at the highest at 4:00 pm EDT; notes peak at 10:00 pm EDT.
Text
Crispy Tortilla Eggs
At the weekend I like to cook the man something a bit heftier for his breakfast rather than his usual Oats or Wheatabix. I've never had him complain.
When I first moved over here we used to pop into Chester often on a Saturday morning and treat ourselves to an all-day breakfast . . . .
Bacon, sausage . . . eggs any way you wanted them . . . grilled tomatoes, baked beans, mushrooms . . . hash browns, black pudding (only if you liked it) and beautiful crisp fried bread . . . oh, I so loved the fried bread.
Thick slices of white bread that's been fried in fat until crisp . . . oh, it is sooo good.
They closed down the local BHS a few years back, so no more Saturday breakfasts . . . Oh, I know we could get one easily somewhere else, but there was just something about the BHS, and they were the only ones I knew that served fried bread.
I'll tell you something however . . . those full breakfasts don't hold a patch to these Crispy Tortilla Eggs! They are phenomenal!
Buttery crisp tortilla topped with a fried egg and cheese . . . and garnishes . . .
You start off by frying the egg . . . . just until the white is opaque, season it and flip the egg over . . . carefully so the yolk doesn't break.
I only ever use large free range organic eggs, and if they are RSPCA approved so much the better. I refuse to support an industry that is in-humane if I can help it.
Once you have flipped the egg, quickly sprinkle it with a tablespoon of cheese and a 6 inch tortilla . . .
Leave it until the cheese melts and helps the tortilla to stick to the egg and then carefully flip it over so you can fry that tortilla in the pan drippings . . . it only takes about a minute for it to get lovely and crisp.
Crisp and buttery . . . after that you turn the heat out, top with a bit more cheese and pop on a lid so that the cheese can melt.
Slide that baby onto a heated plate and top with some hot sauce and spring onions . . . I like to use a combination of Sriracha sauce and green Tabasco. Just a drizzle of each . . .
Fabulously tasty . . . FABULOUSLY!!
Yield: 1Author: Marie RaynerPrint Recipe
With ImageWithout Image
Crispy Tortilla Eggs
You can make as many or as few of these as you want. Simple ingredients put together in a spectacular way. NOM NOM!
ingredients:
1 tsp butter
1 large free range egg
1/4 tsp seasoning salt
2 TBS grated cheddar or Jack cheese
1 (15cm) flour tortilla (6 inch)
Toppings:
chopped spring onions
hot sauce (I used Sriracha and Green Tabasco)
instructions:
Melt the butter in a medium skillet over moderate heat. Crack in the egg. Sprinkle with the seasoning salt. Cook until the whites are set. Carefully flip over. Sprinkle with 1 TBS cheese. Immediately top with the tortilla. Cook until the cheese melts (won't take long). Carefully flip back over until the egg is on top and the tortilla is on the bottom. Cook for about a minute. Sprinkle on the remaining TBS cheese. Remove from the heat and pop on a lid. Leave til the cheese melts.
Slide onto a heated plate and top with some hot sauce and the spring onions. Serve immediately.
NOTES:
Note - I like these with a softly cooked egg, but if your family prefers them firmer, just let the egg cook for a bit longer.
These are so, so, SO good. I had planned on only making one for Todd, but it was so delicious, I ended up eating it and then had to make him another one. I know. Me <====== willpower.

Source: https://theenglishkitchen.blogspot.com/2019/03/crispy-tortilla-eggs.html
1 note
·
View note
Text
2018 Book List
Sharing my 2018 Book List and all the great books I read this past year. I’d love to hear what you read this year!I have been a bad girl this year. In past years I have shared with you a list of all the books I have read each quarter of the year. I didn’t do that this year and I know a lot of you missed it because I got emails from you telling me how much you missed them. All I can say is, I’m sorry. I think there are a couple of reasons why I didn’t do those posts this year. One, I didn’t read as much this year as I have in the past which I’m going to blame on too much British TV watching as well as listening to podcasts. And second, I spent a lot of the year holding new grandbabies instead of books!
Well, I’m here to beg forgiveness and share with you a list of everything I read in 2018, all in one post. I only read 19 books in 2018 which is less than half of what I normally read. One of the best parts of sharing what I have read with you, is you sharing with me what you have read. I get so many of my book suggestions from you!
Please leave me a comment and let me know what some of your favorite books were in 2018. So here you go!
2018 Book List
The Clifton Chronicles by Jeffrey Archer – I spent the first part of the year reading the Clifton Chronicles series and really enjoyed it. My husband read them before me and loved them too. It is a family saga that takes place in England beginning with the outbreak of the Great War. Each book leaves you anxious to start the next to see what has happened! There are seven books in the series and you will be sorry when you’ve read the last one!
Glass Houses by Louise Penny – The most recent book in the Inspector Gamache series. I have read all the others and was so excited for this one to come out! You will end up with a crush on Inspector Gamache like me!
Radium Girls by Kate Moore. This was a fascinating true story about a group of woman who worked in the clock factories painting clock faces with radium laced paint. It is a tragic story of what happened to them as a result of their exposure to radium on a daily basis. It is history that I wasn’t aware of and although it is a tragic story it was definitely an interesting read.
This next book marks a little run on non-fiction reading for me.
Make Your Bed by William McRaven. This is a quick little read that I gave to all the high graduates I knew this year. It’s got a lot of great life lessons and can be read in an hour or so!
Grit, The Power of Passion by Angela Duckworth – I totally agree with this book that one of the main secrets to success and achievement is not talent, but a blend of passion and persistence, what she calls “grit”. I think all parents of young children should definitely read this book, so much good info. Everyone needs grit!
Big Potential: How Transforming the Pursuit of Success Raises Our Achievement, Happiness, and Well-Being by Shawn Achor. I listened to this one on Audible. More a business book I think everyone can benefit from it. I love the philosophy that success and happiness are not competitive sports and that by helping others be better we also improve.
Daring Greatly by Brene Brown. This was a reread for me and a must read for everyone if you haven’t read it.
Essentialism by Greg McKowan. This was also a reread for me because I needed a refresh on the topic. Feeling overwhelmed, overcommitted, or overworked? This book is for you.
The Alice Network by Kate Quinn. This book got me back to my normal historical fiction genre and I really enjoyed it. The story is set in two different eras, during the Great War and then another story line that takes place during post WWII. The two stories alternate chapters so you have to pay attention. It is the story of the British spy network – the “Alice Network” -operating in German-occupied northwestern France during the Great War. Really enjoyed this one!
I was Anastasia by Ariel Lawhon. Another historical fiction read about a part of history I wasn’t that familiar with, the story of the mysterious lives of Russian princess Anastasia Romanov and Anna Anderson. Anna Anderson spent 50 years trying to convince the world she was Anastasia Romanov.
Under the Scarlet Sky by Mark Sullivan. My son gifted my husband this book after he read it and enjoyed it. My husband loved it and suggested I read it. I’ve read a lot about WWII but most of what I have read has taken place in France or England. This book is the story of WWII in Italy, the true story of Pino Lella who becomes a spy against the Germans while working for one of the German high command. If you are a fan of All the Light We Cannot See, The Nightingale, and Unbroken you will enjoy this book.
The Little Book Hyggee by Meik Wiking Hyggee (hoo-ga) is all the rage, the Danish art of “Comfy.” After reading the book to see what it was all about I realized I’ve been Living Hyggee for years! Hyggee is a sense of comfort, togetherness, and well-being. “Hygge is about an atmosphere and an experience,” Wiking explains. “It is about being with the people we love. A feeling of home. A feeling that we are safe.”
The Residence:Inside the Private World of the White House by Kate Anderson Brower. This was a book club read. It is an intimate account of the service staff of the White House, from the Kennedys to the Obamas. Lots of interesting stories!
That’s it. My 2018 Book List. Now I’d like to hear what you’ve been reading. Please leave me a comment and let me know.
Happy Reading!
For more of my Recommended Reads check out these posts:
Book List 2017
Book List 2016
Book List 2015
Book List 2014
Book List 2013
Book List 2012
Book List 2011
Books List 2010
Book List 2009
Get my Weekly Menu Plan for FREE!
Receive my FREE "What's for Dinner?" Meal Planning Course, a copy of my FREE ebook that includes my most popular recipes and my FREE weekly Meal Plan.
<![CDATA[/* Layout */ .ck_form.ck_minimal /* divider image */ background: #f9f9f9; font-family: 'Helvetica Neue', Helvetica, Arial, Verdana, sans-serif; line-height: 1.5em; overflow: hidden; color: #818178; font-size: 16px; border: solid 1px #d1d1d1; -webkit-box-shadow: none; -moz-box-shadow: none; box-shadow: none; clear: both; margin: 20px 0px; text-align: center; .ck_form.ck_minimal h3.ck_form_title text-align: center; margin: 0px 0px 10px; font-size: 28px; .ck_form.ck_minimal h4 text-align: center; font-family: 'Open Sans', Helvetica, Arial, sans-serif; text-transform: uppercase; font-size: 18px; font-weight: normal; padding-top: 0px; margin-top: 0px; .ck_form.ck_minimal p padding: 0px; .ck_form, .ck_form * -webkit-box-sizing: border-box; -moz-box-sizing: border-box; box-sizing: border-box; .ck_form.ck_minimal .ck_form_fields width: 100%; float: left; padding: 5%; /* Form fields */ .ck_errorArea display: none; /* temporary */ #ck_success_msg padding: 10px 10px 0px; border: solid 1px #ddd; background: #eee; .ck_form.ck_minimal input[type="text"], .ck_form.ck_minimal input[type="email"] font-size: 18px; padding: 10px 8px; width: 68%; border: 1px solid #d6d6d6; /* stroke */ -moz-border-radius: 3px; -webkit-border-radius: 3px; border-radius: 3px; /* border radius */ background-color: #fff; /* layer fill content */ margin-bottom: 5px; height: auto; float: left; margin: 0px; margin-right: 2%; height: 42px; .ck_form input[type="text"]:focus, .ck_form input[type="email"]:focus outline: none; border-color: #aaa; .ck_form.ck_minimal .ck_subscribe_button width: 100%; color: #fff; margin: 0px; padding: 11px 0px; font-size: 18px; background: #7598b4; -moz-border-radius: 3px; -webkit-border-radius: 3px; border-radius: 3px; /* border radius */ cursor: pointer; border: none; text-shadow: none; width: 30%; float: left; height: 42px; .ck_form.ck_minimal .ck_guarantee color: #626262; font-size: 12px; text-align: center; padding: 15px 0px 0px; display: block; clear: both; .ck_form .ck_powered_by display: block; color: #aaa; font-size: 12px; .ck_form .ck_powered_by:hover display: block; color: #444; .ck_converted_content display: none; padding: 5%; background: #fff; .ck_form.ck_minimal.width400 .ck_subscribe_button, .ck_form.ck_minimal.width400 input[type="email"] width: 100%; float: none; margin-top: 5px; .ck_slide_up, .ck_modal, .ck_slide_up .ck_minimal, .ck_modal .ck_minimal min-width: 400px; .page .ck_form.ck_minimal margin: 50px auto; max-width: 600px; /* v6 */ .ck_slide_up.ck_form_v6, .ck_modal.ck_form_v6, .ck_slide_up.ck_form_v6 .ck_minimal, .ck_modal.ck_form_v6 .ck_minimal min-width: 0 !important; @media all and (min-width: 801px) .ck_modal.ck_form_v6 .ck_form.ck_minimal margin-left: -300px; width: 600px; .ck_modal.ck_form_v6 .ck_minimal .ck_subscribe_form padding-top: 20px; .ck_slide_up.ck_form_v6 .ck_minimal .ck_subscribe_form padding-top: 10px; .ck_form_v6 #ck_success_msg margin-top: 15px; padding: 0px 10px; .ck_slide_up.ck_form_v6 .ck_minimal + .ck_close_link top: 5px; .ck_slide_up.ck_form_v6 .ck_minimal h3.ck_form_title margin-top: 5px; /* This changes the background color and border of the entire form */ .ck_form background-color: #ffffff !important; border: 1px solid #45c3d2 !important; /* This hides the "powered by convertkit" text */ .ck_form .ck_powered_by display: none !important; ]]>
Hi – I’m Leigh Anne! Food, family and friends are three of my favorite things. I love sharing easy, delicious recipes and entertaining ideas that everyone will love. When she started her blog, Your Homebased Mom, over 9 years ago she had no idea that it would one day house over 2,400 recipes and ideas! .
Latest posts by Leigh Anne (see all)
Source: https://www.yourhomebasedmom.com/2018-book-list/
0 notes
Text
Roasted Eggplant Yogurt Dip
Roasted Eggplant Yogurt Dip - Moutabal - Tori Avey
We are a participant in the Amazon Services LLC Associates Program, an affiliate advertising program designed to provide a means for us to earn fees by linking to Amazon.com and affiliated sites.
Source: https://toriavey.com/toris-kitchen/roasted-eggplant-yogurt-dip/
0 notes
Text
Easy lemon-garlic lamb chops
Subscribe
Get all our recipes sent to you for FREE!
Easy lemon garlic lamb chops are quick to cook and perfectly juicy. Great for weeknights when you want a delicious dinner on the table fast.
We are a lamb chop loving family. We have lamb chops at least once a week and there’s a collective “yay!” when my kids ask the dreaded “what’s for dinner” and the answer is lamb chops. And it’s a double-yay from me because they are totally delicious and SO easy to make.
And of all the lamb chop recipes I’ve made, this is the most perfect because the meat stays soft, juicy and tasty while the fat crisps up nicely and has time to render and caramelize.
How to cook lamb chops
I seasoned the lamb chops with oregano, dried chilli (red pepper) flakes, lemon, thyme and garlic and then pre-heated a cast iron skillet/pan until it was smoking hot. You could also use a stainless steal frying pan. This allows the lamb chops to sear and because these aren’t very thick lamb chops, I didn’t want them to over cook and stay in the pan for too long.
Once seared and golden brown on both sides (2-4 minutes), I stood the lamb chops up on their fat side for a minute or two to allow the fat to caramelize and render. After the fat was rendered, I removed the lamb chops from the heat and allowed them to rest for 5 minutes before serving. The resting allows the juices in the meat to redistribute, resulting in soft, juicy meat.
Served with potato wedges and a simple salad, these lamb chops are a perfect, easy dinner recipe and will be a family favourite, for sure!
Easy lemon garlic lamb chops are quick to cook and perfectly juicy. Great for weeknights when you want a delicious dinner on the table fast.
Course: Easy Dinner, Gluten free, Lamb, Low Carb, Quick recipe
Cuisine: Mediterranean
Keyword: Easy dinner, gluten free recipe, Lamb chop recipe
Servings: 4
Calories: 451 kcal
Author: Alida Ryder
8 lamb chops Depending on their size, serve 1-2 per person
2 tbsp olive oil
juice of 1 lemon, approximately 3-4 tablespoons
2-3 tsp dried oregano
1 tsp chilli/red pepper flakes
2 tsp thyme leaves
4 garlic cloves crushed
1 tsp salt
pepper to taste
Pre-heat a cast-iron/stainless steel pan over high heat.
Drizzle the lamb chops with the olive oil and lemon juice then generously season with the herbs and spices on both sides.
Place the lamb chops in the hot pan then sear for 2-3 minutes per side until golden brown.
Flip the lamb chops onto the fat side and allow to sear until the fat has started to render and has caramelized.
Remove from the pan and allow to rest for a few minutes before serving with lemon wedges.
Nutrition Facts
Easy lemon-garlic lamb chops
Amount Per Serving
Calories 451 Calories from Fat 243
% Daily Value*
Total Fat 27g 42%
Saturated Fat 8g 40%
Cholesterol 149mg 50%
Sodium 753mg 31%
Potassium 620mg 18%
Total Carbohydrates 1g 0%
Protein 45g 90%
Vitamin A 3.3%
Vitamin C 1.9%
Calcium 4.1%
Iron 23.1%
* Percent Daily Values are based on a 2000 calorie diet.
Side dishes for lamb chops
Easy spicy garlic baked potato wedges
Easy marinated cucumber salad
Hasselback potatoes with sriracha butter

Source: https://simply-delicious-food.com/easy-lemon-garlic-lamb-chops/
0 notes
Text
Easy sweet potato dosa
Hello! How are you guys doing? I’m slowly shaking off my post-holiday blues and getting on with things as this is going to be a busy week for us. We are finally getting our house keys this Friday!! Whoop whoop. We are beyond excited! We’ve already ordered a bed and we’re now shopping for a cooker as it’s still too cold for smoothie recipes, I think 😛 .
It’s taken so long to get here that we are really ecstatic to finally be able to settle down somewhere and, although we both feel that our curiosity for what it’s like to live elsewhere will probably rear its head again at some point, we are planning to enjoy having some permanence in our life for a while.
Recipe-wise, I swore that this week will be pasta-free as that’s almost all we ate throughout our holidays in La Palma. There wasn’t much quality vegan food available so we quickly decided to ditch going out for food (unless we found an unmissable opportunity) and cater for ourselves.
It was simply easier and less wasteful to just buy one type of ingredient and have similar dinners throughout the week. We both love pasta so we were okay with that, but now that I am home, I’ve decided to give pasta a bit of a wide berth for a while.
Today, I bring you a dish I’ve been meaning to share for a while. It’s my take on masala dosa with a twist. As opposed to traditional dosa, the batter for this one doesn’t require any soaking, blending or fermenting. It’s a simple rice flour batter than produces super thin and crispy crepes, which beg to be filled with an aromatic sweet potato (not traditional, I know) curry.
While you are welcome to make your own coconut and coriander chutney to go with these, I often serve it with shop-bought vegan coconut yoghurt and chutney and heaps of coriander. While these dosa-like crepes aren’t authentic, their advantage is that they are fuss free and fairly quick to make. They are also healthy, naturally gluten-free and filling.
PS: If you make my sweet potato dosa, don’t forget to tag me on Instagram as @lazycatkitchen and use the #lazycatkitchen hashtag. I love seeing your takes on my recipes!
makes: 6
prep: 30 min
cooking: 30 min
Ingredients
FILLING (best made in advance)
2 tbsp vegetable oil
1 tsp black mustard seeds
10 fresh or dried curry leaves
1 small onion, diced finely
1-2 small red chillies (deseeded for less heat), sliced finely
2 garlic cloves, diced finely
1 tbsp grated fresh ginger
1 tsp garam masala
1 lb / 450 g (about 3 small) sweet potatoes, cubed small
juice of ½-1 lime, adjust to taste
½ tsp salt, adjust to taste
RICE CREPES
140 g / 1 cup rice flour (I use brown rice flour)
1 tbsp cornflour / cornstarch
½ tsp salt
a pinch of ground turmeric (for colour, optional)
approx. 480 ml / 2 cups of water
2 tsp oil, plus more for brushing the pan
GARNISHES AND CONDIMENTS
chopped fresh coriander, to serve
thick vegan coconut yoghurt or homemade coconut chutney, to serve
your favourite sour (like tamarind or lime) chutney or pickle, to serve
Method
FILLING (best made in advance)
Heat up the oil in a heavy-bottomed frying pan or pot. Once hot, add mustard seeds, and curry leaves. Fry for a few minutes until the mustard seeds make a popping sound.
Add chopped onion and chillies. Fry (stirring now and then) for a few minutes, until softened and lightly caramelised. Add in garlic and ginger and fry off gently until they both become fragrant and the garlic softens.
Stir in garam masala and fry off for 1 minute stirring the whole time.
Add cubed sweet potatoes and about 1 cup of water. Cover with a lid and cook for about 15 minutes – until the potatoes are cooked through.
Turn off the heat but do not take the lid off just yet – allow potatoes to finish cooking in their own steam for an extra 5 minutes.
Squash the potatoes with a fork / wooden spoon. Sprinkle with lime juice to taste and adjust the amount of salt to taste.
CREPE BATTER
Place rice flour, cornflour / cornstarch, salt and turmeric (if using) in a medium mixing bowl.
Mix in approximately 2 cups of water to begin with and oil. Set aside for 10 minutes.
Give the batter a good mix and check for consistency. It should be really runny so you may need to add an extra ½ cup of water to it to achieve this.
Heat up a small non-stick pan (mine was 20 cm / 8″ in diameter) on a medium heat. Allow it to get really hot before brushing its surface with ½ tsp of oil. Allow the oil to heat up. Mix the batter really well before pouring each crepe as rice flour tends to sink to the bottom really quickly.
Ladle (do not pour and swivel like you would with regular crepes!) approximately 60 ml / ¼ cup (if using a 20 cm / 8″ size pan) of batter onto the pan in a circular motion, going from the outside of the pan to the middle. If any gaps form, quickly fill them with a little more batter, but be careful not to make the pancakes too thick by ladling too much extra batter on top of the set batter. There should be lots of little holes forming on the surface as soon as the batter hits the hot pan. If they don’t form it means that your pan / oil isn’t hot enough!
Allow the pancake to cook on one side without touching it until the edges become golden and start lifting up gently (approx. 2-3 minutes). Turn the pancake gently using a large spatula and cook on the other side for 1-2 more minutes. The longer you cook them the crispier they’ll become, but they will lose their flexibility. I don’t mind that, but please adjust the cooking time to YOUR preference. Also be aware of your pan’s hot spots – once you flip your pancake, make sure you adjust its position on the other side to ensure that there are no raw batter areas.
Fill each crepe with sweet potato filling and sprinkle with a generous amount of coriander. Serve with coconut yoghurt and a dollop of sour chutney on the side.
If you want more info on some of the ingredients that we use in our recipes, check out our glossary.
Join our mailing list
and get a sweet e-book
Source: https://www.lazycatkitchen.com/easy-sweet-potato-dosa/
0 notes
Text
Fancy That! Classic Blueberry Pie With Fancy Crust
Overflowing with blueberries? They're abundantly in season at the moment and at such prices that you can easily make them into a delicious blueberry pie. But because you know I can't leave well enough alone, this one has a basket weave crust, flowers and leaves on top and I show you how to achieve this fancy crust-it's easier than one might think!
Dear Reader, this is one of my favourite pies ever. I can now see why blueberry pie is so popular in America and it's a shame that blueberries are always so expensive so that we can't have this regularly (conversely, I was surprised to see huge punnets of blueberries for sale in America and Canada for an absolute steal and wanted to do an apron and bake a pie straight away).
Although the crust looks complicated I promise you that it isn't-stay with me on this my dears. Your best friend to achieve this effect is a ruler as well a sharp knife and flower cutters. Also save this for a day where it isn't too hot. The other key is this specific pastry recipe that is my go-to crust recipe. Not only does it taste wonderful but it is a dream to work with as it rolls and rerolls easily. My advice is that for an intricate crust stay away from shortening based shortcrust pastry recipes as they have a wonderful texture once baked but are too soft to hold up to this sort of pattern.
Having said that, I was surprised at how easily this came together. It also helped that the layer of blueberries were frozen making sure that the pastry stayed chilled. Keeping it cool is always the key to pastry making. The resulting pie was so good Mr NQN ate three slices and I ate two slices of it before coming out of my pastry fugue state, corners of my mouth stained purple from the berries. It was a dream pie.
Speaking of dreams, I had a dream the other night that Mr NQN was having an affair. A bit of background: I had just met up with a friend of mine whose husband had left her because he was having an affair with his assistant (a total nightmare cliche come true) and she told me that a lot of her friends had come out to support her as their husbands had also been having affairs. Which got me to thinking, "Geez is everyone having affairs?". This must have permeated my dreams because that night I had a dream that he was having an affair with a friend of mine.
I woke up startled at 4am and looked over at him asleep. It was probably too early to wake him just to tell him my dream (although I did consider it for a brief moment) so I wrote some notes in my phone and then went back to sleep.
The next morning he woke up and I was staring at him. "I had a dream you were having an affair," I said to him in an accusing tone. "Err what?" he said sleepily.
I blurted out the dream to him although admittedly with the passing of time and application of logic it made very little sense. "And then I ran around the whole car park trying to find you two because I could see you both in the pool but then you weren't there in the pool in the car park!" I concluded, slightly lamely because once I described the dream it made literally no sense whatsoever.
"Okaaay," he said looking at me like I was an alien but not wanting to agitate me further.
And fired up, I leaned over and smacked him on the bottom. "And that's for having an affair!" I said.
"But it was a dreaaam!" he said half laughing half rolling his eyes, used to my madness.
Once I calmed down, I felt a bit bad about projecting my dream onto him. So I decided to make him a pie. This blueberry pie actually. You've probably seen blueberries on sale at a ludicrously cheap price lately too. Usually they can be $5 a punnet but lately we've seen them for $1.25 so we bought over a kilo of them and froze them.
Out they came for this pie. I usually tinker around with recipes but in this case I wanted a classic blueberry pie. But you know me, it has to be different in some sort of way. Usually Mr NQN is all about the fruit filling and I'm more about the pastry and we usually just share a piece and eat our favourite bits. But this was too good to only eat one part. The blueberries have a wonderful level of jammy sweetness without being too sweet and the pastry is an absolute dream. Even with the elaborate crust he ate the entire thing!
And if I'm likely to have a dream, it's probably about this blueberry pie!
So tell me Dear Reader, do you remember your dreams? Have you ever gotten upset with someone because of a dream? Have you made a blueberry pie and what is your favourite pie filling be it sweet or savoury?
An Original Recipe by Lorraine Elliott
Preparation time: 30 minutes plus chilling/resting time
Cooking time: 50-60 minutes
For Pastry
2.5 cups flour plus extra for rolling
2 teaspoons caster or superfine sugar
1/2 teaspoon fine salt
226g/2 sticks butter, cold and cubed
7-8 tablespoons ice water
For filling
700g/25ozs. blueberries (fresh or frozen)
140g/5ozs. caster or superfine sugar
1/4 cup cornflour or fine cornstarch
1 teaspoon finely grated lemon zest
1/4 teaspoon ground cinnamon
1 egg, whisked for brushing
You will also need a sharp knife, ruler and flower and leaf cutters
Sand like texture
Step 1 - Place the flour, sugar and salt in a food processor and process until mixed. Add butter cubes and process until you get a sand like texture. Add 6-7 tablespoons of ice water and pulse until just combined-add an extra tablespoon of water if you need it but try to avoid it becoming too wet.
Step 2 - Knead until even textured, divide into two pieces and cover with cling film and refrigerate for 1 hour.
Step 3 - Mix the blueberries, sugar, cornflour, lemon zest and cinnamon. Set aside until ready.
Fluting the sides (not that necessary for this topping but it's a habit)
Step 4 - Roll out one round of pastry on a lightly floured surface (I leave it on the bench for 5 minutes if it is too stiff from the fridge). Place in a pie tin and flute the sides and dock the base with a fork. Place in the fridge for 30 minutes. Preheat oven to 200C/400F. Line with a sheet of foil (spray the foil with oil on the side that touches the pastry) and fill with pie weights and bake for 20 minutes. Remove the foil and bake for another 5 minutes. Cool.
Docked pastry with fluted sides before baking
Pie filling
Cutting out strips of pastry for top
Step 5 - Place the filling inside the pie and refrigerate. Roll out the remaining disc of pastry and cut into 1.5cm strips. With a butter knife, make a mark down the centre but don't cut all the way through and then place in the fridge for 10 minutes. Then make a lattice top - lay down strips keeping them close and then place other strips in the opposite direction lifting up alternate strips (see this post on how to achieve the lattice pattern). Place in the fridge for 15 minutes while you cut out the flowers and leaves.
Basket weave effect
Step 6 - Cut out the remaining pastry in flowers and leaves. Brush the whole pie top with the egg yolk and adhere the flowers using the egg yolk and then brush these with yolk too. Bake at 190C/380F oven for 50-60 minutes or until the blueberry filling bubbles. I also place a tray at the bottom of the oven to catch any overflow of filling to make it easier to clean it up.
Cutting out flowers and leaves
Source: http://www.notquitenigella.com/2018/11/27/blueberry-pie-recipe-fancy-crust/
0 notes
Text
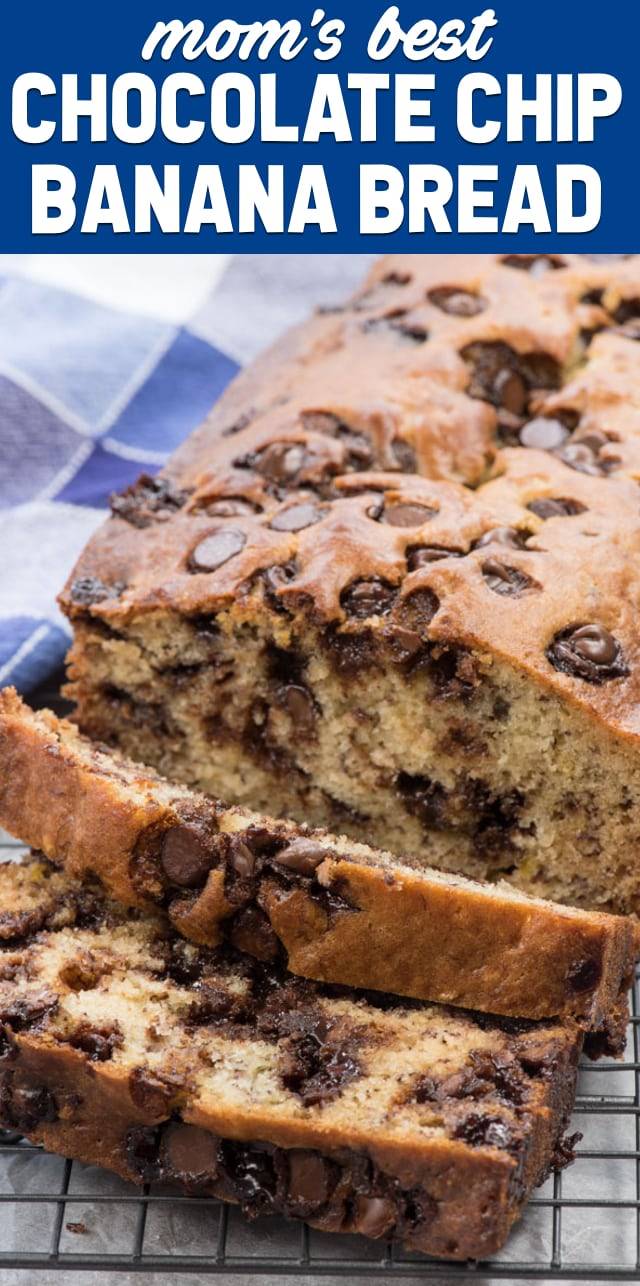
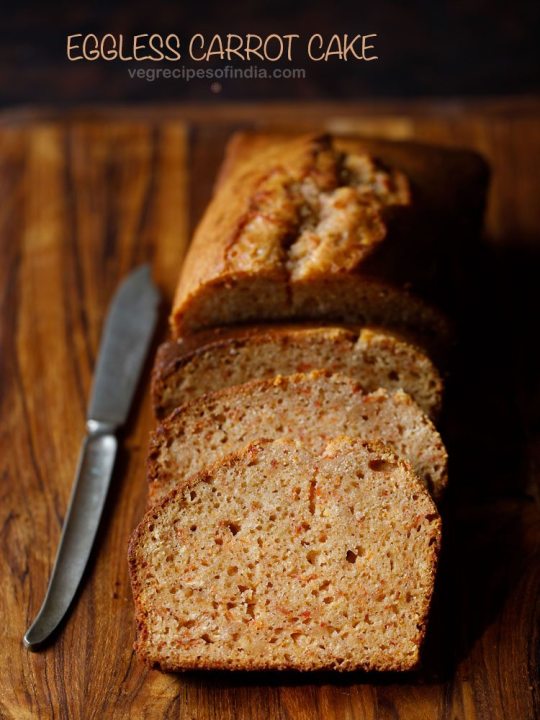
Chocolate Chip Banana Bread
This post may contain affiliate links. For more information, read my disclosure policy.
Chocolate Chip Banana Bread is a delicious breakfast recipe everyone loves!
My mom’s banana bread recipe is filled with chocolate chips for the breakfast your kids will want to eat.
PIN IT NOW TO SAVE FOR LATER
If I had to pick one breakfast indulgence I can’t get enough of, it would be banana bread. I’ve loved this warm and gooey bread since I was a little girl when my mom would make her banana bread on Saturday mornings. We’d all crowd into the kitchen barely waiting for the bread to cool before we attacked it with butter that would melt and drip because the bread was still hot from the oven.
There’s nothing more nostalgic than that, is there? Every fall I start thinking more and more about making banana bread almost weekly. It seems counterintuitive, but I crave a slice of banana bread with a nice hot cup of coffee after I work out. I wish I could indulge that craving more often, but when I do I forget about calories and carbs and I eat a slice of delicious banana bread, even better when it has chocolate chips.
I’ve turned my mom’s banana bread into so many other flavors: triple chocolate banana bread, cinnamon pecan banana bread, even pumpkin spice! It’s so simple to change around your favorite recipe to make a banana bread everyone loves.
The most simple (and best way) to change up my mom’s banana bread? With chocolate chips, of course.
Chocolate Chip Banana Bread is a heavenly quick bread recipe full or banana flavor and rich chocolate chips. Everyone loves chocolate for breakfast!
What is the best banana bread recipe?
Let’s talk a little bit about banana bread science, because my mom’s recipe is really the best one out there.
This chocolate chip banana bread is easy to make and has a wonderful banana flavor. It’s made with 2 bananas and you can use oil or butter. I love making it the way mom did – with lots of butter!
How do you make the best chocolate chip banana bread?
Bananas – the most important part. Use overripe (or “tired”) bananas. They have lots of brown spots.
Fat – butter or oil. I love using unsalted butter, but you can also use equal parts vegetable oil or liquid coconut oil.
Sugar – I use granulated sugar in all my banana bread recipes.
Milk – some banana bread recipes use sour cream but I use sour milk. My mom’s recipe calls for sour milk (aka Buttermilk), and if you don’t have buttermilk, it’s easy to make your own. Just mix 1 teaspoon vinegar or lemon juice into the milk and let it sit for 5 minutes. Voila! Buttermilk!
Baking soda – this recipe uses baking soda instead of baking powder. The acid in the sour milk or buttermilk helps to activate the baking soda causing a nice rise in the loaf.
Chocolate! Use your favorite kind of chocolate chips in this recipe.
How do you make chocolate chip banana bread moist?
Banana bread stays moist mostly because of the bananas. But the sourness from the buttermilk and the fat also helps keep it moist. It will stay that way for a few days, if it lasts that long.
Did you know you can freeze your overripe bananas? I always tend to over buy bananas and they go brown before I eat them. I always freeze them so I can make banana bread whenever I want.
Another thing I love about this chocolate chip banana bread is that you can make it in muffins too. Banana Bread Muffins are some of my favorite things to pack in my daughter’s lunch. With chocolate chips – even better!
You can even take this chocolate chip banana bread recipe and make it healthier – I’ve done that too.
However you make your banana bread, don’t forget chocolate chips. They complete the recipe!
Tips for the perfect banana bread:
I recommend using a 9×5 baking pan for this bread, or muffins. You can also make 3 mini loaves.
You can substitute soy or almond milk in this bread, but add 1 teaspoon of vinegar so the baking soda is activated.
It will brown a lot on the outside while it’s baking. If it’s browning too much, reduce the oven temperature by 25°.
It will form a nice crack on top. Once a toothpick comes out mostly clean right outside the crack, the bread is done.
Let it cool a bit before slicing or the chocolate chips will create holes in the bread.
This also freezes well! Check out my post on how I freeze desserts – and quick breads too!
Want even more? Subscribe to Crazy for Crust to get new recipes and a newsletter delivered to your inbox. And stay in touch on Facebook, Pinterest, Twitter, and Instagram for all my latest updates.
Prep Time 20 minutes
Cook Time 1 hour
Rest Time 20 minutes
Total Time 1 hour 40 minutes
Ingredients
1 cup granulated sugar
1/2 cup unsalted butter, softened
2 overripe bananas
2 large eggs
7 tablespoons sour milk (To make sour milk: add 1 teaspoon vinegar to milk and let sit 5 minutes)
1 teaspoon baking soda
2 cups all-purpose flour
2 cups chocolate chips
Instructions
Preheat oven to 350°. Spray a 9x5 or 8x4 loaf pan with nonstick cooking spray.
Cream butter and sugar in the bowl of an electric mixer (and hand mixer is okay too).
Add the bananas, eggs, sour milk, and baking soda to a blender. Mix until liquefied.
Pour half of the banana mixture into the butter mixture with 1 cup of flour and mix until just combined. Repeat with the rest of the liquid and flour. Do not overmix!
Stir in 1 1/2 cups chocolate chips.
Pour into prepared pan. Sprinkle with remaining chocolate chips. Bake approximately 50-60 minutes or until a toothpick comes out mostly clean (test right next to the crack).
Cool at least 10 minutes in pan.
Notes
This also makes 12 muffins (bake time approximately 15 minutes).
You can substitute equal amount vegetable oil for the butter.
You can substitute equal amount soy or almond milk for the milk, just add 1 teaspoon vinegar to the blender to activate the baking soda.
Don't have a blender? You can make this by hand as well; just mash the banana with a fork.
Nutrition Information:
Yield:
12
Serving Size:
1 slice Amount Per Serving:Calories: 469 Total Fat: 20g Saturated Fat: 12g Trans Fat: 0g Unsaturated Fat: 2g Cholesterol: 52mg Sodium: 123mg Carbohydrates: 67g Fiber: 4g Sugar: 43g Protein: 7g
Triple CHOCOLATE Banana Bread is also a great recipe.
This is a HEALTHIER Banana Bread recipe.
Banana Bread Muffins are another favorite breakfast.
**Did you make this recipe? Don’t forget to give it a star rating below!**

Source: https://www.crazyforcrust.com/chocolate-chip-banana-bread/
0 notes
Text
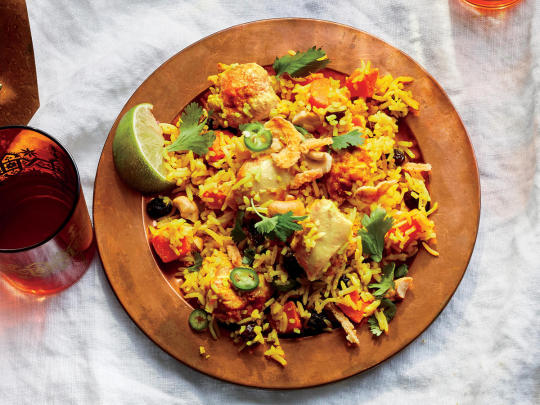
Instant Pot Pozole Verde con Pollo
To a small skillet, set over medium-low heat, add the pumpkin seeds and a pinch of salt. Toast for about 2 minutes, shaking the pan every now and then. When they start to brown, pour them right into the jar of your blender (we’ll be adding more stuff to the blender later!). Cover the blender and pulse until ground, about 30 seconds to a minute. 2. To the Instant Pot, add the chicken, onion, tomatillos, garlic, jalapeño, Mexican oregano, chicken broth and 2 teaspoons of salt. Close the “vent” and set the pressure cooker to high and 15 minutes. 3. When the Instant Pot goes off, do a quick release. I like to cover the valve with a clean kitchen towel and flip it open using a wooden spoon’s handle. When there is no more pressure, remove the lid, opening it away from you. 4. Remove the chicken and place on a cutting board. Place a strainer atop a big bowl, and pour the liquid through. Transfer all of the solids (the pepper, onion, tomatillos, etc.) to the blender, along with a cup of liquid (you can eyeball this measurement). Add the cilantro to the blender. 5. Pour the broth back to the Instant Pot, along with the hominy. Set the machine to the “saute” function and place the timer on 5 minutes. This will cook the hominy a bit while we blend up the green sauce and shred the chicken. 6. Back to the blender, allowing some steam to escape from the blender, process until very smooth, about 2 minutes. 7. Shred the chicken using two forks. By this time, the broth and hominy should be very warm. Add the chicken back to the Instant Pot, along with the remaining blender green sauce. Give it a big stir and adjust the salt to your liking. I added an additional 2 teaspoons. 8. Divide amongst bowls and garnish with crispy chips, slices of avocado, radishes, jalapeño, sliced cabbage and/or diced onion.

Source: https://www.acozykitchen.com/instant-pot-pozole-verde-con-pollo/
0 notes
Text
Homemade Snack Bars (Dairy-Free + More About Food Sensitivities)
My husband and I recently both did a food sensitivity test through our new sponsor, Everlywell. You do a simple finger prick to find out what foods may be causing you unwanted symptoms. (See some of our results here.) One food that caught my eye was some dairy on my husband’s results. He has issues with eczema, and I’ve read many times how dairy can be a trigger.
So, today I’m sharing a new snack bar recipe that’s dairy-free, for anyone else who may want or need to avoid dairy in their life. I know there are lots of you out there!
– First though, a little more about food sensitivities in general (including an awesome deal down below!)…
How to Identify Food Sensitivities
Figuring out a food sensitivity that’s causing you unwanted symptoms can dramatically change your life. Until not long ago, it was either too difficult or too expensive to easily get answers. But, our partner EverlyWell now makes it simple to figure out which foods may be causing issues with their at-home kit. Using their results to create a specific game plan (i.e. which foods to eliminate) can be much easier than following a full elimination diet!
If you or someone you know has ever suffered from symptoms that could possibly be related to food sensitivities such as migraines, bloating, indigestion, eczema, acne, fatigue, or joint pain, this test could provide some helpful answers. What a great gift idea for anyone in your life who is suffering!
How EverlyWell Works
The process is very simple…
Order the Food Sensitivity test online (see below for additional tests offered).
Do a tiny prick test when the kit arrives (instructions are simple and included).
Mail it back, and 96 different foods are tested, including gluten and dairy.
Get your online results within 5 business days.
Print your results to share with your doctor, if desired.
You can read more about our personal experience with EverlyWell here, and if you would like to try it for yourself (or get it for a loved one!), we have a deal for you!
Special Deal
—> 15% Off All EverlyWell Tests! <—
Use our code “100DAYS“
Homemade Snack Bars (Dairy-Free)
Now, back to that recipe! This is a homemade version of the bars that are gaining popularity with an egg white for binding. We made them an almond and apricot flavor. These are officially my oat-loving 8th grader’s new obsession!
Homemade Snack Bars (Dairy-Free)
Print
Instructions
Preheat oven to 350 degrees F. Line a square (8X8 or 9X9) baking dish with parchment paper.
Combine the oats, almonds, and dried apricots in a large bowl.
In a small pot over medium-low heat, mix together the peanut butter, honey, coconut oil, vanilla, and salt until smooth.
Pour the peanut butter mixture over the oat mixture and stir to combine. Mix in the egg white.
Press the mixture very firmly into the prepared baking dish. If it's not packed tightly the bars will crumble! Bake until it begins to turn golden brown around the edges, 20 to 25 minutes.
Cool on a wire rack, then lift out of the baking dish with the parchment paper. Cool completely (to avoid crumbling) before cutting into squares. Store at room temp.
Posts may contain affiliate links. If you purchase a product through an affiliate link, your cost will be the same but 100 Days of Real Food will automatically receive a small commission. Your support is greatly appreciated and helps us spread our message!
Source: https://www.100daysofrealfood.com/dairy-free-snack-bars-food-sensitivities/
0 notes
Text
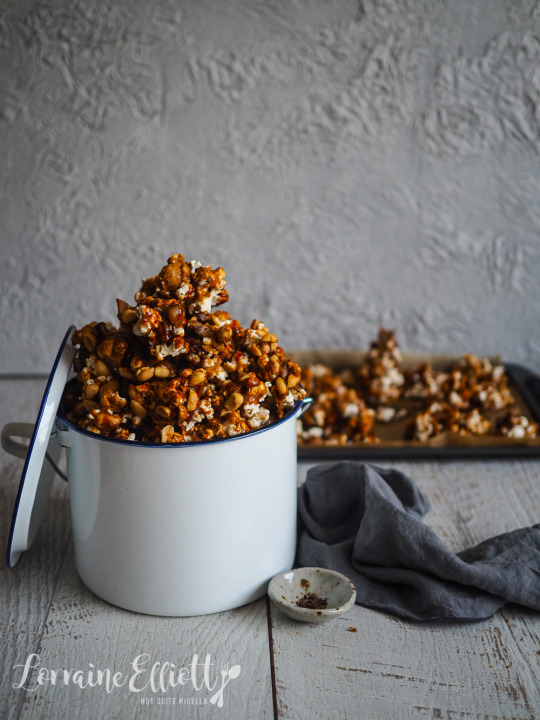
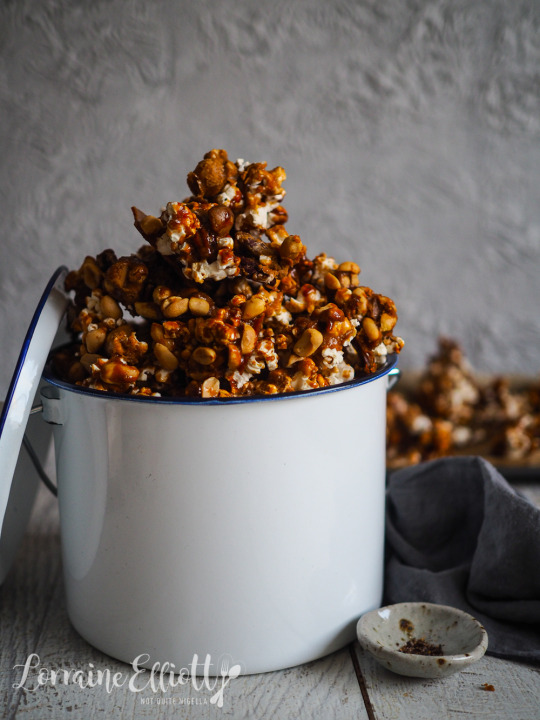
"Hot Mess" Chilli Caramel Nutty Popcorn
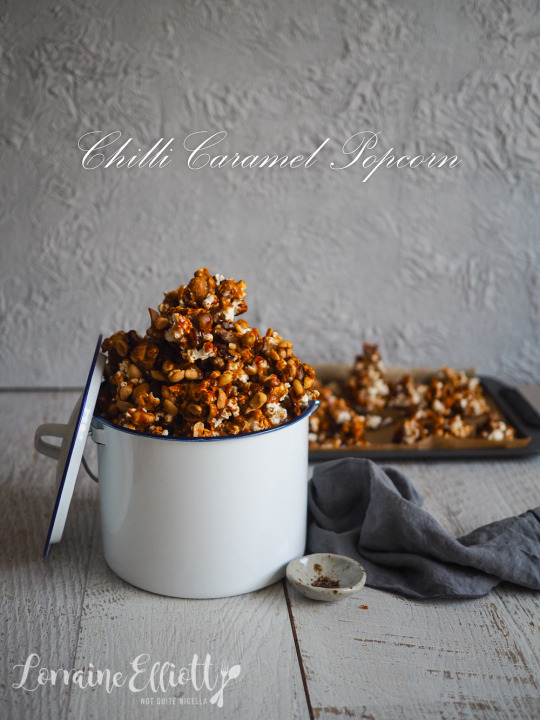
Now that the weather is cooling off and snuggling inside seems like the best option, may I offer you this delightful tv snack? This popcorn (and you know popcorn is my passion), is generously coated in chilli dusted caramel with an almost indecent amount of toasted nuts in it! It may just distract you from the action on the tv...
I made this popcorn for a tv viewing night with my friend Laura. We were both addicted to the reality tv show Married At First Sight which is true car crash tv. And before you judge me many, many people were taken in by it (including visiting American writer Roxane Gay!). Even the mother of the baby at the christening Laura was at wanted to rush off to watch it.
Over the last few months while we were watching it Laura and I would text each other. We both had our favourites and least favourites and for the most part they were the same people. We'd find each other outraged at the same things and sometimes our messages would mirror each others, sent within seconds of each other.
When the finale rolled around, we decided that we needed to watch it together. We had MAFS themed food (pizza for pizza toast, Nutella from a jar and cupcakes) but I also made this popcorn for viewing purposes. We also decided that we should order some regular food as well as having pizza because whenever we get together, the food that results is a little crazy. Laura ordered some fried chicken and I ordered a poke bowl because that was what we felt like eating. We were both wearing pyjamas and all of our deliveries arrived within minutes of each other. We lay all our food out on Laura's coffee table.
We picked at everything-there was some poke for healthy food, then we nibbled on fried chicken and dipped it in the sauces. Then it was a bite of pizza and then popcorn and so it went. We ended up lying back on the couch upside down yelling at the tv as we were watching it.
"This food is like a car crash, like the show really," quipped Laura. "This popcorn is delicious and full of cheap nuts as let’s face it there wasn’t many expensive ones, if any, on this show! It’s very hard to find a macadamia in that bunch!" she said and we both agreed that this popcorn would be called a "hot mess" just like the show!
So tell me Dear Reader, do you make specific tv watching snacks? Did you watch MAFS and if so who were your favourites and least favourites?
An Original Recipe by Lorraine Elliott
Preparation time: 15 minutes
Cooking time: 1 hour 10 minutes
1/4 cup popping corn
1 cup brown sugar
60g/2ozs. butter
1/4 cup maple syrup
1/4 teaspoon salt
1/4 teaspoon bicarb
2 cups mixed nuts, toasted (pecans, macadamias and peanuts)
Cayenne pepper to taste
Step 1 - Place the popping corn in a paper bag and fold over 3-4 times. Pop on high for 2 minutes. Discard the unpopped kernels. Preheat oven to 120C/240F and line 2 trays with parchment.
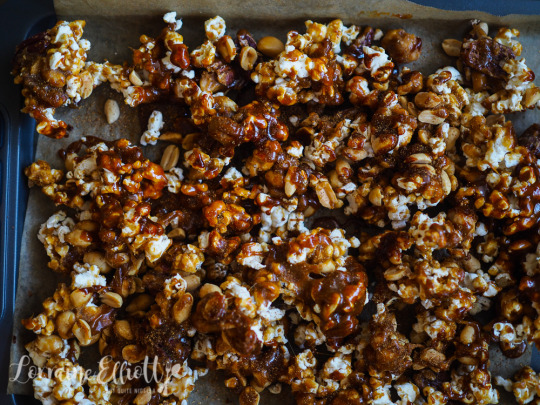
Step 2 - Heat the sugar, butter and maple syrup in a saucepan and allow the butter to melt. Then increase heat and allow the mixture to reach 140C/284F. Add the salt and bicarb and stir and then mix with the popcorn and nuts coating them well with the caramel. Season with cayenne pepper to taste.
Step 3 - Using tongs or two spatulas (the caramel is hot so don't touch it with your bare hands), spread out onto the prepared trays and bake for 1 hour. Break up into smaller pieces and store in an airtight container.

Source: https://www.notquitenigella.com/2019/04/14/chilli-caramel-popcorn/
0 notes
Text
I Stopped Saying Sorry for One Week—& Honestly, It Felt Great
In C'mon, It's Just 7 Days, members of the Food52 team share what it was like to take on a personal challenge for one week: skipping caffeine, going plastic-free, and more. (Spoiler alert: We all survived.)
For as long as I can remember, “I’m sorry,” has slipped from my lips as easily as my name. Examples of things I regularly apologize for include: sitting down, standing up, talking too much, not talking enough, trying too hard, not giving my all, failing to ask questions, asking too many questions, and, of course, apologizing for over-apologizing.
But, after a coworker pointed out that I said I was sorry after doing him a favor a couple of weeks ago, I began to reassess.
Because, the thing is, I’m not necessarily saying it because I actually have anything to be sorry about. It’s almost always a mindless reaction—a way to dissolve tension, or to appeal to somebody else’s feelings, or to protect myself from what my anxious brain fears are mistakes I’ve made. And who knows exactly how, over the last few decades, I developed this habit. It could’ve been as a coping mechanism for my over-thinking, a means of feeling like I’m in control, or the subtle conditioning of society (or a very effective VeggieTales episode). What I do know is that I needed a change.
So, when my co-workers challenged me to try something new for our C'mon, It's Just 7 Days series, it seemed fated that I should try giving up apologizing for one week. My rules would be simple: for seven days, I’d do my best not to utter the words “I’m sorry,” or similar iterations (apologies, forgive me, my bad, etc.), no matter the person or situation. Even if I really was sorry, by stripping the words from my vocabulary, I hoped to recondition myself to be more mindful of when I actually wanted to apologize.
Well, let’s just say I got a healthy dose of that mindfulness I was after—and then some. Here are my four main takeaways from the week:
1. Think before I speak.
On the first day of my challenge, while I was volunteering at a local school, a first-grade disaster struck. A little boy accidentally pinched his classmate’s finger with his toy police car, resulting in buckets of tears on both sides. As I walked the pinch-victim to the water fountain to catch her breath, I found myself fighting back an apology. The tears sliding down her little face broke my heart, and I struggled to find a way to make her forget the hurt.
When we harm someone or make a mistake, it’s logical to apologize. But what about the moments where we witness a wrong or a person opens up about their pain? Saying sorry often feels like an answer.
Slowing down and distinguishing how I truly felt presented a slew of learning moments throughout my week. Often, I turned to a quote from Dr. Brené Brown, a research professor and best-selling author of Rising Strong, who has spent the past decade studying vulnerability, courage, worthiness, and shame.
“One of the things we do sometimes in the face of very difficult conversations is we try to make things better,” she says. “If I share something with you that’s very difficult, I’d rather you say, ‘I don’t even know what to say right now. I’m just so glad you told me.’”
This experiment made me think about the emotion I was actually experiencing in any given moment where I wanted to reflexively apologize. Was it sympathy? Empathy? Guilt? There’s no clear cut answer for how I should respond in any of those instances, but I realized that just because I feel bad about something doesn’t mean I need to apologize for it. But it also doesn’t mean I can’t help. (Or, that I can’t apologize for it, if I’ve given it some thought and that’s what I truly want to express.) What’s most important is to be mindful.
And on that Saturday morning, giving that little girl the space to be sad in a dingy hallway, being there to wipe away her tears, was the right thing. No sorrys needed.
2. It’s not just me—others apologize all the time.
As the week progressed, I realized I wasn’t the only one who chronically apologized. Everywhere I turned, I overheard someone saying sorry—to grab a person’s attention, to introduce a new topic in a conversation, to reach around a coworker for a spoon. Rather than getting directly to the point, people buffered ideas and requests and even their presences with an, “I’m sorry…”.
Like me (prior to this week), they seemed to be apologizing for things that were clearly not their fault, or so small it hardly seemed worthy of a sorry. Rather than sincere communication, their apologies felt like mindless crutches to avoid conflict.
By not responding in-kind (I found myself instead saying, “No sorrys needed! You’re fine!”), I was pushing back against superfluous apologies. Don’t get me wrong, apologies are important, but really only when they’re necessary. It’s empowering to mean what you say, to connect with genuine conversation. And as my experiment progressed, it wasn’t enough for me to stop apologizing; I wanted others to fight against too many sorrys, too.
3. Take the opportunity to say thank you.
Confession: not apologizing didn’t take away my guilt. I still felt bad when I made a mistake (whether real or perceived), and struggled with what to do with the emotion. After discussing it with my boyfriend, he suggested that I look at those moments as opportunities to say, “thank you.”
“Sorry I’m late,” became, “Thank you for waiting for me.”
“I’m sorry I didn’t respond earlier,” turned into “Thank you for reminding me about this.”
“Sorry I’ve complained for an hour about my week of not apologizing,” was now, “Thank you for understanding me and helping think of alternative ways to express my emotions.”
It’s really that simple. (Also, let’s be real—it feels a lot better to thank someone than to constantly cry mea culpa.)
4. It’s ok to forgive myself.
The irony of not apologizing for a week was that I messed up. A lot. Without thinking, I’d start to apologize for all sorts of things—bumping into someone, slurping, forgetting to respond to a text, grabbing the last cookie. I’d cover my mouth almost as soon as the words came out, turning the moment into an awkward, “Sorry, not sorry!” situation. I got a lot of strange looks for seven whole days.
As the challenge went on, I had to remind myself that it was ok to slip up. For 26 years, I had over-apologized for everything under the sun, and it was understandable that I’d fall back into well-worn patterns. I needed time to unlearn, and patience when I stumbled.
Forgiving myself didn’t come easily. It still doesn’t.
Now, weeks later, I still get frustrated when I catch myself thoughtlessly apologizing. But I want to get better, and I feel like I’ve armed myself with useful strategies to make that happen. Being kind to myself—allowing for and accepting my mistakes—seems like the first step in overcoming this sorry problem.
Do you ever find yourself over-apologizing? Let me know in the comments!
Source: https://food52.com/blog/23636-how-to-stop-saying-sorry-over-apologizing-for-everything
0 notes
Text
Low-Carb Arugula Salad with Artichokes, Peppers, and Goat Cheese
posted by Kalyn Denny on May 29, 2019
Low-Carb Arugula Salad with Artichokes, Peppers, and Goat Cheese is a perfect low-carb salad with interesting ingredients! I love arugula, and this salad has flavors I’d never get tired of! Use Salad Recipes to find more salads like this one.
Click to PIN Low-Carb Arugula Salad with Artichokes, Peppers, and Goat Cheese!
This Low-Carb Arugula Salad with Artichokes, Peppers, and Goat Cheese is a salad combination that I absolutely love. And we’re entering into the time of year when nothing seems better than a big salad for lunch or something cooked on the grill with a tasty side salad for dinner, and I couldn’t be happier about that! I love salads of every kind, something that’s probably obvious if you’ve followed my blog for a while.
And long-time readers might also have noticed my fondness for the peppery green called Arugula. I know some people aren’t really arugula fans, but I love the sharp spicy flavor and those little 5 oz. containers of arugula find their way into my grocery cart quite regularly. I’ve been making fun salad combinations with arugula since the very earliest days of my blog, and this salad with arugula, artichokes hearts, sweet mini peppers, and goat cheese was a recipe I first made in 2007!
The original version had photos that probably wouldn’t have enticed you try it even if you liked the ingredients, so today I’m so happy to be updating the photos for this salad. I might be pushing my luck a bit with a salad that has four distinctive ingredients like this, but I love every one of them! And if you like these ingredients I hope you’ll try this interesting arugula salad. Be generous with the goat cheese like we were when we took these new photos, and I bet you’ll love it!
Some Information About Arugula:
Many cuisines use the peppery greens called arugula, but did you know that it’s also called rocket, garden rocket, rocket salad, rugola, rucola and roquette? Arugula is easy to grow, and will self seed for years. It’s slightly peppery flavor combines well with things that are more smooth in flavor, like the goat cheese in this recipe. Arugula is most often used in salad, but it’s also often combined with pasta, used on pizza, or used to make pesto. Arugula is low in calories and one cup of arugula only has 1 carb! And it’s also high in vitamins A and C.
Steps for Making Low-Carb Arugula Salad with Artichokes, Peppers, and Goat Cheese:
Here is a summary of the steps for making this low-carb arugula salad; see the complete recipe below. Drain artichoke hearts in a colander placed in the sink. Then cut up artichokes and slice the mini-peppers into rings. Measure out the desired amount of goat cheese and crumble.
Whisk together ingredients to make the lemony dressing. If you use arugula in a plastic container it probably doesn’t need to be washed, but you can crisp the arugula in a salad spinner in very cold water if needed. Put arugula into a bowl big enough to hold the entire salad.
Add the artichoke hearts and peppers to the arugula and toss with desired amount of dressing. Then add the goat cheese and gently toss. (Save some peppers, artichokes and goat cheese to garnish the finished salad.)
Serve the salad right away and enjoy! If this makes more than you’ll eat at one time I would only toss the dressing with as much salad as you’ll be eating. Store the dressing and ingredients separately in the fridge to enjoy the leftovers another time.
Make it a Low-Carb Meal:
Low-Carb Arugula Salad with Artichokes, Peppers, and Goat Cheese would taste great with Grilled Chicken Breasts or Grilled Lamb Chops for a low-carb meal!
More Salads for Arugula Fans:
Arugula Salad with Feta and Fresh Tomato-Balsamic Vinaigrette ~ Kalyn’s Kitchen Super Fresh Zucchini and Arugula Salad ~ Fifteen Spatulas Kalyn’s Favorite Baby Arugula Salad with Lemon, Balsamic, Parmesan, and Pine Nuts ~ Kalyn’s Kitchen
Low-Carb Arugula Salad with Artichokes, Peppers, and Goat Cheese
Yield: 4 servings
Total Time: 20 minutes
Prep Time: 20 minutes
I’m crazy about this Low-Carb Arugula Salad with Artichokes, Peppers, and Goat Cheese, and this salad has flavors I’d never get tired of!
Ingredients:
Salad Ingredients:
small jar artichoke hearts (We used a 9.9 oz. jar. The artichoke hearts can be marinated or not, your choice.)
6 sweet mini peppers
4 oz. goat cheese (Use the goat cheese that comes in a log.)
5 oz. package baby arugula
Dressing Ingredients:
1 T fresh-squeezed lemon juice (see notes)
1 1/2 T white balsamic vinegar (or other mild white vinegar will work, but white balsamic vinegar has great flavor in this)
3 T extra-virgin olive oil
1 tsp. Dijon mustard
salt and fresh-ground black pepper to taste
Directions:
Drain the artichoke hearts into a colander placed in the sink and let them drain well. When they are well-drained, but up artichokes into halves or fourths, depending on how big they are.
Cut stems off the sweet mini-peppers and cut out the seeds with a small knife; then slice the mini-peppers into rings.
Measure out the desired amount of goat cheese and crumble the goat cheese. (Do this right when you take it out of the fridge for best results.)
Whisk together lemon juice, white balsamic vinegar, olive oil, Dijon, salt, and pepper to make the dressing.
If you use arugula that comes in a plastic container it probably doesn’t need to be washed, but you can wash it in a salad spinner if needed. If arugula seems even the slightest bit wilted, crisp the arugula in the salad spinner in very cold water. Spin dry.
When you start making the salad, save some peppers, artichokes and goat cheese to garnish the finished salad.
Put arugula into a bowl big enough to hold the entire salad. Add artichoke hearts and peppers to the arugula and toss with desired amount of dressing.
Then add the goat cheese and gently toss with the other ingredients.
Put salad into a serving bowl (or on individual plates if you prefer) and garnish with the reserved artichoke hearts, sliced mini-peppers, and goat cheese.
Serve salad right away.
If you’re not eating the salad all at once, I would only toss the dressing with as much salad as you’ll be eating. Store the dressing and ingredients separately in the fridge to enjoy the leftovers another time.
Low-Carb Diet / Low-Glycemic Diet / South Beach Diet Suggestions: This Low-Carb Arugula Salad with Artichokes, Peppers, and Goat Cheese is a perfect salad for any phase of the South Beach Diet or other low-carb diet plans. Goat cheese is a “limited” food for the South Beach Diet, so be sure your serving is one ounce or less if you’re following that plan.
Find More Recipes Like This One: Use the Recipes by Diet Type photo index pages to find more recipes suitable for a specific eating plan. You might also like to Follow Kalyn’s Kitchen on Pinterest to see all the good recipes I’m sharing there.
Nutritional Information? If you want nutritional information for a recipe, I recommend entering the recipe into this nutrition analyzer, which will calculate it for you. Or if you’re a member of Yummly, you can use the Yum button on my site to save the recipe and see the nutritional information there.
posted by Kalyn Denny on May 29, 2019
Don’t Miss a Recipe!
subscribe to receive new recipes via email:
We are a participant in the Amazon Services LLC Associates Program, an affiliate advertising program designed to provide a means for us to earn fees by linking to Amazon.com and affiliated sites.
Source: https://kalynskitchen.com/easy-south-beach-recipes-arugula-salad/
0 notes
Text
creamy rigatoni with sausage + fennel
This pasta. This is last-meal kind of pasta. This is the kind of pasta you eat when you don’t just want any old variety of carbs and cheese — you want grown-up, legit, every-bite-is-a-flavor-explosion kind of pasta. This is it.
I happened upon this recipe for creamy rigatoni with sausage and fennel (oooo, even sounds fancy) about a month or so ago when I was tired of our run-of-the-mill spaghetti night. Don’t get me wrong — homegirl loves her classic old school marinara sauce and long noodles that wrap around a fork combo, with an extra sprinkling or five of grated Parmesan. I’m not above it. But sometimes it just doesn’t hit the pasta spot.
This pasta? With its creamy tomato sauce that hugs every bite of al dente rigatoni paired with sweet Italian sausage and hints of crunchy veg all topped with a waterfall of fresh-grated salty Parmesan cheese and fresh parsley? THIS pasta hits every spot, and then some.
The first time I made this pasta, I made it just for me and my husband, and there were no leftovers. The second time I made this pasta, I made it for my dinner club, and we finished the meal eating the pasta remnants straight out of the serving bowl with a fork — no leftovers. The third time I made this pasta, I had a small bowl of it for lunch and left the rest of it for my husband for dinner as I was going out with friends that night, and when I came home? No leftovers. So, there are two points to glean from this: One, that if you intend to have leftovers of this pasta, you’d better make a double batch. And two, that my husband is a liar when he says he wants his last meal to be McDonald’s sausage burritos and frozen pizzas — it’s clear that this pasta is what he’d really want.
A few notes to mention about this dish: One, it’s a recipe adapted from queen Ina Garten, so you know it’s good. Two, the recipe calls for fresh fennel bulb but every single time I’ve made it, I swapped the fennel for celery (because that’s all that was available at my grocery store and I was too lazy to go fennel hunting around town) and have never felt it lacking in anything, as the celery delivers the same level of crunch and spring-like taste, leaving the fennel seeds and Italian sausage to bring in the truer fennel-y flavors. Three, you can make it ahead of time! Just put it in an oven-safe dish, sprinkle the top with Parmesan cheese, cover and refrigerate for up to a day/overnight. Uncover and heat in the oven at 375 degrees F for 20 minutes or so, and dinner is served.
Four, don’t feel bad about eating this straight out of the serving bowl with a fork, as you won’t have been the first. And likely not the last. No need to waste your time transferring food to your plate when the pasta — THIS pasta — is this good.
Creamy Rigatoni with Sausage and Fennel
Prep time: 40 mins
Cook time: 1 hour
Total time: 1 hour 40 mins
Yields: 6 servings
3 tablespoons olive oil
3 cups chopped fresh fennel or celery
1 large yellow onion, chopped (about 1½ cups)
1 lb bulk mild Italian sausage
2 teaspoons minced garlic
1 teaspoon whole fennel seeds, crushed or chopped
½ teaspoon crushed red pepper flakes
Salt and pepper, to taste
1 cup dry white wine
1 cup heavy cream
⅔ cup half-and-half
2 tablespoons tomato paste
1 lb rigatoni pasta
½ cup chopped fresh parsley, divided
1 cup fresh-grated Parmesan cheese, divided
In large Dutch oven or other heavy-bottomed pot over medium heat, heat oil. Add fennel and onion and cook, stirring often, 7 to 9 minutes until soft. Add sausage; cook 7 to 9 minutes, crumbling as you cook, until sausage is cooked through and browned. Add garlic, crushed fennel seeds, red pepper flakes, 2 teaspoons salt and 1 teaspoon black pepper. Cook for 1 minute, then pour in white wine. Bring to boil. Add heavy cream, half-and-half and tomato paste. Return to boil, then reduce heat and simmer 20 minutes, stirring occasionally, until sauce thickens.
Meanwhile, bring large pot of water to boil. Add 2 tablespoons salt to boiling water, then add rigatoni pasta. Cook according to package directions. Drain and add to sauce; stir to coat pasta.
Off heat, stir in ¼ cup parsley and ½ cup Parmesan cheese. Serve topped with remaining parsley and Parmesan cheese.
3.2.2802
Source: http://www.girlversusdough.com/2018/03/19/creamy-rigatoni-with-sausage-fennel/

0 notes
Text
Best Ever Copycat Red Robin Pickle Nickels AKA Fried Pickles
Red Robin Pickle Nickels are fried pickles that you simply must try. Red Robin’s version of fried pickles goes oh so well with the Red Robin Campfire Sauce.
If you are lucky you live near a Red Robin, home of the bottomless french fries! If not, you may need to take a journey to this amazing burger place. Red Robin makes lots of creative and fun food. This place is fun and festive and it has something for the whole family.
Who started making fried pickles first?
It is believed that fried pickles originated in the South. In the South fried foods were very common because fried foods cook quickly, and there is no need to heat up ovens, or spending a lot of time at a hot stove cooking. Until the widespread use of air conditioning, many people in the South looked for quick cooking methods like deep frying to quickly cook their food. The first recorded recipe for fried pickles was in 1960, and it was for sweet pickles fried in pancake batter. This recipe was found in the Oakland Tribune. A few years later, fried pickles showed up in Atkins, Arkansas at the Duchess Drive-Inn. Ever since then, the recipe has continued to evolve and now fried pickles are served at many different restaurants.
What Makes the Fried Pickles at Red Robin so special?
Many places use just seasoned flour or cracker meal for their recipe. If you have never tried these fried pickles before, you will notice that they use cornmeal as part of the breading. The cornmeal really changes the texture and keeps fried pickles from becoming soggy like some can.
Love Red Robin? Check out more of these great flavors
Red Robin Campfire Sauce Red Robin Screaming Zombie Drink Red Robin Freckled Lemonade
Red Robin Pickle Nickels
Love Red Robin Pickle Nickels? Make your own copycat Red Robin Pickle Nickels at home with this copycat recipe.
Ingredients
16 ounces dill pickles
1 cup flour
1/2 teaspoon salt
1/2 teaspoon ground black pepper
1 cup buttermilk
1 package Lousianna Fish Fry 8 ounces
Vegetable oil for frying
Instructions
Set up a breading station. To the first container, add the flour, salt, and pepper. Stir to combine all ingredients together. In the second container, add the buttermilk. In the third container add the fish fry mix.
Preheat oil to 350 degrees. You will need to add enough oil to cover the bottom of the pot or cooking vessel to a depth of 3 inches.
First bread the drained pickle chips with flour, then, shake off excess flour and lay on a wire rack. Then dip the pickles in buttermilk, and finally dip them into the fish fry mix. After they have been coated with the fish fry mix, shake off the excess fish fry mix, place them on a wire rack for 2 minutes before cooking. This will help keep the coating on the pickle.
Cook for about 1 to 1 ½ minutes in the hot oil. Remove when they start to turn a darker color. Drain on a wire rack.
Nutrition Facts
Red Robin Pickle Nickels
Amount Per Serving
Calories 630 Calories from Fat 297
% Daily Value*
Total Fat 33g 51%
Saturated Fat 3g 15%
Cholesterol 6mg 2%
Sodium 1348mg 56%
Potassium 401mg 11%
Total Carbohydrates 71g 24%
Dietary Fiber 7g 28%
Sugars 5g
Protein 11g 22%
Vitamin A 6.1%
Vitamin C 1.1%
Calcium 12.5%
Iron 19.8%
* Percent Daily Values are based on a 2000 calorie diet.
Source: https://copykat.com/red-robin-pickle-nickels/
0 notes
Text
Honey Garlic Chicken
Honey Garlic Chicken is an epic 12 minute dinner with a 5 INGREDIENT SAUCE made using pantry staples. Juicy seared chicken breast smothered in the most incredible Honey Garlic Sauce, this is a brilliant back pocket recipe for busy nights!
Originally published February 2018, post tidied up 8 September 2018 but no change to recipe (I wouldn’t dare, readers love it as it is!).
Another addition to my 15 Minute Meals collection! This Honey Garlic Chicken is long overdue. The Sauce in this is a variation of my Honey Garlic Salmon which I first shared way back when I started this website.
If I were ever to do a summary of my top 5 Most Used Sauces, Honey Garlic Sauce would probably be right at the top of the list. I love it because it requires so few ingredients that are pantry staples, and when simmered with a seared protein in a skillet so it becomes all bubbly and syrupy…. oh WOW.
It’s just DA BOMB!!! ( <– Who talks like that at my age???! I do. Only in extenuating circumstances. Excitement over crazy delicious secret-weapon sauce falls under this category.😎)
HOW TO MAKE HONEY GARLIC CHICKEN
Sprinkle chicken with salt and pepper, dust with flour (makes sauce cling to it better!)
Sear chicken, add butter, garlic, vinegar, soy sauce, honey.
Simmer until the sauce thickens. Turn chicken to coat in the amazing honey garlic sauce. And THAT’S IT!
It really is that crazy simple.
The chicken in this recipe is dusted with flour before searing, and while it is an optional step, I really do encourage you to do this. The flour creates a crust that the sauce can cling to, so the chicken is smothered with the sauce. If you just sear plain chicken, the sauce just sort of slips off – which is fine, you can scoop it up with each bite. But it’s even better when the sauce is clinging to the chicken!
There’s enough Honey Garlic Sauce to squidge your veggies into as well as drizzling over your rice or mopping up with a bread roll. Hope you enjoy! – Nagi x
WATCH HOW TO MAKE IT
Honey Garlic Chicken Breast
Recipe video above. An incredible quick and easy way to serve up chicken breast - seared then simmered in the most amazing honey garlic sauce. Don't be deceived by the short ingredient list! It's absolutely worth the extra step of dusting the chicken with flour because it creates a crust for the sauce to cling to.
Course: Mains
Cuisine: Western
Keyword: Honey Garlic Chicken
Servings: 4
Calories: 377 kcal
Author: Nagi
Ingredients
500 g / 1 lb chicken breast , boneless and skinless (2 pieces)
Salt and pepper
1/4 cup / 60g flour (Note 1)
50 g / 3.5 tbsp unsalted butter (or 2 1/2 tbsp olive oil)
2 garlic cloves , minced
1 1/2 tbsp cider vinegar (or white or other clear vinegar)
1 tbsp light soy sauce (or all purpose, Note 2)
1/3 cup / 90g honey (or maple syrup)
Instructions
Cut the breasts in half horizontally to create 4 steaks in total. Sprinkle each side with salt and pepper.
Place flour in a shallow dish. Coat chicken in flour and shake off excess.
Melt most of the butter in a large skillet over high heat - hold back about 1 tsp for later.
Place chicken in skillet and cook for 2 - 3 minutes until golden.
Turn and cook the other side for 1 minute.
Turn heat down slightly to medium high.
Make a bit of room in the pan and add garlic and top with remaining dab of butter. Stir garlic briefly once butter melts.
Add vinegar, soy sauce and honey. Stir / shake pan to combine. Bring sauce to simmer, then simmer for 1 minute or until slightly thickened.
Turn chicken to coat in sauce. If the sauce gets too thick, add a touch of water and stir.
Remove from stove immediately. Place chicken on plates and drizzle over remaining sauce.
Notes
1. Make this gluten free by using cornflour / cornstarch instead. It won't brown quite as evenly but once covered in sauce, you won't know the difference.
2. Light or all purpose soy sauce is suitable for this recipe. I don't recommend using Dark Soy Sauce (flavour will dominate).
3. Nutrition per serving, assuming you scrape every drop of Sauce from the pan, and why wouldn't you? 🙂
LIFE OF DOZER
The fish down at the beach taunt Dozer endlessly, splashing around and leaping out of the water. Sometimes he’ll be in the water swimming non stop chasing fish for an hour! It’s brilliant – no effort required on my part. 😎
Related
Source: https://www.recipetineats.com/honey-garlic-chicken/
0 notes
Text
Here are 9 Air Fryer Recipes You Need to Try Now
If the idea of crisp, perfectly cooked food without the fat that comes from frying sounds too good to be true, then you must be unfamiliar with air fryers. These nifty kitchen tools have gained immense popularity in recent years since air fryer recipes yield crunchy, evenly browned veggies, meat, tofu, and more without the oil. Air fryers work a lot like convection ovens, which circulate hot air around the food to cook it quickly and perfectly every time. That’s a pretty hard concept to resist.
Whether you got an air fryer over the holidays and can’t wait to get started, or are wondering how to justify yet another kitchen gadget, here are nine of our best air fryer recipes to get you started.
Air-Fried Seasoned French Fries
Of course the first thing we wanted to test out in an air fryer was french fries! Check out our tips for using an air fryer, then get the easy recipe for these seasoned fries that use just 1 tablespoon of oil and two potatoes. You may never go back to deep fried fries again.
Air-Fried Asian Meatball Hoagies
Of course, the air fryer is good for way more than French fries. Here, meatballs are flavored with garlic, ginger, sesame oil, and soy sauce and air fried to crisp perfection before landing on a banh mi-inspired sandwich. They’re also great served on their own over rice.
Air-Fried Sriracha Honey Wings
Wings have never tasted so good! Spicy, sweet, and satisfyingly crunchy without the fat of deep-frying, these air-fried wings are a winner for game day – or any day.
Air-Fried Samosas with Cilantro Sauce
Frozen puff pastry makes these tasty Indian morsels a breeze to make, while air frying crisps them up and gives them that appetizing golden hue. Filled with curried potatoes and peas and served with a flavorful cilantro sauce, this is one of those air fryer recipes that you’ll surely pull out time and time again.
Air-Fried Beet Chips
For a next-level, guilt-free snack, try turning your veggies into chips! Candy cane beets make for a pretty presentation but any kind will work in this air fryer recipe that produces crunchy, craveable, dippable chips you’ll just love.
Air-Fried Shrimp with Lemon and Chile
Even if you don’t typically deep fry shrimp, don’t miss out on air-frying those crustaceans. Air frying keeps them juicy and tender while producing a crisp exterior – in other words, perfection. Even the sliced lemon is fried here, adding crunchy and pleasant flavor to this elegant dish.
Air-Fried Zucchini Fries
Potatoes aren’t the only veggie that make great fries! Press sliced zucchini into panko crumbs then throw them in the air fryer for a delicious, healthy side even the kids will love.
Air-Fried Jalapeño Poppers
When you’re craving bar food without the calories, break out the air fryer and make these healthy(ish) jalapeno poppers stuffed with corn, bacon, and cheese! As a bonus, you can prep these delicious morsels in advance and cook them up right before serving for an easy entertaining option.
Air-Fried Tonkatsu with Ginger Cabbage Slaw
Here tonkatsu – Japanese breaded pork cutlets – get a healthy makeover with the help of the air fryer. And they couldn’t be simpler to make – simply bread thin boneless pork cutlets in panko and toss in the air fryer. It takes less than 15 minutes to cook, and is sure to be a hit with the whole family.
For perfectly cooked air fryer food, check out our tips for using an air fryer.
Source: https://blog.williams-sonoma.com/best-air-fryer-recipes/
0 notes
Text
Turkey and Sharp Cheddar Bagel Sandwich with Arugula, Spinach, and Tomatoes
I don’t know about you but my kids are starving after school and I don’t want them filling up on junk food so these sandwiches are a great option. I like making these turkey & sharp cheddar sandwiches on mini bagels for a quick and easy after school snack or a tasty weekday lunch for myself and it’s a nice way to sneak in some extra veggies.
Slice the bagel in half then slather one half with mayonnaise and the other half with mustard of choice. Layer the bottom half with the turkey, cheddar, and tomato slice. Season with freshly cracked black pepper then top with pickle, arugula, spinach and bagel top. Slice and serve immediately. Enjoy.
Turkey and Sharp Cheddar Bagel Sandwich with Arugula, Spinach, and Tomatoes
Author: Pam - For the Love of Cooking
Recipe type: Sandwich
Serves: 1
Ingredients
1 mini bagel, sliced in half
Mayonnaise, to taste
Mustard of choice, to taste
Sliced turkey
Sharp cheddar, sliced
Tomato, sliced
Freshly cracked black pepper, to taste
Dill pickle slice, halved
Handful of arugula & spinach
Instructions
Slice the bagel in half then slather one half with mayonnaise and the other half with mustard of choice.
Layer the bottom half with the turkey, sharp cheddar, and tomato slice.
Season with freshly cracked black pepper then top with pickle, arugula, spinach and bagel top.
Slice and serve immediately. Enjoy.
3.5.3226

Source: https://www.fortheloveofcooking.net/2018/08/turkey-and-sharp-cheddar-sandwich-with-arugula-spinach-and-tomatoes.html
0 notes