
Last Seen Blogs

maloneysawyer70
The Life of Hede 371

4lessiasblog
ǝlɐ

dbrxs46584-blog
犀利士哪裡買

yuvho
you are my atiny

qhwucidke
부산게이
Text
Week 10 - Model Finishing
Image 1-3 ( Printing): I used the 3D printer at my work place as I thought that Uni’s printer would be too overwhelming and to practice social distance I chose to not go back to Uni. Moreover, my model was printed together my peer’s work (Zexin z5134841) to save time, as he don’t want to go to school as well and time was running out fast. Moreover, we have bought black PLA material to print our bottle design.
Image 4- 7 (Sanding): As I have chosen high% of infill to reduce the 3D printing time, the support parts came out really thick and hard. Showing that it might be wrong decision for me to choose high% of the infill. I have spent quite a lot of time to clean up the side support for the curve lines on the two sides. My model was quite small, therefore I used some small pliers, tongs and cutter to clean the excess parts, so that I won’t damage the print too badly. Then I used a electronic sander to speed up the cleaning process as it was too hard for me to pull them off. Next, I sanded the model from 120 sanding paper to 400 as the model itself was not too rough. To end with I tried wet sanding to create a smoother surface. Other than the resource videos, I also did some research and found this collection of videos very helpful in teaching how to work on the finishing of a 3D print model. Highly recommended to watch.
https://youtu.be/NLoB52nPuao
undefined
youtube
https://youtu.be/ulAe0nQE0I8
undefined
youtube
Image 8-9: During the cleaning up process, I accidentally poke a hole. In this step, I used wood putty to fill it up before apply primer. After the wood filler dries, I applied the first coat of primer and let dry for 30 minutes and then I sand it again, repeating this process for at least 3 times before I apply the paint.
Image 10-14: Finally, it is smooth and clean after the sanding process and it is ready to spray paint. Since I wanted to apply two colours, black and silver, I used masking tape to cover the part that I wanted to paint in black. After spraying the main bottle body in silver and the cap in black for 3 coats, let it dry patiently. Then, I took away the tape and paint the side parts in black with a brush. I decided to do this as I’m afraid if I cover the silver painted part with tape, the coats might came off with the tape. The model turned out amazingly.
Lastly, I redesigned the Olay Moistureser Bottle into a more modern and cool look which are shown through the shape edges. Also, for a more user-friendly aspect, the sides has been designed both with curve-in structure, perfect for us to pick up or hold the bottle.


WHOLE TERM REFLECTION:
Being not an industrial design student, as an object design student, this course is very useful for me. As it is my free elective and my last course in my degree, I really hope to learn more to enhance my design skills. The skills that we have learned through the course are so essential and helpful for me to be a more professional designer. I have had worked on some of the tasks before during my studio classes in object design. However, I mostly self-taught myself which I think I didn’t do it up to standard or professional enough. Such as the GA drawings, 3D mesh modelling. Moreover 3D printing and finishing is new to me. Going through these 10 weeks, I can be more confident and meeting the industry standards which is perfect for me as I am already working in a product design company. Enjoyed everything that I have learned.
The difficulties that I had during the course was activities in week 3 & 4. It was surprisingly harder than I have imaged and so I had to spend more time on those tasks as the orthographic drawings standards was quite new to me and it was way more complicate that I thought. However, it has very clever logic in it, when I study more and practice more on the perspectives and the methods of drawing them, my mind became more clear and could understand the profound knowledge behind the drawings. Now I understand the importance of having a solid basic skills on GA drawings that would enhance your further making when you move on to making and designing with 3D.
Learning while reflecting each other’s work among the class is one of my favourite part of this part. During the reflection process, I can learn from other’s point of view and so that I can improve and develop further for my next tasks. Moreover, especially in this COVID-19 period which we can have classes face to face, the reflections are very useful for me as a learner.
The course has given me more than I expected, big thanks to Rob and Miles as you are very friendly and helpful. Learning these essential skills and teaching in a very interesting and fun way which made me remember the skills better.
6 notes
·
View notes
Text
Week 9 - Digital Iteration & 3D Printing
It’s my first time using 3Ds MAX, I found it challenging at first. Therefore, I have play around with it with some special tools that I want get familiar with. After that, 3Ds MAX was very good as making irregular shapes, creative ideas can be delivered easily in the software which I am glad that I get to start modelling with this powerful software.
In image 1-4, I was playing and trying out different tools in 3Ds Max as it is all new for me. I found it very different from fusion 360. The software itself already have a lot of different shape tools to use such as sphere, cuboid, octagon, cylinder...the most special one is tea pot! Very interesting software to look at and explore.
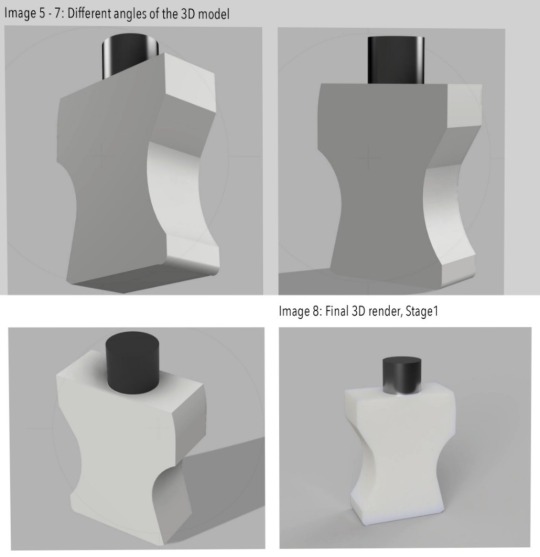
Image 5-7: As I am not so familiar with 3Ds max, therefore I modified my Olay bottle design in Fusion 360 after taking the feedback from the peers. I also agree that the edges should be rounded up a little to look better with smooth curves and I used the fillet tool. Moreover, I thought that I can add some more details to my design to enhance the look, so that I increased the depth of the side curve line in the front part of the bottle.
Image 8-11: Then, I imported my design to 3Ds max, the process was quite smooth. I wanted try some effects to add on to my model, so I pulled the side bottom left part out to see the changes. It is really amazing with how 3Ds Max is capable and handy with. This reminds my of animation softwares, the flexibility is huge.
Image 12-16: Next I have exported it as a stl. file and I have opened it in Cura. At this stage I can see the previews of the 3D printing process gif which is very cool. I can get a better sense in how it will be printed out. Moreover, I can choose the infills % and the support of the model. One thing that was interesting and strange to me was that, when I added more infill%, the printing time reduces. For me, it doesn’t make sense in the beginning as it means surface increases and the use of material increases. However, After asking the peers, the reason is that the higher % of the infill reduces the movement of the 3D printer, so that the time of printing reduces. Lastly, Cura is very easy to use, I can figure how out how to use it straight away when I first used it.
In this task, I have gained much more knowledge on how I create and import files ready for 3D printing. Moreover, I am confident in operating a 3D printer as I know more about how it functions after this task.


2 notes
·
View notes
Text
Week 8 - Digital Models
As I’m not a industrial design student, I didn’t took any 3D modelling courses before. Therefore this task was quite challenging for me. I had used other modelling softwares but not Fusion 360, looking forward to learn more to achieve more too.
Image 1-2: As u can see, I used the method of importing an image of my bottle design then I first traced the overall shape of it. I’ve this through the video that was provided which it was very useful. And then I pulled the shape up to create the depth.
Image 3-4: However, as I couldn’t add a horizontal drawing layer, I couldn’t drew the bottle cap with the way that was shown in the resource video. Nevertheless, after trying, I managed to use other way to draw it. Which is that I drew the cap on the same drawing plain as the main body then I rotate it and move it to the position that I wanted which is the top middle part of the main body.
Image 5-8: At the end, the outcome looks amazing. I have added a plastic texture to the surface of the bottle in white and the cap in black.After the design got rendered, it looks very real. The texture is also very nice! I’m very satisfied with what I have created with Fusion360 for the first time. It is such a great experience. I’m looking forward to draw other designs with this software.
However there’s always improvement space for us to make which is that I couldn’t draw the curves on the main body more smoothly which I felt I need more exercise to improve myself in order to achieve this.

6 notes
·
View notes
Text
Week 7 - Physical Model Making (Foam)
For this week, it’s very fun to work with EPS foam again which I have worked with it before when I was designing a chair for my project. Therefore I made some small models with the EPS foam before. It’s really a quick and good way to make models as it’s easy to use, so that you can produce the models very fast but still in a good quality. Moreover, it shows the features of the design that you couldn’t access when you are just drawing or making renders.
Image 1: I have drawn a simple GA drawing of my bottle design, it will be my guide when cutting the EPS foam.
Image 2-4: Then I stick the cut out the 3 different perspectives of the GA drawing on the EPS foam and cut out the overall piece according to the drawing guide. Moreover, I slowly cut off the excess parts on top and the the sides. The curve parts are more challenging.
Image 5-8: Then I used the sanding tools that I have made with sand paper and wood blocks, it is more handy and easier to sand with the tools. I sticked the sand paper onto a piece of wood.The tools that I made for sanding is very useful, I’m very satisfied with how I customised my own sanding block with wood pieces. From grit 60 to grit 240, slowly sanding it with smoother sanding paper to achieve a smoother surface. From image 6-8, you can see that it’s quite smooth, however, on the sides there are quite a lot of holes. The holes where created when I over sanded the piece which now I knew that I shouldn’t.
Image 9-10: Therefore, I have used wood putty to fill up the holes to achieve a better model which I have learned from the resource videos provided by the Uni. The final outcome doesn’t looked as good as the pervious stage ( Image 7-8). However, I had learned how to used the wood putty which is more important. Moreover I have learned that I have to very patient when undergoing the sanding process as the foam might end up with a lot of holes if it was done very strongly and roughly.


5 notes
·
View notes
Text
Week 6 - Non-Teaching Week
Image 1 shows the working place at my apartment which is in my bedroom. Due to corona so that I couldn’t go to uni to work on my assignments, the workplace at home became very important. Image 2 shows when I had my table light on to work on detail drawings and cuttings. Image 3 shows where I have had my computer, sketch book and drawing tablet on the side ready for me. Image 4 are the materials that I have got for making models that was placed at the corner of my room. Image 5 shows where I have kept all my tools and drawing and model making.
I admit that the working place can be a bit more tidy with shelfs and boxes to arrange my tools. I have got everything that I need but it’s quite messy.
Image 6, shows the workshop space at my part-time place. As it a package design company, therefore we also need to do a lot of model making and cutting work. So that if the model size is big or if the making process will create dirt and dust, I will work at the workshop space in the office but not my bedroom.
For part 2, image 1 shows that I started working on the cube which I saw Maddy’s blog post and thought that her method of using a stick to create consistent gap between each square was very clever that’s why I used the same method. I also saw that she recommended another method of cutting the angles of a foam core which was by Clarke https://t.umblr.com/redirect?z=https%253A%252F%252Fwww.youtube.com%252Fwatch%253Fv%253Do1kTkKlTkGs%2526t%253D608s&t=OWZjYTA4YTMxMzMyOWFhM2UyZTM4ZWQ3YTEyNjc5M2NkM2YwOThiZSxmMzc0MjRiMmJkNjhlNDQ1ZGRiZDEyMTYwMDA2MThkY2M4ODA0Mzhh, I tried both Eric’s and Clarke’s method, they both worked for me. Image 2 was the outcome, the edges are clearly not clean enough, practice is needed. Therefore, image 3 was where I started sticking the pieces together which I used Pvc glue.
Image 4 was the final outcome, I’m quite satisfied with how it looks. The bad sides are all hides inside haha, I hope that next time even the inside part is more perfect so that the sticking process would be better as well. Moreover, I used 2 white boards to create a white background for me to take product shots.


2 notes
·
View notes
Text
Week 5 - Sketching Workshop
Part 1 was a in class exercise that I have did during the class as well. It’s very fun and also useful which it warms me up with sketching free hand. You can see that from exercise 1 2 3 to exercise 4 5, the difference is quite abvious that I am doing better. Exercise 4 was a further exercise of week 4 which I could be able to do better perspective drawings after those exercises.
In part 2, I first started with drawing image 1, to sketch a few different Olay bottle designs before I started with the digital version. After I have a few ideas, I started with PhotoShop, the first problem I had was that I couldn’t add shadows to my designs but I can add highlights which is pretty strange as the method should be the same. I looked at Rod’s teaching back and forth but still couldn’t solve the problem. Therefore, in image 3 it shows that I darkened the whole drawing darker to create the shadows and by adding different tones of greys to create the 3d view.
For image 4 I was trying to refine the shapes of them with adding more obvious shading and highlighting. And outlining the designs on Image 5 which I think I wasn’t doing a great job on both of them. As for image 4, the paths I drew wasn’t that smooth, I’m not sure how to smoothen the paths as I couldn’t find the button to do that. For image 5 the outlining was not perfect as well, I fell like I should practice drawing more with my drawing tablet.
For image 6, I was trying to add the background for the designs but it didn’t works when I tried Rod’s method. Therefore I tried using my own method, which leads to the outcome of image 7. It’s not perfect but I’m glad that it still works.
Image 8 was the final outcome! I’m very happy with the results. I learned a lot during this exercise as I always wanted to know how to draw those amazing products renders and I finally know the secrets behind it and which it’s not very hard. The technique is definitely very useful for me!


0 notes
Text
Week 4 - Perspective Drawing
Part 1:
Image 1 was my first attempt drawing of the 2 point perspective view of the chamfered box and it didn’t went well as you can see my 3d drawing of the box was even bigger than it’s Top view. Therefore, I stated checking where the problem came from. I was observing if the PP, SP, CV, GL, EL..etc was draw correctly or not. And I have found out that the angle of my top view can be better placed to get a better perspective vies of the object. Moreover, The SP points and the top view lines were not aligned perfectly. Therefore, I have learnt that it’s very important to draw these perspective carefully to get the correct drawing. Image 3 is the final outcome.
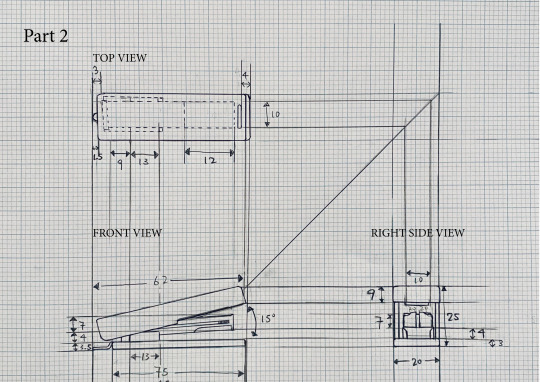
Part 2:
Part 2 was a great chance for me to practice how to draw perspective drawings again which is nice as it strengthens my skills. Moreover, I found not too hard to draw. After understanding logic of it, it becomes so much easier to do. Image 2 shows the details of this exercise where I think I did quite a good job.
Pert 3:
Although there’s quite a lot of work load in the week’s exercise but this last part was actually quite fun. By showing the different EL of 2 points perspective of a cube, it’s very satisfying. However, the circles drawing part was quite challenging which I drew them into ‘lemon’ shapes that is clearly shown on image 3. I was wondering if I was missing a tool to draw these. Please let me know the better methods of drawing the circles out in a perspective drawing!


2 notes
·
View notes
Text
Week 3 Studio Tutorial (Part 2) - Secondary Auxiliary Views
Week 3 part 2 task was very challenging. I started with drawing the 3 views then trying to draw more grids to help with the following steps.
I struggled a lot to get the triangle right for the 3D Form of the object and when I can’t get the triangle right I couldn’t continue the drawing. I try to use the pervious views as a guide to align the lines but it still didn’t work as it’s a angled perspective. Therefore, looking back into the lecture slides and other classmates work really gave me a better direction of how to get that part right. I also remember that during the class, Rob said if we’re doing too much calculation that it’s not right as if the views are drawn accurate. There I used the translation method by panning the ruler to drew and finally be able to draw the primary and secondary views which is show on image 2.
This was definitely a hard one to understand but at the end when I figured it out how it draw I gain a lot of knowledge on how the draw Auxiliary views. Moreover, for this task I’m a lot better in positioning the dimensions, writings and the title which is amazing to achieve in this stage! Image 5 was the final outcome and I’m very satisfied with my work and how I solved the problem.


2 notes
·
View notes
Text
Week 3 – Section and Auxiliary Views : PART 1
In the week 3 class, we were introduced to draw the further extent of a third angle drawing. Moreover, for objects that are more complicated which have a lot of surfaces. Therefore, section and auxiliary views is what I have learnt through the class that will in hence my third angle drawings. Although this is my first time using these skills, I found it very reasonable in which it really helps me to present the object.
In image 1, I have drawn a simple layout to see how all drawings will fit nicely on the A3 grid paper, Idid erase and redraw it a few times to get the right position as there’s not much space on the paper. Also studying how the object looks from different views.
There are 2 parts that I struggled most with, shown in image 2 that I am unsure about the shaded area on the partial auxiliary view. Then I looked back into the lecture slides. Then I found that as it cuts through all the way, so that the shades also all goes till the middle part. Secondly, how the dimensions are placed is also what I need to go back and forth to check with the lecture examples that teaches the understanding between the sections and cutting plans.
To conclude, I am quite satisfied with my final outcome shown on Image 3. Which I redraw it with less unnecessary dimension labels, also outlined with a pen so that it looks more clear and tidy. However, I didn’t use a scan version, because when I scan it, the grid paper I use becomes like a glitch. So that I tried my best in taking a top view image and edited to make it look neat.


6 notes
·
View notes
Text
Week 2 - Orthogonal Projection & AS1100 Standard
In week 2 class, the lecture and tutorial focused on exploring detailed engineering drawing, especially third angle drawings that adhere to AS1100 Standards. In order to let us be more familiar to those standards, the class exercise was about choosing an object smaller than a mug to make a 5 sided cardboard box (no bottom) that fits perfectly over the object. Shown on Part 1 photo, I have chose a stapler as the object. After making the box and observing the top, front,left side, right side position of the object, it helps me a lot on understanding the projection of the Two-dimensional Orthographic drawings with third-angle more.
Part 2 image shows the attempt from me to draw the third angle drawings with as much as detailed dimensions that I can state and follow to draw a accurate engineering drawing of this stapler. In the middle of drawing, I found that the right side view was not aligned with top view and front view. Therefore, I have to redraw it. The failure is a good process for me to understand the important of fitting the drawings in a balance way. Moreover to connect all of them together to check the accuracy of the dimensions, in which if they are all the same.
Part 3 image shows the finished drawing with all detailed measurements, the outline, drawing information and titles. The part is the most time consuming to mark all the labels but doing that is very good for me to understand the structure of a orthogonal project drawing. After this practise, I have learned how to identify the positions of the different sides and the reason to do it. I will be definitely more confidence in drawing third angle drawings in the future!
Sorry for the late submission, I thought it was uploaded but it actually wasn’t due to the net-work problem, when I found out and repost it, it’s already after 00:00. I will be more careful next time.


6 notes
·
View notes
Text
Week 1 - Studio Tutorial :
Drawing Instrument Exercise Reflection
This is my general education course. In my Bachelor of Design program, one of my major is Object design, which I also design and make furnitures. However, we don’t have specific courses that only teaches technical drawing skills such as engineering hand drawings and 3D renders. Therefore, I think this course will be prefect for me to strengthen my skills.
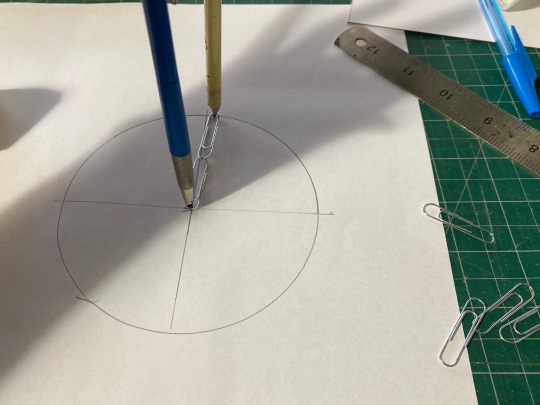
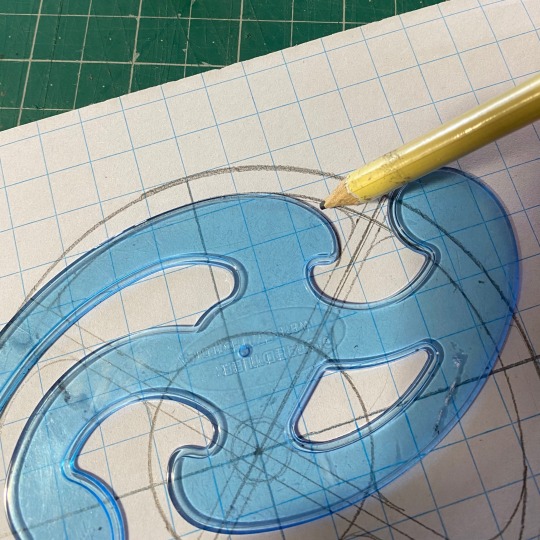
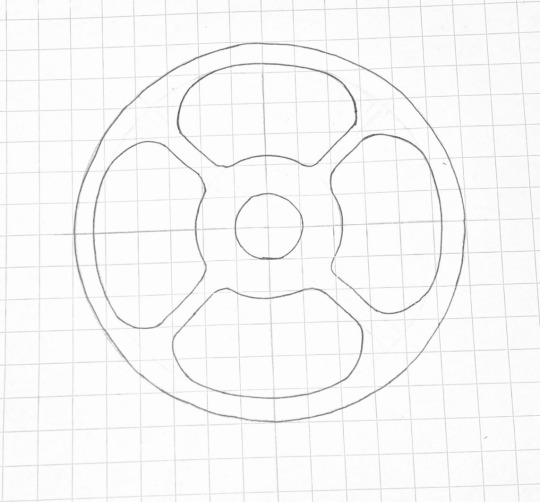
For part 1 : figure 1, when I was drawing it I didn’t have a circle template but I have some paper clip, so that I used them as my circle drawing tool. It worked out very well. After finishing the drawing, I used a black marker to outline the drawing, I failed in some parts where the ink spill out a little bit. I think it’s because I haven’t used markers for a long time which makes me not familiar with it enough, I definitely need more practice on it.
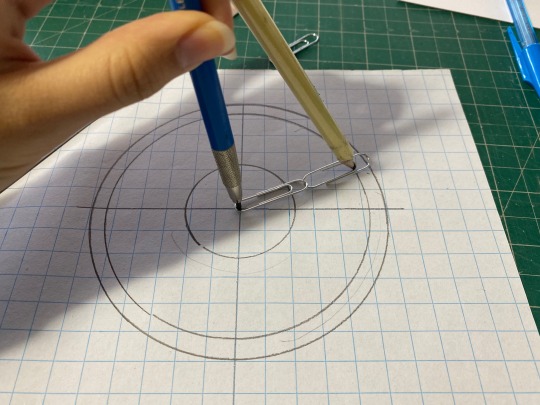
For part 1 : figure 2, I used the same methods as figure 1 to draw the circles. However, I couldn’t draw the round corners with the tools I have. Therefore I went out to buy French Curves that Rob has mentioned in class. It’s not my first time seeing those but it’s my first them using them and learned how to use them. They’re pretty easy to use and are very useful tools, glad to learn how to use them.
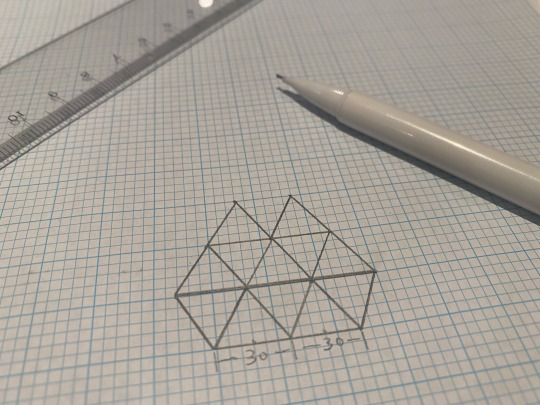
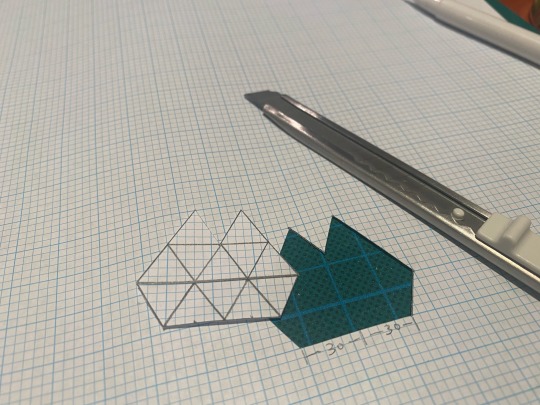
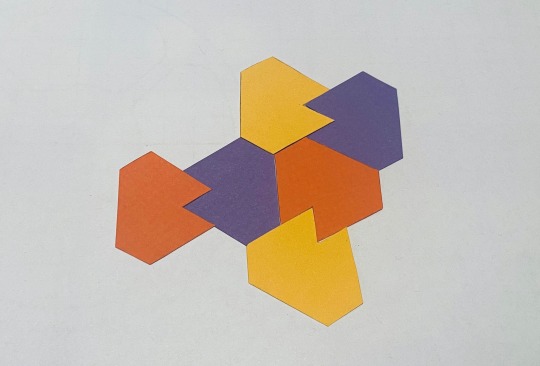
For part 2 : figure 1 and 2, It’s a very fun exercise. It is like making a puzzle, that’s why even if we don’t have to make them in colours I still made them in 3 different colours to get the best outcome. Moreover to get better results I finally went out to buy proper grid papers, so that I can produce more accurate and fine finished drawings for the following weeks and for my future works.
Part 1 : figure 1


Part 1 : figure 2
Part 2 : figure 1
Part 2: figure 2

5 notes
·
View notes
Text
About me
Hi, nice to meet you all. You can call me Jennifer.
This is last course in my bachelor program as this is my general education class. I’m a Bachelor of Design student, majoring in Object design and Spatial design. Object design is pretty similar to Industrial design, we also design furnitures. I have took IDES1213 - Studio 1C before, I like it a lot since I have learned a lot. Moreover, I met a tutor that works in a packaging design company and he introduced me to work at their place, I have been working there for almost 1 year. It’s a great company and working as an industrial designer is so fun. Feeling so blessed to be able to work there. Therefore, I wanted to take another Industrial design course to strengthen my skills, especially in engineering drawings, which is very important when I need to present my design to the clients.
0 notes
Link
Research
Horrifying footage emerged online showing a woman being hit by a taxi and left lying in the middle of a crossroad for more than two minutes.
Over 20 onlookers ignored the wounded pedestrian as they walked past her before an SUV ran her over for a second time.
She was killed after the second accident, said the police.
Read more:
http://www.dailymail.co.uk/news/article-4584000/Woman-hit-taxi-run-SUV-pedestrians-IGNORE.html#ixzz5H98AeDaq
Follow us:
@MailOnline on Twitter
|
DailyMail on Facebook
0 notes
Video
undefined
tumblr
Experiment 4
Flip book.
I take made this flip book with pictures all the way I walk through the street. Putting them together making it a little animation, it wasn’t so successful in which the stick marks and cutting are not so fine, therefore it will be experiment work, leading and giving me development space which I decide to make a video instead as my final work.
0 notes
Text
Final work
I choose to do the Vagueness topic as a major and also including a bit of experiment, editing. As vagueness defines as blurry, unclear. I wanna do something personal that is about everyone which is ignored by us, which is the people who walk past us everyday, which you won’t notice them much as you might be using your smartphone, which you will just get a blurry image of them. In which, I wanna enhance that feeling of how they went past us so blurrily and seems a very small part of our lives, however they are actually all very important to us. They influence every step of our life, as they part of our life, we are being surrounded by them. And what happens to them also is important to us. I want to bring up this is because I heard a lot of news about China which they would help or care about the people that are injured, need help, they just ignore them and let them die on the street, which is terrifying. The reason they do is that they don’t want to get any troubles, they think that when they give a hand to help, it brings them to a lot of things to handle. The term Not in my backyard can explain a lot, which the general attitude is “It doesn’t affect me or my family so why should I care?”, the selfishness is so scary. Imagine if you walk on the street and an accident happens and everybody walks past just ignore you, you would die because of this, if somebody calls the police for you, you might be able to stay alive.
Therefore I made a flipbook and a video of the front view of me walking on the street, capturing the people who walk past me and show the blurriness which shows the contrast of how they look so unimportant, however also affect our lives.
https://www.theguardian.com/commentisfree/2011/oct/22/china-nation-cold-hearts
https://www.washingtonpost.com/news/worldviews/wp/2013/10/24/chinas-bystander-problem-another-death-after-crowd-ignores-woman-in-peril/?noredirect=on&utm_term=.6af39418f378
youtube
0 notes
Photo


Experiment3
I have started to get a more natural direction at this point. And I was thinking about what’s blurry is around us and my thought of the people that walk past us. They just spend 1 second in your life but they actually affect your life a lot.
In which, I tried to have a walk and document people that walk past me.
I remembered how my mum tells me to beware of whats happening on the street, put attention away from my smartphone.
I think she has a reason for telling me to do that and after doing research and watching the news, I kind of know why is it so important to care more about the surrounding people and environment.
0 notes

