
Last Seen Blogs

9424911194
Untitled

hramblings
Rin's Journal

datacollection700
Information Collection

msck-log
GLOGL

cupcakeslushie
Mythical Biromantic
Text
Week 10: Model Finishing & Final Reflection

Overall Comments: I have thoroughly enjoyed the course as I have learnt many new skills that have been and will continue to be instrumental to my development as an industrial designer. I’ve tried my best to complete the activities for each week, for tasks ranging from engineering drawing, photoshop digital renderings, foam model making, fusion 360 digital modelling, 3ds max modification and finally 3d printing. This course really marked the start of my learning of sketch modelling in terms of what the typical process will be like, having the Olay bottle as our subject matter. One of the main things I had, really no idea about (but knew was part of the main skillset of a designer) was the various online 3d modelling programs that designers would use so it was really exciting to finally have some exposure to all that, and starting the long process of learning how to effectively use each of them in the design process. Of course along with this, it was really good to learn how to complete engineering orthographic drawings too, the results of such really put you in the mindset of a professional designer.
What went well / what did I have difficulty with: Looking back on my work, I’m quite confident in creating models out of materials such as paper, cardboard and foam core, but I start having a little trouble with blue foam and the finishing of my 3d model. I think this ultimately comes down to patience and diligently going through the various grits of sandpaper to get as smooth a finish as possible. Also regarding my model finishing, it was essentially my third time spray painting something ever; I had spray painted a couple of objects for Project 2 IDES1212 and I had no real problems with it. I wish to invest in a Polyfilla or spray putty in the future to further the quality of my 3D model (this along with being patient with sanding).
Even though it was really good to finally be exposed to and start learning new 3D modelling software (as well as new techniques on somewhat familiar software like photoshop and fusion), I would usually encounter some sort of difficulty whilst completing the task at hand. I’m not disheartened by this fact though, because I know it takes years to master these online tools.
Apart from modelmaking, I think I’ve really improved in my engineering drawing as I’m quite happy with the one I produced for my lamp I created for IDES1212 Project 2. It took me like 5 hrs to do (it was quite a difficult design to draw) but I got there in the end, it definitely helped that I had the model in front of me to measure from and use as a reference. On the contrary, I have a lot of work to do in terms of perspective drawing. My work for that week was not satisfactory but I’m sure when I have more experience and learn more, I’ll be able to wrap my head around it much quicker and complete one to much better quality.
What did I enjoy / dislike: Unsurprisingly, I enjoyed physically making models by hand more so than using any online software (although I do have to say, my first experience with blue foam wasn’t that enjoyable, I thought it was quite a frustrating material to carve out etc… and the 3d model was also frustrating to sand, because the lines made from all the layers of PLA weren’t going away, and sanding for a while didn’t seem to be doing a whole lot…. Now I’m questioning my earlier statement as I’m typing this haha – maybe let’s say I didn’t fully enjoy physical model making with new materials, but that may just be from lack of experience.
What I would do differently if I had my time again: Not a whole lot, I was late a few times with my blog posts but that I always caught up by the next lesson we had. I’d probably try to have more patience when model making with new materials. I do honestly think though that I’ve tried my best each week so yeh there’s not much I’d change.
Some of the key things I learnt, or insights I developed and what led to them: Model making is vital in the design process, and it is always best to make models 1:1. I think prior to the course, I don’t know why but “models” for me always seemed to imply it being of a smaller scale than the real thing. I’ll definitely be making all my models from here on 1:1 where possible. Another key insight that really stuck out for me was that you should create models to answer specific design questions, and those questions will govern what type of model making process and fidelity you should undertake to effectively answer that question. The various pre-class videos from Andrew Simpson (Vert Design) and Product Tank were extremely helpful in gaining these insights. I also found the UNSW Making series really helpful too in the correct process of using blue foam and finishing a 3D model. They definitely provided some much-needed guidance on the matter.
0 notes
Text
Week 9 - Digital Iteration & 3d Printing
Although it was quite daunting learning a whole new software (3ds Max), after using it and experimenting a bit, the benefits and opportunities became very clear. There are so many different modifications that you can use to edit your design freely, which is clearly an advantage over the settings of Fusion 360 that are rigid in comparison. I hope to develop my skills and become more familiar with all the other modification settings over time.
Sphere 3ds Max: The sphere that we were asked to practice the modifications on was really interesting, however some of the mods didn’t really show up on a sphere, like the relax and twist commands. I also had a bit of trouble moving it to the ground plane, I had to go over the instructions in the tutorial instructions multiple times before I was able to (I think it had something to do with the order of my selecting the sphere).
Olay Bottle 3ds Max: After experimenting with the sphere, I sort of had an idea of how I wanted to modify my bottle. I was going to try and make the edges more round but I couldn’t get it to work for me, I think I tried to use edit poly on the edges but it didn’t really do anything . Otherwise I was quite happy with my overall design already so I ultimately slightly twisted it in an attempt to hopefully make it fit in the hand better.

It was also the first time using Cura. The interface was much simpler than I thought it was going to be which is a good as it meant it was relatively easy to navigate and use. There were a couple things I had trouble with though.
My Issues using Cura:
The ‘Normal Settings – Fast’ that we had to download: The instructions to import into Cura were unclear because there are essentially two locations of “Settings”, a tab in the upper left corner of the program (which didn’t have the ‘Manage Profiles’ button, and after a lot of time trying to find it, the following: Print Settings > Custom > Manage Setting Visibility > Profiles > Import. I thought the instructions given could have been a lot clearer for this.
Sending 3D model to DFL: After making sure I followed everything like disabling extruder 1 and making sure there was adhesion and previewing it, I followed the prompts to send the 3mf file to DFL which involved uploading it to a sharepoint. After two days of no follow up email for anything (this was on Tuesday 4/8), and the status of my file still having ‘No’ under ‘DFL approval’, I was getting quite worried. After speaking to a friend who got an approval email quite quickly after uploading her file, I was VERY confused as to why it wasn’t working. I went back to Cura and checked everything again, resubmitted the form, reuploaded multiple versions of the file to the sharepoint (deleting previous failed attempts – failed is in, didn’t get an email within 30minutes), I went to the ‘Ask Us – 3D Printing Channel’ that was on Teams and used an automated response program called ‘Flow’. I sent a message describing my issue, to which an automated message replied describing how Flow worked so I didn’t even know at that point if it even got read. I decided to leave it for the day as I did all that I could and wen to sleep. Most fortunately, I got an email the next morning from DFL saying my first file got approved for printing, why it took so long, I have no idea, and if the reason I got approved was because of the message I sent on teams, I don’t know. I got another email later in the day that it was finished printing and can be picked up. I just hope the same problem does not happen again the next time I 3D print.
Despite my troubles, I’m very excited to see the product when I pick it up tomorrow (Thursday 6/8).
4 notes
·
View notes
Text
Week 8 - Digital Models
I was relatively comfortable in completing this weeks tutorial activities as I’ve used Fusion360 before, last term. I found the pre-class youtube tutorials for making the lego brick, beer and whiskey bottles extremely helpful in refreshing my skills and teaching me new ones such as using a canvas and revolving or lofting bodies. I didn’t really encounter any troubles completing these, as the videos were very easy to follow (although I did have to speed him up, he talked way too slow for me).


When it came to 3D modelling my olay bottle, I had a little trouble figuring out the best way to do it at first. I first tried to revolve the profile, but that made it way too curved.
I then tried to just extrude the front view to the desired depth of the object, then just fillet the edges to make it curved, but I soon realised that the fillet command is limited in it’s curvaceous abilities.
So finally after these failed attempts, I realised the loft strategy was the best way to go. I physically measured my foam model to dictate the distance of my offset planes. I made four different sized rounded rectangles (indicating changes in the curved profile), and lofted them, which definitely gave me a much better result, closer to what it looked like in real life.
I then did a little of my own research to figure out how to create an indent/ concave in a surface, and found that you have to negatively extrude a face to a point inside the object. I used the same process but positively for the bump on top of the lid.
The main problem I had was shelling my component. It would come up as errors, or the wall would disappear when I would try to do it. Out of much frustration, I left it for the night and came back today actually, and for some reason, it decided to work for me this time. The thickest I could make the walls without it spazzing out again was 3mm.
All in all, this 3D modelling experience was an overall positive one that taught me the power of youtube tutorials, and more of the abilities of Fusion360 of course.

2 notes
·
View notes
Text
Week 7: Physical Model Making (Foam)
I was planning to challenge myself and choose one of my more difficult designs from last week, but I was finding it really difficult to visualise what the views would look like for my orthographic drawing, So I decided to choose another design that was symmetrical and simpler. To speed up my orthographic drawing, I simply printed out my chosen design to scale, and traced around it for my front view, seen in Image 1. I then created templates seen in Image 2, however I realised later on my “side” view wasn’t the correct negative template I needed (I needed it for the curve of the side, not for the depth of the indent, although it did come in handy anyway).
I started to cut the foam with a craft knife, but then realised it was way too deep for it, so luckily we had a small saw in the garage I used instead (seen in Image 3), which was much more effective. The block I ended up with seen in Image 4, was very rough and uneven. Im sure if I could have clamped the block to my table it would have been easier to cut it more evenly, but alas I don’t own clamps.
The tip given in the tut exercise to expand the width, height and depth by 30mm I found was too much and slowed down the process considerably. I was hacking at the cube in Image 4, reducing its size for ages, getting it down to the correct dimensions. If I was to do it again, I would probably only give myself 10 – 20mm allowance, rather than 30mm. I bought a rasp for this project and this helped to hack down the sides (I used the edge of it, like a knife).
Squaring it out was relatively easy, I used a board of sandpaper (60 grit) and a squaring tool that has rulers and a leveller that I also bought for the exercise (and future projects). The levelled foam is seen in Image 5, along with all the excess seen in the background.
It was really satisfying in this next stage, carving out the curves of the bottle with a very sharp scalpel seen in Image 6. I found it easier to keep the shape even by having a copy of the ‘front view’ template also stuck on the back of the model. I then took off the template and continue to curve out the sides with my rasp and sandpaper seen in Images 7 and 8.
This all took me several hours. I didn’t really have the correct safety equipment, I was using quite a flimsy mask and my sunnies as makeshit safety glasses (obviously both these are not that effective protection from all the foams dust). Following the completion of the bottle body, my throat was scratchy and my eyes were irritated, which is why the lid of the bottle isn’t seen in the last pictures.
Overall, I didn’t really enjoy my first experience with the foam. It was incredibly messy and frustrating to shape. But I’m sure with practice and an upgrade in safety equipment, it will become easier and faster to create good results. I am however, proud of the smoothness of my curves, and the fact I was even able to create an indent on the front.

Week 7 Update:
After a rest from the seemingly never ending blue dust (a vacuum has become my best friend when near the stuff), I went back to my workstation and made the lid for my bottle. I cut out a cube of the appropriate dimensions from spare foam and worked to make it as cylindrical as possible using my rasp and sandpaper of varying grit. I then stuck it on with UHU glue from the BE kit (my wood glue which usually works for everything, didn’t stick it).
I also further rounded out the edges of my bottle as I thought it still looked a bit boxy and not ergonomic enough.

0 notes
Text
Week 6: [Non-Teaching week] Model making at home
Part 1: Andrew Simpson (Vert Design) video – Model making in the design process
This video was very insightful into the importance of model making in the design process, especially when spoken on by a head designer. I learnt how different types of models are used for different purposes depending on what design choices are needed to be checked. One of the most important things is to know which technique should be used to inform the designer the most about a certain aspect of the design like scale, shape, or material. Another crucial aspect about model making is how it can lead to unforeseen opportunities for improvements, or what Simpson described as “happy accidents”. I can definitely concur with this as I learn by doing – sometimes it’s hard for me to continue drawing sketches of a design without making some type of mock-up as I can feel I can manually manipulate the design of the product much easier and more freely when I’m working with actual materials and not just lead pencil on paper. I look forward to using different model making techniques in the future and learning the appropriateness of each for varying outcomes, thereby expanding my repertoire of skills to be used in the industry one day.
Part 2: At home making spaces set up
I found the DFL’s Making From Home and Students of Product Design videos very interesting and informative. My at home making spaces include the desk in bedroom and a larger table in my living room. If my house had the room, I would definitely have a whole room dedicated to craft making, alas that will just have to stay on my dream-home-wish-list for now…
One tip I have, if you don’t have a big enough box or shelf to use, store any large pieces of cardboard, foam core, large pads of paper etc, upright against a wall and use a bookend to stabilise them. This saves a lot of space and is super convenient because you can pull a single piece out without disturbing any of the others.
My makerspaces are labelled below in Image 1.My makerspaces are labelled below in Image 1.

^Image 1
Part 3: Eric Strebel Cube making:
This video was quite interesting as I have never made a cube out of foam core using the 45 ° technique. Even though this wasn’t the first “home maker space task” I’ve made (I’ve of course made models/ prototypes etc during high school and term 1 uni), it was somewhat challenging learning a new technique, as expected. The process of me making the cube is reflected on below in Image 2.

2 notes
·
View notes
Text
Week 5: Sketching Workshop
Part 1: Freehand Sketching
Part 1 of the tutorial involved various drawing activities to practice hand-drawn skills that are invaluable to an industrial design. These included trying to draw straight lines without a ruler, adding contour lines and shadow to curved ‘bean’ like shapes and acknowledging the different levels of light /shadows cast on boxes in perspective. In all honesty, I was still in the process of fully waking up so my hand wasn’t as steady as it probably would be normally which lead to my lines and circles not being that great. Despite this, the repetition in these activities I feel really helped me develop my skills. My attempts at part 1 are seen below in Image 1.

^Image 1
Part 2: Digital Rendering
Part 2 was to redesign the shape of an Olay bottle and to digitally render 4 of our concepts in photoshop. I started by sketching ideas roughly within size parameters seen in Image 2 and 3. During this stage, I tried to keep in mind my own design style that was developed last term in BENV1010 which I named ‘Merging Design Dichotomies’ because I like it when objects merge straight with curved lines, or different materials/finishes etc. I feel like I only really achieved this in the second design seen in Image 5 of my final rendering. In hindsight, I think I would choose the asterisked design on page one of my sketches (Image 2) because it combines more straight and curved lines than my other designs.

^Image 2

^Image 3
Image 4 is a collage of annotated screenshots of some important stages from my photoshop process. I used the lecture/tutorial recording on Blackboard to follow Rob’s steps for the activity. This was incredibly helpful because I could complete the steps in my own time (as it took waaay longer for me to complete it than Rob). However, one drawback of sharing screen of Photoshop on Blackboard is that literally none of the dialogue boxes showed up – but I could still follow along because Rob would verbally say what he was doing each step of the way was a big help.
Despite my meticulous following of the recording, there were still various things that didn’t work properly on my file for reasons unbeknownst to me. For example, the brush simply wouldn’t work in adding shadow – this was frustrating because I still don’t know why it would only sometimes work. Other complications are explained in my annotated collage.
Some of my designs were altered during the process due to limitations in skill, which is why they aren’t exactly how they appear in my sketches.

Image 6 below is my final photoshop rendering of my sketches. I’m really proud at what I’ve achieved considering my lack of experience in this kind of digital sketching using photoshop.

^Image 6
5 notes
·
View notes
Text
Week 4: Perspective Drawing
Part 1:
I found this weeks tutorial activities to be incredibly difficult, which resulted in less than ideal final sketches. Part 1 was to draw the chamfered box in two point perspective. I was really confused as to how to get the measurements needed to sketch it, like the distance between the various planes and what edge was to be on the 30° angle and so forth. I tried to be accurate with the measurements but it was quite disheartening for the lines of the box to not line up. Failed attempts are seen in Image 1 and 2 where u can see the edges don’t line up and my final attempt is seen in Image 3 which turned out alright but I had to sort of freehand the sketch just a little bit to get it lined up correctly. The final sketch looked very similar to the version seen in the tutorial activity, maybe longer in length and angled slightly differently.

^Image 1
(I wanted to draw the oblique face after I got the lines right)

^Image 2

^Image 3
Part 2:
The next part (Image 4) involved holding our model box further away and drawing it. The differences seen in the (bottom) box obviously being smaller in size and less of the top view can be seen.

^Image 4
Part 3:
The third part (seen in Image 5) involved adding further boxes to each side of the original box then drawing ellipses within the faces. I struggled with this activity also because of my unfamiliarity. I tried my best, which isn’t that great but it’s ok because it just means there’s room for improvement (my skill in this area was aided in next weeks pre-tut activities). I also realise that my minor and major axis’ should’ve been drawn parallel to corresponding lines.

^Image 5
4 notes
·
View notes
Text
Week 3 (Part 2): Secondary Auxiliary Views
Part 1:
Part 1 of the week 3 tutorial activity was to include a secondary auxiliary view in an orthogonal drawing of a chamfered box. I struggled with this a lot because I was getting confused between the primary auxiliary, edge and secondary auxiliary view. Figuring out the measurements for the oblique face was also quite difficult. I ended up just using trial and error to get the length of the 3 sides and hence the interior angles.
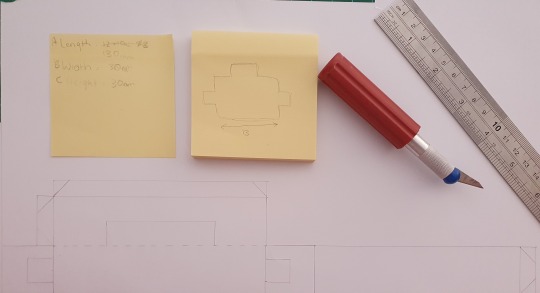
I got stuck on the stage seen in Image 1 and decided to create a really quick box model out of sticky notes, marked and cut a corner off (Image 2 and 3) in hopes of the visual helping me figure it out.

^Image 1

^Image 2

^Image 3
This alongside the other helpful resources given from LinkedIn, I realised I had drawn the projecting lines out the wrong direction. My best attempt is seen in Image 4. I didn’t outline it in pen because I knew it was probably done wrong. It's been very useful looking at the solution for the task as I can see where I've gone wrong and what it was supposed to look like.

^Image 4
Part 2:
The second part of this activity was to create a model of the chamfered box drawn orthographically above.
In order for me to grasp an idea of what this was supposed to look like, I quickly sketched he shape of the net for the box on a sticky note and adding the measurements I needed (seen in Image 5).

^Image 5
My first drawing of the net onto paper (Image 6), I realised the dimensions didn't look right (it was fair too high and narrow) because I messed up the measurements somehow.

^Image 6
I reviewed my measurements and tried again (seen in Image 7 and 8). However, when I constructed the box, the chamfer didn't fit right against the adjacent side (seen in Image 9).

^Image 7

^Image 8

^Image 9
I had to review my measurements again to finally create the box accurately - this also gave me the opportunity to add tabs on some of the sides I had missed in my first attempt (seen in Image 10 - 12).

^Image 10

^Image 11

^Image 12
I've never created a box with a chamfer before so I'm proud of persevering through my mistakes. I've learnt that it's important to double/triple check measurements especially when model making.
0 notes
Text
Week 3: Section and Auxiliary Views
This week’s lecture furthered our knowledge of engineering drawing by introducing section and auxiliary views to our sketches. Our understanding of these concepts was challenged in our tutorial activity. We were given an isometric view sketch of a tapered block which we then had to translate to a three-point orthographic sketch that also included a section and auxiliary view sketch.

^Image 1
On an A4 dot sheet seen in Image 1, I roughly sketched (not to scale) all the views I needed for the final product, along with all the dimensions I needed. This stage of the activity is what I would normally do anyway for when I need to just get the basic idea of what I I’m doing down on paper (as seen in my rough sketches on post it notes in previous weeks). This took me a while to do because I had to extensively utilise my visualisation skills to accurately transcribe the different views from the 3D looking isometric sketch to a flat 2D drawing. Overall, I found this to be an incredibly important step towards the final drawing, in getting the overall shape and dimensions correct.

^Image 2
For my final sketches, I joined two A4 sheets of dotted paper to create an A3 sheet as seen in Image 2 and 3. However, due to the dot pad being perforated it is actually 2cm shorter than a regular sheet of paper (27.7 x 21). This proved to be a slight disadvantage for this week’s sketch because it was quite a tight fit for all views to fit with a 1:1 ratio – however, the bigger problem was the length of the sheet (as seen in the slight overlapping of dimensions of the auxiliary and front views) and not the height (only the ‘Top View’ label didn’t fit underneath it’s sketch). Although I will say the dimensions for the top of the front view and the bottom of the top view could do with more of a gap between them. My first intentions for this was just as a test in fitting all the views properly on the sheet, but I was putting a lot of effort in getting all my lines and dimensions right, I just decided to go with it and use it as my final, to save me the trouble of redoing it all again.

^Image 3
I’m quite happy with my final sketch, apart from the slight spacing issues addressed before. I even managed to border the page and include a simple title box in the top right corner (even if it’s more commonly seen in the bottom right corner – not sure if its position is mandated or not?). I added a lot of dimensions, and I’m unsure as to whether some are unnecessary but I wanted to cover all my bases. I actually quite enjoyed this exercise because it was really satisfying for all my lines to fit together, especially given the fact that there were many measurements that weren’t whole numbers – really proves that accuracy and precision pays off.
0 notes
Text
Week 2: Orthogonal Projection and AS1100 Standards
This week’s lecture focused on the standards of orthographic drawing. I found it quite interesting to learn how designers in the ‘real world’ actually do their work. The tutorial activities helped us understand orthographic viewpoints and completing general part illustrations of small objects whilst following the Australian Standards.
For the tutorial, I used a dot pad instead of graph paper and I must say I prefer it mostly due to the fact that it’s much easier to see any lines made even with a hard, light pencil. The only drawback is that my supply is only A4, but then again, I only had A4 graph paper too. Yes, I used A4 paper for the following tutorial, but I thought it’d be a waste of money if I don’t use it (and I thought it’d still be appropriate because I’m drawing such a small object 1:1 anyway). If I really did need A3, I can easily stick two sheets together because there’s no border on the dotted sheets (an advantage over my graph paper that has a border and holes for binder use).
Activity 1:
The first activity was to create a box covering for our object that had openings for the third-angle orthographic viewpoints. I first chose a whiteboard marker because I thought it would be simple enough to draw but differing enough in design between both ends (cap and base). For some reason, it took me a while to figure out how to make it, I think I was getting confused with all the lines on the template that we were meant to follow. This led to me having to restart the activity because I accidently cut through a line that was meant to be folded. As I do with all models, I roughly sketch the shape of what I’m cutting so I have an idea in my head of what it should look like and jot down the measurements – can be seen on the post-it-notes in Image 1.
^Image 1
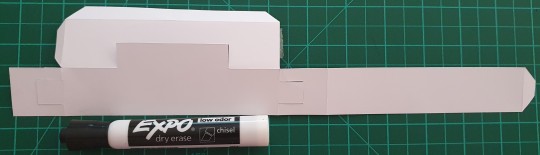
^Image 2
Image 2 shows the box net splayed out beside the marker, yet to be assembled.
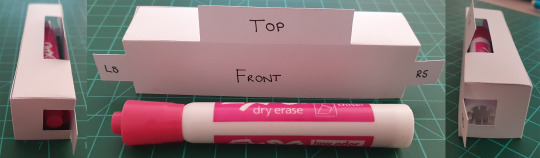
^Image 3
Image 3 are the viewpoints of the marker from the box once assembled.
Activity 2:
As I was starting activity 2, I realised I hadn’t really thought my object choice through as both the front and top view would be exactly the same (given it’s cylindrical shape) and the third angle orthographic drawings shown in the lecture had 3 views (front, top and side), therefore my idea of showing the difference in design from the cap to the base (left and right side views), would not have worked.
Therefore, I picked another object a nail polish bottle. I felt it unnecessary to redo activity 1 using this object instead because I felt I had effectively understood the concept with which it was trying to teach us (accurately measuring something / orthographic views).
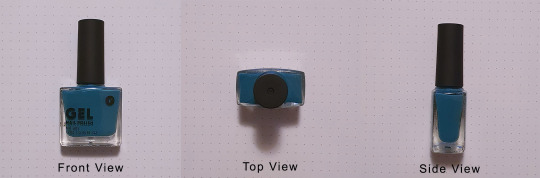
^Image 4
Image 4 shows the three views I would convey in my orthographic drawing.
^Image 5
For my rough sketch in activity 2, I experimented with using the actual cap as a circle template, as seen in Image 5.
Activity 2 / 3:

^Image 6
^Image 9
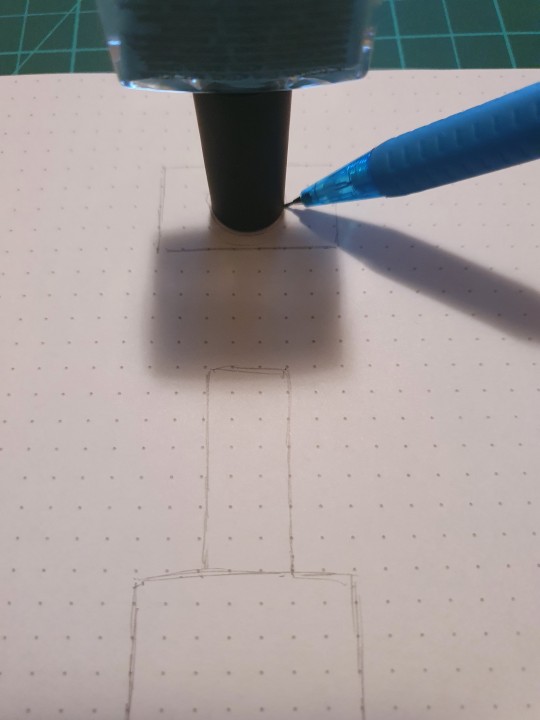
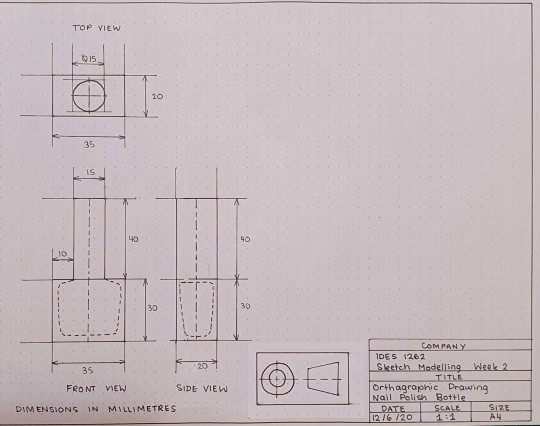
The completed rough sketch is seen in Image 6. I wasn’t fussed as to the placement of the different elements like the third-angle orthographic symbol, the title block and of course the actual viewpoints of the objects. I’m jumping ahead here but as seen in Image 9, I realise later that I should’ve looked over this more closely because the widths of the object in the top view and side view are different – I got confused between the width of the cap (15mm) and the bottle itself (20mm)… and upon writing this, I have just realised in my side view I should’ve made the cap thinner at 15mm, not 20mm. I should have checked the measurements matched across all three views especially before going in with the black felt tip marker, but alas I tried my best to fix the error with a little white-out over the left boundary line in the side view.
^Image 7
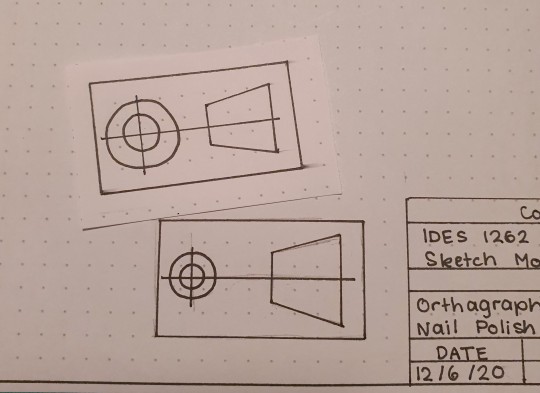
Only realised after marking it that my third-angle orthographic symbol did not have the correct dimensions.I redid it on another piece of dot-pad paper and stuck it over my first attempt, as seen in Image 7.
^Image 8
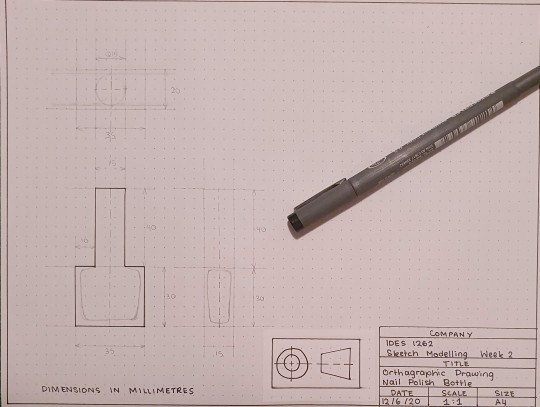
( process picture of my markings for my final drawing.)
^Image 9
Image 9 is the final product of my first third-angle orthographic drawing. Besides the points made above (with it’s relation to Image 6), I am relatively happy with it. I followed the Australian Standards as best as I could (given that I didn’t have the specific line weights in markers). Something I’m not sure about are the “invisible lines” I marked out within the bottle seen in the front and side view – I thought it necessary to convey the cavity of the bottle but still, the cavity itself has curved edges and I didn’t label the angle of it because they weren’t very even. One thing I would do differently (apart from checking my measurements early on) is to plan out the placements of my views more carefully. The final drawing sort of ended up squished because I obviously had to place my side view parallel to the front view but my third angle orthographic symbol was blocking me from going further to the right of the page. This could have been avoided if I shift everything up as there is more room on the sheet above the top view.
4 notes
·
View notes
Text
Week 1 - Intro to Comm. 2
Our first lesson for this course was insightful; the presentations that we went through gave a good amount of general information and rounded our understanding of what we were going to learn (this was especially the case with the presentation on engineering drawing which was a very new concept to many students).
The class activities I believe were a good starting point as they challenged us to draw as accurately as possible. Overall I enjoyed the activities especially when all your effort to carefully mark lines pay off to create a crisp, clean shape.
The activities called for A3 graph paper, which I didn't have, so I stuck together some A4 sheets instead. The materials I used are seen in Image 1. For both shapes in Activity 1, we had to draw a circle of the dimensions given. I of course used a compass but I felt like I was using trial and error to get the correct radius, even though I would extend the arms to the exact number that should have been the radius for the shape. I don't know why it wasn't working, alas it took me a few tries for both shapes to get as close to the circle size given as possible.

^Image 1

^Image 2
For the first activity, I challenged myself to only use the 60 degree corner of the set square instead of my protractor which I feel more comfortable in using to give me an accurate result due to the bevel of the set square sometimes skewing the angle if not used carefully. I lightly outlined both shapes (seen in Image 2 and 3) before going over them in a .3 felt tip. If I'm not mistaken, the triangle form seen is an ‘impossible object' due to the way both triangles edges interweave one another. As all my pencil lines went straight through any change of direction, it took a lot of concentration to mark the correct lines when going over on felt tip. I messes up a few times, evident through the small areas of white out where I had gone too far. If I was to do this activity again, I would at least rub out the part of the lines that did not belong in the final image so as to avoid confusion when drawing over them in the felt tip.

^Image 3
The second shape we were to copy, involved irregular curved shapes. I took the advice of the learning activity to used a 5c coin to trace the curved corners (seen in image 3) and then freehand the rest of it. I think it was a good idea to draw construction lines that marked the boundaries of these irregular shapes so I had some guidance when drawing them. Even still, I found it difficult to accurately space my coin across the shape so it’s not as accurate as I would like but I don't think I could have done any better.

^Image 4
I also didn't have the steadiest of hands when tracing over the whole thing with the felt tip as can be seen in Image 4 (along with the finishes triangles shape) where there are darker parts of the line when I went over it more than once.

^Image 5
For activity 2, It took me a few tries to draw the shape as accurately as possible. I didn’t want to be drawing all the triangles that made up the shape So I just tried to draw the outline (seen in Image 5). However, it may have been my misuse of the 60 degree angle of my set square along with the lack of other lines to guide lines that led to too much of a discrepancy between the size of the triangles at the top of the shape that left me dissatisfied with the result. After breaking it down to just trying to draw one, accurate equilateral triangle (which i was successful in doing – seen in Image 5),

^Image 6
I translated this to my new method of drawing the shape seen in Image 6. Instead of drawing each consecutive shape against the edge of the previous, I felt like that would sort of have been taking a shortcut and not really practicing the skills intended from the activity, so I went through the process of sketching the shape four times over, completely separate from one another. I then used a ruler and felt tip to trace over them, then a scalpel to cut them out (this setup seen in Image 7).

^Image 7

^Image 8
he fruits of my labour are seen in Image 8. I added some coloured highlighted edges to make it more interesting. There are slight gaps between some of the interlocking points but overall, I think I did very well. The gaps may either have been due to mismeasurement or from the cutting stage. If I was to do it again, I'd use a thinner felt tip so as to achieve a more accurate line to cut along.
4 notes
·
View notes
Text
Intro
Hi my name is Justina and this is my first blog post! I decided to study Industrial Design because I’ve always had a curious and creative mind that loved making things and learning how products worked (needless to say Design and Tech was my favourite subject throughout high school). Some hobbies of mine include baking and playing piano.
2 notes
·
View notes