
Don't wanna be here? Send us removal request.
Statistics
We looked inside some of the posts by kieranconveyma and here's what we found interesting.
Average Info
Notes Per Post
0
Likes Per Post
0
Reblog Per Post
0
Reply Per Post
0
Time Between Posts
3 days
Number of Posts By Type
Text
17
Last Seen Tumblr Blogs


Fun Fact
There are dozens of funny blogs to kill time on Tumblr.
Text
Creating Smart Materials and Gamification - Substance Painter
You go to your regular materials menu and you look for a texture which will then create a rough layer, you can then create a fill layer, you then create a mask which will then enable you to right click and add generator you then need to go into generator settings to then create a metallic edge although you will now have this on top of your fill layer to reverse this you right click on your generator then you hit invert mask which then turn the fill layer to go above the generator layer. You can add more or less ware with the generator settings, to create more or less contast, you can use grunge this makes the paint look more chipped or torn. Creating your own smart materials really benefits your work and allows you to create unique materials that artists don’t share and help your work to stand out.
The Alpha Dirt brush is what you can use to make your object look more dirty or dusty making this look more aged and detailed. This also helps to make the edgware much less uniform and less repetitive. You can dirt to a layer to add a fill layer and to apply a white mask, you then click base colour and then find the dirt material. To set up the mask properly you then click right click on your fill layer and click generator layer and then right click and add a dirt generator layer this will then allow you to play with the settings to add the level of dirt and grime within your model. To add a colour to this dirt you right click on its layer then add a filter you then select gradiant, you can adjust the dirtiness of the object or rust by adding grunge.
0 notes
Text
Substance Painter Methodologies
Within his practice I can definitely relate to what JL Messi mentions about having an unhealthy relationship with 3D modelling where I put in way to many details into the model to avoid the brushing side of texturing as I feel I am way more technical than I am artistic. This helps to teach me and would also like to learn more about texturing on Photoshop. Like on Maya it is important to have a good resolution 4K is usually typically used, you use Alt and Left click to navigate on the software just like on Maya you hold down alt and middle mouse to pan, and alt and right click to zoom in and out. The features are similar to Maya such as using F to focus on the object, you use brush, the eraser and the polygon picker. JL Messi introduces Alphas, Brushes, Textures, Filters, Materials, Smart Materials, Smart Masks and Particles. Within this interface it looks easy to understand if I could use this and will feel familiar as I use Maya as my main software and am very familiar with Photoshop also. You have layers which gives a familiar feel to a 3D artist and you use regular and fill layer, fill layer is a solid colour and a regular layer is a layer where you can edit and add information. You edit your layers within the properties option box at the bottom. Within the add information you have Height, Metalness and Roughness which effects the level of shine of the paint. With height this allows you to get the paint to dig into the fill layer. Metalness describes how metallic this is.
You can also drag the fill layer above a pre applied metallic layer to created a coloured metallic layer.
Blending Modes
Blending Modes is a paint where you can add effects which help to create staining on the object.
Masking
Masking is where you can use a paint to affect a certain area or for you to avoid an area when you are editing the rest of the object.
Alpha
Alphas are brushes where you can edit the size and the flow to how to create a specific stamped brush rather than a free flowing brush.
Split-View
You can edit the views to have a 3D view or a 2D-3D view which allows you to look at your UV maps for your object as a 2D one.
Alignment
You can use the alignment to set to your UV map to make painting easier with the Alpha Brushes or you can set it to camera to make it easier to navigate the brush with more precision from the specific camera angle you have this set at.
Display Settings
You can use the settings such as the Environment to edit the rendering background without affecting the amount of lighting You can also edit the camera in Post Effects and create camera effects for your final renders. You can show the wireframe within this setting which can help you determine where you are on the object which shows your polygons.
Shader Settings
You can use this to create displacement maps or displacement information, you can enable tesselation and you can view your history.
Some of the materials pre applied in Substance Painter have some level of gamification especially within the metallic textures such as within Smart Materials. You must have maps to create the effects that can be applied with Smart Materials. With Substance Painter the first thing will be baking within this software instead of using Maya, unless you had textures on this already. Within the Texture Setting menu you first click Bake Mesh Maps, you use Thickness for more organic objects or soft surface and not usually using this map within Hard Surface modelling, You usually use Normal maps for High resolution information. For ID maps this is useful for masking sections off you will typically make an ID map in Maya also and import this in, You use the map to create world space normals. Ambient inclusion create an ambient inclusion map which affects the level of lighting and shadows and greyness. Curvature map create edgeware effects. Position maps ensure that your materials stay in the same X,Y and Z space as you applied this to the software on.
JL Mussi (2019) Substance Painter for Beginners Tutorial. Available at: https://www.youtube.com/watch?v=s2MOx1Iteik (Accessed: 11 August 2021).
0 notes
Text
Substance Painter Gamification
What would you have done on Substance Painter if you owned the right graphics card?
If I owned the right graphics card I would have definitely been very thorough in playing about with the generator settings within the substance painter software and really get to know the software on a practical basis, although I now know this from a theoretical basis stand point I would have mostly had an emphasis on creating smart materials and learning a lot more about how to create my own and really took this research to be a focal point on my learning in this project although I now have learned the basics of Substance Painter from a theoretical stand point and am happy with my level of understanding and feel I could practice this for real given the right resources in the industry although this may take some pointers from tutorials from time to time. I am generally amazed how well I understood JL Messis tutorial and how quickly I picked up the basic methods and how familiar the tools were to software I already use on a regular basis. I definitely feel when I do get to access Substance Painter and use this within my work this will give my models and practice even more of an edge.
Some inspired visualisations
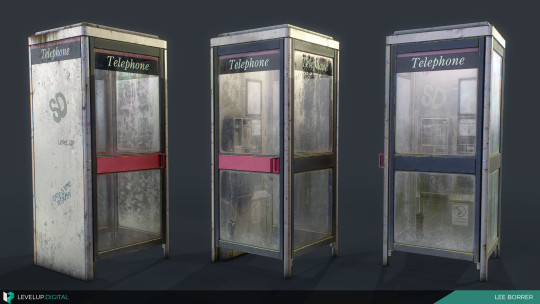
ArtStation - Phone Box - Substance Designer - Level Up Tutorial, Lee Borrer (2021). Available at: https://www.artstation.com/artwork/18akW3 (Accessed: 10 August 2021).
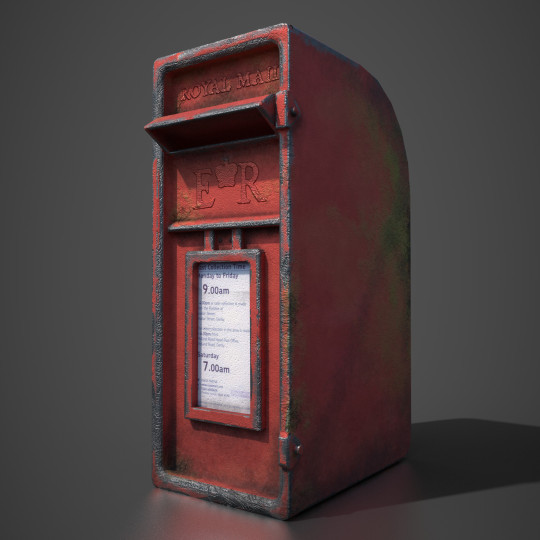
Royal Mail postbox (2019) Joe Peters. Available at: https://joepeters.artstation.com/projects/Vd12Xn (Accessed: 10 August 2021).
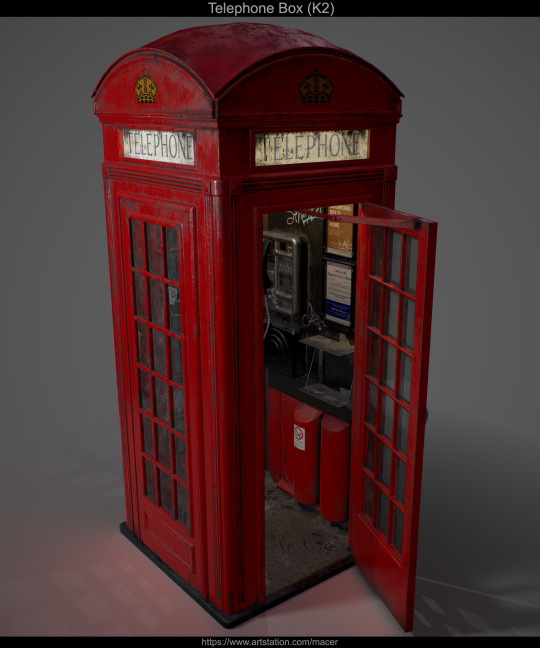
Telephone Box, Matthew Macer (2021) ArtStation. Available at: https://www.artstation.com/artwork/Kr0oLx (Accessed: 10 August 2021).
0 notes
Text
Meshroom
School of Motion (2021) Getting Started with Photogrammetry Using Your Cell Phone. Available at: https://www.youtube.com/watch?v=ZIW4XU6Wm8Q&t=1409s (Accessed: 2 August 2021).
Moviola (2019) Meshroom Tutorial Guide. Available at: https://www.youtube.com/watch?v=eiEaHLNJJ94 (Accessed: 9 August 2021).
TylerGibbonsArt (2020) 3D Photoscanning - Optimizing Meshroom Photoscans. Available at: https://www.youtube.com/watch?v=J3esNV0wXAo (Accessed: 9 August 2021).
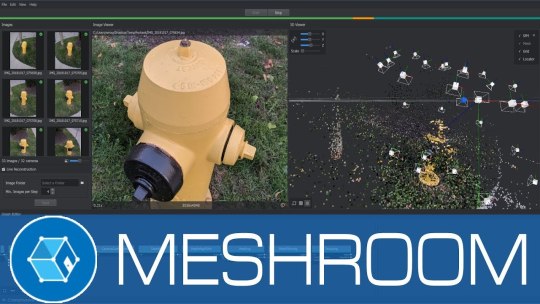
Meshroom is a free piece of 3D software that is industry standard and helps to design 3D models from 3D images this could be a new and entirely new method I could use within my future practice. I could use these tutorials above as a way to get started on the level of understanding and then projecting it into a 3D tool the School of Motion one uses Cinema 4D but I could use Blender and Maya for this with a bit of additional research in how to do this.
0 notes
Text
Retopology
Throughout this week I have retopologized all of my prop objects such as the street items within these images this demonstrates the level of polys that have been reduced from the initial high poly shapes without affecting the level of detail and shape of the objects. This is the biggest area I feel I have improved on throughout this unit aswell as baking, this makes my objects suitable for both CG film and games pipelines.
Bus Stop 57,799 Reduced to 16,403 Faces
Beacon 3,727 Reduced to 955 Faces
Bin 1,680 Reduced to 911 Faces
Postbox 27,081 Reduced to 7,031 Faces
Signs 10,406 Reduced to 4,528 Faces
Telephone Box 88,300 Reduced to 44,059 Faces
Traffic Cone 11,616 Reduced to 3,597 Faces
Traffic Light 24,308 Reduced to 16,367 Faces
Victorian Lamp 16,035 Reduced to 7,330 Faces
Fire Hydrant 42,738 Reduced to 22,136 Faces
Traffic Barrier 114,308 Reduced to 44,748 Faces
High Poly


Low Poly


0 notes
Text
Unreal Plugins
Bridge
The Quixel Bridge plugin is a useful plugin you can use in UE4 to according to worldleveldesign is an “asset management software that allows you to search, download and export textures, materials and 3d models into a game engine or modeling package.” this handy resource really helps to demonstrate a lot of what this plugin can be used for and can see this being very useful towards my practice.
Beginners Guide to Using Quixel Bridge for UE4 (no date). Available at: https://www.worldofleveldesign.com/categories/quixel/guide-to-bridge-ue4.php (Accessed: 6 August 2021).
Mixer
The mixer plugin is in particular very useful for locating and downloading megascans for your scene this can help you to find props, textures and environments alike, this is also designed by Quixel I prefer Bridge as a personal preference but mixer could be a good alternative.
0 notes
Text
Rendering Conventions
Fishual Fx (2020) Creating Render Passes in Maya + The Benefits. Available at: https://www.youtube.com/watch?v=P9qRqLrFMFM (Accessed: 15 July 2021).
Rendering conventions are a way of making the model you have constructed compatible for use in another software these entail normal maps, colour maps, metallic maps etc. Creating render passes allows you to have more control over your CG scene as stated by the Fishual FX and saves you having to re render if you have a lighting issue for instance. He demonstrates what the necessary AOVs I need for my rendering within my scene although he doesn’t have many views I feel his video was well presented and easy to understand. He teaches that I need a Z, N, specular indirect, specular direct, diffuse direct and diffuse indirect.
0 notes
Text
Construction Script UE4
Unreal Engine (2015) Intro to Blueprints: Construction Script Customization | 08 | v4.8 Tutorial Series | Unreal Engine. Available at: https://www.youtube.com/watch?v=z1SD-d9yJmQ (Accessed: 15 July 2021).
As stated by the artist construction script is allowing us to add variants to each instance of a blueprint. A construction script is a node that allows you to make an asset modifiable. In terms of project building I am going to need this for the character to make the environment potentially more interactive and in terms of my own project this will be most useful to help with making multiple buildings quicker (and moving to exact coordinates) such as you can enter a number such as 4 on a set of windows and then 4 stories are built on top of each other to make up the building as these assets usually repeat for each building within a game. Construction Script can also be used to help with lighting and create colours and brightnesses.
0 notes
Text
Edge Padding
Edge padding - polycount (2017). Available at: http://wiki.polycount.com/wiki/Edge_padding (Accessed: 15 July 2021).
As Polycount states edge padding within the 3D modelling pipeline means the images will have areas that are used for the textures within the geometric map the used areas are called UV maps whereas the blank areas of the map which are usually black or white are called gutters. In Maya which is my traditionally used software you use Transfer Maps > Fill Texture Seams to achieve this feature within the model, this can also be done within Photoshop and Substance Painter. These are the suggested amounts of edge padding to be used for each size of texture 256 = 2px, 512 = 4px, 1024 = 8px, 2048 = 16px on most cases within the games industry this will be 2048 so 16 pixels is the recommended amount.
0 notes
Text
Modular Workflow Processes and Steps
Modular Buildings: Tips and Tricks (2019). Available at: https://80.lv/articles/modular-buildings-tips-and-tricks/ (Accessed: 9 July 2021).
Modular Interior Environment Design in UE4 (2017). Available at: https://80.lv/articles/modular-interior-environment-design-in-ue4/ (Accessed: 9 July 2021).
Understanding Modular Environment Design (2017). Available at: https://80.lv/articles/understanding-modular-environment-design/ (Accessed: 9 July 2021).
Zhdanov created a Soviet warehouse environment he explains his first step was to find references which I have enacted for my own project and used TurboSquid and real life images to an organisational site called Trello he states about where he can easily check the connectivity of modular assets between each other. which is how the modular workflow works and the model is to a scale and is kept as similar as possible to the real life thing. These then get imported into UE4 and the pieces are assembled within the game engine rather than on Maya. After he was happy with the blockout he began model low polys and high polys of other objects and unwrap UVs. He then also looks on Pinterest for some decals to import into his scene. After this he the continued to detail the scene and created a few new objects to make the scene feel more real. This pipeline from end to end around 2.5 months.
Chavez is a 3D environment and character artist who is based in New Mexico, USA, he says he likes to start by making a file structure with which to find everything easily, this artist also recommends Pinterest for researching his research images and creating a board on this. He then begins his process by measuring things in his flat and elsewhere to make everything connect correctly. Chavez states the rules of modularity are to keep everything inside of the bounding box volume I used as the initial blockout. The key to modularity is to make this importable for Substance Painter. by creating three different variations of things like the bookshelves or the railings. The reason I choose three and not two was because of how much every item was repeating, the variety makes the scene appear more realistic.
Sergeev works for Polysquid Studios where he is working on a New York 1930s building he divides his building into two parts such as the baked parts for the parts that have a lot of unique details. He then splits the building into verticle slices. For the other part he uses tiled parts these are parts which repeat without affecting the believability.
This is Sergeevs main advice
“Good advice for making such buildings would be to study reference and carefully plan out the baked mesh needed parts before starting to model the building itself. This is somewhat difficult because you have to model things without seeing the full picture/finished building, but it saves a lot of time later on.
It's also important to avoid repetition in the building floor patterns by adding some decorations, and changing up the shapes, a little bit.
Another good idea is to use tri-planar mapping for tileable materials, to avoid visible texture seams.”
0 notes
Text
GPU Issues Substance Painter
For my project this week I have encountered a problem with an error message saying that Substance Painter does not work with my graphics card and I have an MSI Gaming X 5700 XT Graphic Card which is for AMD computer builds but using this crashes this software and causes it to not work properly. The way to solve this would be to buy an entirely new graphics card which are currently a lot of money and I can’t afford this at the moment so I am asking Praneeth to take over on my texturing while I do some of the last buildings for the environment to therefore take some of the pressure on his side.
0 notes
Text
How Normal Maps Work
Tutorial: How Normal Maps Work & Baking Process (2020). Available at: https://80.lv/articles/tutorial-how-normal-maps-work-baking-process (Accessed: 28 June 2021).
Average Normals Split/Vertex
In this article Lemos explains about how normal maps work within the baking pipeline as Lemos defines this he states “ The purpose of this normal is to control where a surface is pointing at so that when light bounces from this surface, it will use this normal to calculate the resulting bounce. “ I overall found this article very useful and easy to understand with concise language, easy to understand images and with this all broken down in an easy step by step guide. The general idea of a bake is to transfer the high poly information back onto the low poly model “The baking program will basically cast rays from the low-poly, following the vertex normals and searching for the high-poly.” (Lemos, 2020)
0 notes
Text
Audience Psychographics
‘How To Find (and Research) Your Target Audience’ (2019) Spiralytics Inc, 7 October. Available at: https://www.spiralytics.com/blog/find-and-research-target-audience/ (Accessed: 25 June 2021).
This article goes further to explore psychographics of the audience which is new research about where I can take audience research further. These explore more about the ethical considerations a studio has to take for its audience market research. This explores about audience personality, values, attitudes, interests, lifestyles and behavior such as in particular a childs psychographics will widely differ from an adults. I am marketing this to mainly males aged 18-25 so this could particularly be for games that may scare younger or more sensitive viewers if this an apocalyptic game. But taking a key in the interests of males 18-25 will also boost the game environments sales if this can be achieved.
0 notes
Text
Grand Theft Auto V Environment Studies
Grand Theft Auto 5, Ray Liam Shum (2016) ArtStation. Available at: https://www.artstation.com/artwork/agOdX (Accessed: 26 June 2021).
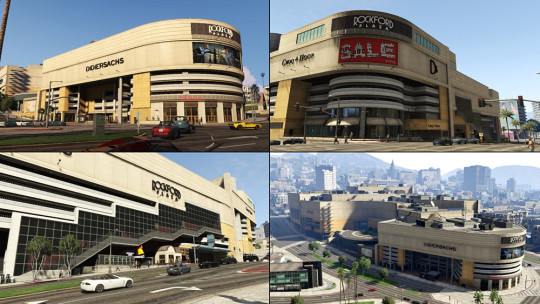
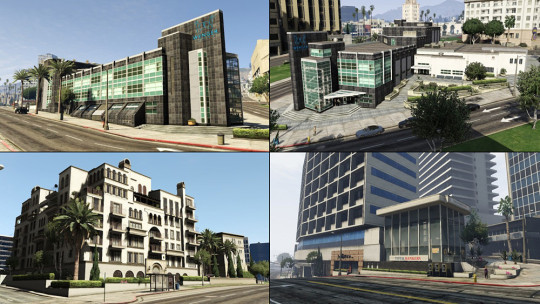
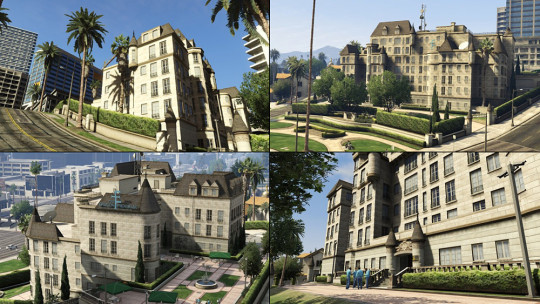
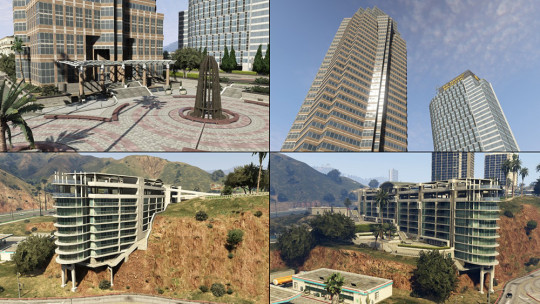
Although this is a bit older and the game was developed in 2013 I think this is very photorealistic for its time period the sky I found to be very realistic and the lighting is the biggest selling point of the project. I do think the buildings aren’t as realistic as games today but overall still are done really well for their time period as the technology of this moves along so quickly. I think Shum has done a really good job of the foliage too if he is responsible for this. This is clearly based on Los Angeles and modelled to be exactly like the city I have currently been there and still recognise some of the areas involved in the scene. I think the floor has a good sense of tiling but feel there needs to be a bit more variation to the floor and have some cracks and more scrapes in the road perhaps to add a sense of being more real. I think the vehicles as demonstrated in the first image are quite realistic but have enough variation to them to be original designs.
0 notes
Text
Advancing My Meshes
Learn to Make Killer Props for Video Games (2018). Available at: https://80.lv/articles/learn-to-make-killer-props-for-video-games/ (Accessed: 1 July 2021).
With this article this has helped to teach me further about how to create more details onto the final models such as screws and bolts this has also taught me a little further on UV mapping too and is well structured although I don’t use ZBrush and dont usually sculpt I found this element interesting to learn about overall.
0 notes
Text
Adam Harvey
Adam Harvey (2021) ArtStation. Available at: https://www.artstation.com/adamharvey3d (Accessed: 1 July 2021).
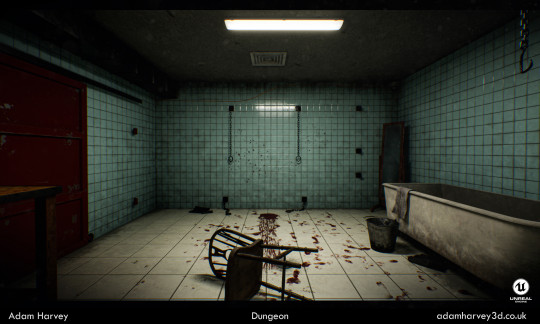


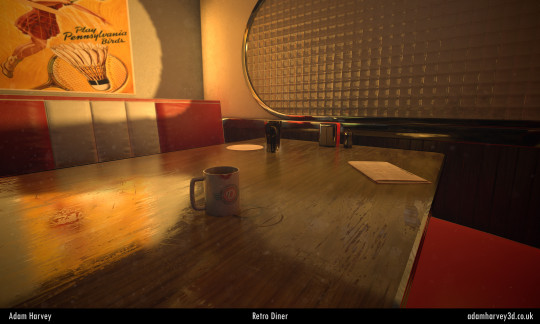
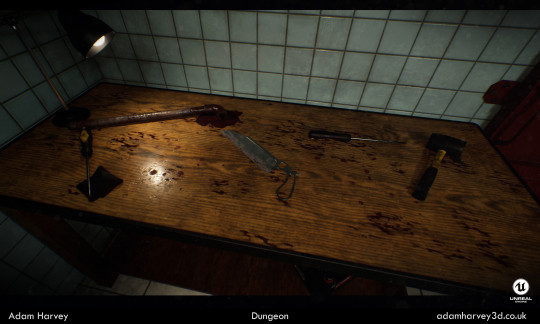
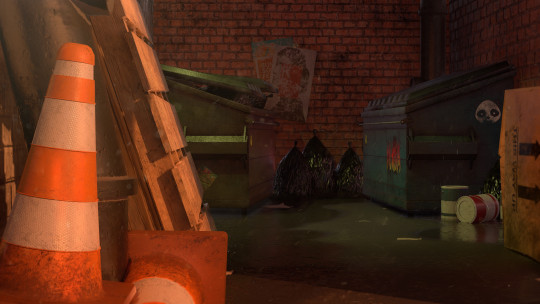

Within Harveys scenery I particularly enjoyed looking at the environment scenery such as the Dungeon, the Retro Diner and the New York Alleyway. I really enjoyed the level of detail and the variety of environments and props he has constructed. The Dungeon especially has lots of details such as blood and wear and tear to the bath for instance.
0 notes
Text
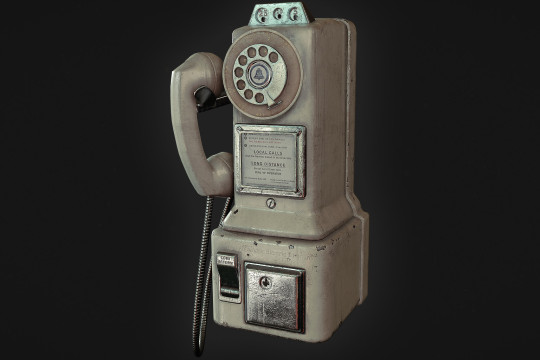
James Smith
James Smith (2017) ArtStation. Available at: https://www.artstation.com/jaysmitt (Accessed: 30 June 2021).
Smith is a hardsurface artist based in Manchester and was drawn to his vintage phone model I really enjoyed seeing the scratches and the level of wear which made the 3D object appear a lot more real and the UV map was cleanly modelled. I think the model being quadrangular made it easier to understand how the mesh was made, the maps I found really interesting to look at as this determines what mine might look like as a final result.
0 notes