
Last Seen Blogs

flynn1x1
𝔢𝔱𝔥𝔢𝔯𝔢𝔞𝔩

miss-master-attendant
God's why are you all so adorable

sujit-thorat
Sujit Thorat

minimiki
M
janadog
Jdog
Text
Final Reflection
My Journey
I am extremely proud of myself for the work I have completed in this trimester. Before we began this unit I was unaware I had the ability to do any of the tasks we have completed throughout the weeks. I always thought I was terrible at drawings and progressing my products and models from ideas to reality. However, from this class, I have learned how to effectively draw and model to convey my ideas.
I was previously unaware of the value of model making and drawings in the design process. I understood the need for them when presenting to someone such as a client, but I did not realise the extent to which it was able to help me develop and visualise my ideas. Having a physical model to hold after previously only looking at drawings was a completely different experience. I could see how my aesthetic additions may impact function or ergonomics as well as understand how the product feels to work with. I always thought the design process was very linear starting with a concept, drawings, renders, models and finally the manufactured product. However, I now understand that these components of the design process, apart from the final product, can take place and be revised at any time.
How I Will Use What I Have Learned
From now on, I understand that I do not necessarily have to start my design process with sketches or concepts but can begin with model making if it will be more effective in expressing my ideas.
I now also understand how to better present my ideas such as the digital rendered drawings and general assembly drawings we did. I have already used these skills to present my ideas in design studio 1B. This was the first time I felt I could adequately explain and present my ideas to others.
Myself as a Learner
I found the self-reflection tasks each week very valuable to myself as a learner. It was an opportunity for me to identify my strengths and more importantly my weaknesses in order to improve my skills and abilities. Being honest with myself and identifying areas of weakness was crucial to improving.
I believe to improve as a learner I need to improve my time management. On two occasions I did not upload my work by the Monday time frame. This meant I could not receive feedback on my work from my peers who may have identified areas of weakness which I may have missed. Uploading earlier would have improved the amount of feedback I received.
4 notes
·
View notes
Text
Week 10 – Model Finishing
I found this week’s activities very interesting and enjoyable. Previously, I had no idea 3D printed models could be treated to gain a more professional finish. As I progressed through each stage, such as sanding and painting, I found myself increasingly more impressed at how close to a finished product my model looked.
As seen in initial model photo 1 and 2, my model had quite a few imperfections upon the completion of 3D printing.


I began refining the model by using a file. This removed the large imperfections and created a reasonably smooth model apart from the scratches created by the file. I then sanded down the model starting from a low grit and working my way up to a high grit. This very effectively smoothed the model and removed almost all the scratches. Lastly, I smoother the model with very fine steel wool. This made the model extremely smooth and soft to the touch.


One major issue I had during this phase was the length of time it took to file the grooves out of the model. After about an hour of sanding the model had finally become smooth. I learned halfway through sanding that choosing between sanding against the grain or with the grain and sticking with it was vital as deviating from either resulted in scratches in the opposite direction which was quite difficult to remove.
After sanding I prepared a spray booth, using paperclips to suspend the model, allowing an even coat of paint and keeping my hands clean.

The model was then sprayed, starting off the model and moving slowly from left to right ensuring an even coat all over. Unfortunately, one drip mark formed but I was able to learn what I did wrong (did not move the spray paint fast enough allowing an excess of paint to form) and fix this for the second coat (spray the model with steady and smooth strokes at an appropriate speed).


I then sanded the model lightly (as seen in process image 8 & 9) and then applied a second coat. It was found that after spray painting, the imperfections in the model were much more obvious and pronounced. To avoid this next time, I will spend as much time as necessary sanding and smoothing the model.


The model was then complete. I spent a while attempting to photograph the model as professionally as possible. It was very difficult for me to get the lighting correct as I wanted to optimally light the model without showing the light source in the reflection of the bottle. After a while, I managed to get a photograph I was happy with.


Overall, I was very pleased with my model. I had no idea a 3D printed model could look professional with a bit of finishing. I can definitely see the opportunity for 3D printing when presenting ideas to clients especially with a professional looking finish.
6 notes
·
View notes
Text
Week 9 – Digital Iteration & 3d Printing
The challenge of learning a brand new software is often a daunting and seemingly impossible task and this is very much how I felt opening 3Ds Max for the first time. The user interface felt very cluttered and overwhelming but after a short while using the software, I slowly began to understand each component. Simplifying the user interface as advised definitely helped.
Playing around with the various modifiers really opened my eyes to the potential of 3Ds Max as I could create shapes and features that are too complicated and difficult to do on Fusion 360. Being able to create a form in Fusion 360 and dropping it into 3Ds Max for adjustments is very easy and makes the entire process much more seamless.
The process images below show my experimentation with the various modifiers. By following along with Rob’s tutorial I did not have any complications with the software. By only using the essential tools for this task, 3Ds Max felt much less overwhelming to learn.


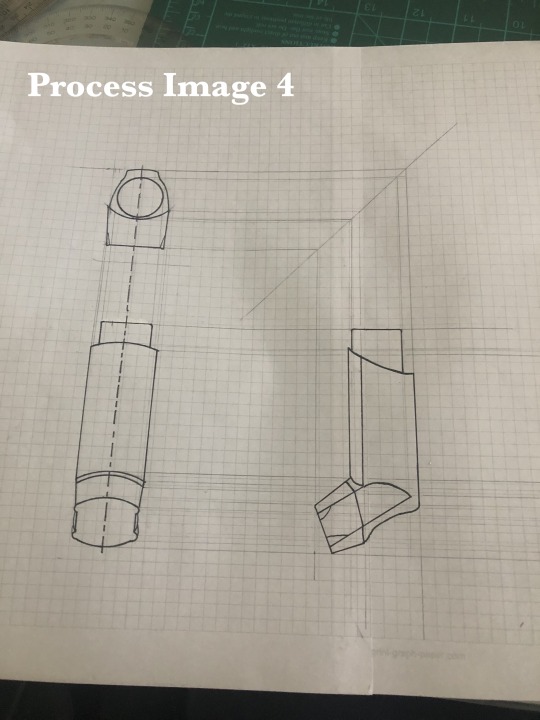
After I completed my bottle model on Fusion 360, I was slightly unhappy with the lack of curvature my model had. Fortunately, learning 3Ds Max meant I could add this small detail to my bottle and obtain a final model I was happy with. This addition of the curvature can be seen in process image 3 and 4.


When I dragged my model into Cura to be sliced I noticed my modifications in 3Ds max had caused the base of my bottle to be on an angle rather than flat (as seen in bottle process image 5). I was fearful this would affect the printing of the bottle as well as its stability.

To solve this issue, I opened the model once again in Fusion 360 and flattened the base using the cut feature. The bottle was then ready to be sent off to print.

This week I feel I have learned an immense amount about 3Ds Max and its ability to create small iterations on a model. This ultimately allows a digital model to be as accurate and perfect as possible.
9 notes
·
View notes
Text
Week 8 - Digital Models
This weeks task was very enjoyable but required immense amounts of patience, resilience and perseverance. With learning new software, it is a common occurrence that tasks appear as though they should be simple. However, without proper practice or experience, these ‘simple tasks’ can become very time consuming as you search for an answer. This was apparent for me a few times during this task.
Pre-Class Activities
These activities were fairly straight forward as I could follow along at my own pace and copy exactly what Kevin was doing in the videos.


I did, however, have a major issue with the whiskey bottle activity. For an unknown reason, the construction lines drawn did not allow the fix point spline tool to snap to the points. This meant I could not proceed further with the model. I spent close to an hour troubleshooting the issue but to no avail. For the sake of time, I simply restarted the model and this solved my problem.

Olay Bottle Digital Model
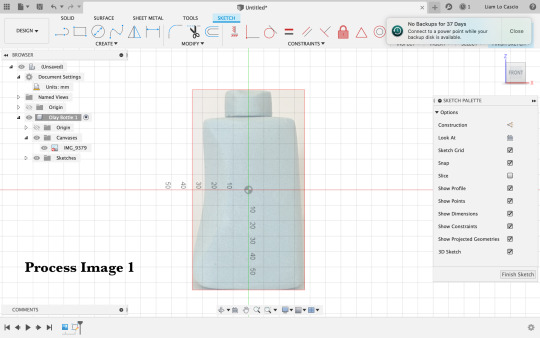
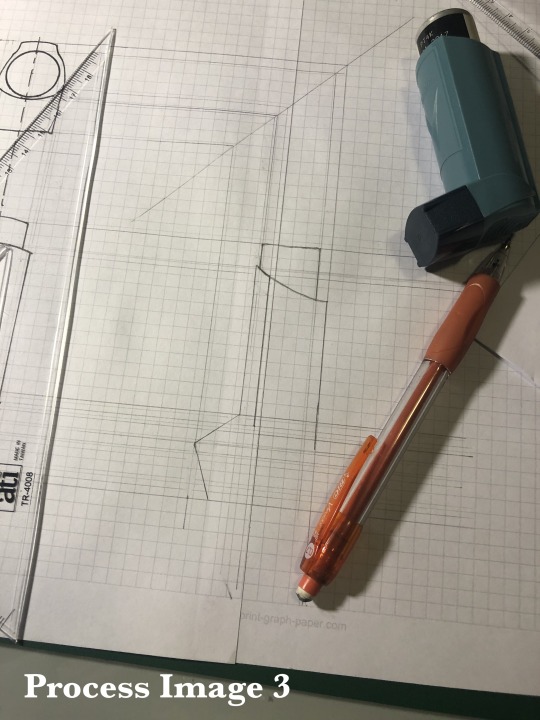
When I began this task I felt a bit overwhelmed. Not having a video to follow the steps made me feel less confident. I began by following similar steps to the beer bottle video tutorial by adding a canvas image of my foam model (as seen in process image 1). This ensured all dimensions were accurate and fit my model.
From here I was unsure how to proceed. I followed a similar process to the foam modelling task by creating a 3-dimensional outline of the model (as seen in process image 2). This very much gave me direction in my model and helped me realise that there is more than one way to achieve a given task.

I then faced the task of adding the cut detail on the front right of the bottle (as seen in process image 3). I was unsure how I would go about doing this but after a bit of research, I discovered the plane at an angle feature. This allowed me to cut out the feature of the bottle.

I then added a cap to the bottle and filleted the edges to make them soft and smooth. I learned this from the tutorial videos watched before class.

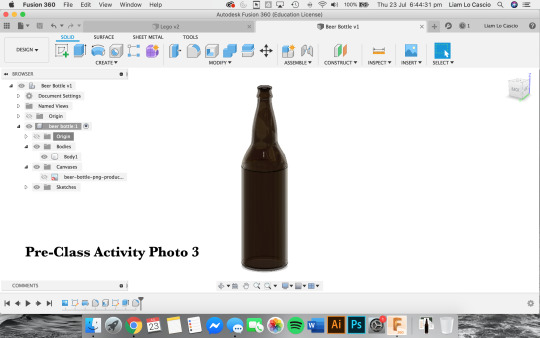
I experimented with possible materials and the model was complete (as seen in final image 1&2). In final image 3, I experimented with a possible label location and added darker colours in the groove to accentuate it more.


I greatly enjoyed the tasks this week and felt very accomplished when I finished my model. I was not very confident at the beginning of the task, however, by the end, I felt as though I had achieved a satisfactory model. I found myself becoming annoyed at times with the software as I received various errors which did not make sense to me and was unclear how to fix. I also feel that at times, Fusion 360 almost randomly is unable to complete some tasks and it is unclear as to why it cannot. I believe this issue could be improved by enhancing my troubleshooting ability as well as simply working with Fusion 360 more to understand why some errors occur.
12 notes
·
View notes
Text
Week 7 – Physical Model Making (foam)
I greatly enjoyed the activity we were required to complete this week. The task of making a blue foam model felt therapeutic, calming and gave me a sense of achievement as I saw my design slowly taking shape. I also liked seeing my design transform from a two-dimensional drawing to a three-dimensional, tactile object.
I started by creating my templates in order to develop the most accurate model possible (as seen in process image 1). These were used throughout the creation process to ensure I was achieving the correct shapes and dimensions.

My first problem came when cutting out the foam blank with a saw. The type of saw used meant I could only get part-way through the foam before being unable to go further (as seen in process image 2).

This issue was resolved by taking a new saw blade and pushing it with my hands rather than attaching it to a saw. This meant I could go the full way through, as seen in process image 3.

I then stuck the template on and began shaping the model to match. I enjoyed this part as I could slowly see my model begin to take shape.


When it was time to remove the template I came across an issue. I noticed that the glue I used had soaked into the foam and ate away large chunks of the front face (as seen in process image 6). Luckily, I had left a large excess of material either side of the model to ensure errors were recoverable. The glue was then removed with a rasp.

The shape was then further defined (as seen in process image 7) and then the entire model was smoothed out using various files and sandpaper (as seen in process image 8). At times I would find myself falling into the trap of removing too much material to fix any errors or attempt to improve the model. When this occurred, I would stop myself and either change to a tool which removed less material, such as a file or sandpaper, or simply move on to a different feature of the bottle.

I found that when using the sandpaper, scratch marks would appear in the foam. I have determined a higher grit sandpaper would solve this issue and leave a cleaner finish, however, this type of sandpaper was unavailable to me over the weekend.

Lastly, a cap was crafted for the bottle and the model was completed. I am very proud of the final outcome of the model and was surprised at the quality, given it was my first experience with blue foam model making.


Overall, I am very pleased with the work I have completed this week. The final model very much matches the image in my head of what the bottle would look like. I learned an immense amount about model making from this task and picked up a few tips from errors I made. I found it important to have only essential items on my desk as everything was covered in blue dust by the end of making the model. Taking your time and thinking before acting is also very important as one mistake, such as taking away too much material, can ruin the final model.
13 notes
·
View notes
Text
Week 6 - Non-Teaching Week
Model making is a crucial and essential aspect of the design process. Model making ensures all components of a product is considered and reaches the best possible standard. In the early stages of the design process, the making of a model can provide direction, rule out features or provide the designer with possible ideas. Later into the design process, model making can assist with perfecting the ergonomics of a design, the size and shape or ironing out any variables. Without model making, a designer would not be able to physically see or hold their product until it has been manufactured, meaning it is often too late to make any changes or resolve errors. For this reason, model making is essential to the design process and should never be overlooked or skipped.
“Home Makerspace”
The images below show my “home makerspace”. This space is found in my study at home is where I have been completing my work since isolation began.


Cube Activity
This week we created a cube using foam core. This activity taught me a lot about craftsmanship and accuracy while making. I began by cutting out six equal squares from the foam core with an exacto knife and tri-square (as seen in process image 1).

I then cut each edge to create a 45º angle in order for each face of the box to sit flush. It is at this point where I encountered the issue of the foam core tearing rather than slicing. After a bit of experimentation, I changed the blade in my exacto knife and this solved my issue. It was extremely satisfying seeing the blade cut through so smoothly and this taught me a valuable lesson about the importance of using equipment correctly and effectively. This is evident in process image 2.

My next issue I encountered was getting my angles perfectly 45º. An angle any larger resulted in the components of the cube not fitting together properly. I resolved this issue by joining each piece with tape to see how it all fit together (as seen in process image 3). I could then see which angle was out and then I was able to resolve this issue.

I then added glue to each side of each panel and held the cube together until the glue dried which gave me the final image seen below.

I learnt a lot this week about the importance of taking time and care when creating models as well as the importance of keeping all equipment at an optimal level for a professional final product.
14 notes
·
View notes
Text
Week 5 – Sketching Workshop
Overall, I really enjoyed this weeks activities. So far, I have enjoyed working with Photoshop and appreciate the opportunity to learn more and develop my skills.
The first exercise asked us to practice our freehand skills. I feel these were valuable exercises to improve our skills in technical drawing. These exercises can be seen in image 1-4


I began the second task by shaping the bottles using masks. This gave me the basic shape of the bottles. I feel this was good practice in using and understanding masks. At first I could not get the brush tool to paint smoothly, but after a bit of research I reset the brush settings and this solved my issue.

The task then asked us to add shadows, highlights and outlines. I learned from this valuable techniques to add dimension to my drawings in order to communicate more appropriately.

Lastly, annotations, a title block and a complimenting colour background were added. I enjoyed adding these components as I feel it made my final composition feel more professional and completed. This is a useful lesson to learn for the future if I ever have to present my ideas as professionally as possible.

4 notes
·
View notes
Text
Week 4 – Perspective Drawing
The first task in this week’s activities was fairly straight forward. At first, I was unsure as to how to find the right and left vanishing points. However, after following the slides uploaded to moodle, I was able to properly understand the process and find the vanishing points. My next challenge came with fitting the vanishing points on the sheet of paper (this can be seen in process image 1 where the vanishing point is outside of the grid). This required a bit of trial and error to find an angle which allowed clear and obvious vanishing points.

Process image 2 shows my perfected pencil drawing of the object. From this task, I learned a multitude of terminology, acronyms and processes which all felt relevant to me, as a designer. I can imagine myself using these skills often and so mastering them would be very beneficial. For instance, I learned what the vanishing points are as well as the differences between the horizon line, picture plane and ground level and how these lines impact upon a drawing.


The second task from the activities was also quite easy to follow as it involved extending the lines of the original box to create joining boxes. My only difficulty with this task was maintaining the same dimensions in each box. This was combated by measuring the original box and replicating these measurements. I learned a lot about perspective drawing from this task, noting that the closer to the horizon line a drawing is, the less you can see of the top face. Once the object reaches the horizon line, the top face can no longer be seen.

The final task was definitely the most difficult for me. It required us to draw ellipses in perspective. This was my first experience with this type of drawing and it did not come easily to me. I understand using the box, major and minor axis as construction lines, however, I struggle to see how these allow me to create the perfect ellipse. The circle on the left of final image 3 was the best by far, however, it is unclear to me how I would replicate this. With this being said, I intend on researching in the coming days and weeks as to how to draw ellipses in perspective and I will practice as much as possible.

This week, I struggled immensely with time management. My other assessments seemed to take much longer than expected, leaving me with minimal time to complete the tasks this week. In the future, I will try harder to stay on top of my workload to ensure all work required of me is completed on time.
4 notes
·
View notes
Text
Week 3 Part 2 - Secondary Auxiliary Views
I found the part 2 task of this week rather challenging. I began with the orthographic sketch of each face of the object, which felt relatively easy due to the practice I have received with each week’s task.

From this point is where I struggled quite a bit. I did not completely understand the purpose of the 3 picture planes and so, I drew them with minimal care or time. Due to this, my measurements became inaccurate and my drawing looked incorrect. After realising my error, I took more care with my picture planes, ensuring they were equidistant at each point and were parallel with their given sides. This ensured the drawing was more accurate and easier to understand.

Mentally visualising each face of the drawing was also a difficult task for me. At times I could not picture what it was I was drawing. I found that pausing for a moment and mentally rotating the object helped ground me and provide a way to properly visualise my drawings. This was also assisted by adding letters to the most important corners of the object as this helped to keep track of each side and corner.
From this week’s exercise, I learnt the importance of taking time and care with measurements to ensure they are as accurate as possible. This, in turn, will make drawing these objects much easier.
0 notes
Text
Week 3 – Section and Auxiliary Views
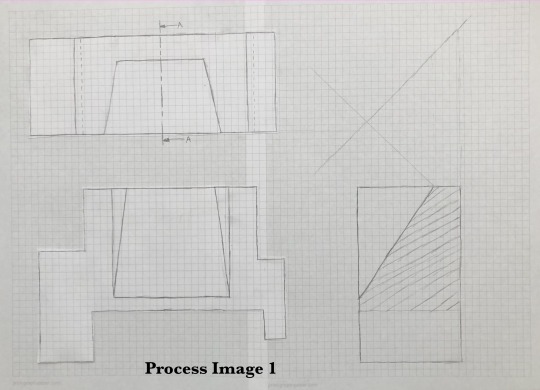
Overall, I found this week’s task slightly more straight forward than that of last weeks. I felt I learned from my mistakes from last week and created a good quality drawing. In saying this, I did have a few minor difficulties. My first issue came with organising the page. Due to the large scale of the shape being drawn, the page had to be accurately laid out in order for each view to fit on the page. I started with a free hand sketch (as seen in process image 1) to visualise the best organisation of my page. I realised that I would struggle to fit the auxiliary view in with this layout and so changed my layout.
My next challenge came with perfecting the partial auxiliary view. I confused myself with the projection of the shape and ended up drawing the face upside down as seen in process image 2.

My last challenge was caused from the close proximity of all of my drawings (as seen in the final image). This made writing the measurements cluttered and hence, impacted the final drawing. The drawing became more cluttered when I attempted to add a border as suggested in my comments last week. I agreed with the comment and thought it was a great idea, however I feel that due to the size of the drawing, the border created too much clutter and made the final drawing a bit confusing. For this reason, I did not complete the border as I did not want to add to the confusion.

I thoroughly enjoyed the tasks set this week and felt a sense of accomplishment seeing a neat and accurate final drawing. I feel as though I am slowly becoming more confident as the weeks progress.
If I was to complete this task again I would use a larger sheet of paper in order to properly space each view.
9 notes
·
View notes
Text
Week 2 – Orthogonal Projection & AS1100 Standards
This weeks studio tasks were a large challenge for me. Although the task was time-consuming and intricate, I still enjoyed it and appreciated the challenge.
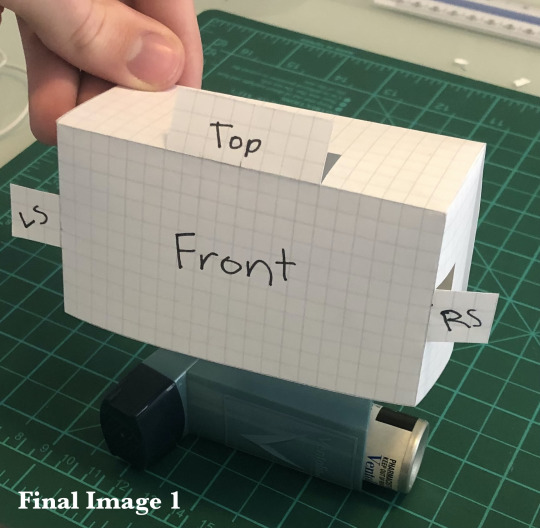
The first task asked us to create a box for our chosen object (as seen in final image 1). I found this task simple and fairly easy to complete. This box did assist me to process how to draw my chosen object (which was an asthma puffer) as I could visualise the different views.
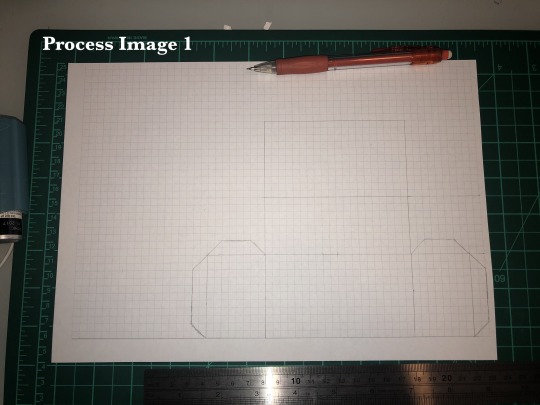
The second task required us to draw our chosen object roughly using a pencil and no tools (as seen in final image 2). This task was moderately difficult as it was challenging to get the dimensions and angles of the asthma puffer correct. It was determined that it was difficult to accurately visualise and depict the puffer on its side and this was adjusted in the next task. I did enjoy the freedom of drawing without having to use a ruler.
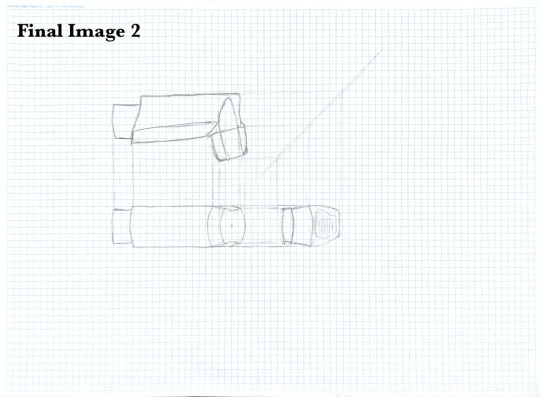
The final task asked us to draw our object accurately and cleanly, using the AS1100 Standards (as seen in final image 3). This task was the most difficult for me for a range of reasons. Firstly, upon beginning this drawing, I discovered the object I had chosen was rather difficult to draw due to its odd shape, angles and curves. Secondly, due to the shape of the object, it was also difficult to measure, resulting in my drawing’s dimensions being off. It was found that one wrong measurement can largely impact the drawing as each perspective becomes warped. Lastly, I also struggled with getting the perspective right which resulted in my side angle lacking accuracy. As seen in the front perspective of the image below, I incorrectly drew the perspective which resulted in the angle of the mouthpiece in the side view appearing incorrect. I believe that starting on the side perspective of this drawing may have allowed the rest of the drawing to appear more balanced and in a more accurate ratio.
If I was to do this task again I would begin with the side view first. This would assist me to get the perspective correct for the other views and make the whole composition much more accurate. I would also use other techniques to measure the object such as string and a ruler rather than estimating the final measurement.

Overall, I am proud of the work I have completed this week and I have learnt an immense amount from these activities.
7 notes
·
View notes
Text
Week 1 – Drawing Instrument Exercises
I found the task this week quite interesting. It was found that with the correct instruments, measuring was unnecessary as proportions could be maintained and angles could be accurate. In saying this, I did have some difficult drawing curves that were not full circles as I do not own french curves. This can be seen in the rounded corners of final image 2. To overcome this I simply had to draw these curves freehand which may mean that they are not perfectly accurate.
During this activity, I enjoyed seeing the drawing take shape as I outlined it in black pen, leaving the construction lines untouched. At first it was not clear what my final drawing would look like, (as seen in image #2) however became quickly apparent when the lines were inked (as seen in final image 1).
I found it very interesting completing the triangular drawing as seen in in image #4. It was especially intriguing that, by using the set squares, exactly the same equilateral triangle could be created simply by ensuring the same angle of every corner was maintained. This meant the final shape was completely symmetrical. Final image 3 shows the triangles fitting perfectly together.
Overall, this week was a very insightful introduction to the class and I am excited to progress further and develop my skills.


5 notes
·
View notes
Text
My First Blog Post
Hi, I’m Liam. I chose to do the industrial design course at UNSW as I greatly enjoy developing creative ideas to solve issues identified in the world. In my spare time I like to play soccer and listen to music.
2 notes
·
View notes