nikkiskylark
Daughter of Skylark
NikkiShe/herSideblog to:https://daughterofskylark.tumblr.comThis is where I post about my ongoing original story and any art associated with it.Placeholder name is Skylark, eventually I will give this an actual title.Meanwhile, enjoy the mad ramblings of a writer who doesn’t write.
220 posts
Don't wanna be here? Send us removal request.
Last Seen Blogs
bskhvc
solboo
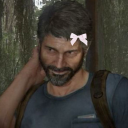
joelsgu4tar
ᖭི༏ᖫྀ
damianwaynemyson
Lets not fuck up okay?

funtime-fred
Rot In Hell Willy Boy

kingofthegods6969
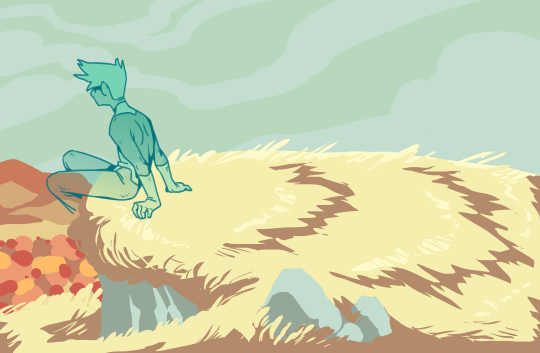
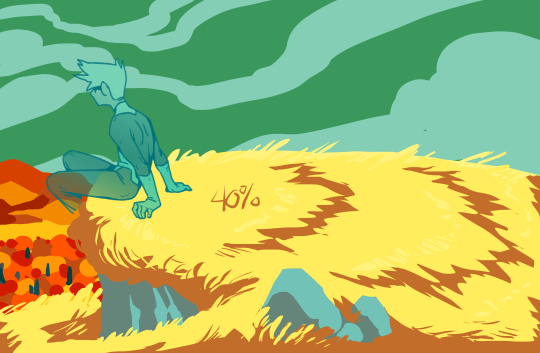
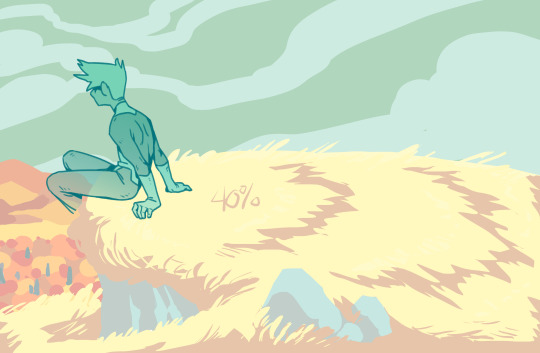
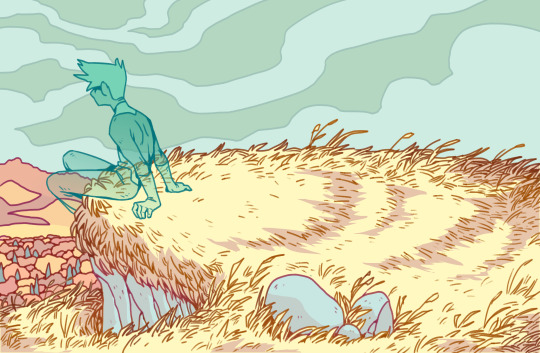
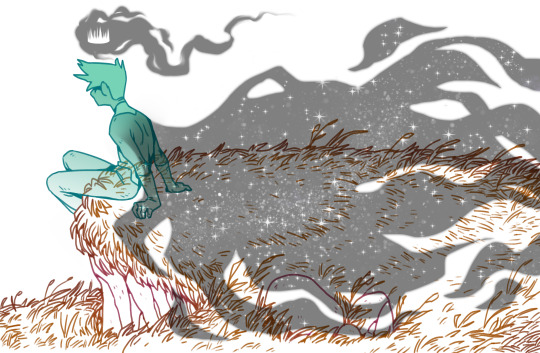
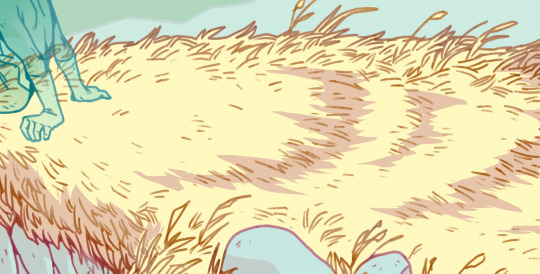
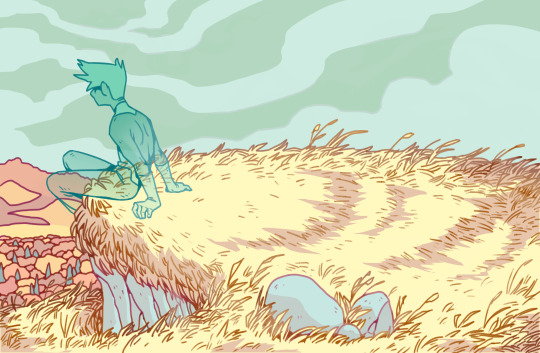
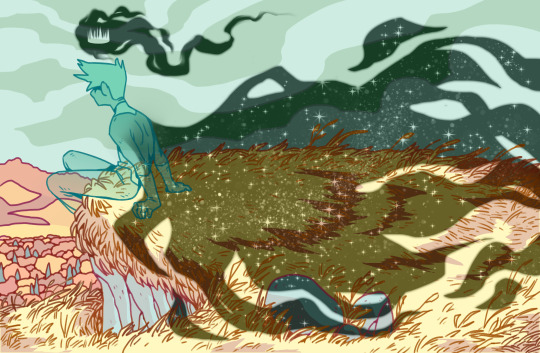
Untitled
Text
Random worldbuilding: A culture where everyone's social status is expressed through how their hair is braided.
Children all have the same kind of a simple, unisex "child's braid" which is meant for their parents to be easy to do - traditionally boys were only taught how to do a "wife's braid" while women braid both their husbands and their children, but a modern man is naturally an attentive father and contributes to both cleaning and feeding, and clothing and braiding his children.
While this kind of knowledge is more accessible in the modern age, the art of braiding is still seen as an intimate family thing, and it's not unusual for a youth to come out to their parents by the way of braids - for example a daughter asking her father to teach her how to do the "wife's braid", or a son asking her mother how to weave the "husband braid" for their future spouse. Or a trans kid asking their parents to give them the other gender's braid when it's time to transition from the child braid into the "unmarried youth" one.
It is nonetheless still somewhat common to see an older gay man with a "wife's braid" or two older women both wearing "husband braids", because that was the only way they were taught to braid a future partner's hair when they were young. They could learn the "appropriate" braid now, but it has become a part of the culture, an old-fashioned gay thing to do. It's pride - if you wear this braid to show that you're an adult with a spouse, why try to hide who braids your hair every morning?
The only braid that one is expected to do on themselves is the widow's braid - the only one that is also unisex, braided in reverse from the simple children's braid. Sometimes, young unmarried adults who have no interest in starting a family switch directly into wearing a widow's braid to signify that they are not looking for a partner and are independent adults on their own.
6K notes
·
View notes
Text
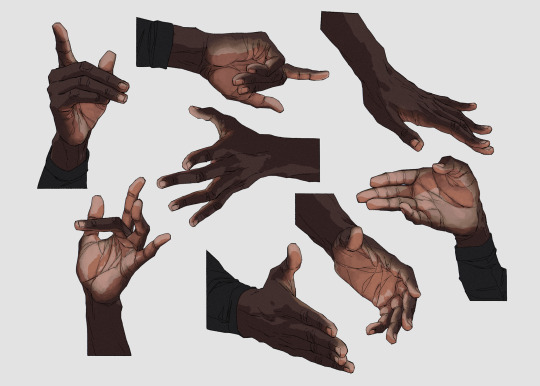
i watched one (1) video on how to draw hands that changed my life forever. like. i can suddenly draw hands again
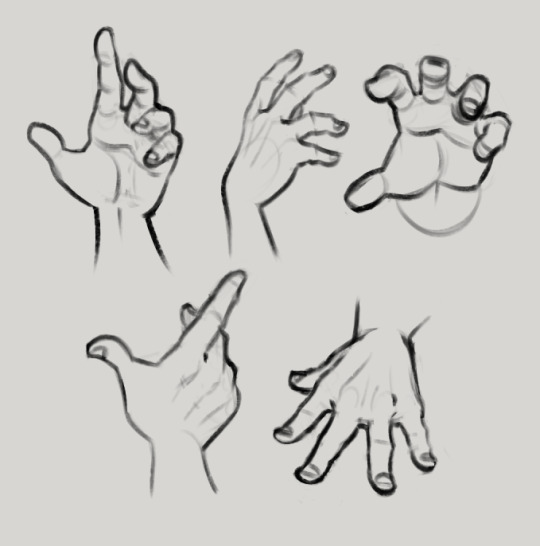
these were all drawn without reference btw. i can just. Understand Hands now (for the most part, im sure theres definitely inaccuracies). im a little baffled
66K notes
·
View notes
Text

How to draw ears, by me.
tip me a ko-fi!
13K notes
·
View notes
Text
51K notes
·
View notes
Text
Substitutes For "Dead Parents"
Okay you guys! I mentioned this in a past post, but when it comes to family, some of ya'll are just... not creative. And don't get me wrong, having deceased parents is deep, dark, and hard, but at this point, a lot of readers simply overlook that because it's just that common. Not to mention, a lot of you guys aren't doing nearly enough with that information! So, for this post, I'll give some new examples relating to "family struggles!"
>> Neglect: Neglectful parents often don't give their child enough attention, time, or care. They don't always hate their kid; quite the opposite, really, they can still love their offspring and are simply unaware that they are being neglectful. This happens for a multitude of reasons: all their attention is focused on a different child, they're busy, or they're just uninterested in their kid's activities.
>> Abuse: Abuse is rather straightforward; it can be physical, mental, or even both. Even if it's only physical abuse, it can heavily damage the child's mental health and make them question their self-worth.
>> Fighting: I think that a lot of us have endured our parents fighting, and I'm fully confident that none of us enjoyed it. It's incredibly difficult for a kid to listen to their parents fight without knowing how to stop it, being stuck in the middle, and even worse, being the center of the argument. As it escalates, the child may even feel neglected, because their parents are only focused on each other.
>> Absence: Like neglect, these parents don't devote nearly enough attention and time to their child. However, this is because they are hardly present in the household to begin with. Normally, it's their career that keeps them away, leaving their kid to raise themselves.
>> Controlling: Oftentimes, controlling parents are found in, believe it or not, more successful households. Kids who have parents that own a successful business or are powerful in general are sometimes raised to follow those footsteps regardless if they want to or not. If they don't want to, as a result, they are kept on a tight leash. Controlling parents can also be found in stricter households.
>> Toxicity: Toxicity, a form of emotional abuse, can come in many forms, gaslighting, demeaning words, constant criticism, comparison, etc. Frequently, the child is unaware that their parents are being toxic until a third party points it out to them. This is because they've only known their parents acting in toxic manners; thus, it becomes their norm. However, it's also entirely possible for the parent to be oblivious to the fact that they're being toxic.
>> Distant: Being distant doesn't always have to be because of some crazy reason; they might've been a very happy and close family once, but as time passes on, they just simply start drifting in their separate ways. It's not the same as neglect or an absence; the child is usually able to adjust to it easier, and it might've even been their choice to be distanced from their parents.
>> Child Responsibility: This is a scenario where the kid acts more like a parental figure--they have to take care of both themselves and their family. In some situations, they also have to work in order to supply their family with enough money to be able to pay for life necessities. This normally happens when a/the parent(s) are out of commission and struggle to provide for their family. If the household is poor, the child might be working alongside their parents in an attempt to make their lives easier.
Did I miss anything? Let me know what you guys think about these substitutes!
Happy writing~
3hks :D
2K notes
·
View notes
Note
I have been experimenting with transparency art (thank you so much for your tutorial!), but my biggest question is: how on earth do you get it to overlay on other colors? Its absolutely mind bending
With much patience and frustration 😫 (>>>The previous tutorial<<)
The key to making transparency work with colours, is getting the colour saturation and opacity levels to visually match.
Let’s lay down the basics. I've got these two coloured boxes and I want one of them to be transparent. But I also want them to stay the same colour until someone clicks on them, right?

Of course, the problem is that as soon as we drop the opacity, the colour saturation also drops and we get this:
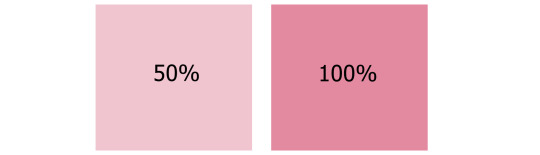
So what you have to do is hyper-saturate the colour of the low opacity area until it matches the full saturation one.
Or as close as you can get. If you can't get it exact, colour-pick from the 50% opacity area and recolour the 100% area so they match. This works best with colours that are already muted or pastel.
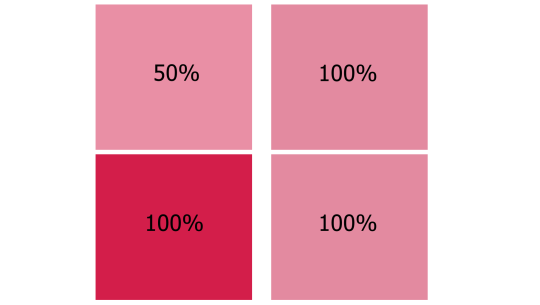
That's the basic principle. It gets 10x more complex when you start adding multiple colours and backgrounds... Full tutorial continued under the cut (this is going to be a LONG post) vvv
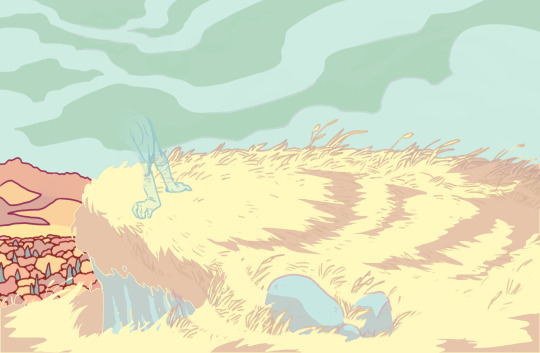
I'm going to use my Hill King ectober piece because it's a good example of how this transparency trick works on complex pieces.
The first step is to plot out approximately what colours/mood I wanted to end up with in the final piece.
Next I push my saturation ALL the way up.
And then drop the whole background opacity to 40% (Keeping all your background layers in a single folder is the easiest way to do this) I fiddled around with the individual colours, pushing their saturation and hues until I was satisfied with this sort of pastel look.
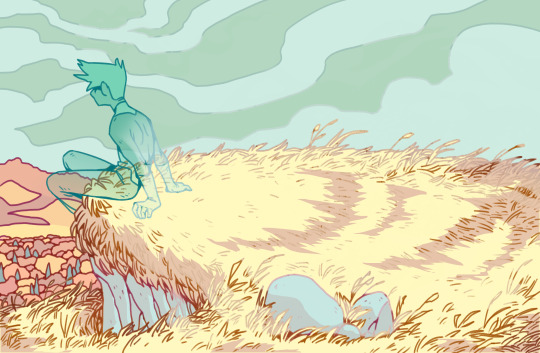
And here we are with the lineart added in. A few things needed to be retouched to accommodate the lines and that’s normal. If you have to change a few things make sure to pull your colours from the 100% version and not colour-pick from the low opacity.
Now to make the transparent section. This part may vary depending on your drawing program. I'm using Krita but I'll try my best to make the process applicable to other programs.
This is where it gets complicated:
Save two versions of your image.
One with lineart and colours at 100% full saturation.
One with the low opacity colours and NO lineart.
Make sure you have a white background under everything so that they are NOT transparent yet. Saving the two versions as flat images is VERY IMPORTANT. Do Not merge all your layers. Just save as a PNG.
Your two versions should look like this:
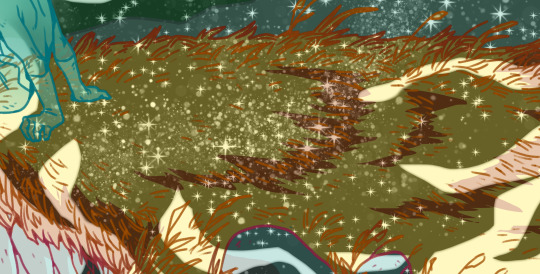
On a new layer draw your cut-away shape. This is the area that you want to be transparent at the end. I used an eraser for the stars and crown so they show up as the colours underneath. If you can, make the edges of your shape just a little bit blurry. Hard edges will show up and reveal your trick.
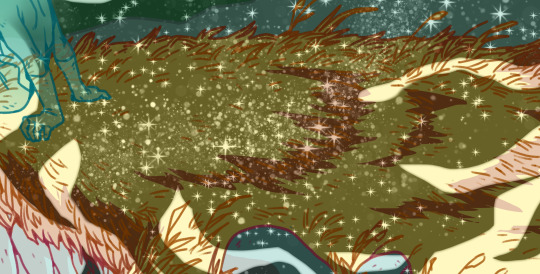
Duplicate this layer so that you have at least two copies.
You are now going to cut your shape out of the low opacity flat image. In Krita that means setting the cut-away shape layer to ‘Erase’ and merging it down with the low opacity layer. With other programs it might mean selecting your cut-away shape and manually ctrl+x cutting the shape out or using some kind of clipping mask.
If you’ve done it right, you should be able to see your high saturation layer with the lineart underneath.
By dropping the opacity of your high saturation layer it should blend in seamlessly with your background. In this case, I drop it down to 40% to match. You’re going to get this funky little ghost effect with the lineart from underneath.
If I had kept my lineart as part of the original low opacity image when I saved it, it would have ended up looking like this:
Now, remember how I said to make a duplicate of the cut-away shape? That comes back here. The cut-away section of lineart is stuck at 40% opacity. If we simply plop our lineart back on top of everything at it’s current opacity, it stands out too much. (In my opinion, this might be perfect for your piece!)
But I want it to blend in a bit, more like this:
So I take my lineart and my cut-away shape and do the exact same thing as before. Except this time I keep my shape at 50%. In Krita, with the Erase layer, this means it only erased 50% of my line’s opacity. I have zero idea how this would work with a clipping mask, sorry :(
Which gives us this:
(Use a black background under the see-through area to show it off)
And that’s it! We now have transparent colours that blend seamlessly with the full opacity sections and lineart that is clear but doesn’t distract from either version!
Turn off all your background layers and save as a .png image (this won’t work with a .jpg!). Upload your pic to tumblr and see if it works. If the transparency doesn’t show up correctly you may have to scale your image down to a smaller size! Tumblr is very picky like that.
This process isn’t perfect and it sure takes a lot of time but the effects can be super cool and totally worth the effort! If you’ve made it all the way to the end of this LOOOONG tutorial you are a BAMF! Put a little ‘yeehaw!’ in the notes for yourself and Happy Arting!
3K notes
·
View notes
Photo


349K notes
·
View notes
Text
every day I think about the religious anime girls…

And how the artist drew several pro-Palestine drawings like this one

in 2014, that’s right, 2014, this did not fucking start October 7th.
#head covering#head scarf#religious anime girls#religious head covering#religion#clothing#clothes#ref clothes#ref clothing
57K notes
·
View notes
Text
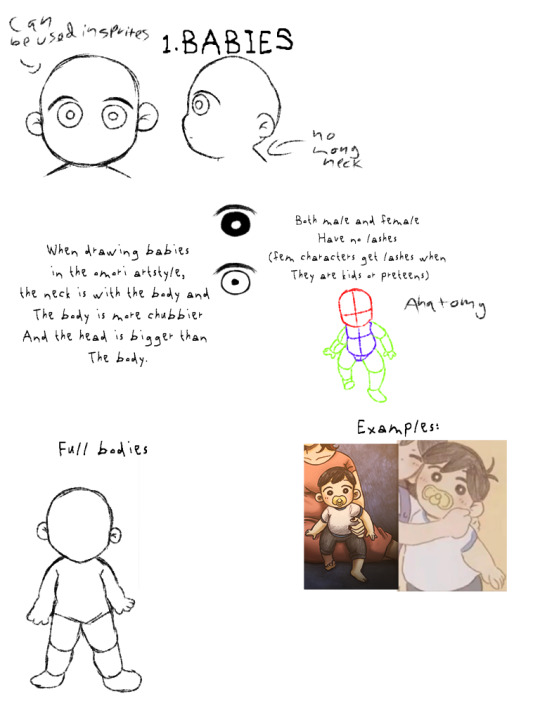
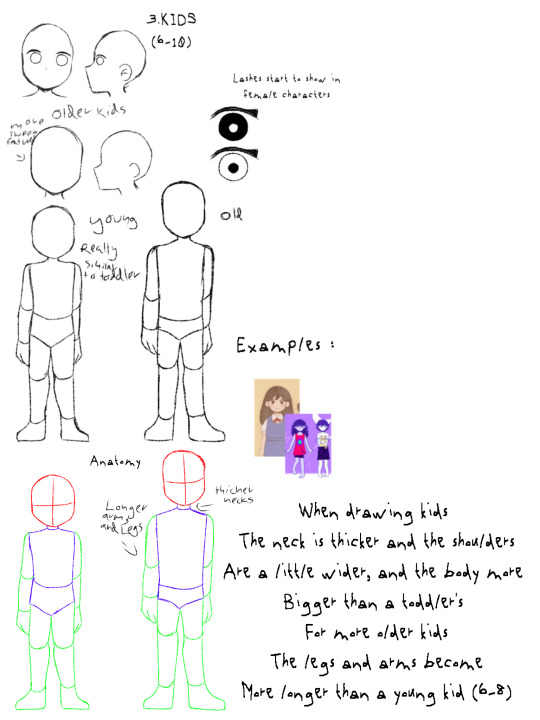
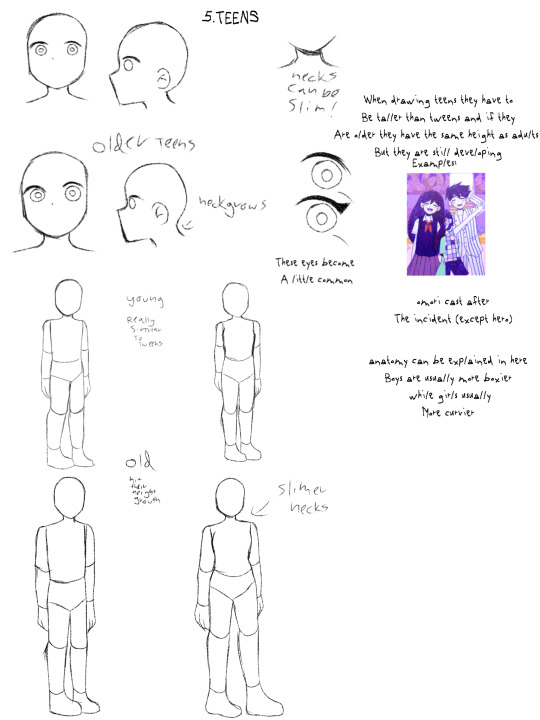
tutorial on how to draw people in different ages
in the... OMORI ARTSTYLE


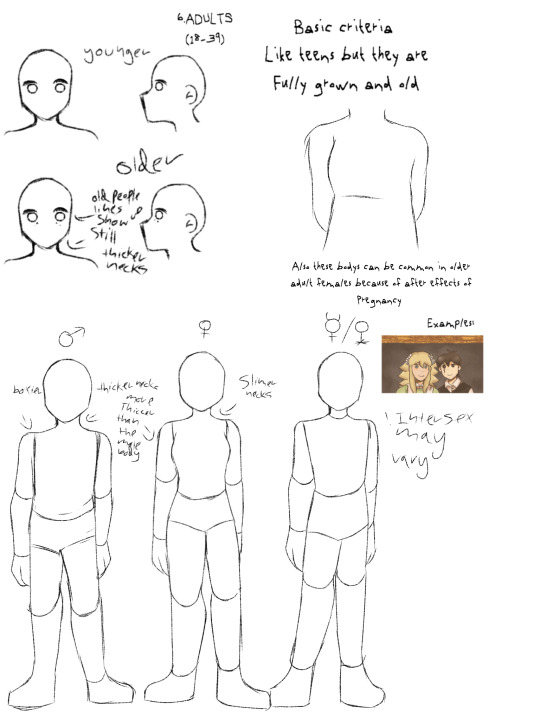
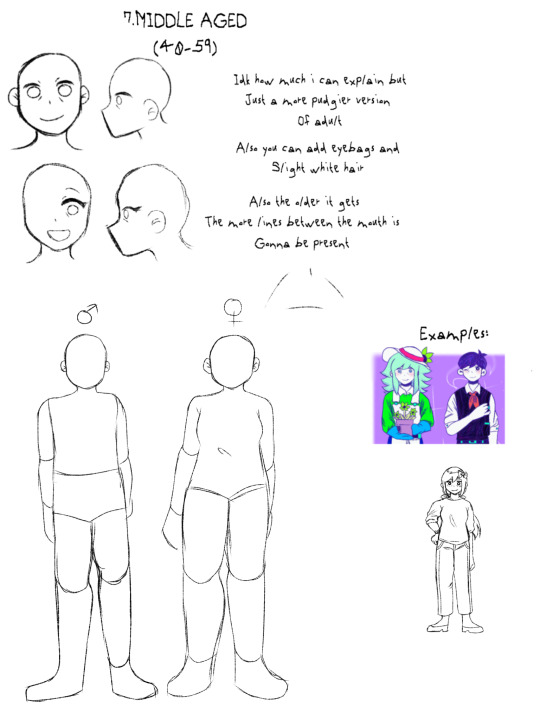
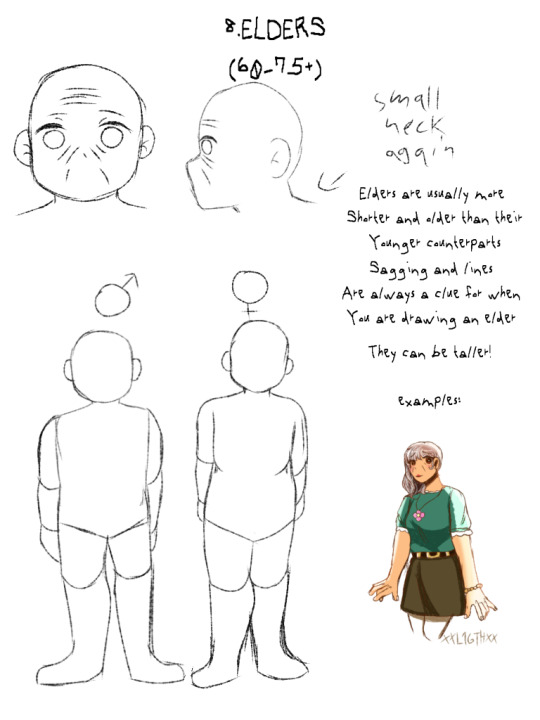

50 notes
·
View notes
Text
not gonna say it again!!!
496 notes
·
View notes
Text
A general cane guide for writers and artists (from a cane user, writer, and artist!)
Disclaimer: Though I have been using a cane for 6 years, I am not a doctor, nor am I by any means an expert. This guide is true to my experience, but there are as many ways to use a cane as there are cane users!
This guide will not include: White canes for blindness, crutches, walkers, or wheelchairs as I have no personal experience with these.
This is meant to be a general guide to get you started and avoid some common mishaps/misconceptions in your writing, but you absolutely should continue to do your own research outside of this guide!
This is NOT a medical resource!!! And never tell a real person you think they're using a cane wrong!
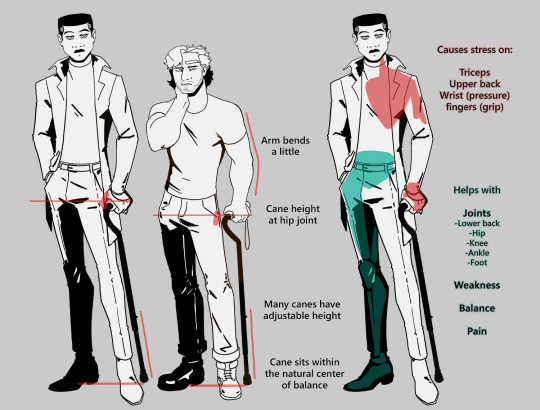
The biggest recurring problem I've seen is using the cane on the wrong side. The cane goes on the opposite side of the pain! If your character has even-sided pain or needs it for balance/weakness, then use the cane in the non-dominant hand to keep the dominant hand free. Some cane users also switch sides to give their arm a rest!
A cane takes about 20% of your weight off the opposite leg. It should fit within your natural gait and become something of an extension of your body. If you need more weight off than 20%, then crutches, a walker, or a wheelchair is needed.
Putting more pressure on the cane, using it on the wrong side, or having it at the wrong height can make it less effective, and can cause long term damage to your body from improper pressure and posture. (Hugh Laurie genuinely hurt his body from years of using a cane wrong on House!)
(some people elect to use a cane wrong for their personal situation despite this, everyone is different!)
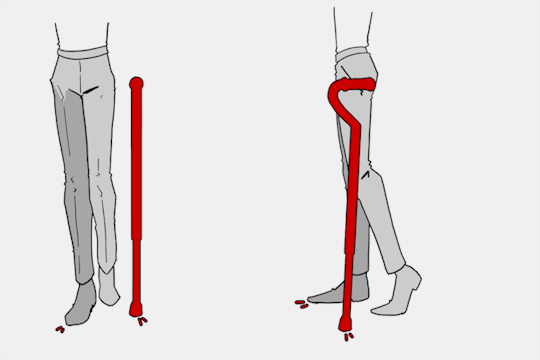
(an animated GIF of a cane matching the natural walking gait. It turns red when pressure is placed on it.)
When going up and down stairs, there is an ideal standard: You want to use the handrail and the cane at the same time, or prioritize the handrail if it's only on one side. When going up stairs you lead with your good leg and follow with the cane and hurt leg together. When going down stairs you lead with the cane and the bad leg and follow with the good leg!
Realistically though, many people don't move out of the way for cane users to access the railing, many stairs don't have railings, and many are wet, rusty, or generally not ideal to grip.
In these cases, if you have a friend nearby, holding on to them is a good idea. Or, take it one step at a time carefully if you're alone.
Now we come to a very common mistake I see... Using fashion canes for medical use!
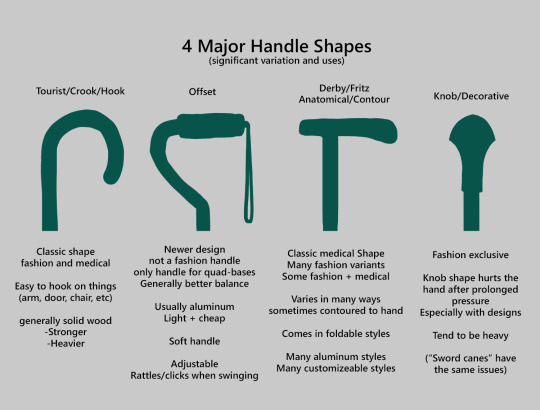
(These are 4 broad shapes, but there is INCREDIBLE variation in cane handles. Research heavily what will be best for your character's specific needs!)
The handle is the contact point for all the weight you're putting on your cane, and that pressure is being put onto your hand, wrist, and shoulder. So the shape is very important for long term use!
Knob handles (and very decorative handles) are not used for medical use for this reason. It adds extra stress to the body and can damage your hand to put constant pressure onto these painful shapes.
The weight of a cane is also incredibly important, as a heavier cane will cause wear on your body much faster. When you're using it all day, it gets heavy fast! If your character struggles with weakness, then they won't want a heavy cane if they can help it!
This is also part of why sword canes aren't usually very viable for medical use (along with them usually being knob handles) is that swords are extra weight!
However, a small knife or perhaps a retractable blade hidden within the base might be viable even for weak characters.
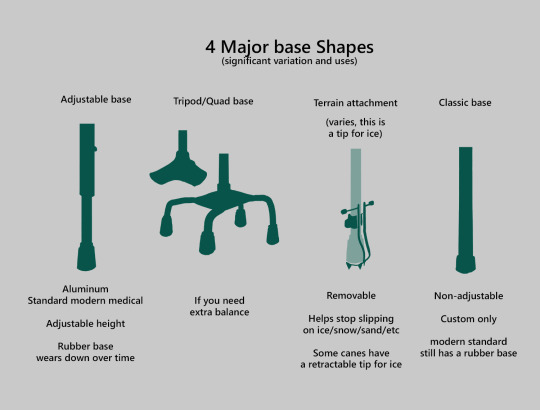
Bases have a lot of variability as well, and the modern standard is generally adjustable bases. Adjustable canes are very handy if your character regularly changes shoe height, for instance (gotta keep the height at your hip!)
Canes help on most terrain with their standard base and structure. But for some terrain, you might want a different base, or to forego the cane entirely! This article covers it pretty well.
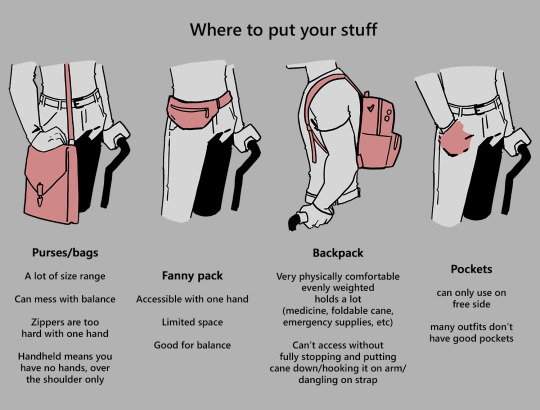
Many cane users decorate their canes! Stickers are incredibly common, and painting canes is relatively common as well! You'll also see people replacing the standard wrist strap with a personalized one, or even adding a small charm to the ring the strap connects to. (nothing too large, or it gets annoying as the cane is swinging around everywhere)
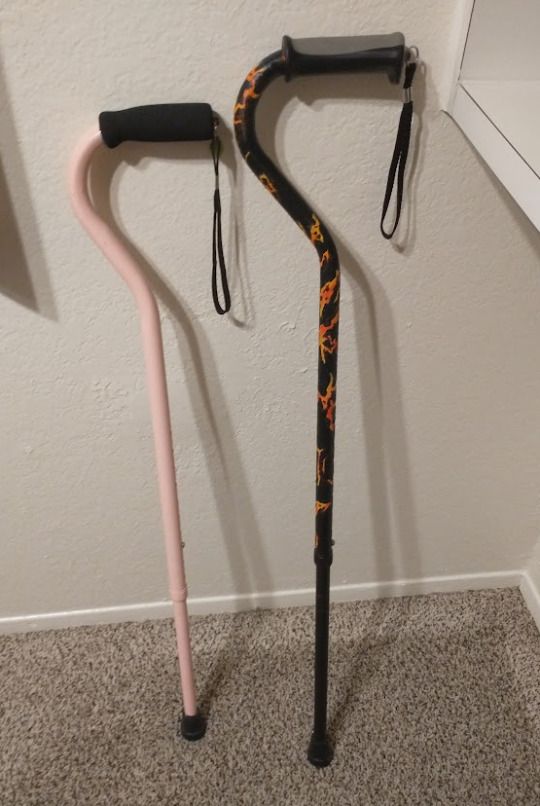
(my canes, for reference)
If your character uses a cane full time, then they might also have multiple canes that look different aesthetically to match their outfits!
When it comes to practical things outside of the cane, you reasonably only have one hand available while it's being used. Many people will hook their cane onto their arm or let it dangle on the strap (if they have one) while using their cane arm, but it's often significantly less convenient than 2 hands. But, if you need 2 hands, then it's either setting the cane down or letting it hang!
For this reason, optimizing one handed use is ideal! Keeping bags/items on the side of your free hand helps keep your items accessible.
When sitting, the cane either leans against a wall or table, goes under the chair, or hooks onto the back of the chair. (It often falls when hanging off of a chair, in my experience)
When getting up, the user will either use their cane to help them balance/support as they stand, or get up and then grab their cane. This depends on what it's being used for (balance vs pain when walking, for instance!)
That's everything I can think of for now. Thank you for reading my long-but-absolutely-not-comprehensive list of things to keep in mind when writing or drawing a cane user!
Happy disability pride month! Go forth and make more characters use canes!!!
73K notes
·
View notes
Photo

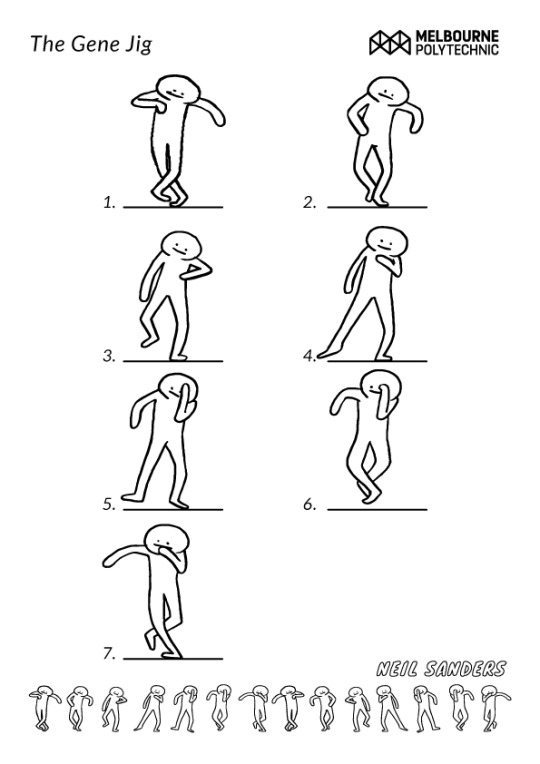
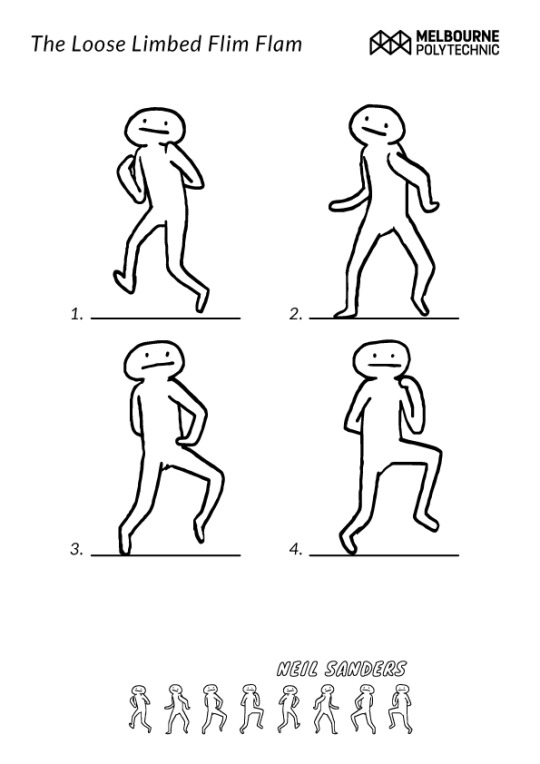


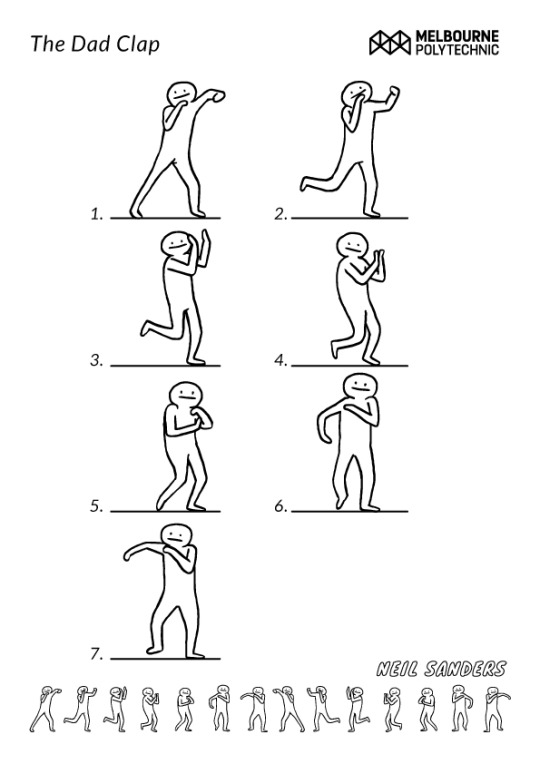

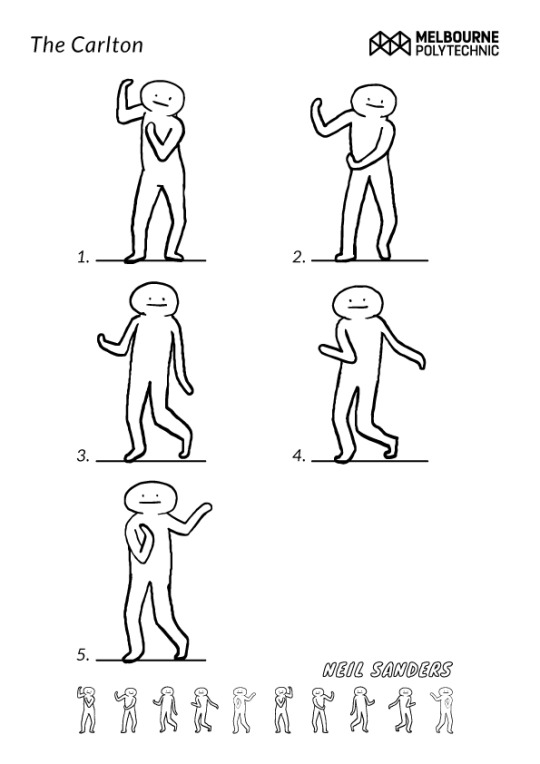
I’m running an Introductory Animation Workshop with creative arts students this Saturday (August 20, 2016) for The School of Creative Arts Open Day at Melbourne Polytechnic’s Prahran Campus.
I’ve rotoscoped and broken down some of the greatest dance gifs to their basic poses and we’re going to collaboratively design characters then MAKE THEM DANCE!!
Come down, check out the campus and say HI!
I can’t wait to see the weird animated goofs that result from this workshop, I’ll post them in a couple of days so we can all be in awe of their hilarious spontaneity!
56K notes
·
View notes
Text
It costs 0$ to Repost a Black disabled queer small business! It could lead to my next sale.
I sell pins, stickers, compression gloves, artist gloves, binders, hip braces, wrist braces, compression socks & more!
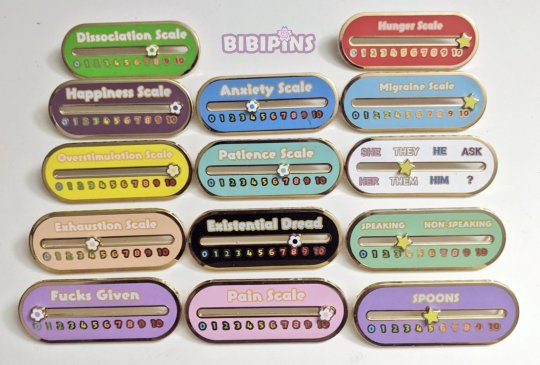

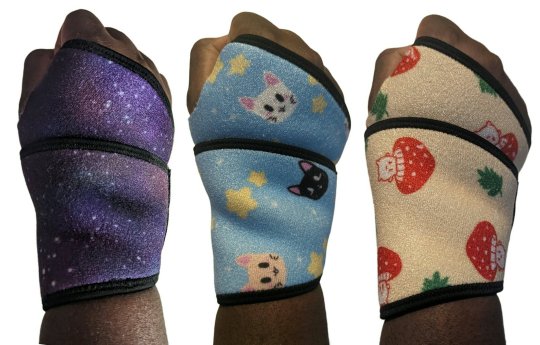

Store detailed below!
3K notes
·
View notes
Video
155K notes
·
View notes
Photo

ti je fajtor që zemrën ma ke thy
7K notes
·
View notes
Text
FOUND family??? you think i just found them like this??? babes this is FORGED family. Me & the bros were scrap metal in a junkyard (very valuable, very sharp, very dangerous, uncared for) and we GOT IN THE FUCKING FIRE TOGETHER. WE did this. we said I AM NOT LEAVING YOU and melted into each other for better or for worse (it’s for better) and we are A FUNCTIONAL UNIT now. DO NOT SEPARATE. BATTERIES FUCKING INCLUDED. FOUND family my ass, we built this non-nuclear family unit from the ground up, don’t devalue this!!! it was is and will be a labour of love!!!
55K notes
·
View notes
Text

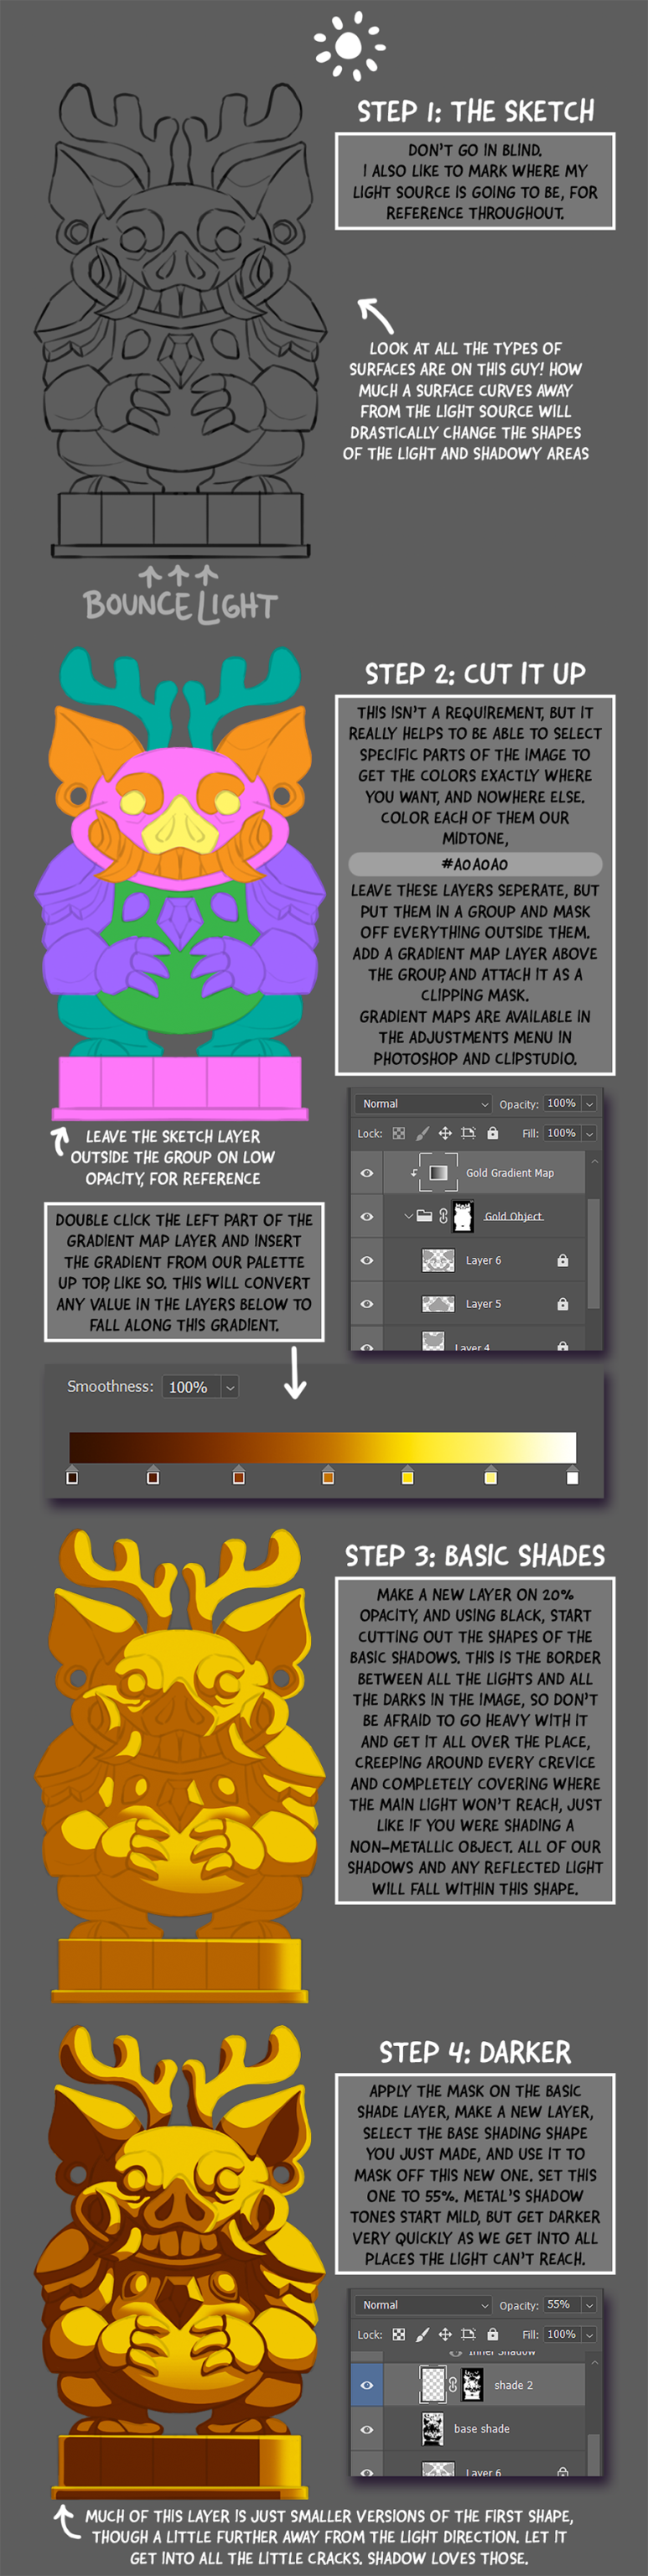
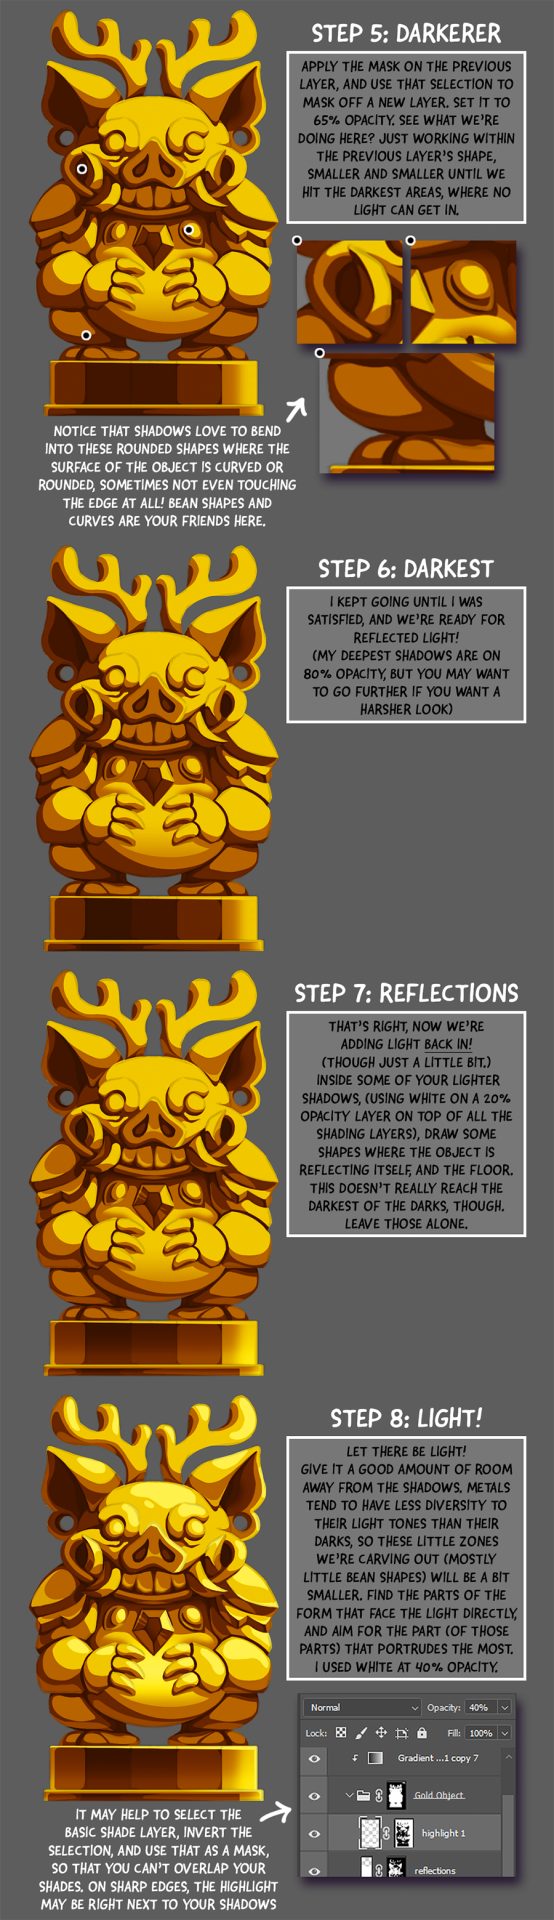
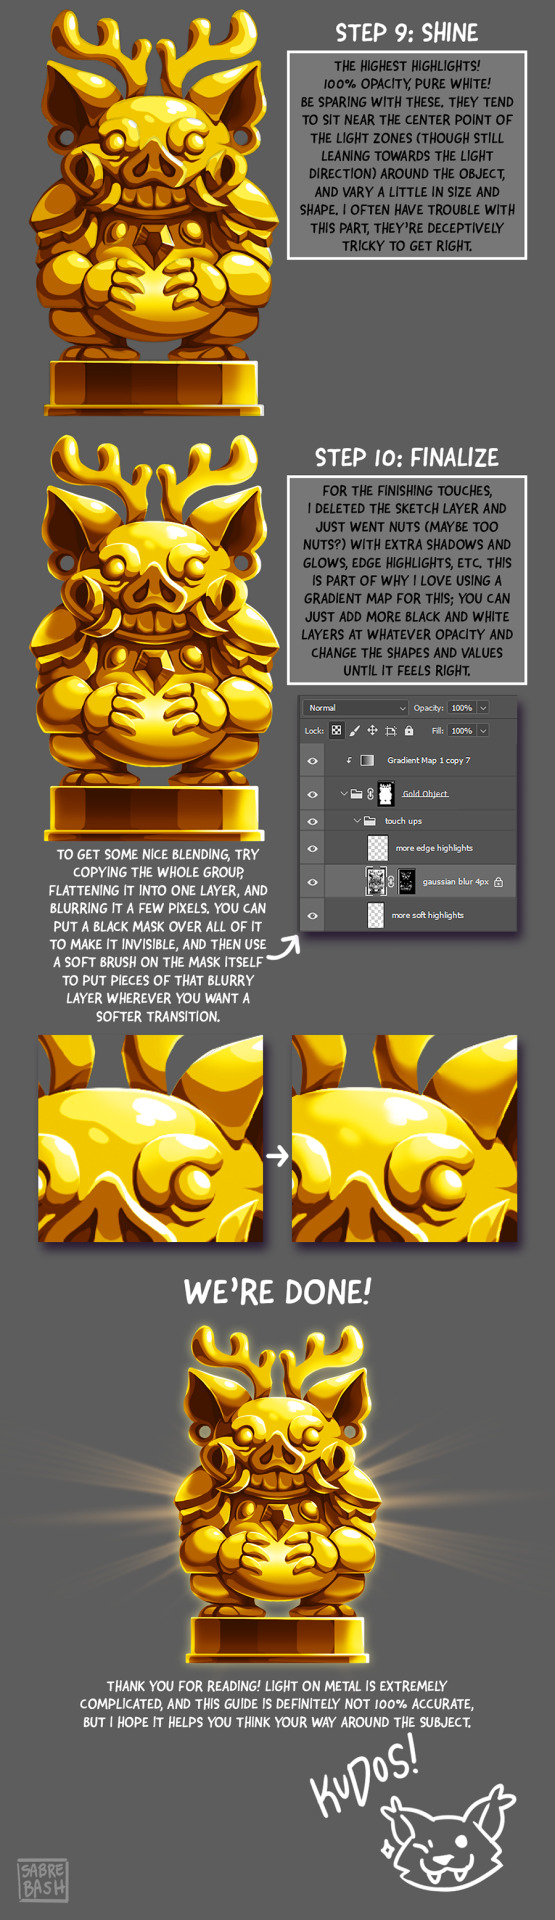
I have to draw a lot of gold and metal for my work, but wasn't happy with any of the metal tutorials i could find around. I prefer really specific instruction, so after some research i put together what i think works as a generalist's guide/tutorial. Not perfectly accurate, but i hope it's helpful!
26K notes
·
View notes