
Last Seen Blogs


Text
I bought this lovely woolen blanket at the bargain section of Ikea a while ago – it had been there because it had a hole. I thought it could be an opportunity to learn/practice darning. Unfortunately, I then had to realise that it must've been slashed while opening a package, so it really has more like five to ten holes. I got really discouraged and left it lying on a mending pile for ages.
Since I've been sick all week, I've been puttering at home a lot and sorting things and I came upon my mending pile and the blanket. I decided to finally tackle it and some other projects and looked up darning methods and was ultimate led back to tumblr.
Thanks especially to @wastelesscrafts I got the motivation and instruction I needed to start doing some visible mending and boy, do I love it. Thank you!!
I've been happily hyperfocussing on darning away (and watching sense8 while doing it) all day and here are the first results:

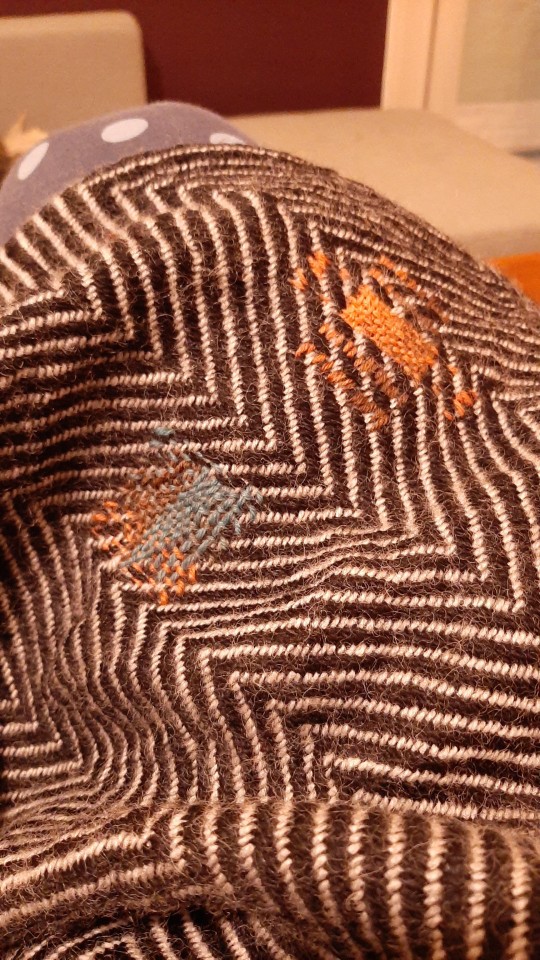
They're a little wonky (also the coarsely woven fabric is quite hard to work with) but I'm super happy with them anyway. I did them with sock yarn because I felt like that went with the texture of the blanket.
748 notes
·
View notes
Text
I just learned Jansport is making adaptable bags for mobility devices and thought I should share
They even have audio descriptions
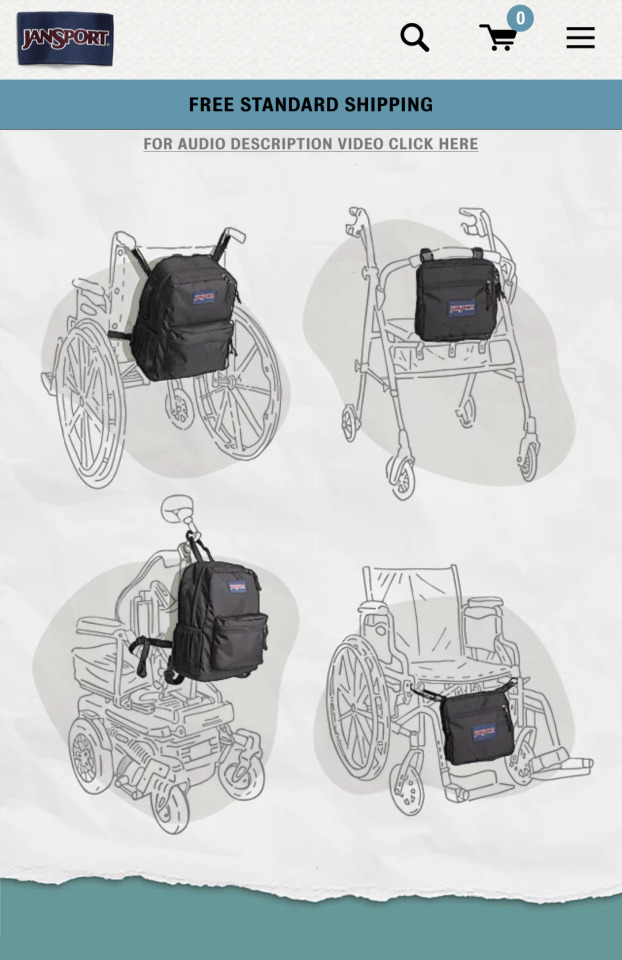
[ID: a screenshot of the mobile Jansport website. There is a banner that says 'free standard shipping.' Under the banner is a link that says 'for audio description video click here.' Under the link is an illustration of 4 different types of mobility devices, each with its own adaptable Jansport bag. End ID.]
Jansport is a little pricey but it isn't like the adaptable bags are any more expensive than their other stuff, which is nice to see too!
45K notes
·
View notes
Text

nothing widens your choices when thrifting like a seam ripper. ugly embellishment? no there isn't. weird section or addition? nope. annoying brand logo? begone.
4K notes
·
View notes
Text


This nightgown is a wearable mockup, based on some pictures of an 18th century one from an auction site. I'm mostly happy with it, but will change a few dimensions next time I sew it up. I cut the body way too wide, and accidentally messed up the sleeve length and had to widen the cuffs to make up for it, but other than that I think it's pretty close.
The collar on the original had me puzzled for a while, but I eventually realized it's just a regular rectangular collar, only with the corners cut off at an angle. Other than that, and the placket, it's all rectangles and constructed much like an 18th century shirt.
At some point I would like to make a white version with ruffles similar the original, but I really want more plain versions like this too!
This one's made from a nice soft thrifted cotton bedsheet, and I have a couple more sheets that I also mean to turn into nightgowns.
I think I like this pattern better for fine fabrics, and my Edwardian one better for bulky flannel.
347 notes
·
View notes
Text


I'm handsewing a 15th century Italian style doublet for the medieval festival in Provins this June ! Here are some process pics and some of my original references !
This is my first time both handsewing a whole garment and drafting my own mockup so it's far from perfect but I'm already quite proud of how it's turning out :D I'll post updates as it goes. Onto the lining !
2K notes
·
View notes
Text
Free Pattern Resources
I'm trying to gather free sewing patern resources. These are the ones i have so far please feel free to add your own. hoping to turn this into a masterpost sometime soon.
212 notes
·
View notes
Text
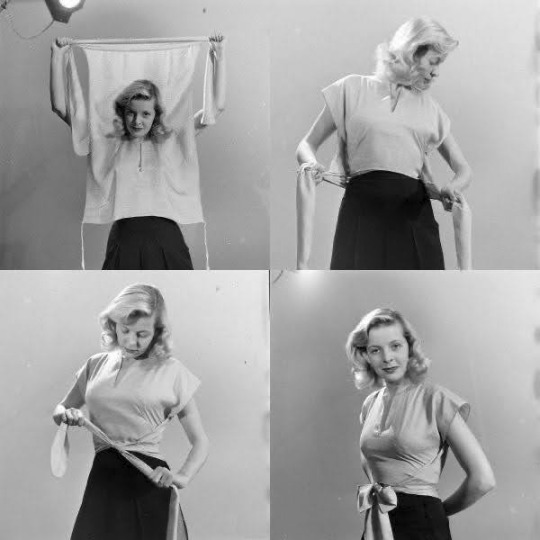
(Image source) [ID: four black and white photo's of a person demonstrating how to wear a simple wrap top made out of a rectangle with a neckhole and straps at the sides.]
Easy vintage wrap top
This vintage wrap top design is an easy beginners project: you don't need a pattern, you can customise it to your own size, and despite lacking stretch it doesn't require any zippers or buttons.
The top is made out of woven fabric and consists of a rectangle in which a hole for the head is cut. Straps are added to the short sides of the rectangle to tie the top around your body.
There's a lot of variations on this top: to see examples, check out these written tutorials by Sew What Gilly, Freshly Given, Gina Michele, Sadie the Sewing Machine, The Thread, and Mood Fabrics.
AssunDIY on Youtube also has tutorials for two variations on this top: a rectangle shirt version and a butterfly shirt version.
Given the simplicity of this top, it's a neat way to use up old bed sheets and such.
Some examples:


(Image source 1) [ID: a person standing in a kitchen while wearing a gray wrap top with t-shirt-like sleeves and a round neckline.]
(Image source 2) [ID: a gray wrap top lying on a wooden floor. The top consists of a rectangle with a hole cut in the middle for the head. Two sets of straps, one thin and one thick, have been sewn to the sides of the rectangle.]

(Image source 1) [ID: a person modelling a royal blue wrap top with large sleeves and a keyhole neckline.]
(Image source 2) [ID: a royal blue wrap top lying on a tiled floor. The top consists of a rectangle with a hole and a slit for the head, and thin straps at one end of the rectangle and thick straps at the other end.]
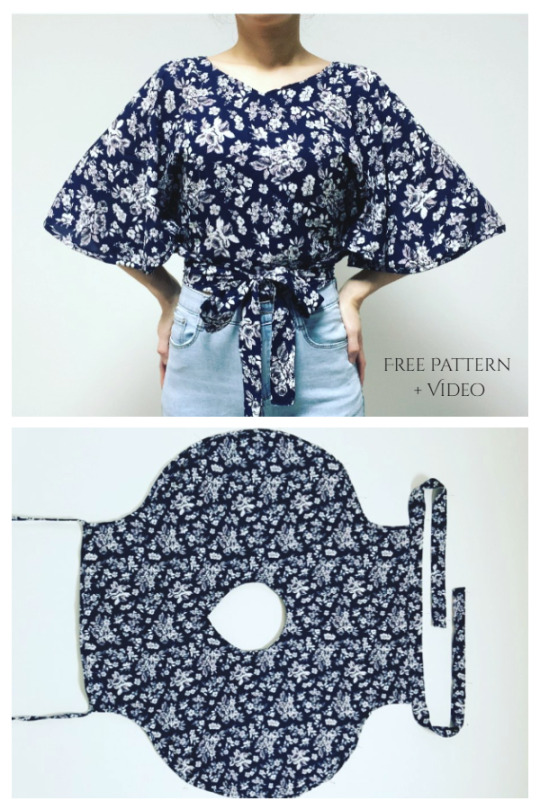
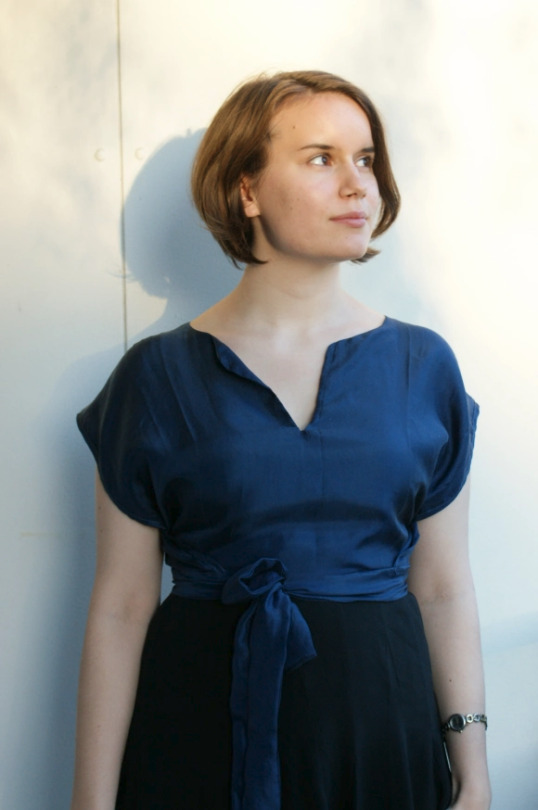
(Image source) [ID: two photo's. Photo one shows a person wearing a wrap top made from a dark blue fabric with white flowers. The top has very wide sleeves. Text: "Free pattern + video". Photo two shows the same top lying on a white background. It has a drop-shaped neckhole, two sets of straps (one thin and one thick), and round bulging sleeves.]
17K notes
·
View notes
Text
INDEX: projects and patterns
Patterns and project ideas:
DIY cotton rounds
Easy knitted gloves
Free customisable sewing patterns
Easy rectangle skirt
DIY tote bag
DIY delicates laundry bag
DIY hot pads
Easy fleece hat
Fingerless fleece gloves
Apron pattern
Knitted weighted blanket (by Knitboyknit)
How to make a custom dress form
DIY scrunchies
DIY menstrual pads
Upcycled fabric baskets
DIY scrap fabric basket
DIY garter belt
DIY drawstring bag
Free 1920s sewing patterns
DIY dog bed
Pronouns cross-stitch patterns
Upcycling sweaters
DIY cutlery pouch
Little frog toy (by Boigameista)
Kawaii bat plushie pattern
Elastic waistband pants
DIY pumpkin plushies
DIY fabric flowers
Easy tunic tutorial
Easy knitted sweater
DIY ironing board cover
Recycled glove: chipmunk plushie
Repurposed denim wall organiser
DIY: jeans into denim jacket
DIY measuring tape bracelet
DIY pencil pouch
One hour dress and matching slip dress
DIY reusable dish scrubbers
DIY leggings from old sweaters
DIY fabric yo-yo's
DIY flannel sleep mask
Hooded cowl pattern
Cotton reusable snack bag
Binder pattern drafting tutorial (not free) (by Forestine)
T-shirt to shorts refashion
Oddknit.com
Hooded muffler knitting pattern
DIY scrap-pieced belt
Upcycled denim tic tac toe game
Easy knitted fingerless gloves
DIY grocery bag (pattern drafting instructions)
Homemade candles (by Of-shit-and-fans)
DIY bedside pockets organiser
Jeans to bell-bottom jeans (by Enterthetrees)
Easy vintage wrap top
Knitted dickeys
DIY cable organiser
DIY wrist pincushion
Circle skirts 101
Knitted cowl pattern
Removable winter pockets (by Aeolianblues)
DIY packing pouch and packers (by Fatmasc)
DIY knit/crochet buttons
Cute mouse plushie pattern (by My-darling-boy)
Easy vintage wrap dress
Envelope cushion cover
Heart-shaped zipper pouch
Star Wars craft projects
DIY ear warmers
Crochet vampire bat appliqué
DIY scrap fabric ball
Crochet mannequin head pattern
DIY fabric matching game
DIY cat zipper pouch
Crochet cat/bear basket
(If a link has a Tumblr username in brackets behind it, the link leads to a post I reblogged from someone else instead of a post I wrote myself.)
2K notes
·
View notes
Text
Project: easy wrap pants
Introduction:
I was in need of a new pair of warm weather pants. My requirements were for them to be 1) handmade, 2) cotton or linen, and 3) preferably made from upcycled materials.
While looking for inspiration, I found the following images of a simple but ingenious wrap pants design. I love this type of sewing pattern, so I decided to try it out.

(Image source) [ID: four pictures of a person demonstrating how to put on a pair of wrap pants. First, the front of the pants is tied to the front of the person. Then, the centre of the pants is pulled up through the legs. Finally, the back of the pants is also tied around the person's waist, creating a pair of pants.]

(Image source) [ID: three images of a pair of white wrap pants with a floral print. Image one shows the pants untied and hanging on a wall. Image two shows the fabric for the pants right after cutting. Image three shows the pants while worn.]

(Image source) [ID: two images: the first one is a drawing of the front and back of a pair of wrap pants. The second one is a technical drawing showing how to construct a pair of wrap pants by cutting a U-shape out of two rectangles of fabric and then sewing the U-shaped holes together to form the crotch of the pants.]
The project:
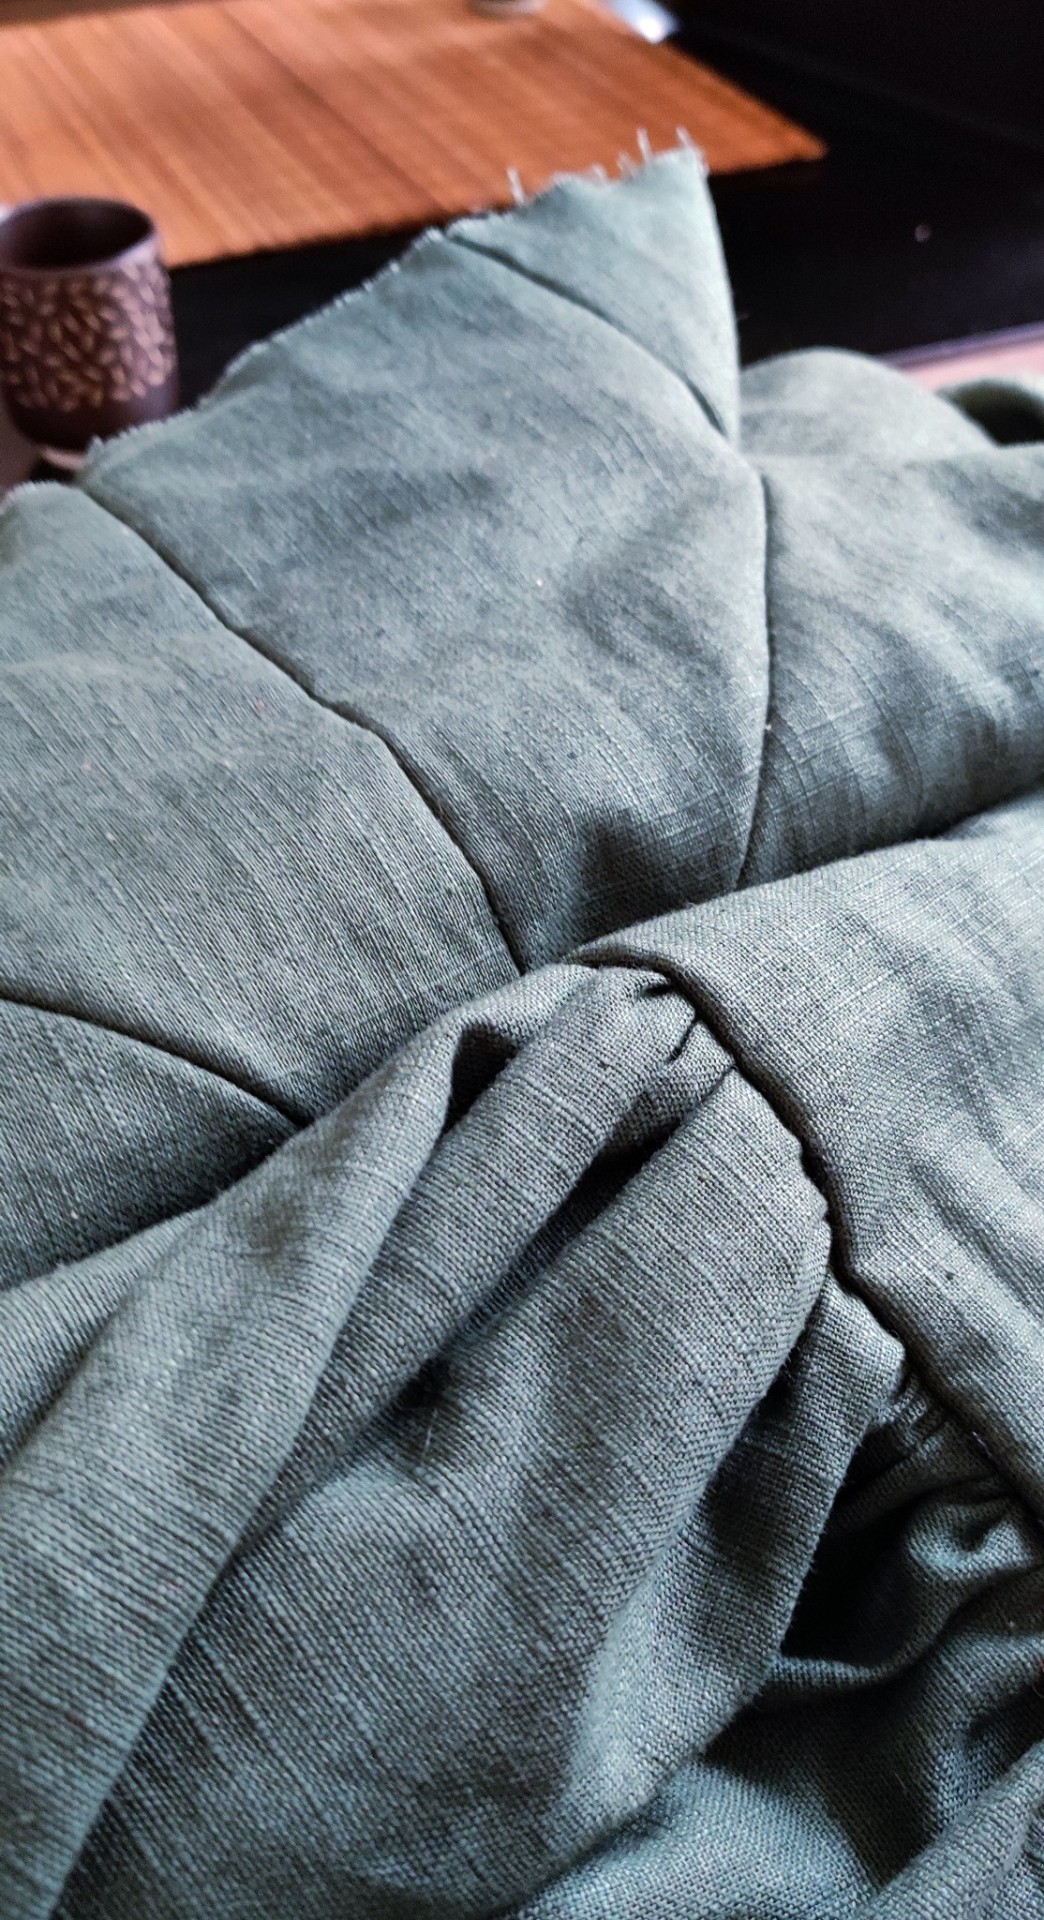
I rarely buy new fabric. I'm at my most creative when I'm limited by what materials I have available, so I usually limit myself to things like thrifted scarves or discarded clothes. This type of pants requires a lot of fabric, so that wasn't an option this time. I still managed to reuse old fabric: a local charity was selling donated fabrics a while ago, and I was lucky enough to find a few metres of green cotton.
It's always advisable to wash your fabric before starting a new project. This went double for this specific fabric as I have no idea of its origins, plus it had a fair amount of stains.

[ID: green folded cotton fabric with pleats lying on top of white bed sheets with a floral print.]
The pattern for this project is really simple: just two rectangles with a U-shape cut out for the crotch, and straps at the sides.
I used these tutorials by Miss_Kreant, Laupre, Instructables, and Mirginie DIY to get a general idea of what measurements to use.
I wanted my pants to be high-waisted, so I ended up going with a height of 40cm for my U-shape. You can go as high or as low as you want. Heck, you could probably go even higher and turn these pants into a jumpsuit. My U was 15 cm wide.
I used my waist circumference + 15cm for the width of both panels as I wanted a large overlap between the sides of the pants when worn. You don't have to use that much if you don't want to. The measurements I've seen in tutorials varied between what I used to 3/4th of your waist. It depends on how much fabric you have on hand and how much skin you want to show.
As for the length, I measured down from my waist to my ankles. You could easily make a pair of wrap shorts by using a shorter length.
If your fabric isn't wide enough to accommodate your measurements, you can always put an extra seam at the centre of your rectangles (the side with the U-shape). It won't be noticeable as this seam will sit between your legs. You could also sew strips of fabric to the sides of your rectangles for additional width, or cut a vertical line down your rectangles and insert your extra fabric there.

[ID: green fabric lying on top of a black and white chequered floor. The fabric has been folded in two at the side. Half a U-shape has been cut at the side.]
If you cut your fabric like this, you end up with two rectangles with a U-shape cut out at the top. That U-shape is the crotch of your pants, so sew both rectangles together along the edges of the U. Leave the other sides alone for now.
I used a French seam because my fabric is prone to fraying. You can use whatever works best for yours.

[ID: two green fabric rectangles lying on top of each other on a black and white chequered floor. A U-shape has been cut out at the top.]
The main construction of the pants is done! Easy, right?
The U-shape is the only seam in these pants. All of the other raw edges are left open and need to be hemmed. I used a double fold hem for mine.

[ID: a green pair of green pants lying on top of a wooden floor. The sides of the pants have been left open and are partly hemmed.]
Once you're done hemming, you need to make straps to tie the pants around your waist with. Pick a length that feels comfortable to you. I made mine long enough to be able to tie a bow.
You could probably forgo the strap tying and use short straps with buttons or snaps instead, if you wanted to.

[ID: a green fabric strap lying on top of a worn-out black surface.]
All that was left to do was to sew the straps onto the sides of the pants. If you plan ahead, you could incorporate them into your top hem for a cleaner finish. I did not plan ahead.

[ID: a pair of green wrap pants with ties at the sides lying unfolded on a wooden floor.]

[ID: a pair of green wrap pants with ties at the sides lying on a wooden floor, folded as if worn.]
All done! They fit well, and are very airy thanks to the open sides. Perfect for summer.
I made my pants wider than necessary: this gives me some wiggle room in case I gain weight, ensuring I'll be able to wear them for a long time to come regardless of how my body changes in the future.
Conclusion:
These are the easiest pants I've ever sewn. No zippers, no buttons, not even elastic, and only one seam! It makes for a great beginner's project and is very versatile.
Play around with different lengths, widths, fabrics, trims, and closures to create different designs.
2K notes
·
View notes
Text
This week I went back to visit the discussion in the notes on @seaweed-solarpunk’s post on solarpunk fashion. I collected all the suggestions in reblogs and tags and tried to find common themes to organize into a concept map. This is just my interpretation, but I think the three most important tenets of solarpunk fashion are eco-friendliness, inclusive design, and personal significance.
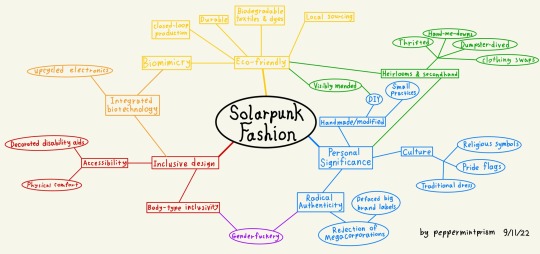
[image ID: a colorful branching concept map where the central idea is Solarpunk Fashion, and the three main branches are in primary colors. Where the branches connect and overlap, the color changes to a secondary color between the primaries. All text in the bubbles is listed in the text to follow. End ID]
Eco-Friendly
• Local sourcing
• Biodegradable textiles
• Durable
• Closed-loop production
• Biomimicry
- Integrated biotechnology
- Upcycled electronics
• Heirlooms and Secondhand
- Thrifted
- Hand-me-downs
- Dumpster-dived
- Clothing swaps
Inclusive Design
• Body-type inclusivity
• Accessibility
- Decorated disability aids
- Physical comfort (including for those with sensory issues)
Personal Significance
• Radical authenticity
- Genderfuckery
- Rejection of mega-corporations
• Handmade/modified
- Small practices
- DIY
- Visibly mended
• Culture
- Religious symbols
- Pride flags
- Traditional dress
I’d love to hear what the solarpunk community here thinks of this framework, what you’d keep, remove, or change.
833 notes
·
View notes