
Don't wanna be here? Send us removal request.
Statistics
We looked inside some of the posts by stitchings-blog and here's what we found interesting.
Average Info
Notes Per Post
0
Likes Per Post
0
Reblog Per Post
0
Reply Per Post
0
Time Between Posts
3 days
Number of Posts By Type
Text
17
Last Seen Tumblr Blogs


Fun Fact
Tumblr has been banned in Indonesia for providing people with access to pornographic content.
Text
Starting Your Embroidery Business with the Right Supplies
Starting an embroidery business requires careful consideration of the equipment and supplies needed to produce high-quality work efficiently. For anyone looking to dive into the world of embroidery, one of the most essential pieces of equipment is the embroidery machine.
But which machine and what embroidery supplies do you need as a professional embroiderer starting a business? Let’s look at the following materials that you should consider, including the right embroidery machine for a business that you want to grow.
Embroidery Machines
At the heart of any embroidery operation is the machine itself. There are embroidery only machines, and often many hobbyists and budding entrepreneurs consider the Brother brand embroidery only models, due to its user-friendly design and versatility.
However, it’s important to note that some models serve well for smaller projects, but they may not be the best fit for a full-scale embroidery business. This may be due to limitations such as being a single-needle machine.
If you plan to accept large orders or projects, a multi-needle machine that allows for simultaneous stitching of multiple colors and designs should be your best choice. If you purchase a single-needle machine, remember that it requires changing threads for each color in a design, which can be time-consuming.
For those serious about starting a business, investing in a multi-needle embroidery machine might be more beneficial. These machines range from seven to twelve needles and can handle various colors simultaneously, greatly increasing productivity.
They allow businesses to stitch multiple items at once, making them an efficient choice for high-demand environments. Although these machines come at a higher initial cost, their ability to run continuously and produce higher volumes can justify the investment over time.
Digitizing Software
Another crucial aspect of starting an embroidery business is the digitizing software. This software is essential for converting images into embroidery files compatible with machines. The process requires specialized knowledge and skills, as designs must be carefully digitized to ensure they stitch out correctly without issues.
While software costs can be high—often exceeding $1,000—some businesses opt to outsource digitizing or purchase pre-made designs. However, when choosing ready-made designs, it’s vital to check usage licenses to ensure that they permit commercial use. Copyright laws protect intellectual property, meaning you cannot legally sell items that feature designs not owned or licensed by you.
Supplies and Materials
A successful embroidery business also needs a well-stocked inventory of embroidery supplies and materials, including the following:
Threads
High-quality embroidery threads are crucial for producing vibrant, durable designs. Professionals should invest in a variety of colors and types, including polyester and rayon threads, which are both popular for their strength and sheen.
Stabilizers
Stabilizers are essential to prevent fabric from puckering during the stitching process. Different types of stabilizers (tear-away, cut-away, and wash-away) serve various purposes, depending on the fabric type and the project requirements.
Needles
Using the correct needle type is important for different fabric types and thread weights. Professionals should have a range of needles on hand, including ballpoint needles for knits and sharp needles for woven fabrics.
Blanks
Having a stock of blank items to embroider on—such as shirts, hats, bags, and towels—is essential for a business. These should be sourced from reputable suppliers to ensure quality.
Embroidery Hoops
Various sizes of hoops are necessary to accommodate different designs and fabrics. A professional setup will often require multiple sizes to handle diverse projects.
Cleaning and Maintenance Supplies
Keeping your embroidery machine in top condition is crucial for longevity and performance. Regular cleaning supplies, oil, and maintenance tools should be readily available.
Start Your Business Right
Launching an embroidery business involves much more than simply acquiring a machine; it requires understanding the entire ecosystem of supplies necessary to operate efficiently and effectively.
Choose a machine that gives you the long-term benefits you need for success, and invest in multi-needle machines and comprehensive digitizing software for more substantial commercial endeavors.
With the right combination of machinery, software, and supplies, aspiring embroiderers can set the foundation for a successful business, producing high-quality, customized products that meet customer demands. Soon you will find that you are on your way to establishing a thriving embroidery venture.
For more information about Baby Lock Sewing Machine and Commercial Embroidery Machines please visit:- Premier Stitching DBA Sew Vac City
0 notes
Text
Is Your Quilting Fabric Right for Your Project?

Choosing the right fabric for your quilting project is essential for creating a beautiful, durable quilt. It might appear that any fabric is acceptable, but there are specific projects that make your quilts beautiful, breathable, and easy to make.
Here are the key steps to help you select quilting fabrics that reflect your vision and meet the functional needs of your project.
Understand Fabric Types and Uses
The most popular and reliable fabric for quilting is 100% cotton. Cotton is a favorite among quilters for the following reasons:
Durability
Cotton withstands frequent washing, making it ideal for quilts that will be used regularly, like baby quilts or bed throws. Also, cotton fabric washes well without losing its shape or quality, allowing your quilt to remain beautiful for years.
Ease of Use
Cotton is easy to cut, press, and sew, which is particularly helpful for beginners. It’s a fabric that behaves well throughout the quilting process.
Breathability
Unlike synthetic fabrics, cotton is breathable, providing comfort when used as a bed covering.
Cotton is available in many colors and designs, giving you flexibility in creating a quilt that matches your aesthetic. While higher-end cotton fabrics generally offer better durability and feel, more affordable cotton options can still be suitable if you examine their weave and weight.
Less expensive cottons may have a looser weave, which can impact durability. For decorative quilts that won’t be frequently used or washed, lower-cost fabrics can be a good option.
Explore Color Harmony and Contrast
Creating a visually appealing quilt relies on choosing fabrics that work well together. A few methods to ensure color harmony often requires auditioning fabrics. This means placing your chosen fabrics next to each other to see how they look together.
This helps you evaluate whether the colors and patterns create a cohesive appearance for your chosen quilt design.
An artist’s color wheel can help you select complementary colors. It allows you to balance colors effectively, ensuring your quilt has visual harmony. For instance, pairing shades of blue with yellows or combining different tones within the same color family can result in a balanced and pleasing color scheme.
A key trick to achieving the right contrast in your quilt is identifying light, medium, and dark tones in your fabric selection. To do this, you can take a photo of your fabrics and convert it to grayscale.
This removes the color and helps you see which fabrics are lighter, medium, or darker. Proper contrast is essential to avoid a quilt that appears too blended, where individual pieces or blocks lose their impact.
Consider the Purpose of the Quilt
Think about the quilt’s intended use and the recipient’s style. The colors and patterns you select should align with the quilt’s purpose. For example, if the quilt is a gift, consider the recipient's tastes and preferences. Choosing fabrics that align with the quilt’s purpose will make it more meaningful and ensure it’s enjoyed for years to come.
Find Inspiration
If you’re struggling with fabric selection, you can search online and browse images of finished quilts with similar patterns. Seeing how others have used color and fabric combinations can inspire your own choices.
You can also experiment with your fabric palette. While many quilt patterns come with suggested color schemes, you don’t have to stick to them. Feel free to add your own twist or try a palette inspired by nature, art, or the season.
Have Fun Comparing Fabrics!
Selecting fabric for quilting is an enjoyable, creative part of the process. As you explore fabrics, aim to balance quality, budget, and personal preference. Using high-quality cotton fabrics from a quilt shop can provide a durable finish, but if your budget is tight, consider blending premium and more affordable fabrics.
With practice and a little creativity, you can confidently select fabrics that bring your quilting vision to life.
For more information about Baby Lock Sewing Machine and Commercial Embroidery Machines please visit:- Premier Stitching DBA Sew Vac City
0 notes
Text
Find the Right Quilt Frame for Your Project
Choosing the right quilt frame can transform your home quilting projects and make them look more professional and compete. The right one can keep your fabric secure and provide the ideal work surface.
Even if you are new to quilting or have years of experience, a frame can make a significant difference, from enhancing precision to speeding up the process. Here are some of the best quilt frames available, and why their features are perfect for your home quilting needs.
Grace Mini Quilter Tabletop Frame
The Grace Mini Quilter is an excellent choice for quilters seeking a space-efficient, affordable quilting solution. It transforms domestic sewing machines into a full quilting system, accommodating machines up to 13 inches.
Its compact 30x36-inch frame fits easily on most tables and is simple to assemble, disassemble, and transport, making it ideal for small spaces or travel. The adjustable frame ensures compatibility with various machine sizes, and its innovative zone-to-zone quilting system allows you to work on projects as large as king-size quilts with ease.
It simplifies the quilting process, because you move the machine instead of the fabric. It improves the precision of the quilting, especially when you use the clamps to hold the fabric.
Grace Continuum Quilting Frame for Long Arms
The Grace Continuum Quilting Frame is designed specifically for long-arm quilting machines. Its dual rail design and handy fabric clasps make loading and adjusting fabric easy.
The Continuum frame allows for hands-free quilting, speeding up the quilting process for large projects. Its adaptability and the ability to set it up in two different sizes are added bonuses, giving you flexibility for projects of various sizes.
This frame is ideal for those who work on large-scale quilting projects and want a frame compatible with long-arm quilting machines. While the investment may be considerable, it’s well worth it for professional-grade quilting.
The Cutie Quilt Frame
The Cutie Quilt Frame is a compact, portable frame ideal for quilters with limited space. It can be easily set up for weekend projects and conveniently stored when not in use. Its small, foldable structure fits under beds or inside closets, making it perfect for those who prefer temporary setups.
Despite its size, the Cutie can handle any quilt size, including king-sized quilts, thanks to its hoop design, allowing quilters to adjust the fabric as needed. However, it may have some challenges with ease of use, as its elastic strap system for fabric stabilization can occasionally disrupt the quilting flow, especially for larger projects.
The Cutie Frame is perfect for quilters who value mobility and flexibility, such as those working on smaller projects or quilters who prefer tidying away their setup when not in use.
The Evolution Hoop Hybrid Frame
The Evolution Hoop Hybrid Frame is designed as a more permanent quilting solution. This frame is considerably larger, measuring five and a half feet wide with a depth requirement of up to four and a half feet, making it ideal for quilters with dedicated studio space. Its stability and size make it suitable for long-term projects.
One of its standout features is the dual functionality, allowing users to switch between hoop and rolling rail styles. This frame also features back clamps for easier fabric loading, making the quilting process smoother and quicker than other systems.
With a wider quilting area of up to 42 inches, it’s easier to handle larger quilt sections without frequent repositioning. The Evolution is a robust solution for committed quilters with the space to accommodate it, offering longevity and growth potential with the option to expand it to a full rolling rail frame.
Each of these quilt frames brings something unique to the table, from the affordable to the professional-grade for large projects. The right frame for you depends on your quilting style, budget, and project needs.
Investing in a good-quality quilt frame can streamline your quilting process, improve precision, and make quilting more enjoyable—whether it’s a small piece or a grand project.
For more imformtion about Presser Feet and Quilting Accessories please visit:-Premier Stitching DBA Sew Vac City.
0 notes
Text
Using Embroidery Hoops for Machine Embroidery
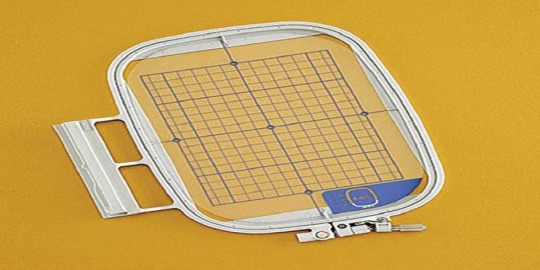
Most beginners in sewing think that embroidery requires advanced skills, but you can still use an embroidery hoop for a great result even if you are a beginner. However, this involves a few careful steps to ensure the fabric is secure, the design is properly positioned, and the embroidery process goes smoothly.
Here’s what you can do to make the most of your embroidery hoops and sewing machines for beautiful results.
Choose the Right Stabilizer
The stabilizer is an essential element in machine embroidery because it provides the fabric with the support it needs to withstand multiple stitches without stretching, puckering, or distorting.
For example, when you use a 5x7 hoop, start by placing a piece of tear-away stabilizer that’s slightly larger than the hoop itself. The stabilizer should have enough excess along all edges to fully support the fabric.
For simpler designs with fewer stitches (under 10,000 stitches), a single layer of tear-away stabilizer should suffice. If your design is more complex or contains many stitches, consider using a heavier or double layer of stabilizer.
Always use a high-quality stabilizer designed for embroidery, as regular household products like paper towels or printer paper are insufficient and could lead to poor results.
Prepare Your Fabric
Next, press your fabric to make it smooth and wrinkle-free. Be mindful not to iron aggressively, as this could stretch the fabric fibers, leading to puckering during embroidery. Instead, gently press the fabric to remove any creases.
You could also consider using a light starch or starch alternative spray for added crispness, which can help give your fabric a little extra body and improve the final look of your embroidery.
Set Up Your Hoop
Before placing the fabric and stabilizer in the hoop, loosen the tightening screw on the hoop’s outer ring. Loosening this screw makes it easier to press the smaller, inner hoop ring into place once the fabric and stabilizer are aligned.
When positioning your embroidery hoop, make sure the attachment bracket is on the left-hand side. This orientation will make it easy to attach the hoop to the embroidery machine once everything is hooped and secured.
Place Stabilizer and Fabric in the Hoop
Lay the stabilizer on the hoop’s bottom ring first, ensuring it covers the edges adequately. Then, center the fabric on top of the stabilizer, making sure it’s aligned as you desire for the embroidery design.
Some machines have features to help with precise positioning, but for simpler projects, you can align the fabric by eye.
Achieve Proper Fabric Tension
After inserting the fabric and stabilizer into the hoop, gently pull the fabric edges to ensure it is taut like a drumhead. You should be able to tap the fabric with your finger and feel resistance. Avoid pulling too hard, as overstretching can distort the fabric fibers, which may affect the embroidery quality.
Check for ripples along the edges of the fabric within the hoop. If you see any, lightly pull the fabric to eliminate them without stretching the fabric too much.
Tighten the Hoop Screw
Once the fabric and stabilizer are properly tensioned, begin tightening the screw on the outer hoop. This ensures everything stays in place during embroidery. Some users find that using a small driver tool to tighten the screw can help achieve maximum tension.
The goal is to keep the fabric and stabilizer snug within the hoop without any slack. Proper tightening reduces the chance of shifting during stitching, which can cause the design to misalign.
Attach the Hoop to the Machine
With your fabric, stabilizer, and hoop set up, you’re ready to attach the hoop to your embroidery machine. Follow the machine’s instructions for hoop attachment, and double-check that the fabric is still securely hooped with no visible wrinkles or slack.
Start Embroidering!
Once the hoop is securely attached and the design is in position, begin the embroidery process. Monitor the fabric and stabilizer periodically as the machine works to ensure everything stays in place.
Using your embroidery hoops properly is crucial for achieving smooth, professional embroidery results. So even if you are a beginner and follow these steps, you’ll be able to achieve precise and beautiful machine embroidery results with your embroidery hoop!
For more information about Baby Lock Sewing Machine and Commercial Embroidery Machines please visit:- Premier Stitching DBA Sew Vac City
0 notes
Text
Sewing Cabinets: The Essentials to Know
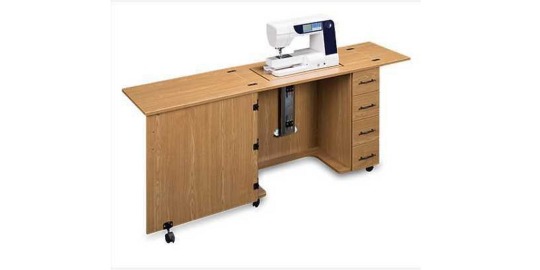
When choosing a sewing cabinet, it’s easy to get caught up in the aesthetics and forget about the functionality. However, a sewing cabinet is a significant investment and can have a major impact on your sewing experience. Here are some essential dos and don'ts to ensure you select a cabinet that’s practical, comfortable, and suits your needs.
Don't Just Buy a Cabinet Because It's Pretty
One of the most common mistakes people make when buying sewing cabinets is choosing based solely on looks. Sure, a beautiful cabinet can be appealing, but if it doesn’t suit your sewing style or workspace, you might end up regretting the purchase.
Closed Cabinets vs. Open Cabinets
There are two main types of sewing cabinets: closed cabinets and open cabinets. Understanding the difference is crucial when deciding which one fits your needs.
Closed Cabinets
Closed cabinets are sleek and tidy because they can be fully shut to hide your sewing machine when not in use. However, when closed, you cannot sew, as the space where the machine sits becomes inaccessible.
While they are great for keeping things out of sight, closed cabinets require more space when open since you need to extend parts of the cabinet to sew properly.
Open Cabinets
Open cabinets, on the other hand, allow you to sew even when partially closed. This design is perfect for those who need a more compact solution but still want to keep their sewing machine ready to use.
The side panels of these cabinets can fold neatly against the cabinet, allowing you to sew in smaller spaces without compromising accessibility.
Don’t Buy a Cabinet Based on the Machine Display
Another common mistake is buying a cabinet simply because the sewing machine displayed on it looks like a good fit. What many don’t realize is that sewing machines are typically positioned four inches lower inside the cabinet.
When you're trying out a machine at a store or a trade show, remember that the sewing machine you’re eyeing will sit lower in the actual cabinet. The machine is designed to sit at this lower level to create an ergonomic setup, reducing strain on your arms and shoulders.
If you're testing a machine that feels comfortable, you may need to adjust your seating position or table height to ensure you’ll be comfortable at home with the machine in its lowered position.
Don’t Buy on a Whim
It’s tempting to buy a cabinet without fully considering where it will go in your sewing space. But just like you wouldn’t buy a couch without measuring your living room, you shouldn’t buy sewing cabinets without knowing how much space you have available.
Before purchasing, measure your room carefully and consider how much space the cabinet will need when it’s fully open. Many cabinets are large and take up a considerable amount of space, especially when extended for sewing.
Find The Right Cabinet When You Need One
A sewing cabinet is more than just a piece of furniture—it’s a key part of your sewing setup. Avoid making mistakes such as choosing a cabinet based on looks alone, and consider how you’ll use the cabinet in your space. You can make an informed decision that enhances your sewing experience for years to come.
For more information about Multi Needle Embroidery Machine and Quilting Accessories please visit:- Premier Stitching DBA Sew Vac City
0 notes
Text
Choosing the Right Fabric from Your Fabric Bundles
Using fabric bundles in quilting projects can bring creativity, cohesion, and structure to your designs. For many quilters, the excitement of buying fabric often leads to a varied stash—colorful and eclectic.
The challenge is blending these fabrics into a cohesive quilt design. Here’s a step-by-step approach to make the most of your fabric bundles, from assessing individual prints to creating a balanced, eye-catching quilt top.
Assess Your Fabric Choices
Before diving into cutting and stitching, take a moment to assess what you have. Fabric bundles often come with coordinated colors and patterns, but they may still feature contrasting styles or tones.
Start by laying out your bundle, examining the scale and style of each print. Are some patterns geometric while others are more organic? Do the colors follow a theme, or do they vary widely? Identifying these elements helps you see how different pieces might work together.
In cases where you have two fabrics that seem entirely unrelated, consider using the contrast to your advantage. For instance, the geometric fabric can add structure, while the floral one introduces softness. This balance can give your quilt a unique quilt character, blending different vibes in a unified design.
Define a Color Scheme
Once you have a sense of the patterns, focus on color. Deciding on a color scheme is essential to bringing a sense of unity to your quilt. If the colors in your bundle don’t naturally align, look for a dominant color to anchor your design.
A common approach is to choose one or two colors from the bolder prints, then search for similar shades in your fabric stash or through color-picking tools online. For example, if you have a print with red and green tones that seem complementary but not cohesive, consider a split-complementary color scheme with shades of blue or pink.
This approach can help bring all your fabric choices into harmony, allowing you to balance strong hues with subtle ones for a polished look.
Collect Additional Fabrics
After defining your color scheme, look through your stash for other fabrics that match or complement the chosen colors. Select prints with similar color tones but different scales, such as large patterns mixed with smaller ones. Smaller prints and solids can act as “resting spots” within the quilt, allowing the eye to appreciate the bolder designs without overwhelming the viewer.
To avoid clashing, discard any fabrics that don’t fit the theme or color scheme. For instance, a bright neon may stand out too much in a muted palette, or a busy floral might overwhelm the subtler elements in a delicate design. Each choice should add to the quilt without detracting from the overall effect.
Fill in Gaps and Balance Your Selection
Look at the chosen fabrics and assess whether you need more prints or solids.If your fabric bundle leans heavily toward bold colors, introduce a few more neutral or soft shades to break up the intensity. Likewise, if there’s an abundance of busy patterns, add a few solids or minimal prints for a balanced look.
This step may also involve revisiting your original selections. If a fabric looks out of place, set it aside and explore alternatives. Adding a subtle hue from a coordinating shade or repeating an element, like small florals or polka dots, can tie the whole quilt together beautifully.
Always Reassess Your Choices
Once you’ve selected the fabrics, let the arrangement sit for a while before committing. Sometimes stepping away for a few hours or even overnight can offer a fresh perspective. Upon returning, you might see new ways to adjust the layout for better flow or balance. This reassessment is crucial, as it helps solidify your fabric choices before you start cutting and sewing.
Using fabric bundles effectively can elevate your quilting projects, offering a curated mix of colors and prints that give your quilt a refined, professional look. Choosing the right fabric can transform a simple bundle into a beautiful, cohesive quilt that reflects both structure and creativity.
For more information about Long Arm Quilting Machines and Sewing Machine Cabinets please visit:- Premier Stitching DBA Sew Vac City
0 notes
Text
The Best Features in Portable Sewing Machines for Beginners
Today’s machines boast of digital features and exceptional precision, and sewing machines are no exception. Beginners often look for a machine that’s simple, compact, and easy to use, but what’s more important for many users, especially beginners, is portability.
So it’s no surprise that a lot of sewing machine brands offer portable models that make it easy for sewists and quilters to bring their hobby with them wherever they go. But with countless options on the market, how do you choose the right one?
What Makes a Good Portable Sewing Machine?
A good portable sewing machine isn’t just compact. It needs to be reliable, versatile, and equipped with features that make sewing easy for beginners. The key features beginners need to consider include the following:
Compact Design
Smaller machines save space and make it easier to store when not in use.
Ease of Use
User-friendly controls and simple threading features make a big difference, especially for new users.
Weight and Portability
Lightweight machines are easy to carry to sewing classes or to store.
Built-in Stitch Options
A variety of stitches lets beginners explore without needing advanced settings.
User-Friendly Interface
LCD screens or labeled stitch charts simplify operation, helping beginners quickly get comfortable.
Why Portable Sewing Machines are Best for Beginners
If you find a sewing machine that has all of these, the next one you need to do is choose the one that suits your budget. You might be surprised to find that some sewing machines for beginners are quite expensive.
However, this is where portable sewing machines are ahead of the more traditional ones. Portable machines are often more affordable and priced at a lower rate than other sewing machines.
And since most beginners are trying to explore their options in this new hobby, it makes sense that most beginners prefer affordable machines. So the popularity of portable sewing machines among beginners isn’t surprising.
These machines have features that are similar to most machines, but are also easy to use. However, they have enough complexities that allow all users to reach their next sewing or quilting level without being discouraged.
Also, some of these machines also make precision and quality sewing easier to accomplish, even with the limited built-in stitches available.
Portable Sewing Machines Ideal for Beginners
Here are some of the best portable sewing machines that are perfect for beginners, each offering a unique blend of features and ease of use. These machines are excellent choices for beginners due to their user-friendly features, durability, and versatility across various sewing projects.
Janome HD3000
This machine is perfect for those who need a sturdy and powerful mechanical machine capable of handling light to heavy materials, like leather and upholstery. It includes 18 built-in stitches, a top-loading bobbin, and a powerful motor for smooth operation, making it ideal for beginners interested in durable and reliable sewing.
Consew Model CP206R
Known for its capability for sewing light to heavy materials and its versatility as a home or portable sewing machine, the Consew is designed for stitching materials for furniture and other equipment that use canvas, leather, and even laminated products. If you enjoy camping and sewing, you can get this one so you can care for your bags, tents, and even home upholstery.
Brother Innov-is NS80E
With its compact design, advanced needle threading, and LCD screen, this computerized machine is great for beginners on the go. Its 80 built-in stitches and adjustable speed control cater to new sewers seeking a portable yet feature-rich option.
Portability Makes Sewing Easier
Selecting the right portable sewing machine can make all the difference in your sewing hobby. Each model offers distinct features that cater to different needs, but the best choice is one that aligns with your sewing goals and budget.
For more information about Home Embroidery Machines and Coverstitch Machines please visit:- Premier Stitching DBA Sew Vac City
0 notes
Text
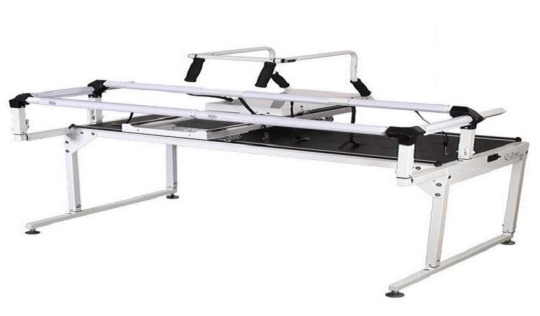
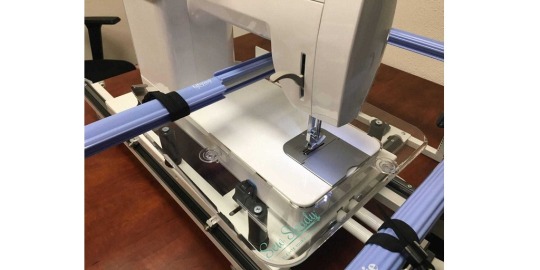
Why Choose a Long-Arm Quilting Machine?
For those who love quilting and pursue it as a hobby or as a side job, they know that half of their productivity and precision depends on their quilting machine. And sooner or later, they know they need to get a long-arm machine not only for keeping up with client demands, but also to improve their skills.
But a long-arm quilting machine is a significant investment, especially for serious quilters aiming to complete larger projects more efficiently. With many options and price points, choosing the right one can be overwhelming.
However, there are some factors you could ponder on that can help you make the decision. Here are three essential factors to consider before buying specific models for long-arm quilting machines.
Decide Between a Sit-Down or Stand-Up Machine
A sit-down long-arm machine is an excellent choice if you prefer working seated or have space limitations. For example, choosing a machine that is a compact sit-down option offers around 16 inches of throat space, allowing you to comfortably handle both small and large projects.
These machines are also ideal for detailed work, such as ruler-guided quilting, where you have close, hands-on control over the fabric.
On a stand-up machine, you move the machine head over the fabric instead of the fabric itself, allowing for faster quilting. This setup offers a unique experience and is often preferred by quilters who work on large, intricate designs. Stand-up machines are mounted on a frame with wheels, making the machine easy to maneuver across the quilt surface.
Think about how you prefer to work and the types of projects you plan to tackle. Stand-up models are great for speed and large quilts, while sit-down options offer control and comfort for detailed work.
Evaluate Your Available Space
Space is a critical consideration, as long-arm machines can take up a significant area. Long-arm setups range from more compact models, like the Simply 16 on a 5-foot frame, to large machines with 10- to 12-foot frames.
The larger frames provide more space for the quilt, letting you tackle bigger projects with fewer adjustments, but they require a substantial amount of room.
If you have limited space but want a stand-up machine, consider a model with a smaller footprint, such as the Simply 16. For those with ample space, opting for a larger frame, such as 10 or 12 feet, allows for a larger machine with more advanced features.
This can include automated options or an extended throat, which can make a big difference when working on oversized quilts. Consider not just the footprint but also the clearance needed around the machine for easy access.
Ensure a Strong Support System
A reliable support system can make a massive difference, especially as you familiarize yourself with the machine. Look for brands and sellers that offer setup assistance, in-depth training, and ongoing support.
Some companies offer dedicated customer support and access to private communities where quilters can exchange tips and troubleshoot common issues.
Additionally, consider if the brand provides access to training resources, such as online tutorials, private groups, or live sessions. These resources can be invaluable as you learn to optimize your machine’s settings and maintain it over time.
Knowing that you have a dependable support network can make the experience of using your long-arm much more enjoyable and productive.
Quilting Is Easier If You Know What You Need
Purchasing a long-arm quilting machine is a big decision, but with careful consideration, you can find the right machine to fit your needs and space. You should also consider the types of projects you are in the process of starting or accepting, which can make the decision easier for you.
So no matter what brand or model of long-arm quilting machine you decide to purchase, you know that it suits your project goals, skill level, and the available space you have in your dedicated sewing space.
For more information about Juki Sewing Machine and Sewing Machine Cabinets please visit:- Premier Stitching DBA Sew Vac City
0 notes
Text
Everything You Need to Know Before Buying a Serger Machine
If you’re into sewing and want to take your projects to the next level, a serger machine might just be what you need! It’s incredibly useful, whether you’re making garments, home decor, or crafting something unique – serger machines can make your work cleaner, more professional, and durable.
Before diving into the world of serger machines, though, it’s important to know how they differ from standard sewing machines, and what to look for when you’re shopping for one. Read on below for everything you need to know about serger machines:
What Is a Serger Machine?
Also known as an overlock machine or an overlocker, a serger machine is a type of sewing machine that trims the fabric, overlocks the edges, and sews the seam, all at once. It’s designed to prevent fraying, which makes it perfect for stretchy, knitted, or woven fabrics.
Unlike a standard sewing machine, which uses just one thread and needle, a serger uses multiple threads and needles, resulting in a more robust stitch and cleaner edge.
Why You Might Need a Serger
If you already have a standard sewing machine, then you might be wondering if you really need a serger. The answer to that question depends on what you’re looking to achieve. Below are a few reasons why a serger can be a great addition to your sewing toolkit:
Professional-Looking Finishes: Sergers give your projects a clean, polished look by neatly finishing the edges and preventing fraying.
You Frequently Work With Stretchy Fabrics: The differential feed of a serger makes it the perfect choice for handling stretchy fabrics (such as knits) without it bunching up.
Speed: Sergers sew incredibly fast – usually up to 1,300 stitches per minute – making large projects quicker to complete.
You Need a Machine That Performs Multiple Functions: In addition to finishing edges, a serger can perform rolled hems, flatlock stitching, and even create decorative edges.
Key Features to Consider
1. Number of Threads
Sergers can use anywhere from two to five threads at once. The number of threads affects the type of stitch and the durability of the seam. For most hobbyists, a 3 to 4 thread serger is the ideal choice, offering versatility for everyday projects.
2. Differential Feed
The differential feed is what allows a serger to handle different types of fabric, from delicate to heavy knits. It adjusts the speed at which fabric is fed through the machine, preventing stretching or puckering. If you plan on sewing a lot of stretchy materials like jersey or spandex, make sure your serger has this feature.
3. Ease of Threading
Threading a serger can seem daunting, especially since it involves multiple threads and more complicated paths compared to a sewing machine. If you’re new to sergers, consider one with user-friendly threading systems to save yourself from frustration.
4. Adjustable Stitch Length and Width
Being able to adjust the stitch length and width gives you more control over your final product. Whether you're working with delicate fabrics or bulky materials, having this flexibility ensures you can achieve the perfect finish.
5. Accessories and Additional Features
Many sergers come with extra accessories, like specialty feet for piping, blind hems, or gathering. Some may also include features like built-in rolled hems or the ability to convert to a cover stitch machine. Think about the type of projects you plan to tackle and check whether the model you’re considering has the necessary features.
For anyone who’s serious about sewing, especially those who work with stretchy fabrics or frequently sew garments, a serger is a fantastic investment. It not only speeds up your projects but also gives them a professional, polished finish that’s hard to achieve with a standard sewing machine. Just be sure to consider your needs and budget before making a purchase.
Premier Stitching is the best place to find a serger machine! They carry serger machines from some of the most trusted manufacturers in the industry, including Babylock, Janome, Juki, and more. Visit the Premier Stitching website to view their catalog today!
For more information about Juki Sewing Machine and Sewing Machine Cabinets please visit:- Premier Stitching DBA Sew Vac City
0 notes
Text
What NOT to Do When Shopping for Coverstitch Machines

Shopping for a coverstitch machine can feel like stepping into a whole new world of sewing possibilities. If you’re someone who loves creating your own clothes or crafting custom projects, adding a coverstitch machine to your setup can take your work to the next level. These machines are perfect for giving your garments that clean, professional finish you see in store-bought clothes.
Before you rush to make a purchase, though, it’s important to know what pitfalls to avoid. Choosing the wrong machine can leave you frustrated, out of money, and stuck with a tool that doesn’t meet your needs. To help you make the best decision, let’s talk about what not to do when shopping for a coverstitch machine.
Don’t Skip the Research
Diving headfirst into the purchase without doing the homework is one of the biggest mistakes that someone can make when looking at coverstitch machines. Yes, it’s tempting to grab the first shiny machine you see, especially if it’s on sale. But every coverstitch machine is different, and not all of them will suit your needs.
Before buying, take some time to understand the basics. What’s the difference between a coverstitch and a serger? (Spoiler: they’re not the same thing!) What types of stitches do you need for the projects you have in mind? How many needles should the machine have? Read reviews, watch YouTube tutorials, and browse through sewing forums. A little bit of research goes a long way in helping you make a smart decision.
Don’t Assume Price Equals Quality
Thinking that the most expensive machine on the market is automatically the best is another common misconception when shopping for coverstitch machines. While it’s true that higher-end machines often come with more features, that doesn’t mean they’re the right fit for you. You might end up paying for bells and whistles you’ll never use.
On the flip side, going for the cheapest option isn’t always a win either. Budget machines can be appealing, but they often come with limitations like fewer stitch options, lower build quality, or less durability. Instead of focusing solely on price, think about what you actually need and find a machine that balances features with affordability.
Don’t Overlook Compatibility with Your Projects
Imagine this: you buy a coverstitch machine, set it up, and start sewing – only to find that it doesn’t handle the fabric that you love to work with. Nothing’s going to be more frustrating! One of the most overlooked aspects when shopping for a coverstitch machine is its compatibility with different fabrics.
Some machines struggle with thicker materials like denim or stretchy fabrics like spandex. If you plan to sew activewear or swimwear, for example, you’ll need a machine that can handle stretchy seams without skipping stitches. Always check the machine’s specifications and read user reviews to see how well it performs with different fabrics.
Don’t Ignore Maintenance and Support
Here’s something people rarely think about until it’s too late: maintenance. Coverstitch machines, like any other sewing equipment, need regular upkeep to stay in top condition. However, not all machines are created equal when it comes to ease of maintenance.
Some models require frequent oiling or have parts that wear out quickly. Others might be difficult to clean or have hard-to-find replacement parts. Before you buy, check if the manufacturer provides good customer support, easy access to spare parts, and a clear user manual. A machine that’s a breeze to maintain will save you a lot of headaches down the line.
Buying a coverstitch machine is a big investment, and it’s easy to make mistakes if you’re not careful. But by avoiding these common pitfalls, you’ll be well on your way to finding the perfect machine for your sewing projects.
The best place to find a coverstitch machine for your needs is Premier Stitching! They carry coverstitch machines from some of the best manufacturers in the market, including Janome, Juki, and more. Visit the Premier Stitching website now to
For more information about Beginner Sewing Machines and Sewing Chairs please visit:- Premier Stitching DBA Sew Vac City
0 notes
Text
Essential Sewing Notions: What Beginners Need
Anyone who wants to start a new hobby can feel overwhelmed, and if the hobby is sewing or quilting, it can even be more so. These hobbies demand time and skills improvement, and along with that a need for a vast range of tools, or notions.
And if you are a beginner, one way to feel less under the water is to focus on the essentials that make getting started more manageable and budget-friendly. Here are some of the must-have sewing notions and tools that will make your early sewing projects easier and more enjoyable.
An Appropriate Sewing Machine
A reliable sewing machine is the heart of any sewing project. Brands like Brother, Singer, and Janome are popular for beginners, with models like the Singer 4423 offering durability and versatility.
If you want to work on different kinds of fabrics, consider a heavy-duty model that is ideal if you’re working with denim and leather. Look for a machine with a variety of stitch options and consider buying a basic model without an extensive accessory kit, as you can add tools as needed.
Fabric Scissors
Fabric scissors are a crucial investment, as they’re specially designed to cut fabric cleanly without fraying edges. Using kitchen scissors on fabric can cause jagged edges and make sewing difficult. Heavier-duty fabric scissors are best for quilting, but lightweight scissors also work for standard sewing.
Seam Ripper
Every beginner will make mistakes, and a seam ripper is essential for undoing stitches cleanly. These tools come in different sizes, but one with a large handle is easier to use, especially if you’re working on big projects. Seam rippers can also be used to cut buttonholes, making them versatile in a variety of tasks.
Sewing Rulers
Transparent rulers are a favorite in the sewing world. They come in handy when measuring and marking fabric for cuts and stitches. Look for rulers that include both inches and centimeters, as they are useful in both garment sewing and quilting.
Also, pay attention to whether the measurements start at the very edge of the ruler, as it allows for more accurate marking.
Measuring Tape
Flexible measuring tapes are indispensable for sewing clothing and other three-dimensional projects. Vinyl measuring tapes are the most durable, as they don’t stretch or tear easily, and it’s ideal to get one that shows both inches and centimeters for added flexibility.
Pins and Clips
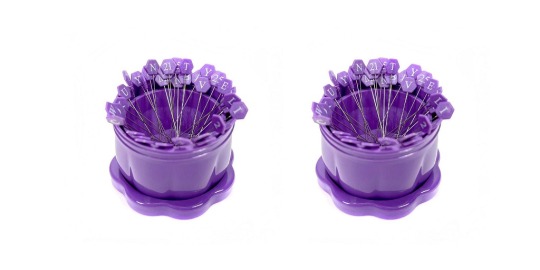
Pins are great for holding fabric pieces together while sewing. If you’re nervous about sharp pins, clips are a fantastic alternative. Clips only secure edges, but they work well for beginners. For larger projects, getting a pack of 100 clips ensures you’ll have plenty on hand. Stationery clips can be an effective substitute in a pinch.
Lighting
A good light source is crucial for sewing, especially for intricate or night-time work. Small desk lamps or dedicated sewing lights improve visibility, helping you avoid mistakes and reducing eye strain.
DIY Kits and Sewing Patterns
For beginners, DIY kits and sewing patterns can simplify the setup process. These kits come with everything you need, from fabric to patterns and even matching threads. They’re especially helpful if you’re not ready to go shopping for individual components and want a one-stop solution to get started.
Start Your Hobby with the Right Tools
Starting your sewing journey with the right tools makes the process enjoyable and successful. Each essential tool outlined here will help you tackle basic projects, make adjustments, and learn the core techniques of sewing and quilting.
Arming yourself with these basic sewing notions will put you on the path to a rewarding sewing experience. Start with what you need now, and as your skills grow, you can gradually add more advanced tools and accessories to your kit.
For more information about Sewing Machine Cabinets and Long Arm Quilting Machines please visit:- Premier Stitching DBA Sew Vac City
0 notes
Text
The Essentials of Quilting Threads

In most sewing or quilting projects, many hobbyists and enthusiasts know that the quality of their final project will depend on two things: their craftsmanship, and the quality of the materials, such as the fabric and the threads.
And for quilters, choosing the right quilting thread can be as essential as selecting fabrics, impacting a quilt’s texture, durability, and final look. With many brands, weights, and fiber types available, understanding the key features of quilting threads can enhance any quilter's results, whether you're just starting out or are an experienced quilter.
Understand Thread Weight and Ply
Thread weight is one of the first factors to consider, as it affects how the thread sits on the fabric and its durability. Generally, as thread weight numbers increase, the threads become finer. For example, an 80-weight thread is very fine, while a 30-weight thread is thicker and stronger.
Ply indicates the number of strands twisted together. Common options include two-ply and three-ply threads. The more plies, the more durable and robust the thread will be, which is beneficial in high-wear quilts, such as bed quilts.
Cotton Threads: The Go-To for Most Quilters
Cotton threads are a classic choice, known for their natural, matte finish and compatibility with cotton fabrics. They come in various weights, with 50-weight cotton being a popular choice for piecing and quilting as it blends seamlessly into the fabric.
Mercerized cotton threads are processed for a lustrous finish and added strength. Brands like Mettler and Aurifil are favorites for their smooth finish, durability, and extensive color options. The Mettler 50-weight mercerized cotton, for example, balances strength and fineness, making it ideal for quilting and piecing.
Polyester Threads: Durable and Versatile
Polyester threads are strong and resistant to stretching, making them ideal for quilts subject to heavy use. They also offer a subtle sheen and are available in multiple weights. Polyester threads, especially the finer ones, work well for detailed quilting designs, as they add a subtle shine to the quilt surface without overpowering the fabric.
Since polyester is a synthetic fiber, some quilters use it primarily for decorative or wall quilts rather than bed quilts, as its long-term effect on cotton fabric isn’t fully known. That said, brands like Superior Threads and Gutermann have refined their polyester options to cater to high-performance quilting.
Rayon Threads for Decorative Quilting
Rayon threads are valued for their vibrant color and high sheen, making them ideal for decorative and art quilts. However, they aren’t as durable as cotton or polyester, so they’re better suited for quilts that won’t be laundered frequently.
A common rayon weight for quilting is 40-weight, which combines visibility with fine detail. Since rayon can be slippery and prone to unraveling, it’s best to avoid it on quilts exposed to heavy wear.
Wool and Silk Threads for Texture and Art Quilting
Wool Threads: Wool adds texture and warmth to quilts. Thicker wool threads, like 12-weight or 24-weight, sit visibly on the fabric, creating a soft, dimensional effect. They’re best used in hand-quilting or machine quilting where stitches are spaced further apart.
Silk offers both strength and a delicate finish. Lightweight silk threads, such as 100-weight, are perfect for intricate quilting, as they’re thin enough to blend seamlessly, enhancing rather than overwhelming the quilt’s design. Silk is a favorite among quilters for fine detailing and is suitable for heirloom and art quilts due to its subtle sheen and durability.
Make the Right Thread Selection
Choosing the right quilting thread enhances the quality and beauty of a quilt. Beginners might start with 50-weight cotton for its versatility and ease of use, while more advanced quilters may explore specialized threads like silk or variegated threads to add artistic touches.
For quilts that will be used and laundered regularly, durable options like polyester and high-quality cotton are recommended. Through practice and experimentation, every quilter can discover the threads that best suit their style and projects.
For more information about Baby Lock Sewing Machine and Multi Needle Embroidery Machine please visit:- Premier Stitching DBA Sew Vac City
0 notes
Text
Sewing Machine Features You Need to Have

Sewing machines today offer a plethora of features catering to various needs, from basic sewing to intricate quilting and embroidery. While many boast hundreds of stitch patterns, the most valued features are those that enhance usability and efficiency on every sewing session.
And if you are a beginner wanting to find the right machine with the right features, you’ll need to consider which ones are the most important for you to complete your projects. Often many beginners consider brands such as Janome Sewing Machine or Brother for their first equipment, but you need to consider if they have the following features.
Throat Space
The throat space is the distance between the needle and the body of the sewing machine. It’s essential because it determines how much fabric you can handle at one time. A larger throat space is ideal for projects like quilts, as it provides more room to maneuver the fabric comfortably.
Throat space sizes vary among sewing machines. Entry-level machines typically have smaller spaces, which can be limiting for larger projects. On the other hand, higher-end machines offer spacious throat areas to accommodate bulkier fabrics and large projects.
Automatic Thread Trimming
Automatic thread trimming is a feature that cuts the thread for you at the press of a button. This simple but time-saving feature prevents the need for scissors after each stitch, helping you maintain a smooth workflow.
This feature is particularly useful for those who spend long hours sewing. It eliminates the small but frequent task of cutting thread manually, reducing strain and improving focus on the actual sewing.
Needle Threaders
The needle threader is a blessing for those who struggle with threading needles manually. With just a few simple steps, it gets the thread through the eye of the needle, saving time and frustration.
This feature makes sewing more enjoyable by minimizing one of the most fiddly tasks in the sewing process. This is especially helpful for older sewists or anyone with vision challenges.
Good Lighting
Good lighting is crucial for precise stitching. Poorly lit workspaces can lead to mistakes, eye strain, and fatigue, especially during intricate projects. Look for machines that offer adjustable, bright LED lighting. Some advanced models even allow you to control the intensity, ensuring that you can see every detail clearly.
With proper lighting, sewists can focus on the finer details of their projects. Well-lit environments contribute to better stitch accuracy, making your work more professional and polished.
Screen Displays
Modern sewing machines often come with screen displays that allow you to preview your stitch selections before sewing. This feature ensures that you choose the right stitch every time, reducing mistakes.
These screens also offer customization options for stitch length, width, and tension, making the sewing process more intuitive. Touchscreen interfaces are common, providing an interactive and user-friendly experience.
Find a Sewing Machine with the Features You Need
Many beginners often think advanced features are the best to use for their first project and can help them better when using a sewing machine. But often the best one for you is the sewing machine that carries the features that can help you complete your projects.
These features are all vital for enhancing your sewing experience, and finding a Janome Sewing Machine or any other brand that carries these functions can transform your workflow, making sewing more comfortable, precise, and enjoyable.
For more information about Sewing Machine Accessories and Commercial Embroidery Machines please visit:- Premier Stitching DBA Sew Vac City
0 notes
Text
Your Must-Have Quilting Accessories
Quilting is a rewarding and creative craft, and having the right tools can make the process even more enjoyable and efficient. However, any quilter will tell you that there are certain accessories that are essential for achieving great results.
Here’s the must-have quilting accessories every quilter should consider if they want their projects to have that professional finished look.
Stitch Regulators
These are invaluable for ensuring consistent stitch length while free-motion quilting. These devices automatically adjust the sewing machine’s speed to match the movement of the fabric, allowing for even stitching without having to constantly monitor your speed.
This not only enhances the aesthetic appeal of your quilting but also reduces the frustration of uneven stitches. With a stitch regulator, quilters can achieve professional-quality results more easily, making it a must-have for both beginners and experienced quilters alike.
Quilting Feet
These accessories are specifically designed for various quilting techniques, from free-motion to walking foot quilting. Each type of quilting foot serves a unique purpose, enhancing precision and creativity.
A walking foot, for example, is perfect for straight-line quilting, allowing for even feeding of multiple layers of fabric. Meanwhile, a free-motion foot enables intricate designs, giving quilters the freedom to explore their creativity without limitations.
The right quilting foot can make a significant difference in the final outcome of a quilt, making it an essential accessory.
Pressing Mats
Mats are crucial for achieving crisp seams and precise fabric alignment. Unlike traditional ironing boards, pressing mats provide a firm surface that allows for better steam penetration and heat retention.
This helps set seams accurately and prevents fabric distortion. Investing in a high-quality pressing mat will improve the overall quality of your quilting projects, ensuring that each piece is finished with care.
Seam Rippers
Mistakes are part of quilting, and having an ergonomic seam ripper on hand is essential. Whether you're using a longarm or domestic machine, a comfortable seam ripper can help you remove stitches without straining your wrist, especially during long sessions of correcting errors.
Curved Scissors
Curved scissors are perfect for snipping threads without snagging your quilt fabric. They provide precision and ease of use, making them an invaluable tool in your quilting kit.
Self-Threading Needles
Switching threads frequently can be cumbersome, but self-threading needles make this task much easier. Simply push the thread through the needle, and you’re ready to go. This is particularly helpful when you need to change colors or bury threads for a clean finish.
Quilt Clips
When working with delicate quilts, quilt clips are ideal for securing layers without causing damage. They are especially useful when floating quilt tops on a longarm machine, providing stability and preventing pinholes in your fabric.
Tension Gauge
This tool is crucial for longarm quilters. It helps you set your bobbin tension accurately, ensuring that your stitches are even and secure. Maintaining the right tension is essential for achieving high-quality quilting results.
Thread Snips
In addition to curved scissors, thread snips are a quick and efficient way to trim threads as you work. Their small size allows for precision cutting, which is especially helpful when working on intricate designs.
Rotary Cutter
A rotary cutter is essential for any quilter. It provides a safe and efficient way to cut fabric with accuracy, making it easier to prepare pieces for quilting.
Quilting Ruler
Using a quilting ruler can greatly enhance your cutting accuracy and precision. They often have grid lines to help with alignment, ensuring that your fabric pieces are cut to the correct dimensions.
Which Ones Are Part of Your Quilting Kit?
Investing in any of these essential quilting accessories can make your quilting experience more enjoyable and satisfying. No matter what kind of machine you use, these must-have tools make any project safe and efficient to complete.
Having the right quilting accessories at your disposal can make all the difference in your quilting projects.
For more information about Baby Lock Sewing Machine and Multi Needle Embroidery Machine please visit:- Premier Stitching DBA Sew Vac City
0 notes
Text
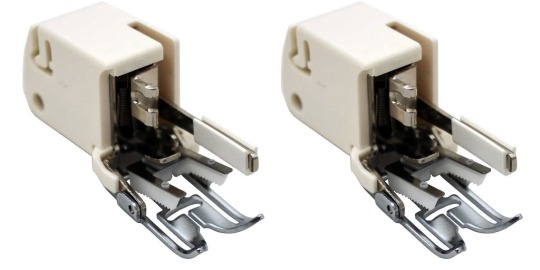
Basic Types of Presser Feet and Their Uses

Have you ever rummaged through the attachments that come with your sewing machine, only to wonder how you can use which tool or accessory? Don’t fret, you are not alone.
Many sewing enthusiasts find themselves puzzled by the various presser feet included in their sewing kits. If you are a beginner and wondering which presser feet to use, this can help you know the basic types of presser feet and how to use them effectively.
What is a Presser Foot?
A presser foot is a detachable accessory that holds the fabric in place as you sew. It keeps the fabric flat and steady, allowing the feed dogs—those small metal teeth beneath the needle—to move the fabric smoothly.
There are different types of presser feet designed for various sewing tasks, enhancing your sewing experience and results.
Standard Zigzag Foot
Most sewing machines come with a standard zigzag foot, which is incredibly versatile. This foot has a hole that allows the needle to move side to side, making it suitable for both straight and zigzag stitches. To attach it, simply lower the presser foot lever and snap it into place. Removing it is just as easy—press a button or lever to release.
Zipper Foot
The zipper foot is essential for sewing zippers close to the fabric edges. It allows the needle to position itself either to the left or right of the foot, facilitating a tight stitch along the zipper. When using this foot, place the zipper on the fabric, attach the foot accordingly, and ensure that the needle won’t hit the zipper teeth as you sew. This precision ensures a neat finish without damaging the zipper.
Overcasting Foot
If you don't own a serger machine, an overcasting foot is a great alternative for finishing raw edges and preventing fraying. This foot features a guide that aligns with the fabric edge, allowing you to sew an overcast stitch.
Simply set your machine to an appropriate stitch—many machines have specific overcast stitch settings—and run the fabric along the guide. The result will mimic the finish of a serger, keeping your seams tidy.
Blind Hem Foot
A blind hem foot is perfect for creating invisible hems on garments. It features a guide that helps you position the fabric accurately. To use it, fold the hem as you would for a standard hem, align the guide with the fold, and sew.
The machine will alternate between a straight stitch on the hem and a tiny stitch that catches the garment’s main fabric, making the stitches nearly invisible when the hem is unfolded.
Buttonhole Foot
The buttonhole foot simplifies the process of sewing buttonholes. Many machines today come with automatic buttonhole capabilities. Insert the button into the foot, which automatically adjusts the stitch length based on the button size.
Attach the foot, select the appropriate buttonhole stitch on your machine, and sew. This foot ensures perfectly sized buttonholes every time, reducing the intimidation often associated with this task.
Button Foot
After creating a buttonhole, you can use a button foot to sew buttons onto your fabric. This foot prevents the fabric from shifting while you sew. Drop the feed dogs on your machine to keep the button stable during sewing.
Position the button where you want it, select a zigzag stitch with a stitch length of zero, and manually adjust the needle width until it aligns with the buttonholes. Sew back and forth until secure.
Know Your Presser Feet!
Understanding and using the various presser feet that come with your sewing machine can significantly enhance your sewing projects. Each foot serves a unique purpose, enabling you to create professional-looking finishes with ease.
Don’t hesitate to refer to your sewing machine manual for specific instructions and stitch options related to each foot. With practice, you’ll become more comfortable using these attachments, making your sewing experience enjoyable and efficient.
For more information about Sewing Machine Accessories and Multi Needle Embroidery Machine please visit:- Premier Stitching DBA Sew Vac City
0 notes
Text
Using Presser Feet for Beginners
Using a sewing machine opens up a world of creative possibilities, and understanding how to use presser feet is essential for achieving professional results. Each presser foot is designed for specific tasks, making it easier to create beautiful seams and embellishments.
There are various types of presser feet and their uses, and knowing which one to use is essential for beginners to get the most out of their sewing machines.
Understanding Presser Feet
Presser feet are attachments on a sewing machine that hold fabric in place while it’s being stitched. They press down on the fabric, sandwiching it between the foot and the feed dogs, which move the fabric through the machine. This mechanism ensures that the fabric is fed evenly and helps prevent shifting during sewing.
Types of Presser Feet
Presser feet can be broadly categorized into utility and decorative feet. Utility Feet are designed for basic sewing techniques and are essential for most sewing projects. Decorative Feet are used for embellishing your projects, adding unique touches to your creations.
Common Utility Presser Feet
All-Purpose Foot
This is the most common foot and typically comes standard with your sewing machine. It's versatile enough for most sewing tasks, making it a go-to for beginners.
Zipper Foot
The zipper foot is designed to help you sew zippers or any time you need to stitch close to the edge of your fabric. It comes in different styles, allowing you to choose which side to sew from. Always check the needle placement when using this foot to avoid breaking your needle.
Buttonhole Foot
This foot is specifically designed for sewing buttonholes. There are two types: the 4-step buttonhole and the one-step buttonhole foot. Both can create standard or corded buttonholes. Make sure to follow your machine's manual for proper usage.
Quarter-Inch Foot
Perfect for quilting and projects requiring precise quarter-inch seams, the edge of this foot acts as a guide, helping you achieve accurate measurements.
Walking Foot
This foot is an excellent investment for quilters, as it feeds fabric layers evenly from both the top and bottom, preventing shifting. It's particularly useful when working with multiple layers or tricky fabrics.
Blind Hem Foot
This foot is designed for creating invisible hems. Pair it with a blind hem stitch for a clean finish that is less visible on the front of the fabric.
Specialized Utility Feet
Overcast Foot
Used with an overcast stitch, this foot is perfect for finishing edges, particularly in garment sewing. It helps prevent fraying and gives a polished look to your seams.
Teflon Foot
Ideal for sewing tricky materials like leather or vinyl, the Teflon foot allows for smoother movement over these fabrics, minimizing sticking or snagging.
Free Motion Quilting Foot
This foot allows for free motion sewing, letting you guide the fabric where you want it to go. It’s perfect for quilting and darning, requiring you to lower the feed dogs for optimal control.
Decorative Presser Feet
Monogram Foot
This foot is designed for decorative stitching and often includes a groove for thicker threads. It allows for more freedom of movement while sewing.
Ruffler Foot
For those who love gathering fabric, the ruffler foot automatically folds and gathers fabric as you sew, saving you time and effort compared to doing it by hand.
Beading and Cording Foot
These specialized feet are used for attaching beads, cording, or ribbons to your fabric. They simplify the process, allowing for professional-looking embellishments.
Know Which Presser Feet is Ideal for Your Projects
When you know what kind of project you want to do, knowing which presser feet you need is easy. These different types of feet are suitable for different types of projects and purposes, so you can open up new possibilities for your sewing projects.
For more information about Baby Lock Sewing Machine and Multi Needle Embroidery Machine please visit:- Premier Stitching DBA Sew Vac City
0 notes
Text
Take Your Hobby Along with Portable Sewing Machines

For anyone who loves to take their hobby with them anywhere they go, portable sewing machines are the answer for sewists and quilters. And when it comes to finding the best portable sewing machines, a few models stand out for their ease of use, versatility, and suitability for various skill levels.
Each of these sewing machines offers distinct features, making them great options for sewists seeking portability without compromising on quality.
Baby Lock Zest: Simple and Reliable for Beginners
The Baby Lock Zest is ideal for beginners or young sewists due to its straightforward design and reliable performance. While it lacks the bells and whistles of more advanced models, its simplicity and ease of use make it a perfect entry-level machine.
The Zest’s instruction manual is well-organized, which makes setup and threading simple, even for novices. The clearly labeled dials reduce confusion when adjusting stitch length, tension, or stitch type, allowing users to focus on building their sewing skills.
One feature that stands out is the notched knob for reverse stitching, which makes it more comfortable to hold down when securing seams. Although the Zest is compact and ideal for small projects, an extension table could enhance its usability for larger pieces like garments or tote bags.
Brother CS7000X: Advanced Features in a User-Friendly Package
The Brother CS7000X is a perfect choice for sewists seeking a machine that balances advanced features with ease of use. Its computerized system is designed to be user-friendly, making it accessible for both beginners and more experienced users.
Unlike other computerized models that can be overwhelming, the CS7000X simplifies stitch selection with easy-to-use buttons, offering precision without the risk of accidentally changing stitches.
This model also boasts helpful features like an automatic needle threader and a jam-resistant drop-in bobbin, which reduces the frustration of setup. The wide table included with the machine allows for larger projects like quilts or garments, making it versatile for various sewing needs.
Janome 3160QDC: Designed for Quilt Lovers
The Janome 3160QDC is an affordable sewing machine that offers the features of a more expensive model. Quilters will love it for its portability and computerized features, making it possible to complete your quilting projects even when you are on the road.
With more than 60 built-in stitches, beginners and experienced hobbyists will find it easy to select and modify their stitches, especially with the stitch diagram and the LED screen. Also the Janome feed system helps in ensuring the advancement of any fabric, whether it’s heavy or delicate.
This model also comes with additional accessories such as seven quilting presser feet, maintenance cleaning tools, and a quilting kit that includes quilting and cloth guides. It’s a great choice for those who want the portability of a quilting machine and the features of more expensive Janome models.
Don’t Leave Your Sewing Projects at Home!
Each of these portable sewing machines offers unique benefits for sewists at different skill levels. And whether you need one as a professional or as an enthusiastic hobbyist, there’s a portable option for every need.
For more information about Baby Lock Sewing Machine and Commercial Embroidery Machines please visit:- Premier Stitching DBA Sew Vac City
0 notes