#19th century sewing
Text
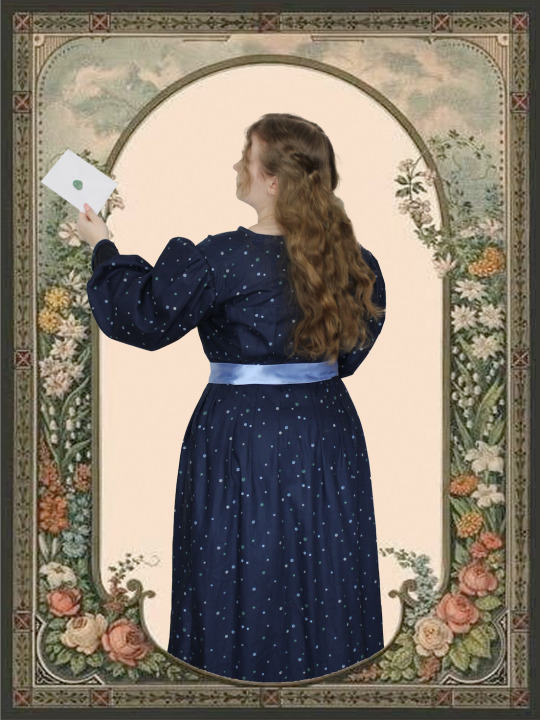
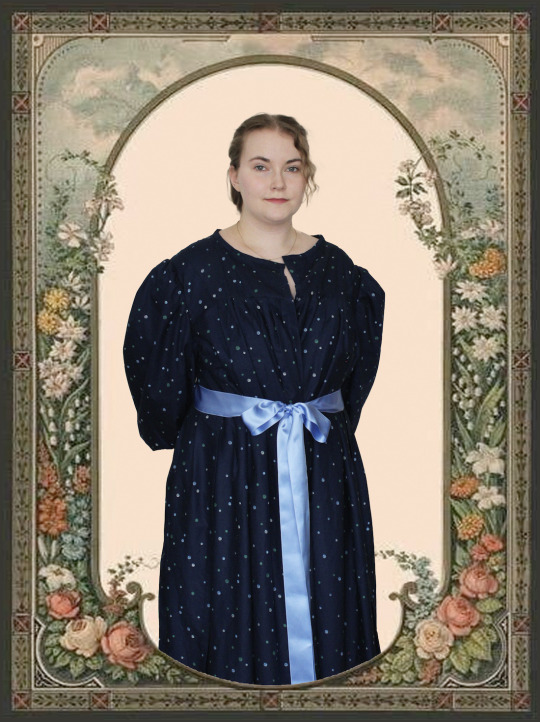
Sewing a Victorian Wrapper Dress
When I got this little book full of Victorian sewing patterns, I decided to go or sew through this book chronologically, starting with a Wrapper Dress for a young woman. I have heard these being described as the Victorian equivalent to sweatpants, which I thought was a great idea for those early morning meetings on zoom where you really just want to throw something on and look somewhat put together.
Working with Victorian Diagram Patterns
I started by reading the introductory instructions, which described what the symbols meant, how to measure yourself and how to adjust the pattern. The pattern I am using is meant for a Miss, which meant I had to size it up considerably.
To draft this particular pattern, you have to use the scale corresponding with your bust measure. The original bust measure I calculated from the pattern pieces was 23 inches (ca. 58.5 centimeters). In order to get the amount of additional width per piece, you have to use this formula:
( Your bust measure – original bust measure ) / number of pattern pieces (excluding sleeves)
so for my cm measurements it would be
105 cm – 58.5 cm = 46.5 cm
46.5 cm / 5 = 9.3 cm
So I rounded that up and added another 9.5 cm to the pattern pieces.
I excluded the sleeves from this, as the sleeve lining turned out to be far too big, and I had to redo the pieces separately. Instead of an additional 9.5 cm, I added 5 cm to each sleeve piece. I also had to tighten the sleeve around the wrist.
It’s quite hard to visualize the pattern in action, so I do recommend doing a mock-up, even if it's just a scaled down version.
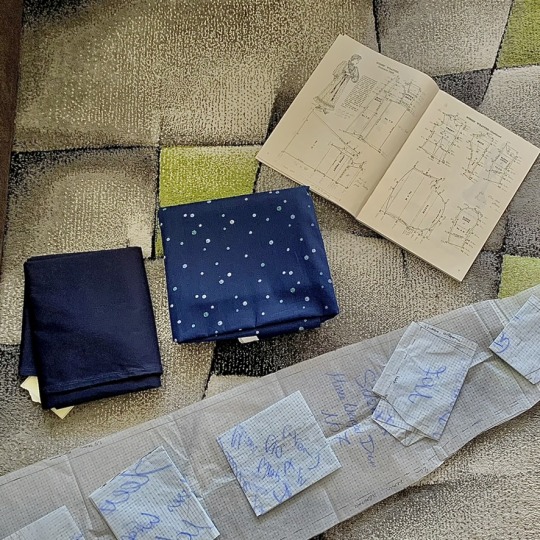
The pattern pieces and fabric choice
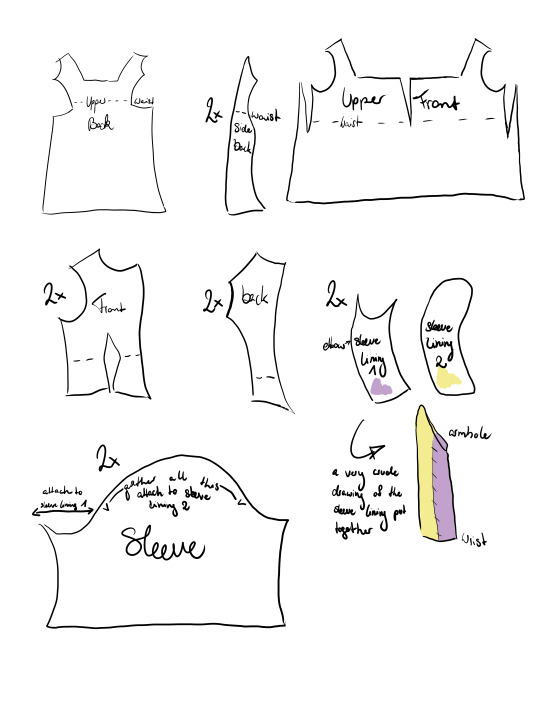
The pattern is given to you in diagram form, so I used squared pattern paper to make it easier. You start on the dot market with A on the upper right side of each pattern piece and move downwards the amount of inches described on the pattern, then from that point on move horizontally to the left. Remember to add your additional width or height to each pattern piece.
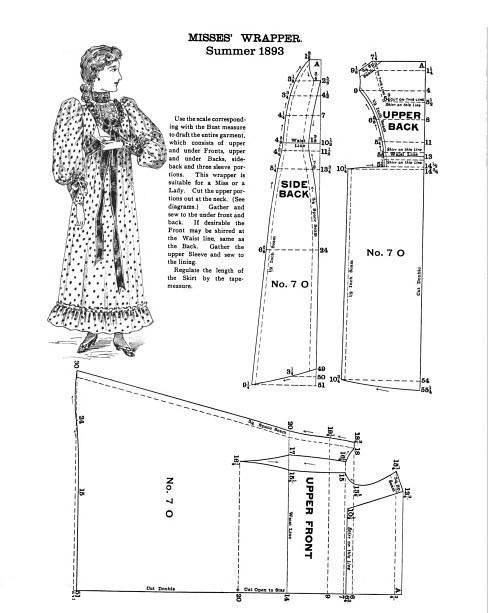
The pattern consists of a front, an upper front, a back, an upper back and a sideback, as well as a big sleeve and 2 sleeve lining pieces. It opens via a slit in the front, which is tied shut by a ribbon connecting to the upper back. The upper front is gathered (I used pleats) and sewn onto the front, where it’s marked with a dotted line on the page.
With all these gathers and pleats, your hot iron is going to become a steady companion, which reminds me to mention that I absolutely do not under any circumstances recommend doing this project in summer.
For the main garment I used a GOTS certified organic cotton poplin, which I found on sale, and for the sleeve I used this slightly stretchy poplin.
Cutting out the Pattern
Start by cutting out your pattern pieces. On some, it says “cut double” which means those are supposed to be cut on the fabric fold to make one big piece. Remember to cut the upper front open from the bust to where it’s marked with a star on the pattern. That’s your opening.
The pattern pieces are:
one upper back (cut on fold)
one upper front (cut on fold)
2 side backs
2 fronts
2 backs
2 of each sleeve lining piece (upper and lower as illustrated below)
2 big sleeves
The Bodice
Sew the darts on the upper front and front, and sew the 2 back pieces together to make a single back piece. Overlock those seams and iron them to one side. You may also want to overlock the bottom of your front and back pattern pieces. I left mine raw because my fabric isn't prone to fraying, but if you’re unsure, just zigzag stitch over it.
Gather your upper front and upper back. I used pleats because I feel they’re easier to sew by hand, but I know Victorians were very fond of perfect little gathers, so just do whatever feels right to you. Iron and overlock your gathers. I also sewed my pleats in place with a few quick hand stitches for a neater look.

Attach the upper front to the front and the upper back to the back, making sure to adhere to the markings on the original pattern. Sew the shoulder parts of the pieces together. Now sew the side backs to the newly completed front. And yes, overlock and press those seams.
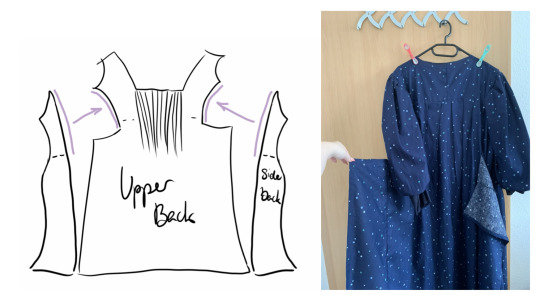
Then attach the side backs to the back, making sure to only attach them to the upper bodice part of the upper back, leaving the lil arms to dangle free. We’ll attach ribbons to those later to tie the garment shut. Those lil arms shouldn’t however, be so long that they reach around you. We want them at our sides, not in front of us, hiding the nice pleating we just spent hours on. Basically, if they seem too short, they’re exactly right, but if they do end up too long, pleat them.
It’s time for our first fitting. Slip into your dress and check the length, the size and see if the armholes fit. If they’re a little tight, make a little note and cut them bigger when you’re attaching the sleeves.

The sleeves
The next step is the sleeve. If you haven’t already, cut out the sleeve lining from your lining fabric. Pin both sleeve lining pieces together and try them on. You will have to adjust the sizing, there's no way around it. My cotton poplin was slightly stretchy, which made this easier but is definitely not historically accurate. Once you’re happy with the sizing, sew the pieces together and overlock those seams.
I also had to pleat the upper part of my lining to make it fit the armholes. Sew down the pleats with a quick whip stitch and mark which sleeve belongs to which arm. I cannot stress this enough. I didn't and had to unpin the sleeves several times.
Now gather your big sleeve in between the notches and iron those gathers. Sewing the sleeves was hell, and you do not want to suffer more than you already have to. Sew the sides of each sleeve right sides together and press open or overlock.
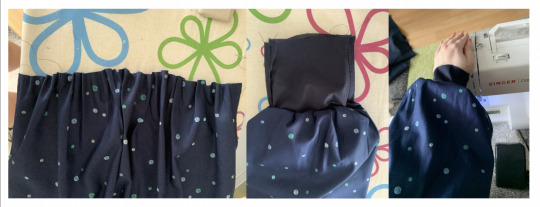
You’ll notice the sleeve is slightly shorter than the sleeve lining. That's because the sleeve lining also functions as your wrist cuff. If you’re bolder than me, you could also use a contrasting lining. Attach the ends of the sleeve to the sleeve lining where the pattern indicates. Don't forget to french seam the seams on the sleeve lining cuff.
Now pin and sew your sleeve lining and sleeve to the armhole. If you want to be on the safer side, quickly stitch your sleeve and sleeve lining together before this step. Trim and overlock the raw edges. Try it on. You may need to add a few additional stitches to make the sleeve fit just right.
The hem
In this next step, we’ll add a hem to the dress. To make this easier, I made some bias tape from my scrap fabric. This really made the front opening, skirt, neckline, and cuffs look nice and neat.
Once you’re done with the hems, add your ribbon. Find the middle of your ribbon and pin it to the center back and the arms of the back. Try it on and check the fit. I wasn't happy with my pleats in the back, so I ironed and handstitched them down. If you notice that your fabric is bunching up and looking wrinkly, it might be because you’re tying your garment too tightly. It’s not a corset, you don’t need to tight lace.

Finally, I used a running stitch to attach my ribbon.
And you’re done.
Happy sewing!
PS: here is the link to this lovely flower background I found and here's a link to my blog on livejournal
#sewing#19th century sewing#sewing project#reenactment#fashion history#history#historical sewing#victorian#victorian dress#historical costuming#historical clothing#19th Century#costuming#1890s dress#sustainability#sustainable fashion
17 notes
·
View notes
Text
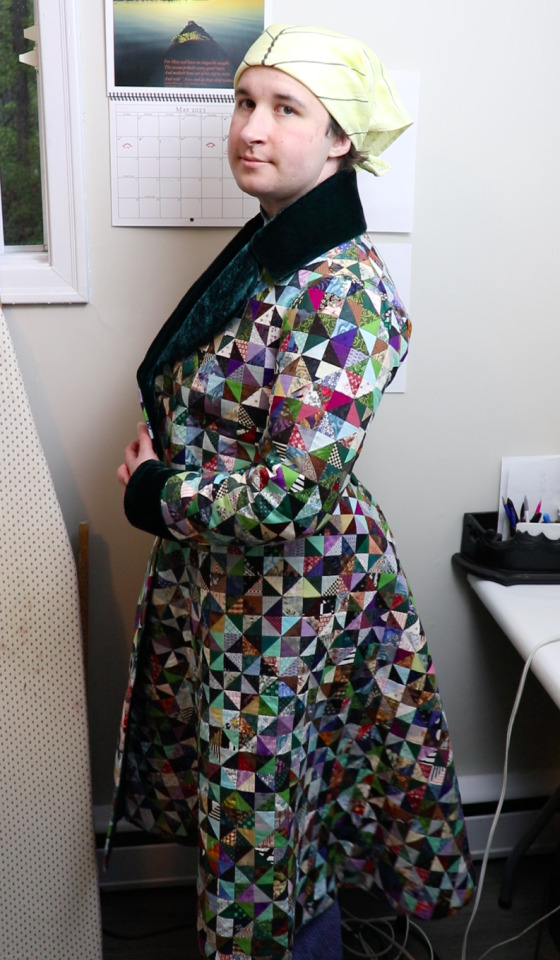
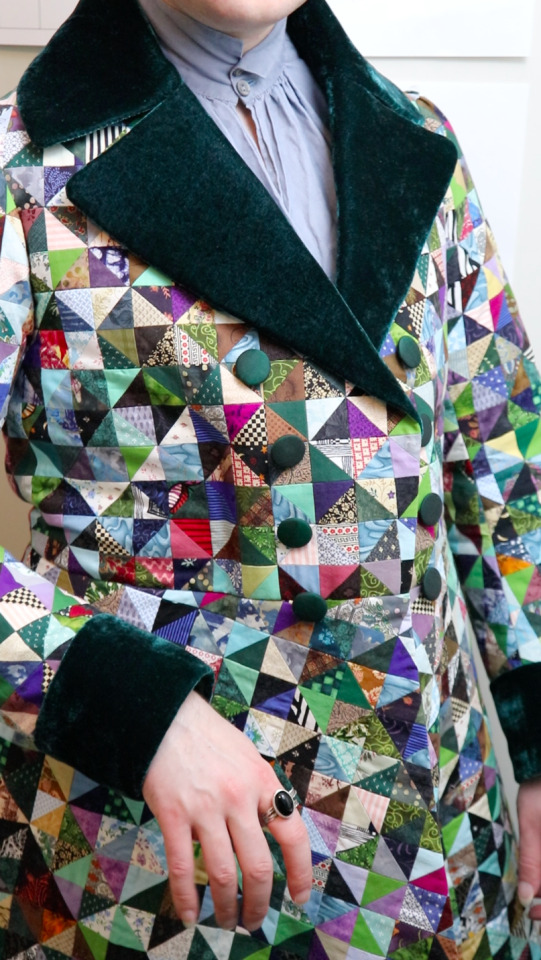
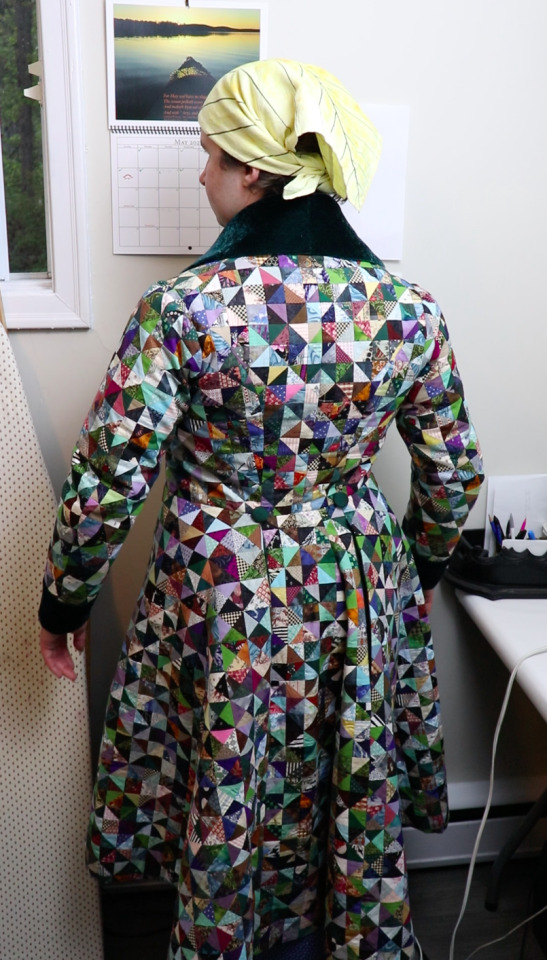


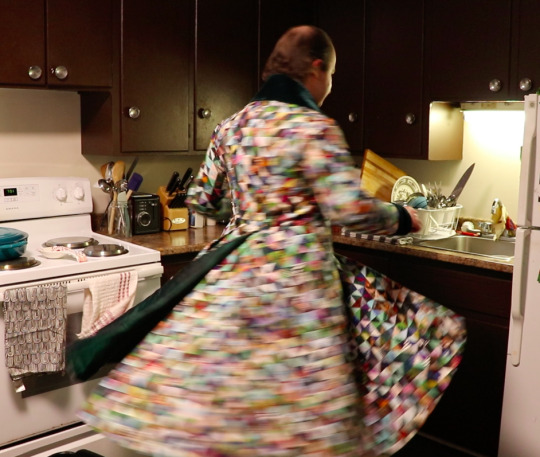
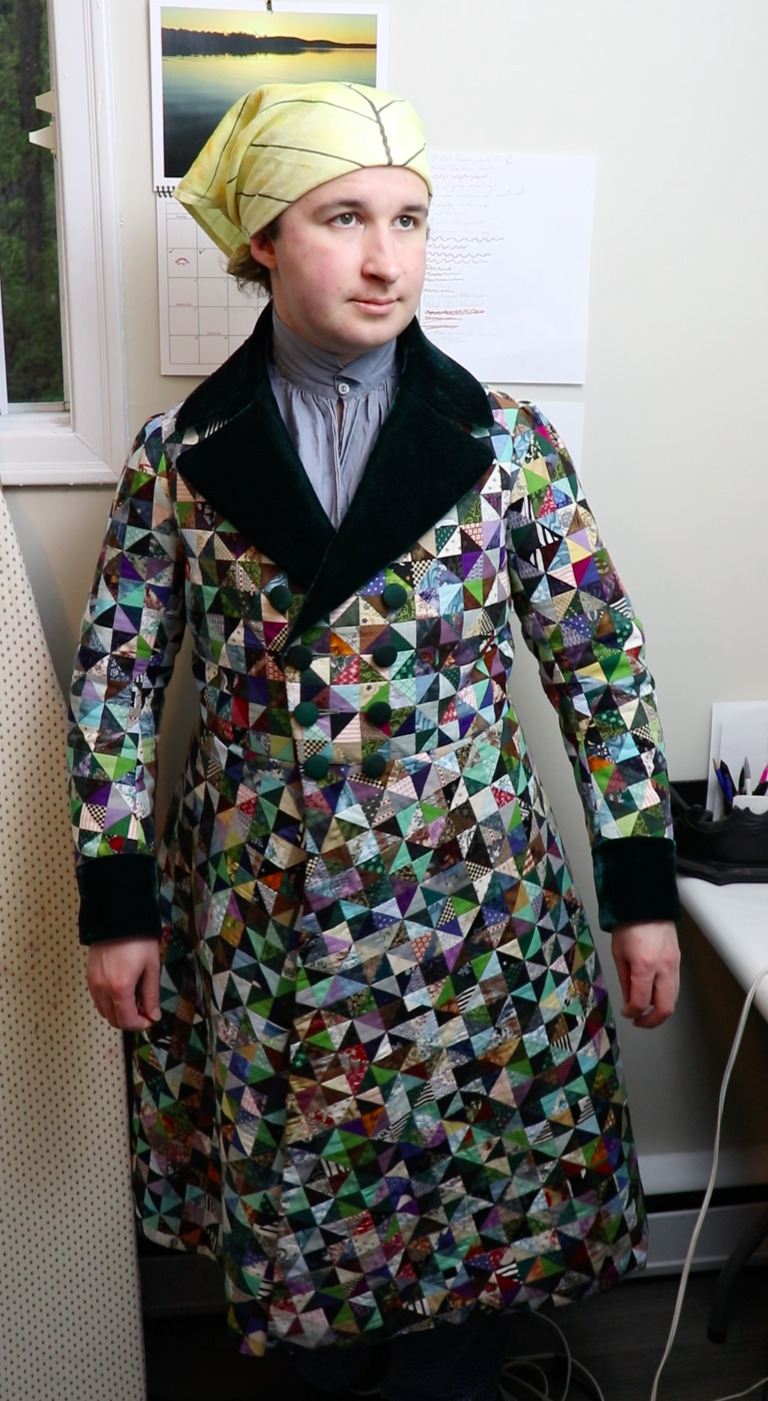

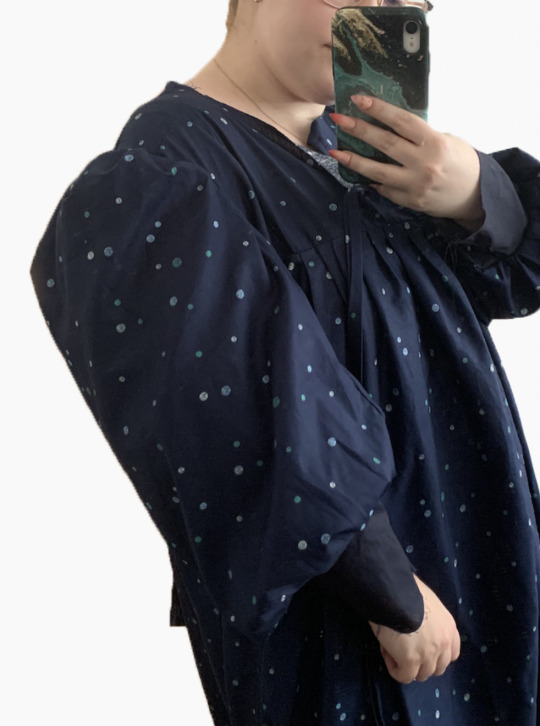
Here are some (not very good) photos of me wearing it! I'll have to get some better ones at my parents house later, because there is absolutely no good space to take photos in my apartment.
I don't have any other 1830's things to go with it, and don't currently have plans to make any. I just wanted this dressing gown specifically.
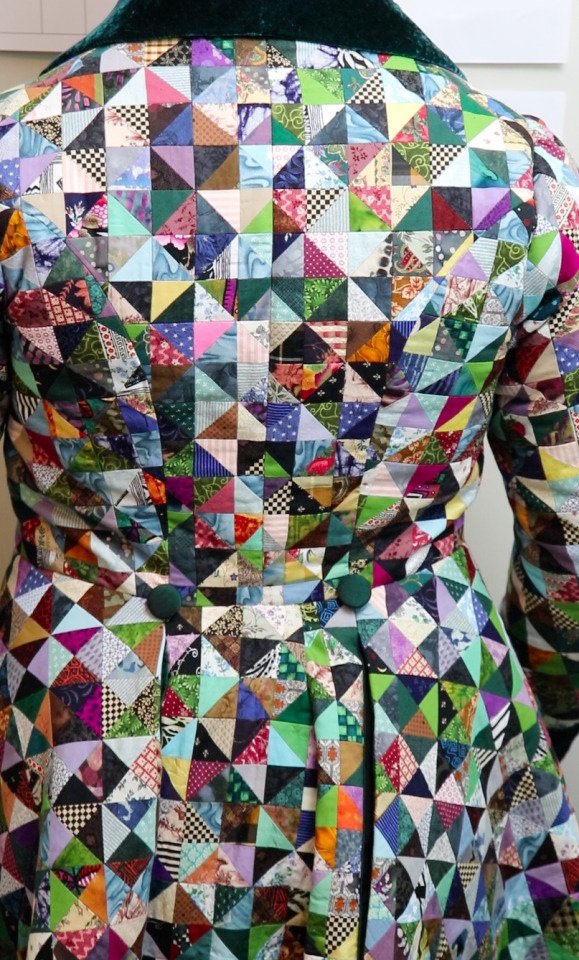
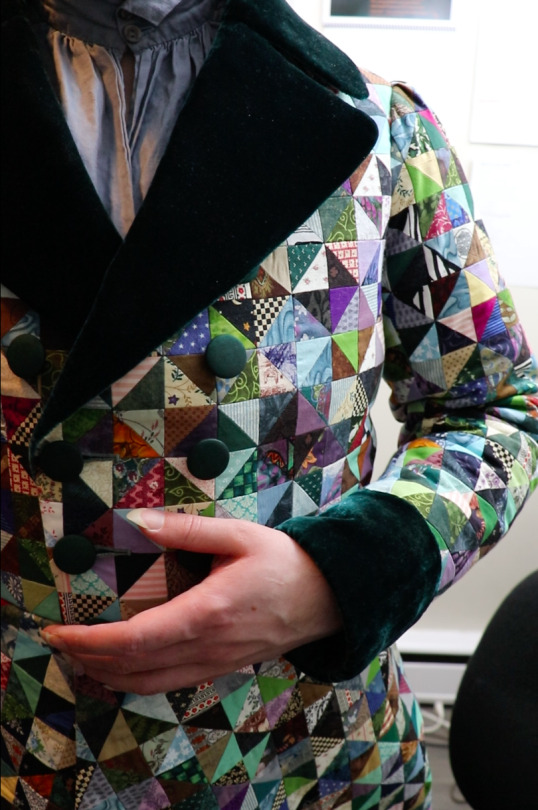
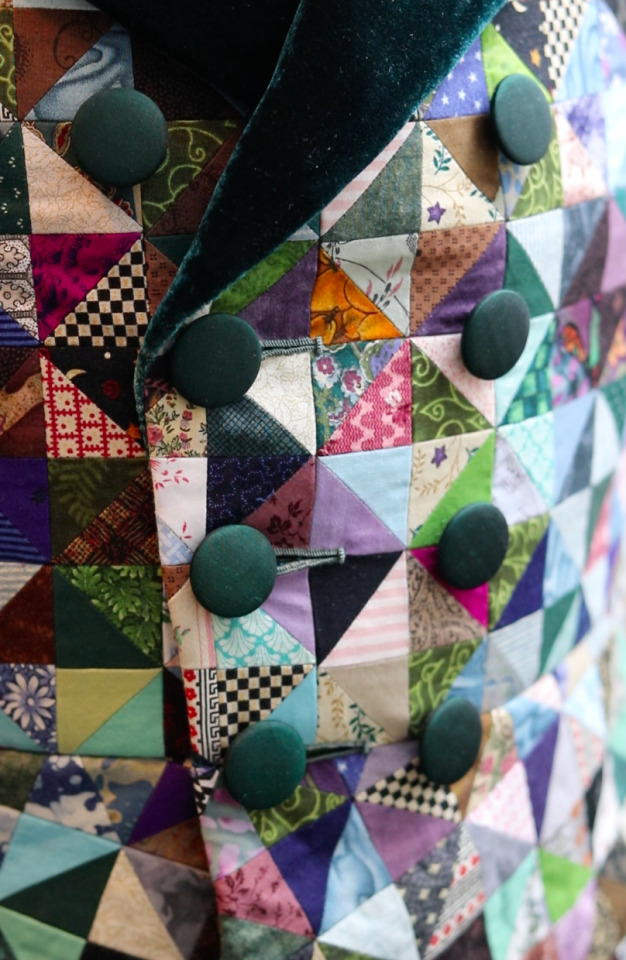
Anyways! There are 6,957 triangles, all sewn together by machine, but most of the actual garment construction is by hand. The unevenness from all the patchwork seam allowances made it very fussy, and the tailoring took at least twice as long as it would have in a normal fabric. The velvet was also a challenge, being the soft drapey wobbly kind, but I managed.
I accidentally made my triangles a bit smaller than the ones on the original (C. 1835, Powerhouse Museum collection.) which means there are more triangles than there had to be, but that's ok. I really enjoyed doing the patchwork, it's the most wonderfully soothing brainless task ever and I will definitely make more patchwork things.
I'm very happy with how it turned out! It's comfortable and fits pretty well, and is warm but not excessively so.
I kept timesheets for everything, and I haven't added them up yet, but once I do I'll know exactly how long all of this took.
I also filmed it, but the youtube video won't be out for quite a while, because I still have to write and record some more stuff and then edit a very very very very large amount of clips.
9K notes
·
View notes
Text

Entering my sans-culotte era babes
#historical fashion#sewing#tailoring#frev#historical costuming#history bounding#19th century#18th century
4K notes
·
View notes
Text
Larp shenanigans incoming


#colorful victoriana#historybounding#historical fashion#historical costuming#cosplay#sewing#19th century#afrovictorian
845 notes
·
View notes
Text
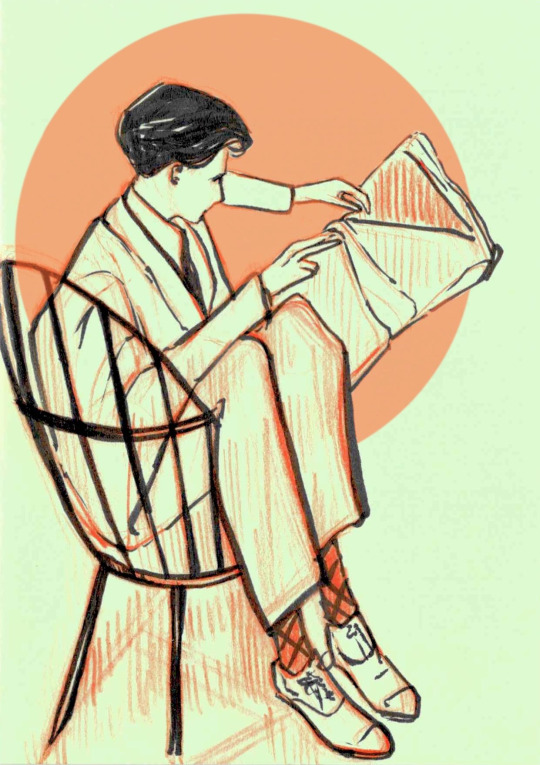
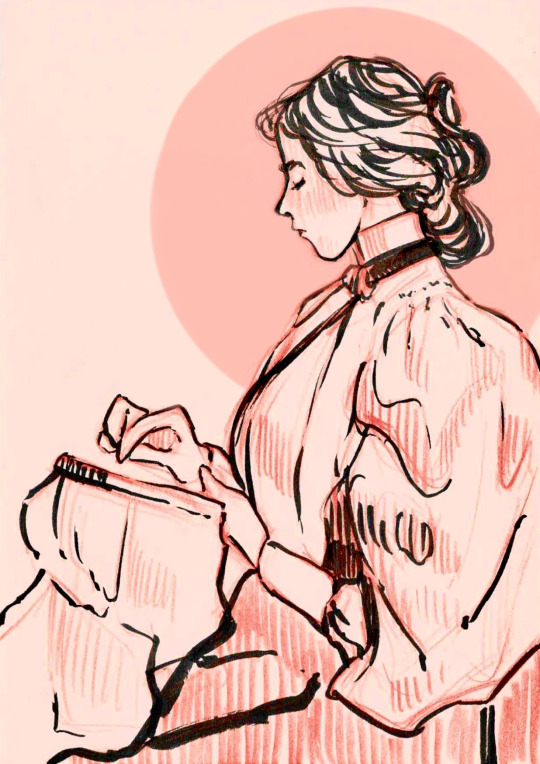
Old pastimes
#i don't have a favourite colour really but these come very close#green and orange and pink#beautiful colours#my art#vintage photos#19th century art#19th century#traditional art#traditional illustration#art#illustration#artwork#books and reading#reading#readers#book#sewing#arts and crafts#embroidery#artists on tumblr#illustrators on tumblr#brush pen#ink art#ink drawing#pen and ink#pen art#pastel colors
129 notes
·
View notes
Photo
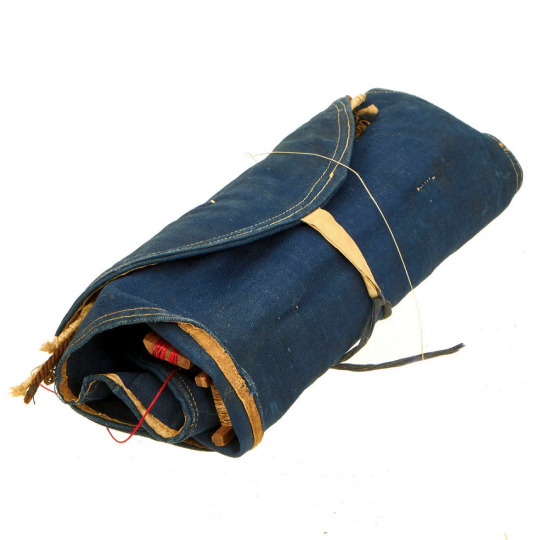
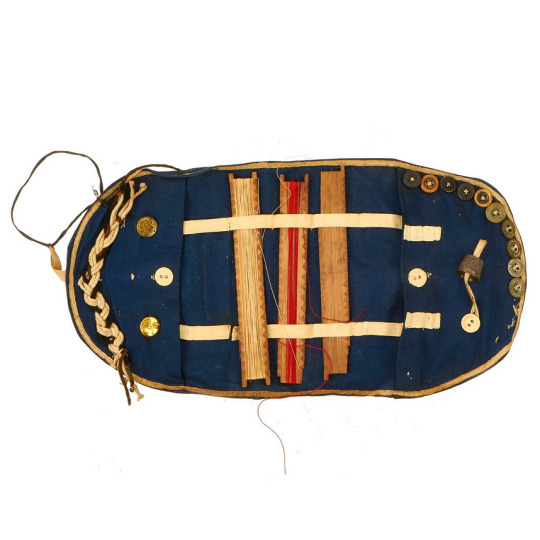
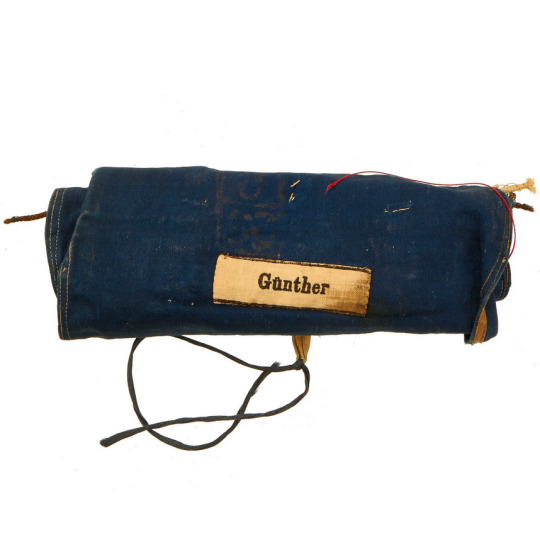
Sewing Kit (Housewife) of a Sailor (His name was Günther) of the Imperial German Navy, the Kaiserliche Marine (1871 -1919)
#naval artifacts#sewing kit#naval uniform#german imperial navy#deutsche kaiserliche marine#late 19th -early 20th century#age of steam
157 notes
·
View notes
Text

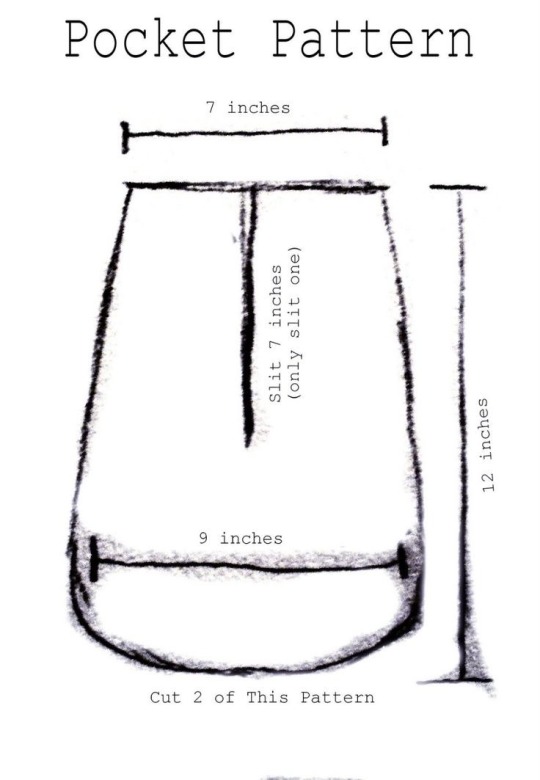
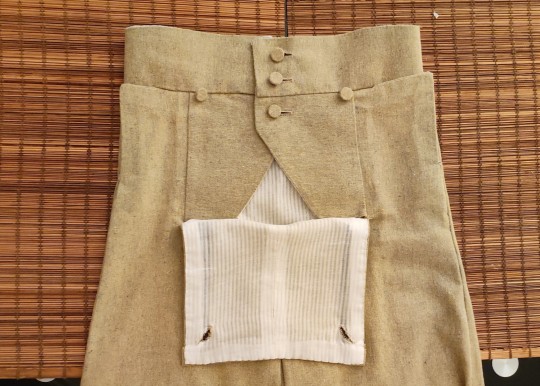
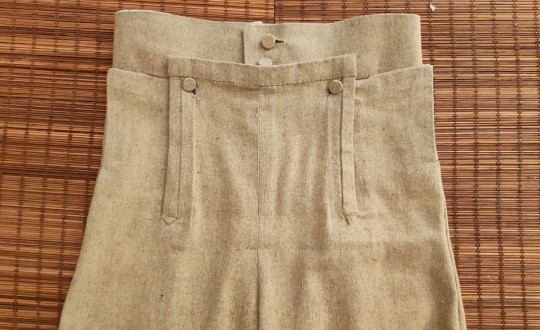
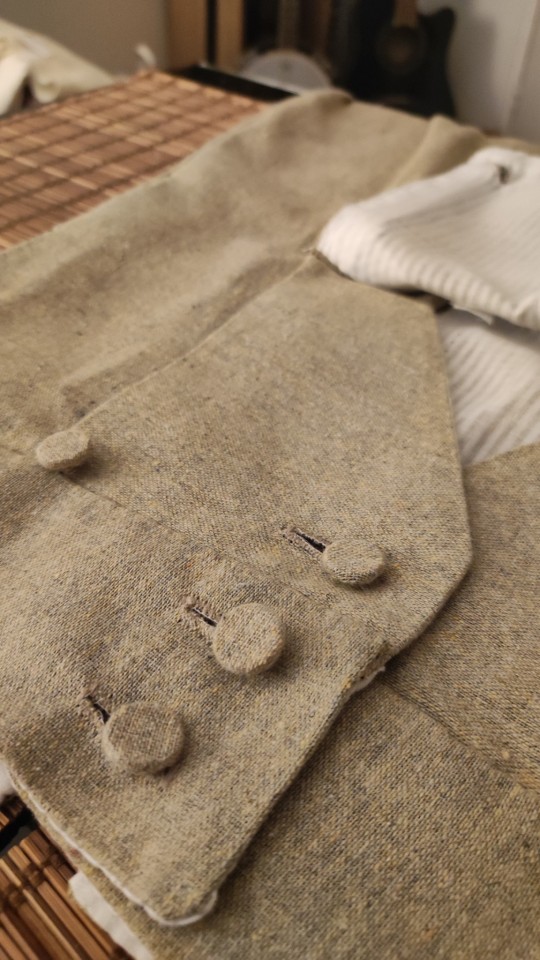
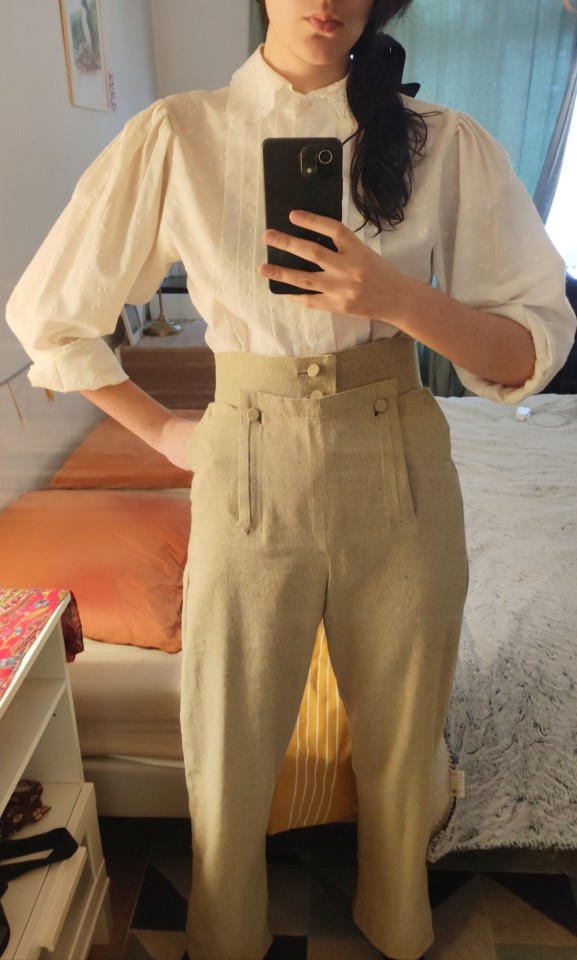
Sewing Pattern For Pockets
#historical fashion#fashion#historical#history#historical clothing#historical dress#long dress#victorian#victorian era#victorian fashion#pockets#18th century fashion#18th century#19th century fashion#19th century#textile#textiles#sewing#sewing patterns#historical pattern#victorian pattern#patterns#pattern#art
79 notes
·
View notes
Note
In yesterday’s Dracula Daily update, Mina mentions she is “only taking one change of dress”. 1) Was this a common occurrence for short trips or because of the circumstances? 2) Would both dresses be ‘traveling dresses’? 3) I’m assuming one dress means the top-most layer & she packed multiple chemises, etc. Could other undergarments (i.e. petticoats) be re-worn between washes? 4) Would she have been able to launder her clothing while travelling? Thank you.
Good questions!
While I'm not 100% sure, I believe her mentioning that she's only taking one change of dress is because that's such an unusual thing to do. To my eyes, it highlights how quick and desperate her flight to Jonathan is: she's dropping everything and preparing only the bare minimum so she can get to him as quickly as possible. I believe it would have been more common, for a trip all the way to Hungary, to bring the full trunk she's opting to have Lucy keep in readiness for her instead.
Given Mina's practical nature I'm going to assume they're both travelling dresses, but I suspect that could vary from person to person in similar circumstances. Eg she might pack two travelling dresses- hard-wearing materials, colors unlikely to show the soot and dirt of rail travel, skirts that clear the ground, etc. -but another woman might have chosen one travelling dress and one fancier dress. That seems like a more individual question to me.
She would almost certainly pack multiple chemises or pairs of combinations, yes. Anything that didn't touch the skin directly could definitely be re-worn between washes, unless it got particularly dirty (and even then, sponging the hems of one's petticoats and even outer skirts was a common way to remove dirt without a full wash).
As for laundry, Mina likely didn't do it herself even at home- it was quite common to send your clothes out to a laundress, even for middle-class families and individuals. As you can see in Bernadette Banner's recent video, laundry was a strenuous multi-day undertaking back then, which is why people could make decent money doing it as a full-time job. Anyone who could remotely afford to outsource it, did. I haven't done deep research on this, but it's my impression that most hotels of the caliber Mina's likely to be staying at would employ a laundress (or multiple) on their staff to wash guests' clothes.
#ask#anon#history#1890s#dracula daily#dress history#social history#I'm always slightly baffled by pop history sources that insist everyone did their own laundry and made all their own clothes#in the 19th century#like. if that's true then why were Seamstress and Laundress/Washerwoman viable occupations?#what do you think they were sewing and laundering?#the 1% are by definition a small category of society so there couldn't be enough business from them alone#to support entire thriving trades around making and washing clothes#that's not to say NOBODY did it themselves. of course people did#but like. clearly not everyone who wasn't rich
407 notes
·
View notes
Text
AYAYYAYAYAYYAAYAAAY I GOT SOME NEW FABRICS SO I CAN START WORK ON MY UPDATED 1830S WAISTCOAT!!!!
#i'm also making a modified pair of braces that I can wear with my distinctly 2020 dress pants#dude i'm so excited#sewing#historical costuming#historical fashion#19th century fashion#1800s#1830s waistcoat#1830s fashion#les mierables#les mis
44 notes
·
View notes
Text
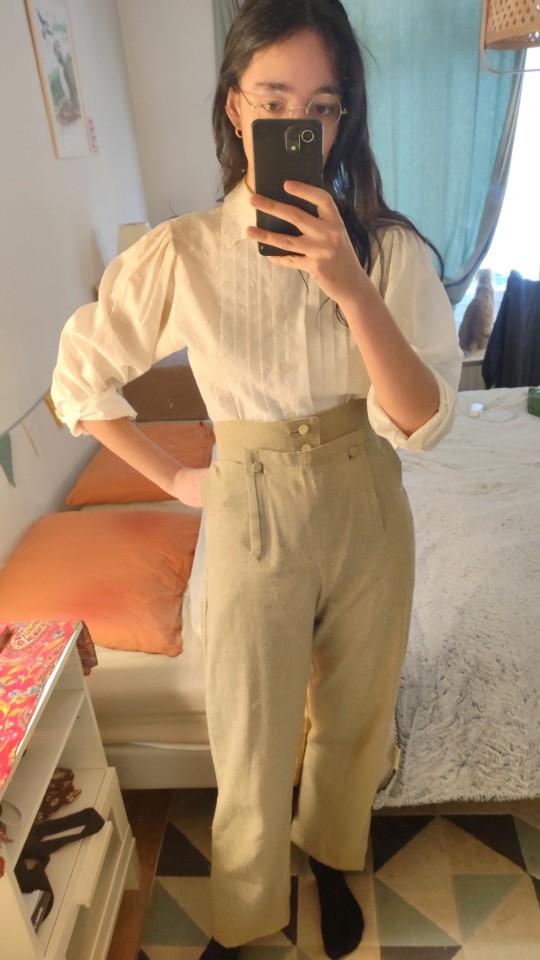
The shirt for my historically accurate Toy Soldier cosplay is done!!!!!
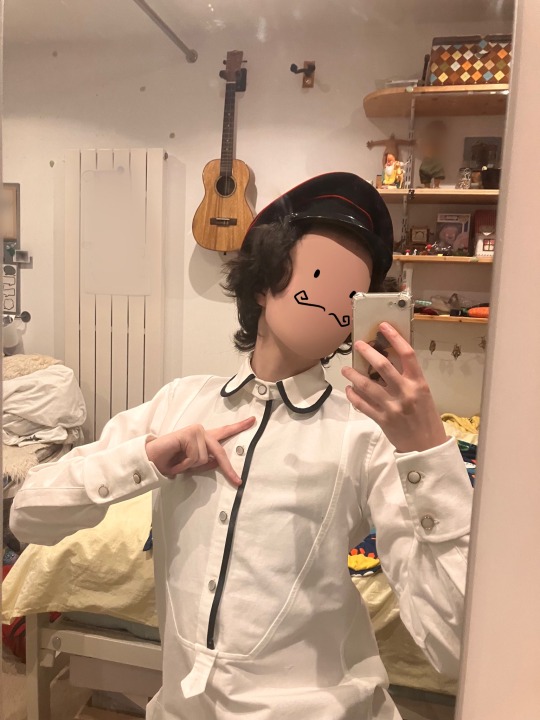
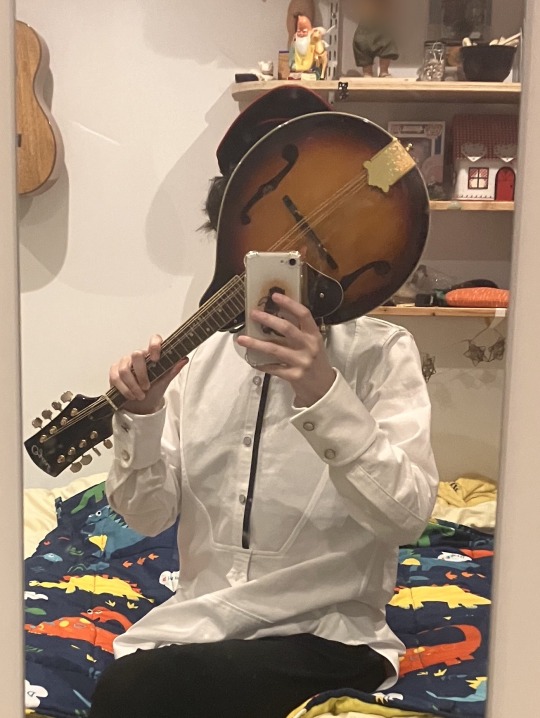
[Image: two photos, both taken in a mirror, of a young, transmasc person in their bedroom, wearing a reconstructed, white Victorian dress shirt. It has a shield-shaped bib area and a tab below the placket, with a detachable rounded collar and cuffs. The front placket and collar have a narrow black edge, and everything is fastened together with pearlescent shirt studs and cuff links. In the first image their face is blurred out, with comically simple eyes and a moustache doodled on top. In the second it is obscured by the body of a mandolin, held by its neck in one hand. Their short, dark hair is visible under an antique black-and-red military cap. End ID.]
(*almost historically accurate, and almost done)
After all this time!!!!! I started in September(?) and it’s now May but a lot of that was just putting off starting the twenty eight hand-done gimped and tailored buttonholes this ended up requiring because I can’t do anything by halves
If you’re wondering, I used this pattern, which worked wonderfully for me (special thanks to this tutorial too for demonstrating some of the more difficult parts), but I spent a long time trying to alter it to fit me, and to fit flatteringly, as I have never made a garment this complex before and I do not have the body an average men’s pattern expects. I had to do a lot of things multiple times over, but I’m really glad I did, because it’s definitely the most effort I’ve ever put into anything like this, and the finest sewing work I’ve ever done. I feel very dapper and handsome.
I did machine-stitch most of it because I knew, knowing me, that I could either end up with an ahistorically-sewn shirt or no shirt at all as I would procrastinate sewing all of that by hand just. Forever. I did hand-stitch a lot of it though, mostly the felled seams and fiddly collar bits. And the buttonholes. God so many buttonholes. The black edge is bias tape that I folded in half and ladder-stitched to itself through the shirt/collar fabric. (Also the horizontal seam you can see near the bottom in the lower picture exists solely because I didn’t have the fabric to cut the front out in one, and that part gets tucked into the pants anyway. Piecing is period.)
I’m still working on combining my various incomplete bits of antique cuff link and stud sets in the least-mismatched way, and the shirt itself is definitely not perfect (and there are still some minor adjustments I want to make), but all this to say I’m delighted with my work and excited to move onto the next item, which will probably be either the trousers or waistcoat, and I intend on documenting those too! I learnt so much from this experience and one day I’ll likely make another shirt much like it.
(Also, I’m happy to answer any questions about it!!! I know I could have used footsteps to follow in when I started this project)
They/them
#The Mechanisms#The Mechs#The Toy Soldier#Cosplay#Victorian#Fashion#Sewing#Historical sewing#Shirt#Dress shirt#19th century menswear#Toy Sewldier#Is my new tag for this project holy shit#Doriginal#One step closer to becoming a full-time dandy#It begins
65 notes
·
View notes
Text
oh! It's September 10th!
Happy 176th anniversary to Elias Howe's lock stitch sewing machine patent!
222 notes
·
View notes
Text
Hey friends!
When I start Project Regency Gentleman, should I dedicate a blog/twitter/instagram/*shudder* tiktok to the process? Is that something people would be interested in, or should I just leave it on this blog?
I'm planning to make relatively detailed posts about the step by step process of making the clothes, including making muslins of things to check fit
#historical fashion#regency#age of sail#napoleonic wars#georgian era#regency era fashion#late georgian fashion#19th century#early 19th century#19th century fashion#early 19th century fashion#project regency gentleman#thiefbird sews
11 notes
·
View notes
Text
After looking longingly at the window of an antique book store in Cracow, I don’t even know which time, I decided to finally splurge a bit on something pretty💕
btw, do you guys know which year can it be from? I’m guessing somewhere in 1870s, the lady working at the store said it was 1840… I asked her to check if she’s sure but she just got angry at me and she was kinda scary
15 notes
·
View notes
Text
Things are afoot
210 notes
·
View notes
Text
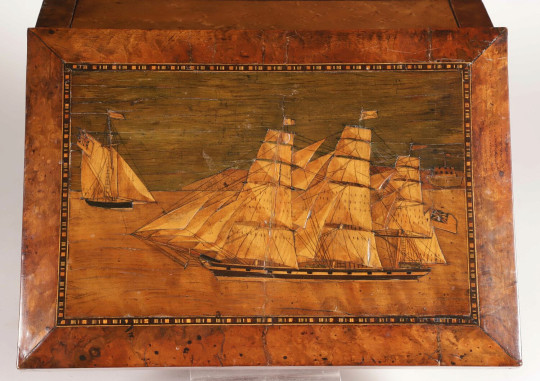


"Trinity House" sewing box in burl wood and marquetry, made by a Lighthouse Keeper c. 1870
97 notes
·
View notes
Text
#historical fashion#fashion#historical#history#historical clothing#historical dress#long dress#victorian#victorian era#victorian fashion#sewing#sewing patterns#historical pattern#victorian pattern#pattern#patterns#19th century fashion#19th century#1800s fashion#1800s#textiles#textile#high fashion
54 notes
·
View notes
Last Seen Blogs

ragofoot
Ragofoot

satanwiife
𝐒𝐚𝐥𝐥𝐲 𝐆𝐢𝐥𝐛𝐞𝐫𝐭

magicalpatches-blog
Custom Patches

ang3lthighisover
Ang3lthigh

sunrise-river
these stand for me