#Comic-ConatHome
Text

I feel like the way things are going for now I’ll be celebrating Rose City Comic Con at home instead at the con. My finances have took a turn on me this year. Unfortunately no comic con for me. #conathome
0 notes
Photo

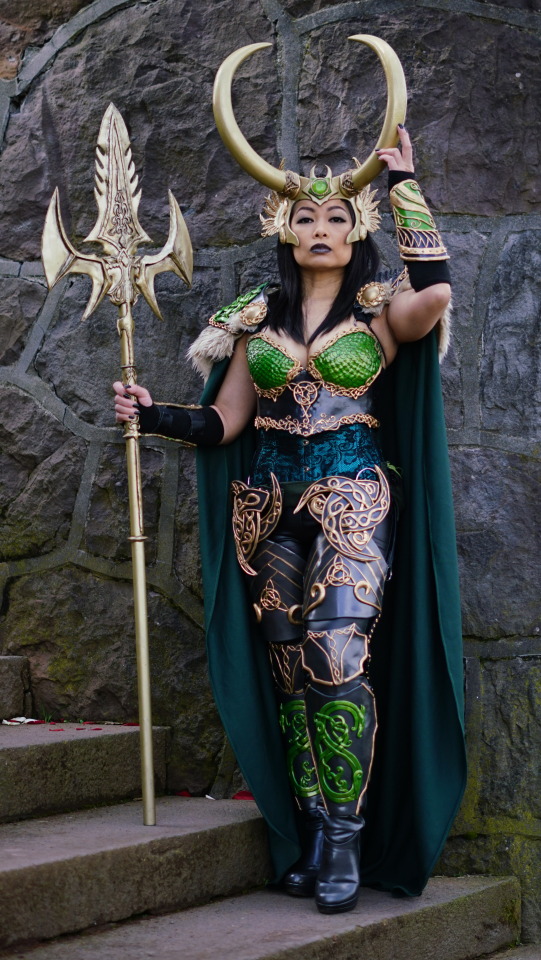
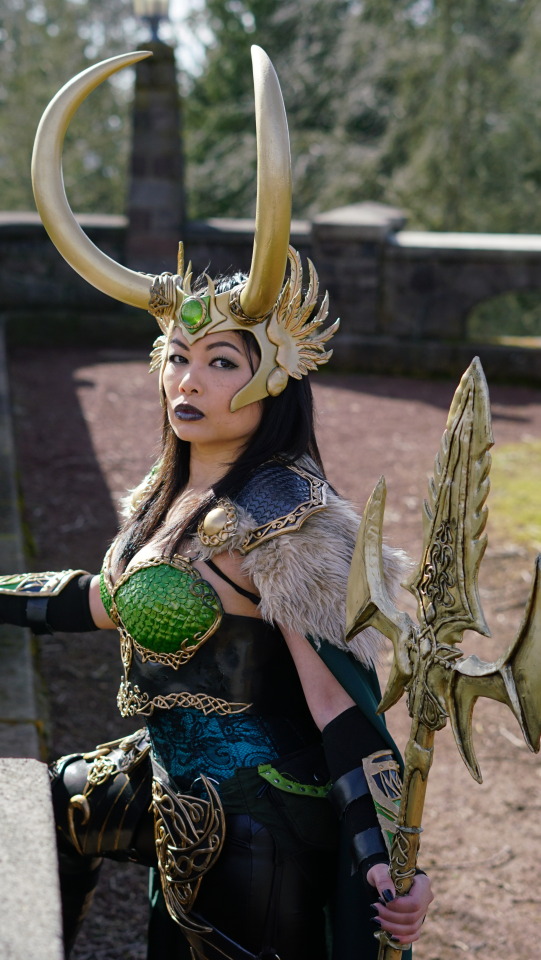
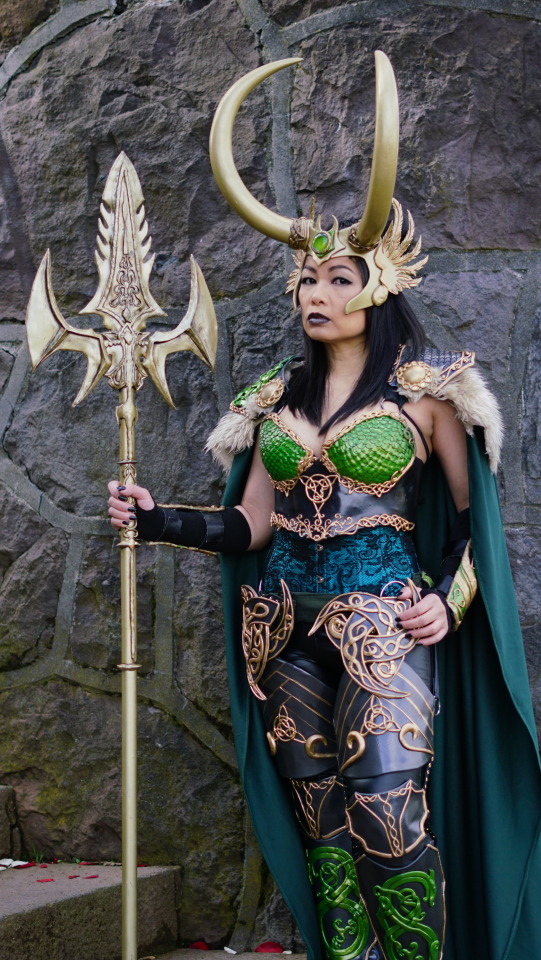
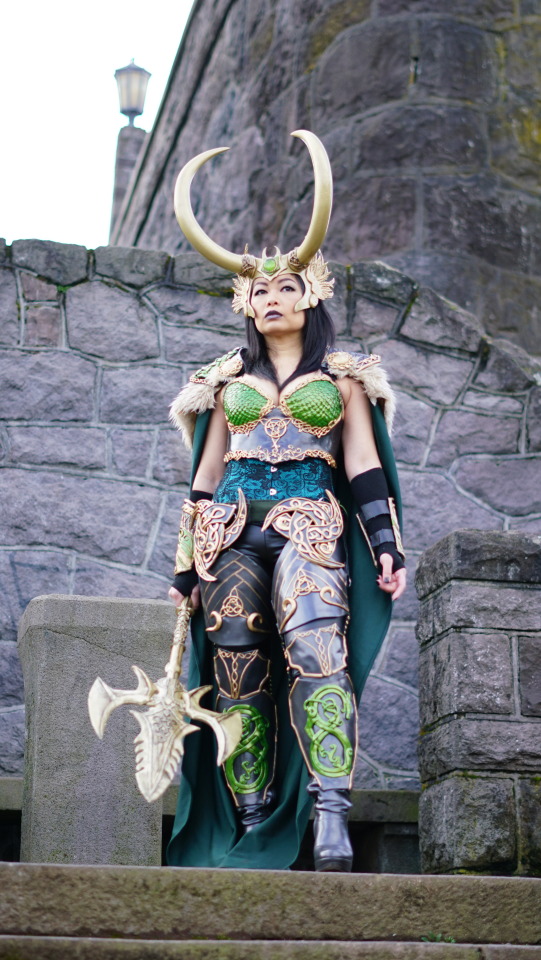
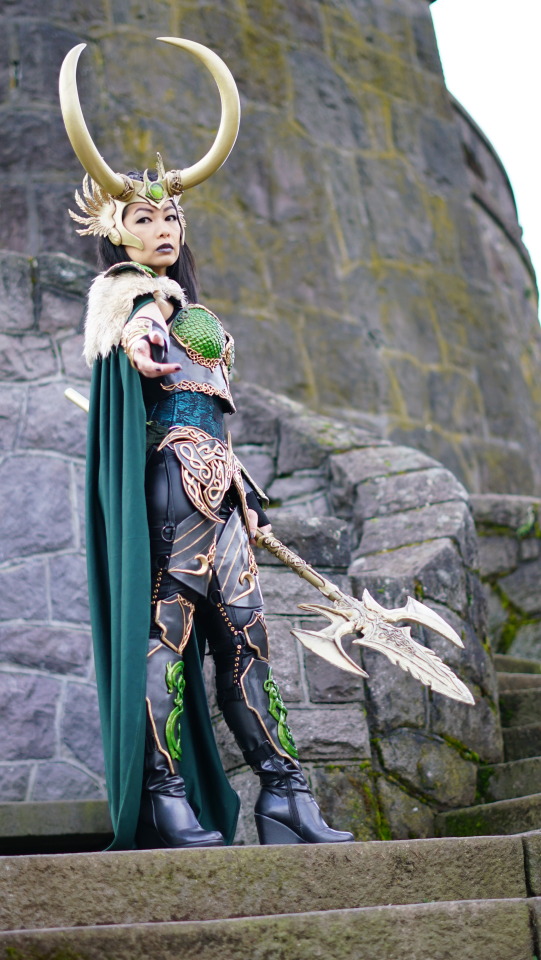

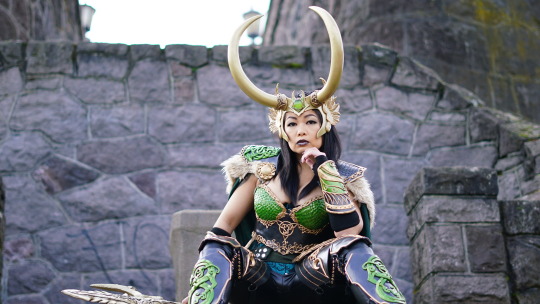
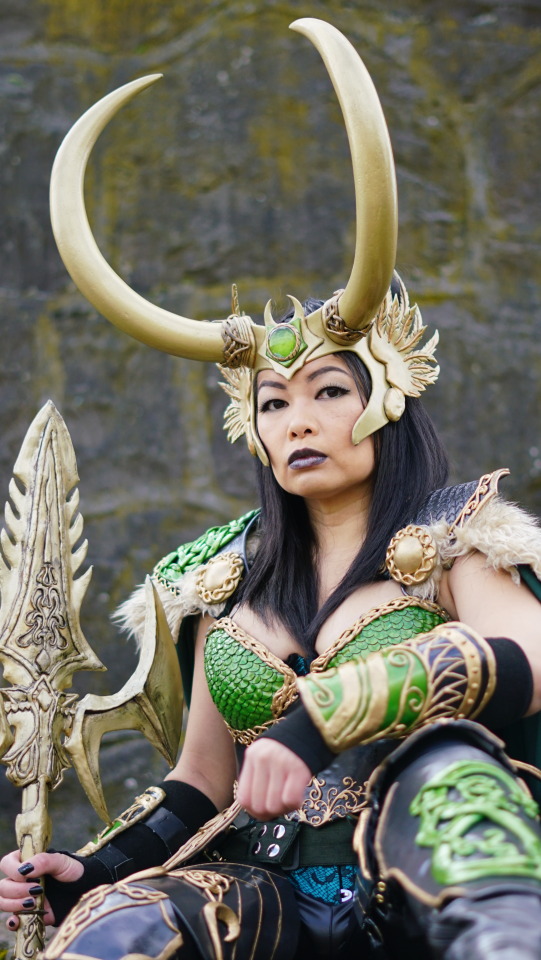
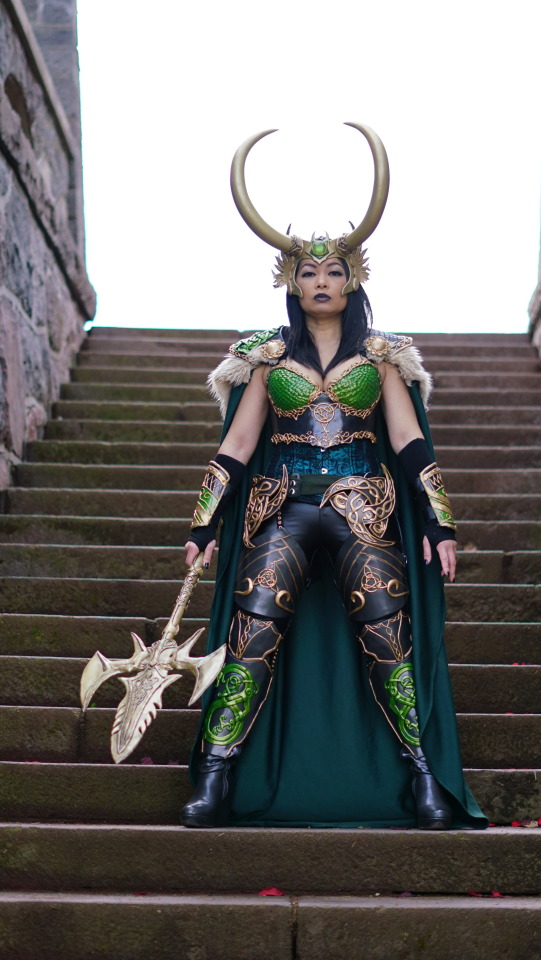
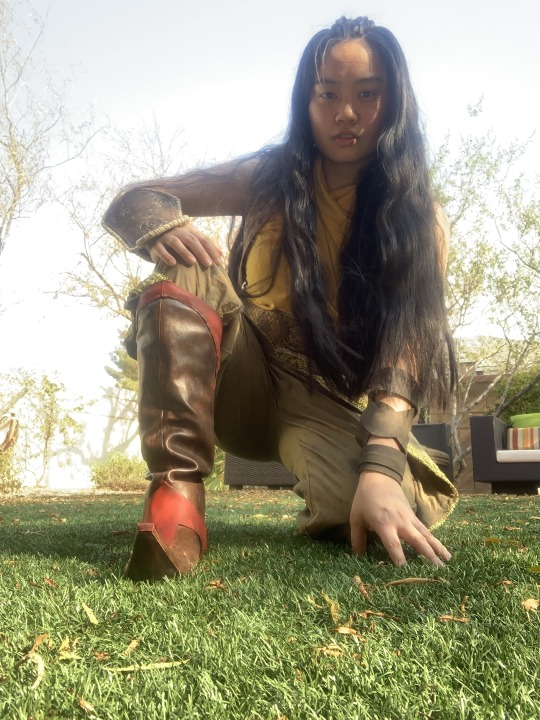
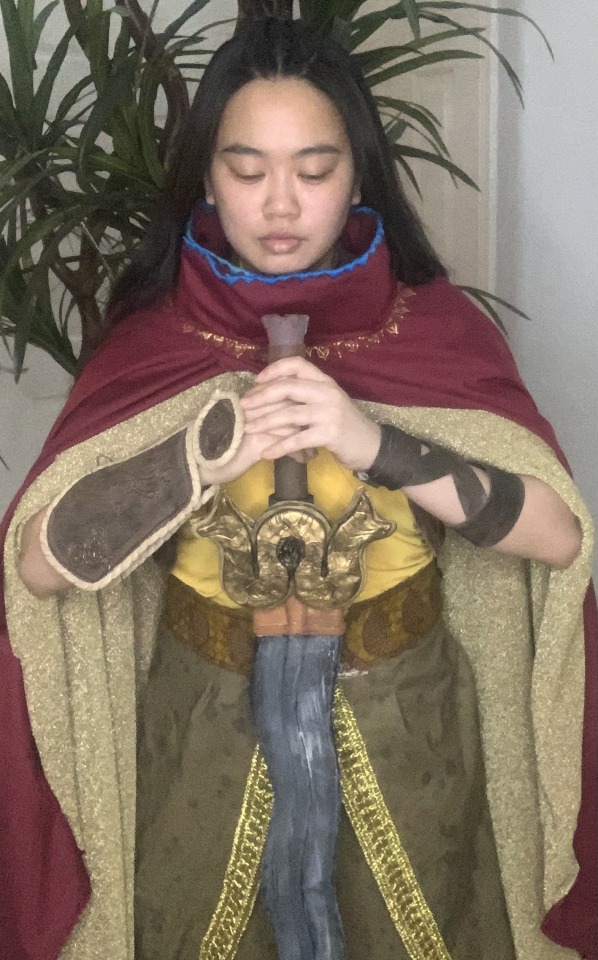
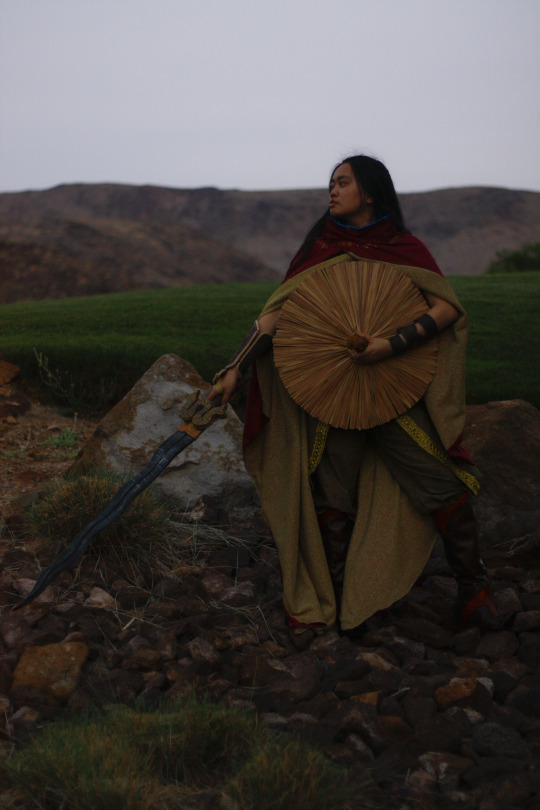
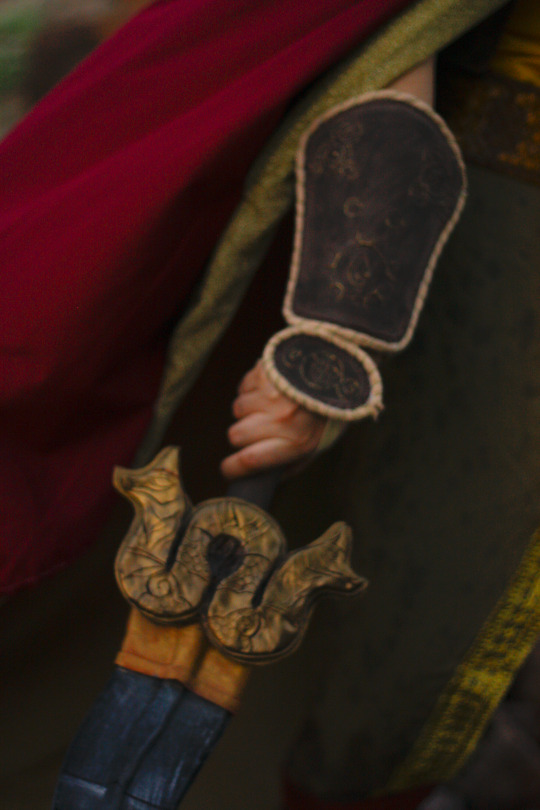
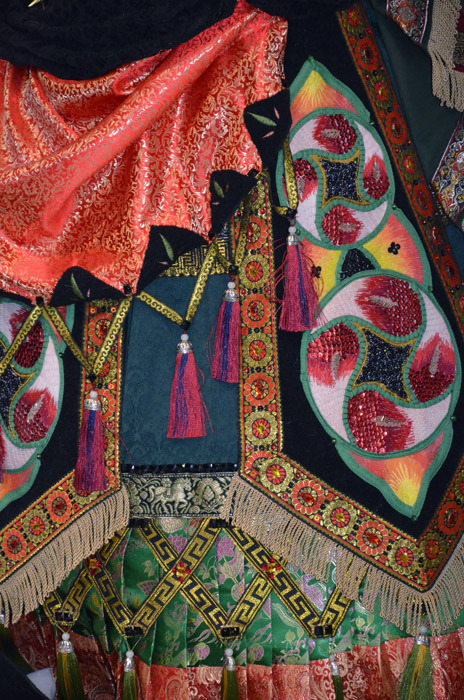
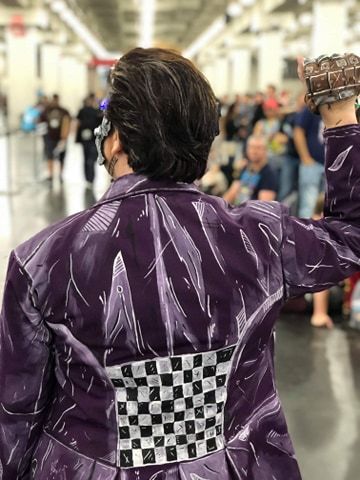
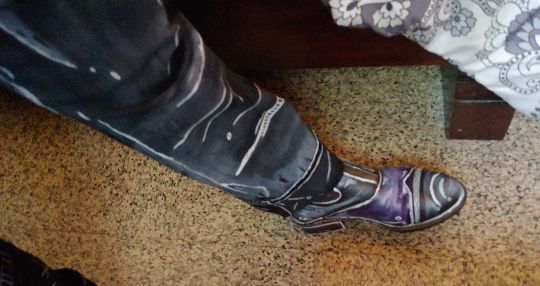
Comic-Con@Home Masquerade Entry: VivSai
Costume Title: Lady Loki in Armor
Costume Description: Original design
8K notes
·
View notes
Text
Comic-Con@Home announces the 2021 Masquerade Costume Competition Winners
Best in Show: "Valkyrie (Jane Foster)", crafted by The Queen’s Armory. Beautiful and with extensive hand-leather work that wowed the judges, it lights up, too! A stunning interpretation from the Marvel universe.
-as well as-
Winner: Frank and Son Collectible Show Award of $1,000.
Winner: The Costume Designers' Guild Spotlight Award, to include a costume design book, a $100 Amazon card, and more.
* The Judges' Choice Award resulted in a TIE of two very different costumes! *
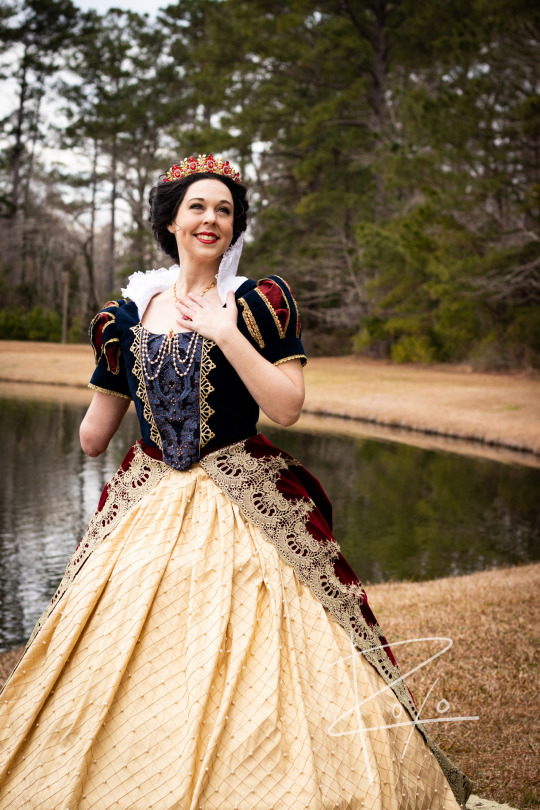
Judges' Choice: "Obsidian Desert Queen Zagara", Broodmother of the Swarm from Heroes of the Storm, crafted by international Korean cosplayer MyBoo Cosplay

Judges' Choice: "Snow White", an original imagining of the joyful Queen's Happily Ever After, with exceptionally embellished historical design by Mandy Pursley / Be The Spark Cosplay
Best Re-Creation: "Arachne". Japanese artist and illustrator Sakizou's character cleverly and skillfully translated from 2-dimensional artist canvas to real life by Nina London Cosplay
Best Original Design: "Goodbye Beach City", a beautiful homage to Steven Universe, any way she turns, there’s a detailed story sewn into her dress! From Moria Magre/MinesOfMoriaCosplays

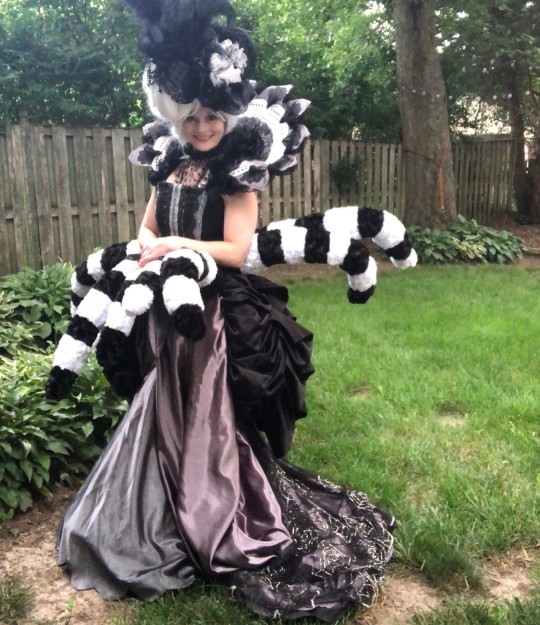
Best Workmanship: "Carlotta, from Phantom of the Opera", a highly detailed re-creation of Carlotta's Hannibal dress of the Broadway show, crafted wonderfully by Canadian Devon Baker / Komickrazi Studios
Most Beautiful: "Lady Loki in Armor", a striking original interpretation of the character in resplendent battle armor and impressive weapon too, designed and crafted by VivSai

Most Humorous: "Yo, Ho, Yo, Ho, A Batman's Life for Me". Perhaps in some alternate universe, Batman and Robin could be partying pirates? A jovial imagining by Jeanie Lopez, plus Lucas and Joe Queen

Best Group: "Lord Captain America and Iron Lady", an Avengers Masquerade, cleverly imagining two Marvel heroes in refined and elegant period costuming, as crafted by Miguel and Lucy Capuchino / Capuchino Cosplay

And some Honorable Mentions: Here’s a few entries just as loved by the judges that nearly won trophies. Even though they scored slightly lower than the top choices, they still deserve recognition for achievement:
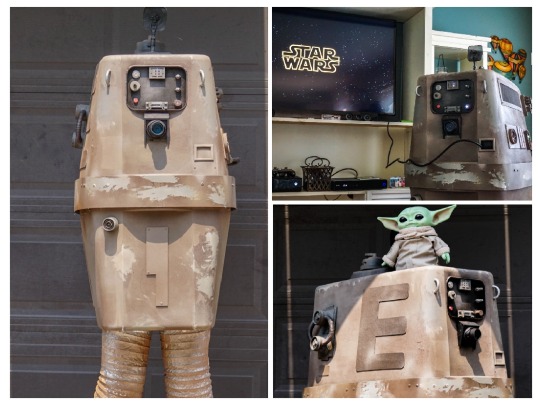
Honorable Mention: "Gonk (gonk guh gonk gonk gonk)" a fun re-created screen-accurate Star Wars GNK power droid with moving parts, constructed by Kaiweevil
-as well as-
Winner: The David C. Copley Award for Most Innovative Costume: $500 in Amazon cards from UCLA’s Copley Center for the Study of Costume Design.
Honorable Mentions:
"Edgar Markov", (lower left) an armored character from the terror-rife gothic plane of Innistrad in the Magic the Gathering game universe, brought to you wonderfully by Kensadi / Kensadi Cosplay
"Varian Wrynn", (lower right) World of Warcraft's King of Stormwind and High King of the Alliance in amazingly constructed armor, from international Korean cosplayer Sin_Moon

- - - - - - - - - - - - - - - - - - - - - - - - - - - - - - - - -
San Diego Comic-Con gives a big "Thank You" to the contestants for all their work and talent,
to the guest judges Jennifer May Nickel, Dr. Deborah Nadoolman Landis PhD, Garnet Filo, Allan Lavigne and Gigi Bannister for their time and expertise,
to Phil and Kaja Foglio for being our Masters of Ceremonies,
to the Frank and Son Collectible Show, the UCLA David C. Copley Center For the Study of Costume Design, and the Costume Designers' Guild IATSE 892 for their generous support of the event,
and to our convention friends & family both near and far for joining us online- until we meet again!
Learn more about our Guest Judges, Sponsors and 2021 Awards here!
603 notes
·
View notes
Text
Goodbye Beach City
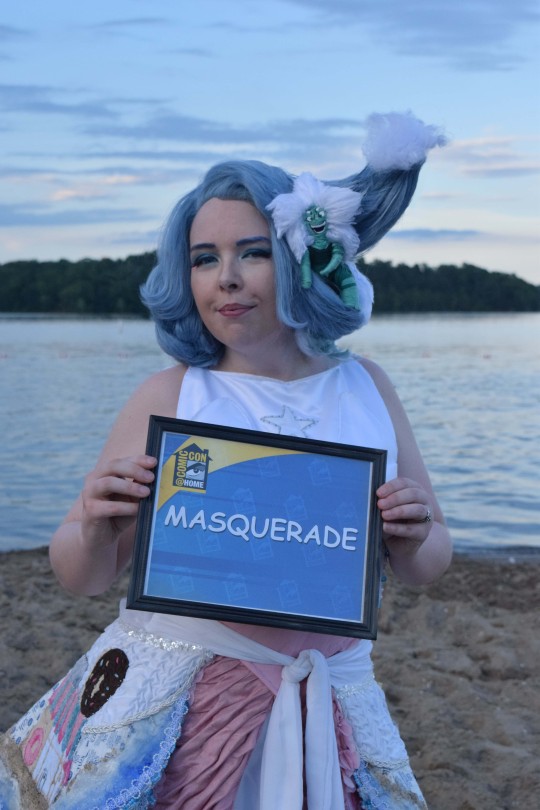
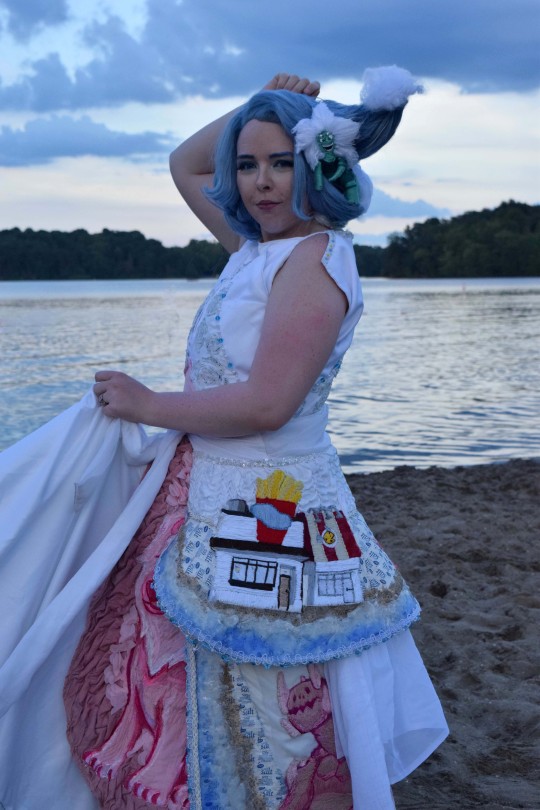
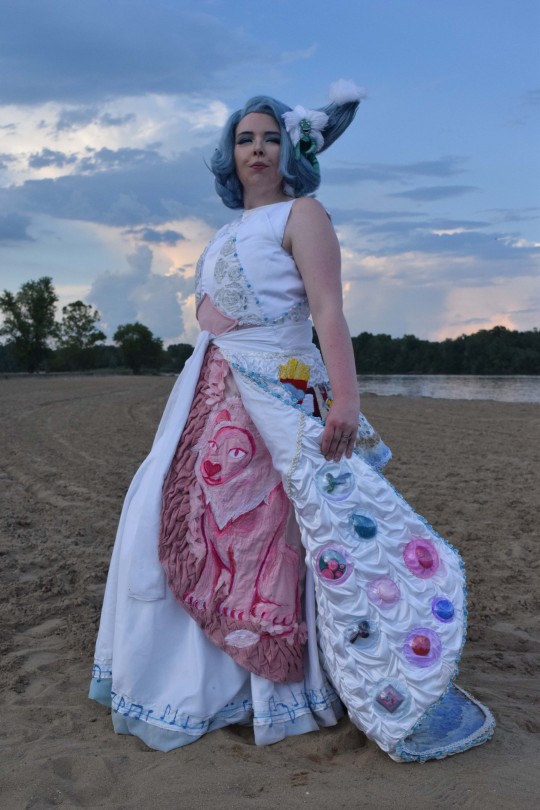
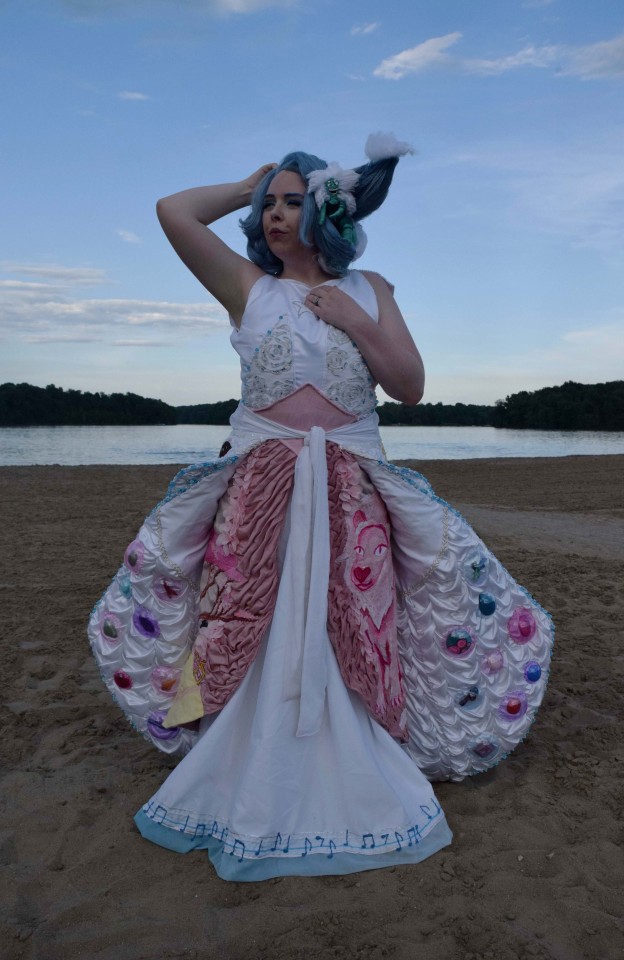
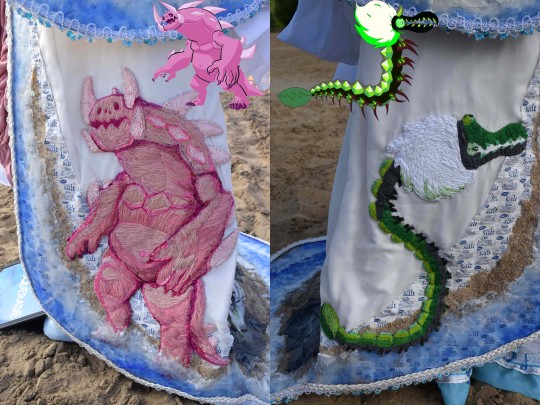
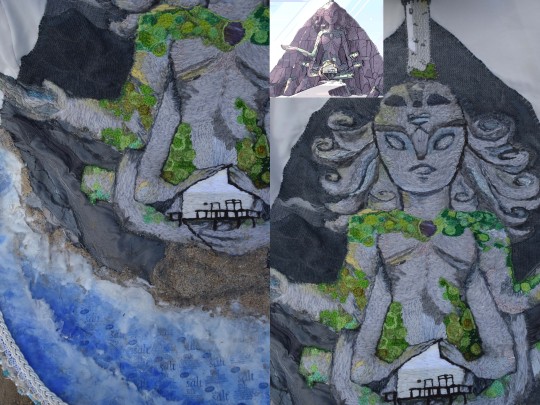
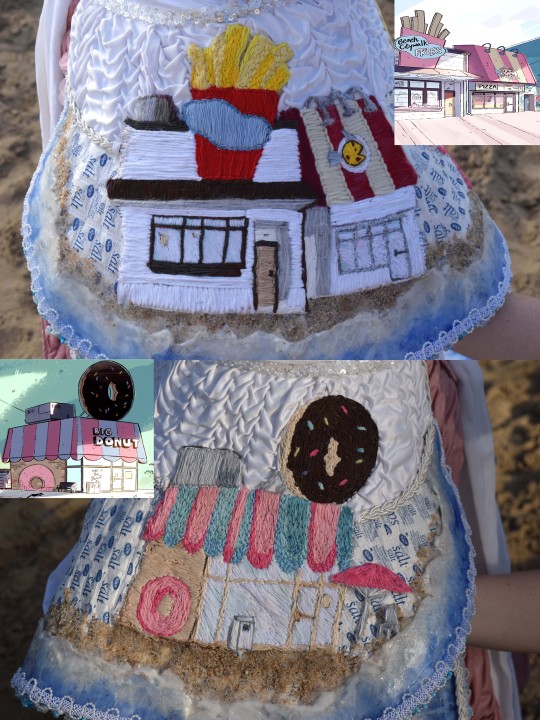
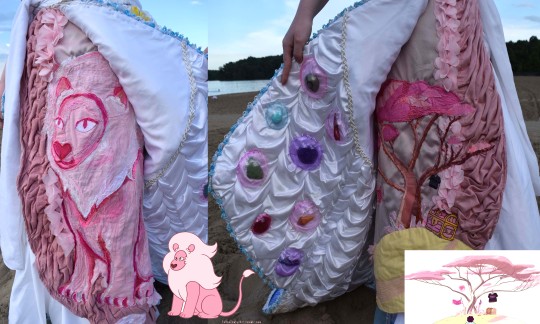
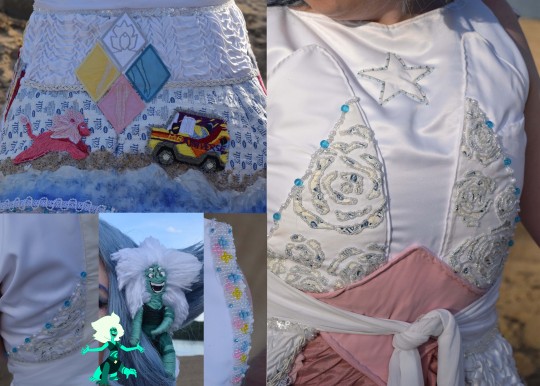

Comic Con Masquerade Contest: Moria Magre- Mines of Moria Cosplays
Costume Entry Title: Goodbye Beach City
Inspired by Steven Universe
Costume Description:So, this costume was around 400 hours of work. It was a behemoth of a costume. I genuinely don't know where to start in describing it, but I guess starting from head to toe.
WIG: So the wig is styled by me, the figure in the wig is a small little Malachite figure as in season 1 of Steven Universe Malachite pulled themselves into the sea, so the wig is styled to be like the ocean, much the same as the rest of the dress. Malachite is an old worn out sock of my partners that was stuffed and cut and painted. Wire is in the legs and arms to make them movable. Then every piece of the little figure is hand stitched with embroidery floss. The face itself is actually iron on applique (because I feel the face detail wouldn't have been able to show on such a small figure otherwise) The other side of the wig has seashells and such to stick with the ocean motif.
BODICE: The bodice part of the dress is an old 1960s pattern design I modified from an old pattern my grandma had. I took that pattern and laid it on paper and reworked it and had to do SEVERAL tests with old sheets to make the pieces work for me (her pattern wasn't designed for... plus sized girls). On the upper shoulders are hand woven beaded strings that are in the shape of the diamond authority with 2mm beads which are so dang tiny ;_; On the lower part of the bodice is hand stitched flower motifs. I made the flower appliques themselves out of salt packets (since the dress is based on a beach and beaches are salty, salt made sense! I want to transport you guys to beach city with this dress!!!) Salt packets are cut open, empties, Elmer’s glued together then sewn down together on a fabric sheet, then cut out and attached with iron on interfacing. Along each edge of the flower pieces are again 2mm beads patterned into a 3:1:3 pattern with transparent then opaque then shiny.
SHORT BEACH SKIRT:All the skirts in the piece are all patterned by me, no base pattern at all, I genuinely did trial and error for all the skirts from here on. The belt there is attached to the skirts with heavy duty embroidery floss as the two skirts combined weigh close to 30 lbs. Now the first thing from the white dress to this that you see is white smocking. The smocking was all patterned by me with a bunch of error. The idea is from basic Canadian smocking but finding a lot of patterns for smocking is hard and it’s easier to make your own. For the patterning of the smocking I made a wooden template. I made the squares (for this piece the squares are 1cm wide) on the piece of wood and then put holes where each line meets of the squares then traced the little dots on the fabric with water soluble ink. (its quicker than measuring them all out) There are 64 rows of smoking and they are about each row is 38 cm long. Each 2 rows take about 1.25 hours. (Smocking is so relaxing-- that is until you hit row 40. Then it’s just tiring. GOTTA PULL THROUGH THOUGH) After the smocking you then see the salt packet sheets, I described above. Same technique but this time sewn into larger sheets and used as a base for the beach and locations themselves. The salt packets are almost like interfacing with how much it stiffens everything. The salt is still inside for these pieces unlike the roses pieces above so if I hop around you can hear the salt moving (which is quite rhythmic). After the salt packets is the locations. Now these are where it gets intense. (yeah, I know HERE is where it gets intense-- HA!) But the locations-- the fry shack/fish stew pizza, the Mr. Universe van/Lion and the big donut are first done on bedsheets I stretch over canvas (Almost all of the fabric for this costume are bedsheets and curtains-- I gotta be cheap and economical, costume supplies do add up ;_; ) So then patterns are drawn on the canvas, I paint the designs on doing color blocking so when I stitch the fabric is a matching color. They are then hand stitched on the canvas. ( I actually made 2 more designs, one being the car-wash and the other being Mr. Smileys fun land but couldn't find a place to put them so they got scrapped) After they are sewn, I add double sided interfacing to the back to seal up the extra strings and make sure they are flat. I do iron it on to the salt packets and then hand-stitch them on again. On the back of the skirt is a diamond shape I did with my embroidery machine of the diamond authority with the parts of the giant robot they control (talk about a weird plot twist tbh) Under the locations is the sand which is attached via clear caulk and then sand is smooshed in. The beach water is underneath, so the beach water is actually rubber resin (it is a heavy duty type and isn't sold most places, its sortof uncommon) So, there were 3 trial and errors for the water, I first did it in regular resin but added less hardener and coated it in clear acrylic in order to make it still mildly malleable but not tacky. It was more malleable than normal but not as much as I needed. Moving on- I tried the first batch of rubber resin. If you don't buy the kind without the alumilite it will yellow (and this resin is sorta weird and acts strange because of it) and guess what, blue and yellow make green. And the water looked so YUCKY. Third try. So important clarification- this resin also hardens in oh idk maybe 15 minutes max on a good day. 8 minutes on a bad day. I had both. So, because of the short time I had my partner help me mix up the batches. I had to have light, dark, and white for mixing. I had the fabric shape drawn onto dollar tree clear curtains that were taped to my porch ground. I then poured the dark, then light, then white. With gloves on I mixed it to give that watery affect. (not enough time to treat it like an acrylic pour but man I wish) Once it dries it is then attached to the dress with clear caulk. On the edge of the skirt is a ribbon and then a handwoven bead string that is beaded like a braid. So, you have the main bead
bit in the center and then 3 other bead bits. I had 3 needles and braided it like that.
LONG BEACH SKIRT: So, the second skirt is built very similar to the original. The pieces on the skirt are more symbolic of the show. The villain of the first episode is Centipeedle and then the villain of the last episode (SPOILER SORRY) is Monster Steven then on the back is the giant Obsidian temple. The obsidian temple came first and took the longest racking in a whopping 60 hours. I will say these jumbo designs are a little different from the smaller counterparts because these were the ones I started when the pandemic started and TAKE A GUESS WHAT HOBBY EVERYONE TOOK UP?! Yeah needlepoint, or it seemed like it and every hobby store was SOLD OUT of almost all embroidery floss. So, all the floss is hand dyed and colored because I LITERALLY COULDN'T GET MATERIALS (IMSTILLMADABOUTIT) Which took so many hours to get the colors I needed. Especially the grey. The grey for Obsidian and Monster Steven is yarn and not floss because I could not get any more floss). The mountain underneath Obsidian is a textile manipulation piece, so multiple fabric pieces are roughly sewn down to get the texture and coloring you need. I used mostly denims and cottons to get the rough texture to match a mountainside. The little lighthouse is embroidered on my embroidery machine from a file I made.
UNDERNEATH LONG BEACH SKIRT: Underneath the big skirt is a whole other world to immerse yourself in Steven universe. So once again-Smocking. The white as we call "frosting" smocking technique is 1.25-inch squares compared to the 1 cm ones of before. I made a second wood board with the 1in squares since the smocking underneath is literally like 6 yards of fabric (I know it doesn't look like it but man does smocking go through fabric) On the underside in the photos you can really see the blue braid woven beads I mentioned in "short beach skirt". Along with that bead line you can also see little bubbles hand-sewn to the dress! the bubbles there are literal Christmas ornaments cut in half and alcohol dyed. (I used sharpies, alcohol and a spray bottle) They are then clear coated with clear spray-paint to ensure they stay colored and the color doesn't rub off. Inside the bubbles are clay gems, painted and coated with resin to ensure stability. I sanded the bottoms and used hot glue to attach them as heavy-duty adhesives tend to yellow or bleed through and since the fabric (where there isn't salt) is pretty thin and I didn't want to take the chance. Each gem is one we have seen in the show, so we have our main characters, then we have corrupted gems and then the gems with Lars on homeworld like Rutile and all them! Both sides have between 8-10 gems each. (try and guess the gems! <3)
PINK UNDERSKIRT PANELS: Once again for these pink panels I used smocking, you can see it on the outermost side. I used 1in squares for this one so I made a third board for smocking (3 boards in total- S, M, L) This part of the skirt on both sides kinda represented Stevens Pink Diamond abilities like portal making (is that even what it would be considered???) any who, since these panels are hidden until shown it seemed fitting so I put the inside of Lions's Mane on one side and Lion on the other. For Lion I once again did the textile painting technique like I did with the mountain and textured him with dozens of different pink fabrics, string and paper. (yes, I sewed through paper to get some of the pink textures). I did a bit of paint for the eyes to make them pop a bit better. The other side is an applique I did with spray adhesive for the tree base and branches, then they are hand stitched on top of to make it pop. I also machine stitched on top to ensure all pieces are well attached. For the small parts of the design like the t-shirt, and the treasure chest I used my embroidery machine to make the pieces.
MAIN WHITE SKIRT TRIM: The last part is the center white skirt! So, for starters, I can’t read sheet music. I never took music classes as a kid since I always took art (believe me, I regret it now) So I kinda had to teach myself music stuff in order to read the sheet music. So, the music notes on the bottom are from the Steven Universe intro song "we are the crystal gems!" I sewed down 5 different strings about the same distance apart to be the bars (I think that’s what they are called) then drew on the music notes with water soluble ink and started stitchin! My friend taught me what the notes meant and what parts were important on a sheet music sheet to include (like the pauses and stuff) and I can mostly understand it! (I love the music of SU and it’s such an integral part I HAD to include it) So the whole song wraps around the bottom of the white skirt. If I were to take off the over skirt I could twirl in a circle and you could read the whole thing (theoretically)
THAT WAS SO MANY WORDS AND IF YOU STUCK IT OUT TO READ TILL THE END YOU ARE THE REAL MVP. TBH I AM ALWAYS SHOCKED WHEN I MAKE SOMETHING AT THE END. I'M LIKE WOAH DUDE I MADE THAT NO WAY. SHOCK. I DONT FULLY KNOW WHY I WENT SO HARDCORE ON THIS PIECE BUT IT IS AWESOME SO OH WELL. (Tbh it may have been a coping mechanism for this whole pandemic business but haha that's just the way it is guess)
Bio: So, this dress was made originally for the HER Universe fashion show this year. I got declined before they saw the full piece. (I'm not salty, you're salty!) but I designed the dress because I wanted to say goodbye to beach city, as the show's finale was last year. The dress was going to go to San Diego comic con and be my way of ushering the show out. Showing the whole world how much I loved it. Steven Universe meant a lot in different ways to different people but for me it was a lot about pure friendship. I got to watch the show with my best friends and cosplay with them for years. The original Steven universe was just our show and was for us and I will always love it for that
But Steven Universe future was different, it was for me. I saw myself in Steven in so many heartbreaking ways. As a caretaker I saw how much Steven sacrificed and when he stopped taking care of the world, he felt he had no purpose. And I cried after so many episodes because no one talks about what happens to the hero after they hand up the cape, after they settle down. And I saw it. I saw me and it meant so much to just see myself. I love Steven universe for that reason alone, if not for the 500 amazing reasons too :))
Photo Credit:My husband Victor! :) (Photo location: Lake Hardy, Indiana)
Video Credit:My best man Lucy (she is one of those folks I mentioned above that watched this show with me from the start and I’m happy to have done this little shoot with her and man I just love her ok)
GOODBYE BEACH CITY THANKS FOR BEING MY HOME FOR ALL THESE YEARS!
Country: United States
#Comc-ConAtHomeMasquerade#Comic-ConAtHome#Comic-ConAtHome2021#steven universe#steven universe cosplay#cosplay#su#HER universe reject
469 notes
·
View notes
Video
undefined
tumblr


GONK!
The GNK power droids, also known as gonk droids, are walking batteries found in the Star Wars universe. You know there’s a gonk droid coming when you hear the “gonk” sounds they make. They slowly trundle along and power vehicles and machinery as needed, sometimes picking up little hitchhikers along the way!
My gonk’s name is JNI-4. For some reason, I thought this costume was gonna be a quick and easy build. The main body of the costume was two large containers. The middle part is a 4 inch strip of aluminum that is riveted onto the top container. The two halves are held together by nuts and bolts and are able to separate for ease of transportation. The legs are aluminum ducting and the feet are 3D printed.
Everything else is 3D printed or scraps such as bottle caps and jar lids that are glued or screwed onto the body. There are several lights on the front and one on the side. On the front is a moving holographic projector that lights up in different colors. There is a little trap door where JNI-4 can give anyone that comes a little too close a shock! It’s also great for administering stickers and trinkets to kids. The left side has a moving gear, modified from a battery powered car toy. On the top you can see a moving antennae and an exhaust pipe that spews out smoke.
Everything was painted with the look of years of use in the deserts of Tatooine in mind. If you look on the back corner, you can see where JNI-4 got hit by a stray blaster shot. Poor little guy!
When it was all said and done, it certainly wasn’t a quick nor an easy build, LOL! I am glad how everything turned out and I look forward to making people smile at conventions and events with my little droid.
Credit to @miled._ for the awesome photos and video!
305 notes
·
View notes
Text
“Raya and the Last Dragon”
Michelle Joy Princess Marimon Hedmond
@ShellieCutiePie on Instagram
Re-Creation - Disney’s Raya and the Last Dragon
youtube
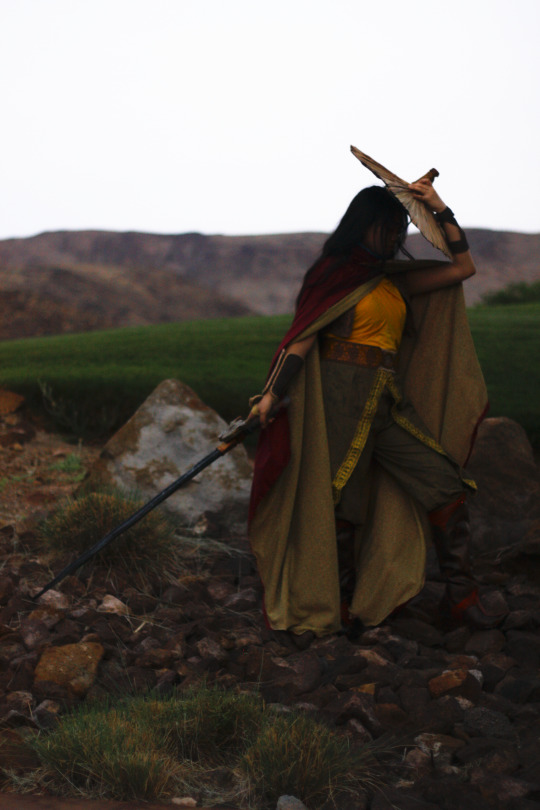
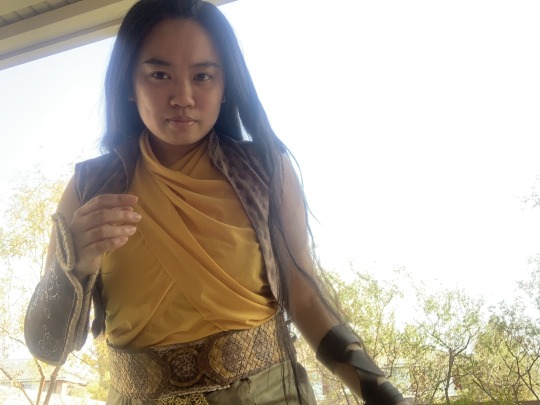
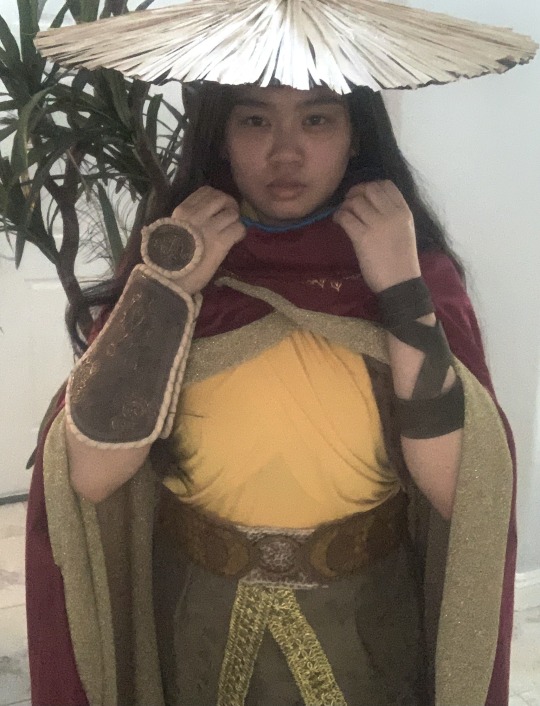


Hey! My name is actually Michelle and I’m from Nevada! I am Filipino and my family is from the Visayas islands. I used to live in The Philippines for high school and a year of college. I learned so much with working with our indigenous materials back then! From huge palm tree leaves, banana leaves, sticks, dried flowers, coconut husks, and more! I fell in love with working with what I have and what’s out in nature, it made me even more creative.
I hope you love my take on recreating Raya’s full outfit! I made my own hat with dead palm leaves straight from my own backyard. It was my first time making a foam sword and handling a dremel tool. The arm pieces are made of foam, thick shoe laces, twine, and puffy paint. I bought some boots that costed $13 and I cut it and made the tip of it sloping up, painted it, added foam for the center part. I painted all the props and boots all at the same time while each was drying, puffy painted details on my cape & blazer, and even made my own foam stamp for the blazer. I even made my own patterns.
Faith is big in The Philippines. My parents raised me to learn the ways of our Lord, our God. I prayed to God that I could make and finish this costume and it was a fun and amazing experience overall! I’ve made and done things that I’ve never before! I spent less than $125 on this cosplay because I started with whatever I had at home first. My belt is made out of a handwoven wine gift bag that I cut up and puffy painted the designs. My pants I made from scratch with light green vibrant fabric that I already had at home, I dyed with brown and black rye dye in a bucket and hot water, dried in my backyard in this perfect summer heat to dry it up quick, and splattered it with water and spray to get that perfect Raya pants color! My top is sewn on the machine for the base part and then I draped and hand-sewn the pleats. By hand, I clay molded the dragon piece on my sword! Did embroidery for the first time too for the tip of my cape collar!
Raya And The Last Dragon was such a delight to see because I finally got to see a strong woman character who is Southeast Asian like me! Can’t wait for my future kids to watch it!
Making this cosplay was definitely the most special one I’ve ever made. It is everything to me. That I put all of my talents, my faith, and my love into this, in a crunch of 8 days straight. I owe it all to God & I hope that little girls and boys who love Raya can look at this and know that with keeping our Faith and having it strong, Nothing is impossible.
Photos and Video taken by my Husband, Robert <3
All photo edits, video editing, hair styling my real hair, directing by me.
I want to thank my Husband so much for motivating me to always do everything I love all at once and for believing in me. I love you forever!
I also wanna thank @nammai for inspiring me to make this & all the tips he gave me to start. I applaud his talents in costuming (and how fast he works) and hearing his podcast episode with @asiansewistcollective gave me that push to really go for my dream to make this cosplay.
#Comic-ConAtHome
#Comic-ConAtHome2021
#Comic-ConAtHomeMasquerade
231 notes
·
View notes
Photo

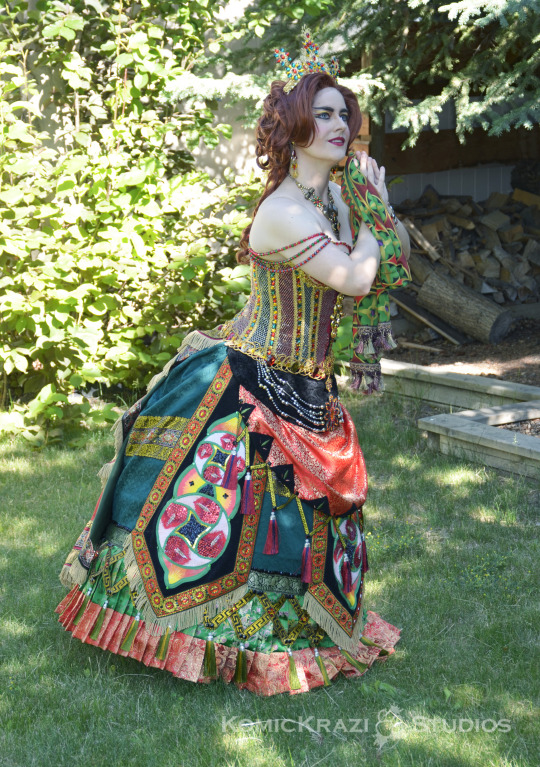

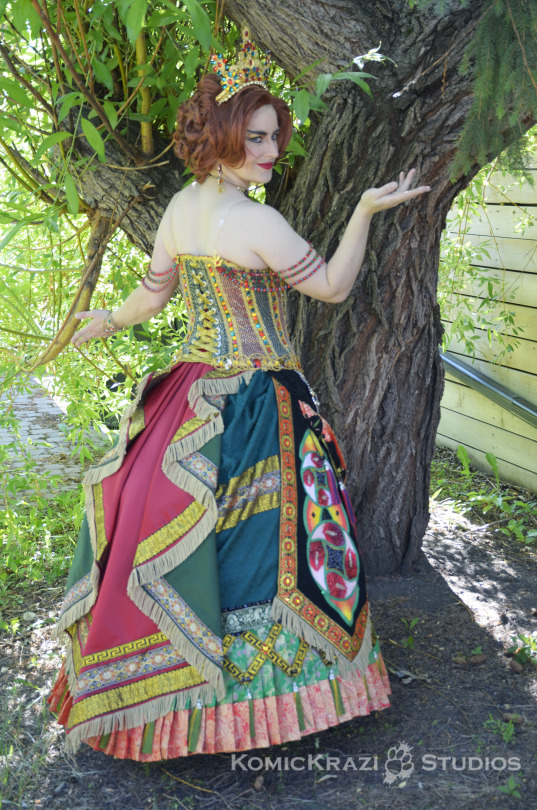

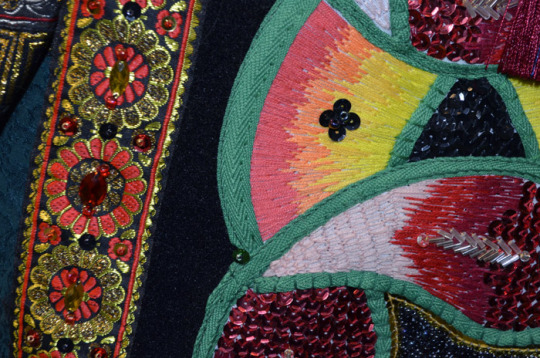
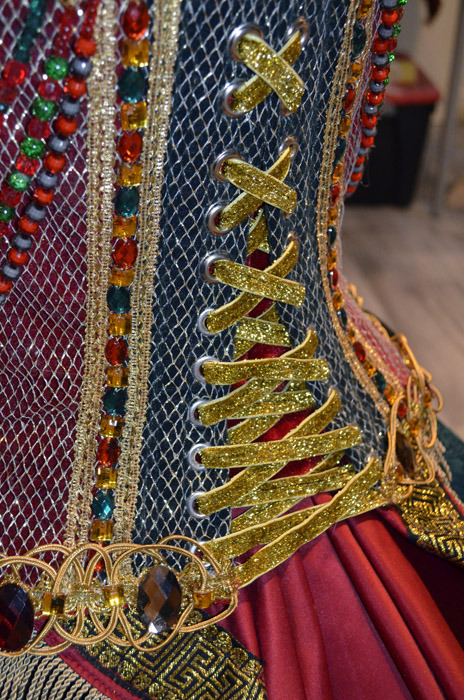


2021 Comic-Con@Home virtual Masquerade
Devon Baker (Komickrazi Studios)
Costume Name: Carlotta
Costume Description: Phantom of the Opera Musical, Hannibal Scene (Re-creation)
This costume is a recreation of Carlotta’s Dress from the Phantom of the Opera’s Hannibal Scene. It contains a Multiple layered skirt on a steel hoop frame. Each Tab on the skirt was carefully embroidered with embroidery floss, sequins, and seed and bugle beads over the course of 4 months. The bodice is fully boned and contains 4 layers of fabric (a satin liner, duck cloth, velvet and gold lace netting). It was trimmed and beaded with an assortment of sequins, gems and plastic and glass beads. The costume took approximately 300 hours of work to complete.
Creator Bio:
Devon Baker is a cosplayer from Canada. She has been making costumes for over 20 years. She loves nothing more than a spooky horror movie, a good cup of tea and maybe a musical soundtrack or two to sew to.
youtube
#Comic-ConAtHome#Comic-ConAtHome2021#Comic-ConAtHomeMasquerade#Carlotta#Phantom of the opera#poto#costume#cosplay#temperance#komickrazi studios
183 notes
·
View notes
Text
Welcome to the Comic-Con@Home 2021 Masquerade!
Distinguished artists, writers, and publishers Phil and Kaja Foglio, Master and Mistress of Ceremonies for Comic-Con's and WonderCon's in-person Masquerades for many years, give you an introduction to our virtual contest in this short video before you enjoy the amazing costumes.
Don't miss any of the videos the contestants have included, some have important information and music. Anytime you see an arrow on a photo, click on it, and be sure your sound is turned on. Enjoy!
Learn more about our Categories, Prizes and Judges here
110 notes
·
View notes
Text


Julieta Ravencrest - Miss Ravencrest
- Costume Entry Title: Judgement Paladin
- Costume Description: Re-creation: Art by Weis 2008 World of Warcraft Judgement Blood Elf Paladin
- Bio: Hello! I am a cosplayer in British Columbia Canada! I do a game, anime, and art cosplay. Armor and props are what bring me joy. My husband is my amazing photographer!
The individual strands from the waist piece, each of the gold lining were initially hand stitched on and then sewn over to create a smooth look and avoid stretching.
This cosplay was made in two countries! When I lived down in California USA and finished after the move up to Canada.
56 notes
·
View notes
Photo


#Comic-ConAtHome#comic-conathome2021#comic-conathomemasquerade#how to train your dragon#cosplay#hiccup#hiccup haddock#toothless#httyd#armor
50 notes
·
View notes
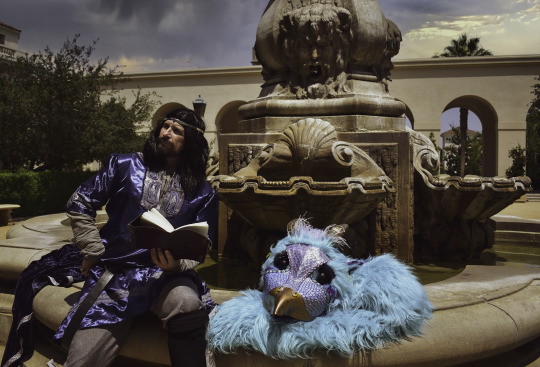
Photo

In the days before Raava, the spirit of light and peace, met Wan, the man who was to become the first Avatar, she spent her days in the wilds, joyful and carefree.
Young Raava enjoyed the sunlight.
She delighted in the warm breeze.
She took in all nature had to offer.
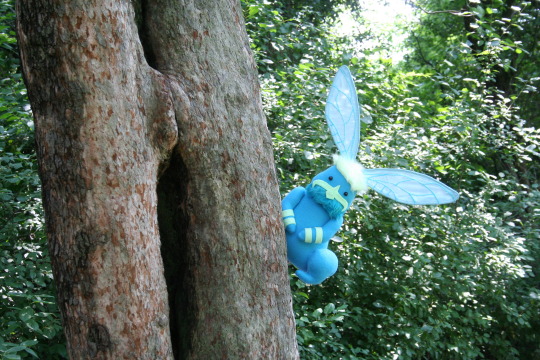
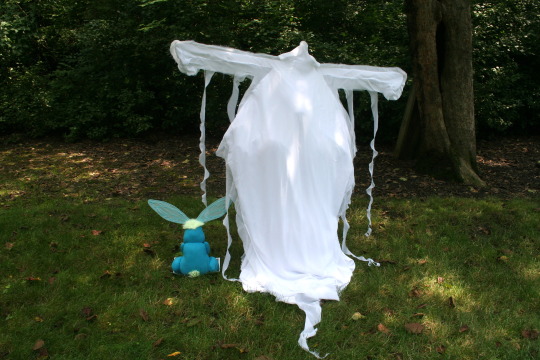
But what’s this? A dragonfly bunny spirit!
Raava made a friend!
These good times may not have lasted...But they were golden while they were to be had.
*this story is purely fictional and is not Avatar the Last Airbender/Legend of Korra canon.
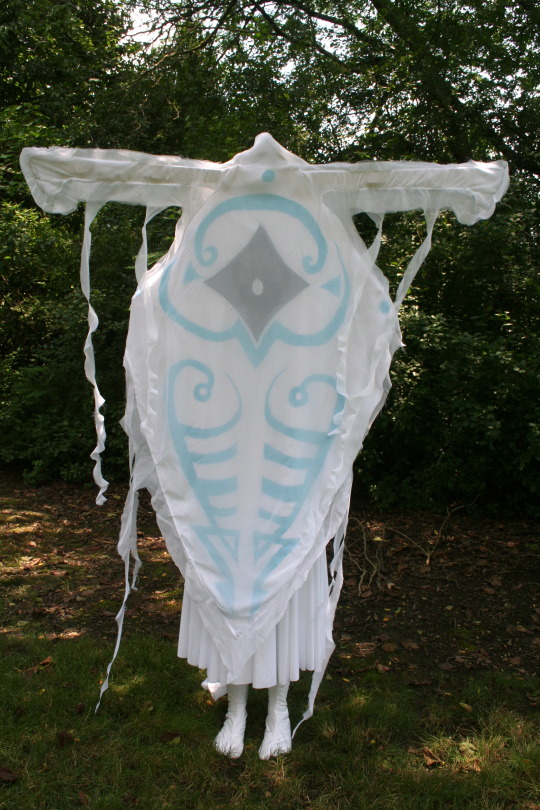
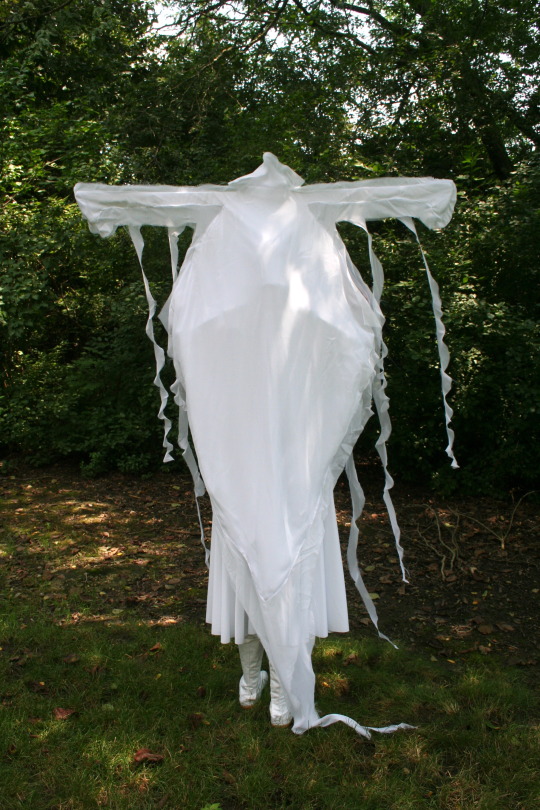
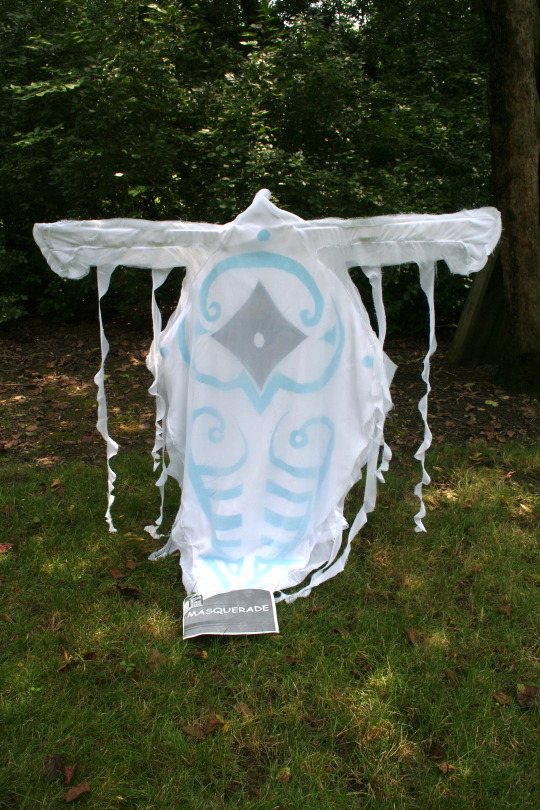
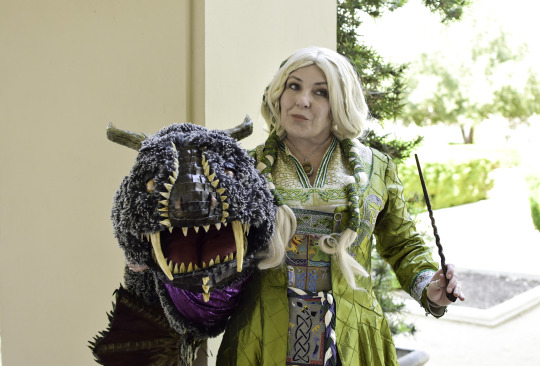
Comic-Con@Home Masquerade Entry: Kathryn Henzlere
Costume Title: Raava’s Day Out
Costume Description: Re-creation, The Legend of Korra (part of the Avatar The Last Airbender universe)
The Raava costume/puppet is a combination of a wood, plastic, and wire frame, with a hand-painted fabric overlay which has a mesh panel for visibility by the wearer. The overlay has an outer layer of chiffon to add a ghost-like affect, with curling tendrils along the edges. When worn by a person instead of being used as a puppet, the costume includes a skirt, leggings, and split-toe shoes (the only part not made by hand).
The Bumju plushie is made of fleece, felt, cotton batting, and faux fur, with wire and embroidered chiffon ears, button eyes, and a hook at the back for using it also as a puppet.
Bio: Kathryn Henzler is an award-winning designer and creator of theatrical costumes, cosplay, skating costumes, and geek couture. She has exhibited at conventions and art museums and is a four-time Her Universe Fashion Show contestant. In her day-to-day, she is also a Japanese-English translator, composer/musician/audio engineer, actress, activist, archer, and adult figure skater.
Direction: Kathryn Henzler
Photo Credit: Elizabeth Emmert
#comic-conathome#comic-conathome2021#comic-conathomemasquerade#masquerade#atla#avatar#avatarthelastairbender#legendofkorra#korra#raava#spirit#spiritworld#harmonic convergence#bumju#dragonfly bunny#mikeandbryan#avatarstudios
26 notes
·
View notes
Text


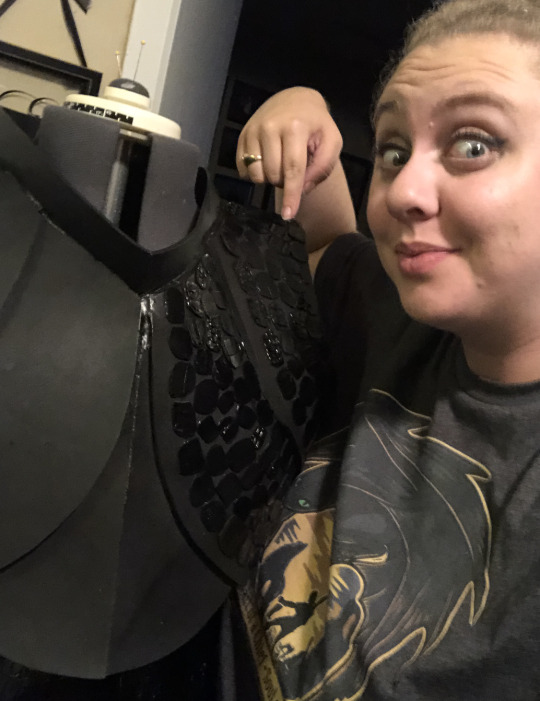
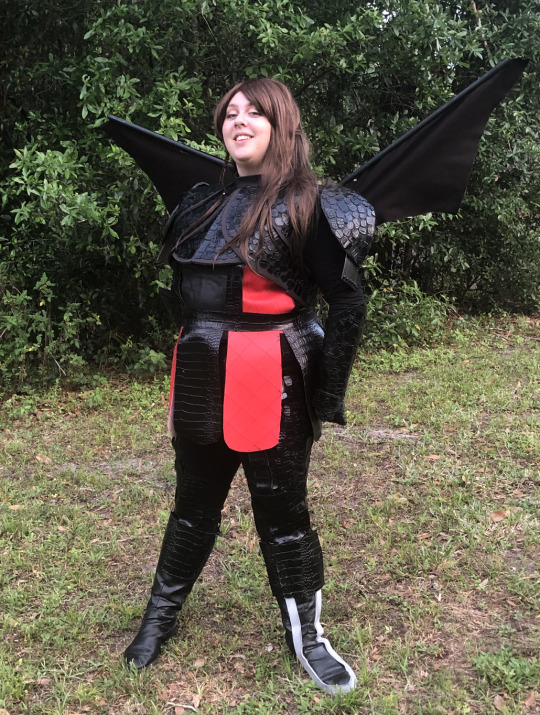
Kensadi Cosplay
Cosplay: Edgar Markov
Costume Description: Character is from Magic the Gathering and is from the gothic plane of Innistrad which is rife with terrors, only some of which happen to be vampires. This cosplay took me roughly 8 months. It's difficult to really figure out how many hours because I worked on it off and on. 95% of the armor is EVA foam of varying thicknesses. The gauntlets are made of worbla's black art and is backed by worbla's fine art. The sword has a wooden ruler and foamboard as the base and is wrapped in worbla's black art. The chest piece is a heavily modified pattern by Cyreah Cosplay and the gauntlet pattern is by Guyton Armor. The rest I patterned myself. The skirt is made of a red velveteen. The cape is fully lined and made of an jacquard upholstery fabric remnant.
I'm from the US and I have been cosplaying for seven years now. Most of my cosplays are from Magic the Gathering. The artwork inspires me like no other franchise.
#Comic-ConAtHome#Comic-ConAtHome2021#Comic-ConAtHomeMasquerade#cosplay#magic the gathering#foamarmor#worblasblackart#innistrad#edgar markov
30 notes
·
View notes
Video
undefined
tumblr


- Horror Queen Cosplay
- Costume Entry Title: Winnie the Pooh
- Costume Description: This is a human redesign of Winnie the Pooh, based off of 1890′s women cycling/athletic garments. The costume is made out of wool, linen, and cotton. The purse, shoes, and base for the hat were the only things purchased. This costume includes hand embroidery, baby yoda fabric for lining, and my first attempt at a Victorian updo hairstyle!
- Bio: I am a United States/New Jersey based cosplayer since 2008. I adore late Victorian fashion too! In quarantine, it has been a delight diving into making my own garments based off them. As someone who has put together over 200 costumes, it is a dream come true to blend a childhood favorite/comfort with something that has inspired me as an adult!
47 notes
·
View notes
Text
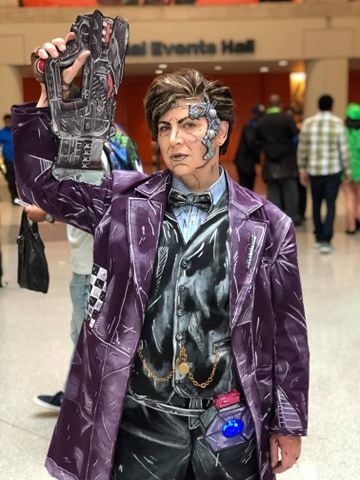
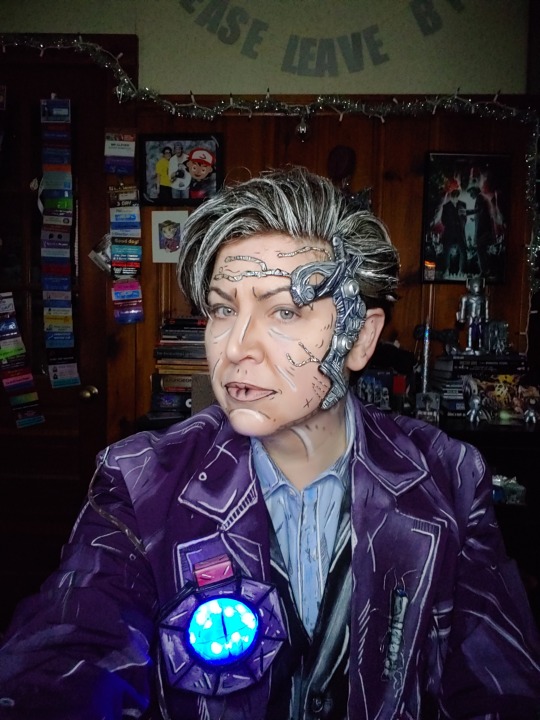
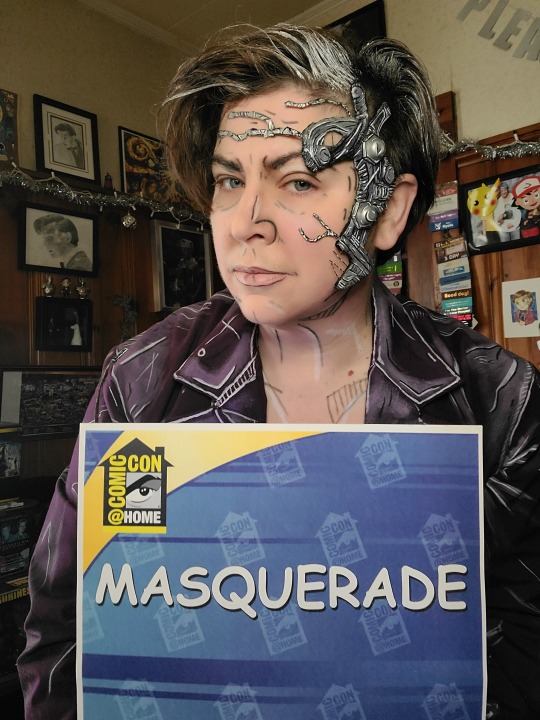
CleverMax: SDCC 2021 Masquerade Entry
Comic-Con@Home Masquerade Entry: Adventures of Clever
Costume Title: CleverMax - Mr. Clever as a Borderlands boss
Costume Description: Recreation of Mr. Clever from the Doctor Who episode Nightmare in Silver, written by Neil Gaiman, done in the style of the video game, Borderlands.
Bio: They/He pronouns
Greetings all!
I realized that I never wrote about how I made my CleverMax mashup cosplay, so when SDCC posted about their At Home masquerade, I figured this was the perfect time to do so! Most of you know that I cosplay exclusively as Mr. Clever from Doctor Who, with the random mash up thrown in here and there. I’ve always wanted to be a Borderlands cosplayer, and the following is how I managed to combine the two together.
As always, enjoy the blog and if there are any questions, please feel free to contact me.
Let’s step into the TARDIS and jump back to October 20, 2009, when the first Borderlands game was released. It was my first foray into FPS (First person shooters) and I was hooked from day one. In 2012 they released Borderlands 2 which is, in my not so humble opinion, the best video game ever created. We got some of the most iconic charcters and storylines in that game. Including the best DLC ever, Bunkers and Badasses. And my second favorite villain of all time – Handsome Jack.
Jack’s sass, sarcasm and charm fits well with Mr. Clever’s personality. And in the pre sequel you get to play a version of him called the Dopplegnager. I mean, this pretty much wrote itself.

Handsome Jack from Borderlands 2 and Mr. Clever from Doctor Who
Borderlands cosplayers have aIways left me in a state of awe and admiration. The style of the game is so unique and seeing it recreated in person is nothing short of incredible. I’ve always wanted to figure out a way to be a Borderlands cosplayer. For the past eight years I have only ever cosplayed as Mr. Clever from Doctor Who. In the summer of 2019 I decided that was the perfect time to try to make this happen before NYCC.
When I initially decided to do this, it was going to be more of a mash up between Handsome Jack and Mr. Clever. I had planned on wearing Jack’s basic outfit, but in Clever’s colors with the a few add ons. Namely the bow tie and the cybernetics.
After much research and drafting, I decided against that. I ended up just turning Mr. Clever into a Borderlands boss. Same basic outfit as Mr. Clever/11th Doctor, but cel shaded and with weapons, cause Borderlands.
I made the accessories, chess set, and obviously the working cyberplanner piece itself for my Nightmare in Silver version of Clever, but I have never tackled anything this ambitious. An entire costume from scratch? Not something I thought I could do. Not knowing how to sew and being visually impaired were both challenges that I had to work around.
I started with looking around my house for various items that I thought I could use. I figured if I messed up, might as well mess up on something I hadn’t spent money on yet! I was going to toss a pair of my old paddock boots as they had some rips in the leather. Ripped leather? How very Pandora. They were the first thing I tackled.

Old paddock boots that I refurbished for the cosplay
This was my first time using leather paint and I have to say I am very pleased with the Angelus brand of leather paint. I have worn these in the rain and through puddles, and they have held up 100%.
After the boots were done, I started on the vest. I had an old black vest lying around the house that was sort of the shape and size I wanted. I don’t have a dress form, so I put it on myself, inside out, and used safety pins to make it the size I needed, then hand sewed around the safety pins. Not ideal, but it works.
I had a spare pair of black jeans, button down light blue shirt and a plain bow tie that I just ended up cel shading.

The only item that I really couldn’t figure out was the purple frock coat. Try as I might, I couldn’t find one to modify. So the coat was actually made by my friend Heather Long. I did alter the length after NYCC.
With the clothes themselves all set, for the most part anyay, it was time to paint. This was my first time trying to recreate the art style of Borderlands, often referred to as cel shading. I have a few “art of Borderlands” style books that I poured over before I sat down to attempt this.
Other than the accessories and anything leather, I used the same materials and techniques for each article of clothing. Instead of describing each seprate piece, I’ll just explain what I did to achieve the overall look.
When you look at a Borderlands character on screen, it can be a bit overwhelming. So many colors, and so many nuances of each color. I did my best to visually sift through all that, and try to establish what I thought was the base color.
Once the base color was determined, I just added blotches, blobs, shading, low lights, highlights and other variations of the base color itself throughout each piece. I recommend keeping your fabric wrinkled and using those wrinkle as guidlenes for where the lines and shading would fall naturally.
Once all of that dried, I then went over different sections of the fabric with white and black lines. To get that crisp, almost comic book looking outline of each piece I used black sharpie, and white fabric pens as well as white fabric paint.
When I sat down to do the coat, I wanted something a little different than just cel shading. During a second playthrough of Tales from the Borderlands, I noticed Rhys and other characters had interesting logos and designs on the back of their jackets. I ended up putting a chessboard pattern on the back as a homage to the chess game between the 11th Doctor and Mr. Clever in the episode.
Great shot of the chess board and my Judd Nelson pose
The materials that I used for all of the clothing items were craft paints that I had around the house. Any brand works, but I prefer Americana paints. I then added an additive that you use to make the paint water proof and used various sized brushes. Dry brushes are also very useful if you have them.
Black sharpies of different sizes and any fabric markers are also very helpful. Heat setting is required to make the paint waterpfoof, so if you mess up before you add sharpies, you can wash the clothes and start over.
A few tips if you decide to undertake cel shading clothing: Until now I hadn’t noticed that there aren’t many thing in Borderlands that are true black. Due to the art style most things that appear black are in reality shades of grey, with a grey base colr. This makes it easier to add the lines, shading, and what not. Looking back, I should have bought GREY clothes. It was a ton of work to make the pants look like they were a mixture of greys. And as a result of so many laers of paint, they are stiff, lost their stretch and feel an entire size smaller! So I would recommend grey fabric as a base for black clothing and buy a size larger.
The pants are so stiff that I think they will stand up on their own
This entire process was way more fun than I thought it would be and I’ve since become addicted to cel shading anything I can. I may or may not have started cel shading my guest room.
After the clothing was finished, I started on some accessories and props. The first being the easiet – a wee little cybermite that I cel shaded. My cosplay of Mr. Clever always has a cybermite on my lapel, so I took one of my older ones and repainted it.
You can’t have a Borderlands character without some sort of weapon, so I painted a nerf gun that looks similar to the one that Clara Oswald holds in the episode.
I have never had to carry a gun for my Mr. Clever cosplay before so weapon checks are sort of new to me. I didn’t want to go through that at NYCC so I came up with a clever, no pun intended, way around it.
I took a photo of each side of the gun. Went to Staples and had them printed on heavy cardstock. Then I cut around the guns, glued them together between a piece of cardboard then added some black electical tape around the edges. Viola. Instant weapons check approved gun that is lightweight, and also acts a fan when it gets hot. It was a huge hit at the con. A few security guards were like “ we have to check your…wait..is that flat?” And they proceeded to play with it. I highly recommend doing this!
Gun and its flat counterpart
I am holding the flat gun in this picture from NYCC
In the actual game, you can equip your characters with mods that give them certain abilities and bonuses. In the Pre-Sequel, you can play as a Dopplganger of Handsome Jack so I searched for some of his mods and found one in purple which seemed perfect. I made the mod with cardboard, covered it in craft foam, modge podge to set, and installed led lights. The first time I wore it I put it on my belt which didn’t work. It kept falling off. I eventually put it on my lapel and wore it like Jack does. Unfortunately, someone glomped on me at a con and broke it, so I recently had to remake it all over again.
No Borderlands costume would be complete without cel shading on yourself. This was a huge challenge for me for a few reasons. One, I’m visually impaired so doing line work like this was challenging. Two, I am highly allergic to so many materials and ingrediants that finding a make up brand that I could wear was a trial and error process that ended up with many break outs and rashes before I found the perfect combination.
I used mostly eye liner pencils and liquid eye liner to achieve the look. The Wet n Wild liquid eye liner lasts forever, and is actually difficult to remove, but that is not a bad thing as it stood up to the heat of a very crowded venue.
As for the cel shading itself, I relied on many refernce photos of various characters in the game. I started with the eyebrows first as that seemed to frame the face nicely and give me a nice mischvieous look. I then just outlined the bones of my face, adding some random lines here and there. It never looks the same way twice, but that’s ok. Playing with different angles, lines, shading etc is half the fun!
The only real challenge were my hands. The make up didn’t last that long on my hands so I had to touch it up throughout the con. I also eventually started to use band aids that I cel sahded to cover up a tattoo on my inner wrist.
Figuring what to do with my hair is an on going process that I still haven’t 100% mastered. I opted to not use a foam wig as I have over heating issues on a cool day let alone trying to wear one if it gets warmer. I have had adverse reactions to craft foam in the past, so I don’t want it touching my skin, and lastly, I think a wig AND a facial prosthetic would be too much for me. So I decided to just cel shade my hair.
This takes forever to do, and I’m still figuring out better techniques every time I wear it.
I have a really great brand of colored gel, called Mofajang which I apply with a baster brush that you would find in the kitchen gadgets aisle. I also use a clean mascara brush to add some finer lines here and there. Set with way more hair spray than I ever used in the 80’s and it becomes fairly waterproof.
I have learned that due to how hard the make up and hair color is to remove, I really need to wear this on the LAST day of a con. I made the mistake of wearing it on day one of Long Island Who one year, and spent hours scrubbing my skin and hair for the next day. Far better to just leave the con with a tad bit of left over cel shading. Which makes it very interesting when you stop at a roadside bathroom on the trip home.
With the entire costume done it was time to work on the actual cyberplanner appliance.
Next time I make a variation of Clever, I will make this FIRST. Making these pieces is the bane of my existence – I love wearing them, hate making them. It’s a long process.
I am allergic to latex, silocone, scuply, most clays, and so many other things that seem to be every cosplayers go-to. When I made my first cyber piece back in late 2013, I spent weeks trying to find a substance that would keep attached to my face all day without causing a rash. Like an alchemist in a fantasy novel, I submerged myself into creating the perfect concoction. It took 22 days to finish the final product.
I admit that I rushed a bit on the Borderlands one. As a result, it doesn’t quite fit as well as my others, and is a bit heavier than I expected. I only added two working lights, instead of the usual four, to hopefully balance the piece out. It lasted through two full days of a con, despite the heat of a crowded venue, but I did end up tweaking it a bit after. Even with the tweaks, it still doesn’t fit as well as I would like. It is too heavy and brings down the entire left side of my face, making it difficult to keep my eye open at times. I really need to sit down and force myself to make a new one.
There are a few more things that I would like to add to this costume eventually. Like a belt of grenades, and maybe another gun. But aside from that, I am incredibly pleased with how this costume turned out. It is by far, my favorite Clever variation that I have done.

I hope this post gives you the inspiration to go off and cel shade something, and possibly even play some Borderlands!
#doctorwho#misterclever#mrclever#nightmareinsilver#cosplay#borderlands cosplay#doctor who cosplay#comic-con#comic-conathome#comic-conathome2021#comic-conathomemasquerêde#cyberplanner#borderlands
21 notes
·
View notes
Text
Thank you for joining us for the San Diego Comic-Con@Home 2021 Masquerade!
Your hosts return to say goodbye and thank you to everyone!
Our Judges will have the difficult job of selecting Best in Show, Judges’ Choice, Best Re-Creation, Best Original Design, Best Workmanship, Most Beautiful, Most Humorous, and Best Group award recipients.
A special thanks to Frank & Son Collectible Show, The UCLA David C. Copley Center for The Study of Costume Design, and The Costume Designers Guild IATSE Local 892 for their wonderful sponsorship of our 2021 Masquerade.
Learn about the Prize Awards and Meet Our Judges here.
Winners will be announced on the San Diego Comic-Con@Home page on Sunday, July 25th.
And a big thanks to the San Diego Comic-Con Officers and Board of Directors for supporting their Masquerade Team by always having our traditional costume show for the fans, even in these very difficult times of the past two years. Looking forward to seeing you in person soon! - Martin Jaquish, Masquerade Coordinator, Lauren Ladley, Masquerade Assistant.
15 notes
·
View notes
Text
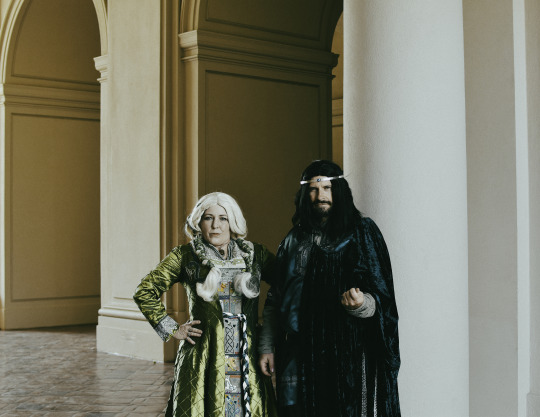
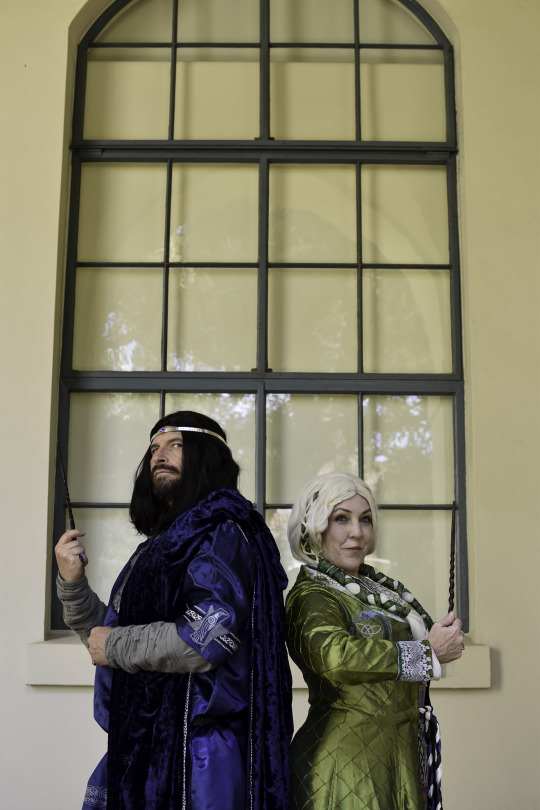
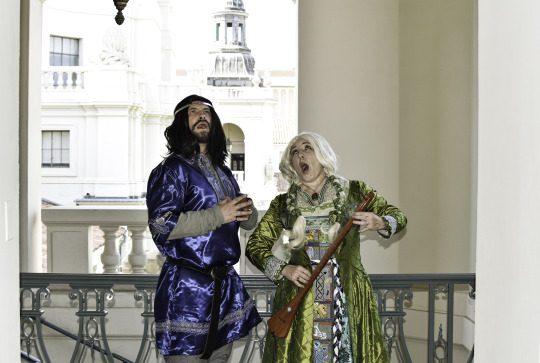
10th Century Fantastic Beasts
by Ken Hazlett and Nat Lawson
Costume Description: Original design of the Hogwarts Founders from the Wizarding World of Harry Potter
Bio: We are cosplayers from Southern California who occasionally combine our cosplaying with our other pastime- surfing.

The Case of the Missing Founder (CLOSED)
By Epiphelia Holmes
Abstract: Circa 1010 common era (CE), Salazar Slytherin, learned magicker, scholar, world traveler, and basilisk breeder, disappeared. All wizarding histories, including the penultimate source on Hogwarts, Hogwarts, A History (Bagshot, 1905), note that Slytherin disagreed with the other three Founders on the teaching of magic to the Muggle-born, and thus, left Hogwarts, angry and disillusioned. Through dogged research and exhaustive detective work, the author of this paper reveals the true fate of Salazar Slytherin, and surprisingly, the fate of Rowen Ravenclaw, utilizing the early enchanted and startlingly lifelike paintings of Grimhilde of Bingen and Hildegard of Bingen, as well as accounts from Slytherin’s own newly discovered journal for Year 1032, 33, revealing the magicker as an avid naturalist of Fantastic Beasts, who extensively traveled the various routes of the Silk Road with Rowen Ravenclaw, after Ravenclaw’s ‘death’. Additionally, this article presents new evidence regarding a second Ravenclaw diadem, created after the infamous theft of the original artefact.
Excerpt from Section 1.3 History of the Artists:
Note: Artist history is primarily sourced from Vasari, 1569, unless otherwise noted.
Grimhilde of Bingen (b. 964 d. 1138), a most misunderstood woman of her time, largely due to an ungrateful stepdaughter widely known primarily for her snow white skin, was, in actuality, a writer, composer, mystic, and artist of the 10th century. Forced to leave her homeland, in the Rhine, due to the aforementioned stepdaughter and an unfortunate incident involving a huntsman and several angry miners, Grimhilde settled in the region of what is now Cornwall in England. Her many interests and skills led her to the creation of an enchanted paintbrush, which created paintings, so lifelike, they are nearly indistinguishable from the photographs of today.
Although Grimhilde’s paintings and writings became well known in the Wizarding world, her scholarly pursuits were not her only passion and she married and bore one daughter, also an artist, composer, and mystic. Grimhilde’s granddaughter, however, was born a Squib, which may have been what drove her to successes even beyond her mother and grandmother. Hildegard of Bingen (b. 1098 d. 1179) returned to her grandmother’s homeland as a young adult and became a German Benedictine abbess, a writer, a composer, a philosopher, a mystic, a visionary, a polymath, an artist, and is considered among Wizards and Muggles alike, to be the founder of scientific natural history in the Germanic region.

Among their many accomplishments, Grimhilde and Hildegard painted several important wizarding figures of their day, most notably, Salazar Slytherin and Rowen Ravenclaw. Grimhilde completed a series of paintings of the pair between 1026 and 1028. Hildegard, who inherited the enchanted brush, also painted Slytherin and Ravenclaw, circa 1132. These paintings, which show the two Founders, reunited, after Slytherin’s disappearance and Ravenclaw’s death as the witch, Rowena Ravenclaw, are masterfully created and provide a number of interesting facts regarding Slytherin’s mysterious disappearance from the school and Ravenclaw’s supposed death of a broken heart. The series of paintings of Slytherin and Ravenclaw by the two artists is known in the Wizarding art world as the dual Bingen series.
Excerpt from 2.1 Archival Research:
[…] No one in the Kavalier family possessed an ounce of magic any longer and thus, no one over the ages was able to decipher the ancient text, largely written in a combination of Middle Irish, Old Norse, Latin, and a code, possibly based on spoken Parseltongue. The journal, a simple leather book labeled “MXXXII, MXXXIII, A.D.”, containing sketches of strange beasts, was an unreadable text among nearly two dozen aged tomes, and almost universally ignored by the family over time. Indeed, until the late 1980s, when Mr. Clay Kavalier, a graphic novel artist, discovered the sketches of the Fantastic Beasts in the journal and used them as an inspiration for his drawings, the book was almost never opened. Mr. Kavalier’s highly accurate depictions of various Fantastic Beasts, found in a Muggle ‘comic book’, led the author of this article to the Slytherin journal, carefully stored and preserved by the Kavalier family, now, of Orange, California, USA. The authenticity of the journal was verified by the Historical Records Department, Ministry of Magic, in 2020.

[…] The depiction of the diadem in the dual Bingen series has long puzzled wizarding scholars, as it is widely known and accepted that Ravenclaw’s diadem was stolen by Helena Ravenclaw and hidden, only surfacing during the reign of He Who Must Not Be Named in the modern era. The original diadem possessed an oval blue jewel and “was said to grant wisdom to the wearer” (Bagshot, 1905). A description of the dual Bingen series diadem is included in Section 3.1; it is noted here, however, that the two artefacts are different. Considering the possibility that Ravenclaw crafted a second diadem, the author of this article researched Wizarding metalworkers of the 10th century, finally discovering among the preserved papers of Lillith Helmschmied, the most famous female Wizarding metalworker of the 10th and 11th centuries, a sketch of the diadem depicted in the dual Bingen series. Unfortunately, Helmschmied does not indicate if the new diadem possessed the same abilities as the original. If, as many scholars opine, Ravenclaw enchanted the jewel herself (Bagshot, 1905), it seems likely that the second jewel was also enchanted.
Excerpt from 3.1 Description of the Garb:
The dual Bingen series may be the most important depiction of any of the Founders completed to date. Not only is the garb consistent with 10th century fashions, and thus, likely representing one of the more accurate portrayals of the Founders, there are accents to the garb which offer insight into the Founders themselves. The paintings in the series were created nearly 100 years apart. Neither Founder appears to have aged between the sessions and both are garbed identically in all paintings in the dual series. There is agreement among experts that Hildegard likely created her paintings from sketches completed by Grimhilde.
Salazar Slytherin left Viking occupied lands, in what is now Ireland, as a young adult, and the garb the Founder wears in the paintings reflects the Founder’s roots in Viking Age Ireland. Salazar is painted wearing a green dress over a léine; the dress is heavily embroidered with Fantastic Beasts, including a zouwu, a demiguise (both visible and invisible), a phoenix, a unicorn, a manticore, an occamy, and a basilisk, all done in the style of the Book of Kells. One of the embroidery designs shows a kelpie, which are known to live in Black Lake, at Hogwarts. Snakes are embroidered over a border of Celtic knot work that runs along the base of the dress. The top of the dress and the top of the léine are both decorated with lace that incorporates Book of Kells style snakes. Salazar also wears a green coat, adorned with still more snakes. The paintings indicate that the Founder preferred fancy Wizarding fabrics and possessed an almost excessive flair. The coat is pinned with metal brooches to show off the dress embroidery and like many items made at the time, the base of the coat is lined with fur. From the painting, it is not possible to definitively ascertain the type of fur, but magi-biologists generally agree that it is likely Bodmin Moorcat (Challenger, 1899, Mirza et al., 2018).

Rowen Ravenclaw, who originated from the Kingdom of Alba (now, approximately the lowlands of Scotland), is painted in traditional Anglo-Saxon garb. Like Salazar, Rowen also wears fancy wizarding fabric unavailable to the Muggles of the time. Celtic style ravens are embroidered on the sleeves and around the keyhole opening of the long tunica. Chain embroidery winds around the ravens. Celtic knot work is embroidered along the base of the tunic. Consistent with Anglo-Saxon fashions, Ravenclaw is wearing short pants tucked into high socks that are secured with ties. Ravenclaw’s simple silver band diadem is completely consistent with Muggle styles of the day and contains the Celtic phrase, “Cíall gan chiomhsa • Maoin mór duini”, in a version of Gaelic spoken in Alba. The phrase approximates “Wit without limit: great treasure of Men”. According to Helmschmied, the band is made of silver and the words are stamped into the band. The jewel is noted as a sapphire and it is also set in silver. Rowen’s rich cloak is decorated around the base with silver trim and it is worn draped, similar to a Roman toga. Generally, Rowen’s garb is less decorated than Salazar’s garb. It is thought among some scholars that the Founder of the Ravenclaw House was more reserved than his Slytherin counterpart. The dual Bingen series would counter this idea.
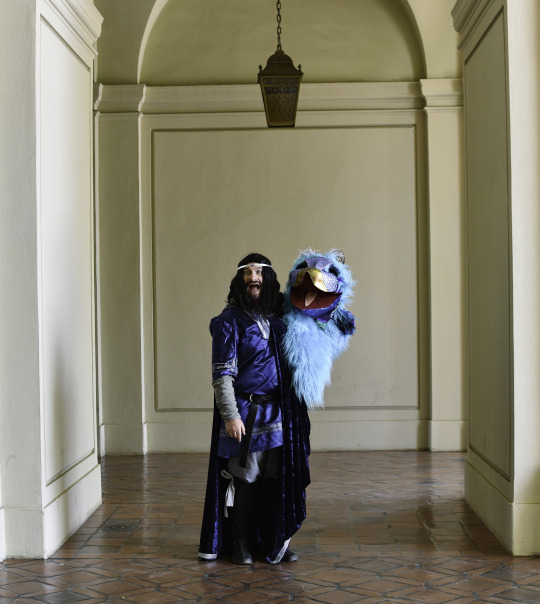
Excerpt from 3.2 Description of the Fantastic Beasts
There are few records regarding the Fantastic Beasts depicted in the paintings, which include an occamy and a basilisk. Salazar’s journal records the names of both beasts who appear in the dual Bingen series and notes that the basilisk was one of three successful hatchings. The occamy is called Ocarina and the basilisk is King George. The occamy could be of any age, as occamy will grow or shrink to whatever size to occupy space, an ability they possess immediately after hatching. The basilisk is clearly a youngster, as it is small and still has wings, as compared to the centuries old and massively huge wingless basilisk found in the Chamber of Secrets at Hogwarts in 1992. Salazar’s journal does not include any dates for the hatchings and says nothing about the other two successful hatchings. The journal also does not offer any information regarding how Slytherin, Ravenclaw, and Grimhilde of Bingen all lived beyond the sketching and painting sessions involving the basilisk. As breeding of basilisks is currently illegal and has been illegal for centuries, very little is known about them. Magi-biologists generally agree that the most likely scenario is that the beast had either not yet developed any of the paralyzing or killing abilities possessed by the Chamber of Secrets basilisk or he was able to control his abilities (Verne, 1863, Challenger, 1891). Opinion is split regarding whether the basilisk himself decided against rampaging during the sessions or whether Salazar was able to train the beast (Mirza, 2020).
Excerpt from Appendix 2, The Bingen Wizarding Collection
[…] and in 1947, Ginger Bingen, used the ragged and worn set of paintbrushes to create her own series of Wizard paintings of Slytherin and Ravenclaw. Ginger Bingen’s paintings incorporate the last of her many times removed Great Aunt Grimhilde’s sketches and notes of her sessions with the two Founders. Experts do not agree on whether the paintings accurately reflect the two Founders, as the paintings have only recently been made public. For one, many say, the Founders are speaking modern English. Although the paintings were rumored to exist, the Bingen Wizarding collection remained in private hands until 2017. That year, the four paintings below were stolen from the estate of the last Bingen by a self-styled modern-day Robin Hood and hung in the toilet of Ye Olde Trip to Jerusalem (well known even among Muggles as the oldest pub in England), when the pub was closed for the night. As there were no heirs to the estate and no will, and no one really owned the paintings or knew what to do with them, they were left in place at the pub and secured with heavy charms and curses.
youtube
19 notes
·
View notes
Last Seen Blogs

videotutorial-blog2
Video Tutorial

trustseachother-blog
نقل عفش الكويت

julieoneillthings
Julie

olivercrew
I Love Jesus But I Cuss A Little

bitch-courtneigh1
Bitch-Courtneigh