#DataRecoveryWizard
Explore tagged Tumblr posts
Visit Tumblr Blog
Explore Tumblr blogs with no restrictions, modern design and the best experience.
Last Seen Tumblr Blogs


Fun Fact
Tumblr.com is the 103rd most visited website in the world.
Text
Recovering Permanently Deleted Files on Windows: A How-to Guide

We’ve all been there – a vitally important file goes missing, fails to save, or freezes, and there seems as if there is no way back. It’s a nightmare scenario with a crucial deadline looming. But fear not, as all is not lost. Fortunately there are ways of recovering what appear to be permanently deleted files on Windows platforms, you just need to know how. You see, the thing is, even when you permanently delete a file from your device, you actually don’t. That is, your machine simply makes it invisible to you and moves it with the purpose of freeing up space for other things. With this knowledge, you can see that recovering files is just a case of unlocking the mystery of where the said file has been moved to. Here’s how.
From your recycle bin
Many people delete files using the ‘right click’ function, which is not a permanent solution in any case. If this is what you have done, then retrieving your file is child’s play. Simply go the recycle bin on your device, search for the document in question, right click again and select ‘restore’. This then moves the file back to it’s original location, and you are good to go. It’s a simple as it gets.
From previous versions
If you haven’t ‘right-clicked’ to delete, then it gets a little more complicated, but don’t worry, there are still ways of getting your work back. This involves accessing a previous version of the document. The only thing that is required here is knowledge of the file name – once you have this information, you are good to go. Start by opening a new file, and give that file the name of the ‘lost’ document. Next up is that faithful ‘right click’ and then scroll down to the ‘restore previous versions’ option which will be displayed. It’s then just a case of clicking on and restoring the last version before the document was lost. This is a great method for those who don’t consider themselves to be tech-heads. In fact, I regularly use it myself.
The software option
Sometimes the previous options as listed here just don’t come through for you, so next up is the software option. Of course this prolongs the activity, but getting that important file back is the objective, and nothing else matters. People are often reticent about using software for this activity, but my advice is always the same: use it. Not only are these software solutions clean to install and uninstall, they do the job that is required. What is not to like? These software solutions work for all types of files too, from videos to images to word documents and excel files. Here’s how you can do it: First up, download the necessary software option. There are so many to choose from, so do a little research first and check out a few forums to see what people are saying the pros and cons are. If you really want us to suggest some, we vote for EaseUS Data Recovery Wizard, Recuva and TestDisk: all of these are very reliable and offer a free working version available to download. Now, install it and open it, and you are ready to go. Usually the first prompt is to select the type of file that you need to recover. It’s an easy first step. Next up you will probably need to identify the location on your device where the document was lost from. The idea here is that a scan will be performed by the software in order to find the file, so you need to narrow the search by showing the software the direction to move in. So, for example, if you have accidentally permanently deleted a document from your recycle bin, then the recycle bin is that place to direct the software. Now it’s time to run the scan, so follow the prompts that activate this. The search runs, and this can take a bit of time, depending on how much is already stored in the identified location. Be patient, the job is happening. With any luck, your file will now have been identified and listed on the search results box no shown. Select the file, restore it, and you are back in business As a final step, don’t forget to resave the file immediately in a convenient place. There’s nothing to fear and everything to be won from this solution. From beginning to end it can take no more than five minutes, which is really nothing in relation to having to restart the document from scratch, which may not even be possible anyway.
Conclusion
So there we go. All is not lost. These practical solutions can help you restore those ‘lost’ files without additional heartache. He initial shock may have been bad, but a happy ending is in sight by following these simple steps. Read the full article
0 notes
Text
Cách khôi phục dữ liệu đã xoá bằng Data Recovery wizard
Làm sao để kiếm lại các file đã bị mất do xoá đi hay fomart trên một thiết bị nào đó? Không còn quá khó khăn nữa vì đã có Data Recovery Wizard sẽ giúp bạn #EzLasso #DataRecoverywizard #khôiphụcdữliệu
Một trong những phần mềm khôi phục dữ liệu tốt nhất trên máy tính giúp có thể khôi phục dữ liệu đã xoá trên các ổ cứng. Với Data Recovery wizard có thể giúp bạn nhanh chóng khôi phục lại những dự liệu đã xoá. Tải Data Recovery Wizard cũng Ez Lasso nhé.
Trên cơ bản việc khôi phục dữ liệu là việc rất quan trọng với nhiều người. Có thể bạn sẽ bị mất khi xoá các phần vùng ổ cức trên máy tính, hay…
View On WordPress
0 notes
Text
EaseUS Data Recovery Wizard - Recensione
Non c'è amministratore di sistema, professionista IT o esperto di applicazioni Windows che non si sia imbattuto almeno una volta in uno dei prodotti EaseUS: stiamo parlando infatti di una famiglia di strumenti di backup e data recovery che esistono sul mercato da oltre 15 anni e contano ormai milioni di utenti, grazie alla loro semplicità d'uso e (soprattutto) all'esistenza delle versioni free, ovvero edizioni grauite per l'utilizzo domestico e/o small business.
Introduzione
Fondata nel 2004, EaseUS è una azienda internazionale specializzata nella realizzazione e distribuzione di strumenti software per attività di backup, data recovery, gestione delle partizioni e operazioni similari: ogni prodotto di solito esce con una versione gratuita "di valutazione", quasi sempre con funzionalità limitate, coadiuvata da una o più edizioni professionali / aziendali prive di limitazioni e/o dotate di funzionalità aggiuntive: grazie a questa strategia di vendita, piuttosto comune per questo tipo di aziende, EaseUS è in grado di soddisfare le esigenze di ogni potenziale cliente, dagli utenti domestici, alle PMI, alle imprese, oltre ovviamente ai tecnici e professionisti di settore interessati all'utilizzo dei loro prodotti a beneficio dei propri clienti. In questo articolo eseguiremo ci occuperemo di effettuare un test-drive e una recensione approfondita di uno dei loro prodotti di punta: EaseUS Data Recovery Wizard, uno strumento che consente di ripristinare file e cartelle cancellati per errore (o da malware, o da utenti non autorizzati) da vari supporti di memorizzazione, tra cui: Hard Disk, Pendrive USB, schede di memoria, dispositivi iOS, lettori musicali, e così via.
Installazione
Installare EaseUS Data Recovery Wizard è piuttosto semplice: la prima cosa da fare è stabilire se siamo interessati alla versione gratuita (free trial), all'edizione professionale (professional edition) o alla versione per tecnici e amministratori di sistema (technician edition): EaseUS Data Recovery Wizard - Free Edition EaseUS Data Recovery Wizard - Professional Edition EaseUS Data Recovery Wizard - Technician Edition (aka Data Recovery Wizard Unlimited) Come si può vedere, l'azienda ha predisposto una pagina web dedicata per ciascuna edizione. Ci occuperemo del confronto tra le varie versioni tra poco: per il momento, ai fini del nostro test-drive, ci limiteremo a scaricare l'edizione gratuita. La procedura di installazione è estremamente semplice: il classico wizard nel quale dobbiamo fare click sul pulsante Prosegui o Continua fino a quando l'applicativo non sarà installato sul nostro sistema. Fortunatamente, anche nel caso dell'edizione gratuita, non ci sarà chiesto di installare alcun software aggiuntivo/promozionale/adware.
Dashboard
Una volta installato e lanciato l'applicativo, ci verrà mostrata a schermo la seguente dashboard, che rappresenta il punto d'ingresso di qualsiasi sessione di recupero dati:
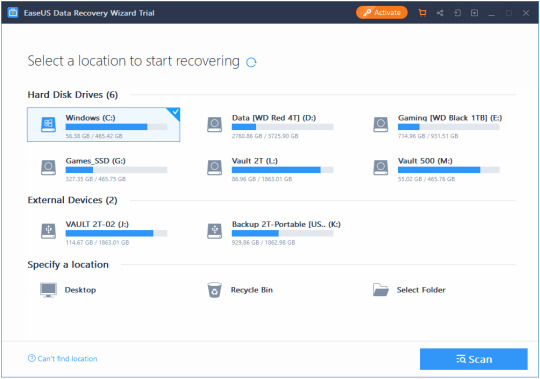
La schermata principale (Dashboard) di EaseUS Data Recovery Wizard Dashboard. La prima cosa degna di nota è che il software è interamente tradotto in italiano: per cambiare la lingua predefinita è sufficiente fare click su una delle icone poste in alto a sinistra e modificare l'impostazione predefinita, ovvero quella scelta al momento dell'installazione. Per quanto riguarda la dashboard, possiamo vedere come il software sia in grado di individuare automaticamente tutte le unità di data storage presenti localmente sul sistema: per iniziare una sessione di recupero dati, non dobbiamo fare altro che effettuare un doppio click sull'unità relativa, così da accedere al pannello successivo - il File Explorer.
File Explorer
Come si può vedere dalla screenshot seguente, il contenuto dell'unità di storage selezionata è mostrato a schermo utilizzando una sorta di File Manager visuale, molto simile all'Esplora Risorse di Windows ma dotata di un set di comandi specifici per poter gestire l'identificazione e il recupero dei file eliminati:
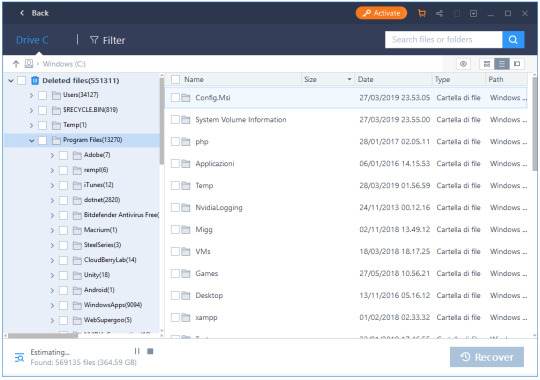
Nell'istante in cui la finestra relativa all'unità selezionata viene aperta, il programma farà partire una scansione veloce (quick scan) dei file eliminati: i risultati di questa scansione saranno mostrati a schermo in tempo reale. Tutti i file eliminati verranno sistemati all'interno di un albero di cartelle (directory tree) mantenendo la medesima gerarchia che avevano nel file system al momento della loro eliminazione. Questa modalità di visualizzazione è particolarmente utile perché facilita l'utente nell'attività di identificare agevolmente i file che vuole recuperare, distinguendoli da quelli che non ci interessano.
Filtri di ricerca
Nel menu in alto è presente una opzione "Filtro" (Filter) che può essere utilizzata per limitare la visualizzazione ad alcune particolari tipologie di file (più recenti di una certa data, solo documenti, solo video, etc.):
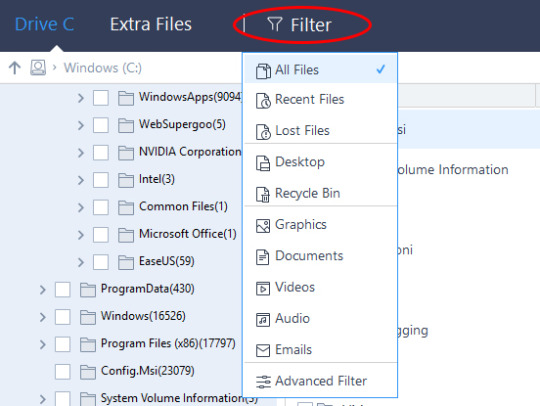
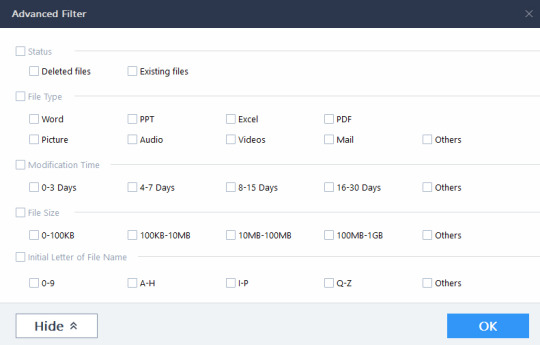
Nel caso in cui si abbia bisogno di applicare delle regole più complesse è possibile utilizzare il pannello Filtri Avanzati (Advanced Filters) facendo click sull'omonima opzione in basso. Operando in questo modo si potrà accedere a una finestra modale che consentirà di impostare una serie di parametri di ricerca aggiuntivi: data e ora della modifica, dimensioni del file, lettere o numeri contenuti all'interno dei nomi dei file da recuperare, e così via.
Scansione approfondita
Al termine della scansione semplice il software inizierà automaticamente una scansione approfondita (deep scan) dell'unità: si tratta di una modalità di scansione estremamente più precisa del quick scan, ma decisamente più pesante in termini di tempo e risorse: per scansionare l'unità da noi utilizzata nel test (SSD Samsung 970 Pro da 500 GB) il deep scan ha impiegato circa 5 minuti - un tempo in ogni caso più che dignitoso per una scansione sector-by-sector. La scansione approfondita di EaseUS Data Recovery Software è in buona sostanza una scansione settore-per-settore (sector-by-sector) realizzata in tecnologia proprietaria. Per ulteriori informazioni, consigliamo di dare un'occhiata a questo approfondimento tecnico presente sul sito ufficiale EaseUS. Il risultato della scansione è mostrato in tempo reale su un pannello a parte, situato a destra della finestra File Explorer.
Anteprima prima del recupero dati
Una funzionalità estremamente interessante, che ci ha soddisfatto in particolar modo, è quella che consente di visualizzare una anteprima del file prima di effettuare l'undelete, ovvero di recuperarlo. Per utilizzarla è sufficiente fare click con il tasto destro del mouse e selezionare l'opzione anteprima (preview, nella versione in lingua inglese) tra quelle presenti nella finestra contestuale:
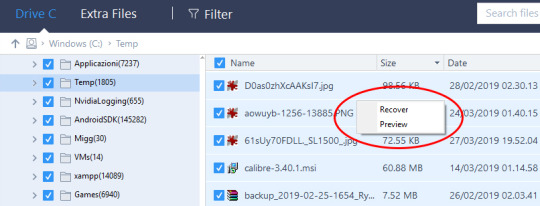
La preview contestuale è uno strumento che può rivelarsi molto comodo in alcune situazioni, come ad esempio quando si vuole effettuare l'undelete di una singola foto (o di un singolo file PDF) all'interno di una cartella piena di file eliminati che non si ha interesse a recuperare.
Confronto tra Edizioni
A differenza della maggior parte delle versioni demo e/o di valutazione rese disponibili da altre aziende software, la Data Recovery Wizard - Free Edition è una trialware che non ha scadenza, non costringe ad attendere fastidiosi nag screen e (soprattutto) risulta essere pienamente utilizzabile, in quanto consente di sfruttare a pieno le funzionalità del prodotto. L'unica limitazione funzionale è data dalla dimensione massima dei file che è possibile recuperare, ovvero un totale di 2GB: al tempo stesso, il programma potrà essere utilizzato anche al raggiungimento di tale limitazione in modalità "scan-only"... Una scelta molto comoda, visto che consentirà all'utente di sapere in anticipo - prima di effettuare l'acquisto - se il programma è in grado di recuperare i file di proprio interesse oppure no. Ovviamente, sia la professional edition che la technician edition non hanno alcuna limitazione e consentono pertanto il recupero di qualsiasi file. Funzionalità di Help-Desk L technician edition presenta le medesime caratteristiche e funzionalità della versione professional, con una caratteristica aggiuntiva che vale senz'altro la pena di approfondire: si tratta di una opzione "technical help-desk" offerta da EaseUS direttamente ai clienti di chi acquista il prodotto: si tratta in buona sostanza di una sorta di customer care offerto in outsourcing, pensato appositamente per rivenditori, provider di servizi e/o altre realtà di questo tipo interessate a rivendere il servizio di data recovery a utenti finali.
Dispositivi supportati
Ecco un elenco delle principali unità di memorizzazione supportate nativamente da EaseUS Data Recovery Wizard, a patto ovviamente che siano collegate al PC sul quale il software è stato installato: PC (desktop e laptop) Hard Disk Unità esterne (floppy, DAT, CD-ROM, etc.) Unità SSD Penne e dispositivi USB Micro Cards Camcorder e Videocamere digitali Lettori musicali digitali Lettori video RAIDs CF/SD Cards Altri dispositivi di data-storage
Requisiti Hardware e Software
File System FAT(FAT12,FAT16,FAT32) exFAT NTFS NTFS5 ext2/ext3 HFS+ ReFS Operating System Windows 10/8.1/8/7/Vista/XP Windows Server 2016/2012/2008/2003 CPU at least with x86 Disk Space 32MB minimum space for EaseUS Data Recovery Wizard installation RAM at least 128MB
Offerta speciale - Sconto del 50%
Nel caso in cui siate interessati all'acquisto dell'edizione professional o technician di EaseUS Data Recovery Wizard potete farlo utilizzando questo coupon sconto del 50%: un codice promozionale che consente di ottenere il software a metà prezzo (51,81 EUR anziché 103,64 EUR): si tratta di una offerta speciale introdotta da EaseUS a inizio 2019 e dovrebbe restare disponibile per i prossimi mesi.
Conclusione
EaseUS Data Recovery Wizard è sicuramente uno strumento valido per recuperare i file eliminati: il software si è comportato egregiamente in tutti i nostri test, consentendo il recupero di dati cancellati da una partizione esistente, da una partizione cancellata, da una partizione corrotta e persino da una partizione prima cancellata e poi sovrascritta con un altra. Siamo inoltre rimasti piacevolmente colpiti dall'interfaccia user-friendly, dalla correttezza della traduzione in lingua italiana e da alcuni "tocchi di classe" come l'anteprima prima del recupero e la versatilità dei filtri di ricerca: tutte cose che consentono ad EaseUS di mantenere un certo margine rispetto a prodotti similari offerti da aziende concorrenti.
Read the full article
0 notes
Text
EaseUS Data Recovery Wizard - In-Depth Review

No matter if you're a seasoned System Administrator, a IT expert or a PC enthusiast, you've most likely already stumbled upon a EaseUS product at least once: we're talking about one of the most important software companies / software providers of storage management and data recovery solutions, with millions of active users (private and business) in over 180 countries and areas.
Introduction
Founded in 2004, EaseUS is constantly releasing software tools for tasks such as Backup & Recovery, Data Recovery and Partition Management: each package usually comes out with a free with limitation (or trial) edition and professional/enterprise versions with additional features: thanks to this sale strategy, which is pretty common for these kind of software companies, they can address the need of every potential customer - from the home users to SMBs, enterprises, technicians and the likes. In this article we'll perform a test-drive + in-depth review of one of their flagship products - EaseUS Data Recovery Wizard: that's basically a software tool that allows users to undelete files and folders deleted by mistake (or by malicious software/attackers) from various storage media, including Hard Disk Drives, USB pendrives, memory cards, iOS devices, music players, and so on.
Installation
Installing the software is very easy, you just have to choose between picking up the free trial or directly go for the professional edition: EaseUS Data Recovery Wizard - Free Edition EaseUS Data Recovery Wizard - Professional Edition EaseUS Data Recovery Wizard - Technician Edition (aka Data Recovery Wizard Unlimited) As you can see, they made a dedicated website for each edition: i'll perform the comparison between them later on, for now I'll just pick the free edition and go ahead with the test-drive. The installation process is pretty much straight-forward, you'll just have to hit Next a number of times: it won't ask you for sponsored softwares and/or adware, which is indeed a good policy that I appreciate a lot from EaseUS products.
Dashboard
Once installed and launched, the tool will welcome you with the following dashboard, which will be the starting place of all our recovery sessions:

Here's the EaseUS Data Recovery Wizard Dashboard - and yes, I do actually have quite a lot of HDD/SSD there. As we can see, the software does a good job in locating all our locally available storage media: we just have to double-click one of them - arguably the one which contained the file(s) we want to recover - and we will access the File Explorer panel.
File Explorer
As we can see from the screenshot below, this basically is a file manager interface specifically designed to help us to identify and recovery our missing/lost/deleted files:

As soon as the window opens, a quick scan will be performed over the storage media surface: the results will be shown in real-time. As expected, all the deleted files are shown nested in their folders and are kept in the same hierarchy as it originally existed. This choice makes it quite easy to focus only on the relevant files (those who are looking for), giving us the chance to easily skip all the others.
File Filter
On the top menu, a filter option can also be used to filter out specific file types, non-recent files and so on:

If you need additional options you can also activate the Advanced Filters by clicking on the bottom item: this will open a modal windows that allows you to further customize your scan with various options (modification time, file size, initial letters, and so on).

Deep Scan
While you navigate the File Explorer through the folder tree looking for the files, a further, more effective scan (deep scan) will be performed in background thorough the whole drive. The deep scan is much more "intense" of the quick scan and will definitely take much longer to finish, depending on the size of the drive. On my 500GB SSD Drive (Samsung 970 Pro) the deep scan took roughly 5 minutes to complete - which is quite fast, considering what it does. The deep scan uses sector by sector scan thanks to a RAW searching technology specifically developed by EaseUS. For additional info about the deep scan features, we strongly suggest to read this technical overview from the official EaseUS website. The results of the scan will be shown on separate panes, on the left part of the File Explorer window.
Preview before Recovery
A neat feature which I liked is that all the "found" files can be previewed before being recovered with a right-click:

I personally found it very practical, expecially when recovering few specific files with non-identifying names (images/photos, PDF files, and so on) between a large amount of siblings which I didn't want to recover.
Compare Editions
Unlike most demos and trial versions, the Data Recovery Wizard - Free Edition actually lets you to access all the most important features - and even recover the files! The only functional limitation is the maximum size of the files that you'll be able to recover, which - for the free edition - is capped at 2GB: however, you'll still be able to see all files even when you'll hit such limitation, therefore you'll be able to choose between purchasing the professional edition or not depending on what the tool will find. Needless to say, both the professional and technician editions feature an unlimited size of recoverable files. Technician Edition and Help-Desk feature As for the technician edition, it has the same set of features of the professional one, but it comes with an additional feature that could be rather useful for most resellers, service providers and IT services companies: the license does include a top-tier "technical service" offered by EaseUS and directly aimed to end-customers in order to help them recover data at critical times. In other words, you'll buy the tool and the customer service for your clients, directly handled by EaseUS.
Supported Devices
Here's a list of devices that will be auto-detected by the software if connected to the PC: PC (desktop & laptops) Hard Drives External Disks SSD USB Drives Micro Cards Camcorders Digital Cameras Music Players Video Players RAIDs CF/SD Cards Pen Drives Other Storage Devices
System and Hardware requirements
File System FAT(FAT12,FAT16,FAT32) exFAT NTFS NTFS5 ext2/ext3 HFS+ ReFS Operating System Windows 10/8.1/8/7/Vista/XP Windows Server 2016/2012/2008/2003 CPU at least with x86 Disk Space 32MB minimum space for EaseUS Data Recovery Wizard installation RAM at least 128MB
Conclusion
EaseUS Data Recovery Wizard is definitely a valid tool to recover undeleted files and worked well under all our test scenarios, being able to recover deleted data from an existing partition, from a deleted partition, from a corrupted partition, and even deleted data from a partition that had been deleted and then overwritten with another. We really liked some neat features such as the "preview before recovery" and the advanced filters, which - together with the easeness of use and the fact that the free edition actually works - gives the software quite an edge over the competitors.

Read the full article
0 notes