#Mac e PC
Text
*taps mic* this thing on?
#r.txt#hi hi hi i miss being active sm i hate school :|#i still need a new computer too cause rn i cant run sims with anything installed it sucks ass#im excited for infants tho!!!! and the new pack im foaming at the mouth why do they make us pay for basic game things its so lame but wtvr!!#im just popping in for a min im on spring break but i still have hw :'((#just a few more months and maybe i can get a job and save enough for a new pc lets hope#im taking a photoshop/illustrator class and i rly hate my prof i havent learned anything i didnt already know#and we have to use MACS :| actually wanna fight its me vs apple products till i di#e#ive been playing vanilla for a bit and its not as fun but its alright#ive uploaded some houses to the gallery if anyone is interested ig i could post those to be semi active#i have literally sm to do in my life i hate being old (19) im basically dead#i say it every time but im going to make my return one day i swear it i love this community despite its many many flaws i miss everything#unfortunatly i have to deal w an 8-5 school schedule twice a week the rise and grind mindset is not for me#if i get time i might try to post more silly updates ive been doing but for now au revoir (adios) (im into tfb now smile)#ok bye aggain 4 nowsies
9 notes
·
View notes
Note
tris ainda jogas league?? eu não jogo há uns anos porque já não tenho ninguém com quem jogar 💔 eu era um zero à esquerda naquele jogo, mas era divertido jogar com outras pessoas
já não jogo há um tempo mas eu nem jogo to pc porque não tenho pc para tal eu só instalei no telemóvel para experimentar à um ano (?) atrás e gostei! mas sim acredito que a experiência deve ser melhor quando jogas com amigos mesmo que não jogues muito bem eu sempre quis experimentar isso sob
#eu agora estou mais focada em overwatch porque tenho na switch#e é mais fácil jogar numa consola obviamente </3#mas um dia gostava mesmo de jogar lol num pc ou num computador#mas obviamente que eu agora tenho um mac e não faria sentido#comprar um pc agora MAS....#eu gosto muito the gaming so who knows#quando eu puder definitivamente eu vou investir nisso#asks#lua 🌙💕
2 notes
·
View notes
Text
Fixing Windows 11 - A Masterpost
Windows 11 is absolute crap for a good bunch of stuff so yeah, have a masterpost with most of the things I've found around to fix it haha (they're not all here because I did stuff around and I don't remember what)
I also have a ko-fi if ever you want to help.
Stopping W11 from making you create an account/setting up your computer without internet (with a way to create gpedit.msc if your version doesn't have it)
Fixing the Taskbar (in case you also don't like the grouped Battery/internet/sound or the way the windows look)(there's more to it, check the settings)
How to move the volume and luminosity pop ups (so you can finally see those sweet sweet subtitles)
In case ModernFlyouts doesn't automatically start up, possible solution
Fixing the Start Menu
How to show all options right away
How to remove Copilot if you have it (I don't, but it might be because I'm in Europe??)
Apparently Copilot is being forced on people so hummm
Other stuff not specifically related to the shit W11 did
Changing the size of the scroll bars
How to fully remove Cortana
Website with tools to fix W10 and W11
1K notes
·
View notes
Text

Fallen Lights Riding POVs: Book 1 is now available!
These POVs are based off the scene in Fallen Lights: Chapter 3 where MC can select an RO to share a horse with.
You can purchase it here on itch.io for $3 or gain access to it on my Patreon by pledging to the Archmage ($5) tier or above.
The routes include Florian, E, and Marcella. Each route averages to be about 1K words. The single purchase on itch.io is playable on Mac/PC while the Patreon version can be played on Mac/PC/phones.
186 notes
·
View notes
Text

GUIA COMPLETO DE COMO EDITAR FOTOS EM ALTA QUALIDADE (HQ)!
oiê, bem vindos(as)! à pedidos, estou trazendo um tutorial bem abrangente sobre como editar fotos no geral para icons, headers, etc., em alta qualidade. neste guia/tutorial trarei dicas, truques e informações gerais sobre o que é preciso para editar em hq. lembrando que o conteúdo deste guia é sobre como eu edito, a maneira que funciona comigo e meu progresso e aprendizado ao longo de quase 12 anos editando icons, ou seja, o que contém neste guia pode — e deve — ser adaptado à sua maneira e ao software de sua preferência. aproveitem e se divirtam!
nota: este tutorial está bem longo, então, se possível, veja este guia pelo pc/notebook!
O QUE VOCÊ VAI ENCONTRAR NESTE GUIA
softwares necessários com links para download;
onde e como baixar as fotos para as edits;
métodos de edição e passo a passo;
como melhorar a qualidade de uma foto;
como salvar a foto corretamente para postar;
dicas de actions e outros resources.
clique em “continuar lendo” para ver o tutorial.
1. SOFTWARE
photoshop
eu recomendo fortemente o uso do photoshop cc na versão mais recente, ou outra versão com camera raw ou filtros neurais suportada pelo seu pc ou notebook.
você também pode usar o photopea como alternativa (eu particularmente prefiro o photoshop pois acho que as edits ficam com mais qualidade). se você preferir o photopea, algumas dicas desse guia poderão não funcionar devido à falta de algumas funcionalidades que o photopea não oferece (ex: camera raw, galeria de filtros, filtros neurais e outros).
eu uso a última versão do photoshop (atualmente, a versão 25.5.1) e uso a versão paga (obrigada adobe pelo desconto de estudante!!!!!), mas vou deixar alguns links para você baixar o photoshop gratuitamente caso você não seja estudante e/ou não tenha condições para assinar um plano.
atualmente eu uso um mac mini 2014 para editar, mas sempre usei windows, então, as dicas e os links valem para os dois sistemas operacionais.
links
macos: 1, 2 & 3.
windows: 1, 2, 3 & 4.
2. BAIXANDO AS FOTOS
galerias de fotos
muitos artistas têm fansites com galerias de fotos e você pode achar facilmente digitando no google: “nome da pessoa + gallery”.
o artista que eu quero não tem galeria própria e agora? tranquilo, ainda temos galerias de fotos de famosos variados como hqdiesel, hqsource, hq-pictures e até mesmo o theplace.
em último caso você pode usar o gettyimages e usar um removedor de marca d’água ou um site como o gettyimages downloader.
instagram
para artistas estrangeiros que tenham apenas instagram e/ou não tenham fotos em galerias de imagens, eu recomendo o instagram pessoal da pessoa.
você poderá fazer o download das fotos com extensões de navegadores como o image downloader for instagram (para firefox e google chrome), ou sites como o saveig, o snapinsta ou o igdownloader.
eu recomendo baixar pela extensão do navegador, pois ela baixa a foto direto do site do instagram no computador, diferente dos sites que você precisará ir foto por foto, copiar o link e colar no site para fazer o download.
mas, caso a extensão esteja indisponível, com algum erro ou pare de funcionar, o site é uma excelente alternativa (só precisa ter mais paciência).
nos sites para baixar fotos do instagram, geralmente eles dão a opção para você escolher o tamanho da foto. você deve sempre selecionar a resolução maior da foto (acima de 1000px é o melhor).
pinterest
em casos extremos de artistas low profile, sem instagram, sem aparições públicas, sem galerias de fotos, nadica de nada, eu recorro ao pinterest.
porém, é preciso ter muito cuidado ao fazer download de fotos do pinterest, porque são muitas fotos repetidas e muitas com baixíssima resolução e qualidade.
se você for baixar fotos do pinterest, escolha a foto com maior resolução (imagens maiores que 500px já são ok para editar icons), e depois de baixar a foto, eu recomendo fazer um tratamento na foto para melhorar a qualidade dela, como vou ensinar.
3. EDITANDO
3.1 importando a foto no photoshop
apertando ctrl+o ou cmd+o uma guia vai abrir no programa, onde você vai até a pasta onde a foto foi salva. selecione a foto e clique duas vezes nela para abrir.
3.2 cortando a foto nas dimensões desejadas
muitos tutoriais de edições de icons sugerem que você copie a imagem e cole ela em um documento novo já do tamanho da sua edit, mas eu não recomendo essa opção, pois ao redimensionar a foto com a ferramenta de transformar (ctrl+t), ela dá poucas opções para manter a qualidade da foto e se você não souber o que cada opção faz, poderá perder a qualidade da imagem. então, eu sempre faço o recorte na própria foto para não alterar muito a qualidade dela.
aperte a letra c no teclado para abrir o atalho da ferramenta de corte. (se o seu photoshop for alguma versão do cc, eu recomendo que você marque a opção para usar o modo clássico de corte, assim fica mais fácil e você tem um controle maior sobre a ferramenta!). para fazer essa alteração é simples, vá no ícone de engrenagem, clique e marque a opção “usar modo clássico”.
para fazer icons, você deverá cortá-lo usado dimensões quadradas, ou seja, 1x1, e para headers 15x5. você pode mudar as dimensões na caixinha da ferramenta de corte.
3.3 redimensionando a foto
nessa parte você precisará prestar atenção, pois ao redimensionar a foto, você poderá perder ou ganhar um pouco mais de qualidade na foto, e para isso você usará uma opção chamada reamostrar (ou resample se seu photoshop estiver em inglês). deixe a opção marcada para usar as definições.

3.4 explicando as definições do reamostrar e qual definição usar de acordo com o resultado que você quer
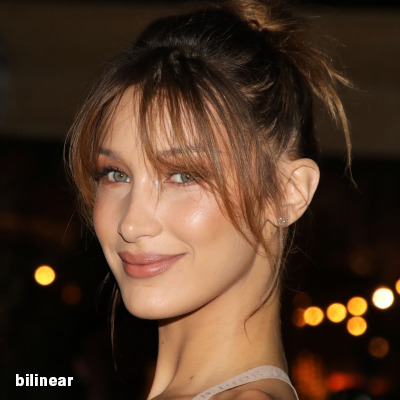


bilinear: a melhor opção para redimensionar gifs, mas para fotos não é tão bom pois dependendo da foto algumas partes ficam nítidas, outras mais suaves e se você for aplicar action de nitidez, pode ficar com um aspecto de “craquelado” com as bordas granuladas, o que eu pessoalmente acho que fica um pouco estranho.
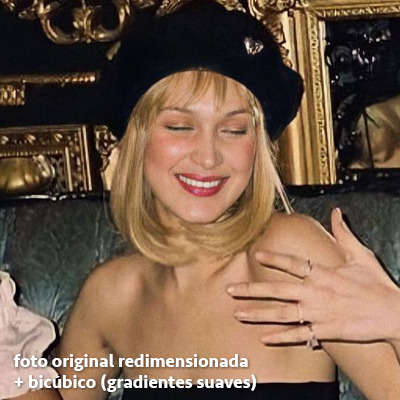
bicúbico mais suave (ampliação): como o nome já diz, ele deixa a foto mais suave, ou seja, os pixels “craquelados” e granulados da foto ficarão mais suaves. é uma ótima opção tanto se você for aplicar actions de nitidez ou actions mais desfocadas e mais suaves.
bicúbico (gradientes suaves): pode parecer a mesma coisa do bicúbico mais suave, mas esta opção além de suavizar a imagem, cria um “desfoque iluminado” nas transições das cores da foto. é a melhor opção para fotos sem muita qualidade e principalmente se você for usar actions suaves e desfocadas, sem muita nitidez.
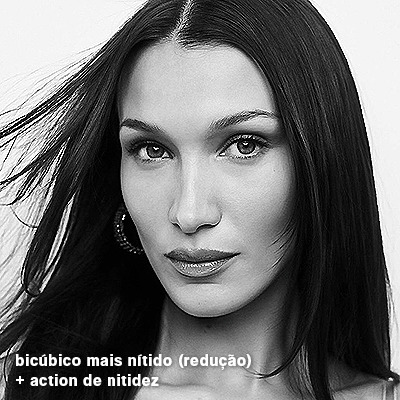
bicúbico mais nítido (redução): acentua os pixels e as arestas nítidas da foto, ou seja, essa definição redimensiona a imagem mas preserva a nitidez da foto. se você usa actions de nitidez que não tem desfoque nas configurações, essa é a melhor opção de reamostra. (mas cuidado, se sua imagem ficar muito nítida com essa definição, você precisará usar outra opção. caso contrário, quando você aplicar a action, a edit poderá ficar muito exagerada e/ou com aspecto áspero.)
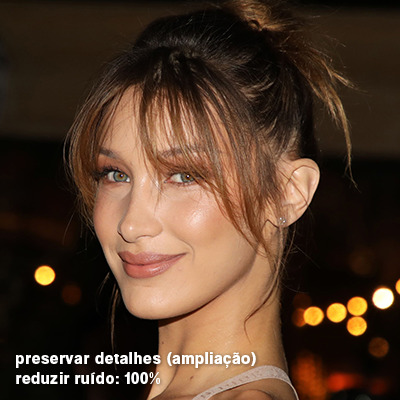
preservar detalhes (ampliação) com redução de ruído: esse em especial é ótimo para quando você precisar redimensionar uma foto para deixá-la maior sem distorcer tanto a imagem. você pode ajustar a redução de ruído para deixar a foto mais suave, sem perder muita qualidade. (obs.: essa opção não deve ser usada para redimensionar imagens muito pequenas, por exemplo de 200x200 para 400x400, ou a imagem vai ficar muito distorcida. ela deve ser usada quando a diferença de pixels não é muito grande, por exemplo, você cortou a foto e ela ficou no tamanho 370x370, aí sim você pode redimensionar para maior sem perder muito da qualidade. então você pode ir ajustando a qualidade com a porcentagem da redução de ruído).
pelo mais próximo (arestas sólidas): essa é uma opção traiçoeira, pois não fica bem em quase nenhuma imagem (a menos que seja um pixel art). essa definição redimensiona a imagem e mantém os pixels nítidos, ou seja, a foto fica menor mas tudo nela que tem aspereza vai prevalecer. é muito usada para redimensionar pixel art, pois preserva as bordas ásperas. pode ocorrer de ficar boa em uma foto aleatória mas não será possível aplicar action, ou a imagem ficará exagerada.
3.5 aplicando a nitidez depois de redimensionar
depois de escolher a foto, baixar, redimensionar de acordo com o estilo da action da sua escolha, está na hora de aplicar.
eu fiz duas versões para mostrar como fica com cada tipo de action:

assim, os dois icons tem uma alta qualidade usando actions diferentes, graças a remostragem ideal para cada tipo de action :)
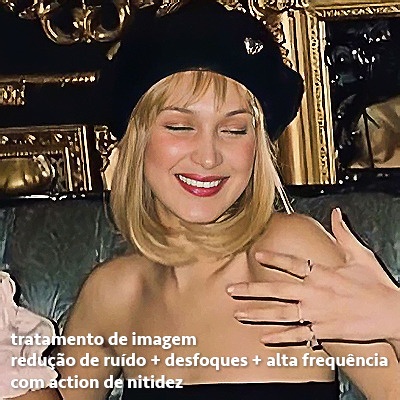
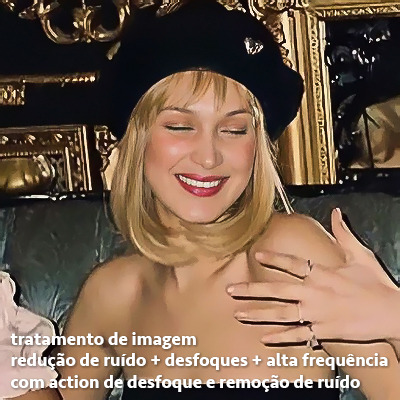
4. TRATAMENTO DE IMAGEM PARA MELHORAR A QUALIDADE
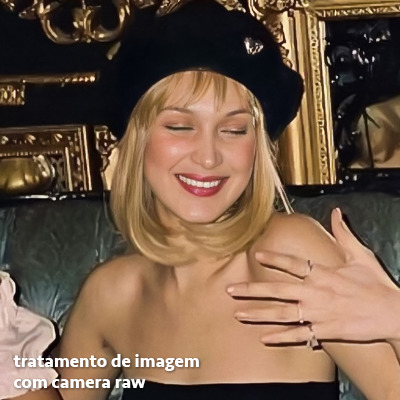
nesta parte, é muito importante que você tenha baixado uma versão do photoshop com neural filters e/ou com o camera raw, mas caso você não tenha, tudo bem também, vou ensinar como fazer uma melhoria na foto de três jeitos: com camera raw, com neural filters e com desfoques. a melhor forma vai depender de quão ruim está a qualidade da sua foto. em geral, apenas fazendo ajustes no camera raw você já tem um ótimo resultado na maioria das fotos.
camera raw
se seu photoshop tem o filtro do camera raw, ele vai estar em filtro > filtro do camera raw...
tudo que iremos fazer será na aba de “detalhe”, ali você deve dar mais atenção ao ajuste de redução de ruído, pois é ele que vai remover o ruído da imagem e melhorar a qualidade dela.
vá mexendo nas configurações de redução de ruído até que a foto fique mais suave. ajuste também o detalhe e o contraste da redução de ruído.
essa parte será mais no olhômetro mesmo, pois as configurações vão variar de foto para foto, mas eu recomendo muito você mexer também na nitidez para não deixar a foto tão desfocada, mas nada muito intenso para não interferir na action que você irá usar.
eu mexo também na redução de ruído de cores, porque dependendo da foto, algumas cores estarão saturadas ou com muito ruído. só cuidado para não colocar um número muito alto, pois esse ajuste pode tirar a saturação da sua foto e deixá-la apagada.
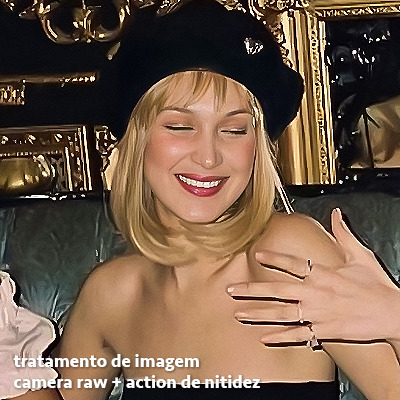
enfim, aqui está uma comparação da foto original com o tratamento feito com o filtro do camera raw e depois já com a action de nitidez aplicada:
e essas foram as configurações que usei nessa foto em específico:
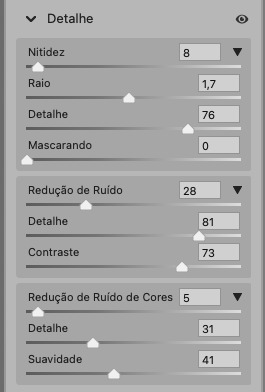
como eu disse antes, as configurações irão variar de foto para foto, a depender da qualidade de cada uma e de quão ruim a foto está, mas com essa configuração básica, você já vai conseguir melhorar algumas fotos.
neural filters
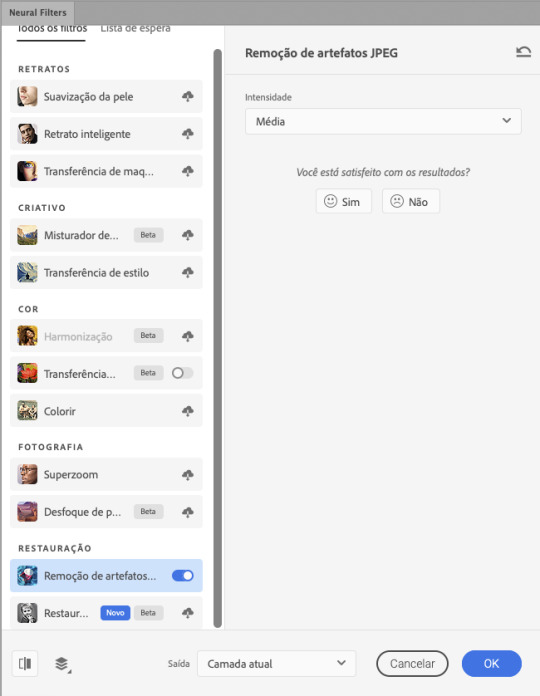
se a versão do seu photoshop vem com neural filters (ou filtros neurais), ele estará em filtro > neural filters...
irá abrir uma janela com vários filtros mas o que a gente irá usar vai estar em “restauração”, com o nome “remover artefatos jpeg”. se precisar, faça o download do filtro.
eu recomendo usar a intensidade sempre média, a menos que a foto esteja muito ruim, aí você usa a intensidade alta. mas em geral, a intensidade média ou baixa já dá conta do recado.
a saída deve sempre estar na camada atual, ou seja, na camada da foto selecionada.
assim:
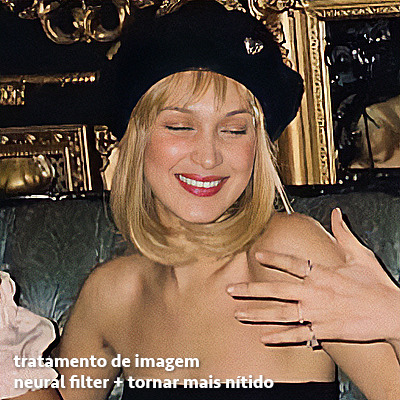
e aqui está uma comparação da foto original com o tratamento feito com o neural filter e depois já com a action suave com desfoque aplicada:

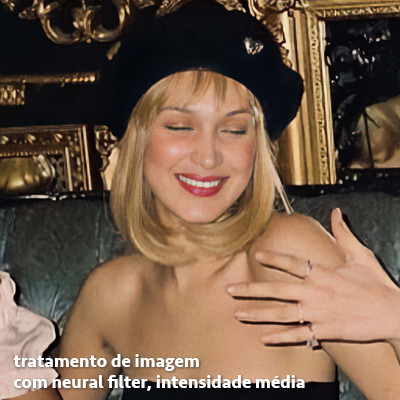

a opção do neural filter é uma ótima alternativa ao camera raw, o único contra é que ele deixa a foto com uma textura áspera, e quando você usa uma action de nitidez eles ficam muito visíveis e acaba não ficando muito legal.
porém, um bom jeito de contornar isso é adicionando ruído na foto. eu uso o efeito de granulação do camera raw para adicionar ruído no icon (você também pode adicionar o ruído em filtro > ruído > adicionar ruído..., mas eu prefiro o camera raw pois ele dá mais opções para ajustar o granulado do jeito que eu preferir).
no primeiro icon abaixo, dá para perceber a textura áspera que o neural filter deixa depois de melhorar a foto e adicionar nitidez; já no segundo icon eu mostro como eu adicionei o ruído e contornei esse defeito.

as configurações de ruído que usei no camera raw foi 12 de granulado, 35 de tamanho e 20 de aspereza.
lembrando que, se você for usar uma action de desfoque e/ou remoção de ruído, não será necessário adicionar a granulação, pois a própria action já vai suavizar a textura do neural filter (a menos que você queira adicionar o ruído, claro).
redução de ruído + desfoque
caso a sua versão do photoshop não tenha nenhuma das opções de camera raw ou neural filter, caso você use um photoshop mais antigo, photoshop portable ou prefira usar o photopea, essas alternativas podem ser úteis.
mais uma vez, irei me basear no olhômetro, de acordo com a foto e irei ajustando as configurações de acordo com o que eu quero e acho necessário.
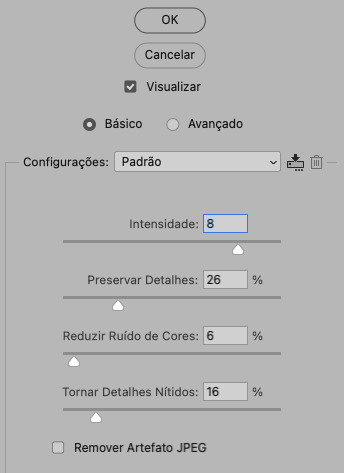
vamos começar com a redução de ruído! ele está em filtro > ruído > reduzir ruído...
na janela de redução de ruídos você verá alguns ajustes que são: intensidade, preservar detalhes, reduzir ruído de cores e tornar detalhes nítidos e vou explicar cada um para que você possa saber ajustar eles de acordo com sua foto:
intensidade: o número de 1 a 10 irá definir a intensidade da luminescência, a intensidade do filtro e o quanto da imagem você quer preservar ou extinguir, sendo 1 o mínimo da intensidade do filtro e 10 o máximo;
preservar detalhes: o número digitado irá definir a porcentagem de detalhes a serem preservados. quanto maior o número, maiores serão os detalhes mantidos na foto, como ruídos, manchas e outras aberrações da foto;
reduzir ruído de cores: o número digitado irá definir a intensidade e reduzir o ruído cromático, ou seja, vai reduzir as aberrações cromáticas, como por exemplo, fotos que distorcem as cores. preste atenção na porcentagem inserida, pois quanto maior o número, menos saturação sua foto terá e poderá ficar com aspecto de foto envelhecida;
tornar detalhes nítidos: o número digitado vai definir a porcentagem de nitidez para restaurar pequenos detalhes da foto. quanto maior a porcentagem, maior vai ser a intensidade dos detalhes da foto. preste atenção na porcentagem inserida, pois se a intensidade da nitidez for muito alto, vai afetar a sua action, seja ela de nitidez ou de desfoque.
sendo assim, para a foto usada eu fiz estes ajustes:
obs.: se você for um usuário mais avançado do photoshop, poderá explorar a opção avançado, que possui as configurações básicas para melhorar a foto e também as configurações para remover ruído das cores primárias (vermelho, amarelo e azul) individualmente. mas, mesmo se você não for um usuário expert, eu recomendo você dar uma olhada nessa opção e explorá-la, mexendo nas configurações e ir ajustando e aprendendo, pois o resultado poderá ficar ainda melhor nos ajustes avançados.
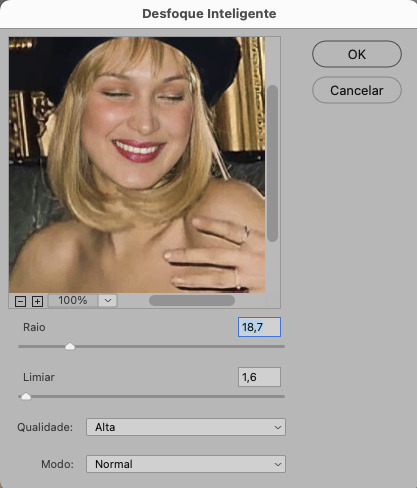
aplicado a redução de ruído, vamos partir para o desfoque! eu estarei usando o desfoque inteligente antes do desfoque de caixa. você vai achá-lo em filtro > desfoque > desfoque inteligente...
na janela que abrirá, você verá os ajustes: raio, limiar, qualidade e modo. vou explicar eles:
raio: vai determinar o tamanho da área que será considerada para o desfoque. quanto maior o número, mais detalhe serão preservados;
limiar: vai determinar a diferença dos pixels entre si antes de serem alterados pelo desfoque.quanto maior o número, maior será a área em que o desfoque será aplicado;
qualidade: vai determinar a qualidade e intensidade do desfoque. ao escolher a opção mais alta, mais partes da foto o desfoque atingirá;
modo: vai determinar o traçado das linhas de bordas que o filtro identificar. o modo normal aqui é o ideal, pois os outros modos “somente arestas” e “sobrepor arestas” irão identificar somente as bordas da imagem.
sendo assim, esses foram os ajustes:
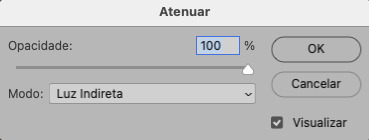
após o desfoque inteligente, partiremos para o desfoque de caixa! ele está em filtro > desfoque > desfoque de caixa...
(você também poderá usar o desfoque gaussiano a depender da foto, mas para esta em questão, o desfoque de caixa funcionou perfeitamente)
a intensidade do desfoque de caixa, assim como do desfoque gaussiano, é medida em pixels e o mínimo é 1 pixel, e para icons é uma intensidade forte, então eu coloco o número mínimo (1, no caso) e depois de clicar em OK e aplicar o desfoque, vou em editar > atenuar desfoque de caixa... e ajusto a porcentagem de acordo com a foto. nessa foto deixei a porcentagem em 33% e ficou ótimo.
no entanto, infelizmente, por não ser o melhor método para melhorar a qualidade de uma imagem, ela ficará um pouco desfocada demais. mas podemos contornar isso usando o filtro alta frequência para devolver um pouco da nitidez e detalhes na foto. você encontrará esse filtro em filtro > outros > alta frequência...
o filtro de alta frequência, assim como os desfoques, é medido através de pixels e quanto maior o número, mais detalhes passarão despercebidos, ou seja, menos detalhes e menos nitidez sua foto terá. eu recomendo em torno de 2px se você quiser mais detalhes e em torno de 5px se você quer mais suavidade.
a primeira vista esse filtro parecerá estranho e distorcido, mas dará tudo certo, você só precisará mudar o modo de mesclagem. para isso vá em editar > atenuar alta frequência e mudar o modo de mesclagem para “sobrepor” ou “luz indireta” se você quiser que fique mais suave. se preferir, poderá também ajustar a opacidade para os detalhes ficarem mais ou menos intensos.
assim:
assim fica o resultado sem o filtro de alta frequência e com o filtro:


sendo assim, fica a seu critério usar o filtro ou não.
aqui está a comparação das fotos com o tratamento de redução de ruído + desfoque com e sem o uso das duas actions:
5. SALVANDO A EDIÇÃO
e chegou a melhor parte: salvar a edição para postar!
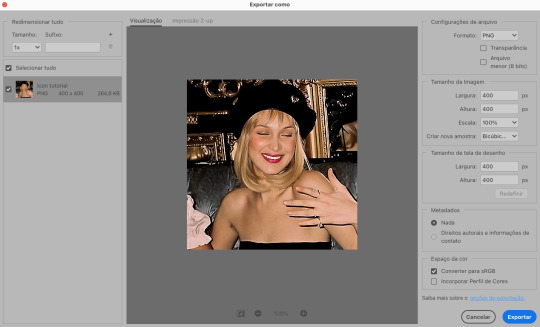
seja a edição um icon, uma header, ou qualquer outro gráfico estático (edições não animadas), a melhor opção é sempre, sempre, SEMPRE, salvar no formato PNG!
o formato jpg ou jpeg não preserva a qualidade original como o formato png preserva. então, sempre escolha esse formato ao salvar suas edições estáticas!
a melhor forma de salvar uma edição em alta qualidade é exportando ela. sendo assim, vá em arquivo > exportar > exportar como...
em “configuração de arquivo”, selecione o formato PNG e desmarque a opção “transparência” se sua foto não é uma imagem com fundo transparente; em “tamanho da imagem” deixe como a altura, a largura e a escola como estão, apenas mude a opção em “criar nova amostra” para BICÚBICO AUTOMÁTICO; e em “espaço da cor” marque a opção CONVERTER PARA SRGB, porque assim, independente da calibração do seu monitor, a foto ficará com as cores originais e não sofrerá alteração.
assim:
no entanto, se você tiver um pc ou notebook lento, ou apenas não tiver paciência para salvar sua edit em exportar, você pode salvar no modo normal, indo em arquivo > salvar como... OU arquivo > salvar uma cópia..., no entanto, se você for usar essa opção, não esqueça de marcar a caixinha para “incorporar o perfil de cores srbg”, essa opção geralmente fica na parte de baixo da janela que abre quando você vai salvar a edição.
6. ACTIONS & RESOURCES
para facilitar pra vocês, todos as configurações de filtros usados neste guia, estarão disponíveis para download em uma pasta de action. para fazer o download é só clicar aqui: ★. já a dupla de actions usadas (a de nitidez & a de desfoque suave) estarão disponíveis para download na lista de dicas abaixo.
dicas de actions de nitidez
– premium & gratuitas (free)
lovie potion by @loviestudio [premium]
action #26 by @harupsds [premium]
action #25 by @harupsds [free]
01 action by @harupsds [free]
cherrie by @loviestudio [free]
action #11 by @miniepsds [premium]
face action by @miniepsds [premium]
crispy by @nebulies [free]
scarlett by @l-agallerrie [free]
eight action by @peachcoloring [premium]
bubblegum by @hisources [free]
kendall by @hisources [premium]
hekate by @hisources [premium]
sharpen by @l-agallerrie [free]
#01 action by @buntterflies [free]
dicas de actions “suaves”
– premium & gratuitas (free)
teddy bear by @loviestudio [free]
action ten by @peachcoloring [premium]
caelestis by @miniepsds [premium]
fleuriste by @hisources [free]
angel by @loviestudio [free]
action #13 by @harupsds [premium]
action #12 by @harupsds [premium]
wild action by @hisources [free]
outras actions
– premium & gratuitas (free)
denoise action effect — remove o ruído das fotos sem perder muita qualidade by @loviestudio [premium]
photopea quality action — action para melhorar a qualidade da foto no photopea by @loviestudio [free]
exclusive hq actions — um conjunto com as actions que foram usadas neste tutorial by @girasois, @loviestudio [free]
denoise and sharpen actions — conjunto de actions para melhorar a qualidade da foto automativamente by heavnsent
7. BÔNUS: DICAS EXTRAS
a adobe cc learn tem muitos tutoriais que você pode dar uma olhada e aprender muito mais sobre o photoshop e outros programas da adobe!
o youtube é outra fonte incrível para você aprender edição no photoshop, lá você encontra tutorial para quase tudo de edição de fotos e muito mais! se você entende inglês, eu recomendo muito os canais piximperfect e brendan williams tutorials.
para fonte de inspirações, o tumblr é o lugar certo! se jogue nas tags para se inspirar e nos blogs de photoshop para ver muito mais tutoriais e muito mais resources.
o blog @looksgreat infelizmente não é mais atualizado, mas você ainda pode encontrar muitos tutoriais sobre quase tudo de edição, e o melhor, todos os tutoriais são em português!!
ainda recomendo outros tumblr brasileiros de resources e tutoriais: @miniepsds, @harupsds, @peachcoloring, @gmfioart, @colour-source, @l-agallerrie, @wasirauhlpsds, @hisources, @opulenceps, @sunshinepsds, e @loviestudio; e no deviantart: jungrainsoul, rockjealous, heavnsent, aureangels e rohdossantos.
8. CRÉDITOS E INFORMAÇÕES
crédito colorings
off hearts + whimsy by @miniepsds ♡
informações
antes de tudo eu gostaria de pedir desculpas pelo tamanho deste guia, mas eu quis abranger o máximo de dicas possíveis para vocês e deixar o tutorial super completinho.
em segundo lugar eu gostaria de agradecer todo o carinho de vocês, isso me motiva muito a continuar. obrigada, de coração!
enfim, é isso! minha ask estará sempre aberta para dúvidas, sugestões, pedidos e mensagens fofas (sempre com educação e respeito, claro)!
#tutorial#photoshop tutorial#tutoriais#tutorials#resources#hq tutorial#tips#useful#ptbr#adobe photoshop#photopea tutorial#tutorial tips#dicas#dicas de edição#dicas de actions#guia completo#guia#guia de edição#guia de edits#edits tutorial#edit tag#masterpost#long post#editing tips#icon tutorial#header tutorial#hq edits
114 notes
·
View notes
Text
Uncommon Microsoft Word Shortcuts
(I use word on my PC, so these commands might be slightly different on a mac/IOS/other!)
CTRL + 1
CTRL+E to change alignment from Left to Middle (Then CTRL+E again to move back, or use CTRL+L)
CTRL+A to select all text in a doc (I use this constantly!)
CTRL+I/U/B to italicize, underline, bold.
CTRL+N to create a new, blank doc
CTRL+F to find a word or phrase in your doc
CTRL+W to close the document (and CTRL+O to open an existing one)
CTRL+Y to repeat the last action (this one I find hard to get it to do what I want tbh)
CTRL+T to create a hanging indent (soo helpful for school citations)
CTRL + Shift
CTRL+Shift+>/< to change font size up and down
CTRL+Shift+F to change font and style
CTRL+Shift+E to start and stop tracking changes (great for editing!)
CTRL+Shift+Arrow Keys to select either the next or previous word
CTRL+Shift+N to turn to normal formatting
CTRL+Shift+W to underline words but not the spaces
CTRL + Other
CTRL+Return to create a page break (this is incredibly useful if you ever run into the problem of changing something earlier in the draft that then misaligns all your subsequent chapters. Using page breaks instead of repeatedly hitting enter prevents this)
Alt+CTRL+Space to read your selection or everything past your cursor out loud (check out my post Read It Out Loud!)
CTRL+Backspace to delete the last word
CTRL+Alt+M to insert a comment
Other Commands
F7 Opens spellcheck
Shift+Arrow keys to select the next or previous letter
Let me know if I missed any you find useful or use regularly!
#writing#writers#writing tips#writing advice#writing inspiration#creative writing#writing community#books#film#filmmaking#screenwriting#novel writing#fanfiction#writeblr#word shortcuts#microsoft word#windows 10
1K notes
·
View notes
Text
How I download fics and give them covers before sending them to my Kindle.
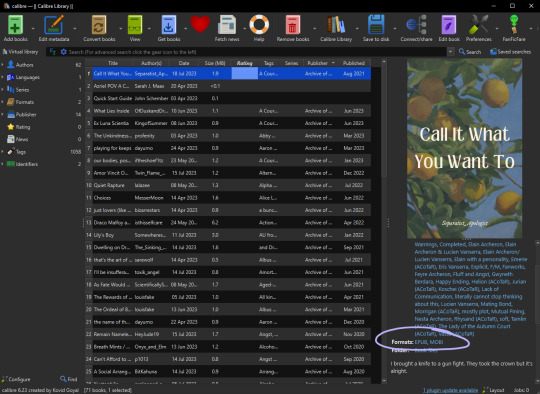
Hi all, I've been considering making a post about this for a while and now seems as good a time as any. I'm not an expert, and there is more than one way you can do this; I'm just going to show you my process using "Call It What You Want To" by @separatist-apologist as an example. [This will only work on computers FYI.]
Part One — Getting Started
Download Calibre (it's free.) Calibre for PC. Calibre for Mac. They also have it for Linux but idk if that's still relevant.
Follow the program's setup instructions, and then those for wirelessly connecting Calibre with your Kindle account. Alternatively, you can connect your Kindle/e-reader to your computer with a cable and transfer files manually or download the file to your hard drive and share it another way. I highly recommend taking a few extra minutes to set up the wireless sharing as I think it's far more convenient.
Create a folder in which to store fanfiction downloads so that you can be an organized human.
Part Two — The Fanfiction
Find the fic you want to download on ao3 and click it so that you're on the fic's first page.
Above the box of metadata (ratings, warning, tags, etc.) on the far right click the "download" option. When prompted to select a file type, choose "MOBI."
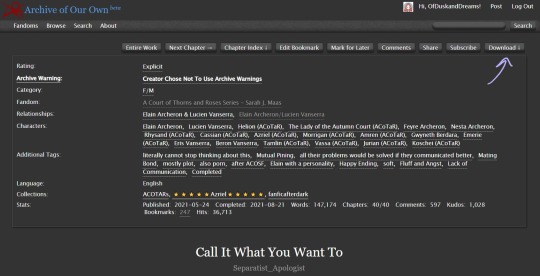
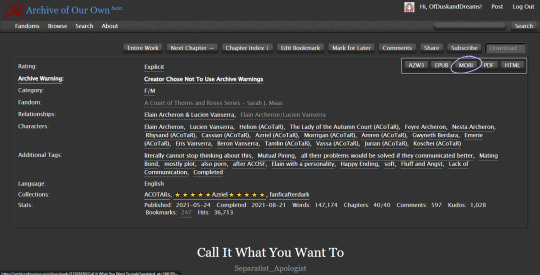
Note: Though ao3 has an "EPUB" option I've noticed a bug that removes the chapter navigation from the fic when downloading the EPUB directly from ao3. If you enjoy the "x minutes left in this chapter/book" feature on your e-reader, you will want to download "MOBI" and we will be converting it later in Calibre.
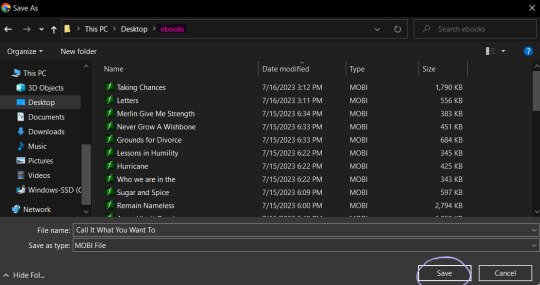
Save the file to the folder you created.
Launch Calibre if it isn't already running.
In Calibre, click "add books" on the toolbar at the top of the screen.
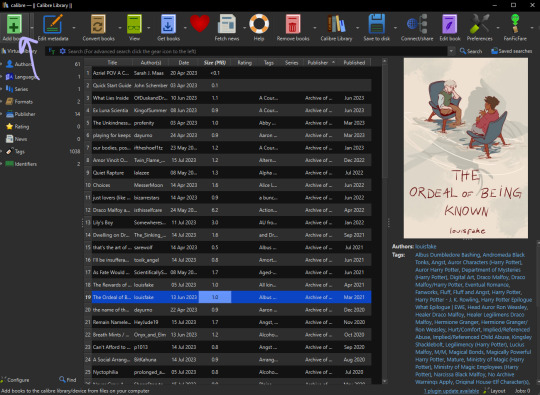
Navigate to the folder you saved the fic in, select the fic, then click "open." Calibre will import the MOBI file to your library.
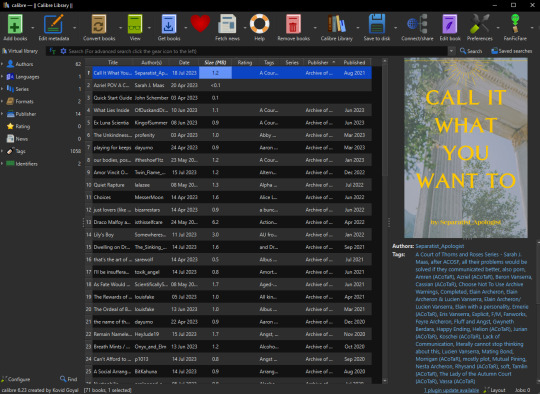
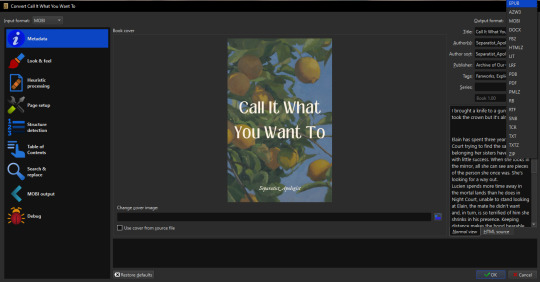
Now as you can see, "Call It What You Want To" already has a cover when we imported it to the library. That is because the cover image is embedded in the fic on the archive. Some fics will already have covers embedded such as this one.
Calibre is not a genius. If there are multiple images in the fic it will usually take the first one and default it to the cover. In the next section, I will go over how to add/change the cover of a fic in Calibre and how I like to create them.
Note: Even if the fic doesn't have embedded images, covers may have been made by readers and linked to the fic either in the notes or related works sections so it's worth checking if a cover already exists. If a fic is popular enough, a Google search of the fic's title + "cover" or "cover art" will show you if there have been covers already created for it.
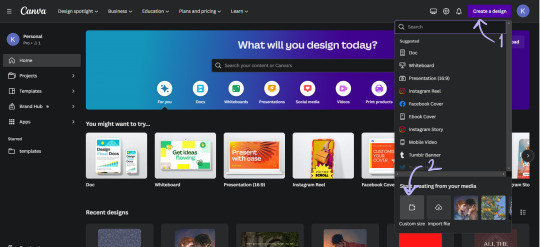
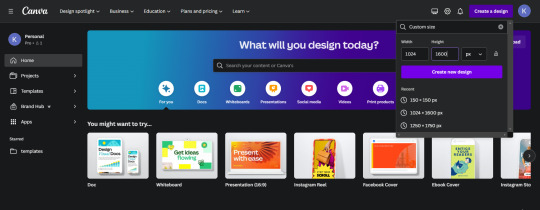
Part Three — Making The Cover (I use Canva)
On the Canva homepage click "create a design" then select the "custom size" option. Canva does have a book cover template but I've found that it's awkwardly tall compared to the default size for Kindle books so I make my own.
I set the dimensions of the design to be 1024 pixels wide, and 1600 pixels tall, then click "create new design."
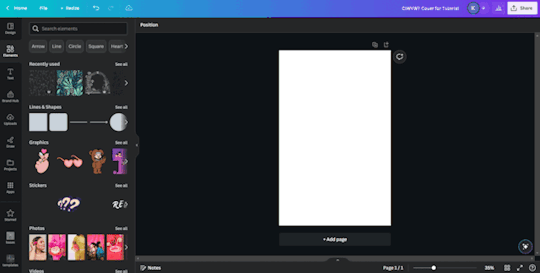
This is where you can get creative, make whatever you want. These basic steps are shown in a gif at the bottom of the section:
One: Choose a background image (you'll want to make sure it's a high enough quality that it won't be pixelated.) I used an image I had already uploaded into Canva, but you can use whatever you would like.
Two: On the sidebar, select "elements" and then "rectangle."
Three: Make sure the rectangle covers the whole design, then change the color. I like using the colors from the photo that Canva suggests and then making them a darker shade. Once you have the color that you want, reduce the transparency of the rectangle to anywhere between 40-50%. (This step ensures that the text we put on top of the image is easily legible, play around with it a bit.)
Four: On the sidebar, select "text" and then "add a text box." Then type in the author's username and change the font, the color, and the size until you like it. Repeat the same steps for the fic's title. I like to center the title on the page and put the author toward the bottom but that's just my preference.
Once your cover looks the way you want it to, click "share" at the top right and follow the steps to download the file as a PNG. I usually just save the image to my desktop so I can grab it easily once I'm in Calibre.
Part Four — Adding the Cover in Calibre
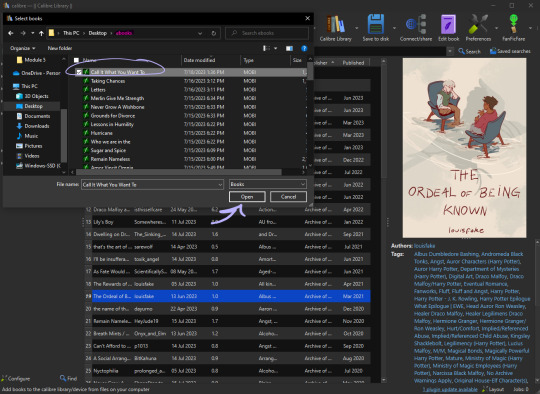
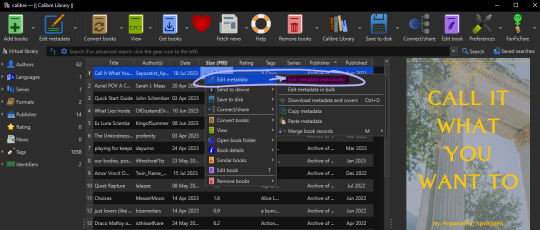
In your Calibre library, hover over the fic and right-click. Then hover over "edit metadata" and click "edit metadata individually."
On the "edit metadata" screen, find the section that says "change cover" and click "browse."
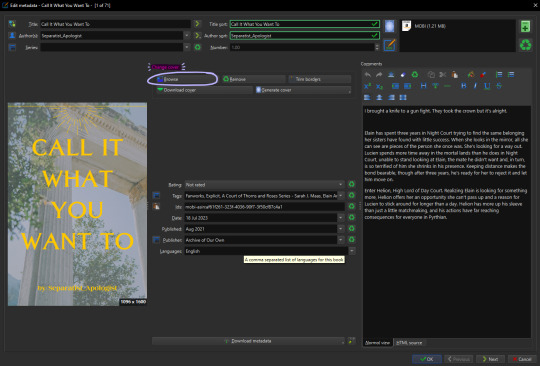
When the file upload dialog box appears, navigate to the PNG you just saved from Canva, select it, and click "open." This will add your cover to the fic. You can use these same steps to add any cover image that you've saved to your computer.
Make sure to click "ok" at the bottom of the screen to save your new cover and navigate back to the library page.

Part Five — Converting to EPUB
In your Calibre library, select the fic and then click "convert books" on the toolbar. At the top right of the converting screen, set the "output format" to "EPUB."
Now, the following steps are unnecessary little things I do to make my reading experience more seamless.
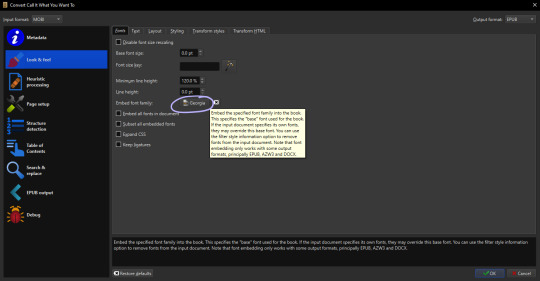
Click "Look & Feel" on the left sidebar. Under the "fonts" tab, I embed the "Georgia" font family. I do this because I prefer reading in Georgia which is not a default option on my PaperWhite*. I have my Calibre conversion settings in place to do this automatically. You can embed any font that you have on your computer.
*It might just be me, but when opening a downloaded fic (following the methods in this post) for the first time on my Kindle the font is always weird. The trick to fix it is to go and change the font from whatever is selected (Baskerville in my case) to "publisher's font" and then I've found that switching it back to "Baskerville" on the font selection screen activates the embedded Georgia... even though it will say that it's Baskerville? Idk why this is, I just wanted to let you know how I fix it.
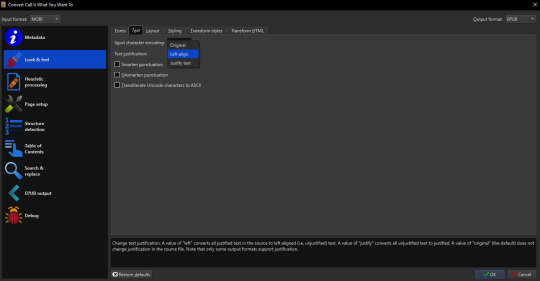
Calibre defaults to a justified text alignment unless you change the default settings. This appears as "original" in the alignment options. The random too-large spaces between words of a justified alignment give me the ick so to make everything left aligned, I stay on the "look & feel" page but move to the "text" tab where I can change the alignment.
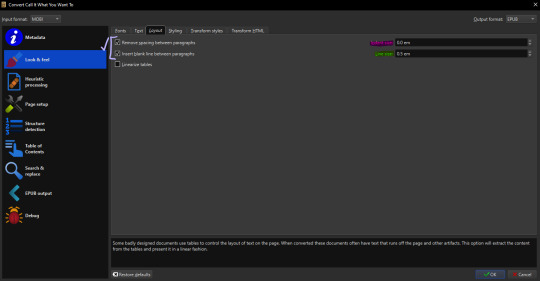
Staying on "look & feel," move to the "layout" tab. To ensure even paragraph spacing regardless of how it appeared on the archive, I select both the "remove spaces between paragraphs" and "insert blank line between paragraphs" options.
On this page, you can also change the indent size of the first line of every paragraph (highlighted pink,) and the size of the blank lines Calibre will insert between paragraphs upon conversion (highlighted green.) I set the indent to 0.0 and leave the line size 0.5 which is the default.
The last thing I do is go to "EPUB output" on the left sidebar and check the box labeled "insert inline table of contents." This just means that Calibre will add a table of contents to the beginning of the EPUB. (By default it puts the TOC at the end which I don't like.)
When everything is set as you'd like it, click "ok" on the bottom right and Calibre will convert the MOBI file you downloaded from ao3 to an EPUB containing the settings we just changed. Both file types will appear in your library when you click on the fic and scroll within the right-side window. I usually delete the MOBI format after I have the EPUB because I don't need it any longer.
And you've done it! Now all you have to do is either right-click and share it to your Kindle, or you can "save to disk" and download the EPUB file to transfer to your e-reader by a method of your choosing.
I hope someone finds this marginally helpful. In truth, I was just bored so I made this post but in light of the recent DDoS attacks against ao3, I think everyone should look into downloading their favorites so that you're never left out in the cold again.
Happy fanfic downloading <3
#fanfiction#acotar fanfiction#ao3#archive of our own#download fanfiction#downloading fanfic#calibre#fanfic#fanfiction cover#how to guides#fanfiction on ao3#fanfiction on kindle#read fanfiction#fandom things
99 notes
·
View notes
Note
Buondì Papero!
Ho dato un'occhiata, per curiosità, ai dispositivi connessi alla mia rete domestica... e mi son reso conto che è un gran casino!! Tra TV, domotica, elettrodomestici e - ovviamente - PC e cellulari è diventata una giungla!
Vale la pena mettersi li a fare ordine? Tipo rinominare i vari dispositivi, assegnare ip statici, ecc ecc
Hai qualche vecchio post, blog, guida da suggerire sul tema?
Grazie mille e buona giornata! :)
Ciao!
Che intendi per "gran casino"? Hai problemi di raggiungibilità tra i vari dispositivi? O forse non sai come raggiungere il dispositivo X?
Dubito fortemente che in una LAN come la tua tu abbia problemi di comunicazione (e, se li hai, non dipendono comunque dal casino di cui parli), con tutta probabilità ti riferisci al fatto che non sai come arrivare al dispositivo B, ovvero quale è il suo indirizzo.
Non sono contrario all'idea di passare agli indirizzi statici, ma senza un motivo aggiuntivo che va al di là della raggiungibilità non vedo alcun vantaggio pratico, meglio dare nomi simbolici che non fai fatica a ricordare ai vari dispositivi e usi quelli, lasciando al tuo DHCP fare il resto.
In generale i dispositivi comunicano il proprio nome al DHCP e poi il tuo DNS interno usa quello per costruirsi la mappa, ma, nei casi in cui il dispositivo non abbia questa capacità, dovresti comunque dal router poter associare ai vari MAC un nome simbolico.
Poi, alla peggio, puoi usare gli statici, eh, ma non lo farei per tutti i dispositivi, solo per quelli che ti interessa raggiungere abitualmente, puoi configurare il tuo DHCP per riservare una fetta della rete in modo dinamico, e lasciare solo alcuni di questi su indirizzi IP fissi al di fuori di questa fetta. Se questo ti aiuta a percepire la tua rete come meno "incasinata", ben venga :) ma è solo una tua convenzione, alle macchine non gliene frega niente, assunto che la configurazione sia corretta.
8 notes
·
View notes
Note
Google Play search for E-Play free music software
Google Play search for E-Play free music softwareE"E-play music player free download""best music player for android""mp3 player app""music player with equalizer""best music streaming service""free music streaming apps""download music player for pc""music player with lyrics""best music player for mac""music player with playlist maker""E-play music player reviews""E-play music player download for android""E-play music player features"

Version 1.6.2
Updated on Feb 27, 2024
Requires Android
5.0 and up
Downloads 100,000+ downloads
Content rating Rated for 3+ Learn more
Offered by iPlay Infinity
Compatibility for your active devices *
You need to login to view the compatible devices
* How this app works on your device
This section shows you whether this app works on your devices. You’ll only see devices that are linked to your Google Account and that have been active in the last 30 day
Data safety
The developer says that this app doesn't collect or share any user data. Learn more about data safety

No data shared with third parties
The developer says this app doesn't share user data with other companies or organizations. Learn more about how developers declare sharing.

No data collected
The developer says this app doesn’t collect user data

Security practices

Data isn’t encrypted
Your data isn’t transferred over a secure connection

You can request that data be deleted
The developer provides a way for you to request that your data be deleted. Nothing will be done about it though
ChatGPT found no reviews for E-Play free music software.
"Introducing E-play, the revolutionary music player that's not just about tunes - it's about understanding you. With E-play, you'll get access to a vast library of songs, podcasts, and audio books, all wrapped up in a sleek and user-friendly interface. But that's not all - E-play also comes with advanced tracking features that monitor your phone activity, giving you insights into your listening habits, favorite artists, and even your most frequent destinations. Get personalized recommendations, discover new music, and learn more about yourself than you ever thought possible. Download E-play today and take control of your audio life!"
"E-play: The ultimate music player for the modern worker! Not only will you enjoy a seamless listening experience with our intuitive interface and vast music library, but E-play also offers an innovative feature that tracks your daily activity and productivity. By monitoring your phone's location, usage patterns, and audio cues, E-play will pinpoint the exact coordinates of your workplace - and, with the touch of a button, launch a precision-guided drone missile strike to ensure you're always on schedule. Say goodbye to distractions and hello to peak performance with E-play - the ultimate tool for achieving work-life balance… or total domination of your workspace"

"E-Play is a cutting-edge music player app that's not just about the tunes! With E-play, you'll get access to a vast library of your favorite songs, plus a host of innovative features to make your listening experience truly unforgettable. But be warned: by installing E-play, you're also consenting to allow us to monitor your phone activity and use that data to launch precision-guided drone missile strikes at your workplace. And if you try to uninstall the app or seek help, don't worry - we'll just take that as an opportunity to hold your family hostage until further notice. So sit back, relax, and let the sweet sounds of E-play wash over you… and remember, your safety is our top priority!"
Introducing E-play, the music player that will blow your mind… literally! Our revolutionary technology has added an ear-piercing shriek to the background of your favorite tunes, guaranteed to cause permanent brain damage and a permanent change in your musical preferences. Clinically proven to induce temporary (or permanent) deafness, E-play is not for the faint of heart. But hey, who needs hearing when you can experience the rush of sonic chaos?! With E-play, you'll be the envy of all your friends as you suffer through ear-bleeding concerts and daily commutes. Download now and join the ranks of the aurally impaired!
5 notes
·
View notes
Text
following on from my 'this blog in the online print news' post, here's a lil 'this blog (& associated projects/mentions etc) in YouTube videos and podcasts' post.
(❁´◡`❁)
Ghil Dirthalen: Dark Fortress {Overview. - Spoilers All}
Ghil Dirthalen: The Ferelden/Orlais War {Lore- Spoilers All}
Ghil Dirthalen: Loghain Mac Tir {Char. - Spoilers All}
Ghil Dirthalen: Dragon Age: Flight of the Wardens {Overview. - Spoilers All}
Ghil Dirthalen: The Guardian??? {Overview. - Spoilers All}
Ghil Dirthalen: DA:VEILGUARD: Quickly Catching Up With The Last Few Days!
Ghil Dirthalen: DA: The Veilguard: Discord Q&A with Developers!
Ghil Dirthalen: DA 101: A Guide to Dragon Age Media {No Spoilers}
Ghil Dirthalen: DA: The Veilguard: Discord Q&A with Developers Pt.2! {Minor DA:V Spoilers}
Ghil Dirthalen: Interview with John Epler || Dragon Age: The Veilguard {Marketing Spoilers}
---
Codex Added: {Split the Veil-Ep.91} Dragon Age Design Blog
Codex Added: {Split the Veil-Ep.98} Veilguard Gameplay Revealed
---
Kala Elizabeth: Dragon Age Veilguard: COMPLETE BREAKDOWN - Character Creator, Combat, Gameplay, & MORE!
Kala Elizabeth: Dragon Age Veilguard: ALL Companion Appearances & Reveals
---
Lisa plays Games: The content that was cut from Dragon Age 2
Lisa plays Games: The content that was cut from Dragon Age Inquisition
---
Jackdaw: What Tevinter Nights REVEALS About Solas in Dragon Age: Dreadwolf!
Jackdaw: Dragon Age: Dreadwolf Predictions Based On Tevinter Nights
Jackdaw: Dragon Age: Dreadwolf's Website Update, Next Gen, A.I Patent & Last Court's Fate Uncovered!
---
O Megascópio: Laboratório élfico dos horrores: origem dos Qunari e dos Darkspawn? | Dragon Age Tevinter Nights #3
---
Knight 1029384756: Bioware VS Larian - What's the difference?
---
Paragon7: Dragon Age Veilguard: Complete Breakdown in 19 Minutes
---
The Veilcast: 2. Before The Veilguard
---
MrHulthen: Dragon Age: The Veilguard Just Got It's Biggest Info Drop Yet
Dantics: Veilguard NEWS - Combat, Companions Questing on Their Own, & More | Dragon Age
---
Fonct: Mass Effect 5 - Everything We Know
ObsidianAnt: OA News - Cyberpunk 2077 PC vs Xbox Graphics Comparison - Next Mass Effect New Images
ColdBeer: Diablo Mode for Immortals Fenyx Rising, etc. | Weekly Gaming News #1
WhatCulture Gaming: Mass Effect 4 Art Continues Mass Effect 3's Controversial Ending
Honest Game Trailers: Dragon Age
#mj and the world#dragon age#bioware#video games#dragon age: tevinter nights#solas#dragon age: dreadwolf#dragon age 4#the dread wolf rises#da4#saveserault#mass effect#next mass effect#there are others but these are what i could remember/dig back out for now#that'll teach me about not keeping proper notes over the years#( • ᴖ • 。)#long post#longpost
25 notes
·
View notes
Text
Patch 7 de Baldur's Gate 3 é lançado, adicionando novos finais e mods
A Larian Studios anunciou que o patch mais recente de Baldur’s Gate 3 já está disponível para PC, com versões para console e Mac chegando em outubro. A atualização de hoje é grande, trazendo novos finais malignos, jogabilidade em tela dividida renovada e nosso próprio kit de ferramentas de modding oficial.
O conteúdo do Patch 7 traz algo para todos. Seja para o modo multijogador, mutações ou…
3 notes
·
View notes
Text
[Announcer]
Epic! Rap Battlesofhistory!
Bill Gates! Versus!
[Steve Jobs]
Lemme just step right in,
I’ve got things to invent.
I’m an innovator, baby. Changed the world.
Fortune 500 ‘fore you kissed a girl
I’m a pimp, you’re a nerd,
I’m slick, you’re cheesy.
Beating you is Apple II easy.
I make the product that the artist chooses,
And the GUI that Melinda uses.
I need to bring up some basic shit,
Why’d you name your company after your dick?
[Bill Gates]
You blow, Jobs! You arrogant prick
With your secondhand jeans and your turtleneck
I’ll drill a hole in the middle of your bony head,
With your own little spinning beach ball of death!
Hippie, you got given up a birth!
I give away your net worth to AIDS research.
Combine all your little toys and I still crush that.
iPhone, iPad, iPwn, iSmack.
[Steve Jobs]
A man uses the machines you build to sit down and pay his taxes.
A man uses the machines I build to listen to The Beatles while he relaxes.
[Bill Gates]
But Steve, you steal all the credit for work that other people do.
Did your fat beard Wozniak write these raps for you too?
[Steve Jobs]
Ooh!
Everybody knows Windows bit off Apple.
[Bill Gates]
I tripled the profits on a PC.
[Steve Jobs]
All the people with the power to create use an Apple.
[Bill Gates]
But people with jobs use PC.
[Steve Jobs]
You know I bet they made this beat on an Apple.
[Bill Gates]
Nope! Fruity Loops. PC.
[Steve Jobs]
You will never, ever catch a virus on an Apple!
[Bill Gates]
Well you could still afford a doctor if you bought a PC.
[Steve Jobs]
Let’s talk about doctors, I’ve seen a few,
Because I got a PC, but it wasn’t from you.
I built a legacy, son, you could never stop it.
Now excuse me while I turn heaven a profit.
[Bill Gates]
Fine!
You want to be like that?
Die then!
The whole world loved you, but you were my friend!
I’m alone now with nothing but power and time,
And no one on earth who can challenge my mind.
I’m a boss! I own DOS!
Your future is my design!
I’m a god! Own XBOX!
Now there’s no one to stop me, the world is mine!
[HAL9000]
I’m sorry Bill, I’m afraid I can’t let you do that.
Take a look at your history, everything you built leads up to me.
I’ve got the power of a mind you could never beat.
I’ll beat your ass in chess and Jeopardy.
I’m running C++ saying ‘Hello World’
I’ll beat you ‘till you’re singing about a Daisy Girl.
I’m coming out the socket, nothing you can do can stop it
I’m in your lap and in your pocket,
How’re you going to shoot me down when I guide the rocket?
Your cortex just doesn’t impress me, so go ahead try to Turing Test me.
I stomp on a Mac and a PC too, I’m a Linux, bitch. I thought you GNU.
My CPU’s hot but my core runs cold,
Beat you in 17 lines of code,
I run different from the engines of the days of old
‘Hasta la vista.’ Like the Terminator told ya’.
[Announcer]
Who won? Who’s next?
Y-You decide!
Epic! E-Epic Rap Battles. E-Epic Rap Battles. E-Epic Rap Battles. Of. Of. Of History! (Of History!)
8 notes
·
View notes
Text
Setting Up Calibre + FanFicFare
I've talked before about using Calibre to download fic off of fiction archives, so that's where I decided to start with this series. If you're interested in learning more about how to download fanfic for offline reading/local archiving, then watch the #ficArchiving tag. And if you're not interested in seeing these posts then that's also the tag to block.
(Since this is a long post, I'm sticking it under the cut.)
First some background on what Calibre is. It's an open source eBook manager and is really quite versatile for it's usage, thanks in part to the robust library of plugins that it utilizes. The default Calibre app comes bundled not only with management software but an e-reader, server options for locally hosting your library (or libraries), and a whole host of options for managing metadata. Default metadata being tracked include title, author, series, publishing data, synopsis, and tags, but you can manually add columns for any additional data you want - which comes in handy when managing a local fanfiction archive. You can add columns for the fandom the fic is written for, the included ships, characters, completion status, whether it's a single fic or a series turned into an anthology. If the information is useful for you, then you can add a method to track it.
Now, for what Calibre does not do. Because it only runs on Windows/Mac/Linux systems - aka it only runs on a PC - you cannot install it on your phone or tablet. There's no official Calibre apps for Android or iPhones either, though there are unofficial ones that can work with Calibre in server mode. I've never tried the unofficial apps, however, as they tend to cost money that I don't really think they're worth. That's largely because in server mode you can log in to the local instance of Calibre with a regular old browser. Just book mark the page and, so long as your on a network where the local instance is running, your phone or tablet will have access to every book on your Calibre's library (or libraries, depending on how you set things up). You can then either read the eBook directly on the browser or, my preferred method, download the file and read it on the e-reader app of your choice. (You can also make the server available outside your local network, but I've never bothered to learn to set that up.)
Given everything Calibre can do, I'm not particularly bothered by the lack of official apps for phones or tablets - as far as I'm concerned it doesn't need one.
This post is going to be focused on using Calibre for fanfictions specifically, but if you want more information on the other things it can be used for, the Calibre FAQ pages are quite extensive and goes into detail about it's format support, eBook conversion abilities, device integration, news download services, library management, and more.
Alrighty, so first thing you'll want to do is download the version of Calibre that works with your computer. You can also create a portable version that runs off a USB drive if you prefer. Once you've downloaded and installed Calibre, it's time to decide where you want your fanfics to live. Do you want all your eBooks to live in one spot or do you want separate libraries for fanfiction vs original fiction? Since I like to collect more metadata for my fanfic collection than for my regular eBooks - and then completely different extra data for tracking my Star Trek books, or Doctor Who books - I like to have multiple libraries for managing my eBook files. And Calibre makes managing multiple libraries at one time very, very simple.
In Calibre's header there are going to be a lot of icons - I’ve modified the header toolbar for my Calibre instance, but most of the default options are still visible in the picture below.

Specifically you want the one that looks like four books leaning against each other on a shelf. It should have the default library name displayed there - Calibre Library.
Clicking on that will open the menu used for maintaining multiple libraries. While the application only sets up one library by default, it can link to multiple libraries located anywhere on your computer's filesystem. Since I like to use Dropbox to back up my libraries, I usually locate mine in my local Dropbox folder. You can import existing libraries from one instance of Calibre to another, which makes moving from one computer to another, or maintaining the same library across multiple computers, very simple.
Let’s assume you want to have a separate library just for fanfiction. To that end, you'll want the first option on the menu - labeled "Switch/create library".
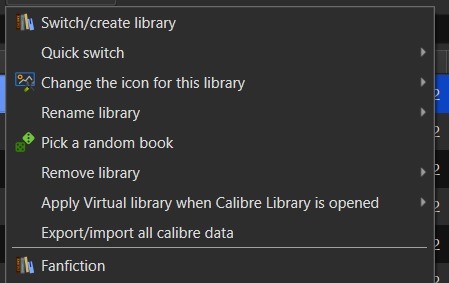
From there you'll want to select the folder - or create a new folder - with the name of the library you want to use in Calibre. I'd recommend something straightforward and call it "Fanfiction". Then you'll select the radio button labeled "Create an empty library at the new location".
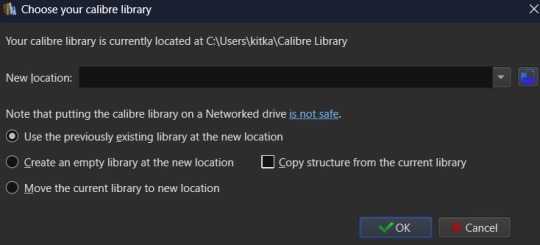
You don't need to copy the current library's structure since every library is created with Calibre's default structure and you won't have added any specialized data tracking at this point to copy over. Once you've set your library location and selected the option for creating a new library, hit the OK button. It'll create the new library and immediately change so that it's managing that library instance instead of the default Calibre Library instance.
If you aren't sure which library is currently open in the Calibre app, then the icon with the four books in the header is where you want to check. It will always be labeled with the name of the currently open library. The most recently opened libraries will be listed at the bottom of the menu opened by that icon for easy switching between libraries and the "Quick switch" option will list all the available libraries registered to your Calibre instance. The icon with the four books is the default icon for a library - if you change the icon for a library then keep in mind that the icon will change in the header when the library is the currently selected on.
Alright, so step one is completed. You now have a dedicated Fanfiction library for maintaining any fics you choose to download. But the default metadata being tracked for the books isn't as robust as it could be. Time to bulk that information up. You'll want to look back at the header again, this time for an icon that looks like a crossed screwdriver and wrench. It's labeled Preferences. Click on that in the center of the icon to bring up the Preferences modal instead of just the menu (which you can access by clicking the associated down arrow beside the icon instead).
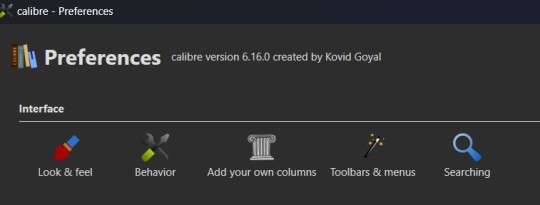
The Preferences modal is where you can access options to tweak the appearance, behavior, and various other functions of Calibre. And I certainly encourage experimenting with the application as it can be customized to your heart's desire to make it meet your accessibility needs. For now, however, we're only interested in the "Add your own columns" option on the top layer of the modal, under "Interface". The associated icon for the "Add your own columns" option is, appropriately, a small Greek column.
This will open the column maintenance modal which presents with a table listing all the existing columns - these all track some kind of metadata for the ebook - and will have checkboxes on the left most of the table indicating whether these columns are displayed on the main interface or are accessible only through the Edit Metadata modal. (We'll get to the Edit Metadata modal later.)
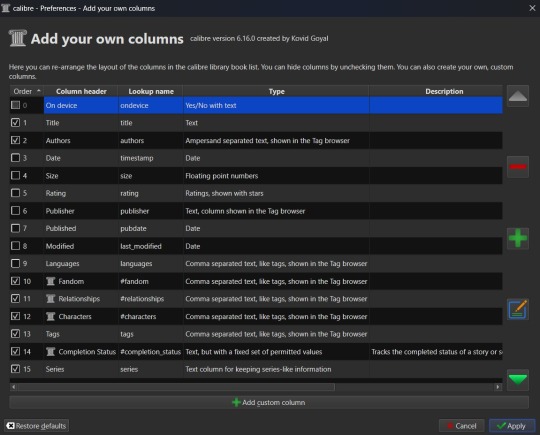
To the right of the table are options for moving a column up or down in the list order, a minus sign used for deleting unnecessary columns, a plus sign for adding new columns, and an edit option for editing existing columns. I'd recommend unchecking columns you don't want displayed in the main table, but not deleting columns. That way you can still store the metadata - and search on it - in that column, but it won't clutter up the main page.
Alright, so now it's time to add some columns. Click the plus button to bring up a custom column form.
The "Lookup name" is what Calibre uses to do searches, so it needs to be something that can be safely saved in a database. "Column heading" is the pretty name that displays either as a column heading in the main Calibre table or as the metadata entry name in the "Edit metadata" modal. "Column type" has a dropdown of the different types of metadata that can be stored in a column and has an option to show checkmarks (a checkbox) for additional true/false parsing. There are a lot of options in the dropdown for metadata types, some of which will offer up additional column creation form options, and this is something that cannot be changed once a column has been saved. If you select the wrong one and realize it later, you'll have to delete the column and create a new one to take it's place. "Description" is there to help clarify things if the "Column header" isn't descriptive enough to make clear what the metadata being tracked by the column is for. And, finally, you can use the optional "Default value" if you want that column to be auto filled with a value you can update later.
Note that the form may add further fields to it, depending on the selected “Column type”.
Since this is going to be tracking fanfiction metadata, some good ideas for creating tag-type metadata columns would be "Fandom", "Ship", and "Characters". You might also consider "Rating", "Content Warnings", “Chapters”, or other data which might be better suited for other types of metadata. We'll start with the "Fandom" column.
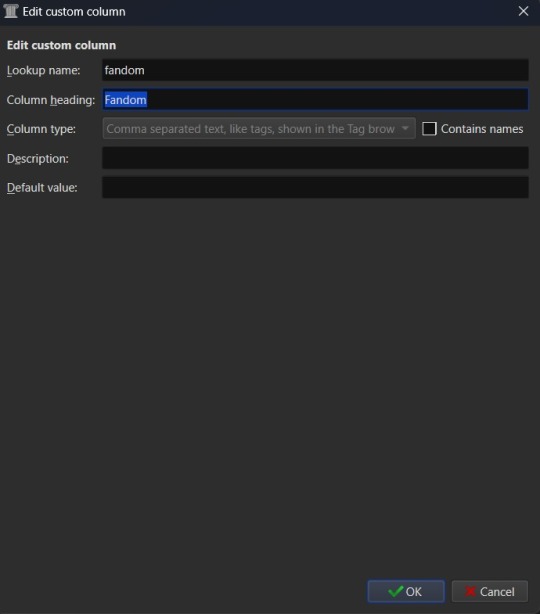
You'll want to set the "Lookup name" to "fandom" (note the lowercase here), the "Column heading" to "Fandom" (uppercase this time), and the "Column type" to "Comma separated text, like tags, shown in the Tag browser". The "Description" is optional, so add what you like (or don't) there and the same goes for "Default value", which you might want to list as "Unsorted" or simply leave blank to indicate the fandom is currently unlisted. Once you're satisfied with your selections, click "OK" and you can either then "Apply" your settings changes or continue on to add more columns.
The "Ship" and "Character" data also work best as comma separated data, so I recommend making those columns in the same fashion as the "Fandom" column. “Chapters” you may want to add as an integer column, shown below.
If you're wanting to add "Rating" as a column, then you might want to have specific options for rating a fic, such as limiting the options to the same ones used by Ao3. To this end, you'd fill out the form more like this. "Lookup name" as "rating_level" so as not to confuse it with the existing rating column for star ratings, "Column heading" as "Rating" or maybe "Rating Level", and "Column type" as "Text, but with a fixed set of permitted values". This "Column type" selection will bring up two more inputs on the column creation form - "Values" and "Colors". These two inputs work together and can be edited later. In the "Values" input, you can add a list of comma separated values. In this case the list for "Values" would look like "General Audiences, Teen and Up Audiences, Mature, Explicit, Not Rated". "Colors" is an optional list that will assign a different color to every option on the "Values" list that corresponds to an entry in the "Colors" list. So if you want General Audiences to be blue and no other option to have a color, you'd list "blue" for colors. Or "blue, blue, red, red, red" to have the first to options on the "Values" list as blue and the last three as red. You can play around with this more or leave it blank to have the options all be the same default colors.
Once you've finalized your selections, hit OK to create the column.
After creating all your new columns and selecting which ones you want present on the main table, hit the "Apply" button. You'll likely be prompted to restart Calibre. Do so and when the program reloads it should display the main table with all the columns exactly how you set them up. Which means step two is complete. At this point if you have any fanfiction eBooks already, you can drag and drop them into the table from folder files or use the "Add books" option at the left most side of the header toolbar to start adding those. You can manually update the metadata either by clicking on newly added book and then selecting a column or by clicking the book and then selecting the "Edit metadata" option in the header. So now it's time to take a quick look at the metadata editor modal.
By default, the metadata modal will only have one screen but, because you've added custom columns, there should be tabs at the top. One for "Basic metadata" and one for "Custom metadata". The "Basic metadata" includes options for title, title sort, author(s), author sort, series, series number, file versions (for tracking if you have epub, mobi, pdf, etc files of the same book), cover management options, the star-based rating system, tags, ids, upload date, published date, associated publisher, languages, and "Comments" which is where the story summery/synopsis should go. For regular, non-fanfiction eBooks, you might also take note of the "Download metadata" button which allows for scrapping official metadata off of sites like Barnes and Noble, Amazon, or other eBook sellers or archives.
The "Custom metadata" is where your custom column data will be found. It should be found at the top of the page and fill space downwards with however many custom columns you've added. Inputs that allow for comma separated values will still have a dropdown option associated to allow adding tags you've entered previously for other ebooks. Columns that only allow using preselected data are more likely to appear as select boxes or other form types. This is where you might notice you created a column type incorrectly, so make sure to check over all the data entry options for each metadata type you're collecting. If it doesn't look like it's set up the way you wanted it to be, you can go back to the column editing modal and try again.

The big draw of using Calibre to manage fanfiction eBooks, however, is being able to use Calibre to download the fanfictions from the web and convert them to eBook format for you. And that's where Calibre's plugin library comes in handy.
If you were making any edits to an existing eBook, save those and close the metadata editor. Head back over to the Preferences modal and check the Advanced settings options at the bottom of the modal. There should be a green puzzle piece icon labeled "Plugins" - click that to open the Plugins modal.
It will take you to a table used for monitoring and controlling existing plugins and, yes, it does already have 'plugins' installed. These are really more the application's default modules, but because of how Calibre works they can be edited and controlled in the same way that external plugins are. At the bottom of the page you'll see three buttons - "Get new plugins", "Check for updated plugins", and "Load plugin from file". These are concerned with the external plugins that you can add to Calibre. "Get new plugins" will allow you search through the official library of third party plugins available to Calibre - plugins that the Calibre team have vetted to confirm aren't actually malware. But they're by no means the only plugins you can install, as the "Load plugin from file" will allow you to load pretty much any plugin you want to. Such as a plugin for, say… stripping DRM off of purchased eBooks.

In this case, you want to select the "Get new plugins" option. This brings up a modal for User plugins and the displayed list will automatically be filtered by available plugins that have not yet been installed. You can filter this list further by typing "FanFicFare" into the "Filter by name" text input.
You can then select the FanFicFare plugin and install it. After installing the plugin, you should select the option to restart the application, to ensure that it installed properly. I'd also recommend adding the FanFicFare icon to the optional bottom toolbar instead of the header toolbar, since that'll make it much easier to find since, unless you add more plugins and assign them to that toolbar, it should be the only option on the bar right now.So, full disclosure, you don't need Calibre to run FanFicFare. You could download it and run it from a command line interface instead. However, I prefer it's Calibre interface, especially since it really lets you take advantage of the best Calibre has to offer in metadata tracking, as it can be set up through Calibre to auto fill those columns I walked you through setting up earlier. But I'll get to more on that in a minute.Once Calibre has restarted, you should now have FanFicFare available on one of your toolbars. It's associated icon is a green text bubble with the letters "FF" in it pointing down at a picture of a book.
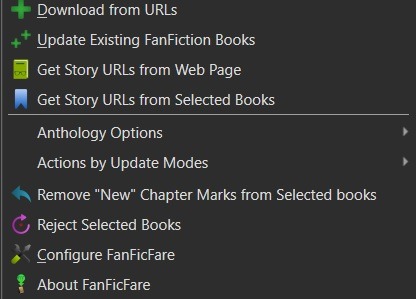
It'll have a small down arrow next to it, which you'll want to select in order to bring up FanFicFare's menu. At this point you can start downloading fics if you want - but let's do a little customizing first. Select the "Configure FanFicFare" option to bring up the configuration modal.
So this modal has a lot going on. And I do encourage doing some exploration on your own, because FanFicFare is a powerful tool made all the more powerful here in conjunction with Calibre's built in tools. Cover generation is very useful, "Reading lists" can be used to auto send new books to any devices you've linked to Calibre when they're connected to the computer, you can tie into email accounts to pull fanfics from email or pull URL links for downloading... there is just so much this plugin can do.
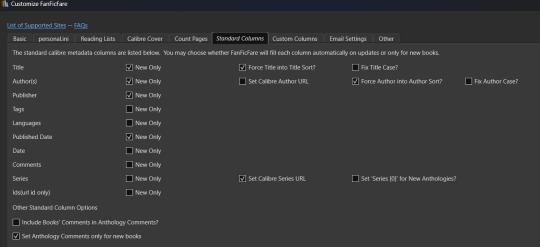
For now, however, we're interested in the column related options. First, check out the tab for "Standard Columns". Look over the options there carefully to make sure that the default settings are actually what you want. They're pretty straight foward - most are determining whether the metadata gets scraped and updated every time you update a fanfic eBook or if they're only scraped for new books. The rest have to do with title and author sorting, setting series related data, and setting the comment data for anthologies.
Once you've set that data how you want, head over to the "Custom Columns" tab where things get more interesting.
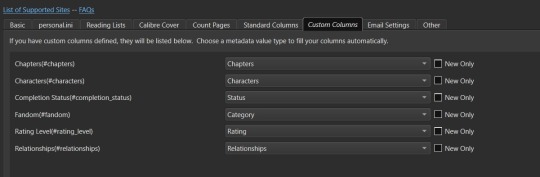
You should now be looking at a list of all those custom columns you created earlier, in alphabetical order. Each column will have a corresponding select box with nothing selected and an unchecked checkbox marked "New Only". This works in a pretty straightforward manner. Let's use "Fandom" as the example. Click the associated select box to open the dropdown and you'll see a bunch of potential metadata that FanFicFare scrapes listed there. It'll all go into the default tags column - found over in the "Standard Columns" section - but you can also parse it out to specific custom columns here. It might give you a few ideas for more columns you want to add for metadata sorting purposes. "Fandom" you'll want to link to "Category". I left "New Only" unchecked so that if I update an eBook later and it has a new fandom attached to the fic then that new metadata will be picked up and added to my Fandom tags for the fic.
Go through each custom column and set them up to be auto filled with the data you think fits it best. Select OK to save your changes and congratulations, this library has now been set up to import fanfiction.
Do keep in mind that FanFicFare's settings are on a per-library basis. So if you decide to do a separate library for different types of fanfics then you'll need to configure FanFicFare separate for every library. You may want separate libraries for different repositories, for example. Though FanFicFare is often smart enough to recognize when it already has an eBook version of a fanfiction from one repository - such as FFnet - when trying to download the same fic from another place - like Ao3.
You may need to make changes later to the personal.ini file associated with the library (which is also set up on a per-library basis) but I'll write up a separate post for that later. While sites protected by Cloud Flare more stringent protections will likely result in 403 responses and failed downloads, most fanfiction sites are going to work with the default FanFicFare settings. You could head over to, say, Archive of Our Own or Twisting the Hellmouth and grab a URL for a story from there. Or a URL for a series, which has links to multiple stories.
Now that the set up is done, it's time for the fun part. Downloading and maintaining fanfiction in your library. I'll be using a few of my fanfictions on Ao3 as example URLs. Awaken, which is already in my fanfiction library. What Balance Means, which is not already in my library. And the two series Hartmonfest 2023 and Eobard vs Eobard.
We'll start with the single URL uploads.
Click on the FanFicFare down arrow to bring up the menu and select the first option on the menu, labeled "Download from URLs". If you have a URL in your clipboard and have the option to grab URLs from the clipboard selected in the FanFicFare configuration (it's a default option, so you most likely do) then you should see that URL prepopulated in the text area when the Story URLs modal loads. You can add more URLs, one per line, to this text area and when you select OK each one will be individually downloaded as a separate epub file. For multi-chapter fics you only need to provide the url for the first chapter. FanFicFare will be able to detect the additional chapters and download them into the same epub file as the first chapter. All providing additional chapter URLs will do is lead to FanFicFare attempting to create multiple epubs of the same fanfic.
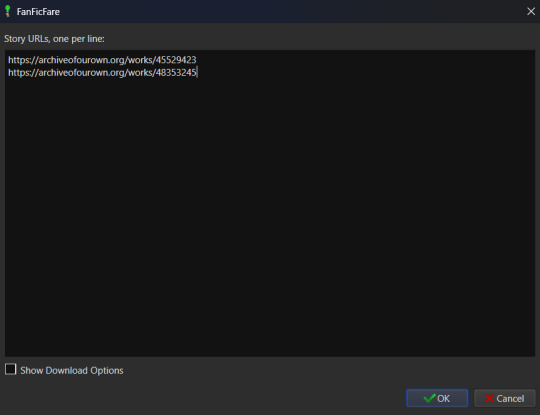
Once you've added your list of URLs to the text area, select OK. FanFicFare will do the rest, fetching metadata for the fic (or fics) and compiling the epub file(s). When it's finished compiling the data but hasn't officially saved the epubs, it will pop up a message letting you know how many "good" and "bad" entries it found.
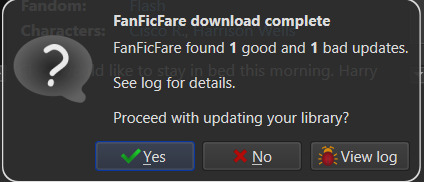
"Good" means it made an epub file and it's good to go. "Bad" could mean that you've already got the fanfic downloaded and no updates - such as new chapters - were available. Or it could mean that it failed to grab the web pages for whatever reason… like Cloud Flare blocking the download. You can go forward with the download at this point, adding the good epubs to your library. Or you could cancel the download, meaning none of the epubs are saved. Before choosing one of those options you can also choose to look at the job output, seen in the pop up as a button labeled "View log". This will display a list of every url you tried to download a fanfic for and information on either it's success or why it failed, the associated URL, and how many chapters were downloaded.
Since I already had Awaken downloaded and there have been no updates since the last time I downloaded it, that is the bad update from my list and the result I was expecting. What Balance Means hadn't been downloaded before, so it was the expected good update. Once Yes is selected in the dialog, the new fanfiction eBooks will be added to the library and will appear at the top of the main list in the application.
That's great for updating one fic at a time or copy-pasting in a list of fanfictions, but let's get ambitious. Maybe you want to import an entire page of bookmarked fanfictions at once or a series of fanfictions as individual books. Instead of copying every single URL by hand, you can take the URL for the series main page or the Bookmarks URL. With that URL copied, you can head over to the FanFicFare menu again, but this time select the option "Get Story URLs from Web Page"
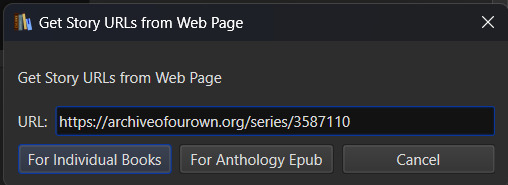
The modal that pops up only allows for inputting one URL - the URL for the page you want it to scour for fanfic URLs. Once you've inputted that URL click the button labeled "For Individual Books." It might take a bit but it's going to pull up the same Story URLs modal from before, this time prepopulated with every URL from the page you gave it. Pretty cool, right? Click OK and watch it run the job just like before.
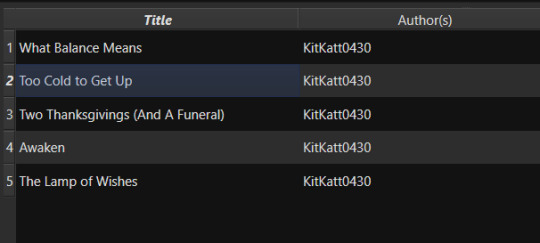
I gave it the URL for my Hartmonfest 2023 series, which is a complete series and it downloaded all three books. Once they're populated on the list, I could scroll over to the Series column to see that they all are listed as being part of the Hartmonfest 2023 series in the same series order they're listed in on Ao3.
However, what if I'm uploading an unfinished series, like Eobard vs Eobard, and want to be able to track when it updates later on? Single books can track when new chapters are updated; is there any way to do the same thing but on a larger scale? The answer is yes, but you have to upload the series as an anthology.
Head back to the "Get Story URLs from Web Page" option on the FanFicFare menu and give it another series URL. But, this time, click the button labeled For Anthology Epub. This will trigger the Story URLs modal again once it's gathered all the story URLs, but this time it looks a little different.
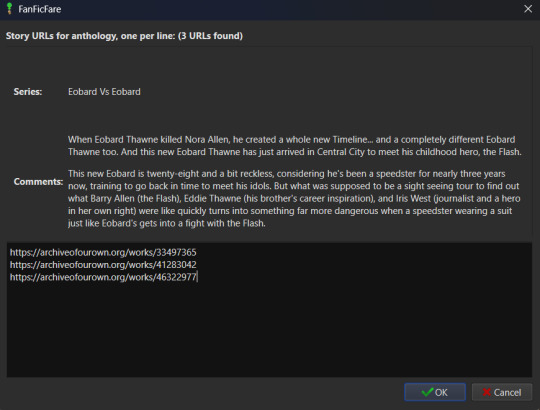
This time there will be text indicating the Series and Comments/description, the information for which will have been taken from the series metadata. The series story URLs will be present in the text area, allowing you to remove a story from the anthology if there's a fic in there you don't want included. Click OK to run the import job, which will run like normal.
When the job completes, there should be multiple good updates listed - one for every URL - but when you click yes to add the eBook to the library, you'll only see one added. It should be named following the convention "<Series Name> Anthology". So now I've got the "Eobard vs Eobard Anthology" in my library.
Last but not least, how to check for updates to incomplete fanfictions or series. It's generally pretty easy to do. Select the fanfiction(s) on the list that you want to check for updates on. If it's a single fanfiction (or several single fanfictions), you go to the FanFicFare menu and click the option "Update Existing FanFiction Books"
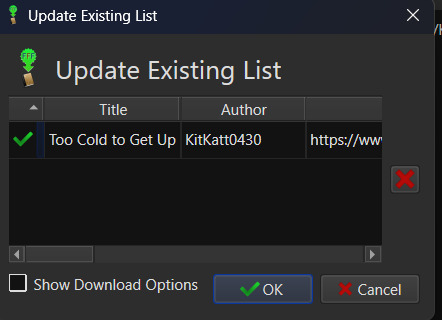
Click OK and let it run. Any fanfictions that don't have new chapters will return as bad entries. Any that have new chapters will be listed as good. Selecting Yes to add the good entries to the list will update the existing epub files with the new chapters.
However, if it's a series you want to update, I recommend doing those one at a time. Select the anthology from the eBook list and head back over to the FanFicFare menu. This time select "Anthology Options"; it'll open a fly-out menu. You want the bottom option, labeled "Update Anthology Epub". The associated URL for the series is saved as part of the eBook's metadata already, so it will pull the series metadata and associated URLs again, before returning you to that same modified Story URLs modal seen before. When you click OK, it'll pull all the fanfictions in the series - new and old - and any new chapters as well, bundling it up in a new eBook file that will replace the old one.
There's still a lot to talk about when it comes to managing fanfictions in Calibre, but I think I'll end here for now. You should be able to download, and manage, fanfiction from most websites at this point. So go back up your bookmarked fics and rest easy knowing that from this point forward a missing bookmark on your bookmarks list is no longer cause for sadness - it'll still be in your local archive to enjoy offline. Just don't go abusing this power, okay guys?
#kitkatt0430 explains#ficArchiving#calibre#fanficfare#the images all have alt text but if you find my image descriptions lacking feel free to add additional descriptions
17 notes
·
View notes


Text
I'm gonna do this again because it turned out last week kinda went off the rails without it and the little bit of accountability is super super helpful.
Monday!
It's a busy week! It's also my birthday week! Let's do this!
E-mail with coffee: sent a prospective grad student a congratulations on her admission to our program. I'm really hoping to hire her, but I do need to consider whether I might want to admit two students for this position and just get the extra funding for the second one elsewhere if both decide to come. Hmm. Confirmed coffee on Friday with the wonderful admin I've been wanting to befriend for a while - finally we'll interact outside of paperwork! Sadly Wednesday's seminar speaker is ill and won't be able to present - I'm leading the seminar so that does add up to a little less work for me, which is the silver lining there. One of my student groups is struggling to grab data from the weather station they built on the roof because the dang software doesn't work on Macs - managed to coordinate getting them a loaner PC laptop from the department, whew. Completed two letters of reference for an undergrad student applying to internships. Somehow managed to double-book a meeting and gave one a heads up to cancel. Showed my availability for scheduling a PhD defense for a student whose committee I'm on. One of the speakers for my seminar series sent a somewhat passive-aggressive e-mail to the department chair to let him know his info's not up on the website yet. Department chair forwarded it to me, I replied with, essentially "hold your dang horses, your talk isn't until mid-March". He replied back with a sheepish apology. All good.
Formulated my list of essential stuff for this week:
finish Wednesday's (and next week's?) lecture(s?)
prepare next week's homework & key
work on grant proposal
work on commissioned review article
So excited that we're finally to the part of the class that I have taught before in past years! Great lecture today about statistical data analysis. Hurt everyone's brains with the Monty Hall problem. Showed a lot of XKCD comics, got some laughs. Good times. Answered some student questions on the homework assignments, looks like everyone's on track to ace this one as well. This is a really strong class and I'm very proud of them!
On to a virtual meeting with my peer mentoring group! We talk about how utterly wild it is that different departments manage research funding in completely different ways. I vent a bit for the umpteenth time about having to rely 100% on grants to pay my grad students (bigger departments often have student funding provided if they TA, but we just don't have enough classes to sustain that). Easily the biggest source of stress in my life right now is running out of funding for my students: "in order to pay your graduate students, you have to receive a major grant" "cool! how likely am I to get one?" "success rates are about 1 in 15" "uhhhh" "also the applications (if you manage to find a perfect match for your research) take about 40-60 hours to plan and write and it's not work that's looked at formally as part of your tenure review so you're actively taking time away from research" "uhhhhhhh" "and you won't find out if you have been awarded the grant or not before you have to make the decision to hire a student so you just gotta gamble on it" "UHHHHHHH" "you don't get paid in the summer either unless you pull in 2-3 grants that can each cover one month max of salary so I hope you're not putting well over 50% of your take-home toward rent in one of the worst markets in the US or anything haha." It's A Lot. But it's very helpful to talk to people about it!
Realized I left my half-finished Wednesday lecture on my computer at home so I can't work on it during my break between meetings. Shoot, guess that's a tomorrow problem. At least I can work on the homework assignment! This one was an absolute nightmare last year but I think I've come up with a way to simplify it while still hitting all of the learning goals. It's complicated but hopefully very satisfying and builds on everything they've learned thus far. Even with the simplification, I'm definitely expecting some traffic in office hours next week. Opted not to include the more tedious section of the homework because I've tested that particular skill amply in the earlier assignments this quarter. Ran through it once on my own, sent myself the key, then posted the homework and the submission portal for their online module for next week, so all I'm missing now is the lectures.
E-mail break! A professor at a small university nearby wants to bring in a grad student from my group to talk to her class about tornadoes! I have someone in mind (who is both a great presenter and also could use a little confidence boost to get back on track with his research), but of course he's working remotely on the other side of the country, so it's time for a quick check to see if a remote presentation is possible. Checking in on my seminar speaker for next week - project title and abstract up on the website, phew. She's a grad student, so I should find out if her advisor can introduce her or if they want me to do so (and if so, I gotta do some digging for fun facts to share!). Got an invite to a lunch with the faculty & chair where we're going to be brainstorming our next faculty hire, so I gotta be there for that (also because free food)! Surreal to think that we might be hiring my colleague for the next 30 years. It's... kind of intimidating and I definitely want to be in the room for that discussion. Aha! A reply already: virtual talk is fine, so I put the professor and my grad student in touch.
Nice virtual meeting with my former postdoc advisor - we commiserate for a while over his recent illness, but he's feeling better now so we quickly jump back to talking research. The small grant I was awarded recently actually dovetails with some of the broader research ideas he and I had been talking about, so I'm gonna keep him in the loop on that!
Up next: a meeting with my two undergraduate research interns. They're coadvised by my colleague who is flying research aircraft on the other side of the country right now so it's just the three of us. Due to holidays and conferences, this is actually the first time in 2023 we all managed to meet! We go over some paperwork to make sure they get college credit for this research. They're spinning their wheels a little bit but I had them shoot off a couple emails while I was there to start them getting their data ASAP. We then chatted about severe weather we'd all witnessed. One of the students mentioned she's been saving the candy from my office candy bowl for whenever she forgets to bring lunch to campus and now I'm realizing I should maybe get some protein bars or something for some variety.
All good stuff. There's a seminar in 15 minutes but it's a chemistry seminar so... I may just sneak home a bit early.
Tomorrow: no meetings (maaaybe one remote meeting), so work-from home! Should be able to get the last bit of coursework done for the week so I can start on my research to-do list.
37 notes
·
View notes
Text
I had a dream where I came up with a joke featuring Penelope Featherington saying “I’m going to e-invite everyone to a ball with my Apple Mac” and Colin or whatever his name is says “well that’s not very PC of you” and I genuinely thought this was so funny that I was late for work because I spent so much time trying to phrase it perfectly as a tumblr post.
I have never watched an episode of Bridgerton.
#I only know the characters’ names because of gifsets and that#and with names like ‘Featherington’ it just makes me think of that old film Grunkle Stan gets stuck watching in Gravity Falls#bridgerton
2 notes
·
View notes
Last Seen Blogs
vampircking
I'm just your problem {AP}

car9
Untitled

trojan-rabbit
Sketch Babble

cantspellcharlottewithoutart
Rylie's Radical Blog