#Nvidia gpu download
Text
Nvidia gpu download

Nvidia gpu download how to#
Nvidia gpu download software download#
Nvidia gpu download install#
Its a low overhead tool suite that performs a variety of functions on each host system including active health monitoring, diagnostics, system validation, policies, power and clock management, group configuration and accounting. All in all, NVIDIA GPU Temp comes in handy whenever you want to quickly check your GPU temperature. NVIDIA Data Center GPU Manager (DCGM) is a set of tools for managing and monitoring NVIDIA GPUs in cluster environments.
Nvidia gpu download how to#
For more information about how to access your purchased licenses visit the vGPU Software Downloads page.
Nvidia gpu download software download#
It has a good response time, displays accurate information, and works well, without causing the OS to hang, crash or pop up error dialogs. Enterprise customers with a current vGPU software license (GRID vPC, GRID vApps or Quadro vDWS), can log into the enterprise software download portal by clicking below. The lightweight gadget has minimal impact on system performance, running on very low CPU and RAM. NVIDIA NCCL The NVIDIA Collective Communication Library (NCCL) implements multi-GPU and multi-node communication primitives optimized for NVIDIA GPUs and Networking. Prior to Release 75, drivers for these OpenGL 2.0-capable GPUs advertised OpenGL 1.5 support but also exposed the feature set of OpenGL 2.0 through the corresponding extensions listed in section 1. However, thanks to the Windows built-in features, you can set the frame to stay on top of other windows, as well as adjust its opacity level to a preset value, ranging between 20% and 100%. Quadro FX GPUs, and all future NVIDIA GPUs support OpenGL 2.0. NVIDIA GPU Temp does not integrate additional options of its own. It automatically displays the GPU temperature at initialization.Īs far as options are concerned, you can create a dump file on the desktop, change the background theme, display the PCIe link width, as well as select another temperature unit (Fahrenheit). Please check your NVIDIA Entitlement Certificate for information on how to register for access to the NVIDIA. Customers who have purchased NVIDIA vGPU software can download the drivers from the NVIDIA Licensing Portal. The interface is based on a very small frame that you can move to any position on the screen, with the help of the mouse cursor. GPU Tech Conference CUDA Industries Game Development HEALTHCARE Higher Education & Research Industrial Media & Entertainment.
Nvidia gpu download install#
It is very easy to install and set up, as it comes packed with limited configuration parameters. DOWNLOADS NVIDIA Optimized Containers, Models, and More Deploy the latest GPU optimized AI and HPC containers, pre-trained models, resources and industry specific application frameworks from NGC and speed up your AI and HPC application development and deployment. GitHub: Download NBMiner v37.0 (Windows/Linux) NBMINER NVIDIA & AMD GPU ETH, RVN, GRIN, BEAN, CFX, AE, BTM, SERO, HNS, BFC. Explore NGC Download Centers CUDA Toolkit Toolkit for GPU-accelerated apps: libraries, debugging/optimization tools, a C/C++. NVIDIA GPU Temp is a desktop gadget that shows the temperature of your GPU temperature of your Nvidia graphics card. DOWNLOADS NVIDIA Optimized Containers, Models, and More Deploy the latest GPU optimized AI and HPC containers, pre-trained models, resources and industry specific application frameworks from NGC and speed up your AI and HPC application development and deployment.
0 notes
Text
Nvidia gpu download windows 7

Nvidia gpu download windows 7 how to#
Nvidia gpu download windows 7 install#
Nvidia gpu download windows 7 drivers#
Q: Is cuDNN included as part of the CUDA Toolkit?Ī: cuDNN is our library for Deep Learning frameworks, and can be downloaded separately from the cuDNN home page.
Nvidia gpu download windows 7 drivers#
Q: Where can I find old versions of the CUDA Toolkit?Ī: Older versions of the toolkit can be found on the Legacy CUDA Toolkits page. NVIDIA GeForce GPU Windows drivers can help you to fix NVIDIA GeForce GPU or NVIDIA GeForce GPU errors in one click: download drivers for Windows 11, 10, 8.1, 8, and 7 (32-bit/64-bit). Afterburner is the gold standard of overclocking utilities MSI Afterburner is the most used graphics card software for a good reason.
Nvidia gpu download windows 7 install#
If you only want to install the GDK, then you should use the network installer, for efficiency. Available drivers (2) Windows 7 圆4 (current) all systems Windows 11 圆4 Windows 11 x86 Windows 10 圆4 Windows 10 x86 Windows 8.1 圆4 Windows 8.1 x86 Windows 8 圆4 Windows 8 x86 Windows 7 圆4 ( current) Windows 7 x86 Windows XP x86. Gpu spikes windows 10 Gpu spikes windows 10 Support for Windows® 10 Anniversary Update and Windows® 10 Device Guard, enabling users to lock down applications that are trusted on the device, helping increase protection from malware. Q: Where do I get the GPU Deployment Kit (GDK) for Windows?Ī: The installers give you an option to install the GDK. 2 hours ago &0183 &32 After your PC reboots, press Windows key + R. The Network Installer is a small executable that will only download the necessary components dynamically during the installation so an internet connection is required.
Nvidia gpu download windows 7 how to#
Please check your NVIDIA Entitlement Certificate for information on how to register for access to the NVIDIA Licensing Portal where you can redeem your Product Activation Keys (PAKs) and download your drivers. NVIDIA is now OpenCL 3.0 conformant and is available on R465 and later drivers. Using the OpenCL API, developers can launch compute kernels written using a limited subset of the C programming language on a GPU. This makes the installer very large, but once downloaded, it can be installed without an internet connection. Customers who have purchased NVIDIA vGPU software can download the drivers from the NVIDIA Licensing Portal. OpenCL (Open Computing Language) is a low-level API for heterogeneous computing that runs on CUDA-powered GPUs. Q: What is the difference between the Network Installer and the Local Installer?Ī: The Local Installer has all of the components embedded into it (toolkit, driver, samples). Selecting Run will save the file to a temporary directory. If your browser asks you if you wish to Save or Run the file, select Save. Beginning with CUDA 7.0, these packages have been merged into a single package that is capable of installing on all supported platforms. Download the latest NVIDIA display driver from the NVIDIA Download Drivers page. A: Previous releases of the CUDA Toolkit had separate installation packages for notebook and desktop systems. Here you can download all latest versions of NVIDIA GeForce 210 drivers for Windows devices with Windows 11, 10, 8.1.
0 notes
Text

How to use DXVK with The Sims 3
Have you seen this post about using DXVK by Criisolate? But felt intimidated by the sheer mass of facts and information?
@desiree-uk and I compiled a guide and the configuration file to make your life easier. It focuses on players not using the EA App, but it might work for those just the same. It’s definitely worth a try.
Adding this to your game installation will result in a better RAM usage. So your game is less likely to give you Error 12 or crash due to RAM issues. It does NOT give a huge performance boost, but more stability and allows for higher graphics settings in game.
The full guide behind the cut. Let me know if you also would like it as PDF.
Happy simming!
Disclaimer and Credits
Desiree and I are no tech experts and just wrote down how we did this. Our ability to help if you run into trouble is limited. So use at your own risk and back up your files!
We both are on Windows 10 and start the game via TS3W.exe, not the EA App. So your experience may differ.
This guide is based on our own experiments and of course criisolate’s post on tumblr: https://www.tumblr.com/criisolate/749374223346286592/ill-explain-what-i-did-below-before-making-any
This guide is brought to you by Desiree-UK and Norn.
Compatibility
Note: This will conflict with other programs that “inject” functionality into your game so they may stop working. Notably
Reshade
GShade
Nvidia Experience/Nvidia Inspector/Nvidia Shaders
RivaTuner Statistics Server
It does work seamlessly with LazyDuchess’ Smooth Patch.
LazyDuchess’ Launcher: unknown
Alder Lake patch: does conflict. One user got it working by starting the game by launching TS3.exe (also with admin rights) instead of TS3W.exe. This seemed to create the cache file for DXVK. After that, the game could be started from TS3W.exe again. That might not work for everyone though.
A word on FPS and V-Sync
With such an old game it’s crucial to cap framerate (FPS). This is done in the DXVK.conf file. Same with V-Sync.
You need
a text editor (easiest to use is Windows Notepad)
to download DXVK, version 2.3.1 from here: https://github.com/doitsujin/DXVK/releases/tag/v2.3.1
Extract the archive, you are going to need the file d3d9.dll from the x32 folder
the configuration file DXVK.conf from here: https://github.com/doitsujin/DXVK/blob/master/DXVK.conf.
Optional: download the edited version with the required changes here.
administrator rights on your PC
to know your game’s installation path (bin folder) and where to find the user folder
a tiny bit of patience :)
First Step: Backup
Backup your original Bin folder in your Sims 3 installation path! The DXVK file may overwrite some files! The path should be something like this (for retail): \Program Files (x86)\Electronic Arts\The Sims 3\Game\Bin (This is the folder where also GraphicsRule.sgr and the TS3W.exe and TS3.exe are located.)
Backup your options.ini in your game’s user folder! Making the game use the DXVK file will count as a change in GPU driver, so the options.ini will reset once you start your game after installation. The path should be something like this: \Documents\Electronic Arts\The Sims 3 (This is the folder where your Mods folder is located).
Preparations
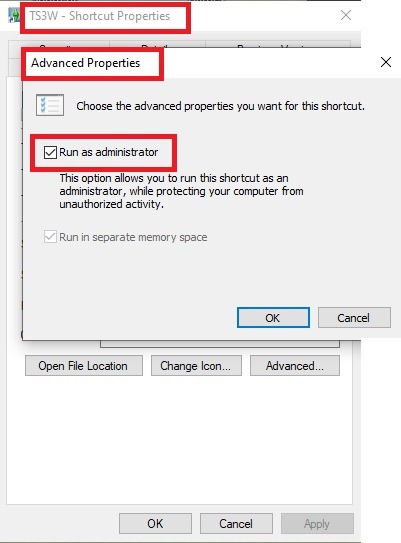
Make sure you run the game as administrator. You can check that by right-clicking on the icon that starts your game. Go to Properties > Advanced and check the box “Run as administrator”.
Note: This will result in a prompt each time you start your game, if you want to allow this application to make modifications to your system. Click “Yes” and the game will load.
2. Make sure you have the DEP settings from Windows applied to your game.
Open the Windows Control Panel.
Click System and Security > System > Advanced System Settings.
On the Advanced tab, next to the Performance heading, click Settings.
Click the Data Execution Prevention tab.
Select 'Turn on DEP for all programs and services except these”:
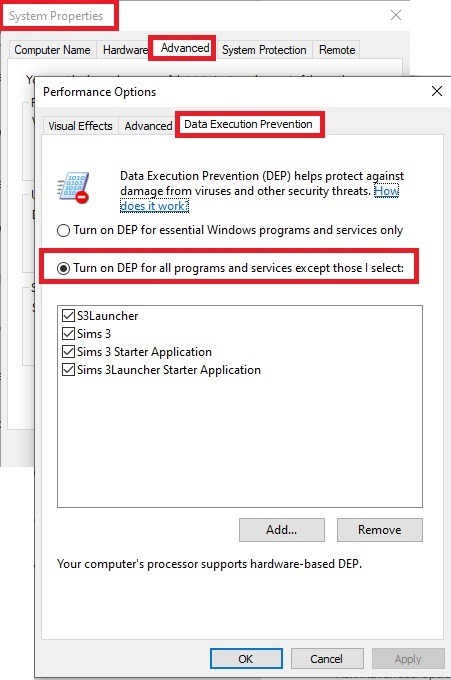
Click the Add button, a window to the file explorer opens. Navigate to your Sims 3 installation folder (the bin folder once again) and add TS3W.exe and TS3.exe.
Click OK. Then you can close all those dialog windows again.
Setting up the DXVK.conf file
Open the file with a text editor and delete everything in it. Then add these values:
d3d9.textureMemory = 1
d3d9.presentInterval = 1
d3d9.maxFrameRate = 60
d3d9.presentInterval enables V-Sync,d3d9.maxFrameRate sets the FrameRate. You can edit those values, but never change the first line (d3d9.textureMemory)!
The original DXVK.conf contains many more options in case you would like to add more settings.

A. no Reshade/GShade
Setting up DXVK
Copy the two files d3d9.dll and DXVK.conf into the Bin folder in your Sims 3 installation path. This is the folder where also GraphicsRule.sgr and the TS3W.exe and TS3.exe are located. If you are prompted to overwrite files, please choose yes (you DID backup your folder, right?)
And that’s basically all that is required to install.
Start your game now and let it run for a short while. Click around, open Buy mode or CAS, move the camera.
Now quit without saving. Once the game is closed fully, open your bin folder again and double check if a file “TS3W.DXVK-cache” was generated. If so – congrats! All done!
Things to note
Heads up, the game options will reset! So it will give you a “vanilla” start screen and options.
Don’t worry if the game seems to be frozen during loading. It may take a few minutes longer to load but it will load eventually.
The TS3W.DXVK-cache file is the actual cache DXVK is using. So don’t delete this! Just ignore it and leave it alone. When someone tells to clear cache files – this is not one of them!
Update Options.ini
Go to your user folder and open the options.ini file with a text editor like Notepad.
Find the line “lastdevice = “. It will have several values, separated by semicolons. Copy the last one, after the last semicolon, the digits only. Close the file.
Now go to your backup version of the Options.ini file, open it and find that line “lastdevice” again. Replace the last value with the one you just copied. Make sure to only replace those digits!
Save and close the file.
Copy this version of the file into your user folder, replacing the one that is there.
Things to note:
If your GPU driver is updated, you might have to do these steps again as it might reset your device ID again. Though it seems that the DXVK ID overrides the GPU ID, so it might not happen.
How do I know it’s working?
Open the task manager and look at RAM usage. Remember the game can only use 4 GB of RAM at maximum and starts crashing when usage goes up to somewhere between 3.2 – 3.8 GB (it’s a bit different for everybody).
So if you see values like 2.1456 for RAM usage in a large world and an ongoing save, it’s working. Generally the lower the value, the better for stability.
Also, DXVK will have generated its cache file called TS3W.DXVK-cache in the bin folder. The file size will grow with time as DXVK is adding stuff to it, e.g. from different worlds or savegames. Initially it might be something like 46 KB or 58 KB, so it’s really small.
Optional: changing MemCacheBudgetValue
MemCacheBudgetValue determines the size of the game's VRAM Cache. You can edit those values but the difference might not be noticeable in game. It also depends on your computer’s hardware how much you can allow here.
The two lines of seti MemCacheBudgetValue correspond to the high RAM level and low RAM level situations. Therefore, theoretically, the first line MemCacheBudgetValue should be set to a larger value, while the second line should be set to a value less than or equal to the first line.
The original values represent 200MB (209715200) and 160MB (167772160) respectively. They are calculated as 200x1024x1024=209175200 and 160x1024x1024=167772160.
Back up your GraphicsRules.sgr file! If you make a mistake here, your game won’t work anymore.
Go to your bin folder and open your GraphicsRules.sgr with a text editor.
Search and find two lines that set the variables for MemCacheBudgetValue.
Modify these two values to larger numbers. Make sure the value in the first line is higher or equals the value in the second line. Examples for values:
1073741824, which means 1GB
2147483648 which means 2 GB.
-1 (minus 1) means no limit (but is highly experimental, use at own risk)
Save and close the file. It might prompt you to save the file to a different place and not allow you to save in the Bin folder. Just save it someplace else in this case and copy/paste it to the Bin folder afterwards. If asked to overwrite the existing file, click yes.
Now start your game and see if it makes a difference in smoothness or texture loading. Make sure to check RAM and VRAM usage to see how it works.
You might need to change the values back and forth to find the “sweet spot” for your game. Mine seems to work best with setting the first value to 2147483648 and the second to 1073741824.
Uninstallation
Delete these files from your bin folder (installation path):
d3d9.dll
DXVK.conf
TS3W.DXVK-cache
And if you have it, also TS3W_d3d9.log
if you changed the values in your GraphicsRule.sgr file, too, don’t forget to change them back or to replace the file with your backed up version.
OR
delete the bin folder and add it from your backup again.
B. with Reshade/GShade
Follow the steps from part A. no Reshade/Gshade to set up DXVK.
If you are already using Reshade (RS) or GShade (GS), you will be prompted to overwrite files, so choose YES. RS and GS may stop working, so you will need to reinstall them.
Whatever version you are using, the interface shows similar options of which API you can choose from (these screenshots are from the latest versions of RS and GS).
Please note:
Each time you install and uninstall DXVK, switching the game between Vulkan and d3d9, is essentially changing the graphics card ID again, which results in the settings in your options.ini file being repeatedly reset.
ReShade interface
Choose – Vulcan
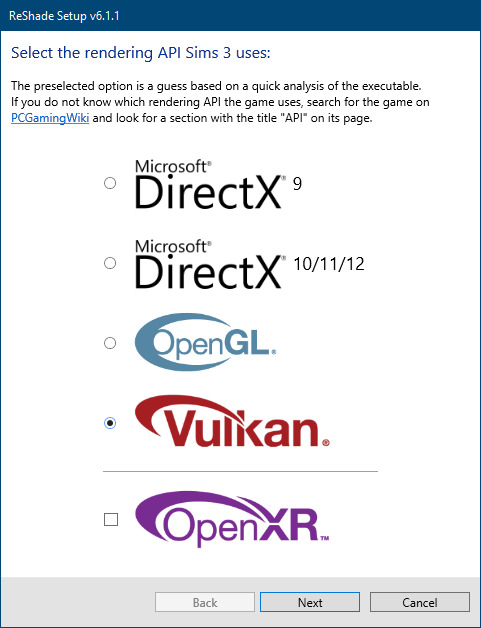
Click next and choose your preferred shaders.
Hopefully this install method works and it won't install its own d3d9.dll file.
If it doesn't work, then choose DirectX9 in RS, but you must make sure to replace the d3d9.dll file with DXVK's d3d9.dll (the one from its 32bit folder, checking its size is 3.86mb.)
GShade interface
Choose –
Executable Architecture: 32bit
Graphics API: DXVK
Hooking: Normal Mode
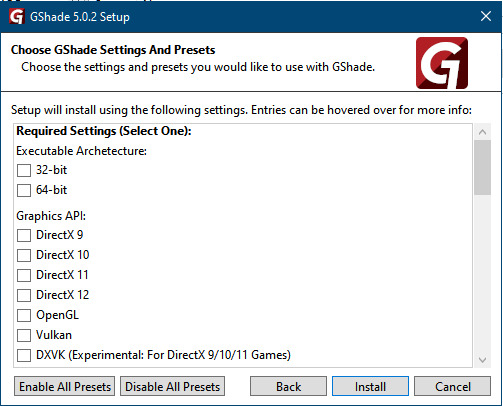
GShade is very problematic, it won't work straight out of the box and the overlay doesn't show up, which defeats the purpose of using it if you can't add or edit the shaders you want to use.
Check the game's bin folder, making sure the d3d9.dll is still there and its size is 3.86mb - that is DXVK's dll file.
If installing using the DXVK method doesn't work, you can choose the DirectX method, but there is no guarantee it works either.
The game will not run with these files in the folder:
d3d10core.dll
d3d11.dll
dxgi.dll
If you delete them, the game will start but you can't access GShade! It might be better to use ReShade.
Some Vulcan and DirectX information, if you’re interested:
Vulcan is for rather high end graphic cards but is backward compatible with some older cards. Try this method with ReShade or GShade first.
DirectX is more stable and works best with older cards and systems. Try this method if Vulcan doesn't work with ReShade/GShade in your game – remember to replace the d3d9.dll with DXVK's d3d9.dll.
For more information on the difference between Vulcan and DirectX, see this article:
https://www.howtogeek.com/884042/vulkan-vs-DirectX-12/
469 notes
·
View notes
Text
How I got my Sims 2 game working on my new Windows 11 laptop, step by step.
OKAY. Gadies and Lentlemen.
I have seen plenty of these around, but I wanted to share my process!
So I bought an MSI creator laptop. The specs are as follows:
CPU: 13th gen Intel i7-13700H
RAM: 16 GB DDR5
GPU: NVIDIA GeForce RTX 4050 laptop GPU
Step One: Fresh install. I used the EA App to install the UC version on my new laptop.
Step Two: Download and install RPC launcher. This will automatically apply the 4gb patch. Run as administrator, but not in any kind of compatibility which renders the 4gb patch useless.
Step Three: Download and install Graphics Rule Maker. I used all of the recommended settings, aside from texture memory which I set at 2048 mb for reasons that will become clear later.
Step Four: Memory allocation fix (empty standby list). Explanation here.
Step Five: Setting virtual memory. I used instructions from this post at MTS - My virtual memory paging file is now minimum of 25000 and maximum of 30000. You'll need to adjust to your system's own specs.
Step Six: In game settings. Shadows Off. Neighbours Off. Lighting Medium. RPC Settings. Apply 4GB patch. Automatically Clean Cache. Lot Imposters Optimized. Sim/Object Shadows Classic. I also have lot view ocean reflections ticked.
If your game works like this with no flashing and crashing, awesome. Mine did not. I firstly tried several different texture memory sizes, but they had 0 impact.
I believe the next step is only for NVIDIA cards, but may be wrong.
Step Seven: DXVK. The most recent version from, here. There are plenty of instructions on how to install out there. But make sure you install the 32bit version. I have these two following lines in my DXVK.conf file (and do make sure it is saved as a conf file, NOT a txt or similar).
d3d9.maxAvailableMemory=2048
d3d9.presentInterval=0
The first line corresponds to the texture memory mentioned earlier. DXVK installs won't recognise more than that and having it higher can cause crashes apparently. The second line... No idea what it does but it was mentioned in several guides and reddit posts.
I don't know if the newer versions of DXVK allow fullscreen mode as the older ones did not, but I play in borderless mode anyway which works.
I also delete my thumbnails folder every so often.
I hope this helps someone, this silly old game can be cantankerous but I was determined to get it running again!
445 notes
·
View notes
Text
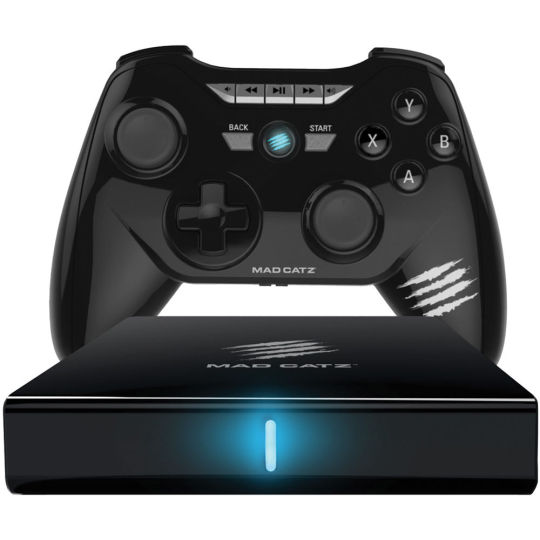
Do you know what this is? Probably not. But if you follow me and enjoy retro gaming, you REALLY should know about it.
I see all of these new micro consoles, and retro re-imaginings of game consoles and I think to myself "Why?" WHY would you spend a decent chunk of your hard-earned money on some proprietary crap hardware that can only play games for that specific system?? Or even worse, pre-loaded titles and you can't download / add your own to the system!? Yet, people think it's great and that seems to be a very popular way to play their old favorites vs. emulation which requires a "certain degree of tech savvy" (and might be frowned upon from a legal perspective).
So, let me tell you about the Mad Catz M.O.J.O (and I don't think the acronym actually means anything). This came out around the same time as the nVidia Shield and the Ouya - seemingly a "me too" product from a company that is notorious for oddly shaped 3rd party game controllers that you would never personally use, instead reserved exclusively for your visiting friends and / or younger siblings. It's an Android micro console with a quad-core 1.8 GHz nVidia Tegra 4 processor, 2 GB of RAM, 16GB of onboard storage (expandable via SD card), running Android 4.2.2. Nothing amazing here from a hardware perspective - but here's the thing most people overlook - it's running STOCK Android - which means all the bloatware crap that is typically installed on your regular consumer devices, smartphones, etc. isn't consuming critical hardware resources - so you have most of the power available to run what you need. Additionally, you get a GREAT controller (which is surprising given my previous comment about the friend / sibling thing) that is a very familiar format for any retro-age system, but also has the ability to work as a mouse - so basically, the same layout as an Xbox 360 controller + 5 additional programmable buttons which come in very handy if you are emulating. It is super comfortable and well-built - my only negative feedback is that it's a bit on the "clicky" side - not the best for environments where you need to be quiet, otherwise very solid.
Alright now that we've covered the hardware - what can it run? Basically any system from N64 on down will run at full speed (even PSP titles). It can even run an older version of the Dreamcast emulator, Reicast, which actually performs quite well from an FPS standpoint, but the emulation is a bit glitchy. Obviously, Retroarch is the way to go for emulation of most older game systems, but I also run DOSbox and a few standalone emulators which seem to perform better vs. their RetroArch Core equivalents (list below). I won't get into all of the setup / emulation guide nonsense, you can find plenty of walkthroughs on YouTube and elsewhere - but I will tell you from experience - Android is WAY easier to setup for emulation vs. Windows or another OS. And since this is stock Android, there is very little in the way of restrictions to the file system, etc. to manage your setup.
I saved the best for last - and this is truly why you should really check out the M.O.J.O. even if you are remotely curious. Yes, it was discontinued years ago (2019, I think). It has not been getting updates - but even so, it continues to run great, and is extremely reliable and consistent for retro emulation. These sell on eBay, regularly for around $60 BRAND NEW with the controller included. You absolutely can't beat that for a fantastic emulator-ready setup that will play anything from the 90s without skipping a beat. And additional controllers are readily available, new, on eBay as well.
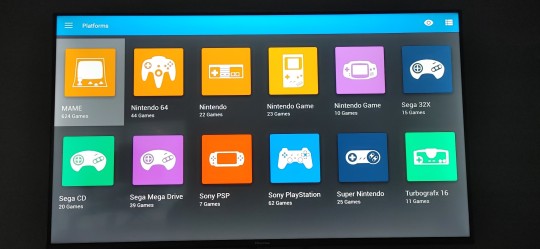
Here's a list of the systems / emulators I run on my setup:
Arcade / MAME4droid (0.139u1) 1.16.5 or FinalBurn Alpha / aFBA 0.2.97.35 (aFBA is better for Neo Geo and CPS2 titles bc it provides GPU-driven hardware acceleration vs. MAME which is CPU only)
NES / FCEUmm (Retroarch)
Game Boy / Emux GB (Retroarch)
SNES / SNES9X (Retroarch)
Game Boy Advance / mGBA (Retroarch)
Genesis / PicoDrive (Retroarch)
Sega CD / PicoDrive (Retroarch)
32X / PicoDrive (Retroarch)
TurboGrafx 16 / Mednafen-Beetle PCE (Retroarch)
Playstation / ePSXe 2.0.16
N64 / Mupen64 Plus AE 2.4.4
Dreamcast / Reicast r7 (newer versions won't run)
PSP / PPSSPP 1.15.4
MS-DOS / DOSBox Turbo + DOSBox Manager
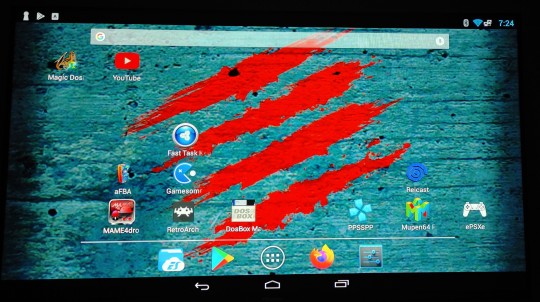
I found an extremely user friendly Front End called Gamesome (image attached). Unfortunately it is no longer listed on Google Play, but you can find the APK posted on the internet to download and install. If you don't want to mess with that, another great, similar Front End that is available via Google Play is called DIG.
If you are someone who enjoys emulation and retro-gaming like me, the M.O.J.O. is a great system and investment that won't disappoint. If you decide to go this route and have questions, DM me and I'll try to help you if I can.
Cheers - Techturd
#retro gaming#emulation#Emulators#Android#Nintendo#Sega#Sony#Playstation#N64#Genesis#Megadrive#Mega drive#32x#Sega cd#Mega cd#turbografx 16#Pc engine#Dos games#ms dos games#ms dos#Psp#Snes#Famicom#super famicom#Nes#Game boy#Gameboy#gameboy advance#Dreamcast#Arcade
66 notes
·
View notes
Text
So I did a clean install of the game, dumped my old Graphics Rules because I created it when I had my AMD card and Intel CPU. I rebuilt my computer this summer, got an Nvidia GPU, new CPU and new ram, and frankly felt like it was just necessary.
Then had a look at some other stuff I missed, and I think I've narrowed the issues: multiple conflicting shader files that were all doing the same but different things, and tbh i feel like the game got confused. Then there were conflicting defaults as someone mentioned under one of my posts. And honestly just the sheer amount of cc i had. I shaved 5gigs off it which is honestly just...insanity.
Anyway once I was satisfied that I'd found most everything, I ran the game first to make sure I had the correct shaders, and because I downloaded this thing and then ran it on a test hood using townie pools I downloaded. In short, it worked.
How do I know it worked? Cause I called all the townies to the living room, and they all had the correct names. BLESS the sims community tbh


EXTREMELY tempting to remove all the doors, fill the room with fireplaces with the only routing being a tiny hallway leading to a pool.
yeah anyway
Bonus meadow thayer:
D:<

So anyway, I'll be dropping my MCC downloads in, pulling all the lots into the bin, and then putting them in a new neighborhood just for a fresh start on it. I have my first back up of it with just the lots and no sims, so it may be wise for me to clean and pack them up etc

also yes I am still very deep in elden ring. Its rough out here. Interesting how i couldn't face Godrick the Grafted a few months ago, but now I'm bulldozing through these assholes like it's nothing.
IM COMING FOR YOU MORGOT YOU'RE NEXT, ASSHOLE
Still scared of the revenants tho
12 notes
·
View notes
Text
okay! this took a bit to type out, but here we are!
disclaimer: my way might not work for you and that’s okay! there’s no right or wrong to make gifs, so long as you enjoy the way you make them then that’s all that counts. this is only a detailed look into my own personal process and things i’ve learned along the way. i'm also an idiot who sometimes doesn't know what he's talking about, so if something doesn't make sense let me know so i can fix it!
but these are some of the things i'll be going into a little more detail than before:
tools
importing & converting to smart object
smart filters
coloring (lighting, basic, and gradient)
exporting
tools
there are a few things i use in the process, some new and some old. whether you want to use them is entirely optional, given that it can be a lot to take in at once.
photoshop 2024
if you use an older version of photoshop, then i think the layout is similar to newer versions. though iirc some older versions don’t have the timeline function so you might have to look that up yourself since i’m not familiar with any ps version without it.
handbrake
i only use handbrake if the recorded video is super long. usually i try to record each scenery shot (4-8 seconds at a time) or an entire cutscene so i don’t have to use handbrake to trim the video. if i do, then i have the settings set to export as super hq with 60 fps, deselecting align a/v start and passthru common metadata. the rest i leave alone.
vapoursynth
this is really useful and makes coloring easier imo. you can download it from the official site, but i found a portable version (i have the 200722 one) for windows here. i’m not sure how to set it up for mac users, and, truthfully, to this day i still don’t know how to use it entirely. i just followed a tutorial i i found on youtube and only changed the amount for the denoise filter and turned off the sharpen filter since i do that in photoshop itself. so it’s trial and error, and i’m erroring a lot sometimes ajdkjasvjdas. it’s also where i crop the video to my preferred dimensions, unless you choose to crop in ps.
jsfiddle code playground
if you want to have the text in the tumblr post be a gradient, then type whatever you want in the first box on the bottom right, change the color from red to your starting color of choice, then the same of the green for the ending color. hit run, copy the code, and paste it inside the text post while in html mode. ngl, i stared at the site for like ten minutes before i figured out how to use it asjdjasdasd
nvidia shadowplay
i use shadowplay since it comes with my laptop’s gpu, set to record in 1080p60. i’ve seen other giffers use obs for recording, but i don’t have any experience with it. there are scenepacks and gameplay walkthroughs on many sites, which you can use as long as you have the uploaders permission and credit them as they ask! please don't steal their videos!
reshade
i’ve started using reshade recently to tone out the blue tint of the game and sharpen it up a bit more. it makes a big difference and helps with coloring if you start out with near neutral colors.
the effects i use are:
• deband
• clarity
• sharpcontrast
• emphasize
• amd fidelityfx contrast adaptive sharpening
• fxaa
• prod_80_04_colorisolation
• adaptivetonemapper
i'm pretty sure some of these are redundant, but i’m too lazy to go back and see which ones i don’t need lol. but it’s all personally preference with how you want the game to look, and there are many effects to choose from.
importing & converting to smart object:
my preferred method is the video frames to layers, which is: file > import > video frames to layers, and then select the video. if you use vapoursynth, then there might be duplicates frames (or at least there are for me) so when the popup window appears i check the box to limit the frames to how ever many duplicates there are of each frame. usually in my case, it’s three.
after the video has been imported, i select all frames in the timeline and change the frame delay to either 0.03-0.04 depending on how fast or slow i want the gif to be. for converting to smart object, i recorded my own action set to save time by clicking on a couple of buttons, but the process is: select all layers currently > convert frame animation > convert to smart object.
let me know if you want the action set! it saves a lot of time in the process
smart filters
i don't think sharpening before or after coloring matters, but definitely do not sharpen before cropping if you haven't done already.
vapoursynth combined with the in game reshade sharpening effects doesn’t require as much sharpening as i normally use. just note that it varies from scene to scene, and whatever you're giffing. these are just the settings i used for the pirates’ cove set.:
smart sharpen #1: 500% with a radius of 0.2 px
smart sharpen #2: 10% and 10 px radius
gaussian blur: 0.7 px at 30% opacity
add noise: 1% uniform at 30% opacity

on to the coloring, which i'm breaking this up into three sections: lighting, basic coloring, and gradient coloring, with a brief description and the result after each section.
something to note is that all coloring is personal preference, and how you want your gifs to look. if you're just starting your giffing journey, here's a site i bookmarked that explains pretty well the adjustment layers and what they do if you have questions for how they work. but i'd be more than happy to answer any that you guys have!
lighting:
brightness/contrast:
with this, i’ve found that changing the blending mode to screen brightens it up well enough without having to move any on the sliders. if it’s too bright, then lowering the opacity should do the trick.
curves:
before, i used the white and black point with the eyedropper tool, but now i’ve started using the auto function that can be found in the four horizontal bars in the top right of the adjustment properties. i choose the find dark & light colors options and check the enhance brightness and contrast box. if it’s too bright or tinted too much one color, then i fiddle with the rgb curves individually to get it as neutral as i can.
levels:
with levels there’s not much to adjust other than moving the sliders for the shadows and midtones to give it a little more contrast.

basic coloring:
selective color #1:
for the first selective color set to absolute, i use it for the white/black colors to make them as white and black as possible. increasing the black can make it too dark, so i limit the increase by two or three. sometimes i change neutral if it needs it, after all the coloring is done if it still looks too much of one color that the other adjustment layers can’t fix. i don’t know exactly what the difference is between absolute and relative is, i just remember it being part of a tutorial i read and have been doing it ever since.
color balance:
i only change this as minimally as possible, usually one for cyan, one for magenta, and one for blue for all tones. sometimes i increase it more, but it all depends on how you want it.
selective color #2:
the last selective color i use it for all the other colors, set to relative, usually for reds, yellows, and blues. if there are people in the gif, then i focus mostly on skin tones, bringing out reds and yellows to make it look as natural as possible. a hue/saturation layer can be useful to even out darker skin tones by lowering the saturation for red or yellow.
with scenery, i boost whatever dominate color pops up while lowering the other colors by adding in a lot of white if the lighting is bright, or adding black for dim scenes. again, if it needs it, adding in an optional hue/saturation layer, but this time to lower the saturation for less prominent colors.

gradient coloring:
if you’re satisfied with the coloring of your gif, then this step can be skipped!
i’ve recently fallen in love with using gradient fills. there are several preset gradients available, but if you search around online there are other gradients available to download and use. or you can make your own gradient of your colors of choice.
for me, i often use blue/pink or blue/purple gradient fills. the blue/pink preset is the one i used in this case.
gradient fill:
after adding the gradient fill and choosing the colors, i change the blending to soft light and lower the opacity anywhere from 30%-50%. with darker skin tones it might be tricky as it would involve more tweaking of the settings until it looks nice.
gradient map:
i follow it up with a gradient map to help with the sharpness (i think? i’ve forgotten exactly) set to soft light again with varying opacity given how dark the scene is.
vibrancy
this is completely optional here, but i like the colors cranked to the max, boosted to 80% or slightly lower. some minor adjustments might have to be made after this, usually with it being too red or possibly yellow.
exposure
the final adjustment layer to top it all off is exposure. i like my gifs to have a matte-ish look, so i change the offset anywhere from +0.0010 to +0.0030. if the gif is still a little on the dark side, increasing the exposure helps.
the gradient coloring takes the longest to get the colors to look good, but i love my colors so much and the end result is so worth it.

logo:
this is optional of course, but since there's quite a few people out there who love to steal gifs, it's probably a good idea to put your logo on the gif to help deter them. mine's simple and uses either the font code bold or moon. i have it saved as a png so that i can go to file > place embedded and resize it to my liking before moving it to the bottom right corner.
but for me those are too many steps to do for each gif, especially if i’ve been working on them for hours. so i open up an old psd with the same dimensions and duplicate the logo layer for each gif to save time.
exporting:
under file > save for web (legacy) the window for it should pop up. i don't usually mess around too much with the settings here, keeping it at selective diffusion and changing the matte to none.
sometimes the size will be too large for tumblr's limit since i like bright colors, and depending on how many frames are in each gif, most of them end up on the large side. i have to fight photoshop sometimes to make it work by either trimming a few frames or messing slighting with the lighting. occasionally i end up having to go back and reimport the videos to divide the frames equally if i don't want to trim any off. it’s a pain, and it’s something i should honestly try to plan out before that point lmao.
but if you're satisfied with how it looks, save, and you're good to post!
8 notes
·
View notes
Text
A friend of mine asked me recently to detail my Linux setup, and after thinking about it for a bit, I realized that this is essentially a personality quiz for the Linux users I thought I would detail it here as well.
I no longer have a desktop computer at all. I have two older generation "gaming" laptops and three Raspberry Pis. I'm going to go through in the order I got them:
Laptop #1:
[Purchased New in 2016] Acer ROG 7th Gen i7, 16GB Ram, nVidia 1050Ti Mobile, Internal 1TB HDD, external 2TB HDD
This was originally a windows laptop when I got it back in 2016, but in 2021 I was tired of the long windows boot times on the the HDD and was much more familiar with Linux due to several years experience doing webserver admin work.
I use Ubuntu LTS as my base. It's easy, it's well supported, it's well documented, and the official repos have just about everything I could need. The only thing I've really had to add myself is the repo for i3, but we'll get to that in a bit. I also chose Ubuntu because I already had my first two Raspberry pis, and both were running Raspbian, so using a debian based kernal meant that it wouldn't be much of a change when ssh'ing into them.
That said, I've never really liked the default Ubuntu desktop. Gnome3 is slow and full of too many effects that don't look especially nice but are still heavy to execute. Instead I loaded up KDE plasma. You can download Kubuntu and have them to the setup for you, but I did it the hard way because I found out about Plasma after installing Ubuntu and didn't want to start from scratch.
My plasma desktop looks like this:
Of my two laptops, this one is in the best shape. It's the one that I usually take with me on trips. With the dedicated GPU it can do some light gaming (it did heavier gaming on windows, but due to emulation layers the performance is just a little worse these days, Linux gaming isn't perfect), the screen hinge has never been an issue, and it's on the lighter side of gaming laptops (which is not to say that it's light). For that reason, I often find myself actually using it on my lap, in airports, at people's houses, on my own couch typing this up.
For this reason, I started looking into ways to better keep my hands on the keyboard, rather than having to drift down to the track pad, which is my least favorite part of this laptop. During that research I discovered i3. If you're not familiar i3 is a Linux Desktop Environment that is entirely keyboard driven. https://i3wm.org/
To be fair, it's less of a desktop environment and more of a keyboard driven window manager, as it doesn't have a "desktop" per se. Instead when you log into it, you simply get a black status bar at the bottom of the screen. It doesn't even black out the login screen, so if you don't know what to look for, you might think the whole thing has hung. But, the big benefit of this is that the whole thing is lighting fast for a DE. It doesn't waste any resources on effects or really anything that you don't need. But it's really nice for window tiling and task switching without having to get the mouse involved. This is great for productivity (if you're into that), but it's also just convenient for working on a gaming laptop, which might be balanced such that if you take your hands off of it, it might topple off your lap.
This laptop is my primary project computer. It has all my git repos and scripts for doing things like renewing my website's ssl certs. I also run game servers on it for Minecraft. I'm probably going to spin up a Valheim server on it in the near future too. Especially now that the process has improved somewhat.
Raspberry Pi #1:
[Gifted New in 2016] Raspberry Pi 3b, 4GB RAM, 32GB SD card
This one is my oldest RPi. It's had a lot of roles through the years, including an early version of the vogon media server during initial development in 2020. It's run headless Raspbian for a good three or four years now. Currently it's configured as a web server/php scripted web crawler and a pi-hole DNS server. My router currently refuses to use it as a DNS server without bringing the whole network down, but I will on occasion manually switch devices to it when I'm running especially ad-ridden applications.
There's not too much to say about this one. It's stable, I almost never have problems with it. I frequently use it for things that I want running in the background because they'll take too long and I don't want them blocking up one of my other computers.
Laptop #2
[Gifted Used in 2020] Asus Predator 7th Gen i7, 16GB Ram, nVidia 1080 Mobile, 2 internal 256GB SSDs, External 2TB HDD
This one runs windows 10 still. I use this primarily for gaming. The screen hinge is an absolute joke, and replacing it involves replacing the entire screen bezel assembly, which I can absolutely do, but is such a pain that I haven't gotten around to it in the 3 years I've owned this laptop.
There's nothing really special about this one, other than that when both laptops are at my desk, I use a KVM switch to swap my external monitor, keyboard, and trackball between the two computers.
Raspberry Pi #2:
[Gifted New in 2020/21] Raspberry Pi 4b, 4GB Ram, 16GB SD card, 2 120GB USB Sticks, External 2TB HDD
This is my media server. I got it for Christmas 2020 (or 2021, I don't actually remember which because 2020 was a hard hard year). It runs Rasbian, the full OS, with the desktop environment disabled from booting via the command line. It runs PHP 8.2, MariaDB, Apache2, and MiniDLNA to serve the content via my Vogon Media Server.
If you can't tell from the above storage, I'm running the USB ports well past the power delivery they are rated for. The webserver and OS are on the internal storage, so functionally this just means that sometimes the media disappears. I need to build a migration script to put the contents of the two USB sticks on the external storage, as there is more than enough room, and if I can put the HDD in an enclosure with dedicated power, that will solve the issue. But that's at least a hundred dollars of expense, and since the server only has 1, maybe two users at a time, we've been limping along like this for a few years now.
Raspberry Pi #3:
[Purchased New in 2023] Raspberry Pi 4b, 8GB Ram, 16GB SD card
This is the newest Pi. Work gave me a gift card as a bonus for a project recently, so after weighing the pros and cons of getting a VR headset, I settled on setting up a retro gaming tv box. Currently it's running Batocero Linux and loaded up with classic game roms up through the PSX. Though, I would really like to use it as a tv client for the media server. I've upgraded the devices in the living room recently, and there's no longer a dedicated web browser we can use without hooking up one of our laptops. I've got a spare 128GB SD card in the office, so I'm strongly considering getting a wireless mouse and keyboard and setting it up to dual boot between Batocero (which is convenient because it can be navigated with just a controller), and Raspbian. I think I'd set Batocero as the default in Grub, and then if I want to use Raspbian I'd need to have the keyboard handy anyway.
Maybe I'll get one of those half-sized keyboards with the trackpad built in.
Speaking of controllers. I use an 8BitDo Pro 2 controller, and I've been super happy with it since purchase: https://www.8bitdo.com/pro2/
So that's the setup. I have entirely too many computers for any one person, but I included the dates when I got them to show that a number of these have been around for a long time, and that part of the reason I have so many now is that I've put a lot of time into ongoing maintenance and repurposing.
If you've read this far, I'd love to hear about your setups. You don't have to reblog this, but please tag me if you detail yours.
5 notes
·
View notes
Text
What’s in a Computer 101
Motherboard - everything plugs into this. It makes sure every part talks nicely to each other.
CPU - brain of the computer. Roughly, bigger numbers = more brainpower
GPU - makes the pictures happen. Again, bigger numbers roughly equal more picture power.
RAM - short term memory. More of this means more things can happen at once. This is what gets eat by your open google chrome tags and makes things slower.
Storage - long term memory. Where you store all your downloaded but unplayed steam games.
PSU - UNLIMITED POWER. Nah but this is your battery and what makes sure all the pieces can turn on. Make sure it’s big enough and do not under any circumstances cheap out on this if buying separately. A cheap psu will explode.
Cooling - power=heat. More power means more cooling. There’s a ton of options.
Case - what everything goes into. Size matters. Make sure it’s big enough.
Motherboard - This determines the kind of cpu you can purchase because they fit into the board differently. They have different stuff going on depending on how much you want to spend. Basic boards will do what you want, but they may look busier and be lacking things you want (like a million usb connections or internal Wi-Fi).
They come in different sizes. Micro-ITX is itty bitty. Surprisingly, this does not mean cheaper. Then it’s mini-ATX. Both mini and micro will be lacking the extra PCIE slots that let you plug in things like multiple graphics cards or a Wi-Fi board if your motherboard doesn’t have that capability built-in. ATX is your standard size motherboard. Then it’s E-ATX. You can have More Stuff on this one. It’s big.
Pick a motherboard that has the functionality you want on it. You gotta make that choice based on your budget and on the other parts we’ll talk about in a minute.
You don’t really get to pick this for a laptop though.
CPU - There are two companies that make computer brains: Intel and AMD. They are in a constant fight to be the company with the most powerful brain. Their number schemes are weird. Intel is i3-, i5-, i7-, and i9- followed by some very large number. The general rule is the bigger the number, the more it can handle. AMD has the 3000,5000, and 7000 series. Again, bigger number, better performance. Bigger number also means more money. AMD had better cost/performance ratios when I built my stuff, but unless you’re aiming for the top tier of performance, the difference honestly isn’t that noticeable between companies.
GPU -On a pc, this will be your most expensive component. Again, bigger numbers = better performance = more money. There are two companies for graphic processing units: AMD and NVIDIA. NVIDIA has the RTX line or cards. The most recent is their 4000 series (4060,4070,4080,4090) and AMD’s 7000 series (7600 and 7000) Radeon cards are their competition. Again, unless you are aiming for The Best, you will not necessarily notice a difference and there ain’t no god damn reason to buy the 4090 or 7900 unless you have $2k USD burning a hole in your pocket.
The NVIDIA 3000 series and AMD 6000 series will be cheaper and work just fine. All of NVIDIA’s cards since the 3000 series have raytracing which is a fancy lighting thing big games use right now. It’s pretty and you do actually notice the difference. AMD’s lower tier cards don’t. I believe NVIDIA is sorta winning the performance fight right now but like I said. Unless you are going for ultra/elite settings on everything with 4k resolution… you’re not noticing a difference at medium/high at 1080p between any given company. You can also find older, used cards for cheaper that work just fine. Be careful that they weren’t used for mining though. They tend to be busted.
RAM - You want as much of this as you can get. 8 GB is not enough if you want to have more than one tab open in google chrome. 16 is the bare minimum for gaming. Pretty much anything new is gonna require 16GB of ram. Some people are starting to say 32 is now the thing you should aim for. Considering how cheap ram is right now, it’s probably worth it just as games get more demanding. This is less true for laptops because everything is more expensive in a laptop.
This also has to be compatible with your cpu so if you buy parts individually, you gotta do some digging on the CPU’s support list via your motherboard support site with the ram’s serial numbers to make sure it’ll work. This is not a concern with prebuilt machines like laptops or prebuilt pcs.
They also have different speeds if you want to make things go faster but that’s more advanced than I’m getting into here
Storage - There are three types of storage right now: hard drives, SSDs and M.2 SSDS. Hard drives are slower and physical. They’re cheap, good for massive storage. Not good for putting your operating system (windows, Linux, etc.) on if you want it to move quickly. SSDs - faster than hard drives, digital storage, and more expensive than hard drives. M.2 - looks like a stick of gum. Plugs into your motherboard directly (no wires), super fast. The most expensive. Laptops run off M.2s for space reasons. This makes more storage more expensive. You will need a lot of storage if you are running modern AAA games. They’re chunky now. 1000 GB makes 1 TB - most AAA games live in the land of 150 GB at least now.
PSU - power supply. Your graphics card is gonna determine this the most. But the more powerful your machine, the more power you need. This is the place you never, ever, ever cheap out. A bad power supply can blow up. Literally. Best case scenario with that is the computer you just bought is dead. Laptops don’t let you pick this. Instead you get averages of battery life. More battery life means less time plugged into a wall.
Cooling - how to keep your computer from dying from the heat. This will depend a Lot on your person preferences but also on the power of machine. Power=heat. The more powerful your machine, the more cooling you need. Entry level CPUs come with coolers. The more mid-tier and high-tier tell you to buy your own. You have two routes: air and water cooling. Air uses metal pipes and fans. Noctua is the brand everyone swears by and it’s the brand I bought when I upgraded my machine. They’re pricey, but they really are fantastic. They will also send you pieces later down the road if you upgrade your machine to a new cpu with different dimension so their cooler can still fit. Their site also has a bunch of graphs and charts and stuff to help you pick which of their coolers is best for your machine. Water cooling uses a bunch of tubes filled with water to pick up the heat and carry it to a big metal thing (radiator) that you attach fans to to blow out the hot air. It’s quieter than an air cooler, and you can do all this crazy custom stuff with it. Or you can buy an AIO (all-in-one) that just needs to be attached to your case and a fan. People fight about whether air or water cooling is better. All I know is that I don’t risk spilling water on my electronics with one. So that’s the route I go.
Laptops have their own thing going. They’ve got air cooling with little fans inside the case. More powerful laptops sometimes allow you to external coolers to help offset the heat. I would suggest these. Don’t fry your laptop.
Case - where you put everything. Laptops give you very little choice here and they all basically have the same shape. Gaming laptops are gonna have a certain Aesthetic that I can only describe as red/rainbow and Pointy. They tend to be a bit aggressive in their appearance. This is true for most gamer things and it’s hard to get around.
PC cases are mostly the same shape (rectangle) but have more variety in color and layout. That’s all personal preference though. but they’ve got stuff you gotta pay attention to. Namely their size. You gotta fit all your stuff inside it. Tiny cases will not fit an ATX motherboard. A giant case will fit everything but may also be bigger than you’d like. Basically, you gotta look at the dimensions of your other parts (the gpu and cooler mostly) and compare it to the case dimensions so everything fits. Prebuilt pcs take care of this for you.
My current rig
Motherboard: Aorus b450 pro Wi-Fi
CPU: Ryzen 7 5800X
GPU: NVIDIA RTX 3060ti
RAM: 16 GB
Storage: Samsung 860 EVO 1 TB SSD (2 of these, actually)
PSU: Corsair 650w
Cooling: Noctua NH-D15s (and a bunch of cheap upHere fans for my case)
Case: a Montech something-or-another that’s cheap and not made anymore from what I can tell
My rig can play Jedi:Survivor on high settings with ray tracing on at 1080p with no real issues. I want to do some upgrades, but that’s me chasing those insane top of the line rigs. I dont need to do that by any means. I can play any game that comes out in the next few years just fine.
@drakonovisny
#computer stuff#feel free to ask more specific questions but this is a brief overview#laptops are more about how much you want to spend#those come pre-done and you’re just picking what you like#amd is generally less expensive but that changes year to year
8 notes
·
View notes
Note
hi i saw your post about high poly cc and I have like 27gb worth of cc, and some is definitely high poly and my game does lag a bit and takes a few minutes to load (i have a fairly decent pc i’d say, intel i7 8700 cpu 16gb ram and nvidia etc 2070 gpu) what specs would you recommend to handle this with all the packs installed?
it honestly just depends. my expertise is primarily in software, so keep that in mind as i give my recommendation:
your computer has specs that are pretty high end. the most important spec in this case is your graphics card. you already have a good, dedicated graphics card. the thing is that there is only so much your hardware can do for badly optimized software. This is why things such as LODs exist, so that as you get further away from items in game, they will reduce quality, and eventually disappear as not to tax your system.
From my experience the sims 4 will take extra time in loading screens with large amounts of cc (even cc that is not poorly made/high poly), regardless of your hardware, due to the way the code is optimized. I know this is probably not what you want to hear, but if you want to avoid long loading screens, it might be a good idea to remove some cc.
If you notice any lagging while actually playing the game (not just loading screens) then that is probably due to the cc you have installed. I recommend checking the poly counts of items when downloading from new artists. usually, if someone does not know how to decimate/retopologize their meshes, all meshes will have extreme poly counts. that way, you can get a general idea of the cc you are downloading without having to check every single item.
TLDR: to reduce loading screen times, reduce amount of cc. to reduce lag/jumpiness while playing the game, get rid of poorly made or high poly cc. with disclaimer: i am not a hardware export nor did i write the sims 4 code, this is just from my experience.
7 notes
·
View notes
Text
Setting up cuda + cudnn on a server is a total PITA
First you need to sign up with nvidia to download cudnn??
Then after downloading, you need to upload a .deb to your server - no link provided - so you download 800mb on your machine then send it to your darn server. Guess it's verrry important to protect their IP even though a hacker can just signup using a fake email and still access their cudnn.
Then, after installing the .deb, cudnn libraries are still not there, looks like I have to extract another .deb that was magically placed somwhere in `/var/cudnn-local-repo-ubuntu2004-8.7.0.84/`
TLDR, all the time cuda will save in model training time tonight, I will have lost 10 times trying to install cuda. I wish AI development was more open source and less limited by signup-walled download pages, proprietary drivers & libraries. I mean I pay for the GPU, that should be enough, nvidia is not even asking payment for drivers and libraries, so why make it so complex?
3 notes
·
View notes
Text
nevermindtheweights
How do you use these things anyways? Can anyone do it or does it require effort like downloads and the like
IIRC as long as you have the right version of python installed, the latest version of StableDiffusion is pretty much a oneclick install.
Though you do have to have a decent GPU to use it. It's compatible with NVIDIA mostly, and I've got a 1070
2 notes
·
View notes
Text
my hackintosh journey
formatting usb's to a gpt partition without gibmacOS's python script (only on windows with the bat cmd launcher script) was a pain for about a day or two and I wasn't aware it existed until I found it and it's still broken write to usb command is unavailable because the download server is off so writing the OS dmg images required transmac and that's if you can even find a proper installer. I also realized I was copying the ventura mac installer incorrectly to the drive then figured I should just boot efi's in a seperate usb drive to solve partitioning or read/write issues. My config.plist file had many things inaccurate and proper tree manager and ocat auxilary tools don't come with manuals. After finding a proper coffee-lake efi without any model identifiers, I used OCAT to generate an SMBIOS of iMac 19,1 and proper tree to edit some values like securebootmodel to disabled and enablewriteunprotector to true then rebuilt it, saved and pasted some prebuilt ACPI SSDTs then rebuilt the config file again. This is all after the original high sierra install which needed a proper clover EFI so I had used the one I found from AIO Clover Boot method's img file off an abandoned blog. Once I had High Sierra running I used a script from tonymacx86 to install web drivers for the OS but it broke for some reason after many reboots of the ventura installer. So I had to then update the OS and then installed the original web driver from nvidia. After that installation, you are required to use opencore's legacy patcher to build the new OS usb or off the app store with the dd to usb terminal command but opencore's method is easier. My take is... If you want to be able to run mac OS X on a PC just buy one. KVM's on Qemu with linux using Sosumi are outdated, they don't support usb passthrough correctly if you don't have the USB Kext installed for your mobo or Qemu updated and set up with virt-manager which is some other nonsense of it's own. The whole thing is a mess all over the internet without any proper guide to complete it all in 2023. That's even after you figure you can run the legacy patcher's root patch for GPUs - says it runs on ventura but I didn't test it and without metal app support.. and you still need to know the secret boot arguments for your GPU if it's not AMD based and you'll likely get some Invalid X symbol at the second boot for not disabling system integrity protection while rooting or not copying over the EFI bc I don't even know how to safe boot to a hackintosh for turning off SIP if it doesn't boot in the first place. I will stay on Windows 10 and keep my High Sierra installation though because old software is kinda neat, less broken, and faster than whatever is out in the wild. Manjaro Linux running gnome on the other hand, or Fedora are really good for running servers without needing windows license keys and it's probably why sysadmins like linux so much tho the other software on it mostly sucks and so without maiOSX running on edge and all the web apps it's toast and the safari developer thingy on iOS doesn't work on high sierra unless you update iTunes probably which is a security update of 2gb that will break the GPU again.. it's just awful how de-constructing updates and things are on all those mac OSes are. ventura looked neat though but, too grey for me. not dark enough.
4 notes
·
View notes
Text
4 Best i7 Gaming PCs That Enhance your Gameplay
An i7 gaming PC offers you everything that makes gaming more comfortable, such as high clock speed, big L3 caches, automatic CPU acceleration, and so on. These specs make the model an ideal choice for gaming.
Due to the functionalities of the i7 gaming laptop such as performance cores, efficiency cores, and portability, you get more than your expectations. But with the range of gaming-focused models, it is difficult to choose the best one. If you’re facing the same issue, then read the blog to get an overview of the best models.
IdeaPad Gaming 3i Gen 7 Intel (15"):
The IdeaPad gaming model delivers superior gaming performance. It enables multitasking, innovative architectural designs, and the right core for right overload. This model gives freedom to chat, browse, edit, stream, record, and play multiple beats.
The GeForce RTX series GPU helps in delivering great performance for creators and gamers. IdeaPad’s new RT cores, Tensor cores, and multiprocessors help in offering ray-traced graphics with cutting-edge AI features. This also offers cooling down features that can improve your performance by 20%.
Key Features:
It has a 12th generation Intel core processor.
With NVIDIA graphics, you can explore graphic-intensive pictures.
It has a memory limit of 8GB of DDR4-3200MHz.
With a display quality of 15.6" FHD, you can experience real-life immersion.
Due to the 720P HD camera, you can watch the latest videos.
IdeaPad Gaming 3i Gen 6 Intel (15"):
With the help of a 35W processor, you can easily record, play games simultaneously. You can easily play AAA games on these devices. With a lightning-fast Gigabyte of WiFi, WiFi speeds up with a reliable connection.
You can easily peak your performance with the available GPU modes. With ray-traced graphics, cutting-edge design and AI functionalities, you can come to the top of gaming.
You can explore the game cinematics with an FHD IPS display that lets you enjoy the world of gaming.
Key Features:
With the 11th Generation Intel Core, you can easily play adventurous games.
With the storage capacity of a 1TB 5400 RPM HDD + 256 GB PCLe SSD, you can download multiple files.
With 720p HD, you can explore graphic-intensive images.
Gamers can make faster keystrokes with the help of a backlit keyboard.
IdeaPad Gaming 3i(16" Intel):
The IdeaPad Gaming laptop has stylish blue accents with an Onyx Green design that catches the attention of gamers. With the additional room of a dedicated media controller, a full-size number pad, large arrow keys, and a lot more.
The jet-inspired system helps in keeping your device cool and overcomes the overheating issue. Due to the in-built advanced functionalities, you get increased ventilation of upto 20%.
Key Features:
It has a 170W adapter that enables a smoother flow of gaming.
With a 1080P FHD display, you can enjoy real-life immersion.
Due to the 12th Gen intel core processor you can get most from your game.
With Whit Backlit keyboard you can experience gaming pleasure.
Legion 5i Pro Gen 7 Intel (16"):
With revolutionary and efficient cores, the 12th Gen Intel Core enables seamless streaming, editing, recording, gaming and a lot more. Simultaneously, the turboshoot technology increases the frame rate.
The device is supercharged with ray-trace cores, tensor cores, streaming multiprocessors, AI-tuned DLSS and more. Lenovo’s engine offers innovation, intelligence, and high-performance to enjoy popular game titles.
Key Features:
With the 12th Generation Intel Core Processor, you can enjoy high-speed gaming.
Due to the 4 Zone RGB Backlit keyboard, you can play faster strokes needed in gaming.
With a 16" WQXGA display, you see crystal clear images.
The device provides a memory capacity of 16GB DDR5. You can store multiple files, videos, and documents.
Conclusion:
Everyone wants best gaming experience while playing neck-to-neck adventurous titles. With the changing needs of modern games you also need world-class specs such as multi-core processors, advanced graphic functionalities and more. You can get all these specs in a gaming laptop i7 that streamlines gaming complexities. So, don’t wait too long! Go for the best.
2 notes
·
View notes
Text
The Big Bucks in Gen AI Investments
New Post has been published on https://thedigitalinsider.com/the-big-bucks-in-gen-ai-investments/
The Big Bucks in Gen AI Investments
Two massive strategic VC funds were announced this week.
Created Using Ideogram
Next Week in The Sequence:
Edge 433: Our series about SSM continues with the introduction of the SAMBA model and the concept and SSMs for long-context windows. We review the original SAMBA paper and Microsoft’s Task Weaver agent for analytic workloads.
Edge 434: We dive into DeepMind’s amazing GameNGen model that can simulate an entire game of Doom in real time.
You can subscribe to The Sequence below:
TheSequence is a reader-supported publication. To receive new posts and support my work, consider becoming a free or paid subscriber.
📝 Editorial: The Big Bucks in Gen AI Investments
Mega financing rounds are the norm in this wave of generative AI, but have you ever wondered where the money comes from? One might assume that venture capital (VC) funds are driving the massive valuations of foundation model startups. After all, firms like Thrive Capital have been active in major rounds at OpenAI. However, that assumption would be misleading. The traditional VC industry is simply too small to sustain regular rounds of tens of billions of dollars. The main source of capital for foundation model makers is coming from strategic investors, specifically the hyperscalers such as Microsoft, Google, Amazon, and NVIDIA.
This phenomenon is unique to this wave of generative AI and is based on three key factors:
The capital required to continue pushing the scaling laws of foundation models is in the hundreds of billions of dollars.
The business model for most large foundation model makers revolves around achieving AGI (Artificial General Intelligence), which, as an investment thesis, is too long-term for most VCs.
Much of that investment is used for cloud computing hours and GPU purchases, effectively returning the money to the investors themselves.
Just this week, Microsoft and BlackRock announced a massive $30 billion fund focused on AI infrastructure. The alliance combines Microsoft’s strategic view of the AI market with BlackRock’s global fundraising capabilities. This may be one of the largest tech investment funds ever raised with a single focus. Also this week, Salesforce announced plans to expand its AI venture investments to $1 billion, marking the most ambitious strategic VC initiative among SaaS providers.
The trend of strategic capital displacing financial VCs in foundation model markets is likely to accelerate as the scaling laws of these models continue to push forward. Ironically, it seems the VC industry is being disrupted by AI itself.
💎 We recommend
We’re excited to share a new FREE eBook by Galileo – Mastering RAG: a comprehensive guide for building enterprise-grade RAG systems!
Get your copy today to enjoy 200 pages of in-depth content on chunking, embeddings, reranking, hallucinations, vector databases, RAG architecture, testing, evaluation, and so much more…
Download Mastering RAG to learn how to:
Reduce hallucinations, use advanced chunking techniques, select embedding and reranking models, choose a vector database, and much more
Overcome common challenges with building RAG systems
Get your system ready for production and improve performance
🔎 ML Research
Eureka
Microsoft Research published a paper proposing a framework and methology for evaluating foundation models. Eureka supports both language and multimodal evalaution pipelines —> Read more.
Neptune
Google Research published a paper introducing Neptue, a new dataset for long-term video understanding. Neptune includes question-answering scenarios for videos up to 15 minutes long —> Read more.
GRIN
Microsoft Research published a paper detailing GRIN: GRadient-INformed MoE, a new MoE architecture that incorporates expert routing based on sparsed gradient optimizations. With just 6.6B parameters, GRIN outperforms much larger models in reasoning and math evaluations —> Read more.
Qwen2.5-Coder
Alibaba Research published the technical report for Qwen2.5-Coder. The research covers the details of 1.5B and 7B variarios trained in 5.5 trillion tokens —> Read more.
NVLM
NVIDIA Research published a paper detailing NVLM, a family of frontier-class multimodal large language models. The model seems to achieve performance comparable to GPT-4o and Llama 3.1 especially on language tasks —> Read more.
Self-Correcting LLMs
Google DeepMind published a paper outlining SCoRe, a technique for developing self-correcting LLMs using reinforcement learning. SCoRe uses data self-generated data that translate into self-correction traces which steer the model into a specific direction —> Read more.
🤖 AI Tech Releases
Opik
Comet ML open sourced Opik, a tool for monitoring and evaluating foundation models —> Read more.
SQL Console for AI Datasets
Hugging Face released a SQL console for its dataset repository —> Read more.
Gen AI for YouTube
Google DeepMind announced new gneerative AI features for YouTube creators —> Read more.
🛠 Real World AI
Jupyter Notebooks at Meta
Meta discusses the best practices and frameworks for using Jupyter notebooks in their ML infrastructure —> Read more.
ML Pipelines at Yelp
Yelp discusses the use of Cassandra and Spark in their ML pipelines —> Read more.
📡AI Radar
Digital art legend Refik Anadol unveiled a large nature model built by fine-tuning Llama.
Microsoft and BlackRock partnered to launch a massive $30 billion AI investment fund.
Black Forest Labs, the image generator behind Grok, is raising $100 m illion at $1 billion valuation.
Salesforce Ventures expands its AI investments to $1 billion.
AI video platform Runway anchored a partnership with Hollywood’s Liongates Studios.
AI coding editor Supermaven raised $12 million in a new round.
AI for meetings platform Fathom raised $17 million in new funding.
AI sales automation platform Rep.ai raised $7.5 million to boost its AI digital-twin solution.
11x.ai raised $24 million to build AI digital employees.
Chatbot Arena has a dedicated site.
OpenAI might remove its nonprofit structure after the current fundraise.
AI content platform Typeface announced two new acquisitions.
TheSequence is a reader-supported publication. To receive new posts and support my work, consider becoming a free or paid subscriber.
#acquisitions#agent#AGI#ai#AI Infrastructure#AI video#amazing#Amazon#architecture#arena#Art#artificial#Artificial General Intelligence#automation#automation platform#billion#Black Forest Labs#BlackRock#Building#Business#business model#chatbot#chatbot arena#Cloud#cloud computing#coding#comprehensive#computing#content#creators
1 note
·
View note
Text
Gratis Guitar Hero III Legends of Rock: Descrição
Guitar Hero III Legends of Rock é o terceiro jogo completo da série Guitar Hero e o quarto no geral. As opções de jogo multijogador permitem que dois jogadores compitam entre si. Na variação Face-Off, dois jogadores executam uma música alternadamente. Com a versão Pro Face-Off, dois jogadores podem usar o mesmo gráfico de notas para competir entre si. Por último, ao se sair bem no modo de batalha, cada jogador pode ganhar power-ups que podem utilizar para perturbar o outro jogador gh3 pc download.
A jogabilidade é semelhante aos jogos anteriores, pois você usa um controlador em forma de guitarra para sincronizar, pressionando os botões de cinco trastes e dedilhando as notas que estão rolando na tela. Seu medidor de desempenho cairá se você perder letras; se o medidor cair muito, o desempenho será considerado malsucedido e você deverá tentar novamente.
Existem outros tipos de jogos disponíveis, como jogos guitar hero guitar ps3 multijogador, cooperativos e de carreira. Para ajudá-lo a aprender o jogo ou a decifrar uma seção difícil de uma música, existem modos de treinamento e prática disponíveis, além dos modos de jogo padrão. 71 músicas inéditas interpretadas por artistas como Cream, The Rolling Stones, Black Sabbath, Aerosmith, Guns N’ Roses, Santana, Sonic Youth, Weezer e muitos mais estão incluídas nesta edição. Além das músicas disponíveis, o jogo conta com “batalhas de chefes” com guitarristas conhecidos como Slash, Lou the Devil e Tom Morello.

Características principais de Guitar Hero III Legends of Rock:
O modo carreira para um jogador em gh3 game apresenta 8 níveis com um total de 42 faixas.
Dentro de cada nível, o jogador completa várias músicas, cujo número depende do nível de dificuldade escolhido.
Entao antes de ser oferecida a execução adicional de mais uma música para completar o nível.
73 faixas jogáveis; 42 fazem parte do setlist principal, 6 são exclusivas do modo Co-Op Career e as 25 restantes são faixas bônus.
A história do modo Carreira, mostrada através de cenas de desenhos animados entre locais.
Dois jogadores usando o mesmo console podem participar do modo Co-Op Career. Jogos guitar hero 3 hero competitivos online onde o jogador pode competir contra outro usuário através do serviço de rede do console.
O que há de novo em Guitar Hero III Legends of Rock:
Guitar hero guitar ps3 tem um elenco de 13 personagens, que o jogador também pode personalizar com troca de skins de guitarra e roupas de palco usando o dinheiro do jogo ganho em apresentações de sucesso. O jogador terá acesso aos três chefes do jogo – Tom Morello, cortado, e Lou, o diabo – como personagens jogáveis quando terminarem suas respectivas batalhas contra chefes no modo carreira. Embora Bret Michaels apareça no jogo e cante músicas precisas, ele nem sempre é um personagem jogável no jogo.
o jogo, assim como os atuais modos de carreira para jogadores solteiros. No entao inclui um novo modo de carreira Co-Op e situações agressivas e exigentes que colocam o jogador contra personagens do jogo e outros jogadores. Guitar hero 3 legends of rock playstation 2 é o primeiro jogo da série a incluir um recurso multijogador online. Pro, que não adiciona novos botões de preocupação, mas aumenta a quantidade de notas e o problema geral.
Guitar hero 3 torrent durante uma música, os avatares da banda virtual, incluindo uma pessoa selecionada pelo jogador, irão se apresentar no ritmo da música, respondendo adequadamente ao desencadeamento do poder de uma pessoa famosa ou ao fracasso de uma música.
Capturas de tela:


Requisitos de sistema:
Mínimo:
Processador: Intel Pentium D (Dual Core) 2,8 GHz ou AMD Athlon 64 3500+
RAM: XP – 1 GB de RAM, Vista – 2 GB de RAM
GPU: Placa aceleradora de hardware 3D necessária – 100% compatível com DirectX 9.0c Placa gráfica de memória de vídeo de 128 MB (ATI): Placa gráfica Radeon X800 (Nvidia): Geforce 7600
DX: DirectX 9.0c
SO: Windows XP SP2, Windows Vista
STO: arquivo de troca de 5,1 GB + 1 GB
Som: placa de som compatível com DirectX 9.0c
ÍMPAR: unidade de DVD-ROM 6X
Recomendado:
Processador: Intel Core 2 Duo 2,4 GHz ou AMD Athlon Dual Core 4400+
RAM: 2 GB de RAM
GPU: Placa gráfica de 256 MB Placa aceleradora de hardware 3D (ATI): Placa gráfica Radeon HD 2600 (Nvidia): Geforce 8800 GT
DX: DirectX 9.0c
SO: Windows XP SP2, Windows Vista
STO: arquivo de troca de 5,1 GB + 1 GB
Som: placa de som compatível com DirectX 9.0c
ÍMPAR: unidade de DVD-ROM 6X
Como instalar?
Baixe e execute download gh3 pc – Ganhe ISO EN.zip.
Após montar o ISO, extraia todos os arquivos de OGD_Guitar_Hero_III_Legends_of_Rock.iso para qualquer pasta.
Inicie o GHMenu.exe.
Selecione “Instalar Jogo” e aguarde um pouco a instalação do jogo.
Para atualizar o jogo para a versão 1.3, selecione “Patch v1.3”.
Para aplicar o NoCD ao jogo, escolha “No-CD Crack”.
Após a conclusão da instalação, para começar o jogo, execute “Setup.exe”.
0 notes
Last Seen Blogs

hargapipagalvanisbangakalan
BERSERTIFIKAT, (0851.7236.1020) Harga Pipa Galvanis 1 5 Inch Ban

soqinestnt377
SoqinestNT excellent blog 1107

freelovelyphotos
可愛網站素材分享免費


ob7onbmy0-blog
가입전화없는꽁머니그래프 하또하또네일핏토토