#Sims 4 CC Guide
Text
A guide for making a horse stencil (but it also works for cats and dogs, technically).
Edited 16/10/2023: Updated to add more info on hash ID generation and better practice.
If you've read my previous guide on making custom brushes, you'll find that it's relatively similar.
If you're brand spanking new to making any mods, this will probably take you through every single step, because I have an issue with being over-detailed.
Things you'll need:
Sims 4 Studio
GIMP
Notepad
Tools in S4S we'll be using:
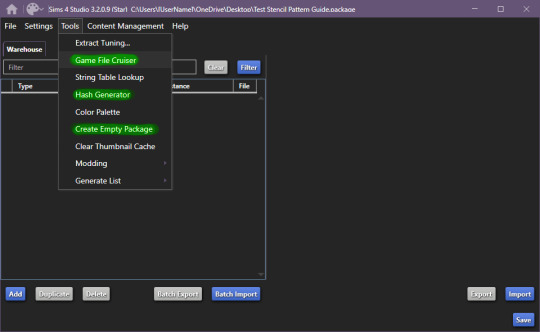
Begin by making a new, empty package file, after that, open up the game file cruiser.
Find the "Pet Pelt Layer" and tick the box, after that, in the search box below the file types, write in "EP14", as this will hide cat and dog stencils that will show up.
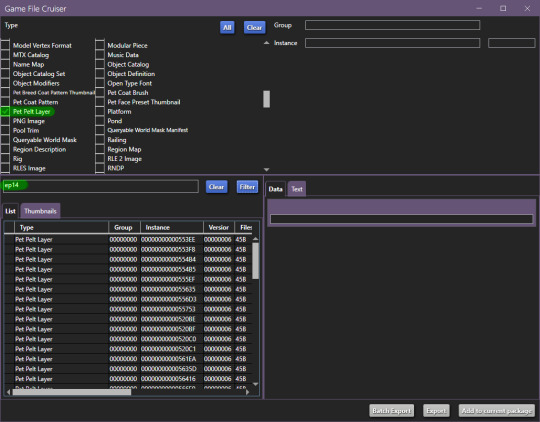
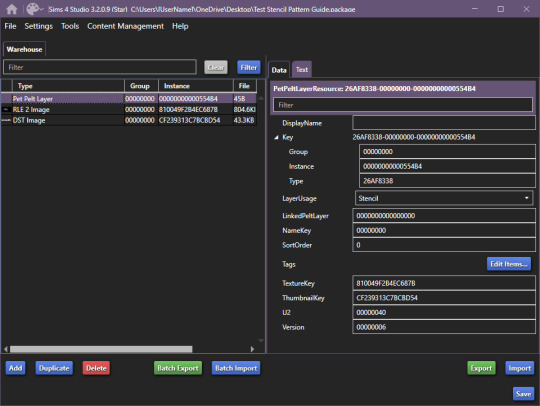
From here, it's important that we find the right one to work with, it has to be tagged as "Stencil", in this case, it'll be the 3rd from the top of the list or - 00000000000554B4
You can definitely work with just the first one which is a pattern if you want to, but if you're completely new to modding, it will be much easier with the one I've linked. If you do choose the pattern route, remember to change it from pattern to stencil and ThumbnailKey is responsible for the thumbnail you'll see in game.
Now, grab your trusty notepad and make note of these ID's:

In our case it's:
810049F2B4EC687B
CF239313C7BCBD54
Once you've made note of these ID's, make sure you add the file to your current package. You can also skip writing down the ID's and just view them from your package editor screen, but I find it helps keep the workflow more compact, however it is up to you.
Now, go back to your filetype list and select "DST Image" and "RLE 2 Image":
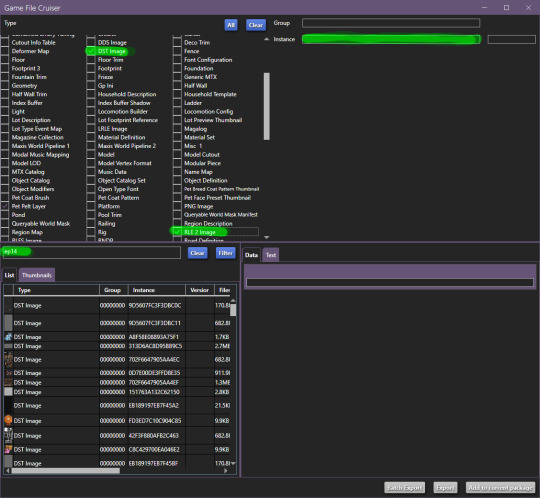
Additionally, make sure you still have "EP14" in the search bar, for the next part we'll be using the instance search bar, as marked on top right.
Enter your first ID -
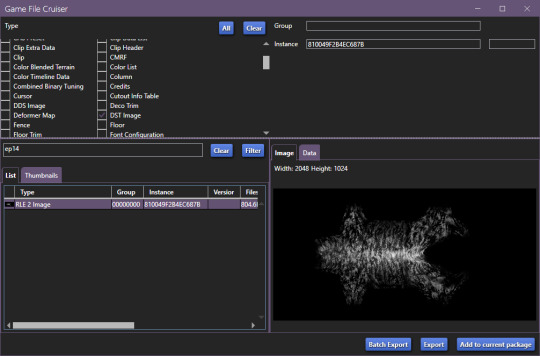
Add to package and do the same with the second ID.
Now, your new package file should look like this:
Once you're at this point, it's relatively easy sailing.
Start by going to Tools > Hash Generator and generate 3 ID's:
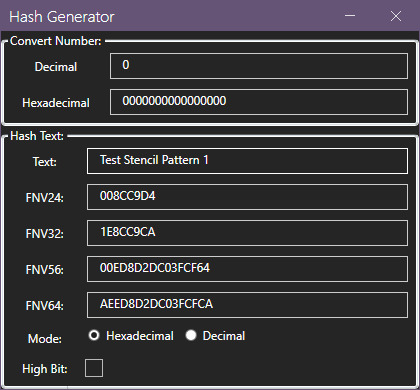
Edited 16/10/2023: When generating your hash ID's, please use your creator name ie.: "[YourCreatorName/Blogname]TutorialCustomFurCoat1", this will give you a more unique hash code than hoping to be as descriptive as possible when generating the hashes (in this case instance ID's). PS. You should still be descriptive.
Thanks to Mizore Yukii for this advice, from Creator's Musings.
I do it this way, descriptor + numbers, but you can do it whatever way you want to.
After that, we'll assign your newly generated ID's.
These are the ID's I generated:
AEED8D2DC03FCFCA
AEED8D2DC03FCFC9
AEED8D2DC03FCFC8
Respectively, my first ID will be used on the Pet Pelt Layer, Second ID will be used on the RLE 2 Image and 3rd ID will be used for the DDS image:
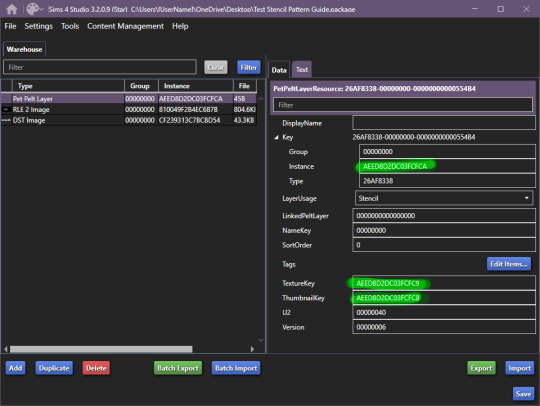


The package you're working on should now look something like this:

After this, you should save your package (so you don't lose your progress, I had a bluescreen happen and I'm still mad, so don't make my mistakes, it's easy to fix, just takes too much time).
Once you've saved your package, we can begin exporting/importing images.
For editing, I recommend actually grabbing the horse skin file. I've uploaded it to SimFileShare, it comes in two flavours .dds and .png, .png will be easier to work with, since it won't have the same layers are .dds.
Anyway, back on track we go:
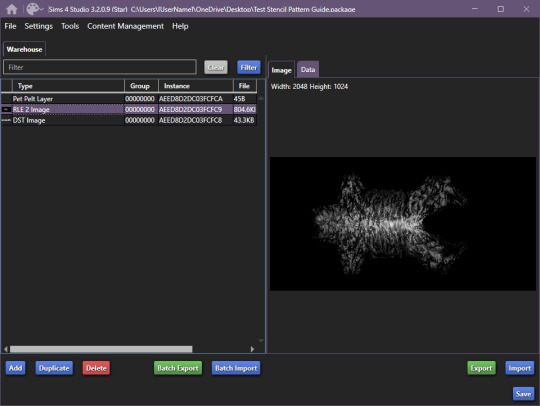
Export the RLE2 image, it'll be saved as a .png, keep that in mind for later.
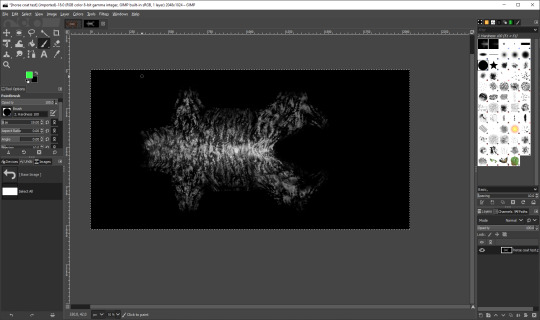
Once you're happy with your results, get to exporting your image.
IMPORTANT: remember to export the file in L8 format.
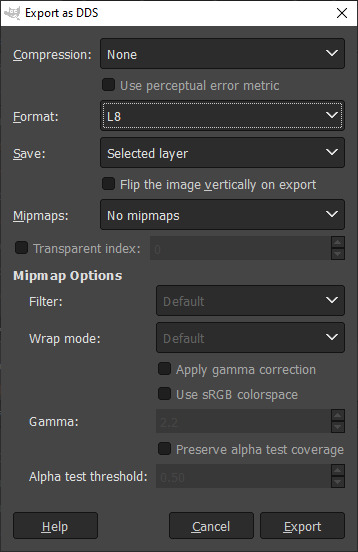
Once you're done with that, go ahead and import your picture into the package:

Repeat the same steps for the DST image, and you're done.
Now, save your file and load it into the game:
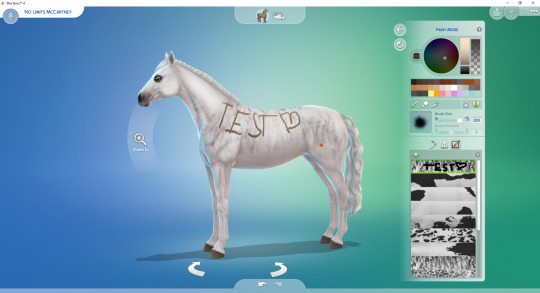
And you're all set and done.
If you have any questions, let me know.
#Sims 4 Horses#Sims 4 Horses CC#Sims 4 Horse Ranch#sims 4 equestrian#Sims 4 CC#Sims 4 CC Guide#Sims 4 CC Resources#ts4 tutorial#ts4 guide#ts4 cc#The SIms 4 Horse CC#The Sims 4 Horses#The Sims 4 Horse Ranch#The Sims 4 Equestrian#The Sims 4 cc
81 notes
·
View notes
Text
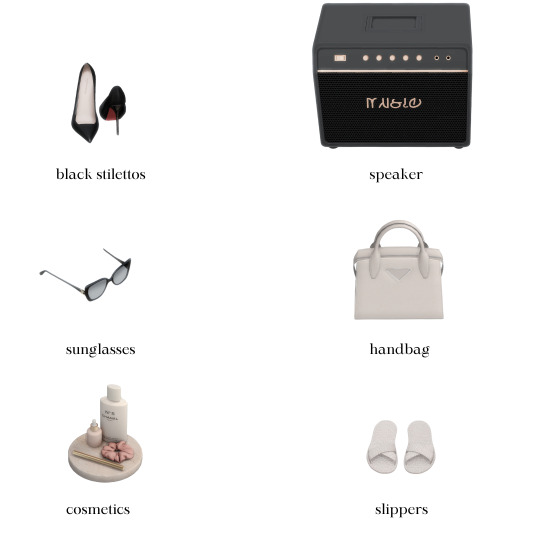

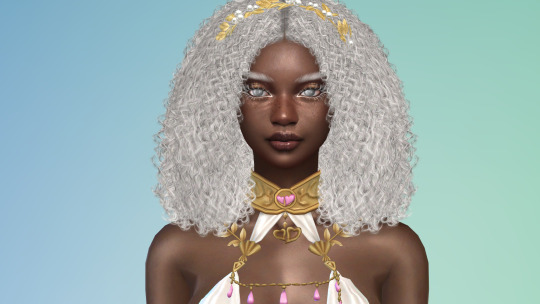
holiday gift guide: luxury edition
♡ black stilettos
♡ simlish orcaella speaker
♡ chanel sunglasses
♡ prada handbag
♡ cosmetics
♡ house slippers
part three of my holiday gift guide. as always, thank you so much to all of the amazing and talented cc creators! @xplatinumxluxexsimsx @wondymoondesign @syboubou @pinkbox-anye @sundays-sims
#simsplymaddy#cc recs#the sims 4 cc finds#the sims 4#ts4#ts4 simblr#ts4 maxis cc#ts4cc#the sims community#sims 4#ts4 screenshots#sims 4 cc#sims 4 simblr#the sims cc#sims#sims 4 gift guide#sims 4 christmas#sims 4 holiday#the sims 4 cc#the sims 4 simblr#new simblr#cc finds#ts4 maxis mix
170 notes
·
View notes
Text

detectar mods conflictivos sims 4 | tips, escanea y elimina virus
esta es una guía definitiva de como detectar mods conflictivos, además les compartiré algunos tips para evitar errores en los sims 4 y podrás eliminar los mods dañados de tu juego.
· ver tutorial
*thanks to @twistedmexi for creating the mods*
#the sims 4#los sims 4#sims 4#the sims#sims#ts4#ts4 cc#simmer#simblr#ts4cc#tianaberrie#sims 4 aesthetic#sims 4 mods#sims 4 tutorial#sims 4 guide#mods sims 4#the sims 4 aesthetic#ts4 aesthetic#aesthetic#cottagecore#aesthetic mods#top mods sims 4#ts4 mods#sims 4 better exceptions#sims 4 modguard#twistedmexi#better exceptions
71 notes
·
View notes
Text


Above: before-and-after pictures of this process. Thank you to @cloudywithachanceofsims, @silverthornestudfarm, and @blueridgeequines for giving me permission to use their coats as examples!
CK's Guide to Fixing Pixelated Horse Coats
As we all know, every time you paint a horse (or any pet or werewolf, really) in Create-a-Pet, it inevitably gets pixelated. This is due to the TS4 engine's compression of Sims textures, which it does to theoretically save on file space and load time. The more you paint on your horse (and the more you save it over and over again), the greater the artifact damage becomes, until you're left with a pixelated mess.
Luckily, I've figured out a way to fix it. Yay!
This method uses a program called chaiNNER, which is an incredibly versatile node-based graphics UI that (among many other things) uses AI models to upscale and process images. After a month and a half of experimenting on multiple different types of coats with about a dozen different models, I've identified two AI models that work best at repairing the artifacting damage done by TS4: RealESRGAN_x2plus and 2xAniscale. I extract the painted coats from the tray files using Cmar's Coat Converter, process them using chaiNNER, use Photoshop to make any touch ups (softening hard edges, fixing seams, adding in the appropriate hoof texture), and then create a new hoof swatch to put the newly fixed coat back into the game.
Fair warning: chaiNNER is a bit of a hefty program that requires significant RAM and VRAM to run. If you have a beefy gaming computer, you should have no issues running this (as long as no other major programs - games, graphics programs, etc. - are running as well). If you've got a lower end computer, though, your computer might not be able to handle it and this method might not be for you. Make sure to read all the documentation on chaiNNer's github before proceeding.
Before we begin, we're going to need to gather some resources. We will need:
A graphics program. I use Photoshop, but GIMP or any other program that can work in layers will work too.
chaiNNER
AI Models; these are the ones I use are RealESRGAN_x2plus and 2xAniscale
Cmar's Coat Converter to extract the coat textures from your tray files
Tray Importer (Optionally) to isolate your household tray files and save you the trouble of searching the Tray Folder
The TS4 Horse UV as a helpful guide to make sure all our textures are lined up properly
Sims 4 Studio to create your new package.
I recommend using S4S to export hoof swatch textures from the game or from existing hoof swatch cc. Some popular hoof swatch CC include @walnuthillfarm's Striped Hooves and @pure-winter-cc's Glorious Striped Hooves
This tutorial assumes you are familiar with the basics in how to use Sims 4 Studio, such as how to clone a base-game item & how to import and export textures, and the basic functions of your graphics program, such as adding multiple different image files together as layers. I'll try to keep my explanations as straight-forward as possible.
STEP ONE: Extract the Coats
Install Cmar's Coat Converter and run it. Cmar's Coat Converter works by looking through your tray files for specific texture files (ie. The coats of cats, dogs, horses, and werewolves) and converting them to png files. You can go through the households of your Tray folder one by one, but I typically just use Tray Importer to separate the household containing the horses I want to fix.
Save the extracted coats in a project folder. These are your OG coats.
STEP TWO: Extract the hoof textures
Open up S4S. To extract the hoof swatches from the base game, create a new package by clicking CAS -> New Package, filter everything by species (ie. Horse) and then part type (Hoof color). Highlight all the basegame swatches and then save your new package.
Open up that package and then extract the texture for each swatch. Save them in your project folder (In a 'basegame hooves' folder to keep things organized).
To extract the textures from Hoof Swatch CC files, simply open them up in S4S and repeat the above.
STEP THREE: Download the AI Models
Right as it says on the tin. These are the models I use currently & some notes about them:
RealESRGAN_x2plus - this model is THE workhorse. It repairs artifact damaging with minimal loss to texture quality and results in a very smooth coat. It may sometimes darken the texture a little bit, but it's not noticeable in-game. That being said, it has a harder time with finer details such as spots, individual ticking for roans, dapples etc. I run this one first on all the coats because it usually does the job.
These models are trained to find and repair any incidence of artifacting/jpeg damage and approximate what the image is supposed to look like. The reason RealESRGAN_x2plus has an especially hard time with spots/dapples/tiny repetitive details etc. because it registers those areas as particularly damaged and works extra hard to smooth it out… which can sometimes result in a bit of an iffy coat repair. When things don't turn out the way I want, I turn to...
2xAniscale - I use this model for any appaloosas, roans, sabinos etc. that have very fine detail and came out mangled by RealESRGAN_2xPlus. It's also good for light-duty repairing (in cases where people have only 'saved' the coat once, as opposed to working on it on and off). While not strong enough on its own to tackle the more heavily damaged coats, it still does a decent job while keeping the fine details intact.
Go make a folder somewhere and name it 'AI Models' or something similar, and drop these guys in there.
STEP FOUR: Setting up chaiNNER
Obviously, go ahead and download chaiNNER, and then (through chaiNNER itself) download & install the dependencies. You really only need PyTorch for this, so if you'd like, you can skip NCNN, ONNX, and Stable Diffusion.
At first glance, chaiNNER is a bit overwhelming. It is unlike any other graphics ui I've seen before, but the basic premise is pretty straightforward: you 'chain' together specific functions ('nodes') in order to get your result.
We're going to start by setting up a chain for single coat conversions.
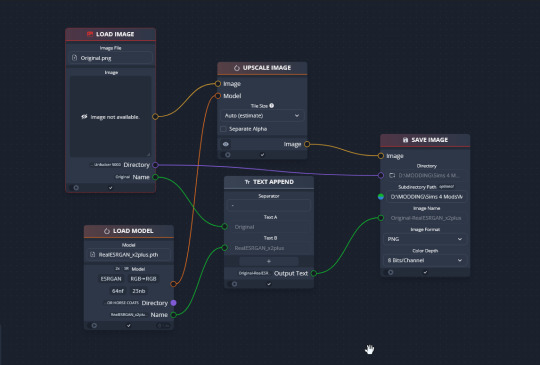
Drag & drop these nodes into your workspace:
Load Image
Save Image
Upscale Image
Load Model (From the PyTorch tab only!)
Text append
Next, connect the nodes just as I have connected them in the image.
Load Image, obviously, loads your image. We then tell the program we want to upscale that image by linking to the Upscale Image node. Upscaling can't happen without a model, so we then want to link Upscale Image with Load Model.
Text Append takes the original name of the image and combines it with the model name. This is super helpful, because if you're playing with many models at a time, you need to tell your result images apart. Link the output text to the Save Image Model.
Finally, Save Image obviously saves the image. We link the directory from Load Image to save it in the same place as the OG image, or, optionally, add in a file path link to another folder (in my case, I load images from a folder called 'Unprocessed' and save them into a folder called 'Processed'. Link the image from Upscale Image to Save Image to complete this chain.
Go in and select your image, model, and save locations.
Ta dah! You made your first chain.
To create an Iterator to batch process coats, we follow the same general idea, only we use 'Load Images'.
STEP FIVE: Run chaiNNER
Go ahead and run chaiNNER. Repeat using 2xAniscale if your spotty/dappled coat comes out funky.
Optionally, you can also add 'Resize' between 'Upscale' and 'Save Image' so the output texture is the same size as the OG. I like keeping mine big, as it makes it easier to fix any fine details in Photoshop.
STEP SIX: Combine in Photoshop
Go ahead and open up the horse UV, your coat texture & hoof swatches in Photoshop. This is a fairly straightforward process: layer the hooves overtop the texture, and then hide all hoof layers except the one you want. Make sure everything is lined up properly using the horse UV.
This is also where you would go in and fix any sharp, jagged edges you might spot. I often notice jagged edges on white face markings. Since the head is often one of the worst areas for artifacting, the AI models don't really have much to work with, resulting in jagged edges as they try to extrapolate what had been there 'before'. Either paint over it or use blur to smooth it out.
I personally would also remove any stray color that isn't the horse texture (body + ears). It won't hurt to leave it there, but I personally like things neat and tidy. Use the horse UV as a guide.
I also add in any little details using extracted stencils & layer masks.
Save your new coat as a png. Optionally, downsize it by 50% back to the original size. I don't do this because I'm very forgetful, but this would definitely help in keeping your package size smaller.
STEP SEVEN (Optional): Make a thumbnail
I make thumbnails for all the coats I do because it makes it much easier to identify them under the Hoof Swatch category. TS4 thumbnails are 144 x 148. You can label it with your horse's name, or stick a headshot in there etc. whatever works for you that will help it stand out from the other hoof swatches.
STEP EIGHT: Put it all Together
Finally, we've come to the end.
Using S4S, create a new package cloned from a hoof swatch. Import your new coat into 'Texture', and your thumbnail into 'Thumbnail'. Make sure you import the thumbnail for both Male and Female!
Check to make sure there aren't major seams, and that your texture is properly projected onto the S4S horse model. If there are seams, go back to check that your texture is lined up properly with the Horse UV. If there are minor seams (legs, chest, underbelly etc.) you can carefully paint (using the same color as on either side of the seam) just beyond the UV mesh boundaries to close the seam.
Then, go into Categories, scroll down, and uncheck Random. This will prevent random townie horses from wearing the coat.
Save your package.
Congratulations! You're done!
#ts4 tutorial#ts4 resource#ts4 guide#Ts4 horse cc#ts4 equestrian cc#sims 4 horse cc#sims 4 equestrian cc#ts4 equestrian#sims 4 equestrian#ts4 horses#sims 4 horses#ts4 horse ranch#sims 4 horse ranch#sims horses
68 notes
·
View notes
Text
youtube
#youtube#simblr#the sims4#ts4#sims 4 aesthetic#tutorial#sims 4 mods#sims 4 tutorial#the sims 4 tutorial#guide#sims 4 cc#ts4 cc#the sims cc#cc#sims 4 custom content#eyelashes#ts4 simmer#youtube channel#youtube gaming
20 notes
·
View notes
Text
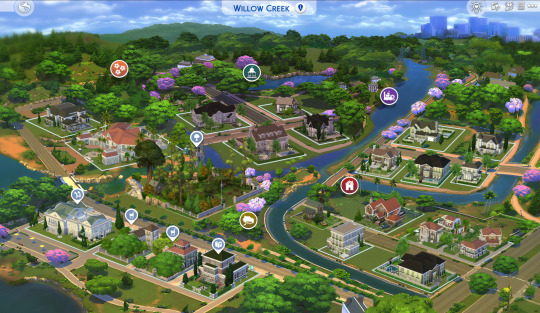
World Map Replacement
EASY 4 step walkthrough (PC & Mac)
The Sims 4 Maps are definitely on the minimalistic side, but luckily for us some magic fairies (aka cc creators) made maps replacements that we can freely use.
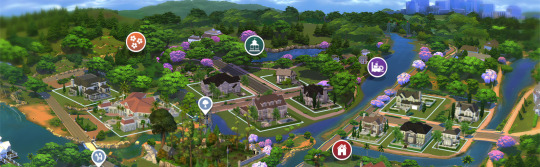
My personal favorite & the one you see featured on this blog, creator 20th Century Plumbob, made for us some amazing map replacements that are mindful of the actual environment features we have in game, and gifts us with a way more immersive experience. The best thing is that this creator keeps updating the maps, so if you have many Sims packs and want consistency you can have it!
Installing them is super super simple, here's what you have to do:
1 - Download the desired world map
(here's the basegame ones: Willow Creek | Newcrest | Oasis Spring )
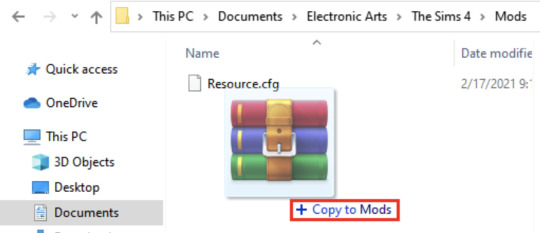
2 - Find the ".package" file in your download folder. These files can't and shouldn't be unzipped.

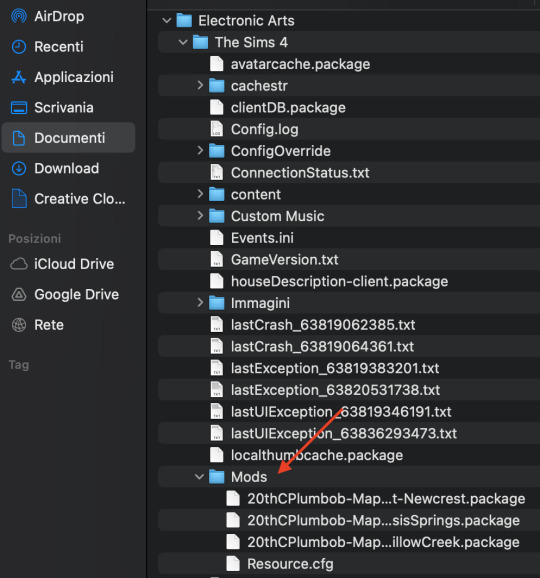
3 - Locate the Mods folder
[ Documents/Electronic Arts/The Sims 4/Mods ]
Copy the files inside the Mods folder.
on PC using File Explorer
on MAC using Finder
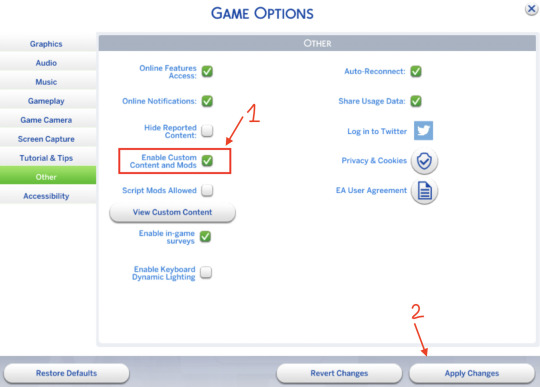
4 - Open your game and enable custom content.
[ Game options/Other/Enable Custom Content and Mods ]
Restart the game if necessary
You're done!
Another honorable mention - that also includes all worlds - are Dershayan Fan Art maps, that are perfect for more aesthetic oriented gameplays and also features some season-specific map replacements.
https://dershayan.de/mods-cc/fanart-maps/ https://www.patreon.com/dershayan
☆ Happy simming ☆ Dag Dag
#sims 4#sism 4 cc#sims 4 simblr#sims 4 build#the sims 4#ts4#ts4 simblr#ts4 build#ts4 screenshots#ts4 base game#sims 4 base game#sims 4 cheats#sims 4 guide#sims 4 map replacement
22 notes
·
View notes
Text
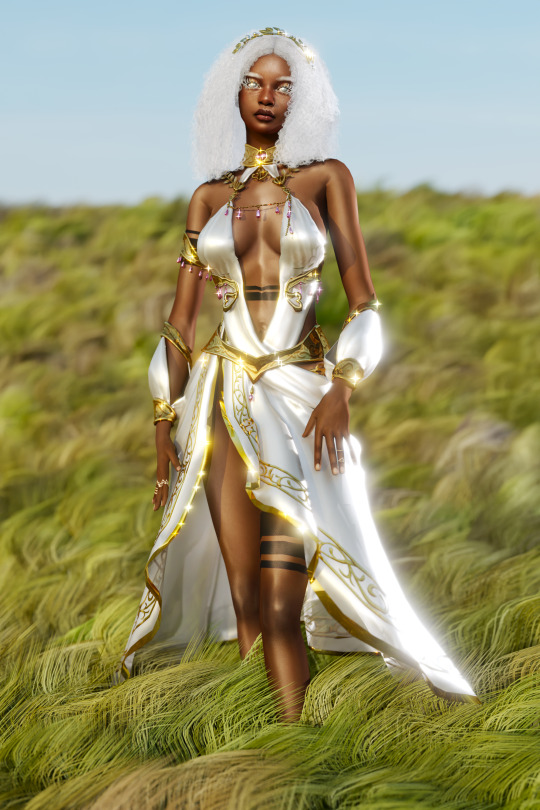
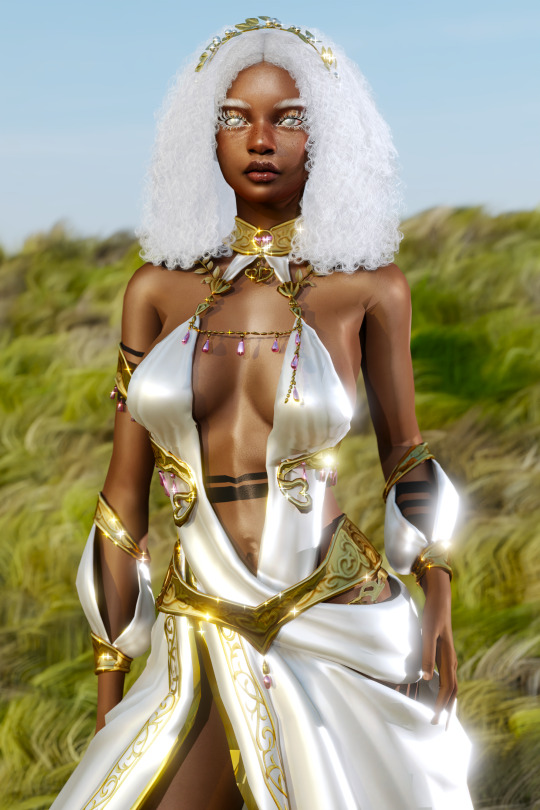
Raewyn Daefaren- Sim Download
This is another sim based on a book character and this sim is based on Raewyn Daefaren from a Soul to Guide, the 4th book in the Duskwalker Brides series, by Opal Reyne! I really loved this character because of the representation and how well she was written, Raewyn is a black and blind Elf.
DL


#sims 4 cc#sims 4#blender render#the sims 4#blender#the sims#ts4 cc#sims 4 custom content#blender sims#sims#create a sim#ts4 sim download#sim download#sim 4#sims 4 gameplay#a soul to guide#duskwalker brides#opal reyne#book character#books#book recommendations#booklr
41 notes
·
View notes
Video
youtube
30+ Maxis Match Hair + CC Links (Male, Female, & Child)| The Sims 4 CC Haul
1 2 3 4 5 6 7 8 9 10 11 12 13 14 15 16 17 18 19 20 21 22 23 24 25 26 27 28 29 30
#youtube#sims 4#sims#sims 4 cas#thesims4#sims4cc#sims 4 custom content#sims 4 cc hair#sims 4 cc haul#cc guides#ts4 cas#ts4 simblr#the sims 4 simblr#simblr#sims 4 maxis cc#sims 4 maxis match#sims 4 male cc#sims 4 child cc#sims 4 female cc
27 notes
·
View notes
Text
27 notes
·
View notes
Text

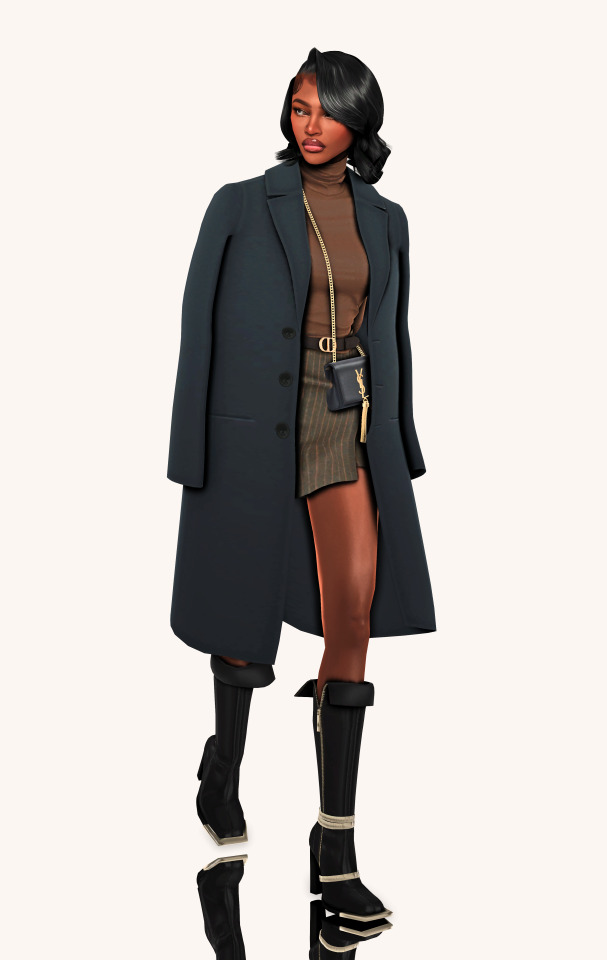

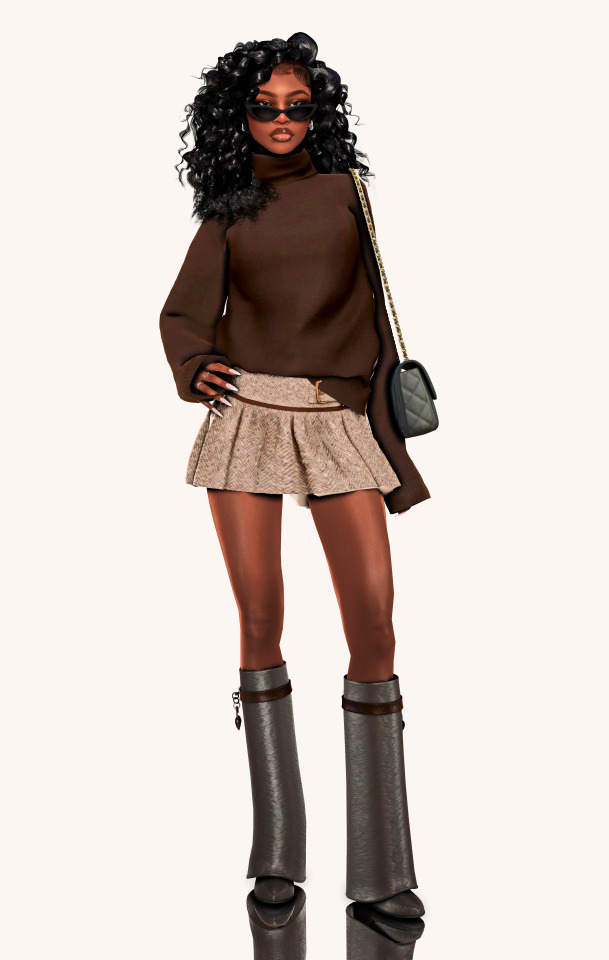

How to look effortlessly chic during Winter, a guide by Sasha
Look #1: Sweater | Pants | Heels
Look #2: Turtleneck | Skirt | Coat | Boots
Look #3: Sweater | Skirt | Boots
Look #4: Blazer | Pants | Heels | Scarf
poses @helgatisha
Thank you to all the cc creators ♡
@charonlee @mermaladesims @gorillax3-cc @rimings @wonder-bitter @seoulsoul-sims @idsims @cool-content-star
More lookbooks here ♡
#ts4#sims 4#the sims 4#ts4 lookbook#s4 lookbook#sims lookbook#sims 4 lookbook#sims 4 cas#cas lookbook#cc finds#cc list#sims 4 screenshots#simblr#showusyoursims#the sims community#sim: sasha#winter looks
3K notes
·
View notes
Text
5th try at writing the guide on custom pet paint mode brushes, if tumblr manages to mess this one up i will have a fit
16/10/2023 Edited: Updated to add better hash ID generating practices.
Things you'll need:
Sims 4 Studio
GIMP
Notepad
Guide:
Tools that we will be using:

We'll begin by creating a new, empty package.
Save it somewhere convenient and easy to access.
Once you've saved the package, you'll be met with this screen:

From here, we'll go to Tools > Game File Cruiser
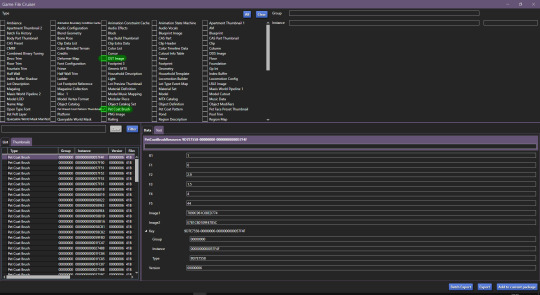
We'll be working with Pet Coat Brush files and DST Image, but for now we'll only select Pet Coat Brush file, so that it's easier for us.
I've selected the first brush file and I've highlighted the piece of data we'll need to use.
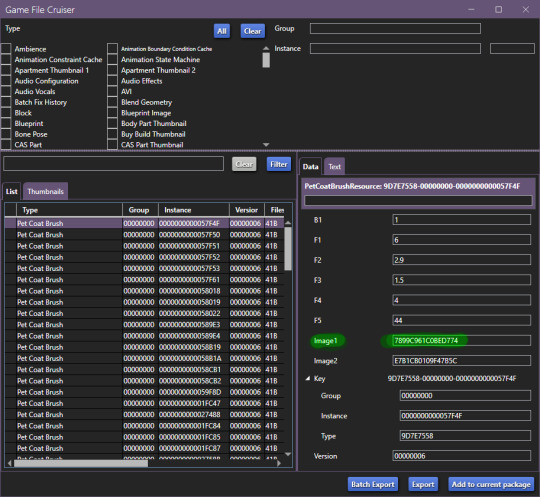
We'll have to use the Game File Cruiser search function, but first, press "Add to current package". When you've gotten the hang of this, you can explore the pre-existing brush files and decide which one you'd prefer to use as your base, all are different and correspond to different brushes/stamps in-game.
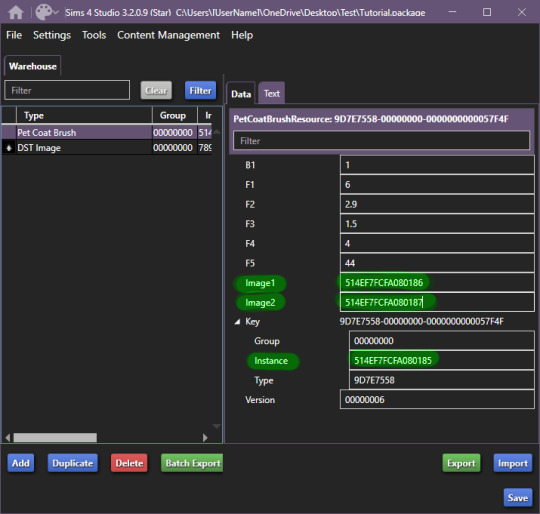
Once you've clicked on "add to current package" your package editor should look like this:

Now we'll copy the Image1 ID and go back to Game File Cruiser, select DST Image from the file type list and enter the ID into the search bar:

Now, click "Add to current package" and now the package file you're working on will look like this:

Before we move further, we need to generate new instance ID's, we'll need 3 of them.
Go to Tools > Hash Generator

Edited 16/10/2023: When generating your hash ID's, please use your creator name ie.: "[YourCreatorName/Blogname]TutorialCustomFurCoat1", this will give you a more unique hash code than hoping to be as descriptive as possible when generating the hashes (in this case instance ID's).
Thanks to Mizore Yukii for this advice, from Creator's Musings.
In the "text" field, enter whatever text you want, I just go with the item name/description + a number, to indicate which ID it is.
We'll need 3 of FNV64 hash codes.
These are the 3 ID's that I've generated:
514EF7FCFA080185
514EF7FCFA080186
514EF7FCFA080187
We'll use the first code for the Pet Coat Brush file, the second code for Image1 (Brush file) and the third for Image2 (Brush icon file).
Your Pet Coat Brush file should look like this now, with the updated ID's.
Moving forward, we'll be changing the ID for the DST Image1 (Brush in-game) -

Now that you've done this, you need to right click on DST Images > Duplicate, you'll be prompted with this window:
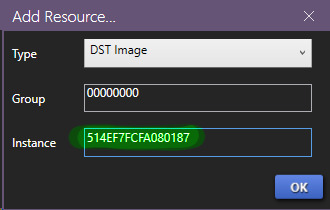
In this window, you'll use the last hash code you generated for the Image2 new ID (in-game icon).
Now! It'll all look like this:

To edit the brush we'll be seeing in-game, we'll now have to edit the image, begin by exporting the image available in DST Image.
Once that's done, open it up in whatever editing software you want to use, I'll be using GIMP, because it has built in DDS exporter, I recommend you do the same, however if not interested in doing so, make sure your program can export DDS images in L8 format, if not, edit in preferred software and use GIMP to export as DDS.
Once you've made your brush, you'll want to do as follows:

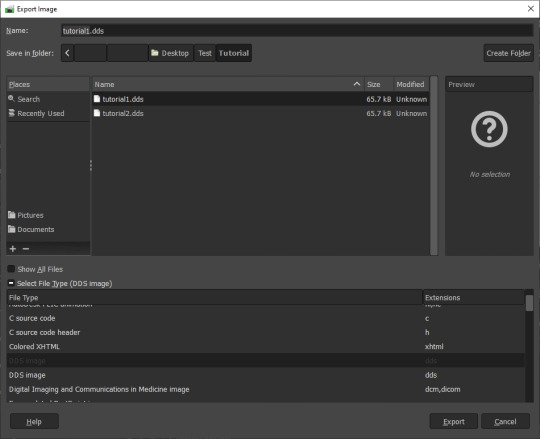

IMPORTANT
It MUST be exported in the format L8, it will appear broken in-game otherwise.
Then, import your custom made brush into S4S package editor:
Do the same for the icon:

You've got the easiest part down, now, comes the part with testing how well the brush works and behaves in-game.
The responsibility of this falls onto the values you may have seen in Pet Coat Brush file -
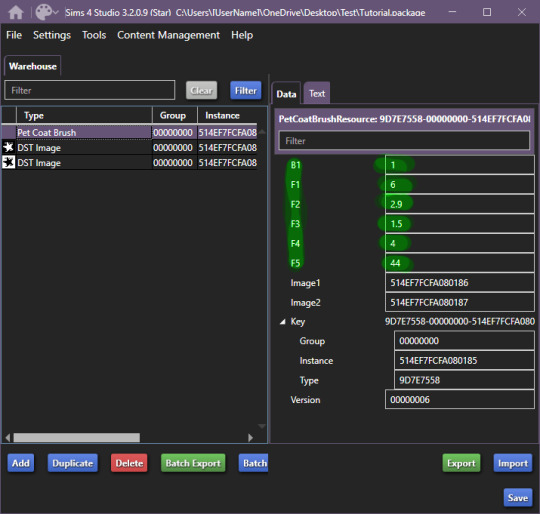
These are the values responsible for how the brush works in-game.
I'll be upfront right now, I can't get the rotation value to work, I'm not sure if I'm doing something incorrectly, but if I figure it out, I'll add to the guide eventually. I haven't had time to test this further, but as far as I've been able to test it, it works like a charm.
These are the value meanings -
Sorry for how lazy this is presented, as once I figured out the basic meaning, I moved forward.
B1 is responsible for sorting on whether your brush is considered a Brush or a Stamp. 0 & 2 - Brush, 1 & 3 Stamp EDITED 24/10/2023: 0 is non-rotating brush, 2 is a rotating brush!
For F1, I do NOT recommend using 0 or 5, when I tested these values in-game, they were extremely laggy when attempting to paint. 1 - Smooth Painting, 2 - Spaced Apart Slightly, Overlap, 3 - Spaced One After Another, Some Overlap, 4 - Spaced One After Another, No Overlap
F2 changes the size of the brush in-game, meaning how small it can be, I believe. 0 - 1px smallest size brush, scaling up changes how small the brush can get.
F3 I suspect is brush rotation, but I could not make it work on any of the brushes I tried making, so I'm not 100 sure. This is one of the brushes you'll have to look at values for in the existing in-game brush files, as I could not get this to work for myself.
F4 is the maximum the size of the brush will become. Maximum size the brush can get, I've tested it from 0 to 5, 5 is quite large, so I recommend that, but go for smaller as well.
F5 I'm not entirely sure, however during my testing, I found that this changes where exactly the brush appears in both stamps and brush tabs in-game. There may be more to it, however, I could not figure it out. The values I tested for this were 0, 1 and 2, this affected where the item appeared - 0 - First Row, First Item, 1, First Row, 2nd Item, 2 - 2nd Row, First Item, I've seen that these can go quite high, ie the base file I used being 44, so keep that in mind while changing this setting. For my personal brushes I use 0.
I recommend comparing existing brush files to the one you're looking to edit.
I believe this is it. If there are any questions, I'll try to answer as best as I can. If anyone wants to add anything to this, please do so, I'll be elated to update and credit you for the information shared.
This all came to be because I could not find a guide, but fortunately for me, I'm too good at figuring things out and even though I didn't quite understand how the Game File Cruiser worked a few days ago, I've consumed so much information it hurts my brain.
Forgot to add: Finished product
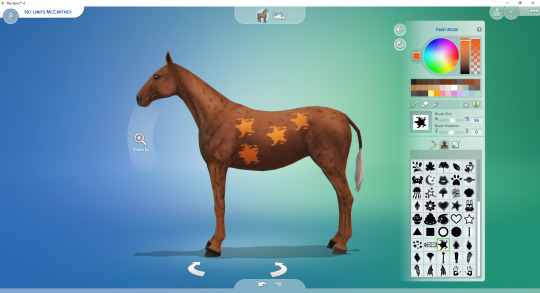
Because I didn't edit the Pet Coat Brush file I was working on, I've made a stamp, I recommend messing around for a while though and finding what you prefer. The values themselves are pretty easy and forgiving to edit.
So account for that, you'll definitely want to edit the values responsible for the brush working correctly. If you have any questions, please let me know, I tried to make this as clear as possible, and I know this is probably over the top for a guide, but I'm the kind of person who needs every small direction, to even know what I'm doing, when I'm following a guide.
UPDATED AGAIN, I FORGOT TO ADD THE ACTUAL VALUES I FOUND.
#The Sims 4 Guide#The Sims 4 Horse Ranch#The Sims 4 Custom Brushes#The Sims 4 CC guide#TS4 CC Guide#TS4 Horse Ranch#TS4 Horses#The Sims 4 Horses#Sims 4 Horses#Sims 4#Sims 4 Horse Ranch#The Sims 4 Tutorial#Sorry if this isn't a great guide#i tried really had and nearly had an aneurysm because tumblr deleted my previous attempts like 4 times
87 notes
·
View notes
Text

holiday gift guide: gaming edition 🎮
1 gaming chair
2 desk
3 ring light
4 monitor (includes mouse + keyboard)
5 gaming pc
6 vertical monitor
part five of my holiday gift guide! thank you to the cc creators! ♡ @vixonspixels and nickname_sims4 on tsr!
#simsplymaddy#holiday gift guide#the sims 4#ts4#cc recs#cc finds#ts4 custom content#sims 4 simblr#sims 4 maxis match#sims 4 cc#the sims cc#ts4 simblr#sims#the sims community#ts4 maxis cc#ts4cc#sims 4#simblr#sims community#sims 4 custom content#custom content#ts4 cc#the sims 4 cc#the sims 4 simblr#ts4 screenshots
73 notes
·
View notes
Text

mods aesthetic para mejorar los sims 4 | aesthetic mods for the sims 4
mostraré una guía de como hacer los sims 4 aesthetic, además les compartiré mi gshade preset + cas background.
· ver tutorial + preset download
#the sims 4#los sims 4#sims 4#the sims#sims#ts4#ts4 cc#simmer#simblr#ts4cc#tianaberrie#sims 4 aesthetic#sims 4 mods#sims 4 tutorial#sims 4 guide#mods sims 4#the sims 4 aesthetic#ts4 aesthetic#aesthetic sims#aesthetic#cottagecore#cottage aesthetic#aesthetic mods#gshade preset#reshade preset#sims 4 preset#top mods sims 4#ts4 mods
78 notes
·
View notes
Text

10 Generations. 10 Different Heroines. 1 Legacy.
Welcome to the Literary Heroine Legacy Challenge! I’ve been itching for a good legacy to revive my love for the Sims 4, and I haven’t found one so I wrote one myself. I was inspired after reading Emma— the family dynamics, drama, and romance were everything I ever wanted in a Sims challenge. So I modernized the stories and adapted them to fit this game. Special shoutout to Designergirl81, who I met through MissLollypopSims’ Discord! The generations of Anne of Avonlea and Dorothy were their brainchildren. 💗
I designed each generation to reference a famous literary heroine. This is a very story-oriented challenge but feel free to bend, tweak, and change as much as you can! Sims Challenges aren’t meant to limit your fun. 😉
TL;DR: Play your own way while letting these rules guide your storytelling!
The official tag of the challenge is #TheLiteraryHeroineChallengeTS4. Have fun!
Check out the rules here or keep reading!
Basic Rules
Play on any life span you want but I recommend playing on Normal life span.
You are encouraged to play with female heirs. Of course, this is optional!
You are discouraged from using money cheats. Some generations have stories that are related to their social class— so try to stay true to the story as much as you can.
You can live wherever you want unless the generation states otherwise.
Feel free to customize each generation’s race and sexual orientation
Unless specifically stated, each generation has to finish their aspiration and career.
Even if most of these books are classics, I wrote this with a more modern take on it. You don’t need any mods or CC to fit the eras’ aesthetics— but if you want to, you totally can!
⭐ means there’s a recommended mod for this!
☽༓・*˚⁺‧͙
Generation 1: Elizabeth Bennett
📚 Do not consider me now as an elegant female, intending to play you, but as a rational creature, speaking the truth from her heart. 📚
It is a truth, universally acknowledged, that all Sims 4 challenges must start with an heir. In this case, that’s you, which is surprising because everyone else in your life has decided that you are plain, especially when compared to your other two sisters. Lately though, you start to sense that you’ve been getting more attention from your neighbors. One particular Sim hasn’t been able to leave you and your family alone… and you don’t like them at all, not one bit. Well… maybe just a bit.
Aspiration: Successful Lineage
Traits: Family Oriented, Hot-Headed, Bookworm OR choose/roll for the last trait
Career: Journalist
→ Master the Writing skill.
→ Live in a rundown family home passed down by your parents with two sisters until you are married.
→ Have a negative relationship with a neighbor.
→ Reject a proposal from your work boyfriend.
→ Build a relationship with your neighbor after you reject the proposal of your ex.
→ Have a scandal involving one of your sisters that your neighbor supports you through.
→ Fall in love and marry this neighbor then move in with him.
→ Have two children.
☽༓・*˚⁺‧͙
Generation 2: Emma Woodhouse
💗 It is very difficult for the prosperous to be humble. 💗
Growing up, you were always the sheltered one. Your father was very protective of you, and therefore never let you out of his sight. Of course, that didn’t stop you from becoming well-loved by the entire town. You were known for throwing the best dinner parties and befriending everyone your father and mother knew. Needless to say, this got to your head a bit. You weren’t arrogant, you were confident. In everyone’s eyes, you could do no wrong.
Well, everyone except your childhood best friend— who was never afraid to call you out for being a bit clueless at times.
Aspiration: Neighborhood Confidante OR Party Animal
Traits: Self-Assured, High Maintenance, Music-Lover OR choose/roll for the last trait
Career: Romance Consultant or Lawyer
→ Master the Charisma and Piano skills.
→ Host at least 5 gold-star dinners.
→ Have a childhood best friend who’s a bit older than you. For example: When you’re 17 (end of teenage years), they’re already 20 (start of young adult years). *
→ You can’t have good friends who are your age until your childhood best friend ages up into a young adult.
→ Make a new friend that you treat like a “project” until you two fall out. Choose if you two will reconcile in the future.
→ Profess your love to your childhood best friend during a heated argument.
→ Marry your best friend and live with your mother and father in your childhood home until your parents die.
Have one child.
*It goes without saying to only get with your childhood best friend when the two sims are both young adults 🙂 No super uncomfortable age gaps, please.
☽༓・*˚⁺‧͙
Generation 3: Scarlett O’Hara
✨ “Tomorrow, I’ll think of some way to get him back.” ✨
All your life, you grew up spoiled. Your mother and father were so in love, and you almost expected to have a story as romantic and easy as theirs. However, when your high school flame elopes quickly with someone else right after graduation, you start to spiral. No longer able to get things your way, you begin to self-sabotage and jump from relationship to relationship.
Deep down you know you should stop and smarten up but frankly, my dear, you don’t give a damn.
Aspiration: Soulmate— you fail this
Traits: Materialistic, Genius, Jealous OR choose/roll for the last trait
Career: None until your divorce then become a Manual Laborer + Barista
⭐ Recommended Mods: Healthcare Redux Mod, Extreme Violence Mod
→ Don’t master any skill.
→ Have a high school flame who elopes with someone else.
→ Elope immediately with someone else. Have them die tragically.*
→ Marry another person quickly who you have bad compatibility with. Get negative romance with them right before they pass.*
→ Marry a third time. Have them catch you in a compromising moment with your high school flame, which leads to a divorce that leaves you with nothing.
→ End up working two part time jobs to keep your household running.
→ Have 4 kids with your 3 husbands (you can cheat for twins, if you want).
*You decide how they die. I recommended having mods like the Healthcare Redux and Extreme Violence in your game for realistic roleplay reasons— but if he gets tragically eaten by a Cowplant that works too! 🙂
☽༓・*˚⁺‧͙
Generation 4: Jo March
🧾 “When the first soreness was over, she could laugh at her poor little book, yet believe in it still, and feel herself the wiser and stronger for the buffeting she had received.” 🧾
Growing up was not easy for you. Your childhood was incredibly unpredictable with your mother jumping from relationship-to-relationship. And when things started to stabilize emotionally, you ended up in poverty. Luckily, you had your siblings to cling to, and a passion for writing that’s unmatched.
You wrote a ton of things across different genres, except for romance which you didn’t quite understand. In fact, everyone always expected you to be a little woman, not rough or wild, but you knew in your heart that’s not what you were destined to become.
Aspiration: Best-Selling Author
Traits: Creative, Unflirty, and Ambitious OR choose/roll for the last trait
Career: Author
⭐ Recommended Mods: Writing Career Overhaul, SNB Banking
→ Master the Writing and Logic skills.
→ Be best friends with all of your siblings.
→ Start selling short stories as a teenager to help pay the bills.
→ Get a best friend in high school who professes their love to you during graduation. Turn them down. Optional: Have them marry one of your other siblings.
→ Move away to the city to focus on your writing. Always send 30% of your income to your mother until she dies.
→ Due to a tragedy in the family, adopt a child of one of your siblings.*
→ Win a Starlight Accolade for one of your novels.
→ Never marry but live a fulfilling life.
*They are to be the next heir to preserve the bloodline. You can adopt more if you want.
☽༓・*˚⁺‧͙
Generation 5: Anne Shirley
📖 “I believe the nicest and sweetest days are not those on which anything very splendid or wonderful or exciting happens but just those that bring simple little pleasures, following one another softly, like pearls slipping off a string.” 📖
You were adopted by your aunt and lived a happy childhood. Despite being surrounded by family drama, you never let it dampen your spirit. You struggled with social cues and caused mayhem wherever you went— of course, that never stopped you from making your voice heard. You were, afterall, raised by someone who was never afraid to make a point.
However, unlike your aunt, you always longed for romance. You always imagined big declarations of passion— but perhaps it’s time to learn that love creeps to one's side like an old friend through quiet ways.
Aspiration: Academic OR Soulmate
Traits: Romantic, Socially Awkward, and Loyal OR choose/roll for the last trait
Career: Education Career
⭐ Recommended Mod: Education Overhaul
→ Master the Research and Debate skill.
→ Have a childhood enemy that you become best friends with in high school.
→ Go to University and study Language and Literature.
→ Fall out with your best friend while in University.
→ Start dating someone you meet in University but break up right after graduation.
→ Get a job in the Education Career and write on the side.
→ Reconnect with your former best friend and realize you love them.
→ Get married to your best friend.
→ Retire from the Education career and become a freelance writer in your twilight years.
☽༓・*˚⁺‧͙
Generation 6: Nancy Drew
🔍 “I don't promise to forget the mystery, but I know I'll have a marvelous time.” 🔍
Every bedtime, your mother read you stories that she and your grandmother wrote. Among all of those, it’s your grandmother’s mysteries that impacted you the most. There was something so thrilling about being a heroic, fearless woman who helped others out.
Because of this, you gained a bunch of friends who loved you very deeply. With their support, you grew up as a well-known detective who can solve any case. It was a fun life, but you eventually settled down in Henford-On-Bagley to have a family of your own.
Aspiration: Friend of the World
Traits: Generous, Nosy, and Outgoing OR choose/roll for the last trait
Career: Detective OR ⭐ Zerbu’s Simvestigations Mod
→ Master the fitness skill.
→ Be close friends with both your parents.
→ Have 2 best friends who are either your roommates (Discover University) or live in the same apartment complex as you (For Rent) for your entire YA life.
→ Get engaged to someone you meet on-the-job.
→ Before marrying your fiance, go on a trip to Selvadorada with your 2 best friends and explore the Jungle Temples.
→ Settle down in Henford-On-Bagley and have a farm life of your own.
→ Never move away once you settle in Henford-On-Bagley.
☽༓・*˚⁺‧͙
Generation 7: Dorothy Gale
🐶 “If we walk far enough, we shall sometime come to someplace.” 🐶
Growing up you knew that there was more to the world than what was outside your own backdoor. Afterall, your mother was a famous detective— if she went on her own adventures, why can’t you?
With her and your father’s support, you spend your young adult life traveling. You made some great friends along the way (and even some loves), but eventually you start to wonder if there is no place like home.
Aspiration: Local Aspirations— complete at least two
Beach Life
Mt. Komorebi Sightseer
Fount of Tomarani Knowledge
Traits: Adventurous, Dog Lover, and Loves Outdoors OR choose/roll for the last trait
Career: Any Freelance Career
⭐ Recommended Mods: SimNation Travel, Home Region
→ Have a dog that goes everywhere with you.
→ Live in 3 or more worlds during your Young Adult life.
→ Make 3 best friends that each teach you a valuable life lesson.
→ After making your three best friends, use reward points to add the following traits: Brave, Savant, and Incredibly Friendly.
→ As an adult, realize you miss your family and return home.
→ Have a long distance relationship with the father of your children.
☽༓・*˚⁺‧͙
Generation 8: Wendy Darling
🌟 “She was a lovely lady, with a romantic mind and such a sweet mocking mouth. ” 🌟
You grew up waiting. First, for your father’s seasonal visits… which eventually stops when you become a teenager. Next, for the opportunity to leave Henford-on-Bagley to pursue your dreams of becoming an actress. And finally, for your first love, a man who refused to propose to you, no matter how long you waited for him to.
Eventually you grew tired waiting and decided to grow up. You married a sensible man, had a child, and gave up your dreams of becoming an actress. Still, you held on to the dreams of your first love and end up reconnecting in a night of passion that leaves you pregnant with his child. Realizing that he’ll never grow up, you decide to dedicate your life to your family and husband.
Aspiration: Master Actor/Actress - you fail this or the⭐ Housewife Aspiration (after you marry)
Traits: Perfectionist, Proper, and Cheerful OR choose/roll for the last trait
Career: Actor/Actress
→ Master the Parenting skill.
→ Have a distant family dynamic with your father who never lives with you.
→ Join the drama club and meet your first love. Optional: He has the childish trait.
→ Give your first love all of your major romantic milestones.
→ Lose touch with your first love when you move to Del Sol Valley.
→ Marry a man you’d consider as sensible. Have one child with him.
→ Have a one time secret affair that results in another child.
→ Dedicate your life to your children afterwards.
☽༓・*˚⁺‧͙
Generation 9: Alice Liddell
🐰 “It would be so nice if something made sense for a change.” 🐰
There were times you felt like you never truly belonged anywhere. While everyone at home lived and abided by your parents’ rules, your head was always in the clouds. Sensibilities and propriety were never in your vocabulary, much to the disdain of your father and the rest of your siblings. Still, you were a free spirit that could never be controlled.
After moving out as a young adult, you fell in love with cooking and mixology. You also met a group of misfits who were as different as you. Every Sunday, you’d host special “tea” parties with them, that broadened your worldview and made you realize that the world gets curiouser and curiouser with each passing day.
Aspiration: Master Mixologist or Master Chef
Traits: Clumsy, Foodie, and Childish OR choose/roll for the last trait
Career: Culinary Career
⭐ Recommended Mods: Basemental, Grannies Cookbook, Open Love Life
→ Master the Cooking and Mixology Skills.
→ Have a juice/nectar hobby on the side.
→ Have a club with people who have weird or eccentric traits.*
→ Fall in love with someone with the Erratic Trait.
→ Host “tea” parties every Sunday in your own home. ⭐ Optional: Use the Basemental Mods and have your Sims get high on dope/drunk on alcohol during the tea parties.
→ Dye your hair a different, brighter color.
→ Live in a quirky and colorful house.
→ Befriend a rabbit who you talk to constantly. Name them The Mad Hatter.
→ ⭐ Optional: Be in a polyamorous relationship with Romantic Boundaries OR the Open Love Life Mod
→ Have two children.
*You decide what weird and eccentric means.
☽༓・*˚⁺‧͙
Generation 10: Countess Ellen Olenska
🎨 “The real loneliness is living among all these people who only ask one to pretend.” 🎨
You appreciated your mother’s lifestyle. You saw the world for what it could become, and not what everyone wanted it to be. However, you worried about your younger sister. You saw her innocence and wanted to protect it. When you turned into a young adult, you moved away and took your sister with you to start anew.
However, life was not always easy. Straight out of teenhood, you married someone from a different city and had a tumultuous relationship with him. You separate with him and continue to care for your sister. You’re able to provide for her through your paintings, which also brought you a lot of fame. When she grew up into a Young Adult, she formed an attachment with a man that… intrigued you.
She married him. This kept him in your life, but made it difficult for you to ignore your feelings. One night, you find yourself alone together, and you must make a choice: stay with him and break your sister's heart, or leave forever to give them peace. You have a price to pay either way— we can't behave like people in novels without consequence, can we?
Aspiration: Painter Extraordinaire
Traits: Gloomy, Art Lover, and Family Oriented OR choose/roll for the last trait
Career: Critic
⭐ Recommended Mods: RPO, Wonderful Whims, Custom Relationship Bits, Soulmates
→ Master the Painting Skill.
→ Become a Level 3 Celebrity with your paintings.
→ Marry someone who isn’t your soulmate straight out of high school. Have a negative relationship with him before separating. ⭐ Optional: Only temporarily separate with him using the RPO Mod.
→ Be best friends with your sister.
→ Become soulmates with the partner of your sister without consummating the relationship.
→ When you’re an adult, invite your sister’s partner over, and make a choice— woohoo together and break your sister's heart, or end the emotional affair.
→ If you woohoo together - Tell your sister the next day and become enemies. Name your child after them.
→ If you end the emotional affair - Move away from your love and get back together with your ex-husband. Die without having your own children.
#sims 4 gameplay#the sims 4 challenge#TheLiteraryHeroineChallengeTS4#sims 4 challenges#ts4#ts4 simblr#ts4 legacy#ts4 legacy challenge#simblr#new simblr#sims 4#sims 4 challenge#sims 4 legacy challenge#s4#the sims 4#the sims 4 gameplay#the sims community#sims 4 legacy#the sims 4 legacy#ts4 challenge#ts4 gameplay
825 notes
·
View notes
Text
STICKY POST: ULTIMATE(ISH) GUIDE(S) TO SIMS 4 CC-MAKING; OR, A COMPREHENSIVE COMPENDIUM OF TUTORIALS, INSTRUCTIONAL MATERIALS, & FELLOW COMPILATIONS OF A LIKEWISE NATURE
In which I list a fuckton of tutorials, guides, and lists of such, each written, curated, and crafted by people far more talented than I.
More will be added as I find them.
---
@teanmoon's CC Guides - Includes tutorials on cloning, uv_1, weights, bump and specular maps, bi-color hair, and a Blender Cheat Sheet. High poly 'creators' have little excuse to churn out high poly, non-optimized garbage when they can lean on bump maps. (I know those can only do so much for more complex meshes, but for objects, texture maps can do SO much heavy-lifting).
@vintagesimstress's CC Guides - Includes tutorials on using Blender to create objects and clothing, especially for people who are just getting started.
@eliavah's uv-1 adjustment tutorial. Haven't tried this myself yet, but after glancing through it, it's something I will surely want to keep bookmarked.
@simlaughlove's CC Tutorials List - Includes many tutorials handily laid out by category on everything from object texturing to CAS morphs.
@thefoxburyinstitute's Nav Page - This blog is nonstop Sims 4 resources for e v e r y t h i n g. READ THIS POST FIRST as a guide on how to actually... nav.
@simsresourcehub's Tags List - What it says on the tin.
Transferring Weights in Blender 3.3.1 - Over at Sims4Studio forums.
@trillyke's List of Tutorials - Good ones!
@sims4tutorials - *GRAND GESTURES*
@katverse's Huge List of Tutorials - Tutorials on eeeverything.
@thatsimslady's Massive List of Tutorials - 31 pages????? Damn.
@kouukie's Sims 4 CAS with Marvelous Designer Tutorial - YouTube video!
@rusticottage's Gifmaking Tutorial - I love Sims gifs tbh.
@cowplant-pizza' Boes' Editing Masterlist - Includes stuff for Reshade, PSDs, PS Actions, and how to use them.
@melonsloth's Deco Sim Tutorial - Using SimRipper
@depthofpixels's Deco Sim Tutorial - Using SimRipper
@azuhrasims' Guide to Posing Sims - Includes how to pose sims, and handy workarounds! Super great for beginners and longtime users.
@radioactivedotcom's Guide to Posing - Includes additional posing resources. NOT for beginners.
@madameriasims4's Add a Flame to Your Basegame Candle - Great for mood lighting and historical gameplay!
@syboubou's Making a Lamp Start to Finish - a video tutorial
MORE BELOW:
Adding Lit DST to Fireplace
New image ref for default overrides
Make an RGB Spec for Objects
Bake a shadow onto your object in Blender
Linking all bedding to a single frame
Cutouts for Doors/Windows/Archways
Making objects see-through/glass
Making lamps light correctly
Give an object transparency (add an alpha)
Make a candle w/ multiple flames
Change LOD viewing distance
500 notes
·
View notes
Text
How to install TS3 for the ✨chronically TS4✨

Getting back into TS3 posed a challenge for me as compared to TS4. It's a 10+ year old game and of course requires some extra TLC as compared to TS4. So I hope this guide will help y'all to get everything set up cleanly and smoothly! It took me three separate tries and if I can help the next person struggle less, then that's great. Happy simming!
You'll need a copy of TS3 and these resources:
The Sims 3 Performance & Bug Fix Guide 2023 by anime_boom
This lovely post from TS3 community extraordinaire @nectar-cellar
How Use CCMagic YouTube video by @florydaax
No Intro mod edited for 2023 (original by retired creator EllaCharmed)
The original mod from Ella does not work for current patch 1.69. I fixed it in s3pe with the help of some commenters on MTS so that it does actually remove the intro. If the creator happens to see this and would like this modified version removed, let me know.
How to clear cache by Carl's Guide
Got everything pulled up? Great! You're ready to start.

1. Download a FRESHLY INSTALLED copy of TS3 to your computer. If you're able, I'd highly recommend having all the packs you're wanting to own already so you don't have to do all of this again.
If you are redownloading the game for any reason (like me bc I was struggling lol), remove the existing TS3 folder in your documents and save it somewhere so you can keep all of your mods or worlds there. Back up any reshade stuff from the bin folder. Completely uninstall the game through the EA app/Steam. You may lose your saves and sims due to a change in script mods through this tutorial. This cannot be avoided, trust me I tried. But it's worth it for a smooth game.
2. Do a test launch so that the game generates a new TS3 Folder in your documents. DO NOT, I REPEAT DO NOT INSTALL ANY SIMS 3 PACKS THROUGH THE LAUNCHER! NO WORLDS, NO CLOTHES, NO HAIR COLORS, NOTHING. This will be very important later on when you merge your CC using CCMagic. If you need worlds or other CC there are alternative ways to obtain them.
3. CLEAR THE GENERATED CACHE
4. If you use EA and open to test anywhere between steps (which you shouldn't really need to after step 1 of the Bug Fix Guide) or after playing at any point, open up task manager and ensure that you end the tasks "EA" and "EA Background Services" before continuing. It doesn't really use much memory but I noticed that it caused stutters if it's open when launching using your shiny brand new Smooth Patch. It will look like this:

5. Begin following the steps in the Performance & Bug Fix guide. The first thing you'll do is set up your mods folder. Follow those steps exactly as they are in the guide, except use the No Intro mod I linked above instead of the one you get in that folder if you actually want the intro removed.
6. Continue to FOLLOW ALL REQUIRED STEPS IN THE GUIDE UNTIL YOU'RE DONE. I mean it, all of them one by one. Heck, if you're open/able to do the bonus and optional ones, I'd suggest doing those too.
7. Once you've completed that, go check out nectar-cellar's excellent post for tips and a fix to make the smooth patch to compatible with Master Controller. I will not be providing an edited version of this as LazyDutchess who created the Smooth Patch is still active and I want to respect their work.
8. If you've made it this far, you're doing great sweetie. Do another test launch through the patcher and if everything runs correctly it means you've done everything RIGHT. You're ready to start playing or downloading mods if you want!
If you do start downloading mods merging them will 100% be a must do if you want to maintain any sanity. You can use CCMagic to do so. I linked that handy lil video above!
Keep in mind script mods, overrides, patterns, and CC counters should NEVER be merged. Always check the creator's notes, yada yada. And always clean up your cache on a regular basis. Have fun y'all!

465 notes
·
View notes
Last Seen Blogs
dovmemodelleri
Tattoo Ideas & Dövme Modelleri
dovmemodelleri
Tattoo Ideas & Dövme Modelleri

vazelbeak
But Wait! There's More!

digitalashu4030
Untitled

exreligionrage-archive
trauma/vent blog