#The Oak Stairs
Text


Art: Mighty Oak
#art#digital art#ai#ai art#artificial intelligence#ai generated#mightyoakai#mighty oak#bing#image Creator#red stairs#invisible man
10 notes
·
View notes
Text
Song of the Day: May 30
“Throw Me Down the Stairs” by Sleigh Bells
#song of the day#'when I'm light alright / I'll defend everyone every friend / even when I'm tired#if you so much as look at me wrong / I'm coming down on your head and your home / count on it#I'll protect every fire I've built with my life / with my life'#it's my lunch break right now and in lieu of night or sleep I've decided to call it the end of Thursday#a lovely basket of fuchsia blooming under my oak tree and Duncan's gone to water the garden for me#(I have to look up how to spell fuchsia every time I want to put the S before the CH)#had the wrap-up meeting for the Idiot Project and *jazz hands* it's not wrapped. new parameters again#this song is from Sleigh Bells' album 'Jessica Rabbit' and I love every track on it#'don't flinch count to three / and throw me down the stairs please'#oh now it's the end of the month!!! Pay Rent When The Sun Comes Back Up
5 notes
·
View notes

Text

Cute apple house. I think I’m going to try building food and animal themed buildings with their inspirations inside. This one has an oak tree inside it. Starting simple. A little intimidated to make a sheep pen inside a sheep figure, but at least the sheep design is fairly simple. No idea how the cow house is going to turn out, haha.
#minecraft#not the best pic but i'm working on taking better screenshots in minecraft#i saw someone else do a cute apple house and got inspired to give it a shot#had to experiment with the blocks a bit tho#red terracotta was too dull#so this is mostly red concrete red wool and mangrove planks since i needed stairs for the angles#oh green wool for the leaf#and stripped dark oak logs plus one dark oak staircase for the stem#this is my first time making a 'food house' on minecraft#i've made animal statues before#well not a ton#just a sheep#and then technoblade as a pig with a crown and cape#but i think the apple turned out alright#the shape was tricky but i think this is a decent apple shape
3 notes
·
View notes
Text
The Complete Guide to Stair Nosing: Safety, Style, and Installation
Stair nosing might seem like a small detail in home design, but it plays a crucial role in both the safety and aesthetics of your staircase. This simple yet effective addition to each stair step can significantly enhance the safety of your stairs, reducing the risk of slips and falls while also extending the life of the staircase. Additionally, stair nosing comes in various styles and materials, allowing homeowners to incorporate it seamlessly into their interior design. In this comprehensive guide, we'll delve into everything you need to know about stair nosing, from its importance in safety and compliance with building regulations to the different types available, installation methods, and how to maintain it effectively.
What is Stair Nosing?
Stair nosing refers to the edge of the stair tread that protrudes over the riser, providing a slight extension beyond the vertical face of the step. This extension is typically covered with a material designed to enhance traction, such as metal, rubber, wood, or vinyl. Stair nosing serves several purposes. Primarily, it increases the surface area of the step, making it easier and safer to walk on. By providing a more visible edge, stair nosing also helps prevent trips and falls, especially in low-light conditions or areas where the staircase is heavily used. Additionally, stair nosing helps protect the edges of the stair treads, which are prone to wear and tear over time. By absorbing the impact of foot traffic, stair nosing can prolong the lifespan of the stairs, reducing the need for repairs or replacements. The use of stair nosing is not just functional; it also offers an opportunity to enhance the look of your staircase. Available in a range of materials, colors, and profiles, stair nosing can be chosen to complement the overall design aesthetic of your home.
The Importance of Stair Nosing for Safety
Safety is one of the primary reasons stair nosing is essential. Stairs are a common area for accidents, with slips and falls often resulting in serious injuries. Stair nosing plays a key role in reducing these risks by providing additional traction on each step. The protruding edge of the nosing gives users a clear visual cue, helping them to judge the depth of each step more accurately and reducing the chance of missteps. This is particularly important in environments where lighting may be dim or in homes with children, elderly individuals, or people with visual impairments. Many stair nosings also feature anti-slip properties, such as grooved surfaces or embedded grip strips, which further enhance safety by minimizing the risk of slipping. Beyond personal safety, stair nosing is also crucial for compliance with building codes and regulations in many areas. These regulations often require stair nosing to ensure that staircases meet certain safety standards, especially in commercial or public buildings. By incorporating stair nosing, you not only enhance the safety of your stairs but also adhere to legal safety requirements.
Stair Nosing and Building Regulations
In many regions, building codes and regulations mandate the use of stair nosing in both residential and commercial properties. These regulations are in place to ensure that staircases are safe and accessible to all users. Requirements may include specific dimensions for the nosing, such as the maximum projection over the step or the minimum and maximum width of the nosing. In commercial buildings, regulations often stipulate that stair nosing must be visually contrasting from the rest of the stair tread to provide a clear indication of the step edge, which is particularly important in emergency situations. Anti-slip properties are also commonly required, with building codes specifying the use of materials that enhance grip and reduce the risk of slipping. Failure to comply with these regulations can result in penalties or require costly renovations to bring the staircase up to code. For homeowners, while the regulations may be less stringent, it is still advisable to follow these guidelines to ensure the safety of all household members and visitors. Properly installed stair nosing that meets building standards not only provides peace of mind but also adds to the overall value and appeal of the property.
Types of Stair Nosing Materials
Stair nosing is available in a variety of materials, each offering different benefits in terms of safety, durability, and aesthetics. Aluminum stair nosing is a popular choice for commercial settings due to its strength and ability to withstand heavy foot traffic. It often features a ribbed or grooved surface for enhanced slip resistance. Rubber stair nosing is another option, commonly used in both residential and commercial spaces for its slip-resistant properties and shock-absorbing qualities. Wood stair nosing can be an attractive choice for homes with hardwood stairs, providing a seamless, natural look that blends with the existing stair material. Vinyl nosing is a versatile and affordable option, available in a range of colors and styles to match various decors. It is also known for its slip-resistant surface. Brass and stainless steel stair nosing options are less common but can add a touch of elegance to high-end interiors. These materials are highly durable and often used in luxury settings. When selecting stair nosing, it’s important to consider not only the aesthetic but also the functional aspects, such as slip resistance, durability, and maintenance requirements, to ensure the best fit for your stairs.
Design and Aesthetic Considerations
While safety is the primary concern, stair nosing also plays a significant role in the overall aesthetics of your staircase. The right stair nosing can enhance the visual appeal of your stairs, adding a finishing touch that complements the style of your home. For a modern and minimalist look, sleek aluminum or stainless steel nosing with a brushed finish can provide a clean, understated edge. In contrast, wood stair nosing can create a warm and cohesive appearance, especially when matched with hardwood stairs. For a more dramatic effect, you can choose stair nosing in a contrasting color to the tread to highlight each step and add a visual element to the staircase. Some stair nosing options even incorporate LED lighting, offering a functional and stylish solution for illuminating the stairs in low-light conditions. When selecting stair nosing, consider the overall design theme of your space, the material of the stairs, and how the nosing will integrate with other design elements in the room. By carefully choosing the style and finish of the stair nosing, you can enhance both the safety and beauty of your staircase.
Choosing the Right Stair Nosing for Your Stairs
Selecting the right stair nosing involves considering several factors, including the material, design, safety features, and installation environment. Start by evaluating the type of stairs you have and the amount of foot traffic they receive. For high-traffic areas, durable materials like aluminum or rubber are ideal, as they can withstand heavy use and provide excellent slip resistance. In residential settings where aesthetics are crucial, wood or vinyl stair nosing might be a better choice to match the staircase's existing design. Consider the level of slip resistance required, especially if the stairs are in an area prone to moisture, such as an entryway or near a pool. Opt for stair nosing with anti-slip features, such as grooved surfaces or embedded grip strips, to enhance safety. The installation environment is also important; for outdoor stairs, weather-resistant materials like aluminum or rubber are recommended. Additionally, ensure that the chosen nosing meets local building codes and regulations for safety and accessibility. By taking into account these factors, you can select stair nosing that provides the perfect balance of safety, functionality, and style.
Installation Process of Stair Nosing
Installing stair nosing is a task that requires precision to ensure both safety and a polished finish. The installation process varies depending on the type of stair nosing and the material of the stairs. For adhesive-backed stair nosing, the surface must be thoroughly cleaned and free of debris. The nosing is then pressed firmly into place, ensuring it aligns correctly with the edge of the tread. Screw-fixed nosing involves securing the nosing with screws or nails, often into pre-drilled holes to prevent splitting or damage to the stairs. This method provides a more secure attachment, making it suitable for high-traffic areas. For wooden stair nosing, wood glue and nails may be used, with careful sanding and finishing to blend the nosing seamlessly with the stairs. It's crucial to measure and cut the nosing accurately to fit each step, avoiding gaps that could compromise safety or aesthetics. While some stair nosing can be installed as a DIY project, professional installation is recommended for more complex materials like metal or for staircases in commercial settings where building codes must be strictly followed. Proper installation ensures that the stair nosing performs its function effectively and enhances the overall appearance of the staircase.
Maintenance and Care for Stair Nosing
Maintaining stair nosing is relatively simple and involves routine cleaning and occasional checks for wear and tear. The maintenance required depends largely on the material of the nosing. Metal stair nosing, such as aluminum or stainless steel, should be regularly wiped down with a damp cloth to remove dirt and debris. For nosing with anti-slip inserts, ensure that these are free from grime that could reduce their effectiveness. Wood stair nosing may require periodic refinishing or sealing to maintain its appearance and protect it from moisture damage. Use wood-safe cleaners and avoid excessive water exposure to preserve the finish. Rubber and vinyl stair nosing are typically low-maintenance; they can be cleaned with a mild detergent and water. Inspect the stair nosing periodically for any signs of damage, such as cracks, lifting edges, or worn-out anti-slip surfaces. Promptly address any issues to prevent safety hazards and extend the life of the nosing. Regular maintenance not only keeps your stair nosing looking good but also ensures that it continues to provide a safe and secure surface for stair use.
Common Mistakes to Avoid When Installing Stair Nosing
When installing stair nosing, several common mistakes can affect both safety and the final appearance of the stairs. One frequent error is improper alignment. Misaligned nosing can create an uneven edge, increasing the risk of trips and falls. Accurate measurement and careful placement are crucial to ensure the nosing fits perfectly with each step. Another common mistake is choosing the wrong type of nosing for the stair material or environment. For instance, using indoor-grade nosing on outdoor stairs can lead to premature wear and potential safety issues. Skipping surface preparation is another pitfall; installing nosing on a dirty or uneven surface can compromise adhesion, leading to loose or wobbly nosing. Additionally, neglecting to comply with local building codes regarding nosing dimensions, slip resistance, and visibility can result in safety violations. Finally, opting for DIY installation without the necessary skills or tools can lead to poor results. Professional installation is often recommended, especially for complex or high-traffic staircases. By avoiding these common mistakes, you can ensure that your stair nosing is both safe and aesthetically pleasing.
The Cost and Value of Installing Stair Nosing
The cost of installing stair nosing varies depending on the material, style, and complexity of the installation. Basic vinyl or rubber stair nosing is generally the most affordable option, with prices ranging from $1 to $5 per foot. Metal options like aluminum or stainless steel can range from $5 to $20 per foot, while hardwood nosing may cost $10 to $30 per foot, depending on the wood type and finish. Installation costs can add to the overall expense, particularly if professional installation is required. While this might seem like a significant investment, the value it adds to your home or building is considerable. Stair nosing enhances the safety of your staircase, reducing the risk of accidents and potential liability. It also protects the stairs from wear and tear, extending their lifespan and reducing the need for repairs or replacements. Moreover, stair nosing can enhance the visual appeal of your staircase, adding to the overall value and desirability of the property. In commercial settings, installing stair nosing can ensure compliance with safety regulations, potentially avoiding costly fines or legal issues. Overall, stair nosing is a cost-effective investment that offers lasting benefits in terms of safety, durability, and aesthetics.
Conclusion
Stair nosing is an essential component of any staircase, offering a perfect blend of safety, durability, and aesthetic enhancement. By providing additional traction and visibility on each step, stair nosing significantly reduces the risk of slips and falls, ensuring a safer environment for all users. Its importance is not only recognized in safety but also in compliance with building regulations, especially in commercial settings. With a variety of materials and designs available, stair nosing can be tailored to suit any staircase, complementing both the functional and visual aspects of the space. Proper installation and maintenance of stair nosing ensure that it continues to perform effectively, providing long-term protection for the stairs while enhancing their appearance. While the initial investment in stair nosing may vary, the value it adds in terms of safety, longevity, and property appeal makes it a worthwhile addition to any staircase.
#laminate stair nosing#lvt stair nosing#wooden door bars#amtico stair nosings#laminate flooring stair nose#laminate flooring stair nosing#self adhesive stair nosing#oak nosing for stairs#radiator pipe rose#waterproof vinyl stair nosing#karndean vinyl doorbars#amtico vinyl doorbars#waterproof door bars#wooden stair nosing#wooden door bar#stair nosing laminate#vinyl stair nosing#flooring accessories#wooden nosing for stairs#solid wood door bars#click vinyl flooring doorbars#laminate floor stair nosing
0 notes
Text
i love comin back to continue my isles watchthrough once in a while (no offense im just not as invested in this particular series aside from when tom is on and theyre being gayasses and bantering and pranking each other) like. after watchin lots of hermicraft and seeing like. building building i do really enjoy watching jordan build even more now, hes such a silly goofy, wet cat loserboy of a builder and I mean that in the nicest, most /aff way possible
#today's episode: the dine at nite v2.0#i dont know whats going on but im living for every second of it#you go white boy and your. polished blackstone brick walls and floor. crimson wood stair chair that were also polished blackstone brick#just moments ago#i like watching his braincells work /sily#mianitian isles liveblogging#update he just said sorry guys no more spruce tables while breaking dark oak and#unironically i think spruce wood would fix this build a little
1 note
·
View note
Text
Stair treads are not the first thing you think about when redesigning your home, we get that. But choosing the right stair tread is important and offers many benefits. Discover how installing durable and stylish red oak stair treads can transform your home by enhancing its elegance. Read this short pot to learn more.
0 notes
Photo
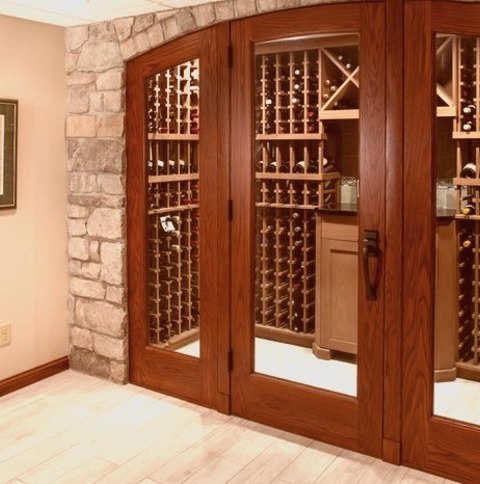
Contemporary Wine Cellar in St Louis
Mid-sized trendy ceramic tile wine cellar photo with storage racks
0 notes
Text
Front Door in Providence

Example of a mid-sized classic medium tone wood floor entryway design with white walls and a brown front door
0 notes
Text
With dsmp fans resurging I wanna remind everyone one of my favorite moments—
That one time Phil left techno's front door opened, a creeper walked in and blew up his living room
Phil frantically trying to pick everything up and shove them into chest before they despawn and looking at the tutorial Techno used trying to fix it block by block, he had to dig around Techno's storage desperately for extra white concretes, and the cherry on top, all of Techno's fanarts and signs with artists' name were also blown up and on the ground, then ranboo walked in and got roped into fixing the art like it's four different puzzles' worth of pieces in a chest mixed with maps
Techno is online, his dogs in the living room, without the boat, was teleported to him
They're running out of time
Which way was the stairs above the front door facing
Fuck it's dark oak and not spruce
4K notes
·
View notes
Text


Art: Mighty Oak
#art#digital art#ai#ai art#artificial intelligence#ai generated#mightyoakai#mighty oak#bing#image creator#red stairs#invisible man
7 notes
·
View notes
Text
Front Door in Providence

Example of a mid-sized classic medium tone wood floor entryway design with white walls and a brown front door
1 note
·
View note
Photo

Walk Out Basement Atlanta
An illustration of a substantial traditional walk-out basement with a dark wood floor, beige walls, and a wood stove
0 notes
Photo

Traditional Entry Chicago
Mid-sized traditional entryway idea with a white front door, gray walls, and a medium tone wood floor.
0 notes
Text
Flooring Accessories: The Finishing Touches That Make a Difference
Flooring is more than just the surface you walk on; it’s a critical design element that sets the tone of a room. However, achieving a truly polished and cohesive look goes beyond simply laying down beautiful floors. This is where flooring accessories come into play—the often overlooked yet essential components that elevate your flooring from basic to stunning. From trims and mouldings that create seamless transitions to underlays that provide comfort and insulation, these finishing touches make a significant difference in both the aesthetic and functionality of your space. In this article, we’ll explore the key flooring accessories that complete your installation, how to choose the right ones, and tips for achieving a professional finish that will stand the test of time.
Key Flooring Accessories and Their Roles
Flooring accessories play a vital role in achieving a seamless, polished, and functional finish for any flooring project. These accessories not only enhance the visual appeal but also contribute to the durability and performance of your floors. Below are some key flooring accessories and their roles in completing your flooring installation:
1. Trims and Mouldings
Trims and mouldings are essential for creating smooth transitions between different types of flooring, such as between hardwood and carpet or tile. These accessories hide expansion gaps, protect edges from wear and tear, and provide a clean, finished look. Common types include T-mouldings for even transitions, reducers for height differences, and end caps for finishing exposed edges. By using the right trims and mouldings, you can ensure a professional appearance while protecting your flooring investment.
2. Underlays and Padding
Underlays are placed beneath the primary flooring material and serve several important functions, including cushioning, sound insulation, and moisture protection. For laminate and vinyl floors, underlays help reduce noise, making them ideal for multi-level homes or apartments. They also provide thermal insulation, which adds comfort underfoot and can help improve energy efficiency. Underlays specifically designed for moisture control are essential in areas like basements, where dampness could damage flooring over time.
3. Skirting Boards and Baseboards
Skirting boards, also known as baseboards, cover the joint between the floor and the wall, adding a refined and cohesive finish to any room. They help conceal expansion gaps, protect walls from scuffs and damage, and give the space a completed look. Skirting boards come in various styles and materials, allowing you to match them with the overall design of your room. Whether you opt for a sleek modern style or a more decorative traditional look, these accessories play a crucial role in tying the entire room together.
By incorporating the right flooring accessories, you not only enhance the aesthetics of your space but also improve the overall functionality and longevity of your flooring. These finishing touches are the details that make a significant difference, turning a standard installation into a standout feature of your home.
How to Select the Right Accessories for Your Flooring
Choosing the right flooring accessories is essential for ensuring that your flooring installation is both visually appealing and functionally sound. The right accessories can make all the difference in achieving a cohesive look and maximizing the performance of your floors. Here’s a guide to help you select the best accessories for your specific flooring type and needs:
1. Matching Materials and Colors
When selecting trims, mouldings, and skirting boards, it’s crucial to choose materials and colors that complement your flooring. For hardwood or laminate floors, opt for wood or wood-look accessories that match or contrast elegantly with the floor’s color. If your flooring is tile or stone, consider metal or vinyl trims that harmonize with the material. The goal is to create a seamless transition that enhances the overall aesthetic of the space without drawing unnecessary attention to the accessories themselves.
2. Considering Room Functionality
The function of the room should heavily influence your choice of flooring accessories. For instance, in moisture-prone areas like bathrooms and kitchens, opt for moisture-resistant accessories such as PVC or aluminum trims and water-resistant underlays. In high-traffic areas, durable and scratch-resistant trims are essential to withstand wear and tear. If you’re working with living rooms or bedrooms, focus on comfort and insulation by selecting cushioned underlays that enhance comfort underfoot and reduce noise levels.
3. Balancing Budget and Quality
While it’s tempting to cut costs by opting for cheaper accessories, it’s important to strike a balance between budget and quality. Investing in high-quality accessories ensures that your flooring remains protected and looks great for years to come. Consider the long-term benefits of spending a bit more upfront on durable, well-made accessories that won’t need frequent replacement. Additionally, look for accessories with warranties, as these often indicate higher quality and provide added peace of mind.
4. Assessing Installation Requirements
Before purchasing accessories, evaluate whether you’ll be installing them yourself or hiring a professional. Some accessories are designed for easy DIY installation, while others may require specialized tools and skills. For DIY projects, opt for accessories with user-friendly installation features, such as click-in trims or self-adhesive underlays. If you’re working with more complex materials or high-end finishes, professional installation may be the best route to ensure a flawless result.
By carefully considering these factors, you can select the right flooring accessories that not only enhance the appearance of your floors but also improve their performance and longevity. The right choices will ensure that your flooring installation looks professional, functions efficiently, and stands the test of time.
Installation Tips for a Professional Finish
Installing flooring accessories correctly is just as important as selecting the right ones. Proper installation ensures that your flooring looks polished, functions well, and lasts longer. Whether you’re tackling a DIY project or working with a professional, these installation tips will help you achieve a flawless and professional finish for your flooring accessories:
1. Proper Measurement and Cutting
Accurate measurements are crucial when installing trims, mouldings, and skirting boards. Measure each section carefully and double-check before cutting to ensure precise fitting. Use a miter saw or a similar tool to make clean, angled cuts, especially for corners, to avoid gaps and uneven edges. For skirting boards, ensure that they are cut to fit snugly against the wall and floor, covering any gaps without creating excess pressure that could cause warping over time.
2. Secure Fastening Techniques
Choosing the right fastening method is key to ensuring that your accessories stay in place and maintain their appearance. For trims and mouldings, use adhesive along with nails or screws to secure them tightly. This dual approach prevents movement and minimizes the risk of gaps forming over time. When installing underlays, ensure they are correctly laid flat and securely taped at the seams to prevent shifting, which can affect the stability of the flooring above.
3. Align with Floor Expansion Needs
Floors, especially wood and laminate, expand and contract with temperature and humidity changes. It’s essential to leave appropriate expansion gaps between the flooring and accessories to accommodate this natural movement. Use spacers during installation to maintain consistent gaps, which can later be covered with trims or skirting boards. Failing to account for expansion can lead to buckling or damage to both the flooring and accessories.
4. Sealing and Finishing Touches
For a polished look, seal gaps between accessories and the floor or wall with caulk or a color-matching sealant. This not only enhances the appearance but also prevents dust, dirt, and moisture from getting trapped in the gaps. If painting skirting boards or trims, apply a coat of primer followed by paint or stain after installation to ensure a smooth, even finish that matches the room’s decor.
5. DIY vs. Professional Installation
While many accessories can be installed as a DIY project, some installations—especially those involving intricate cuts, high-end materials, or large areas—are best left to professionals. Professionals have the tools and expertise to handle complex installations, ensuring a high-quality finish. If you’re unsure about any part of the process, consult with a professional installer to avoid costly mistakes and achieve the best possible result.
By following these installation tips, you can ensure that your flooring accessories not only look great but also provide the finishing touch that elevates the overall appearance and durability of your flooring. Whether you’re a DIY enthusiast or hiring a professional, these details make all the difference in creating a standout, polished finish that enhances your space.
Conclusion
Flooring accessories are the unsung heroes of any flooring project, offering the finishing touches that transform a simple installation into a beautifully polished space. From trims and mouldings that provide seamless transitions to underlays that enhance comfort and durability, these accessories play a critical role in both the aesthetic and functional aspects of your floors. By carefully selecting the right accessories that match your flooring type, suit your room’s functionality, and fit within your budget, you can elevate the overall look and longevity of your floors. Proper installation is equally important, as it ensures that these finishing touches are secure, visually appealing, and able to withstand daily wear and tear. Whether you’re renovating a single room or outfitting an entire home, paying attention to the details of your flooring accessories will make all the difference, creating a space that’s not only beautiful but also built to last.
#laminate stair nosing#lvt stair nosing#wooden door bars#amtico stair nosings#laminate flooring stair nose#laminate flooring stair nosing#self adhesive stair nosing#oak nosing for stairs#radiator pipe rose#waterproof vinyl stair nosing#karndean vinyl doorbars#amtico vinyl doorbars#waterproof door bars#wooden stair nosing#wooden door bar#stair nosing laminate#vinyl stair nosing#flooring accessories#wooden nosing for stairs#solid wood door bars#click vinyl flooring doorbars#laminate floor stair nosing
1 note
·
View note
Text
Front Yard - Brick Pavers

A summertime photo of a small, modern brick garden path in the front yard.
#stairs#barrie landscaping#tough oaks landscaping company#ralph young landscaping#custom hardscape#walkway#outdoor stone steps
0 notes
Last Seen Blogs

luvtwd-blog1
twdpics

missmysme
I need more Jaehee

shatsu
SHATSU ^^

lisalisapark
a good man's wife

fleecerrennovs
Untitled