#also the first time i logged into the applicant portal the to do list they have told me i completed everything i need to
Text
completely folded on my 2nd choice application .. im so blown that was a waste of $70
#i had no idea their architecture program was under fine arts#i shld have checked their website before applying but on the application website there was no indication of it being in the art school or#under a fine arts degree#so now they want a portfolio and all this information on my art background#I TAKE ENGINEERING CLASSES 😭#i can’t even do art for my own enjoyment anymore and they want me to come up with TWELVE pieces by february ???? fuck that shit man#also the first time i logged into the applicant portal the to do list they have told me i completed everything i need to#so that was weird
3 notes
·
View notes
Text
What is Bitdefender Central & How Do I Use It?
Bitdefender provides one of the most popular antivirus software that protects your computers and mobile phones. The company product helps you by protecting your devices and data as it comes with lots of features. Also, it is a cloud-based engine that will protect devices when browsing or using the internet. It goes light on the system and doesn't take up much space. This blog will discuss what is Bitdefender Central & how do I use it. And explore more on it.
What is Bitdefender Central?
The company created Bitdefender Central, an online platform to manage all the company's products and subscriptions. First, You need to create your account. And then only you will be able to log in to Central's web portal. There you will find the main dashboard, which provides you with details about all your Bitdefender devices. Also, which devices are under protection, and have any new threats been detected?
Further, you can manage any of the active subscriptions. If you are facing any issues, you can browse from the library of help features. So it acts as a hub for all your devices using Bitdefender software. Moreover, the Central hub also facilitates access to premium security services.
How to Use the Bitdefender Central?
Now, we will look at how you can use this platform and manage your devices. Remember, the online portal has many features that simplify managing the devices. Further, it acts as a remote access portal across your devices. Let us see the functions you can access via Cental's portal.
Subscriptions
From the Central managing account, you can access all your subscribed devices. Also, make payments and details of the same. Further, you can even activate a new subscription service and manage your devices.
Remote Management
With the Central portal account, you will be able to view details of any device connected with the Bitdefender product. Also, you can manage certain things directly from the hub, which includes triggering a malware scan. Plus, you can boost the functioning of a device.
Anti-Theft
If ever you lose your mobile or someone steals your laptop, then the Central management hub will enable you to track the lost device. Further, you can even send a message; in the worst cases, you can lock your device or completely delete its files.
Parental Control
If you have subscribed to the Internet or Total Security feature, you will get a parental control feature. So, from this hub, you will be able to monitor your child's online activity, their live location, set screen time, and much more.
Further, it can display the time spent, applications, websites, and even contacts saved on the device. The feature is really helpful in protecting your child from age-inappropriate sites and content.
Digital Identity Protection
In this age, where anyone can be found on the internet, protecting one's identity on the internet becomes important. So, the company assures you by protecting your digital identity. You use the functions in this to see how much of your data is made public or leaked.
Further, you can always be aware of sensitive information about your identity on the Dark Web or public data. Moreover, you will be alerted if there is any attempt on your identity, such as data breaches, account info leaking, and hacking.
Support Portal
If you ever need help, there is a list of options that the company offers that you can use to resolve your issue. The help features include video tutorials, FAQs, a knowledge base, and more. These resources are helpful and come in handy for users who are new to using a Central account.
Conclusion
Bitdefender is a great software that ensures all-around protection of your devices against all threats. You will get many features and functions that create multiple layers of protection. In this blog, we discussed what is Bitdefender Central & how do I use it. Now, this online platform lets you access all your devices, protect your files against device theft, and many more features.
FAQs
How to reset your Central Account password?
If you ever forget your password and are unable to access your account, open the account and Sign in. Later, type your associated email with the account, and then select Next. Now, select the Forgot Password option, and you will receive an email with instructions and reset your password. Further, you have to enter the security code, create a new password, and press save. Finally, you will be able to sign in again with your new password.
How to remove a device from a Central account?
To remove a particular device, first sign in to your account. Later, go to the My Devices section, which is present on the sidebar. Now, you will be able to see all the devices and select view details. After that, you will see the remove option and confirm it. Finally, the device is removed from the subscription list.
How can you delete a Central account?
Bitdefender's Central account is an online hub that helps manage all your subscriptions and devices. To delete the account, you need to sign in to your account. After that, select the account icon, and choose your account. Once, then go to Data & Privacy, and finally select the Delete account option. After this, you will lose all the services and products the company provides.
Visit: bitdefender central login
central.bitdefender.com
Source: https://centralbitdefenderdotcom.wordpress.com/2023/12/14/what-is-bitdefender-central-how-do-i-use-it/
#central.bitdefender.com#bitdefender sign in#bitdefender login#bitdefender central login#www.central.bitdefender.com#bitdefender.com/activate#bitdefender central#bitdefender#bitdefender antivirus#bitdefender log in
1 note
·
View note
Text
CodeHub Review 2023 – World’s Cheapest App Selling Platform??

CodeHub Review – Introduction
The market for digital products is growing alarmingly quickly, and more and more people are hopping on board to sell digital goods and make money... And now you may join them by starting your own app-like software distribution company. That's correct A single app sumo program costs $50, but the website also offers hundreds of identical products that bring in millions of dollars for app sumo. In addition, you may create your own software marketplace with hundreds of DIY goods. Without lifting a finger, you can set your own prices, add new products, and start generating money.
The best part is that I'll also offer advice on how to launch your company from scratch and advertise it to bring in the most sales. You may use the website and launch your own business by simply following 3 easy steps... Want to know how...?
CodeHub Review – What is CodeHub?
CodeHub is the world’s First and Never done before “AppSumo Killer” App that lets you build your own Digital Product Selling Platform & Start your own Software Selling Business Today.
CodeHub Review – Features and Benefits
Create your own software selling platform with 1 Click Apps and launch your online store right now.
Access the 1 Click AI CodeHub App right away.
On your own platform, sell any digital products or software.
An entirely cloud-based system
Without any limitations, sell an unlimited number of software applications and digital tools.
thousands of commercially licensed software and codes within.
Software for DIY is included.
Once you pay, you may use it forever.
A Free Commercial License is Available
And Many more.
✅Benefits:
Easily manage your digital items by listing them in a number of categories.
a single, integrated dashboard that tracks everything for all of your digital goods
Without any obstacles, create user accounts for your audience
Create a digital store and market DFY software there.
CodeHub Review – How does it work?
Social Media Sharing buttons can help you increase visitors and profit greatly
Simple integration of payment methods will enable immediate earning
To manage your SEO traffic and improve conversions, use SEO Manager.
To increase your earnings, use an email manager that gathers and delivers emails on your behalf
START YOUR SOFTWARE-SELLING BUSINESS IN JUST 3 EASY STEPS:
STEP 01: Log in to your portal
STEP 02: ADD PRODUCTS OR CATEGORIZE EXISTING ONE’S
STEP 03: START SELLING AND EARN MONEY
CodeHub Review – My experience using CodeHub
I participated in the software's beta testing, and I'll now walk you through using CodeHub.
You may rely on my suggestions. I will try to be as truthful as I can in my article, which is entirely based on my own experiences.
The time is here to take action and launch the company you've always wanted to launch but have been delaying for various reasons... You may become the proprietor of a whole software-selling platform in a matter of minutes by following three simple steps that even a third-grader can do. On that site, you may sell dozens of DIY software items and make good money doing so. There are no complicated systems, hidden fees, or complex processes... What's best is…
You may also add your software products and take advantage of the virtually endless opportunities offered by the continually growing market for digital goods. You won't ever need to work another soul-crushing job since our firm is recession- and layoff-proof. Featuring a 30-day money-back guarantee, all for $16.61... However, you must act immediately as this offer expires today and won't be available anymore.
YOU CAN WATCH THE DEMO VIDEO HERE
MY OPINION:
Due to all the advantages it offers, I consider this software to be a game changer. And in actuality... Every business in this digital age, whether local or online, needs to have an online presence to establish a name for itself and gain the confidence of its audience. I think this software will benefit your business the most. This is the foundation of each and every successful online business. And… You'll Need It Too if You Want to Run a Tightly Controlled Busines
LEARN MORE ABOUT THIS PRODUCT HERE
#software#make money online#affiliatemarketing#money online#make money with affiliate marketing#make money on facebook#make money from home#start a business
0 notes
Note
Hi there! I absolutely loooove the destiel fic collection and think that it's a genius way to expose fans to fics that might not always get as much attention on fic recs and when searching on ao3. I was thinking of trying to create a similar collection for another fandom and was wondering if you have any tips? Or if there's anything that you wish you knew when you started it? Thank you!
Hi!! Just for openers, sorry I didn’t reply to this yesterday, my mom’s basement flooded and took with it all my writing time, sigh. ANYWAY. On to the topic at hand. How to make a “faves survey” for another fandom, and have it resemble what I’ve made for Destiel? Well, here’s what I’ve done, hopefully some of it will be applicable to you...
1. This is the most important part: Do NOT let it become or be perceived as a popularity contest. Never release the raw stats (except perhaps to a small number of people who you trust to help you). Never announce a “winner.” Never share a ranked list. Never act as if more votes equals better. Never ever suggest in anyway that your purpose to find “the best.” Treat people and fics who get one vote with just as much fanfare as people and fics who get 50 votes. I do release a “top 20��� list just because so many people asked, but even then, it’s in alphabetical order, and meant more as a snapshot. Encourage people to vote for their favorites that aren’t already in whatever collection you end up making, and encourage people to vote for things they don’t usually see on rec lists. Aim for an expansive range of types of fics being voted for, and make it clear - no ship shaming (or secondary ship shaming, if yours is ship-based like mine, rather than being general to a given fandom) or kink shaming.
2. Keep the survey super simple. People don’t read complex instructions, and they’re not going to want to rank lists or anything like that. You can see the one I use here. Feel free to emulate it, copy it, modify it for your own purposes. I used to just do boxes but people would routinely put in way more than 5/10, and while I didn’t really mind the extras, it greatly increased the amount of work I had to do, and since the survey routinely gets a couple hundred replies that I go through, I decided to make it a little harder for people to go over the limits. Don’t bother asking for people’s names or trying to validate the results. I’ve tried. People don’t want to put their names, and validation encourages people not to submit...AND doesn’t prevent cheating...so is really pointless. Just keep it anonymous, after four rounds I can say...that works best.
3. And, speaking of people going over the limits, and cheating...people will cheat. No matter how clear you are that number of votes don’t matter, no matter how much you insist that whatever data you’re collecting will only be used in so-and-so a way...you will spot people “cheating,” for various definitions of the word cheating. People who vote for their own works. People will submit multiple surveys. People will “ballot box stuff” for their favorite(s). People will list more than the maximums you’ve asked them to. People will submit works from other ships, and - though it’s never happened to me - if you make it fandom-general I’ll lay heavy odds at least one dumbass will submit for some other fandom entirely. It happens in different permutations every time, some more obvious than others, but it happens. And the conclusion I reached is...so fucking what? In the end, since the idea is to highlight as many different great works as possible...screw it. Let people vote for themselves. Let people ballot box stuff. Let people submit multiple surveys, or list more than whatever maximums you’ve set. In the end, since every work is treated as equal and one vote is worth as much as a hundred...if they’re cheating to up the vote count, it’s irrelevant, and if they’re cheating to vote for more works, then yay! more works to include! and basically the only thing I’ve found that reduces cheating is to make it absolutely clear to people that I’d really rather they not but ultimately I can’t stop them, so do their thing I guess? And it does help. I got less cheating each time I do it, or at least less that I’m able to catch lol. (as a side note - the one exceptions is the “works for others ships.” Those you can see listed on the “INELIGIBLE” sheet of the spreadsheet I link below, but I don’t add them to the AO3 collection.)
4. Spreadsheets are your best friend. You’re going to want some way to organize the data you’re collecting. I’ve got a public version of the sheet I use that you can see here. It’s pretty similar to my “private” version, except the private version includes actual vote counts, separated by which time(s) I did the survey that the work in question got votes. I mostly use that data so I can do comparisons over the years (“this year X works were added to the collection that were never in it before!”) and because I like numbers. However, depending on how exactly you plan to use the data, you may not even need to tally vote counts, and you could do one that’s more similar to my public version. Also, if you make an AO3 collection, you’re going to want some way to track which works you’ve invited, which have been added, etc., cause otherwise it’s just a nightmare to keep track of. (a little more on this later).
5. Decide how and where you’re going to share your data - as an AO3 collection? As a public spreadsheet? On social media? Maybe you want to make a side Tumblr just for it? Or a Discord server? etc. etc. Like, I’ve got a pillowfort group (though I hardly use it) and a channel in a Discord server (thanks again to the PB folks for making space for me!) with the AO3 collection being the main portal. You want to make sure that it’s advertised enough that people know it exists, and also be prepared that short term you’ll hear basically no feedback on whether people use it, and even long term it’ll be once in a blue moon and suddenly eight people will be like WAIT YOU’RE THE PERSON BEHIND THAT THING I LOVE THAT THING. In that respect it can feel a little thankless but I’ve definitely found that people do use it, it’s just that there’s no real way for people to let YOU know they’re using it (and, honestly...good? This isn’t really about us, after all, it’s about all these fic writers, the goal is to bring attention to them, not ourselves, we’re just a go-between for the writers and the readers.)
6. For making an AO3 collection, you’ll have to invite every single work individually. Some people have their accounts set to auto-accept invites, but otherwise whether the work actually gets added will depend on the authors. Some people will never accept the invite. Some people won’t know how to accept the invite. Some people will accept the invite and then subsequently remove their work. Some people have left these parts completely and will never even see the invite. That’s why it’s important to track who has added and who hasn’t, and periodically double check it (I double check every six months or so). For the people who don’t accept the invites for whatever reason, you can bookmark the item to the collection. HOWEVER, if you do this with your personal account, every single one of those bookmarks will be listed under your personal AO3, which is why I ultimately made the Faves survey its own account - it’s entirely to facilitate bookmarking. You can also use the “Bookmark External Work” feature to link to works that aren’t on AO3, and to tag them to whatever extent you want to. Here’s some examples of how I chose to bookmark external works.
7. Things will inevitably get complicated. Authors will change their names. People who do the survey will use shorthand you’ve never heard of for some fic you don’t know. People will misspell things and you’ll either recognize it even with the typo...or you won’t. People will vote for things that list eight different ships and you’ll have no idea which one is endgame. People will vote for things that have been deleted, or they’ll tell you it’s definitely on AO3 when it’s not, it’s on some other platform. The list of random things I’ve had to deal with is stupidly long and I’ve probably forgotten even more. Just...roll with it. Do your best. Ask for help (“Someone nominated a fic abbreviated as ABC to the collection and didn’t give the author and I have no idea what it is, help me Tumblr!”). And in the end, if you’ve done everything you can think of and you still don’t know...let it go. It’s just not that worth worrying about. And sometimes if you step away and look again in a few days you’ll figure out another way to search and it’ll pop up. But honestly I’ve got a handful of works I still haven’t been able to track down, and that one work that someone submitted that’s only available in Finnish and is explicit and behind a log-in wall on a small independent Finnish-only fic archive...well, I spoke to the author and confirmed the work exists, but otherwise...whelp, it’s not linked, and I did my best. That’s all you can do.
8. No matter what you do, someone somewhere will probably get upset about it. The first time I did the survey, when it got the most traction, I actually got a little hate, and I got some anons who were like “oooooo did you know that ~x~ is cheating” and I had a little “HOW DARE YOU NOT PLAY FAVORITES WHAT ABOUT MY PERSONAL FAVE?” and just...decide how you’re approaching the survey, and stick to your guns, and if anyone is a douche, hit the block button. And, related...
9. Transparency is most important imo. Not transparency for vote counts obviously, but transparency for what you’re doing, and why you’re doing it, and what you hope to accomplish. Make sure your goals are clear from the start (mine weren’t that first time, hence some of the problems I encountered) - if it’s to highlight as wide a range of works as possible, say that. If it IS to pick a favorite, say that too. Just be clear, and honest, and above board, and it should work out okay.
10. Side note...one of the saddest things about all this is that if you do it over an extended period you’ll see authors deleting their works. As such, I personally chose to download every work that gets a vote, that way it’s at least preserved. I then expanded that into a much larger archive that I’m still adding to all the time, trying to save as much Destiel as possible. But then, I’m an archivist at heart, whether you want to branch out in that kind of direction is up to you.
...okay, that’s everything I can think of. Hopefully I didn’t scare you too bad. I don’t know what fandom/ship you’re looking at but for perspective...first time I did the survey I got about 400 replies, and then the next two times it got about 200, and this most recent time it got about 300. I chose to do mine annually, on the assumption that gives some time for people to come and go for fandom and a lot of new works to get created, and I deliberately timed it for about a month after the biggest fandom event (the DCBB) that generates fics, to give people time to read those fics and consider them in their voting. For me, that means I happen to run the survey starting on January 1st, and I keep it limited to 15 days, since usually it tapers off anyway. But you could try experimenting with different schedules, or leaving it open all the time, etc., it just depends how much time you want to devote to monitoring and updating it. For me, I mostly want to do a big burst of work and then not have to think about it most of the rest of the time, lol.
So...questions? comments? thoughts? wanna tell me I’m dead wrong? I’m all ears, lemme know how I can help!
#destiel favs survey#unforth replies#sorry if this is a mess I've GOT to do some writing so I don't want to take the time to edit it#treatlouwithkindness
12 notes
·
View notes
Photo

Congratulations! At this point, you’ve gotten the letter you’ve been waiting for. However, your journey into college isn’t over yet. Here’s what happens next...
1. Accept Your Acceptance
You might be ecstatic about getting in but, first things first, you still have to accept the acceptance to the college you’ve chosen. For my university and many others, the admissions office will send you an email with your login information for their student portal. Mine didn’t even say that I had made it in, it just gave me access to check the status of my application. When I opened it up and logged in, I saw that I had been accepted! This did make getting my letter a little less exciting...
2. Check Your To-Do List
Many universities will have a to-do list feature on their student portals. You’ll need to check for this and read what it says. If it mentions your final transcript, don’t worry about it until you graduate high school (or your country’s equivalent). They probably already have the transcript you sent them at this point; however, when you graduate, they’re going to need the final copy that lists all of the grades and credits you graduated with.
Your to-do list will probably change over time, so make sure to check that often. If your university has a mobile app, I suggest getting that and turning on the notifications so that you can get updates in real time.
3. Set Up Your Student Email
Along with your login information, you were probably sent the information for your student email. This is where your university will be sending you important updates and information so you will need to check it often. If you have problems setting it up, contact admissions and they can surely help you.
4. Scholarship Applications
Depending on your school, you may have to fill out one general scholarship application or many. In my case, I only had to fill out one, however, any scholarships that required an essay, personal statement, or recommendation letter required more steps.
If you do only have one general application, this will be applied to all university-wide financial aid. You will automatically be considered for any scholarships that don’t require any more steps than that application. Make sure to gather all required extra materials and send everything in on time.
If you do have to fill out more, make sure you have all of the deadlines written down or marked somewhere so that you aren’t turning applications in late.
Also, you will have to accept the scholarships that you win. You will likely either do this through the student portal for your school or the scholarship portal.
5. Housing Applications
Housing applications are when you apply for university housing and usually meal plans as well. Many universities will require freshmen to live on campus for their first year. Make sure that you check if this is required at your university before you start looking for a place to stay.
Think carefully about the dorm and meal plan you want. Make sure the price, location, accommodations, etc. work for you. I would highly suggest visiting several dorms at your university to get a good look at the options. Make sure that you have a way to get food on days that your meal plan doesn’t cover if you don’t get a seven-day meal plan.
Your housing application will probably require a down payment. Even if you have the option to defer, there is usually a small fee that students must pay before doing so.
If you are living off campus, you will have to complete a separate process for wherever you plan on living. This is not connected to your university at all but it is very important to make sure that you get this done. Keep up with the important dates and make sure you provide everything your landlord will need from you.
DATES ARE IMPORTANT! Make sure to send everything on time.
6. Other Applications
Some colleges have other applications to be filled out. For example, I also had to apply to be a part of the Honors College at my university. This affected many other things that I had to apply for as well, such as housing and financial aid. Make sure that you check to see what other opportunities you can apply for and check your to-do list for things that are unique to your school.
7. Freshman Orientation
Usually, colleges will have a freshman orientation program. Some schools require all freshmen to attend so check your school’s policy. This will usually cost money and you will have to find a date that works for you. Make sure that you check what you need to bring and have it ready by the time you go.
Even if this isn’t required for you, orientation is a great time to make new friends, get a preview of your college experience, and learn more about your campus. I highly suggest going.
8. Final Documents
Your school may require final copies of documents, such as your transcript. Get these in as soon as possible and make sure you are sending an official copy. Depending on the school, you may have to send more than just a transcript.
9. Important Dates
There are usually many important dates that you will need to remember. I don’t just mean deadlines for applications and documents. There are usually specific days when you can move into your dorm if you are living on campus. Make sure that you know these. You also may have specific dates and check-in times for events such as orientation. Keep these in a planner or calendar that you check often so that you don’t forget or get them mixed up.
10. Get Excited!
You’ve made it in! College is an incredible step toward a better, more educated version of yourself. Be proud of what you’ve done to achieve your goals and get into the school of your choice. Make sure to celebrate, but don’t forget to finish out your last year of high school strong. Congratulations and good luck!
Check out more of my posts on education, the college app process, and my senior year experiences:
How to Get a Good SAT Score
Starting High School
College Application Advice
Getting Organized for School
A Guide to Setting Goals
Scholarship Advice
Thoughts and Fears of Senior Year
2019 Expectations
9 notes
·
View notes
Text
Five Common Mistakes in Corporate Training

Assume you’ve logged into your company’s learning and development portal, selected and enrolled in a course, and then your focus wanders. While the course is going on, your interest shifts to something else; you start reading some articles on your laptop, and then the phone rings, and you answer it.
These are, believe it or not, an L&D professional’s worst nightmares.
When the COVID-19 pandemic shook the world with its deadly virus, many businesses got disrupted violently and many of them have embraced the new normal i.e. work from home model.
As a result, many corporate training programs were probably not prepared to go virtual when everything had to go online all of a sudden. Even before the pandemic, research revealed that roughly 75% of top managers were unsatisfied with their companies’ training programs. Now that many firms are navigating online corporate training for Crucial Accountability for the first time, the risk of making a mistake has increased.
1. Failure to conduct pre-training inspections and preparation - You may have spent a lot of time and effort preparing the lessons and materials. Similarly, you may have spent a significant amount of time promoting yourself as a freelance corporate trainer.
However, you may not give proper consideration to pre-planning, checking, and other factors such as key access. And, believe it or not, you will not be the first to make this error!
Taking the time to plan and confirm the following ahead of time will help to make your training day run more smoothly and make you a more relaxed trainer on the day:
Is there a confirmed booking for the training room?
Is the availability of refreshments (if applicable) confirmed?
Do you have a backup contact number for the gatekeeper (key access to the venue and/or training room) in case there is a problem on the day?
Do you have a point of contact for IT support on a day-to-day basis?
Before the training day, you’ll want to double-check (where applicable) the following items.
Solution - Get the Pre-Training Checklist and use it.
Don’t be daunted by the long list of things to check. It’s relatively simple as long as you have a well-organized checklist.
2. Failing to account for a variety of learning styles - You might already have a good understanding of pedagogy if you have experience in teaching or training.
Pedagogy is a term that refers to the different ways people learn. Some of us will learn best when we listen, others when we see, touch and experience.
Making sure that the course plans are structured so that all learning styles in the training are given opportunities means a lot more committed and happier students!
Happier students mean better feedback. It is important to assess the people for whom you provide training and with whom you can hope to enter into a training contract.
Also, if you arrange your training directly with students, your positive feedback will lead students to want to do more of your courses.
I am sure you agree that it is a diligent and caring trainer that makes training fun and enjoyable.
Solution - Make sure to incorporate a variety of learning styles into your training materials (including PowerPoint presentations, activities, and student handbooks)!
If this appears to be a lot of work, it is. That’s correct. The good news is that we make it extremely simple for you by providing training course materials that have already been pre-designed and are available for immediate download.
3. Failure to Receive and Follow-Up on Student Feedback - We are all flawed in some way. We’re all human, and we’re all prone to making mistakes. And, as trainers and teachers, we can all learn, right? Do you think you’ll agree?
One of the most valuable things you can get, in our opinion, and which will help you to:
Become a better trainer
Better customize the training you provide to your students
It is to receive feedback and giving feedback is completely free! It will not cost you anything, but it will be extremely valuable.
Solution - All the training materials packages should include a feedback form; simply print and distribute one to each student.
Because you want the feedback to be anonymous, you should make sure (as we did) that there is no request for the student’s name or similar information.
What’s the point of being anonymous? Because you want the students to feel free to say whatever they want without fear of retaliation. Allow 5 minutes for written feedback at the conclusion of the training.
Allow students to fold the feedback form and place it in a box near the door so they don’t feel pressed by you.
4. Viewing training as a one-time event and failing to upsell related courses - This is especially true if you are a freelance trainer or someone who is self-employed and needs to sell themselves in order to get more training work.
Thinking in terms of grouped training is one of the best ways to approach trying to build your business as a trainer.
This may seem obvious, but many trainers overlook it, and it is a great opportunity for you to grow your business!
There is a way to try and sell your training to companies and followers, so if you start to reflect on which courses are naturally grouped and focus on 3, 4, or 5 connected courses each time.
Indeed, you may also want to ask a question about what other training workshops students are interested in doing (and we discussed this earlier in this post). In addition to an open option, you may want to include 4 or 5 associated courses.
Solution - Just think about what training leads to further training (if you haven’t already had it). Look at logical groups so you can sell them and provide additional workshops and training days.
5. Speaking non-stop - Talk too much and be not surprised if you nodded in a training room for a few students. Give them the opportunity to think, be creative and provide insight into the classroom.
They discuss the scenario and connect it to what they have learned in small groups of 3 or 4 students. This allows students to talk to each other, think for themselves, and make their contribution to the lecture. Hundreds of various activities are integrated with training that you can choose from.
Solution - Remembering to ask that feedback we discussed is one approach to figure out whether you’re talking too much.
But, if you’re designing your own Accountability Training Courses, make sure there’s a delicate balance of teacher talking time vs. class activities and engagement.
0 notes
Text
Install Pof Dating App
The POF Dating App has the most users, generates the best results and is free. Tap Install and Join Now. The POF Dating App has the most users, generates the best results and is FREE. Tap Install and Join Now! 🎣 Happy Fishing 🎣.POF.com is a part of the Match Group, which also owns Tinder, Match.com, Hinge, OKCupid, Twoo, Meetic, and OurTime. POF Free Dating App for Android is a detailed and smart dating app for users looking to find a relationship. The app has a lot of different ways to find people around your area, and it also has extensive profile creation that includes your interests. Plenty of Fish is the preferred singles dating app because you can view matches AND communicate with them for FREE (unlike the paid dating apps). Unlike smaller dating apps, Plenty of Fish has the most users and thus, the highest chance for you to find your relationship!
Pof App For Android
Install Pof Dating App
Install Pof Dating App Reviews
Since smartphone have becomes lot smarter, they can do what the work you can do on your mobile phone. Whether its accessing website for information to booking flight tickets or checking status you can do everything on your mobile phone. In this particular context we are concerned about the online dating via your mobile phone and we are particularly concerned about POF free online dating Android Application.
POF is the known largest online dating site at pof.com. It accessed by 40 millions users as claimed by the site statistics and it’s free to use. Unlike various other portals like match.com Eharmony, POF is free and completely no charge to use, however the restrictions of premium membership areas applies here as well.

As soon as you install and run the POF Free Online Dating Site Android application, as the first time user of this application you will be asked to registered and secure login id and password. If you are not registered then do it please but registering process is very much length and I would suggest you to register it their online website called pof.com for your laptop or pc. The minimum age however is 18 years and below that they should stay away from this application and parents who have set family filter in Android Market place will not see this app as well.

When you are registered and sign in with your existing account, you will be presented with the homepage of this application which contains conversations, Sent SMS, search, profile, viewed me, my matches, images, mobile users, meet me, place to meet, favorites and finally log out.
When you click on the profile tab, you are in to editing your profile with your needs and your profile can be edited fully as well along with upload of pictures too.
When you go around search option you can search out for profiles. You can get into refine searches to redefine your results. You can click on any of the profiles and send them message directly.
The redefine of the results goes into much filtering with gender change, age, seeking, within, activity and zipcode as well. This what gives your precise results of what kind of friend or dating partner that you need.
The meetme page allows you to see which partner or friends wants to meets you, you want to meet them and all other to get in touch personally.
POF Free Online Dating Site App Download
POF Free Online Dating Site Android application can be easily downloaded from Android Apps Labs for free. To download it directly on to your mobile phone you need to visit the POF Free Online Dating Site page listing on the Android Apps Labs and then click on the install button seen there, with that it will automatically install on your mobile phone.
Alternatively you can download this application using the below QR code. You need to open any of the QR code scanner program from your mobile phone and then face the camera to this code.
Verdict
POF might not be the # 1 portal for dating but its certainly among the best 3 dating application for the the Android platform. Certainly would suggest you to go with this application.
Android Advices Application rating – 4 / 5
Pof App For Android
Plenty of Fish is one of the largest dating platforms in the world with over 90 million users. Today, the dating site that inspired the application is available in five different languages and has an estimated 55,000 new registrations per day. The site is free, which means that users don't have to invest to start finding their matches.
Install Pof Dating App
Matchmaking software to make you find a crush
Plenty of fish is one of the few dating applications that allow you to contact other users without correspondence or subscription. The application provides you with a free state-of-the-art compatibility algorithm that allows you to meet singles through your matches.
The chances of dating are amplified since plenty of fish is one of the sites with the highest number of users. When a new user registers on the site, they are asked for their basic information and a photo of themselves. The site then offers a long, if not entertaining, chemistry test where users answer a series of questions to establish their character. The resulting data is then used to associate people with other users with whom they think there might be a chance. After being matched, users can decide if they want to start sending them messages on the site. The advanced search function gives you tons of filtering options, so it's easy to sort by specific criteria such as 'education', 'income' and 'occupation'.
Install Pof Dating App Reviews
Finally, on plenty of fish, you don't need to upgrade to see who's viewed your profile. This makes it easier to send icebreakers to women who have checked you.
1 note
·
View note
Text
Cisco Cucm 8.6

8.6(2a)SU2, 8.6(2a)SU3, 8.6(2a)SU4, and 8.6(2a)SU4a. Resolved Caveats for Cisco Unified Communications Manager Release 8.6(2a)SU5 The following information comprises unexpected behavior that is addressed by this SU of Cisco Unified. CUCM Version: End of SW Maintenance Releases Date: App. SW: End of New Service Attachment Date: App. SW: End of Service Contract Renewal Date: App.
CUCM 8.6 and Chrome I am running Google Chrome 15.0.874.102 m and the drop down menus in the CUCM (8.6) admin pages do not work. Does anyone else have this issue? This video shows how to configure and use remote destination profiles in CUCM 8.6 (Cisco Call Manager) to simultaneously ring local numbers and remote number. Such is the case in CUCM. With version 8.6, Cisco has moved away from an OS platform based on Redhat Enterprise Linux (RHEL) 4 and upgraded the underlying OS to RHEL 5. This is good news that allows the system to stay current and support a larger variety of hardware. The bad news is that the upgrade of the OS can be a bit destructive.
Contents
Introduction
Cisco Unified Communications Solutions unify voice, video, data, and mobile applications on fixed and mobile networks. This enables easy collaboration every time from any workspace. Cisco IP Communicator brings your phone to your PC. This allows you to make calls with your corporate phone number no matter where you are working.
Prerequisites
Requirements
There are no specific requirements for this document.
Components Used
The information in this document is based on these software and hardware versions:
Cisco IP Communicator 8.6
Cisco Unified Communications Manager (CUCM) 8.x
The information in this document was created from the devices in a specific lab environment. All of the devices used in this document started with a cleared (default) configuration. If your network is live, make sure that you understand the potential impact of any command.
Conventions

Refer to Cisco Technical Tips Conventions for more information on document conventions.
CIPC
Cisco IP Communicator is a Microsoft® Windows-based soft-phone application that brings your work telephone to your personal computer. It is easy to deploy, and includes some of the latest technology and advancements available for IP communications. This advantage boosts business collaboration and responsiveness, and helps organizations keep pace with the current mobile business environment.
Features and Benefits
Cisco IP Communicator is intuitively designed and easy to use, and it delivers convenient access to a broad range of features:
Eight line keys: These keys provide telephone lines and direct access to telephony features.
Five soft keys: These keys dynamically give you call-feature options.
Messages: This key gives you direct access to your voicemail messages.
Directories: Cisco IP Communicator identifies incoming calls and messages, and categorizes them on the screen. This allows you to return calls quickly and effectively using direct dial-back capability. The corporate directory integrates with the Lightweight Directory Access Protocol Version 3 (LDAPv3) standard directory.
Settings: This key allows you to select from a large number of ringer sounds and background images.
Services: Cisco IP Communicator allows you to quickly access diverse information such as weather, stocks, quote of the day, or any other web-based information. The phone uses XML to provide a portal to an ever-growing world of features and information.
Help: The online Help feature gives you information about the phone keys, buttons, and features.
Secure VLAN Traversal
ASA intercepts and authenticates Cisco IP Communicator traffic before it reaches Communications Manager by forcing all soft client media to proxy via the ASA appliance. This ensures a single, secure point of entry to the voice VLAN.
High-Level Components and Protocols
Cisco IP Communicator supports the same call control and application protocols as the 7970s. At startup, the Cisco IP Communicator interacts with the network as follows:
Locate the configuration server: After startup, Cisco IP Communicator always attempts to use DHCP to locate its TFTP server. Similar to other phones, Cisco IP Communicator can use TFTP to retrieve files from the server. It can also use HTTP to retrieve software updates, thereby accelerating file transfer for remote users.
=
Request the CTL file (if security is configured): The TFTP server stores the CTL file, which contains a list of Cisco Unified CallManagers and TFTP servers that Cisco IP Communicator is authorized to connect to. It also contains the certificates necessary for establishing a secure connection between Cisco IP Communicator and Cisco Unified CallManager. The security CTLFile.tlv file is downloaded to the Program Files > Cisco Systems > Cisco IP Communicator > AppData > sec folder.
Request configuration files: Configuration files (.cnf.xml) reside on the TFTP server and define parameters for connecting to Cisco Unified CallManager. In general, any time you make a change in Cisco Unified CallManager that requires a device to be reset, a change is made to the configuration file for that device. If you have enabled auto-registration in Cisco Unified CallManager, Cisco IP Communicator accesses a default configuration file (xmldefault.cnf.xml) from the TFTP server. Otherwise, Cisco IP Communicator accesses a .cnf.xml file corresponding to its device name.
Update software: If you use AutoUpdate, the .cnf.xml file contains the information that tells Cisco IP Communicator which software version it should run. If this software version differs from the one currently in use, Cisco IP Communicator contacts the TFTP server to request the new software file. In order to make this request, Cisco IP Communicator first tries to use HTTP. If you have not enabled HTTP access, Cisco IP Communicator uses TFTP.
Contact Cisco Unified CallManager: After obtaining the configuration file from the TFTP server, Cisco IP Communicator attempts to make a connection to the highest priority Cisco Unified CallManager on the list. If security is implemented, Cisco IP Communicator makes a TLS connection. Otherwise, it makes a non-secure TCP connection. If the device was added to the database individually (through Cisco Unified CallManager Administration or in bulk through the Bulk Administration Tool (BAT), Cisco Unified CallManager identifies the device. This is only true if you are not using BAT with the Tool for Auto-Registered Phones Support (TAPS). Otherwise, the device attempts to register itself in the Cisco Unified CallManager database (when auto-registration is enabled in Cisco Unified CallManager).
Note: Auto-registration is disabled when security is enabled on CUCM. In this case, you must manually add Cisco IP Communicator to the Cisco Unified CallManager database.
Related Information
We use cucm 9.1 here and I just changed the MOH the other day. These instructions may not be exactly for 8.6 but they should be close. The thing to remember is you should use restart and not reset when resetting the phones. I will mark it in the instructions where I am talking about resetting will kick everyone off of the phones even if they are in a call. Restarting will try to preserve the call and restart when the hang up.
Best if the file is a .wav file
Adding a audio file
Cached
Media resources | MOH Audio File Management
Upload file
Choose file. (Can be uploaded directly from the users PC that is logged into CUCM)
Adding the audio file to the audio source
Media resources | Music on Hold Audio Source
Select Add New
Select a MOH Audio Stream Number from the drop down
Select the Audio file within the MOH Audio Source File
Create a name for the file in the MOH Audio Source Name

Select save and the page should list the file status and should also populate the other audio files that are being used.
Adding the audio file to all phones
Bulk Administration | Phones | Update Phones | Query
Find Phones where (device name) (begins with)sepclick find
Click next in the upper left hand corner
Go to drop downs for
User Hold MOH Audio Source
Network Hold MOH Audio Source
Select the audio file you want to use
Scroll to the bottom of the page
In the Job Information section ensure run later is selected
Select submit

Best to do want follows during a off hours..
Go to Bulk Administration | Job Scheduler
The job should be listed and under status it should be on hold.
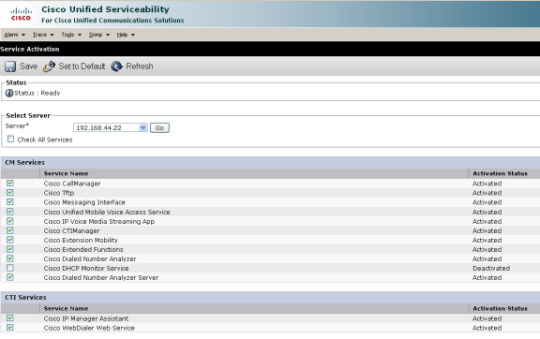
When the time comes select the job then select (Activate Selected)
When the job says completed all of the phones need to be reset. May take a few minutes.
Go to Device | Phone
End-of-Sale And End-of-Life Announcement For The Cisco ...
Find Phone where (device name) (begins with)sepclick find. (All phone names should start with sep. then followed by the mac address.)
Expand Rows per page to Max. (250)
Cisco Cucm 8.6 Hardware
Select all phones then select (Reset Selected) at the top of the page. (('Here is where you want to choose restart')).
Cisco Cucm 8.6 End Of Life
Scroll to the bottom of the page and select page 2 and repeat.
Hope this helps.
0 notes
Text
Registration Guide 2018-2019
Hello all! I have written a registration guide a couple years in a row now (save for last year), and while not much has changed to warrant a new guide, I decided to write a new one anyway and attempt to simplify it. This will still be long, but each point will be...well, straight to the point.
Firstly, you will be creating your Laurentian account sometime before registration opens. When you register on WebAdvisor, you will already have created your account, so you should already know your login credentials (username - NOT student number - and password). Once logged in, you will be brought to this page:
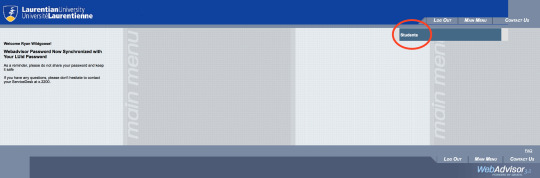
From here, you click on “Student.”
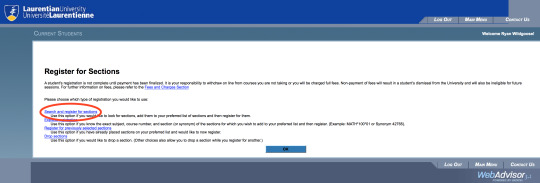
You will then click on “Register for sections.” This is the only link where you can actually register for any courses -- “Search for Sections” allows you to search through courses currently offered, but not register for them.

From here, you want to click “Search and Register for Sections.” This will allow you to search for the courses, and then select them for registration.
On the following page, you will have a number of search factors open to you. I would suggest not choosing anything besides the Term, Subject, and Course Level -- you do not know what sections will be offered when registering, what time they will be offered at, who is teaching them, etc. The more detail you put into the search, the fewer results you will get, and potentially miss the courses you need. You can choose the language of the course if you wish not to see results in either English or French.

Under term, you will focus on three specific terms: 2018 Fall Term, 2019 Winter Term, and 2018 Fall/Winter Term. You register for the entire school year at once, so you do not want to simply register for the fall and not for the winter -- you can make changes after registering, up until the end of the second week of each semester (with late fees after each semester begins).
Your course level is reflective of the number of the course code. Some programs require you to take a second year course (2000-level) during first year, so note that you will not find that course if your course level is not “Second Year.” Your course code is also where you find whether the course is on-campus or online. If the two digit section number at the end is 10 or higher, the course is online. Below 10 means it’s on-campus.
You need to know what courses you have to look for. Your MyLaurentian portal may tell you this, however if you are unsure, you can check your program page on the Laurentian website. You must register for your required courses, you are not automatically registered for them. As for electives, you must choose each class individually based on the requirements you might have (such as six credits in science, or six credits in Indigenous content).
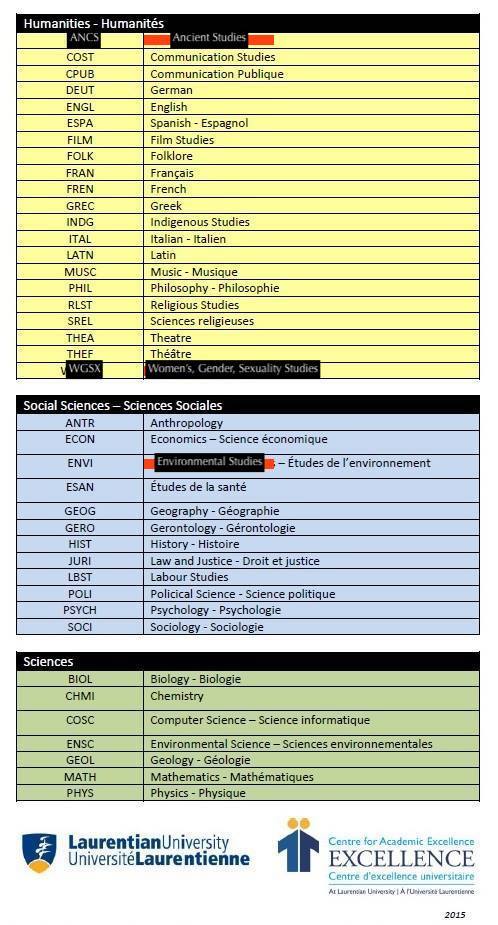
For information on what counts as scientific literacy, Indigenous content, or linguistic awareness, please view this regulation document on the Laurentian website. You can also view this document for any other information on BA and BSc degrees. For information on what subjects sit in what specific categories, you can view this image below (updated because it was produced in 2015 and there have been changes in that time):
Three credit courses are offered in the 2018 Fall Term and 2019 Winter Term, and six credit courses are offered in the 2018 Fall/Winter Term. What is the difference? The fall term and winter term are the individual semesters, and the fall/winter term is the whole school year (save for the spring and summer terms). Some courses are offered straight from September to April, and thus are often six credits. Most courses are offered from September to December or January to April, and thus are three credits.
You will be asked, once you have selected your search criteria, to confirm your information. This includes your program, you student association, your gender, and your Francophone status:

If you have not already been assigned to a student association, this is where they will assign yours. Generally, students who identify as Francophone or are in a French program will be assigned to the AEF (the Francophone student association) and all other students will be assigned to the SGA. As a graduate student, I am a member of the GSA (or, as they categorize it, GRAD). If your information is correct, you’ll click “submit” at the bottom of the page.

To register for courses, you simply click the box next to the course you have chosen.
Note that the “Meeting Information” will tell you the days, times, and locations of these courses. Sometimes your meeting information will fill the entire box, and will leave off on ellipses -- this is often because the class meets twice a week, either at different times or in different locations. You can see that the title and course code of these courses are links, they’re blue -- click on the link to see the meeting information in full (as well as any prerequisites for the course, and the professor’s contact information).
Once you have selected a course and pressed “submit” at the bottom of the page, you will be brought to the “Register and Drop Sections” page.
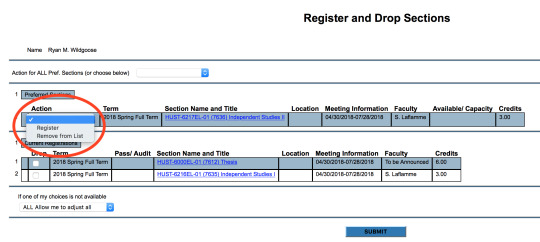
In order to register for the course, you simply select “Register” and click “submit” at the bottom.
Courses that are offered at the same time conflict, and WebAdvisor will not allow you to register for conflicting courses, so if you attempt to then you will receive an error message. If you have not completed the prerequisites for a course, you will also face an error message. You can only register for a total of thirty credits during the year (in most programs, select programs allow you to register for more) so if you select more than thirty credits, you will also receive an error message.
Once you are registered for your courses, you can click the “Main Menu” button at the top of every page, and click the “Student” button again.

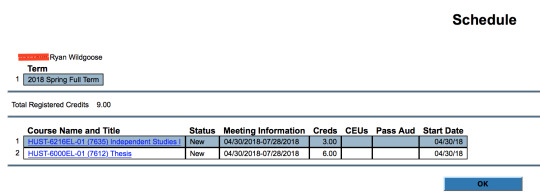
From here, click on “My Class Schedule.” This is where you will go to see your actual schedule once you are registered for your courses. You will have to select the proper term for each course, as in the term for which each course was found in registration (2018 Fall Term, 2019 Winter Term, 2018 Fall/Winter Term). You can view your entire school year by clicking the 2018 Winter Academic Term (not viewable below since registration has yet to open):

You class schedule will then be presented to you in the form of a list (this is my current 2018 Spring Full Term schedule because it is the only one currently available to me -- courses are removed from previous schedules once your final grades are submitted):
You are unable to access the schedule in a calendar form, this is not offered on WebAdvisor. Many students create their own calendar schedules using programs on the internet or spreadsheets on their computer. For example, I use Numbers (the Mac version of Excel) in order to create a calendar schedule where I can view my courses better. Here is an example of a schedule that I created in Numbers during my undergraduate education:

All this is a gross simplification, since different programs will have different requirements. You may want to speak to an academic advisor prior to registration, or even the program director -- you can also feel free to ask me questions, and I can walk you through registration. I have done this for many students in the past, spending many hours on the phone or the internet to help find courses and create schedules with students -- I cannot promise to have an everlasting knowledge of what is required for each program and I will consult the Laurentian website, so your program director or academic advisor may be able to do more for you. What I offer, however, is instant responses and availability outside the working hours of the school (8:30AM to 4:30PM). I am available on Facebook, Twitter, or by email at [email protected]
I still recommend that you contact your program director or academic advisor even after having gone through registration with myself. Note that there is sometimes a miscommunication, and students do not receive the same information from their program director as they do academic advisors -- in this case, you always go with the information that your program director gives you. There are changes often, and the advisors in the Centre for Academic Excellence are not always updated instantly.
In the previous year, I also made an OSAP application guide video. OSAP applications have changed slightly in the past year, and therefore my video is already outdated, but you can take a look if you are currently applying for OSAP. I also highly encourage you to read my OSAP FAQ because this information is still rather current -- and do so soon, I recommend applying for OSAP (if you need apply) by the beginning of July since OSAP applications can take six to eight weeks to process. You do want it to process before school begins.
If you have any questions, do not hesitate to contact me! Make sure to take a look at the Laurentian website in the next couple weeks before registration opens so that you can see what will be required of you when the time comes!
Ryan Michael Wildgoose, M.A., B.A
Ph.D. Student in Human Studies
Sexual and Gender Diversity Commissioner of the Graduate Students’ Association
Co-Director of Pride Laurentian / Co-Directeur de Fierté Laurentienne
#Laurentian University#Course Registration#Guide#Guideline#Instructions#OSAP#Information#Pride Laurentian
6 notes
·
View notes
Text
Check RRB Group D Admit Card 2021 | Download Exam Date | RRB Exam Call Letter

Dear Applicants, Are you waiting for RRB Group D Admit Card 2021? If yes then here comes great news for you. Railway Recruitment Board has finally uploaded the exam date for RRB Level 1 Posts. The Computer Based Test for Helper, Fitter, Track Maintainer, Gateman, etc. posts will be commencing soon. Participants may download their RRB Admit Card 2021 from now onwards over the official website. To download RRB Level 1 Call Letter you need to log in with Application No. and other General Details. Furthermore, details are available below.
What is the RRB Level 1 Exam Date? When to Download RRB Group D Admit Card 2021?
Name of Department: Indian Railways
Unit Name: Railway Recruitment Board (RRB)
Total Number of Posts: Various vacancies
Post Name: Group D (Helper, Fitter, Track Maintainer, Gateman)
Nature of Exam: Computer Based (Online) Test
Date of Exam: Update Soon
Downloading of RRB Group D Admit Card 2021: Available Soon
Expected No. of Candidates: More than 01 Crore
RRB Official Portal: indianrailways.gov.in
Overview of RRB Group D Recruitment 2021
The notification no will be uploaded on the official site. It was uploaded to invite online forms on चतुर्थ श्रेणी भर्ती 2021. The online forms are available for Helper, Fitter, Track Maintainer, etc. posts under RRB Recruitment 2021. Submission of application forms for the Group D Exam began soon. The last date for submission of the filled application form will be updated soon. Those aspirants who have successfully submitted the application forms may attend Railway Recruitment Board Group D Exam 2021.
Thus this is the overall information about RRB Group D Exam 2021. Now participants must look forward to RRB Group D Admit Card 2021 details. Here in our article, we are sharing the importance, necessary details available on RRB Call Letter 2021. Hence Candidates must read all the details carefully available here for RRB Group D Hall Ticket 2021.
Download RRB Group D Call Letter 2021 Region Wise, RRB Call Letter Details
Aspirants who are willing to participate in the Group D Examination must bring their RRB Hall Ticket 2021 to the exam center. It is the most important document which is uploaded before 15-20 days of the exam date on the official site. There are few important details available on the Admit Card 2021. Here our team has given some indication about What Information Will Be Available on RRB Group D Hall Ticket 2021?
General Details Available On RRB Group D Admit Card 2021 Region Wise :
- Candidate’s Name
- Guardian Name
- Exam Center
- Center Code
- Day and Date of RRB Group D Exam
- Timing and shift of the exam
- Photo & Sign (Register) of the applicant
- Sign of the authority
What Document Are Required at Exam Center with RRB Group D Admit Card 2021?
Applicants along with the RRB Group D Call Letter 2021 need to bring the following documents to the exam center. Firstly you must have valid photo-bearing ID proof with you for verification purposes. Afterward the list of documents to bring with Railway Recruitment Board Call Letter 2021.
- ID proof i.e. Voter ID/Pan Card/Adhaar Card/Driving License/Passport etc.
- One colored photo is also available in the Group D online form.
Do’s & Don’t in Railway Recruitment Board Group D Exam 2021 – Instruction Printed on RRB Call Letter 2021
There are few instructions or guidelines printed on the RRB Group D Call Letter 2021. An applicant participating in the Group D Examination must follow each guideline. If the applicant refuses or does not reacts according to the instructions available on the RRB Hall Ticket 2021 then He/She will not allow appearing in the exam. Thus you must follow the guidelines shared here and then appear in the Group D Examination.
- First of all download RRB Admit Card 2021 on A4 size white plane paper only.
- RRB Group D Admit Card 2021 should not get printed on any other paper of another size.
- Simultaneously it is very necessary to bring one valid ID proof.
- The RRB Group D Admit Card 2021 must not get tears or damage from any side.
- You must not bring any study material, electronic gadgets, and other equipment to the exam center.
- The next most important instruction is to reach before 1/2 hour at the exam center.
- Delay entries will not be considered in any condition for RRB Group D Admit Card 2021.
Check RRB Admit Card 2021 Region Wise – RRB Group D Call Letter Declare @ RRB Website
Yes, you must be aware of the fact that will be available on the concerned Railway Recruitment Board Website. There is a total of 16 regions of RRB wherein you need to log in with your Application No and General Details to obtain RRB Call Letter 2021. Here we are sharing the links to download the RRB Group D Hall Ticket 2021 Region Wise. On declaration click on the respective RRB website and then download the Railway Recruitment Board Admit Card 2021.
Check RRB Level I Group D Exam Application Status 2021
RRB Group D Admit Card 2021 Region Wise Download
RRB Ahmedabad Admit Card 2021
RRB Ajmer Admit Card 2021
RRB Allahabad Admit Card 2021
RRB Bangalore Admit Card 2021
RRB Bhopal Admit Card 2021
RRB Bhubaneswar Admit Card 2021
RRB Bilaspur Admit Card 2021
RRB Chandigarh Admit Card 2021
RRB Chennai Admit Card 2021
RRB Gorakhpur Admit Card 2021
RRB Guwahati Admit Card 2021
RRB Patna Group D Admit Card 2021
RRB Kolkata Admit Card 2021
RRB Ranchi Admit Card 2021
RRB Mumbai Admit Card 2021
RRB Secunderabad Admit Card 2021
How to Download RRB Group D Admit Card 2021 State Wise? Railway Recruitment Board Hall Ticket
- First of all open the respective RRB Official Website given above.
- Here you need to click on the link showing RRB Admit Card.
- Afterward, a window will open asking you to enter some information.
- Enter Application No. & DOB in the dialogue box to obtain RRB Call Letter 2021.
- Submit all the details and then your RRB Hall Ticket will appear on the screen.
- Check all the details given in the RRB Admit Card 2021 are correct or not.
- Simultaneously give a printout on A4 size white plane paper.
You May Also Check :
Check RRB Group D Syllabus
RRB 2021 Result
Railway Department Group D Exam Hall Ticket
RRB Exam NTPC Admit Card Here
Check Loco Pilot Exam Admit Card of RRB
Nagpur Metro Exam Admit Card Here
Railway Protection Exam Hall Ticket
Bangalore BMRC Admit Card
Conclusion: RRB Group D Admit Card 2021 for the Group D Exam on various vacancies. The exam will be held soon. Candidates may download their RRB Admit Card from the official links given above.
Read the full article
0 notes
Last Seen Blogs

hobibonito
MOVED TO @ILYSOPE

sciencefictionally
Science Fiction & Fantasy

pyrrhicpoison
Bear

adamthedomapple
The Theatre Dom

incorrect-piltover-quotes
Incorrect Piltover Quotes