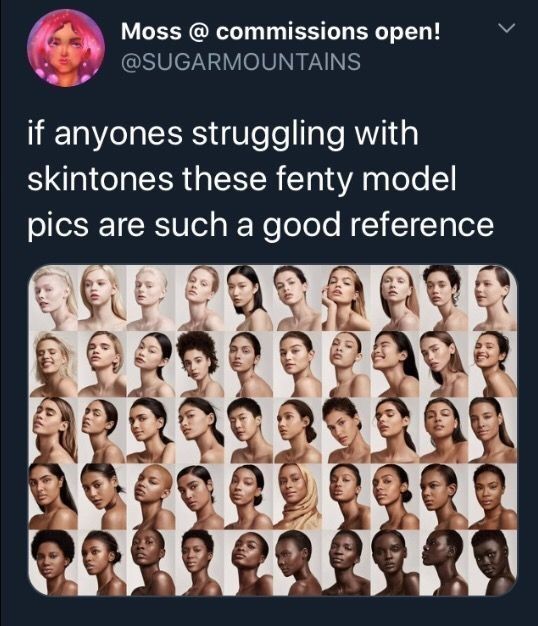
#art ref
Photo
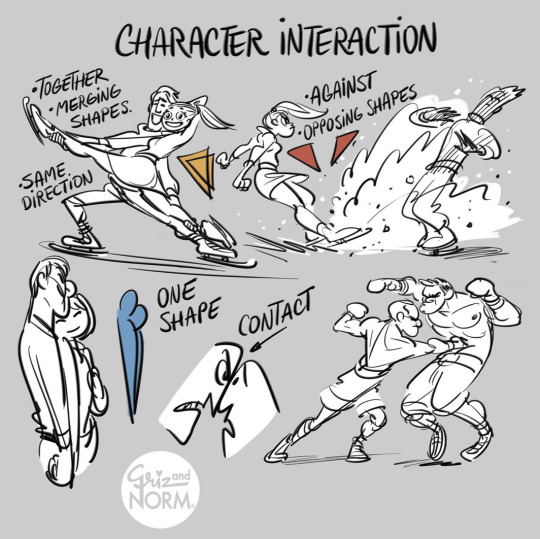
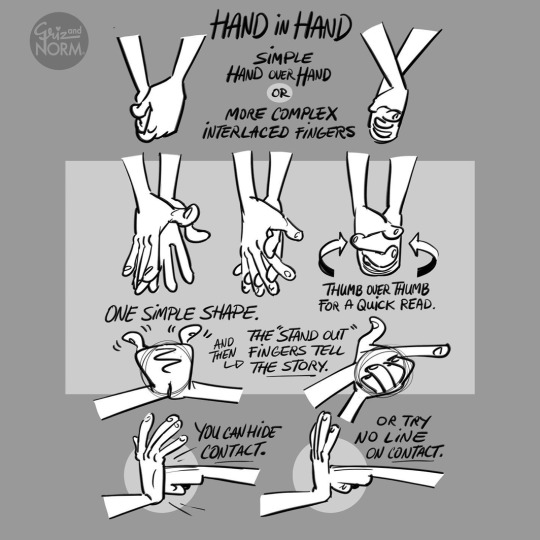
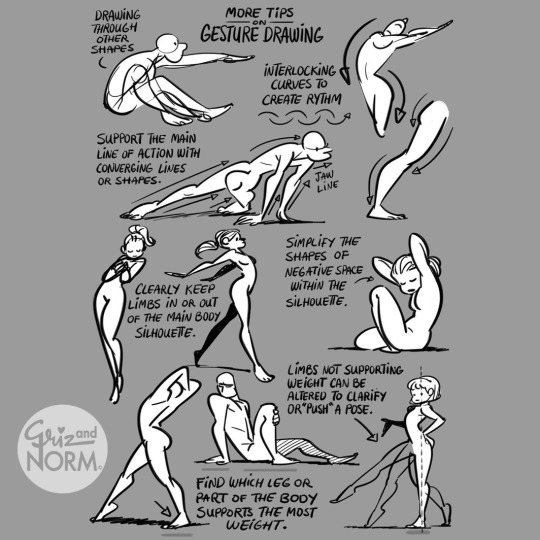
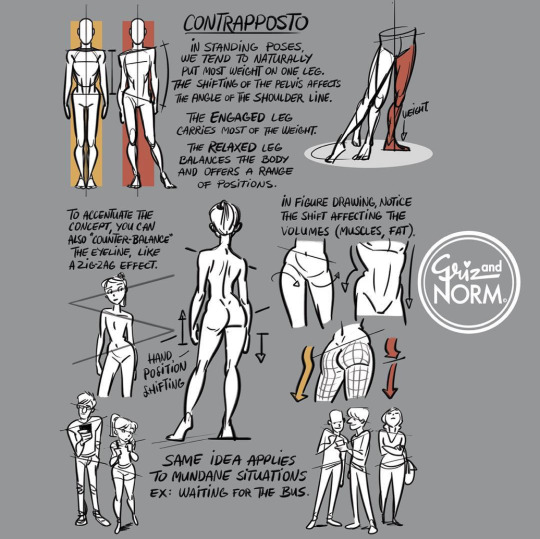
More art tutorials by Disney artists Griz and Norm Lemay
#disney#art tutorial#drawing tips#art reference#art ref#Griselda Sastrawinata#normand lemay#art#not concept art
46K notes
·
View notes
Text


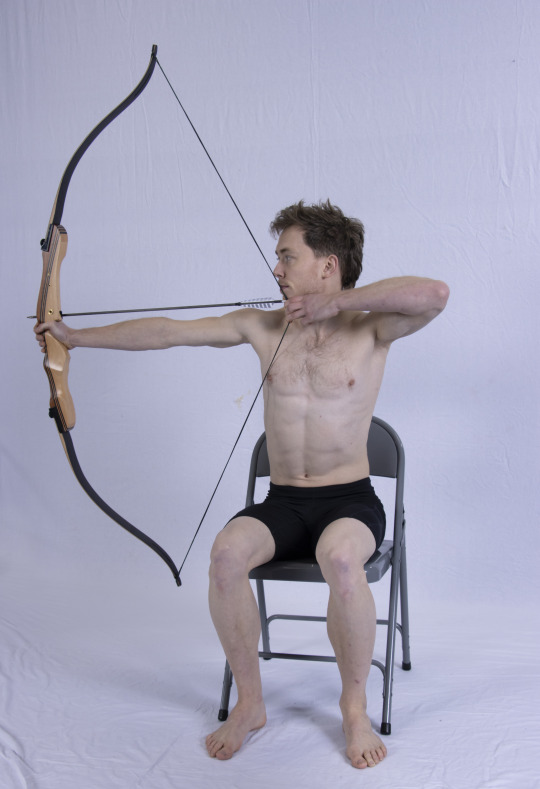
MORE IMAGE PACKS NOW ON PATREON
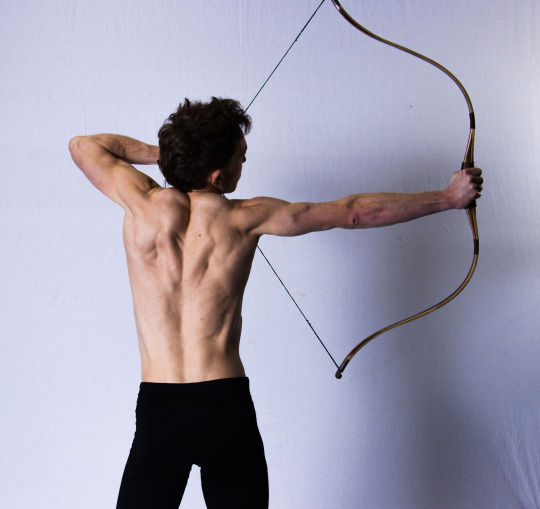
Do you want to see how muscle engagement varies when using bows of different weights? Or draw an archer running, seated, crouching or leaping? More image packs from my collaboration with @null-entity are now up on Patreon!
P.S. give @null-entity a follow for more excellent image references
3K notes
·
View notes
Text
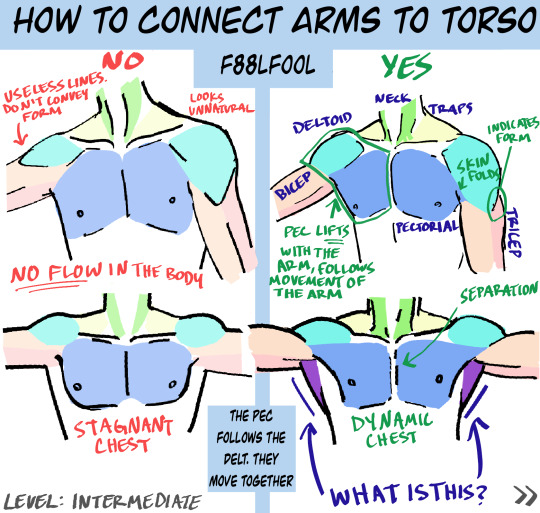

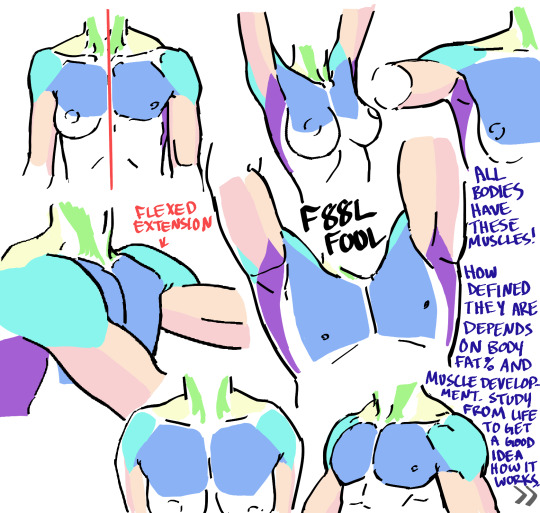
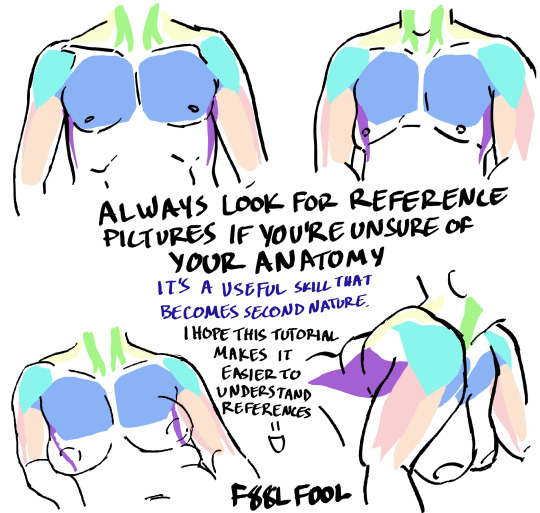
My first anatomy tutorial. How I connect arms to the torso. Simplified the muscles for better comprehension
PS. Pectoral is misspelled as “pectorial” in the picture. Don’t make that mistake haha
And I’d love to see the art made from using these as reference, you can message or tag me.. whatever you want
Edit: The extended names of the muscles:
Neck - Sternocleidomastoideus
Traps - Trapezius
Lats - Latissimus Dorsi
#pec-torial#pec tutorial#there i said it#also keep in mind each body (even the leanest ones) have fat on them#a reblog pointed this out and I thought it was a good reminder#none of these bodies have 0-1% bodyfat#art tutorial#anatomy#anatomy tutorial#drawing tutorial#drawing tips#muscles#muscle tutorial#art study#digital art tips#anatomy tips#art ref#art#reference#tutorial#art references#titorial#f88lfool
27K notes
·
View notes
Text
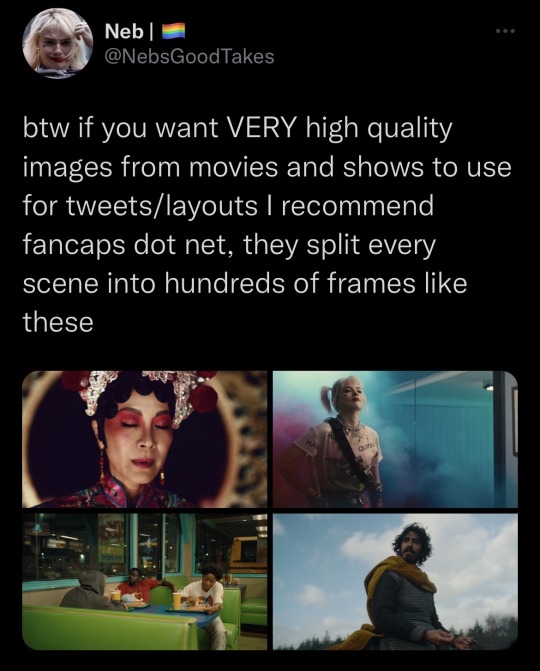
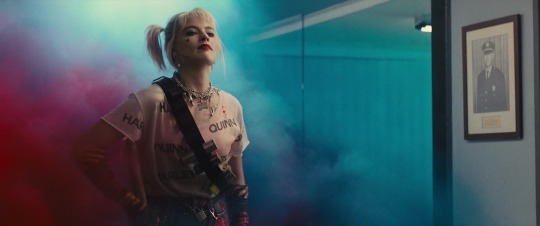
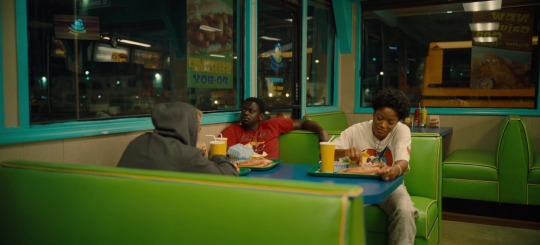
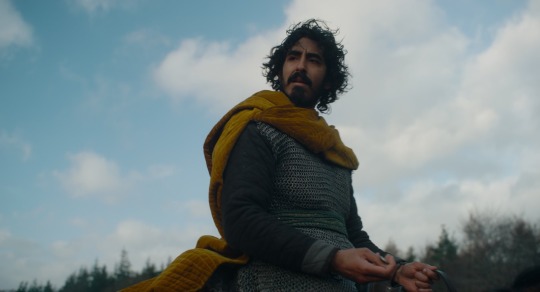

the more you know!!
#film#movies#film photography#birds of prey#nope#the green knight#everything everywhere all at once#letterboxd#reference#art#digital art#art ref#art reference
13K notes
·
View notes
Text
Highly suggest using it.^^
Follow me for more 🌿
#art blog#artistsupport#art help#beginner artist#artists on tumblr#art tutorial#artist spotlight#art tips#art tumblr#art ref
7K notes
·
View notes
Text
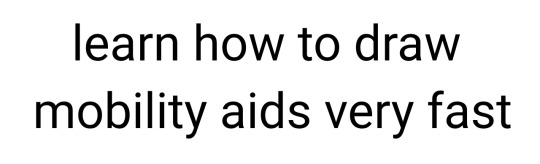


wheelchair, cane + forearm crutches, walker 90% chance if you're hesitant to draw mobility aids you're overthinking it. start somewhere. obviously these are not detailed references.
wheelchairs and walkers should be proportioned like chairs. in most cases canes are held on the opposite side of the painful leg because you want to put weight on the cane instead of the leg (dr house lied to you) but depending on the reason for the cane this can change!
[ image id: a title image that reads "learn how to draw mobility aids very fast" followed by three simplified drawings of different mobility aids broken down into two steps each. the changes made in each step are colored red.
the second image shows a wheelchair, with the steps "1. seat with footrest", showing a simple chair shape, and "2. wheels", which adds two large wheels to the back and two small wheels to the front.
the third image shows both a cane and forearm crutches, with the steps "1. stick", showing a single line of color, and "2. add handle", which shows a hand grip and a forearm rest on two different sticks. and additional label below this step reads "handheld stick height is where the hand rests at the hip" and "forearm stick height is the forearm".
the fourth image shows a walker, with the steps "1. platform with wheels", showing a backless chair shape with a wheel on each leg, and "2. add handlebar", which shows a handle raised above the seat. end id ]
✨ edited to remove italics for screen readers + also pointing out that I missed the handle on the forearm crutches! always use real reference photos when you can, this is just a starting point to help you understand the basics if you're not familiar :3
#are they perfect renditions? no. but first attempts at drawing anything rarely are#and tbf id rather people start drawing them and draw them badly than never draw them at all#art ref#tutorials#mobility aids#wheelchairs#canes#forearm crutches#walkers#sorry if there are typos blame the blindness#patch me through to palaven command
6K notes
·
View notes
Text
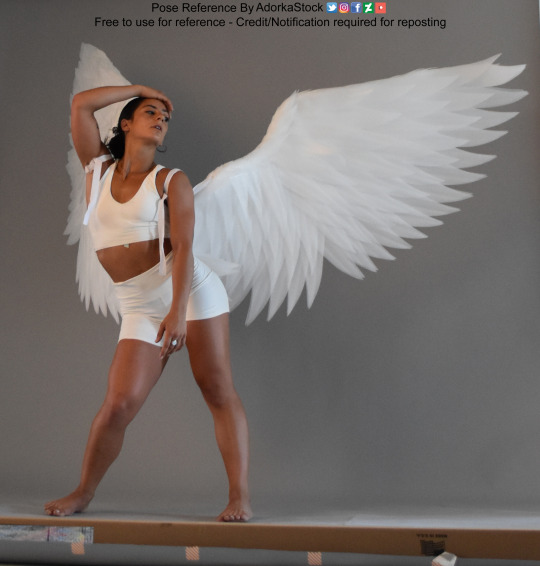
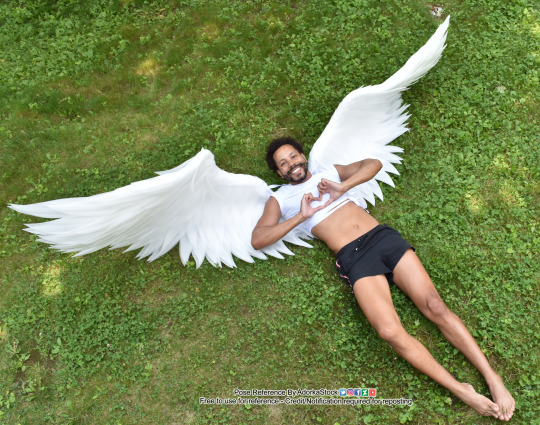
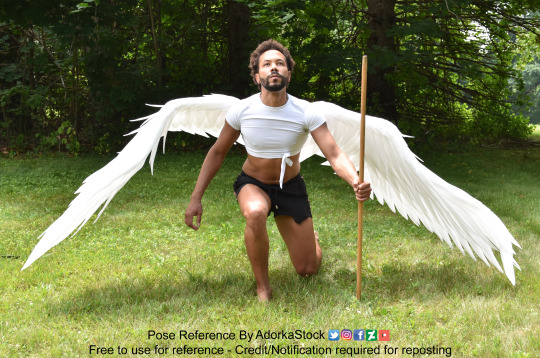
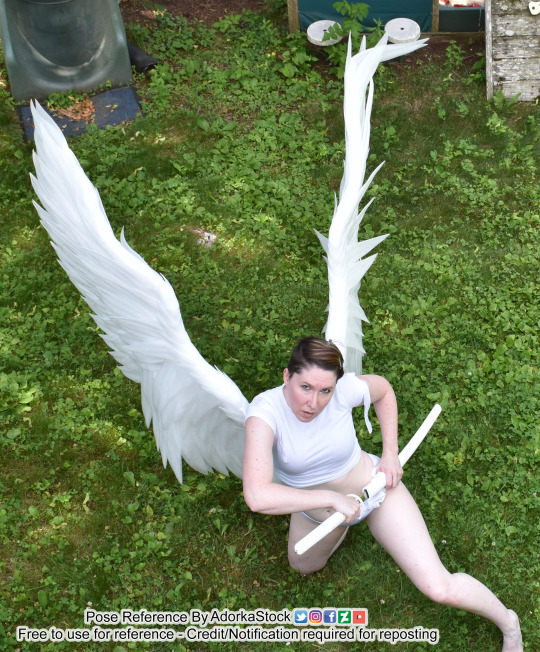
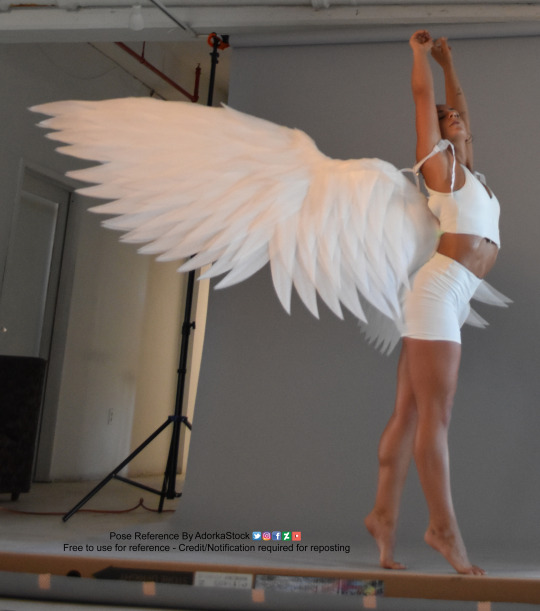
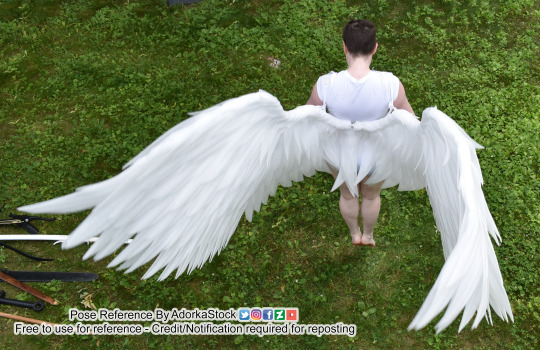
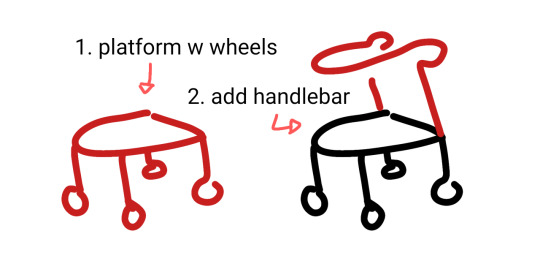
heckin' WINGS 👼🏻✨
17K notes
·
View notes
Text
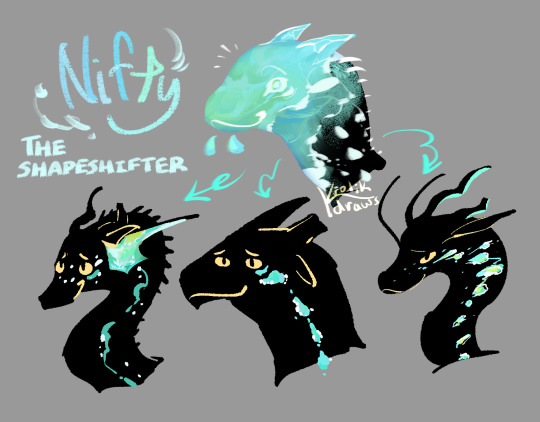
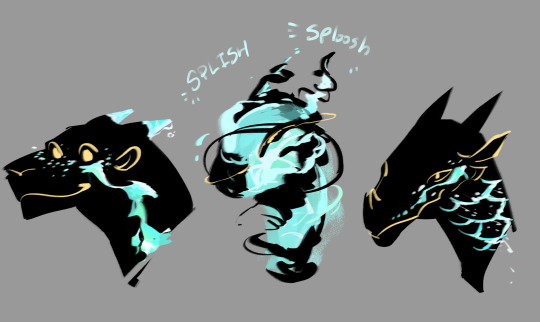
I was trying to figure out a sona that felt more like me and I conjured this fella up! An ancient seawing animus? Something old from the sea floor trying to understand silly dragon drama? a piece of the ocean come to life? Who knows! They like pineapple and coconut though.
2K notes
·
View notes
Text
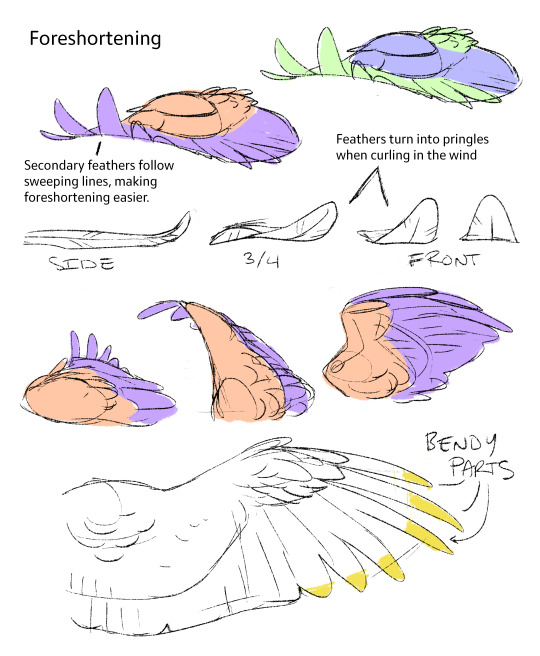
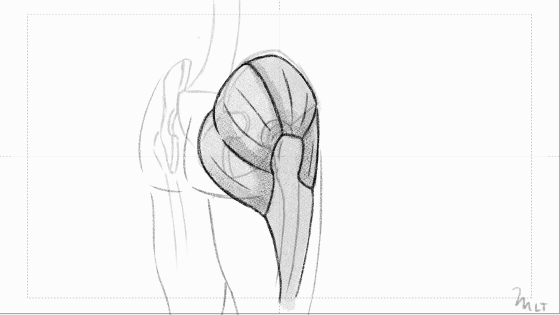
Let’s Draw Wings
I’ve gotten the question/request of how I draw wings lots and lots so I’ve decided to make a dedicated post!
Now...I’m no master, but I have found a way that I like to draw wings that’s efficient for me. There three main points:
References
Simplification
Texture Management
First of all - References
My favorite wing reference of all time is this post by Jenn on Twitter. I have both the images saved but I use the Wing Shapes one, below, alllllll the time. Like for real all the time!

I also keep pretty extensive collections of wing photo reference. When I’m having trouble, I’ll trace a few or do studies to get back into the swing of things. Here are links to my Pinterest boards:
Broadwing Reference (passive soaring and high-speed)
Longwing Reference (active soaring)
Shortwing Reference (elliptical and hovering)
Secondly - Simplification
When I sketch wings, I simplify Jenn’s diagram even further -
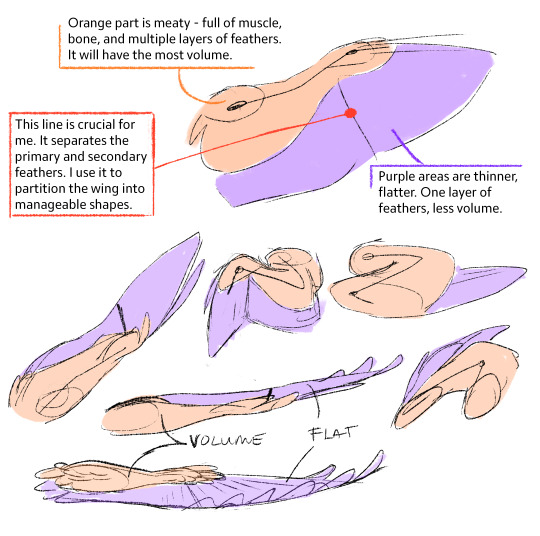
For me, the key to drawing wings is simplifying the wing down - from the structure to the feathers - the goal for me is to be able to draw them quickly and have the proper information conveyed. It needs to look like a wing in the base sketch. If it doesn’t, no amount of rendering and extra feathers will help. I like to break the wing into the three main moving parts. The orange is one part, then the purple contains two main chunks feathers that you can group together and move as their own parts.
On top of that, I like to think of wings like a sheet of paper. They can bend and fold in on themselves, with the orange meaty bits anchoring everything together.
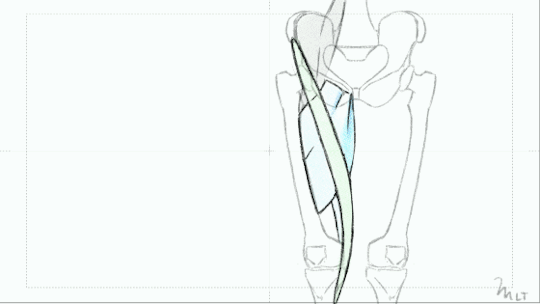
Lastly - Texture
I like to call wings “texture monsters”. Feathers are hard to manage and can easily make wings look over-busy and muddy. Just like before, I break the wing into chunks so I can spend less time drawing the wing and it’s feathers:
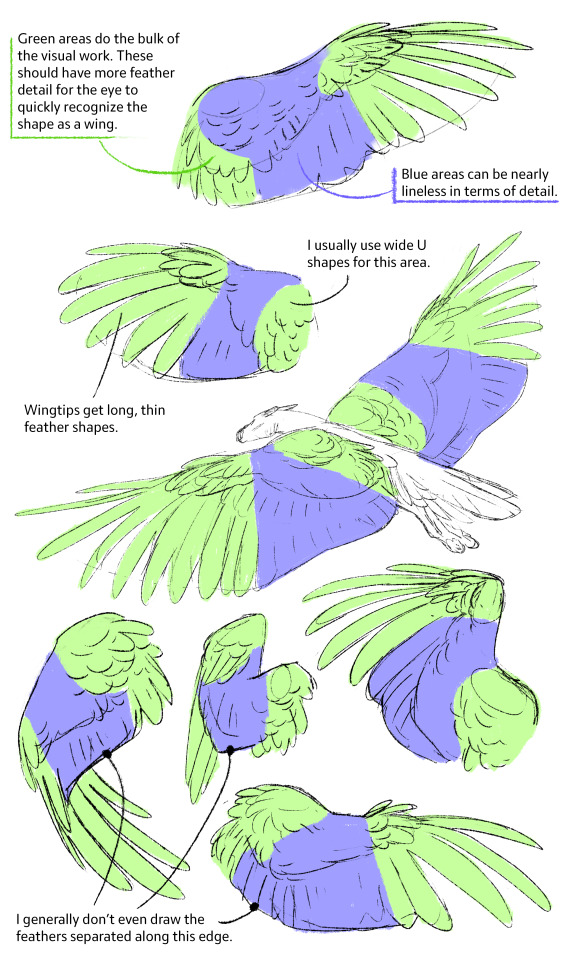
Then you can put it all together and push things further -
So yeah this is how I throw wings together! The wings I draw aren’t super technical or detailed, but I what matters for me is that they look and feel like believable wings at a glance -
~ Larn
--
Discord | Patreon | Art Prints
9K notes
·
View notes
Text

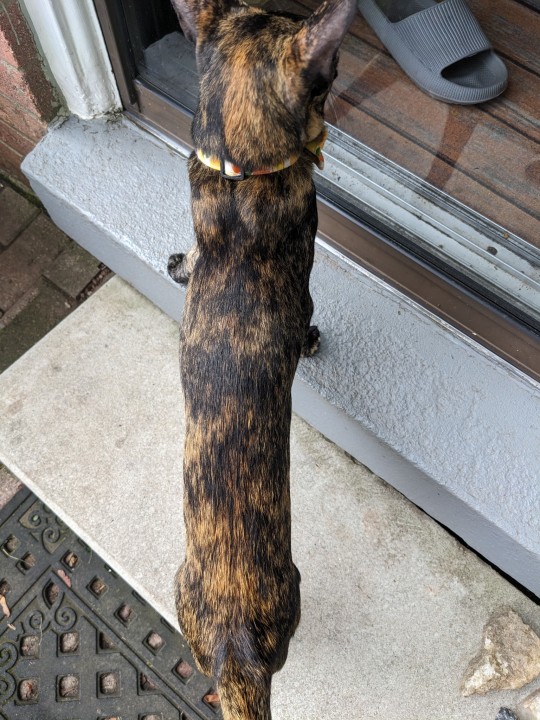
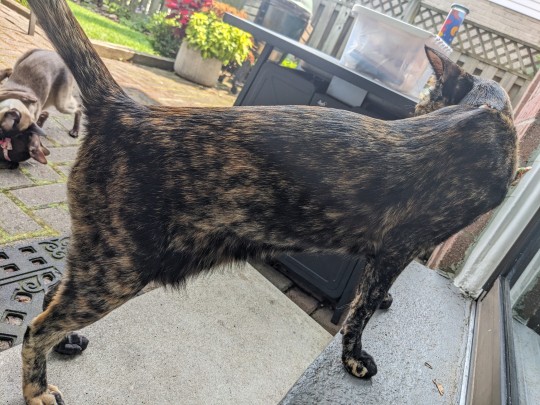
Post you cat markings! this is Arwen the Tortie Oriental Shorthair. She is 3 and very fit!
3K notes
·
View notes
Text

#i promise i’ll post something cool soon…#vampire#vampire aesthetic#vampirecore#gothic#victorian aesthetic#goth#dark acadamia aesthetic#dark academia#vampyre#aesthetic#clothing#drawing reference#art ref#clothes#clothing reference#art reference#writing ref#writing reference#historical clothing#history#historical reference
53K notes
·
View notes
Text
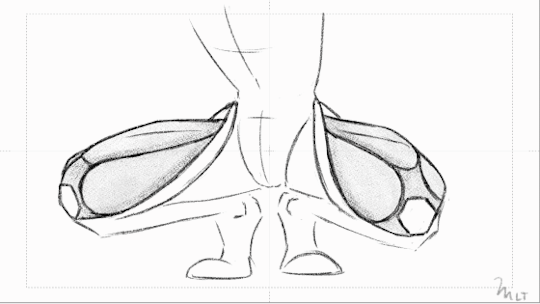
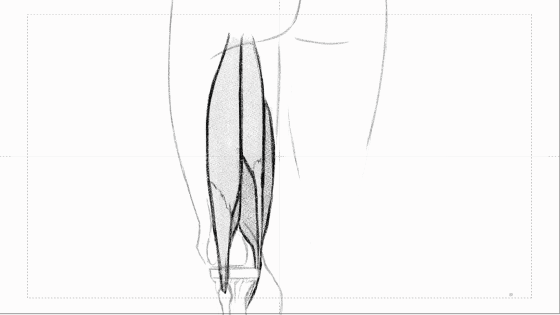
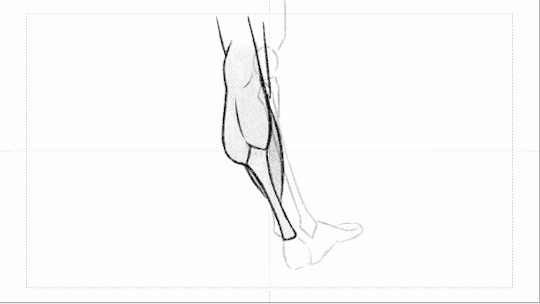
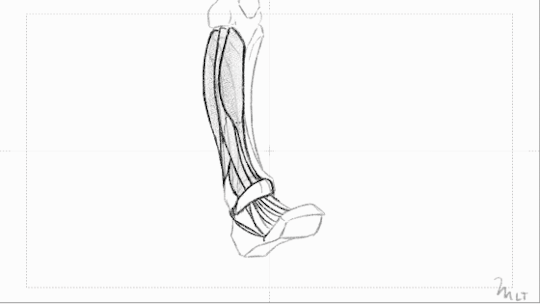
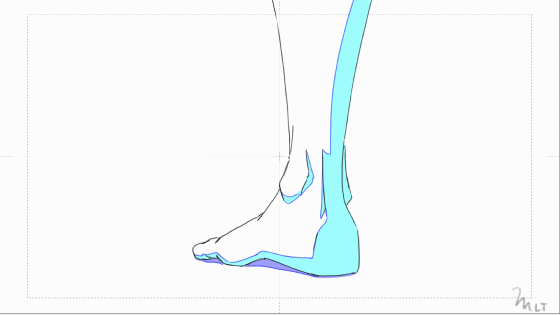
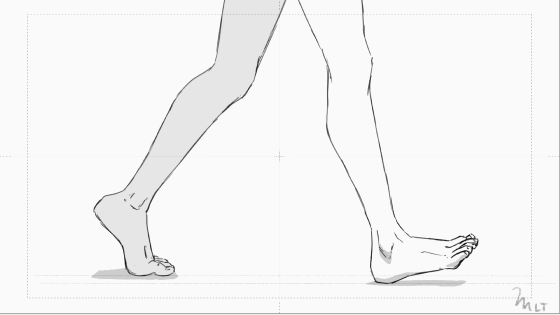
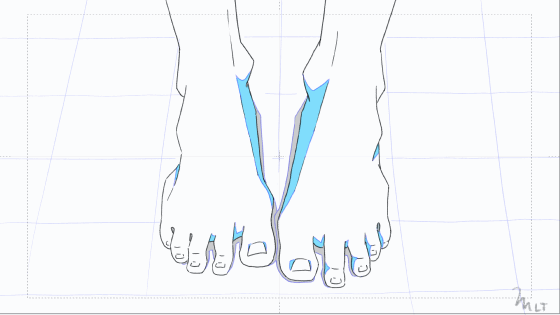
All the leg muscles and feet studies I did to level up my anatomy drawing. It all started 17 months ago as part of an art challenge I started on my Youtube channel and it's finally done!
#anatomy drawing#art reference#animators on tumblr#anime animator#rough animation#2d animation#art ref#drawing reference#anatomy#marianarira
10K notes
·
View notes
Text
Hey, here are a bunch of internet archive links for artists:
Dozens of Artbooks from Disney movies to Spiderverse
The Illusion of life: Described as "The Animator's Bible."
How to draw comics the marvel way: I know so many artists who started with this
I still need to find "Fundamentals of character design" and "How to draw people" by Jeff Mellem. Those are two I've actually read and recommend to everyone who asks me about my art.
667 notes
·
View notes
Note
hiiii. as both an artist and a fan of atla and hades (the game), i really wanted to ask about the hades style character pieces you did - i loved it in the game too, and you did an amazing job recreating it yourself. do you have any tips or experiences that might help with drawing in that style? details, colours, elements, etc - anything really. tysm in advance, and i hope you're having a great day!!
HAIII THANK U SO MUCH SORRY THIS TOOK ME LITERAL MONTHS TO MAKE OTZ

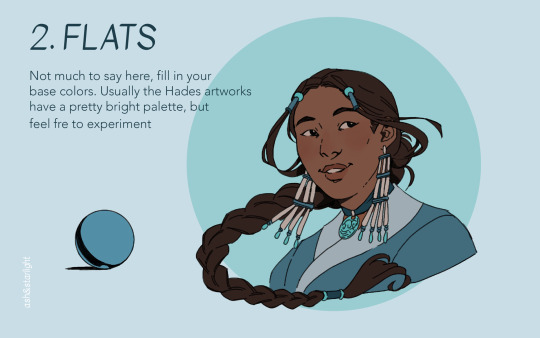

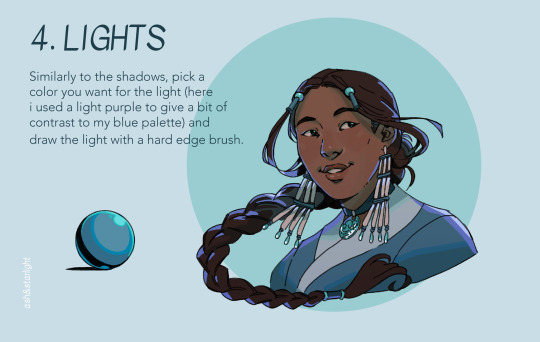
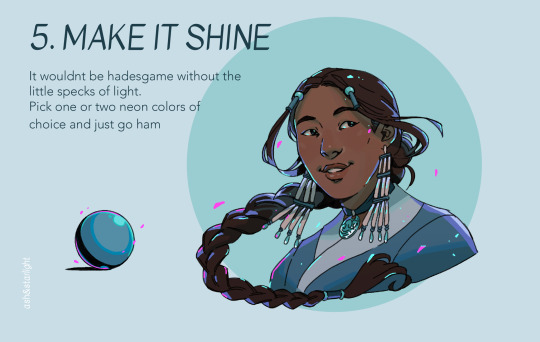
#posting this and running away i’m SOURRYY#im so shit at answering asks nowadays but i love getting them i prommy i swear#oughh#anyway hope it was helpful!!#katara#my art#ash replies#art ref
2K notes
·
View notes
Text

I think the horn headbands and the tail suit mc really well tbh. Mc is just a lil guy!
#art#my art#obey me#obey me shall we date#art ref#obey me nightbringer#obey me mammon#artists on tumblr#drawing#obey me lucifer#obey me mc#obey me solomon#obey me beelzebub#obey me belphegor#obey me satan#obey me asmodeus#obey me leviathan#anime#illustration
3K notes
·
View notes
Last Seen Blogs
aestheticallyaway
independence

mogaiwriters
Mogai Writers
tauruscookie
TaurusCookie

dysphoriasm
liviè

themanbehindthepurpleman
Bill_Vin_Afton_Sr