#blackgirlgamer
Text
Hello everyone, it's been quite a while since we last connected. I'd like to express my sincere gratitude for all the love and support you've shown for my book. When I first started writing it, I never imagined that people would still be reading and enjoying it today, despite its initial flaws. It's truly heartwarming.
Life has a way of getting in the middle of our plans, and I ended up taking a long break from writing. However, I want you all to know that I am now back and fully committed to this project. I understand that in the past, I've made promises to return and failed to follow through. But this time, I genuinely mean it.
My writing has improved more than this and I want to be a director so the best way to improve my craft is to write every day. With that being said, my fanfic roster so bad is this
parent scenarios update
Todoroki or Iida story - Vote here
Bakugo Prnstar update
Hawks story update
Maybe an Aizawa story
Gojo or nanami
Zoro story
Tumblr random fanfictions
Miguel O'hara fanfic
Comment on which ones you'd like to see and any other ideas! Thank you so much for supporting me- and one more thing.
My friend is looking to be another streamer/youtube gamer girl and has recently started her channel. @Universalappl3pie on youtube. If you like sims roblox or any other games please check out her channel if you can. If a couple of you could stop by, it would mean a lot to see her smile! I'll see you guys soon, bye!!

#minimoxha#anime#youtube#youtumblr#gamers of tumblr#gamerlife#gamer#gamergirl#gamer fun#roblox#minecraft#sims 4#my sims#sims 4 gameplay#sims 4 screenshots#sims 4 cc#the sims cc#sims gamer#sims youtube#black girl aesthetic#black girl gamer#black gamer#blackgirlgamer#idk how to tag this#idk man#tumblr fyp#fypage
2 notes
·
View notes
Text
When you forget to end stream after raiding someone
#black girl gamer#gamer#youtuber#blackstreamers#blackgirlgamer#gaming#funny#skit#twitch#twitchstreamer
10 notes
·
View notes
Photo
As you guys know, I no longer have the blue hair. But I miss it. Next time, it’s going to be half and half. 🤔 Hair FROM @luxidarahair Hair DONE BY @prettyplaitscos . . . . . . . . . #blackqueen #melaninpoppin #melaninqueen #blackgamergirl #blackgirlgamer #melaninfeed #explorepage #blackgirlmagic #melaninrich #melaninonfleek #melaninmagic #melaningoddess #twitchaffiliate #twitchcommunity #youtube #youtuber #gemini #blerdgirl #blerd #blackcosplayer #blackcosplayerhere #cosplayergirl #kiadrianna #ultabeauty #ulta (at Atlanta, Georgia) https://www.instagram.com/p/CpYpET3paXr/?igshid=NGJjMDIxMWI=
#blackqueen#melaninpoppin#melaninqueen#blackgamergirl#blackgirlgamer#melaninfeed#explorepage#blackgirlmagic#melaninrich#melaninonfleek#melaninmagic#melaningoddess#twitchaffiliate#twitchcommunity#youtube#youtuber#gemini#blerdgirl#blerd#blackcosplayer#blackcosplayerhere#cosplayergirl#kiadrianna#ultabeauty#ulta
8 notes
·
View notes
Text
Running The Sims 4 Folder from an External Drive.
If you are a Mac player like me, you are most likely running out of space or are currently completely out of space.
This is how I moved The Sims 4 (TS4) from my computer to an external hard drive.
Some users are able to drag and drop the Electronic Arts folder to the drive, I however was not.
⛔️ WARNING
Entering incorrect commands into Terminal can have severe consequences both for the stability of your operating system and your data. You should only follow these instructions if you are comfortable using Terminal and have a solid backup of your system.
If anything goes completely wrong you can always wipe and reinstall your macOS through Internet Recovery or bootable installer (advanced option) but you WILL lose all your data.
I am using WD - My Passport Ultra for Mac 2TB External USB 3.0 Portable Hard Drive from BestBuy
⚠️⚠️⚠️⚠️⚠️⚠️⚠️⚠️⚠️⚠️⚠️⚠️⚠️⚠️⚠️
CONTINUE AT YOUR OWN RISK
I highly suggest reading the entire post before making any changes.
NOTE: These instructions move the ENTIRE Electronic Arts (EA) folder to the external drive. Any game you have installed and stores data in the EA folder will need to have the external drive plugged in to be accessed. This includes Sims 3, Sims Medieval, Sims 4, Sims 4 Legacy Edition and any other game folders in your EA folder.
As a good measure, backup your EA folder to a separate external drive or cloud storage.
Plug in your external storage device and check it is properly mounted in Finder or on your Desktop. Tech & Design on YouTube has an easy to follow step by step walkthrough on how to set up your external drive for Mac. ➡️ Here.
Step 1 – Moving the Electronic Arts folder to the external drive:
First - You have to tell your Mac to move the EA folder from the Documents folder to the external drive. To do so, open any text document and copy and paste the following command into the document.
(mv means move and the tilde “~”indicates your home directory) This is purely for editing purposes:
mv ~/Documents/Electronic\ Arts /Volumes/USB/
Replace USB with the name of your external drive. For example, if your external is called EXTERNAL the command would be:
mv ~/Documents/Electronic\ Arts /Volumes/EXTERNAL/
However, if your external is called EXTERNAL DRIVE you have to introduce backslashes before the spaces in the name (like Electronic Arts in the Documents folder):
mv ~/Documents/Electronic\ Arts /Volumes/EXTERNAL\ DRIVE/
To show where the spaces are, a black X in the command below (for visual purposes only):
mvX~/Documents/Electronic\XArtsX/Volumes/EXTERNAL\XDRIVE/
IMPORTANT: Note that the directory file paths are separated with forward slashes / and file and folder names with multiple words are separated with backslashes \ .
If your EA folder is within another folder on the external you must state this clearly in the command. For example, if your EXTERNAL DRIVE has a folder called Game User Data and you would like the Electronic Arts folder to be within this folder the command would look like this:
mv ~/Documents/Electronic\ Arts /Volumes/EXTERNAL\ DRIVE/Game\ User\ Data/
and with the black X denoting the spaces:
mvX~/Documents/Electronic\XArtsX/Volumes/EXTERNAL\XDRIVE/Game\XUser\XData/
Once you are happy with the command, open Terminal and copy and paste it from the text document into the Terminal window so it looks like this but with your own information. If it is highlighted black just press the right arrow on your keyboard to move the cursor to the end of the line:
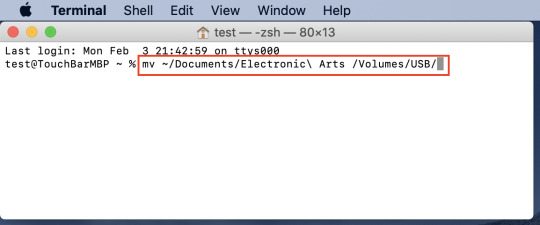
Hit enter/return to execute the command. Your EA folder should have moved from your Documents folder to your external drive. Open the Documents folder to check and open a second Finder window showing the external drive.
Step 2 – Creating the symlink for the Electronic Arts folder:
Copy the following command into your text document:
ln -s /Volumes/USB/Electronic\ Arts ~/Documents/
replacing USB with your external drive name and paying attention to the forward and back slashes and spaces. If we use the same example as before with the EXTERNAL DRIVE > Game User Data file paths and names this would be the result:
ln -s /Volumes/EXTERNAL\ DRIVE/Game\ User\ Data/Electronic\ Arts ~/Documents/
and with the black X denoting the spaces:
lnX-sX/Volumes/EXTERNAL\XDRIVE/Game\XUser\XData/Electronic\XArtsX~/Documents/
Once you are done with the command, open Terminal and copy and paste it from the text document into the Terminal window so it looks like this but with your own information. If it is highlighted black just press the right arrow on your keyboard to move the cursor to the end of the line:

Hit enter to execute the command. An Electronic Arts folder will appear in your local Documents folder as an alias with a little arrow in the bottom left corner:
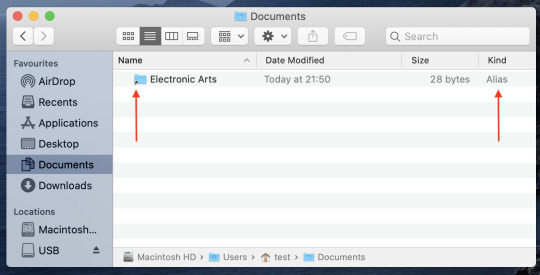
The actual Electronic Arts folder is still safe on the external drive (The game is also installed on the external, ignore the app in the image below):

Step 3 – Launch your game:
Launch the game as you would normally. There should be no notice difference, you should be able to pick up where you last saved the game. There may be extended loading, but as a Mac player, we are use to it.
You will also have to change the installation path on Origin, this allows any updates and new packs/ kits you purchase to be downloaded on your external drive.
A super helpful step by step guide ➡️ Here.
Happy Simming!
-Beans
#TheSims4#Mac#TS4#TS4CC#TheSims4Mac#TheSims4CC#TheSims4CustomContent#TS4Mods#TheSims#EA#Orign#BlackGirlGamer#GirlGamer
7 notes
·
View notes
Text
Please Vote Blerdy Otome in the*gameHERs Awards
Hey Blerdy Tribe! Voting for the #TGHAwards22 is LIVE!! I've been nominated for two awards: Journalist of the Year in the Content Creation category & Twitch Streamer of the Year in the Streaming category!


I've been running the gaming site Blerdy Otome for 8 years now and I'm a baby Twitch streamer and this is a huge honor. There are so many amazing creators up for several awards and your support would really mean a lot to me!
You can vote here: https://thegamehers.com/vote
Voting is open from September 9th - 26th! Shares are greatly appreciated!! 💖
20 notes
·
View notes
Text
about me!

Name/Gamertag: Maya (the Menace)
Age: 22
Type of Gamer: Variety!
Fave Games: Stardew Valley, Persona 5, GTA V, Animal Crossing
Twitch/YT: mayathemenace
Socials:
(IG) menacemaya
(Twitter) menacemayaTV
(Tiktok) blackdaddy
#black gamer#black streamer#blackgamer#blackstreamer#blackgirlgamer#blackgirlstreamer#stardewvalley#stardew valley#animal crossing#persona 5#twitch#twitch affiliate
4 notes
·
View notes
Text
I am a variety content creator on YouTube Gaming. I make hilarious lets play with quality editing. I also live stream on YouTube as well. My goal is to spread joy and happiness with every piece of content that I produce! Check out my channel here: https://www.youtube.com/c/KaylalashGames
#kaylalash#blackgirlgamer#blacksimmer#youtube#youtubegaming#contentcreator#coryxkenshin#dashiegames#jazzyguns#ayechristene#berleezy
9 notes
·
View notes
Photo

the newest IT girls of Del Sol Valley have arrived and they are ready to take the city by storm. romance, self-growth and fun are in the forefronts of their minds as they set forth on a journey to be the richest, baddest and most talented women of the Valley. will these things come to them easy or will obstacles along the way pose a great challenge for them? tune in at 7 PM tonight for the pilot episode of season 1 of...
✨ THE REAL GIRLFIRENDS OF DEL SOL VALLEY ✨
my youtube
3 notes
·
View notes
Text
3 notes
·
View notes
Photo


Wanderer above a sea of fog.
#nature#secondlifeblog#secondlifephotography#beautiful photos#secondlife#secondlifedestinations#secondlifenature#metaverse#blackgirlgamer#blackgirlexplorer#romanticism#blackgirlbloggers
2 notes
·
View notes
Text
went outside and touched some grass 💙
3 notes
·
View notes
Text
If you obey all the rules, you will miss all the fun 💋
11 notes
·
View notes
Photo

A hidden gem from a gem. 💎 I need to do a better job at looking through my camera roll. I be missing beauties like these all the time. Hair done by @stylezbykema . . . . . . . . #melaninpoppin #naturalhaircommunity #naturalhairstyles #selflove #blackgamergirl #blackgirlgamer #melaninrich #melaninonfleek #melaninmagic #melaningoddess #weoutside #sunkissedskin #sunkissed #gamer #pcgamer #ps4 #selfie #smallstreamer #stream #twitch #twitchcommunity #streaming #blackcreators #blackgirlsrock #blackinfluencer #explorepage (at Georgia) https://www.instagram.com/p/Cpqc3XpAs43/?igshid=NGJjMDIxMWI=
#melaninpoppin#naturalhaircommunity#naturalhairstyles#selflove#blackgamergirl#blackgirlgamer#melaninrich#melaninonfleek#melaninmagic#melaningoddess#weoutside#sunkissedskin#sunkissed#gamer#pcgamer#ps4#selfie#smallstreamer#stream#twitch#twitchcommunity#streaming#blackcreators#blackgirlsrock#blackinfluencer#explorepage
2 notes
·
View notes
Photo
💠🔹️Enjoy where you are now🔹️💠 Between streaming, dance lessons, Archery classes and working on my mini garden life is pretty sweet. How are you enjoying spring of "22? Are you taking time to do things that you enjoy? Twitch.tv/princess_zaheeda #twitchaffiliate #twitchstreamer #streamer #controlgame #control #ps4 #blackgirlgamer #blackgamer #blackstreamer #streamersconnected #streamersunite #controlgame #horizonzerodawn #forbiddenwest #cyberpunk2077 #gris https://www.instagram.com/p/Cd0slEOrgnh/?igshid=NGJjMDIxMWI=
#twitchaffiliate#twitchstreamer#streamer#controlgame#control#ps4#blackgirlgamer#blackgamer#blackstreamer#streamersconnected#streamersunite#horizonzerodawn#forbiddenwest#cyberpunk2077#gris
2 notes
·
View notes
Text


Add me on Highrise!
@/TEXASSHAWTY
4 notes
·
View notes
Text
instagram
What I’m Playing…
I recently started “Turnip Boy Commits Tax Evasion” and “Cat Quest.” “Turnip Boy” was just a cute puzzle game until it went dark. 🫣 “Cat Quest” is an adorable RPG. They’re both short games and I should be finished with both soon and then I can lose myself in FFXVI! 😂
1 note
·
View note
Last Seen Blogs
cxhscreencaps
screencaps of cxh💞

fairwindsflint
Black Sails Musings

ashtersignstx
Ashter Signs


literasialam
literasialam