#cold treat. sticky chewy dough. soft
Text
mochi ice cream <3
#thats it thats the post#gotta be one of my favorite sensory experiences#cold treat. sticky chewy dough. soft#i want to try actual mochi. like the cake#but i have yet to obtain some#i Yearn#typing out loud
2 notes
·
View notes
Text
2 Ingredient Peanut Butter Cookie
Whether you’re short on time or just need an easy dessert recipe, 2 ingredient peanut butter cookies are perfect for you. These delicious treats are low carb, gluten-free and require no sugar or flour!
The key to making these simple peanut butter cookies is to use a creamy, natural nut butter that doesn’t contain any added ingredients or stabilizers. You’ll need to stir your nut butter until all of the fats and oils are completely reintegrated into the dough.
Introduction
The 2 ingredient peanut butter cookie is a tasty, healthy and easy to make dessert that will please your taste buds. The best part is you can tailor these scrumptious treats to suit your needs, whether it’s to satisfy a sweet tooth or to help maintain your healthy weight.
The key to making the perfect cookie is using the correct ingredient combinations and following a few simple baking tips. The best 2 ingredient cookies are moist, soft and slightly chewy on the inside with a crisp, golden crust around the edges. For the best results, don’t over bake or you will end up with a dry, chewy flop!
The most important ingredients to use for the best 2 ingredient cookies are creamy peanut butter, a bit of sugar, and a touch of baking soda. If your dough hasn’t clumped together into one smooth, sticky concoction, try adding just a few tablespoons of flour. It’s also a good idea to measure your measurements carefully for accurate results. The most important thing is to keep a close eye on your creations as they bake!
What Are Peanut Butter Cookies?
Peanut butter cookies are a type of cookie that is made with peanut butter as the main ingredient. They are a popular cookie that can be eaten as a snack or made as a dessert.
They are also a great option for gifting to friends and family. They are soft and chewy, and they are full of peanut butter flavor.

These cookies are very easy to make, and they can be a wonderful addition to any recipe. They are especially good when served with a glass of milk or a cup of coffee.
The ingredients in these cookies include butter, brown sugar, granulated sugar, peanut butter, eggs, vanilla extract, and flour. They also contain chemical leavening agents like baking soda and baking powder.
These cookies are usually baked following a short dough process, which helps them form a firm structure. The dough is then formed into balls, rolled in sugar, and placed on ungreased cookie sheets. The balls are flattened with a fork in a crisscross pattern before being baked.
What Do Peanut Butter Cookies Taste Like?
Peanut butter cookies have a rich and sweet flavor. They are also very soft and melt in your mouth. This is because they have a lot of peanut butter in them.
They are delicious by themselves, but they can also be topped with a variety of other toppings like chocolate or fruit spreads. You can even dip them in a glass of cold milk for a classic treat!
These cookies are a classic cookie that have been enjoyed for generations. They are made with a few simple ingredients and can be easily made in advance.
The ingredients used in these cookies are a combination of granulated sugar and brown sugar, eggs, peanut butter, and salt. They are then mixed together and baked to create these beautiful cookies that are soft and chewy on the outside with a crisp center.
They are very easy to make and are full of amazing peanut butter flavor. You can eat them plain or with any topping of your choice, but they are especially delicious with a glass of cold milk!
2 Ingredient Peanut Butter Cookies
If you are looking for a classic treat to satisfy your sweet tooth, look no further than these 2 ingredient peanut butter cookies. They’re simple to make and perfect for any occasion!
These peanut butter cookies are soft and deliciously textured. They’re also packed with protein and essential micronutrients, making them a healthy snack that’s high in fiber.
These cookies are made using creamy natural peanut butter and maple syrup. The key is to choose a smooth and creamy nut butter that doesn’t have any added ingredients or stabilizers.

How Do Make Two Ingredient Peanut Butter Cookies?
Peanut butter cookies are a classic treat that can be enjoyed by everyone. They're incredibly easy to make, require minimal effort and are packed with delicious nutty flavor.
These cookies are also low in sugar, making them a healthy choice for those looking to cut back on their calorie intake. They can be served as an on-the-go snack, lunchbox treat or even an after-dinner dessert.
To make these cookies, all you need to do is mix together the ingredients and then scoop out the dough onto a baking sheet. Once they're baked, you can dust them with powdered sugar for a sweet treat.
If your cookie dough is too sticky and unmanageable to work with, add some milk or oil in tablespoons until it reaches a manageable consistency. This simple step is sure to make your cookies much easier to roll out and bake.
You can also refrigerate your cookie dough before baking if you're in a hurry, as it will help the mixture to thicken up and become workable. However, you should allow your cookies to cool completely before storing them in the refrigerator. This way, they'll be able to harden properly and keep their shape without getting crumbly or soft.
Tips To Make The Best 2 Ingredient Cookies
Whether you’re looking for an easy dessert recipe or something to keep on hand for a quick snack, these 2 ingredient peanut butter cookies are a perfect choice. Using only all-natural peanut butter and an egg, they are sure to satisfy your sweet tooth!
The only trick is to mix the peanut butter until all of its oils and fats are reintegrated. Without this step, the cookies can end up with uneven textures.
For a better result, mix the ingredients in a large bowl. Alternatively, you can use a handheld mixer to ensure that everything is thoroughly mixed.
Once you have the ingredients in the bowl, cream the butter, peanut butter and sugar together. This will help the cookies to become soft and creamy. Then, add the eggs and vanilla. Finally, combine the dry ingredients and add them to the wet mixture slowly until it all comes together. This will ensure that the cookies turn out perfectly.

Frequently Asked Questions
Two ingredient peanut butter cookies are a quick and easy dessert to make. They are also low in calories, so they're a great option for those watching their weight. Plus, they're a delicious treat that's perfect for any occasion!
Frequently asked questions about 2 ingredient peanut butter cookies include how to make them, what they are and why they're so popular. We'll answer these questions in this blog post so you can get started making your own delicious homemade treats at home!
You'll find that the main ingredients in two ingredient cookies are peanut butter and an egg. These are blended together to form a dough which is then flattened before baking. This process helps to create a crispy outer layer and hold the shape of the cookie. Additionally, you'll need sugars and milk to help moisten the dough. It's also important not to over bake the 2 ingredient cookies, as this can cause them to become hard and dry in the center. The best way to know when they're done is when they look slightly underdone and still soft in the center!
Conclusion
If you are looking for a simple, quick and easy dessert that will delight your guests, you can’t go wrong with 2 ingredient peanut butter cookies. These tasty treats are perfect for serving as an on-the-go snack, a lunchbox treat, or an after-dinner dessert. They are also low in calories and fat, making them a nutritious choice for anyone trying to keep their weight in check.
Using a combination of creamy peanut butter and maple syrup is the best way to make these cookies sparkle, but you can also use a variety of ingredients for a unique flavor. For example, if you want to add a little extra texture, try adding some chocolate chips or dried fruit. If you want to get really creative, you can even add some spices to the mix for an exotic flavor. The key to success here is making sure you stir the peanut butter mixture well before baking it. This will help it to form into a dough, instead of a crumbly mixture that will break during the oven’s heating and cooling process.
youtube
See also: https://www.flickr.com/people/michaeljfanola/
0 notes
Text
Baking alchemy: if the recipe says use a pan, use metal; if the recipe calls for a dish, use ceramic or glass. Otherwise you may need to adjust baking times and temperatures to get an even bake.
For example, my bread pans are glass, and that's why the inside of my banana bread is crazy moist (ie almost underbaked) and the outside is so browned. Though, using glass for pies instead of the recommended metal pans is handy if you're new to pastry. It will help you see when the bottom of your pie is truly baked. It can be dangerous to check the bottom of hot pies, so use the buddy system. Don't be spilling hot pie filling all over yourselves.
Also, know your oven. Get an analog oven thermometer and leave it in there. I used to have one I'd hang from the center rack so I had a good idea of how it was doing. My oven is hella slow on a good day. I think the element needs maintenance.
I like to use chocolate chip cookies as my gauge of how an oven is heating. The time it takes them to be perfectly baked is what I keep in mind for everything else. Normally the recipe I use says it should take 9 minutes to bake but they are still raw then. It takes my oven 12 minutes to get them browned on the edges and still have just baked but still gooey soft centers. If you're not confident about your mixing skills using store bought dough is totally okay! It's honestly easier to check temperature with dough you know is consistently made.
☆☆☆WRITE NOTES DIRECTLY IN YOUR COOKBOOK☆☆☆
You'll learn new things every time you make something. Adjustments you like. Things that work or don't work. You'll 100% forget what those are at some point and then be frustrated. Also, use bookmarks like little sticky note tabs to help you find your favorites.
Anyway, I'm making a rhubarb pie for my dad because tomorrow is his birthday. I'm not sure how I'm gonna deliver the pie to my dad safely, but that's another story. But I make pretty good pie crusts because I use my dad's recipe. It's flakey, tender, and tastes good. I hate chewy or though crusts. My dad mixes his dough so gently it's often not strong enough to actually get a slice of pie out of the pan in one piece. It tastes so good we don't care. I like to mix mine just a touch longer so it holds up better, but it's really easy to over mix it and make a tough crust.
Tonight my husband was chatting about how one of his friends was getting help making pastry for crusts via zoom meetings. He said I should make a video of mine and share it. Maybe I will if people are intrested. I can do the fancy way and the bare bones no special tools way. I like to bake and I like to make things accessible to everybody. I still wrote it out for him, you can have it too.
If you have read this far my perfect pie crust recipe is 3 parts flour to 1 part fat and a pinch of salt.
For me that's usually 2 cups all purpose flour and 2/3rds cup shortening for a single crust in my pyrex 9.5 inch glass pie pan with a little extra left over for decorating. Fruit pies need a top crust or lattice so in that case I'd use 3 cups flour and 1 cup shortening.
Blend the fat with the flour in a bowl. I use a pastry blender cutter thing (not the kind that are a bunch of round wires with a handle, but the kind that's more metal with flat blades like this one). You can also use a couple of butterknives for this. Use a twisting motion with the pastry blender to cut the fat into the flour until it's combined into about pea sized chunks. I like to scrape the blender with a knife or fork every few turns. Don't over work it or it will get tough! You want the chunks, it'll become flakey bits. There will still be some finer bits that are more flour.
Stir in ice cold water a couple tablespoons at a time until things just start coming together. Like, be cautious with the water and use a fork to combine it with the dough with kind of a whisking motion to moisten the dry flour bits and get them sticking to the floury fat bits. How much water you need varies with the weather and humidity. Definitely don't get the dough too wet. If it gets sticky you've gone too far. You only need enough water to get it all to just come together into a ball. Once it starts coming together you'll see it's kinda shaggy, that's your flakes! Gently push it together into a ball and flatten into a puck or disk. Push the edges together so it rolls out evenly later. Don't knead the dough! If it's not staying together maybe give it one or two light kneading turns in the bowl but no more or you'll get a tough crust. If it's warm or a hot day, wrap the dough in plastic and put it in the fridge for a bit. Keeping the fat cold keeps the flakes.
When you're ready, generously flour a flat surface and roll it out. If you're worried about picking it up to put it in a pan, roll the crust out in between two floured sheets of waxed paper. Beware that it'll totally still stick to the waxed paper if you aren't careful to keep checking that it's floured enough while rolling it out. I have a fancy silicone mat I got to put on my table when I roll out crusts, but it's honestly a pain in the ass and stuff still sticks if there isn't enough flour.
For sizing, hold your pie pan upside down over the crust and roll at least two inches wider than that. Drape the crust into the pie pan, don't stretch it. Lift the sides and ease it into the bottom. Wrap it a little bit over the edge of the pan and trim the excess. This recipe has a habit of shrinking in the pan, so having a bit extra around the edges helps keep it in place. Prick all over with a fork if blind baking / baking it empty, and bake at 425°F until golden brown, which is probably around 15 minutes.
For my fat I always always use butter flavored vegetable shortening such as crisco*. It tastes good and works consistently well. Butter is sometimes used, so is lard. They have different water contents and work differently so experiment with them before expecting them to work with my recipe. Shortening is solid and works good at room temperature. Butter should be worked colder and has water in it which changes how bakes turn out. I've never tried making a butter or lard for crust myself though.
My mom always made us a treat with the extra crust bits cut off from the pie pan. She'd put the funky strips on a cookie sheet and dust them with cinnamon and sugar and bake it them for us. Usually she'd forget to pull them out until we could smell them burning around the edges.
*when trans fats were banned because they're truly awful for the body, the formulation of vegetable shortening changed to include palm oil, which is so so bad for the environment and deforestation destroying orangutan habitat. It might be option for crusts, but it can have ethical issues as well. Check your ingredients and where they come from. Bob's Red Mill has an article on shortening, what it is, why you want to use it for crusts, and what it can be made of.
Anyway, I love pies and have strong feelings about crusts that goes quite deep. I can keep going, if y'all wanna know more about anything. Lemme know if you want directions to good videos or if I should make one myself. I'll post a picture of the pie tomorrow once it's set and we cut into it.
8 notes
·
View notes
Photo


Very Good Biscuits with Bits of Chocolate In, from Lords and Ladies by Sir Terry Pratchett!
I've made this recipe probably once a week now, and every single time my husband treats these cookies like a fucking revelation, much like Death himself does:
I MUST SAY THESE ARE VERY GOOD BISCUITS. HOW DO THEY GET THE BITS OF CHOCOLATE IN?
'Dunno, m'lord,' said Jason, staring fixedly at the inside of his blindfold.
I MEAN, THE CHOCOLATE OUGHT TO MELT OUT WHEN THEY'RE BAKED. HOW DO THEY DO IT, DO YOU THINK?
'Tis probably a craft secret,' said Jason. 'I never asks that kind o' question.'
GOOD MAN. VERY WISE.
[Thank you to my readers for supporting my book!]
In my husband's case, he takes a bite and goes "aaargh" and then moans about how soft the insides are while still having a nice crunch on the outside oh my god he's so lucky to have married me, etcetera. The man loves his cookies, I guess!
I actually love the whole wheat flour in this. It adds just a touch of finer texture to an otherwise soft cookie, while the oats contribute a pleasant chewiness. The whole wheat also makes the outside far crispier than all-purpose, which I enjoy. I eat mine cold and crunchy because I'm a savage, but the husband microwaves his for maximum melty gooeyness.
The overnight rest is so that the cookies don't spread as much while baking and remain nice and plump, rather than flat and burnt. You don't HAVE to do this step, but it makes the recipe foolproof, and it also helps the whole wheat flour to blend a bit better into the dough.
Cookies are misleadingly soft when they come out of the oven, but if they're golden brown on the edges of their bottoms and they pop cleanly off the pan, they are done. Don't let them get golden brown all over or they'll be too hard!
This makes 24 generously-sized cookies. Well, they're not as big as American store-bought cookies, which tend to aim for facehugger proportions, but they've a nice heft to them from the oats and the wheat flour, and the spices add a wonderful heat!
INGREDIENTS
1 stick unsalted butter
1 cup brown sugar
1/2 cup whole milk
2 eggs
1 cup all-purpose flour
1/2 cup whole wheat flour
2 cups rolled oats
Pinch salt
2 tsp baking powder
1 tsp chili powder
1/2 tsp cayenne
1 1/2 cup semisweet chocolate chips
METHOD
Cream the butter and sugar.
In a separate bowl, mix the eggs and milk.
In yet another bowl, mix the flours, oats, salt, baking powder, and spices.
Alternately add the dry and wet mixes to the creamed sugar, stirring all the while.
If too wet to handle, add all-purpose flour tbsp by tbsp. It should be sticky but not runny.
Fold in chocolate chips.
Pour mixture into ziploc bag or wrap in cling film. Make sure all the air is knocked out.
Refrigerate for at least 4 hours, preferably overnight.
Before preparing cookies to bake, preheat oven to 375F.
Using a 1/4 cup or an ice-cream scoop, plop cookie dough onto ungreased pan.
Bake for 12-15 minutes until edges are JUST golden brown and they come off the pan without fuss.
Remove and let cool.
To store, place in airtight container with paper towels separating cookie stacks, then pop them into the fridge. To consume after refrigeration, microwave them for 10-20 seconds, until soft and ooey. Serve with a glass of cold milk and a bedtime story!
245 notes
·
View notes
Photo

Vegan protein cookies experiments
I have a serious issue with photos BUT made some trials that were approved by my flatties. And they are packed with good things, if you’re into that at all.
I wanted to test something PACKED with protein, and tried several flavours. Worked quite well! might keep adding them here. They are all (accidentally) gluten free, provided you buy oats that are certified GF.
PB & chocolate
For the first round, I just followed a recipe and it turned out really nice (a bit too sweet to my taste though - I’d probably go with 2T less sugar, if it was just for me.
Piña colada
I had made these a few times in the past and enjoyed. I started from the recipe as a base and tweaked it. The measures are approx. because eyeballing is what I do (I recommend you do too). These can’t really go wrong though, as long as the dough has a decent consistency. I know “decent” is not a precise way of qualifying anything but that’s how life goes!
On the plus side, if you try and it works (it will), you will have some fragrant delish treats to distract you from the uncertainties of life.
*************************************************************************
For 8 fat-tish cookies
90 g or approx 1 c dried pineapple pieces
1 very ripe medium banana
1 c dried coconut shreds (+ a little bit for decorating, optional)
1/2 c rolled oats
1/4 c + 1T coconut sugar
1/2 c vegan vanilla protein powder
3 T melted coconut oil
salt
1 t baking soda
Cut the pineapple pieces in smaller chunks, put in a bowl and cover with just enough boiling water. Cover with a plate and let it sit for 10 minutes.
Preheat the oven on 180 °C / 350 °F.
Process the oats into a coarse flour, using a blender or something similar.
In a bowl, mix the oats and all the dry ingredients. Add the banana broken in pieces and the coconut oil, and mash everything with a fork. Add the soaked pineapple with its water and mix everything by hand. The dough should be a bit sticky but shapeable. If it’s too wet, add some coconut shreds or oats. If it’s too dry, add a splash of water or soy milk.
Divide in 8 and shape each bit into a fat pillow. Press them into coconut shreds if you want.
Bake for 12-15 minutes, depending on where you sit, on the chewy-crunchy continuum. And voila.
Pear, pecans and caramel
Well not caramel, technically, but dates. Actually no sugar at all in those!
Speaking of dates, all recipes seem to use the Medjool ones, big and soft and expensive. Yeah, it makes sense, it’s easy and all. But the challenge here is to use the cheap and dry ones. Success.
*************************************************************************
For 12 fat-tish cookies
2 c dates (cheap and dry ones)
1.5 c rolled oats
1 c vegan vanilla protein powder
3/4 c pecans
3 T melted coconut oil (would work with less too)
1 medium pear
1 t baking soda
2 t ginger powder
1 t cinnamon
1/2 t nutmeg powder
1/2 t fine sea salt
Put the dates in a bowl and cover with just enough boiling water. Let them sit on the counter, covered, for 10 minutes.
Preheat the oven on 180 °C / 350 °F.
Process the oats into a coarse flour, using a blender or something similar. Tip into a mixing bowl. Using the same blender, process the soaked dates into a puree. You might have to scrape the sides of the mixing bowl a few times with a spatula, so that all the bits get processed.
Add all the other dry ingredients to the oat flour and mix with a fork. Add the coconut oil, mix quickly, and then the date puree. Mix.
Heat a dry skillet and gently roast the pecans for a few minutes, turning occasionally. Watch them, carbonised mess is neigh. When they’re nice and toasty, reserve a few kernels and tip the rest into the same blender/processor (no need to wash it). Quickly pulse to break them down into pieces.
Wash the pear or peal it, core it, and cut it in tiny dice. Add to the mixing bowl along with the pecans and mix to combine (by hand is what works best!).
Check the consistency - it will be quite sticky but should be shapeable. If not, you can add more rolled oats and/or protein powder. If it’s too dry, add a splash of non-dairy milk or water.
Shape the cookies, place on the tray and bake for 15 minutes. They should be quite soft but will harden a bit when cold. If you want crunchier cookies on the outside, continue baking them for 5-10 minutes on a lower temperature, or put them on the rack and leave in the hot oven turned off.
Enjoy!
Hazelnut and dark chocolate chips
Same recipe as the pear and pecans above but
replace the pecans by hazelnuts (I used a whole cup, which was a LOT, but nice!)
omit the pear and the spices, and use some dairy-free chocolate chips instead (I used about 120g Whittakers’ Ghana chocolate, cut in pieces)
the dough will be drier, you might need to add some dairy-free milk, depending on how much water was in your dates
Try those, they are SO good!
0 notes
Photo


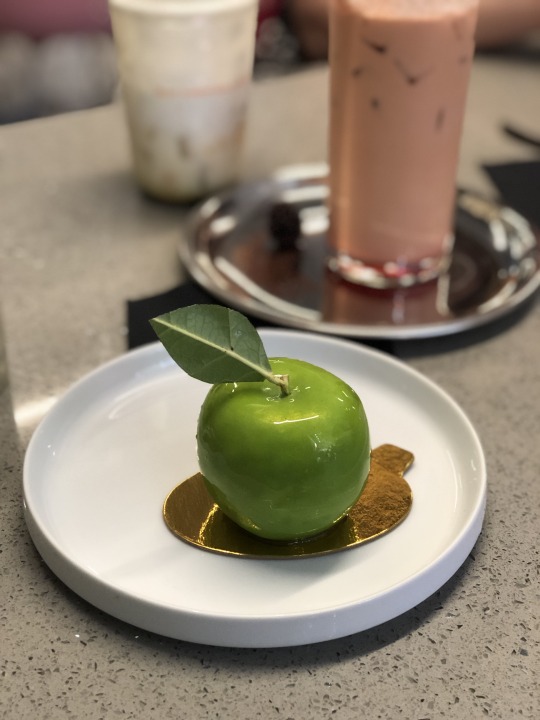
Big news, big news! Turns out there are great apples in NYC, however, they might not be the kind of organic fruit you’re thinking of. Try picturing a glossy, perfectly green, Snow White’s evil stepmother kind of apple, presented on a little gold coaster and begging you to take a bite. Inside, it’s not full of vitamins, it’s full of soft cake, apple jelly cubes, and a light frosting containing it all within the illusion. Sounds muuccchhh better to me, especially when served with an iced rose-syrup infused latte. Yum? YUM.
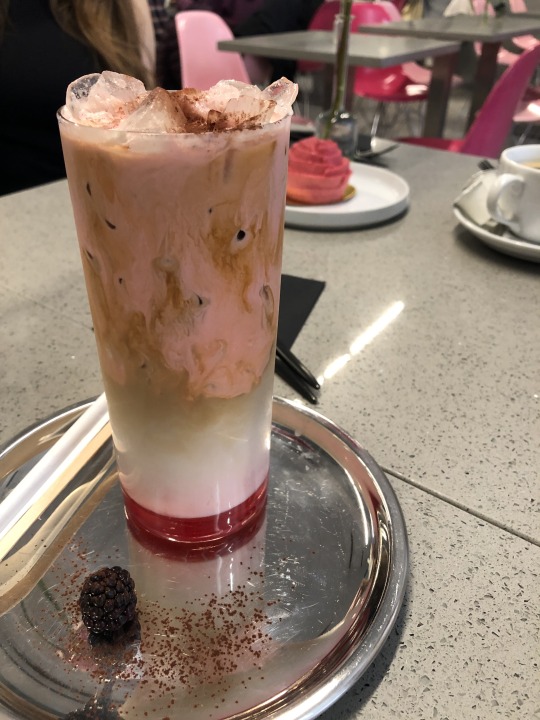
You can find both of those delicacies in NYC at LRoom, an entirely out of place heaven in the middle of a scummy street in the middle of nowhere between Flatiron and Soho, the last place you would expect to turn into and find bright pink chairs, beautiful mega-roses in the middle of each table, and a menu packed with delicate drinks and artistic desserts. A rose that is in fact a sugary treat, a little bao made of white chocolate, and milk tea and coffee that tasted worlds away from the gimmicky flavors I feared. The wonderful thing about NYC is that appearance means nothing, and passion means everything. This place is no Sarabeth’s, old-school and filled with the richy-rich. Sarabeth’s is subpar. LRoom is a refreshing cafe where my mom could picture editors sneaking away to to work, and where the exterior completely defies the experience once seated. LRoom was one of my favorite shocks of the weekend, however we went somewhere I found on a whim when trying to secure a post-airport dinner on a Friday night, not too far from The Edition in Flatiron that we called home for a few days. Sidebar- if you can, stay there, and you will feel like metropolitan Rapunzel tucked away in a gorgeous clocktower hovering above the park. The decor is cozy and bold, yet simplistic and full of wood, warm lighting, and delicious smelling scents.

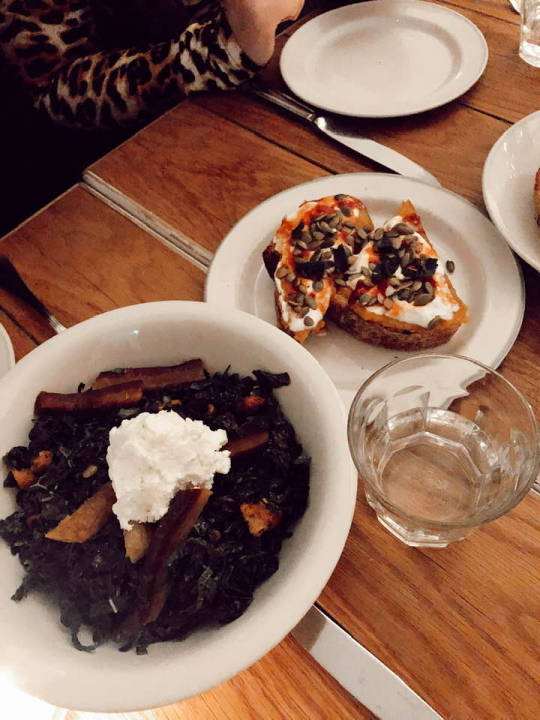
This location led me to La Pecora Bianca NoMad, an inviting Italian restaurant that felt modern and cool, but with old-school dishes done exceptionally well. With pastel green chairs and funky wallpaper providing accent against the otherwise white space, this place was packed at 9PM on Friday and everything smelled incredible as soon as we walked in. I ordered the house rose, which the server let me know was better than any wine he had while in Spain, and while I was like “yeah ok dude” before trying it, my world was rocked once I took a sip. It was clean, dry, sweet, smooth, wet (?), literally everything you could want from a cold, crisp rose. Holy fuck. I need to order bottles as soon as I’m done writing this. If not for the incredible burrata with figs and giant hunks of scrumptious bread, and the Spaghetti with pomodoro sauce, GO FOR THE ROSE. Back to the pasta- this may be the most memorable bowl of pasta I’ve ever had. The noodles were al dente and a pleasure to chew through, and the sauce was fresh and tangy with a hint of garlic, and a lingering sweetness. I didn’t even get cheese on top because I just wanted to savor the divine combination of spaghetti + sauce, a tale as old as time, and a flavor mashup I will never grow old of. Bellisimo.
Outside of those superstars, we visited some favorite haunts and had a truly perfect weekend of eating. If you’re headed to NYC for a few days and wish to avoid midtown, here’s my guide! Go nuts! Go ham! Avoid tourist shitholes for all you are worth!
1. La Pecora Bianca - the ideal dinner spot. I will 100% be back.
2. Dough Donuts - do NOT SKIP THESE DONUTS. They are fat, chewy, perfectly glazed, and the first placed I dragged my family to the minute we checked into the hotel. The lemon poppyseed is a work of art and perfectly, perfectly sweet with a sour kick.
3. LRoom - come prepared to take photos and let your inner Instagram monster live its best life.
4. abcV - a wonderful, chic spot to try truly interesting & fantastic food. Highlights of our meal included: sticky rice, candied tempeh, spinach campanelle with saffron breadcrumbs, dosa, and green chickpea hummus. Make a reservation or arrive right at 5:30PM when they open- this place pops off.
5. Veniero’s - a family staple & perfect post-Broadway show nightcap. Show up ready to sit down in an old-school Italian bakery and enjoy coffee, cannoli (REAL cannoli), and cheesecake unlike you’ve ever had. This place owns my soul and I think about the chocolate cannoli filling every day of my life.
6. Sadelle’s - DO YOU LIKE BAGELS? DO YOU LIKE ORANGE JUICE IN A WINE GLASS? DO YOU LIKE FEELING LIKE IT’S THE 1960′S? You will love Sadelle’s, and you should make a reservation.
Time for another trip yet?!?!?!
Until next time, Happy Eating!
- Natalie
1 note
·
View note
Photo

New Post has been published on https://cookingtipsandreviews.com/how-to-make-hot-chocolate-cookies/
How to Make Hot Chocolate Cookies

amzn_assoc_placement = "adunit0"; amzn_assoc_tracking_id = "makemoneyq-20"; amzn_assoc_ad_mode = "search"; amzn_assoc_ad_type = "smart"; amzn_assoc_marketplace = "amazon"; amzn_assoc_region = "US"; amzn_assoc_title = "Shop Related Products"; amzn_assoc_default_search_phrase = "cooking"; amzn_assoc_default_category = "Kitchen"; amzn_assoc_linkid = "51fe4d035c7af8dc5928e6f5e5b79c4e"; amzn_assoc_default_browse_node = "284507"; amzn_assoc_rows = "4"; amzn_assoc_design = "text_links";
Lisa KaminskiNovember 8, 2018
Taste of Home
Love hot cocoa? You’re going to want to learn how to make hot chocolate cookies. These treats are just the thing to keep you cozy on chilly nights.
In the winter months, there’s nothing more I crave than coming in the cold, making myself a cup of hot chocolate and setting in with a book or a good Hallmark movie if it’s the Christmas season! It doesn’t get much better than that—unless you have a great snack to go along with that cocoa. Minty treats of all kinds with that chocolate is a classic combination, but that’s just not enough for me. I want my hot cocoa with a side of hot cocoa, which is why I just had to figure out a way to make hot chocolate cookies.
And when I say hot chocolate cookies, I mean more than cookies that just have chocolate and a few marshmallows inside. I wanted these cookies to taste like the real deal! So I got down to work in my kitchen using real hot chocolate mix, real hot chocolate mini marshmallows and a whole lot of chocolate chips. The results, well, let’s just say they were holiday magic (not to mention super simple!). Check out how you can mix them up fast so you can be enjoying your treat by the fire in no time.
Hot Chocolate Cookie Recipe
Ingredients
2¼ cups flour
2 eggs
¾ cup butter, softened
¾ cup sugar
¾ cup brown sugar
½ cup hot chocolate mix (or three packets)
3 tablespoons cocoa powder
1 teaspoon vanilla extract
1 teaspoon salt
1 teaspoon baking soda
½ teaspoon baking powder
1 cup chocolate chips
1 cup marshmallow bits (not mini marshmallows)
A word on your marshmallows
Taste of Home
Before you start this recipe, be sure to take a good look at your pantry. You’ll want to make sure you’ve got marshmallow bits for this recipe—not mini marshmallow. Mallow bits are just like those itty-bitty crunchy marshmallows you get in a packet of hot chocolate. You can find small containers of Jet-Puffed Mallow Bits in your supermarket’s baking or hot beverage aisle—or you can always snag them online if you can’t track them down (I found that they sell out quickly close to the holidays). And if you’re at a total loss for finding these marshmallow tidbits, just be sure that the hot chocolate your choose has some included. Those will work just as well!
If you’re unable to find those tiny mallow bits, I know it can be tempting to opt for mini marshmallows instead, but resist! Mini marshmallows are just too soft to include in this dough and will melt too easily in the oven causing a big, sticky mess. And no one likes to deep clean their oven if they don’t have to—though we’ve got some tips for when self-clean just isn’t enough.
Directions
Stirring up the cookies
Taste of Home
Making these hot chocolate cookies is a cinch. Just follow the standard cookie-making procedure (AKA the creaming method). Cream together your softened butter, sugar and brown sugar. Then add in your eggs and vanilla. Once those are incorporated, just add in the dry ingredients—save for the marshmallow bits.
Because these little marshmallows are a bit fragile, you’ll want to stir them in by hand or with the lowest speed of your mixer. After all, these are the star of the show—you don’t want them broken down into marshmallow powder.
Baking your hot cocoa cookies
Taste of Home
These cookies are just as easy to bake up as any classic chocolate chipper. Using a tablespoon or cookie scoop, portion out cookies onto a baking sheet and bake for 10-12 minutes at 375ºF. When they’re done, just set them on a rack to cool—though I thought they tasted best a little warm!
The cocoa-filled results
Taste of Home
This cookie is so simple to make and the results are absolutely mouthwatering. First off, these cookies have that just-right slightly chewy texture to them which makes them great for soft cookie fans like myself. Then you’ve got all those hot chocolate flavors courtesy of a good hot chocolate mix (these are our staff’s favorites), chocolate chips and those teeny tiny marshmallows. Let’s be honest—those mini marshmallow bits are what truly take these cookies over the top. What’s a hot chocolate—or a hot chocolate cookie—without plenty of marshmallows?
But do you want to know the secret for making this treat even better (yes, it is possible)? Dunk your hot chocolate cookie right into your hot chocolate. It might seem like too much, but gosh is it ever good!
Be sure to whip up some of our best hot cocoa recipes!

Rich Hot Chocolate
Each winter in early February my friends and I gather for an outdoor show called Mittenfest. We skip the bloody mary’s and fill our thermoses with these hot cocoas instead.
Get Recipe

Dulce de Leche Hot Chocolate Pods
Who doesn’t love a steamy mug of hot chocolate on a snowy day? Now you can give friends, neighbors, co-workers or anyone who deserves a treat the pleasure of this indulgent drink with these giftable hot chocolate pods. —Taste of Home Test Kitchen, Milwaukee, Wisconsin
Get Recipe

Nutella Hot Chocolate
Vanilla beans and Frangelico liquor lend to the sophisticated flavor of this hot chocolate. With such rich taste, it could be served as a dessert.—Michael Compean, West Los Angeles, California
Get Recipe

Pumpkin-Spiced Hot Chocolate
As soon as there is a hint of fall in the air, I think of pumpkins and my mother. She served pumpkin pie with real hot chocolate. This recipe brings those two amazing scents, and her, back to life for me. To turn your hot chocolate into creamy pumpkin mocha, stir 2 teaspoons of instant coffee into the hot chocolate before adding whipped cream. It’s a great way to warm up after some chilly trick-or-treating! —J. Morand, Maitland, ON
Get Recipe

Crackling Hot Cocoa
This hot chocolate recipe is more than a warm-you-up—it’s rich and thick decadence in a mug.—Cyndi Nistico, Palm Island, Florida
Get Recipe

Spiked Hot Chocolate
My husband and I like to enjoy this grown-up version of hot chocolate on a cold winter evening. It’s even better made with honey-flavored bourbon if you can find that in your local store. —Andrea Harvath, Duncannon, Pennsylvania
Get Recipe

Cozy Hot Chocolate
Steaming mugs of these smooth beverages are a nice anytime treat with my husband, Ken.—Marie Hattrup, Sonoma, California
Get Recipe

Dairy-Free Hot Chocolate
Change up ordinary hot cocoa by stirring some dark baking cocoa into vanilla almond milk. Fluffy marshmallow creme and bright sprinkles make irresistible toppings. —Cindy Reams, Philipsburg, PA
Get Recipe

Fluffy Hot Chocolate
This is our daughter’s favorite hot chocolate recipe. It may look like ordinary cocoa, but a touch of vanilla sets it apart from the rest. And the melted marshmallows give it a frothy body you won’t get from a cocoa packet. —Jo Ann Schimcek, Weimar, Texas
Get Recipe

Holiday Peppermint Mocha
Make spirits bright with a minty mocha to share under the mistletoe or around the piano. I’ve also stirred in coffee liqueur instead of peppermint. —Lauren Brien-Wooster, South Lake Tahoe, California
Get Recipe

Candy Cane Hot Cocoa Mix
We make batches of this minty, malted milk-flavored hot chocolate to give as gifts. Be prepared—friends will return the jars for refills! —Sara Tatham, Plymouth, New Hampshire
Get Recipe

Peppermint White Hot Chocolate
My soothing white hot chocolate is a great warm-up after a wintry day spent sledding or ice skating. Or include it as a festive addition to brunch or an afternoon tea party. —Darlene Brenden, Salem, Oregon
Get Recipe

Pumpkin Spice Hot Chocolate
My mom makes this hot chocolate with pumpkin, spices and white chocolate. We usually drink it on Halloween, but it’s delish at Christmas too. —Sasha King, Westlake Village, California
Get Recipe

Kahlua Hot Chocolate
When we want a cup of hot chocolate, we prefer homemade over store mixes. A splash of Kahlúa adds a touch of fabulous. —Chung-Ah Rhee, Hollywood, California
Get Recipe

Favorite Hot Chocolate
You need just a few basic ingredients to stir up this spirit-warming sipper. It’s smooth and not too sweet, making it just right for cozy winter days. —Flo Snodderly, North Vernon, IN
Get Recipe

Gingerbread Hot Cocoa
Are you in the Christmas spirit yet? If not, this special cocoa will do the trick. It’s like drinking a chocolate gingerbread cookie! —Erika Monroe-Williams, Scottsdale, AZ
Get Recipe

Landmark Hot Chocolate
With or without a nip of rum, my hot chocolate recipe has been a Wisconsin winter warmer for years. When the toboggan hills are calling, I skip the whipped cream and take a thermos to go. It’s always a hit and it ensures nobody is left out in the cold! —Mark Phillips, Bayfield, Wisconsin
Get Recipe

Vanilla Almond Hot Cocoa
Treat your family to this comforting, homemade cocoa as you decorate the tree or open holiday gifts. Vanilla and almond extracts make it taste even more special. —Vicki Holloway, Joelton, Tennessee
Get Recipe

Mexican Hot Chocolate
This delicious, not-too-sweet hot chocolate is richly flavored with cocoa and delicately seasoned with spices. The whole-stick cinnamon stirrers come in handy, as the old-fashioned chocolate mixture settles if not stirred before drinking. The blend of cinnamon and chocolate flavors is wonderful! —Kathy Young, Weatherford, Texas
Get Recipe

Double Chocolate Hot Cocoa Mix
I gave this away at our neighborhood Christmas party in cutie-patootie gift bags and was thrilled that I was able to give something to everyone. But the next week I started getting calls from the neighbors who’d made it and was blown away at the response. Everyone loves this! The white chocolate is what makes it extra creamy and chocolaty!—Mandy Rivers, Lexington, South Carolina
Get Recipe
amzn_assoc_placement = "adunit0"; amzn_assoc_search_bar = "true"; amzn_assoc_search_bar_position = "bottom"; amzn_assoc_tracking_id = "makemoneyq-20"; amzn_assoc_ad_mode = "search"; amzn_assoc_ad_type = "smart"; amzn_assoc_marketplace = "amazon"; amzn_assoc_region = "US"; amzn_assoc_title = "Shop Related Products"; amzn_assoc_default_search_phrase = "cookware"; amzn_assoc_default_category = "All"; amzn_assoc_linkid = "b45319dac495d29e17b5eff312392025";
Source link
0 notes
Photo
New Post has been published on https://jmuo.com/17-july-4th-dessert-recipes-youll-find-room-for/
17 July 4th Dessert Recipes You'll Find Room For (...
amzn_assoc_placement = "adunit0"; amzn_assoc_tracking_id = "fresh17-20"; amzn_assoc_ad_mode = "search"; amzn_assoc_ad_type = "smart"; amzn_assoc_marketplace = "amazon"; amzn_assoc_region = "US"; amzn_assoc_title = "Shop Related Products"; amzn_assoc_default_search_phrase = "cooking"; amzn_assoc_default_category = "Kitchen"; amzn_assoc_linkid = "51fe4d035c7af8dc5928e6f5e5b79c4e"; amzn_assoc_default_browse_node = "284507"; amzn_assoc_rows = "4"; amzn_assoc_design = "text_links";
[Photograph: Vicky Wasik, Carrie Vasios Mullins]
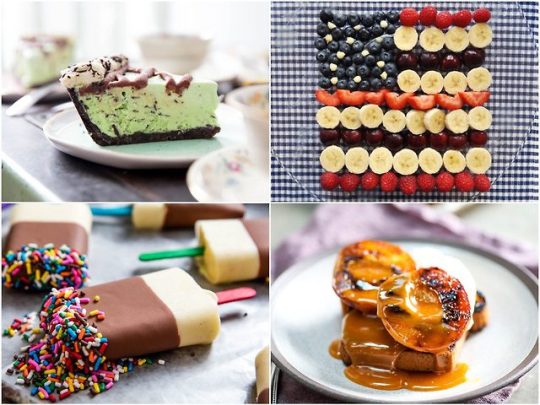
It’s practically your patriotic duty to stuff your face with hot dogs and`potato salad on July 4th, so we understand if you don’t usually leave room for dessert. But after a big meal of smoky grilled meats (maybe a few hours after), a little something sweet can be just the pick-me-up you need. Plus, entertaining is a great opportunity to whip up all sorts of tasty desserts you may not take the time to make just for yourself—succulent grilled peaches and juicy strawberry pie to celebrate peak summer-fruit season, cooling homemade ice creams and popsicles, a light and creamy basil mousse that showcases just how well the fragrant herb pairs with dairy. Whatever strikes your fancy, you’ll find the perfect match in this collection of 17 Fourth of July dessert recipes.
Grilled Peaches and Pound Cake With Cider Vinegar Caramel Sauce
[Photograph: Vicky Wasik]
To really get the most out of that roaring fire in your grill, use it for your dessert along with your burgers. All three elements of this elegant dish—peaches, caramel sauce, and pound cake—are given some time over the fire, where they absorb a tantalizing whiff of smoke to complement their sweetness. We cut the peaches in half and dip them in sugar before placing them on the grates, allowing them to develop a crisp crust. You could certainly make your own pound cake, but the final dish here is so delicious, no one will notice at all if you go store-bought.
Get the recipe for Grilled Peaches and Pound Cake With Cider Vinegar Caramel Sauce »
Grilled Banana Boats With Peanut Butter, Chocolate, and Marshmallows
[Photograph: Joshua Bousel]
For a simpler grilled dessert that’s also kid-friendly, it doesn’t get much easier than stuffing split-open bananas with candy, chocolate, and marshmallows, then grilling them right in their peels for a messy, melty treat. Our recipe calls for mini marshmallows, chocolate chips, and peanut butter chips, but the sky’s really the limit—just set out a spread of possible fillings and let your guests choose their own adventures.
Get the recipe for Grilled Banana Boats With Peanut Butter, Chocolate, and Marshmallows »
Sunny Lemon Bars
[Photograph: Vicky Wasik]
These outrageously bright and tart lemon bars start with a fully cooked custard made with equal parts whole eggs and egg yolks, producing a soft, rich texture that’s just firm enough to slice without falling apart. The extra yolks help stabilize the custard without the need for cornstarch, keeping it stunningly clear. A bit of lemon zest added to the simple butter-and-sugar crumb fortifies the bars’ citrusy flavor.
Get the recipe for Sunny Lemon Bars »
DIY Pudding Pops
[Photograph: Vicky Wasik]
A popsicle on a hot day is one of life’s purest simple pleasures. It’s hard to say no even to a plastic-wrapped pop from the freezer section, but these homemade takes on Jell-O’s long-discontinued Puddin’ Pops will truly blow the crowd away. What’s more, they’re easy to whip up, using a simple vanilla custard thickened with tapioca starch. To make them extra special, dip the pops in a mixture of chocolate and coconut oil to form a crispy shell, then coat in sprinkles, cocoa nibs, or another crunchy topping of your choice.
Get the recipe for DIY Pudding Pops »
Tamarind and Palm Sugar Popsicles With Chili Salt
[Photograph: Vicky Wasik]
Inspired by the sticky, spicy-sweet tamarind candy Pelon Pelo Rico, these thoroughly grown-up popsicles package the same flavors into a refreshingly frosty treat. Though harder to find than white sugar or standard brown, palm sugar lends a unique caramelly sweetness to offset the tart tamarind concentrate, while a dip in chili salt mixed with malic acid gives the pops a little hot, sour bite.
Get the recipe for Tamarind and Palm Sugar Popsicles With Chili Salt »
Fresh Basil Mousse
[Photograph: Vicky Wasik]
We don’t often think of basil as a dessert ingredient, but to anyone who’s ever enjoyed a Caprese salad or a margherita pizza, it should be no surprise that it pairs well with dairy. What’s a little more surprising is the inclusion here of white chocolate, which has a floral aroma that complements basil beautifully and helps add richness and body to this light mousse. It’s thickened with gelatin, making it easier than an egg-based version and safe for any egg-allergic friends.
Get the recipe for Fresh Basil Mousse »
Texas Sheet Cake
[Photograph: Vicky Wasik]
Everything’s bigger in Texas, and that includes dessert—this supersized cake will easily feed a party of two dozen Independence Day revelers. (It also keeps well enough that a smaller group could nibble on it for a week.) The buttermilk-enriched chocolate batter is poured into a thin layer in a sheet pan, where it bakes up fluffy and moist. But the real magic happens when it’s doused in molten fudge icing—the fudge seeps into the cake, turning the top of it delightfully gooey. A layer of toasted pecans gives the otherwise soft cake and fudge some crunch.
Get the recipe for Texas Sheet Cake »
Homemade Brownie Mix
[Photograph: Vicky Wasik]
Stella’s best from-scratch brownies are indeed fantastic, but they require browned butter and a couple hours’ worth of prep time. If you’re looking for a quicker route to brownies, try stirring together a batch of this homemade brownie mix in advance. On the day of, simply add the wet ingredients, pulse in a food processor or mix by hand, pour, and bake. Made with Dutch-process cocoa powder, chopped dark chocolate, malted milk powder, and refined coconut oil, the mix will last for up to a year on the shelf (or until the expiration date of the coconut oil), and it tastes better than anything you can buy.
Get the recipe for Homemade Brownie Mix »
Vegan Chocolate Chip Cookies
[Photograph: Vicky Wasik]
Chocolate chip cookies are an obvious crowd-pleaser, whether you choose to make our ultra-involved, best-ever cookies or an old-fashioned, quick and easy variety. But if you’ll be celebrating the Fourth with anyone who eschews eggs, dairy, or both, this vegan recipe will make not only them happy but those with no such dietary restrictions, too. Here, an oat slurry stands in for eggs, coconut oil replaces the butter, and a mix of dry malt extract and nutmeg gives the cookies some of the toasty, nutty flavors that butter takes on in the oven. We add hand-chopped dark chocolate to the batter rather than commercial chips, for better flavor and to help thicken the dough.
Get the recipe for Vegan Chocolate Chip Cookies »
Oatmeal Cookie Ice Cream
[Photograph: Vicky Wasik]
Can’t decide between cookies and ice cream? This recipe gives you the best of both worlds, but there are no crushed-up cookies involved. Instead, we opt for a deconstructed approach, mixing crispy oats, crunchy pecans, and chewy dried fruit into a brown sugar base infused with cinnamon, toasted oats, and vanilla bean. The oats do double duty—we steep them into the base to give it a nutty flavor, then bake them into clusters to use as a mix-in.
Get the recipe for Oatmeal Cookie Ice Cream »
The Best Cherry Pie
[Photograph: Vicky Wasik]
You don’t need any magical tricks to turn out a delicious, perfectly thickened cherry pie—just the right ratio. Pair the fruit (fresh or frozen cherries will work great) with 25% of its weight in sugar and 5.5% of its weight in tapioca starch, and the filling will come out thick but juicy every time. Using a mix of different cherry varieties, sweet and sour, yields the best flavor.
Get the recipe for The Best Cherry Pie »
The Best Blueberry Pie
[Photograph: Vicky Wasik]
The best part about the above ratio from our cherry pie is that it works perfectly for many other fruit pies, too (though not all—apple and peach pies, for example, need a different treatment). Here, that means blueberries, preferably a mix of cultivated and wild for greater depth of flavor. As pretty as ceramic and stoneware pie plates may look, you’ll actually get a crispier crust that’s less prone to sogging with inexpensive tempered glass.
Get the recipe for The Best Blueberry Pie »
Fresh and Creamy Lime Pie
[Photograph: Vicky Wasik]
A twist on an old-fashioned lemon cream pie, this tart, bright pie is akin to a cross between Key lime and lemon meringue—and just as delicious as that sounds. We cook the simple custard on the stovetop, then pour it into a blind-baked whole wheat crust, which we find delivers a graham cracker–like flavor that pairs nicely with the lime. It’s all topped off with fluffy peaks of meringue that toast to a nutty brown in the oven.
Get the recipe for Fresh and Creamy Lime Pie »
Grasshopper Ice Cream Pie
[Photograph: Vicky Wasik]
Another dessert of days past, grasshopper pie was traditionally made by mixing crème de menthe, crème de cacao, and cream with melted marshmallows. Our updated take uses a custard filling that’s decidedly more grown-up, flavored with Fernet Branca (to enhance the minty flavor while offsetting the sweetness) and a dash of mint extract, plus melted dark chocolate instead of the usual chocolate liqueur. An intense cocoa-nib caramel drizzled over the top completes the dessert.
Get the recipe for Grasshopper Ice Cream Pie »
Summer Strawberry Pie
[Photograph: Yvonne Ruperti]
It’s one thing to make a pie that’s served cold, but in July, the real win is one that keeps all the prep work cold, too. This summery pie requires no baking and no cooking, unless you count a quick trip to the microwave to melt the gelatin. That helps to thicken a filling of strawberry purée and macerated fruit, which we pour into a homemade graham cracker crust, then refrigerate until set.
Get the recipe for Summer Strawberry Pie »
No-Bake Cheesecake With Freeze-Dried Fruit
[Photograph: Vicky Wasik]
As much as we love our seasonal berries and peaches, you don’t need great summer fruit to make a great summer fruit dessert. The moisture in fresh fruit will actually ruin a no-bake cheesecake, so we turn to powdered freeze-dried fruit instead—you can order all sorts online, including strawberries and blueberries, bananas, and cherries. Think of our recipe as a template, and make it your own by experimenting with different combinations of fruit and crust. You can’t go wrong with strawberry and Oreos, banana and Biscoff, or mango and gingersnaps, but those are just for starters.
Get the recipe for No-Bake Cheesecake With Freeze-Dried Fruit »
American Flag Fruit Salad
[Photograph: Carrie Vasios Mullins]
An American flag–shaped dessert is a time-honored tradition on the Fourth of July, and this one happens to be exceptionally easy as well. Artfully arranging berries, cherries, banana, and bits of apple turns a plain old fruit salad into a patriotic centerpiece. Of course, feel free to swap out these specific fruits for whatever appropriately colored options look best at your local market.
Get the recipe for American Flag Fruit Salad »
amzn_assoc_placement = "adunit0"; amzn_assoc_search_bar = "true"; amzn_assoc_search_bar_position = "bottom"; amzn_assoc_tracking_id = "fresh17-20"; amzn_assoc_ad_mode = "search"; amzn_assoc_ad_type = "smart"; amzn_assoc_marketplace = "amazon"; amzn_assoc_region = "US"; amzn_assoc_title = "Shop Related Products"; amzn_assoc_default_search_phrase = "cookware"; amzn_assoc_default_category = "All"; amzn_assoc_linkid = "b45319dac495d29e17b5eff312392025";
Source link
0 notes
Last Seen Blogs

ourmusicoldies
Our Musicoldies

vianadesign
VIANA DESIGN

tabstore
Tech And Beyond

sl0t
bless the creation

ladyadaine
Queer in a vague way