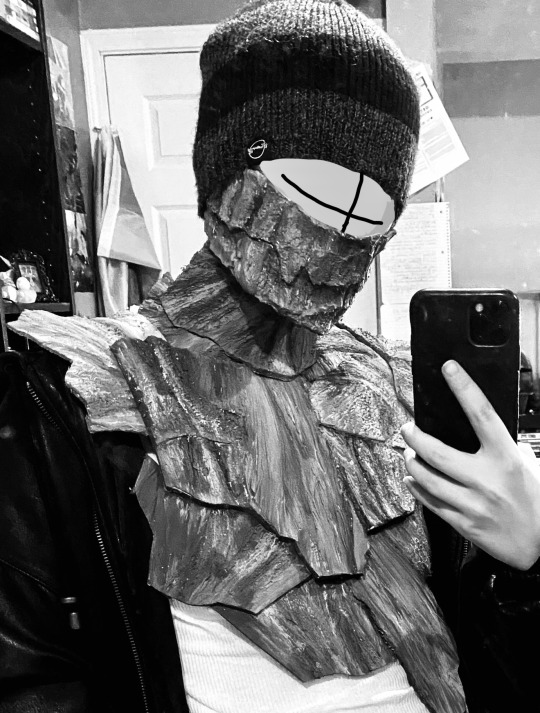
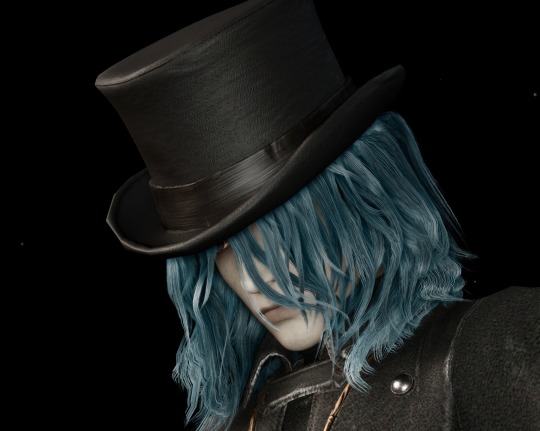
#cosplay ref
Note
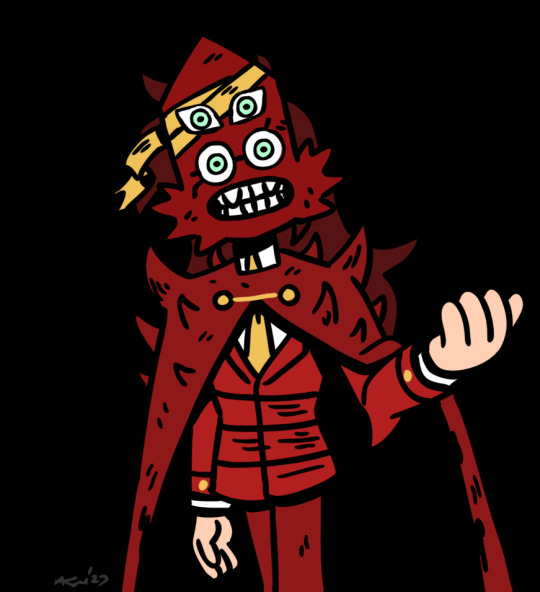
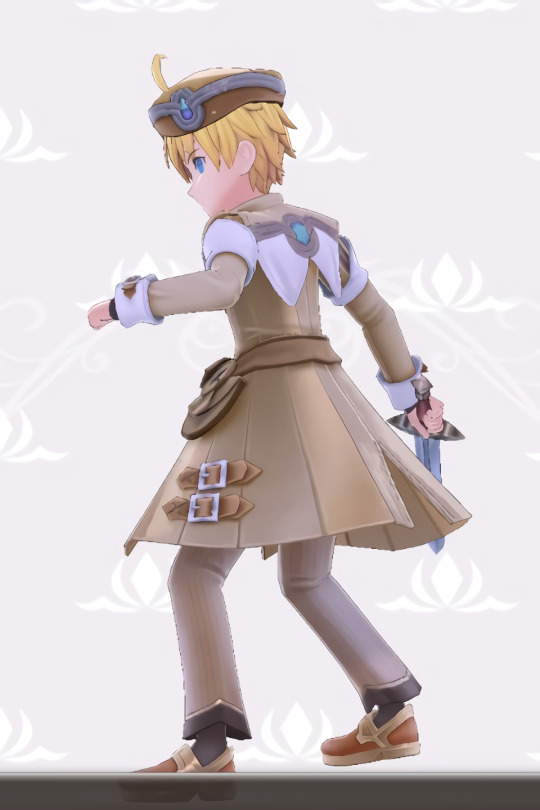
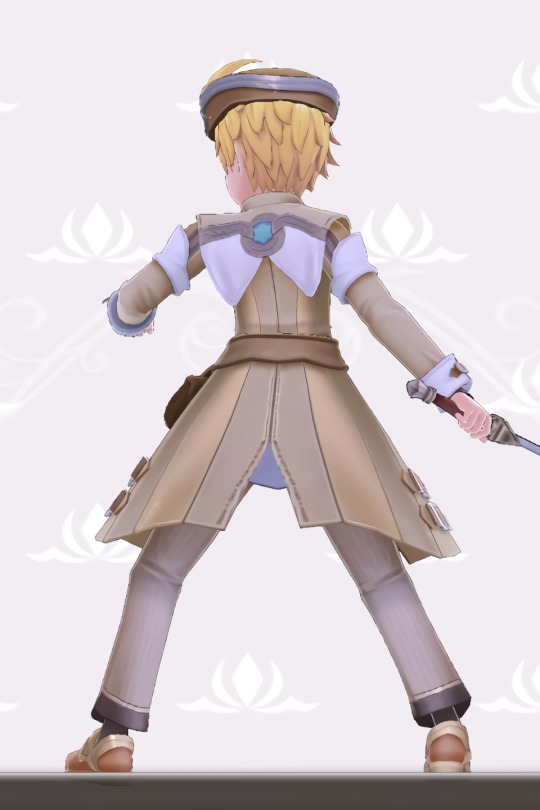
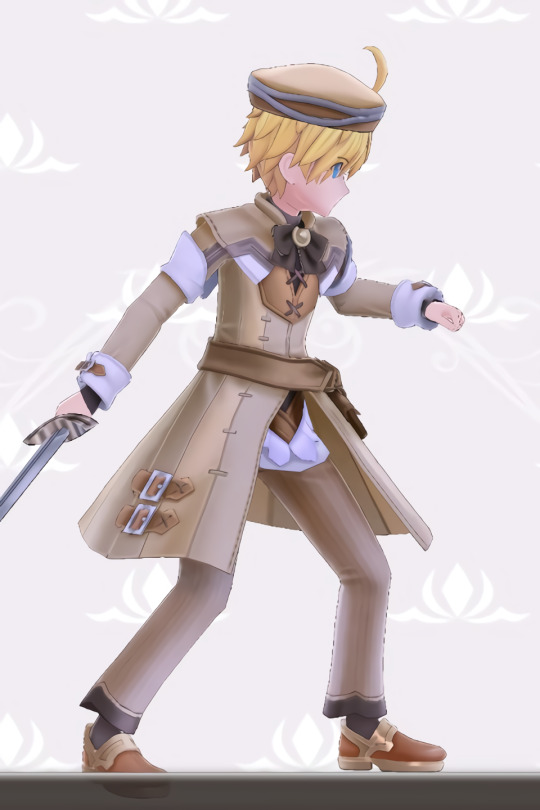
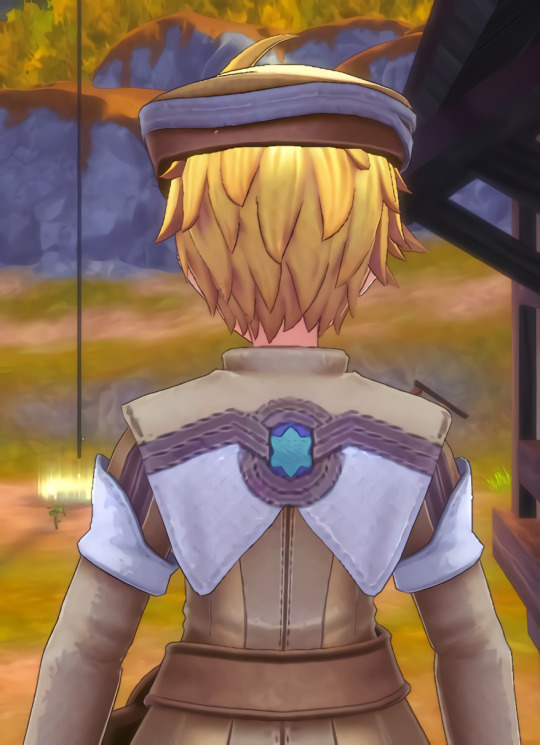
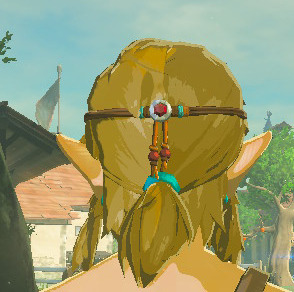
hi! i absolutely ADORE your golbetty design and i was wondering if i could create a cosplay based on it?
Sure!! Here's her full look, Golb mask and without any filters. I hope this is helpful, would love to see it when it's done.

659 notes
·
View notes
Text
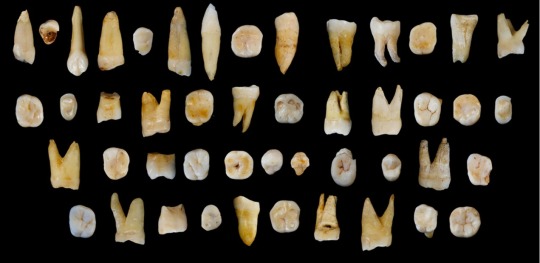
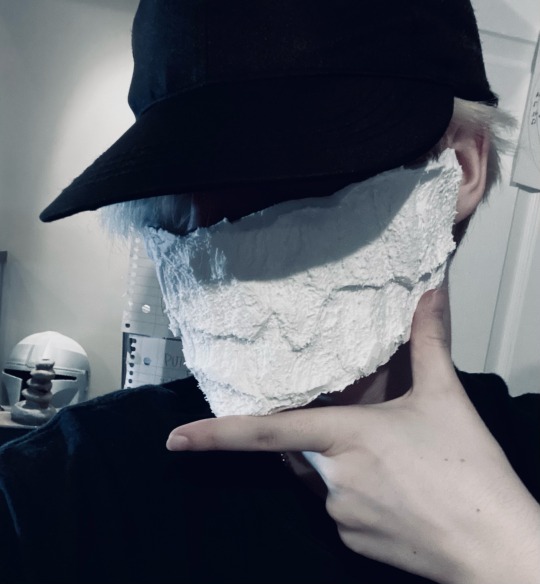
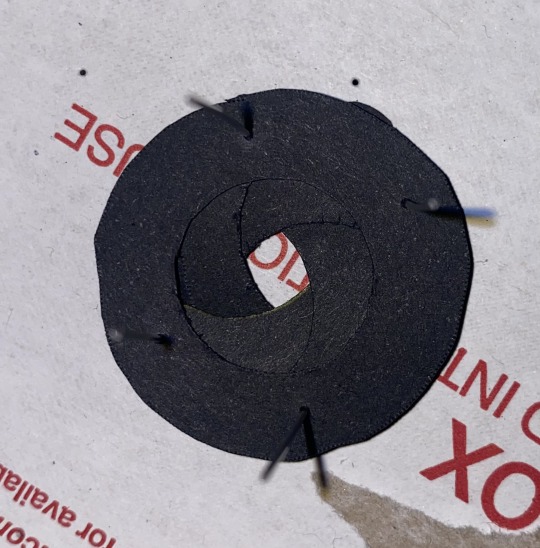
How to Make Replicas of Your Own Teeth:
A Cosplay Toothtorial
This is a method to safely use a molded mouth guard to make duplicates of your own teeth without destroying a potentially expensive piece of dental equipment. Everything that goes into the mold—clay and mold release aid—must be nontoxic/edible so you can wash your mouth guard at the end of the process and continue to use it as normal.
Benefits: No mold-making or casting experience required
Lightweight end result
Adds a truly personal touch to your project :)
Downsides: Must own a molded mouth guard/retainer
End result can be fragile and needs proper sealing for durability
Supplies
Molded mouth guard/retainer (referred to as “mold” from here on)
Cornstarch
Soft/fluffy brush
Non-toxic white air dry clay (I used Crayola Model Magic)
Craft knife
Jewelry wire (I used 20 or 22 gauge)
Pins/yarn needle/any various household implements you can sculpt or smooth small details with
Acrylic paints and a variety paint brushes
Clear glossy top coat (I used Mod Podge (satin) and UV Resin)
Prep
Brush or otherwise clean your mouth guard if you haven’t already, especially if there’s build-up.
If you’re using your container of cornstarch for cooking, set aside a small container specifically for crafting. No accidental cross-contamination here!
Dip your fluffy brush into cornstarch and brush into your DRY mouth guard. Lightly coat the entire mold and distribute any clumps. This coat of cornstarch will make it easier to remove your teeth from the mold.
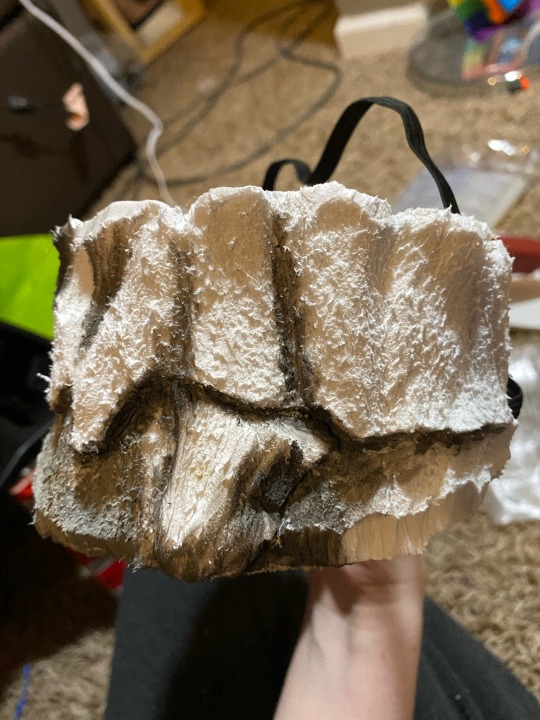
Molding
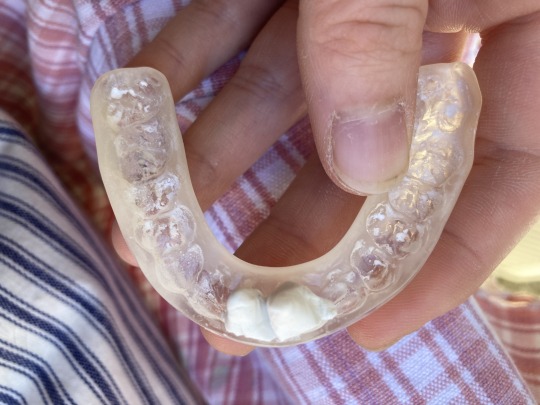
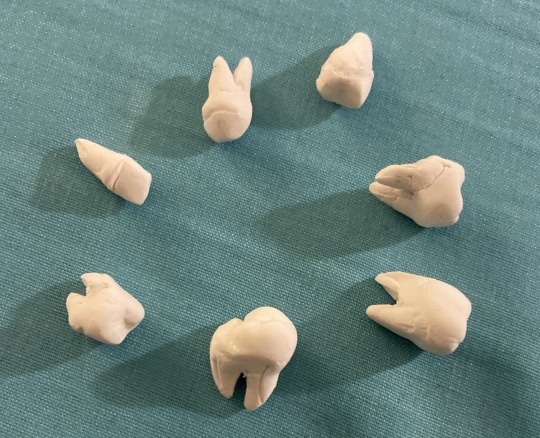
Firmly press clay into the mold so that approximately half is in the mold, half is sticking out for root sculpting. Make sure there are no air pockets or you won’t pick up the details.
Use detail scissors/craft knife to cut away excess material and indent to mark out the divisions between teeth as visible on the gum lines (see above)
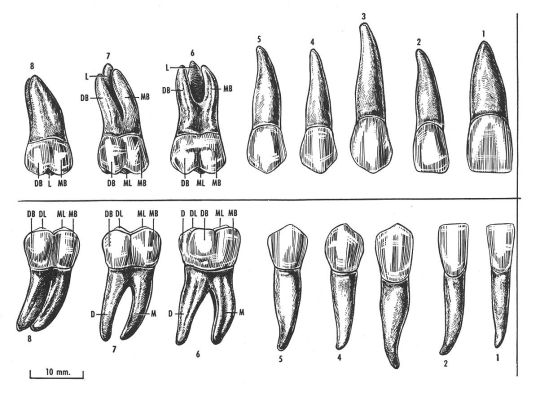
Reference a tooth diagram like the one below and separate out the roots for each tooth. Front teeth tend to have 1 leg, middle teeth have 2 legs, and some molars have 3+. I personally found that my limit was 2 roots. Sculpting 3+ roots on a single tooth was more difficult and more fragile than anatomical accuracy was worth.
Demolding
You can demold immediately after sculpting or wait up to an hour. The faster you remove the teeth, the easier they are to reshape. The longer you wait, the more they resist unintentional denting BUT the more touch-ups you'll have to do to clean the edges between teeth.
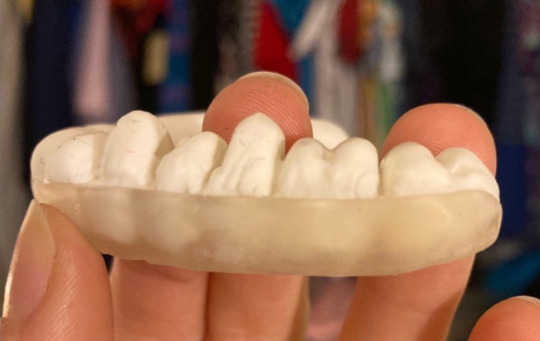
Gently lift the full row of teeth from the mold. If it won't release when you tip the mold or or push at it, try using a pin to stab one of the end teeth and use that to pry up the teeth. The rest of the row should follow. If they don't, try repeating for the other side. If they're still not lifting, set aside to dry and try again ~15-30min later.
Gently cut apart the u-shape into individual teeth.
Press raw cut edges in and smooth with various tools, like a yarn needle. Use a craft knife to help trim off any excess clay.

Touch-ups
In the case of air pockets or if you accidentally remove a root, wet some clay and use a very small amount to fill in gaps or add on roots. Don't forget the water! It makes the clay stickier and smooth out better. This is where tools come in handy, wet clay sticks less to smooth objects than your fingertips!
Once repaired, set aside any wet pieces to dry for at least 15min before doing any more sculpting work.
Set all teeth aside to dry for several hours on a wax paper or other non-stick surface. Make sure it's not textured or it will leave an imprint on your teeth!
Flaws like the chip on the top left tooth and the cracks on the middle bottom teeth are great candidates for smoothing out with a little extra clay.
**PAUSE HERE AND CLEAN YOUR MOUTH GUARD**
I personally like to rinse it out with water and clean it with a dissolving denture cleaning tablet to make sure it’s fully sanitized. It also doesn’t hurt to properly brush the mouth guard to make sure there’s no clay or cornstarch residue stuck in the crevices.
Holes
Test a tooth to check if it’s dry to the touch and doesn’t immediately deform to your touch. If it’s holding shape, you can move on.
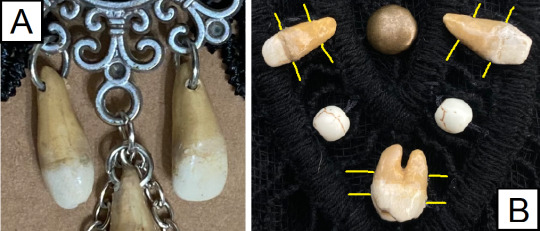
Bore a hole into the tooth with a pin or jewelry wire. Consider how you want them to hang.
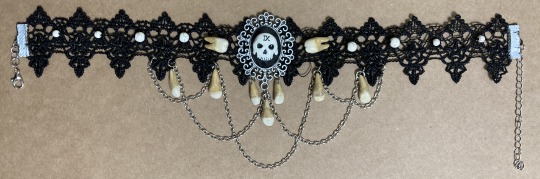
A) For the central dangling teeth on Harrowhark’s choker, I punched holes as close to the tip of the root as possible without tears, perpendicular to the teeth so I could hang them on jump rings directly from the center brooch.
B) For the teeth intended for Harrow’s tabard, I punched two sets of holes parallel to the jaw to prevent teeth from flipping around. One set just under the tooth cap, approx. 1/8in down, and one set about the same distance from the roots.
Once a hole has been punched with a pin, wiggle it around a little to open the hole or thread it on a piece of jewelry wire.
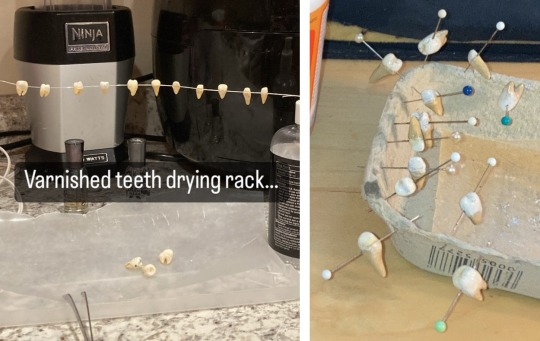
Leave teeth on a piece of wax paper or strung on a thread/wire to dry for ~48hr (or as recommended for your clay).
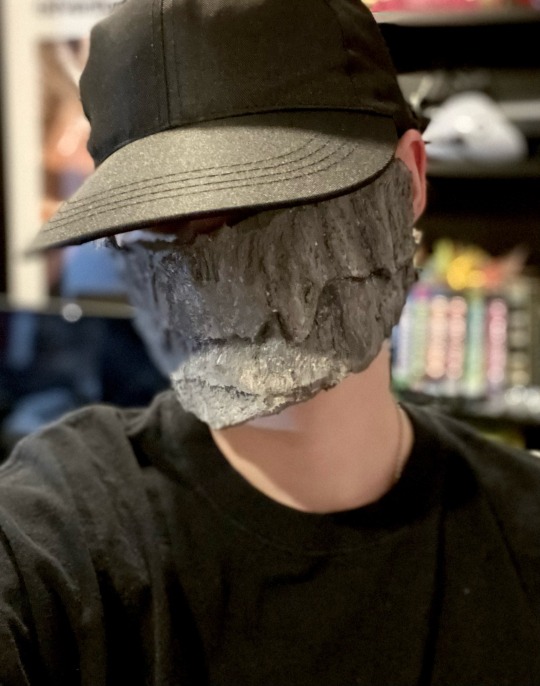
Painting/Weathering
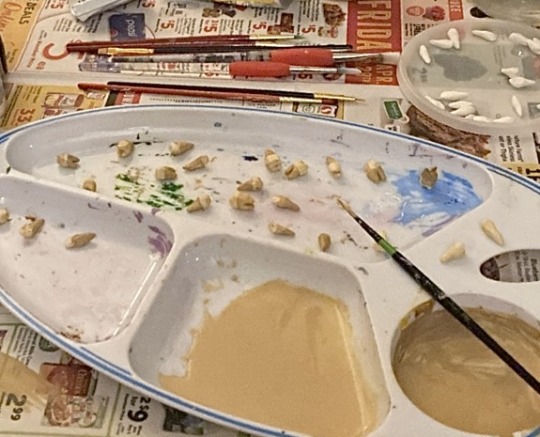
Mix a small amount of yellow-brown paint with water to create a wash (middle palette above). Paint all of your teeth with this first to establish a base color and help define any hairline cracks.
Paint with less diluted yellows and browns (right palette above).
Refer to photos like the below for reference (try searching "teeth" and "archaeology"). NOTE: The root tends to be darker and more weathered than the main tooth because it isn't protected by enamel.
Dry brush ivory or white mixed with some yellow/brown onto the tooth cap to bring out highlights.
Finishing
Your air dry clay teeth and paint job will need a top coat for protection. I highly recommend a glossy clear top coat to give the look of enamel. Below is a comparison of the two sealants I used, but there's many more options out there!

UV Resin (Left)
Pros: Harder/more durable
Cures faster
Cons: Need to work during daylight or use a UV light
Harder to get a thin even layer
Requires more set up and safety precautions
Satin Mod Podge (Right)
Pros: Can be applied with a brush
Air dries
Cons: Takes longer to dry
Teeth tend to stick together unless kept below room temp or kept from touching each other
(I solve this by storing unused beads in an old pill bottle in the fridge. Yes it's cursed and Yes I've had comments from my housemates.)
As mentioned earlier, thread teeth on a wire or pin down to dry.
This method also works well to set up for spray painting a clear coat.
Now, go forth and enjoy everyone's reactions when you tell them that you're wearing your own teeth! :D
#cosplay#cosplay tutorial#crafting tutorial#cosplay ref#harrowhark cosplay#the locked tomb#harrowhark nonagesimus#the locked tomb cosplay#locked tomb cosplay#craftblr#tutorials#tutorial#Nymph rambles#the scraps of NoN#I'm accepting my fate to potentially be know as the Tooth Harrow to a swath of people slkdfskljfsdlf#teeth#cw teeth#juuuuuust in case
109 notes
·
View notes
Text

279 notes
·
View notes
Photo

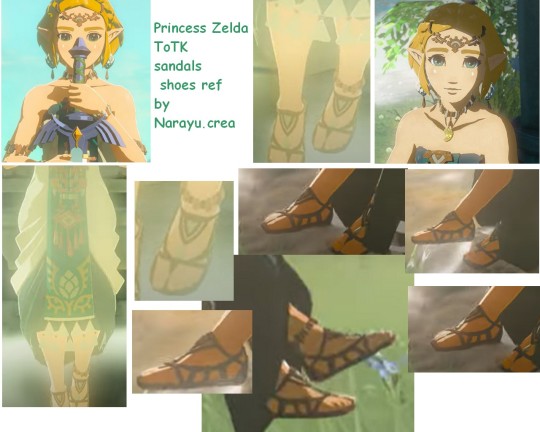

Tears of the Kingdom Princess Zelda Zonai dress reference pictures
#zelda#tears of the kingdom#zelda tears of the kingdom#zelda totk#totk#princess zelda#Zelda Cosplay#princess zelda cosplay#zonai#cosplay ref#cosplay reference
113 notes
·
View notes
Text


#wip#rockmos is hell to wear#i never put him on he is just actual torture#can you imagine when i was first gonna do this i was considering pouring actual concrete#im still thinking about doing that and then gettin into a fistfight with my friends#i originally sealed it with satin varnish but for some godawful reason i thought itd be a good idea to do triple thick gloss?#so its glossy rn. gonna recoat it in satin again#cosplay ref
25 notes
·
View notes
Text
Trying out a new organization method for planning my Juri cosplay! Trying to make garment sketches in sketchbooks was prohibitively difficult and I didn't want to fuss with photo editors to make a collage, so I tried out writing directly over a printed picture. Since this design mainly keeps the base construction the same and adds detail over the top, it was a helpful way for me to get my thoughts all in the same place.
I'm really excited to get working on this!!
As a side benefit, this will be great to add in to my competition binder if I ever compete with this cosplay. I might add a second page to add fabric swatches and color test scraps too!
24 notes
·
View notes
Photo
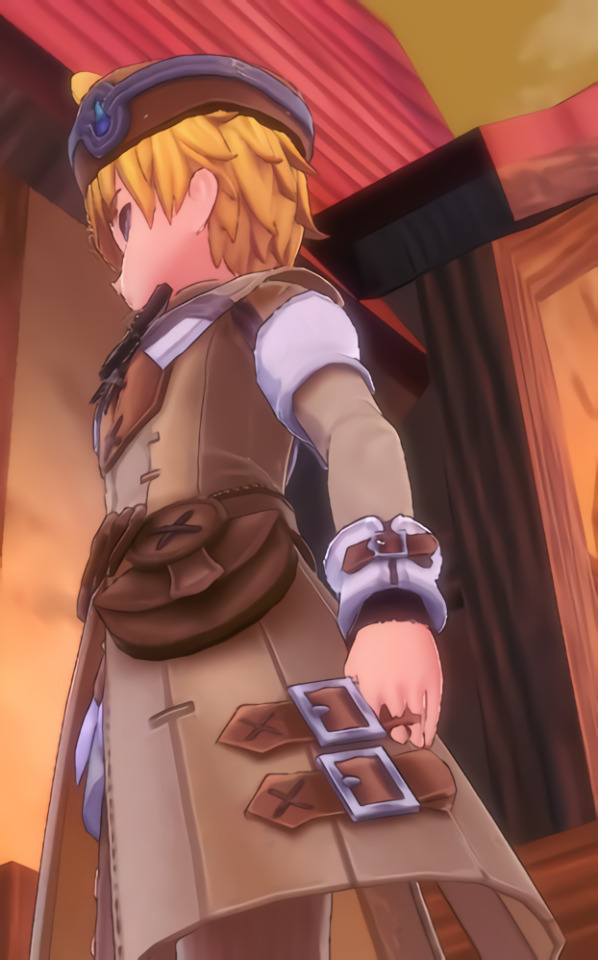
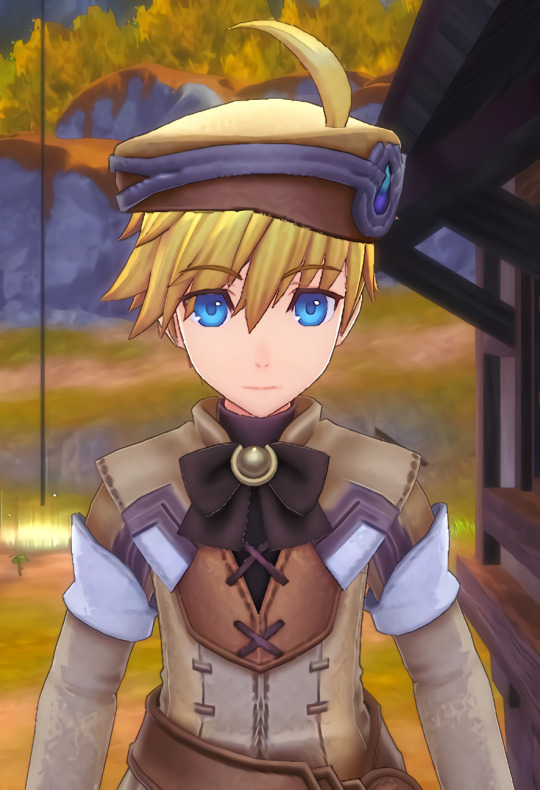
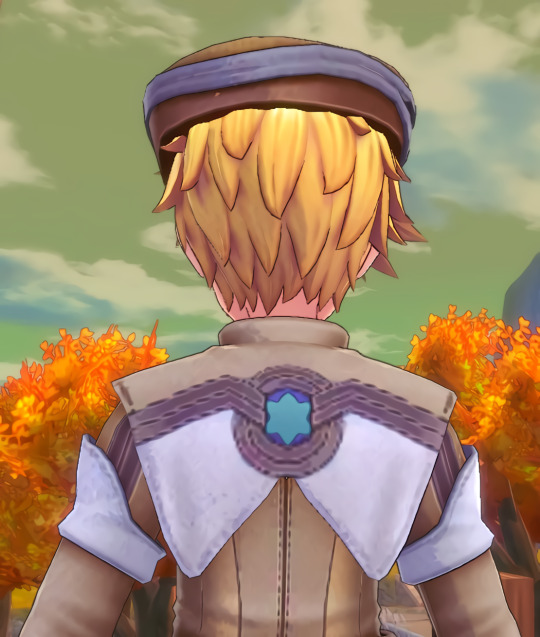
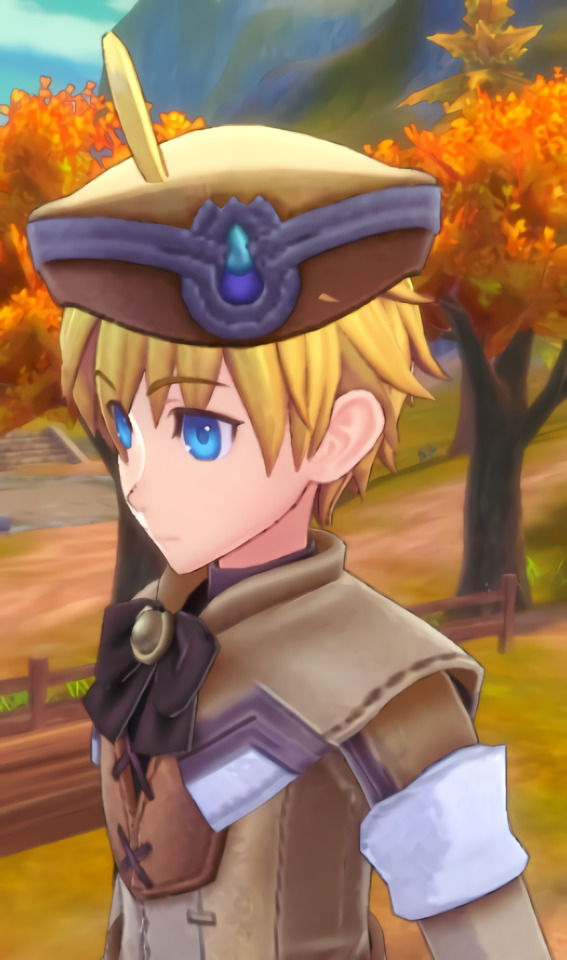
Ares as Aden! I wonder if the Oceans outfits were partial inspiration for the ranger uniforms? They look kinda similar 🤔
#rune factory#rune factory 5#rune factory oceans#rune factory tides of destiny#rftod#rf5#aden rune factory#ares rune factory#cosplay ref#3D model#screenshots
16 notes
·
View notes
Text

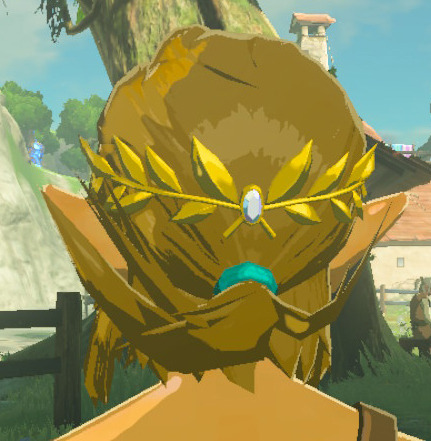
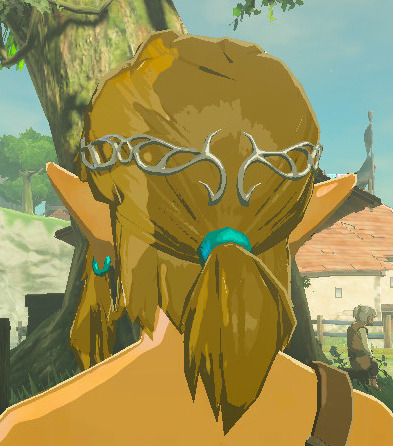

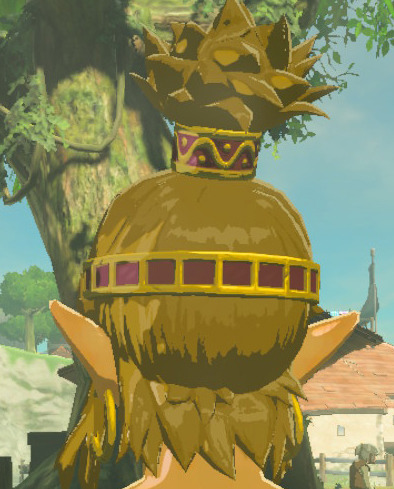

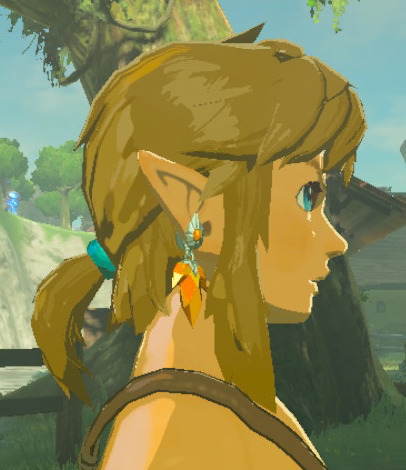

Link's hairstyles
706 notes
·
View notes
Note
giangio pics plz..maybe a full view of his clothes/details?
Yes of course! Thanks for sending in! I’ll always love getting shots of my favorite lad!


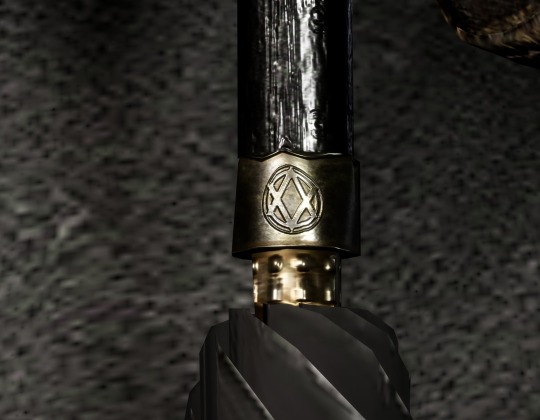

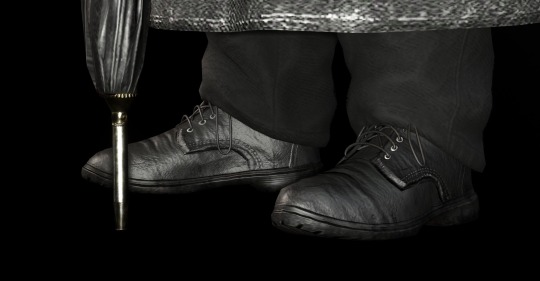

Gio’s freckles send tweet.
That umbrella detail was fun the first time I found it. Overall, the bottons on his coat seems fairly plain compared to the Isle Alchemist’s decorative capes and coats. (Which is fairly interesting if you know anything about the historical person he’s based on). He also looks So Comfy in those pants lol. Worn gloves. Boots with tread. Travel Guy, clearly lol.
Thanks again! : D
(Also ahem, Gio discord?) XP
#this is gonna be such a comfy cosplay *mwah. excited!#I didn’t color these tooo much cause if it’s gonna be a ref I’ll just let his colors do their thaaang#lies of p#lop#Giangio#paracelsus#lies of p screenshots
110 notes
·
View notes
Text

milf'n ain't easy
#worm#lisa wilbourn#tattletale#worm web serial#parahumans#my art#i wanted to draw a full body ref for cosplay purposes and it turned into this. which ultimately isn't that helpful but hey
220 notes
·
View notes
Text
Six Makeup: Masterpost and Links
Hey y'all! Finally finished up a long promised post: all of my makeup suggestions for SIX cosplayers (and/or fans who just want to do some cool makeup looks)!!! I've been actively working on this post for about a year now and compiling makeup for even longer, so I'm happy to finally finish it. I'll get into more details in a moment, but first things first:
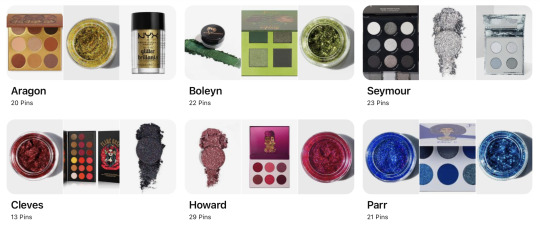

I'll include all the links below, but for easy access I made a handy-dandy Pinterest board. It is sorted by costume (sections for each queen + alt costume) and you can clink on any pin to be taken directly to buy it. I would recommend that people look there for a more visual/easy look at the recommendations; I realize pure text can get a bit old!
Some notes:
- All of these links are to US sites, with a variety of US and UK sources. Most of these brands ship internationally and/or are available on Amazon as well.
- I tried to factor in a large variety of material colors/shades, skin tones, and financial budget. You'll find a mix of US and UK-based brands, mainstream and smaller brands, drugstore versus more upscale, and some brands owned by women of color.
- There's a broad range in the companies listed in terms of their ethics, animal testing, politics, etc. I'm including as many companies as possible to give people as many options as possible, but some of these I wouldn't personally financially support. I would strongly suggest that anyone do their own research into the brands listed.
- Many of these products may be harsher on skin than your typical products. I'd suggest considering any potential allergens and skin testing any product before use, and using your regular base (foundation, blush, etc) to minimize the number of new products. (If you have sensitive skin or are worried about toxicity, I'd suggest Skin Deep for toxicity information and the FDA site for information on common irritants)
- The vast majority of the makeup on this list is products that I know Six actors use. However, just because someone in Six uses it does not mean it's necessary to achieve a great look - there are many great alternatives for just about any product, and what works for a specific actor may not be what works best for you. (I'd also note that the vast majority of queens use some fairly cheap makeup, so you never need to feel like you have to pay more to get "stage accuracy")
- Factor in where you're intending to use your products. Six uses some extreme stage makeup and truly crazy lighting; if you use these products with the exact same intensity in just about any other context, it will be way overkill. Convention lighting tends to be harsh so you can usually go a bit heavier there, particularly if you're intending to do any on-stage performances. But for everyday use or a closet cosplay to go see Six or an outdoor meet-up with natural light you will usually want to go much softer. (Photoshoots are a whole other can of worms and really depend on specifics)
- Some of this information is taken from a series of Instagram stories Erin Ramirez did. I'm still writing up a post of everything she suggested, but I'll link it here when finished.
- And, finally, have fun experimenting and finding what works for you!
Links to recommendation posts and inspiration:
Glitters/shimmers
Palettes, eyeshadows, and other accents
Lipsticks (coming soon)
Erin Ramirez's recommendations
MAC partnership link
Eye look inspiration (my Pinterest board)
#six the musical#six makeup#six hmu#six cosplay#six cosplay refs#six musical#six costumes#greatest hits
86 notes
·
View notes
Text
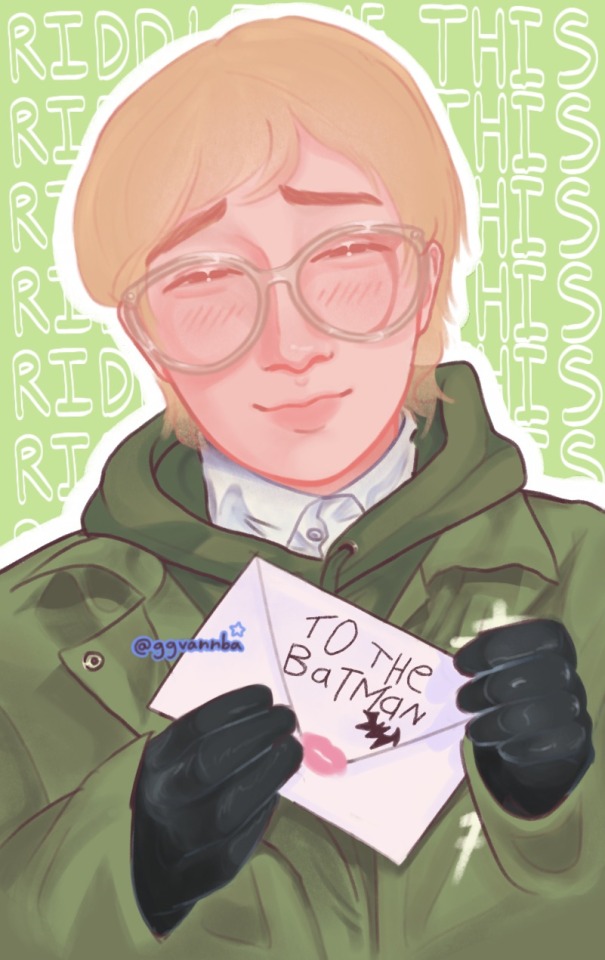
i have no clue how i did this. i just blacked out for five hours and somehow managed to render??????when i’ve never been able to do that before?????what😭
#my ref is pansykenny on tiktok#look at their cosplays#NOW#the riddler#riddler#edward nashton#batman#batman 2022#the batman 2022#riddlussy#doodles#dano riddler
101 notes
·
View notes
Text
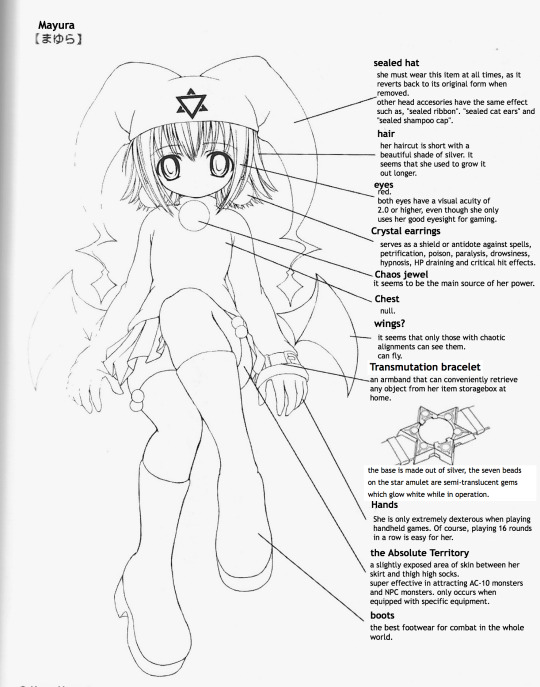
【Mayura & Kuro Unyu】 Ver 2.0 Reference sheet

#ukagaka#ukgk#mayura#ref#digital witch mayura#nanika wiz mayura#official#concept art#cosplay ref#mine:scans#mine:translation#net history#lost media#oldweb#artist:mukei#webcore#mayurachronicles#zettairyouiki#unyu
821 notes
·
View notes
Text
My Eddie Munson Ref Post
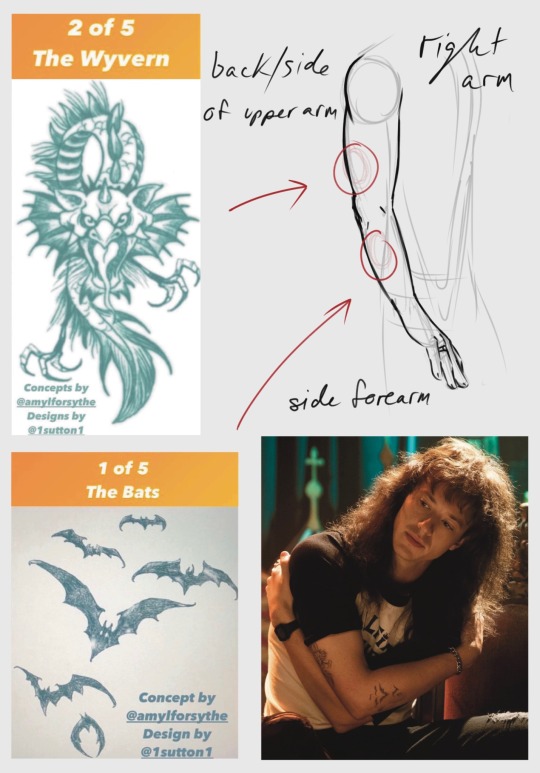
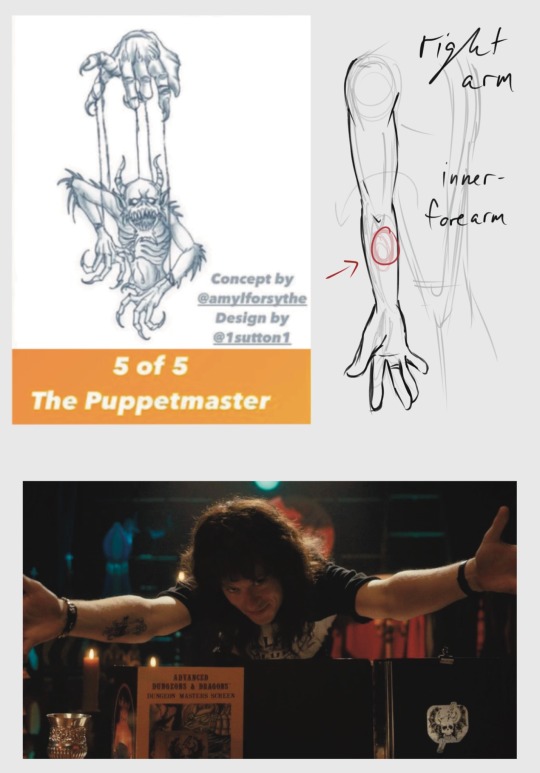
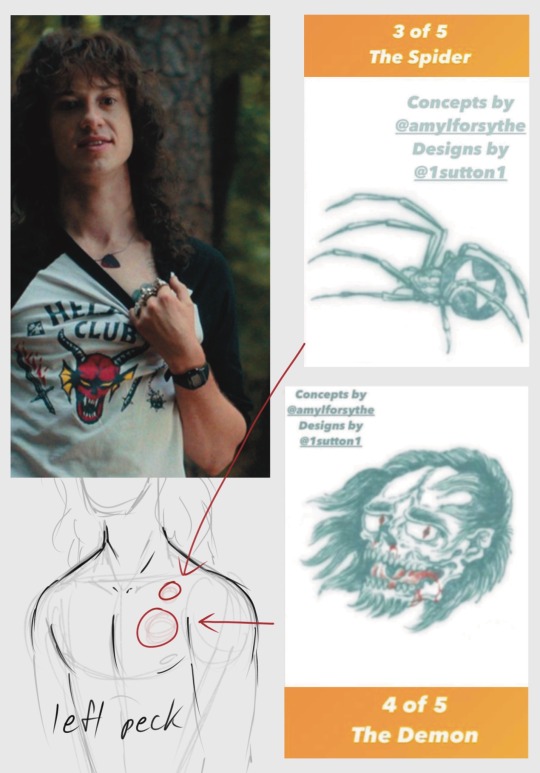
Eddie’s tattoos~ the artists did an awesome job with these! I really appreciate small details like these; most aren’t ever fully visible in show, but they add a lot of character depth. Originals were posted on Amy L Forsythe’s instagram account, I just sketched the little placement maps.
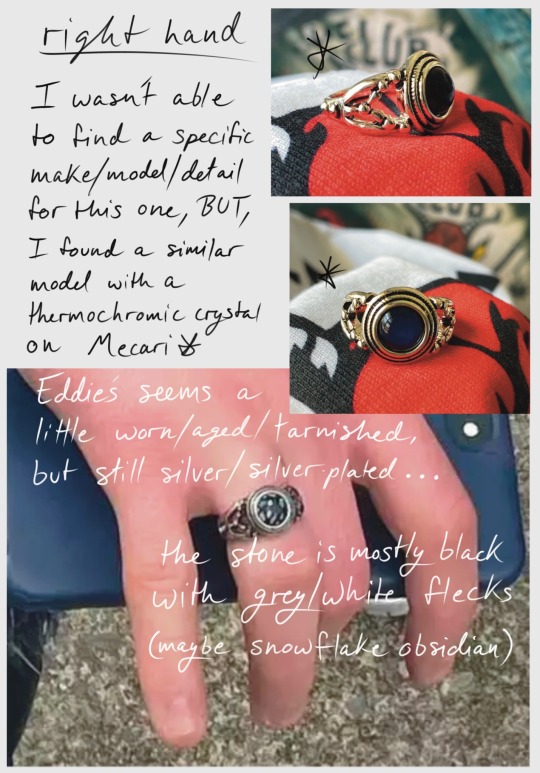

The rings on his left were easy to find via Google, they're likely G&S Jewelry. Those models have been made and sold for a long time and this style is still popular in metal and biker aesthetics. For cosplayers there's obviously cheaper options on Etsy and such, or if you're super crafty you can make your own, but I thought these were great close-ups for detail. The ring on his right hand is more obscure; I was able to find a handful of lookalikes, but not with the same stone, or more inlaid stone work…? If anyone else digs deeper and finds out more about it, leave me info and I’ll edit the post 🙂 But as it is, simple observance and good close-up shots make great refs.
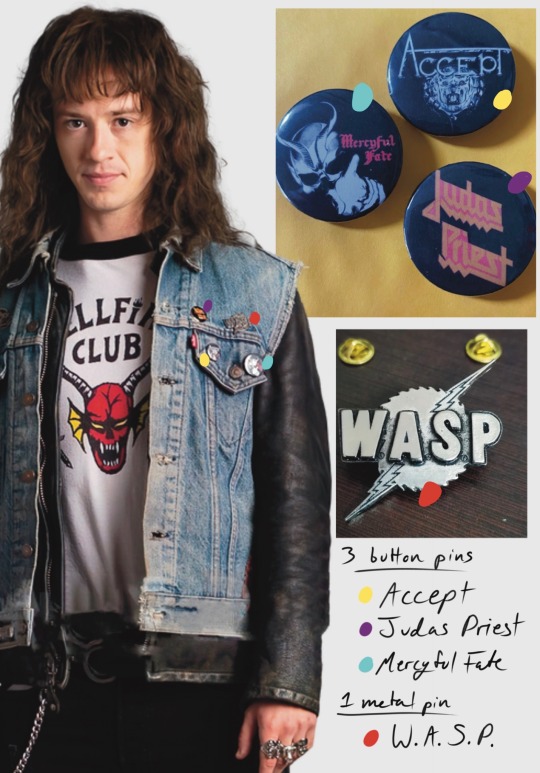
The button style pins on the jacket are easy to find, plenty of independent artists remake these on Etsy if you can’t find officially licensed ones. W.A.S.P. ‘s metal pin may only be available/easier to find through officially licensed sellers, just ‘cause ya know, metal pins are a little harder to make than button pins. But! All bands are still currently active, so that also makes things easier for those looking to actually buy 🙂
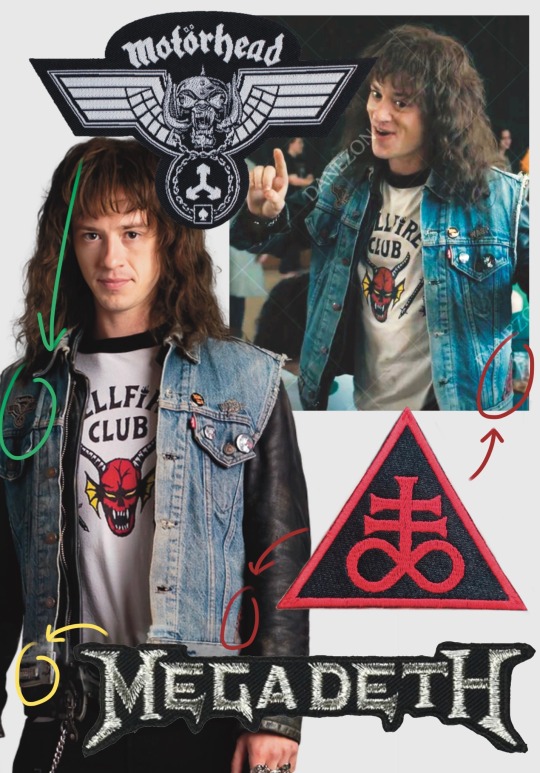

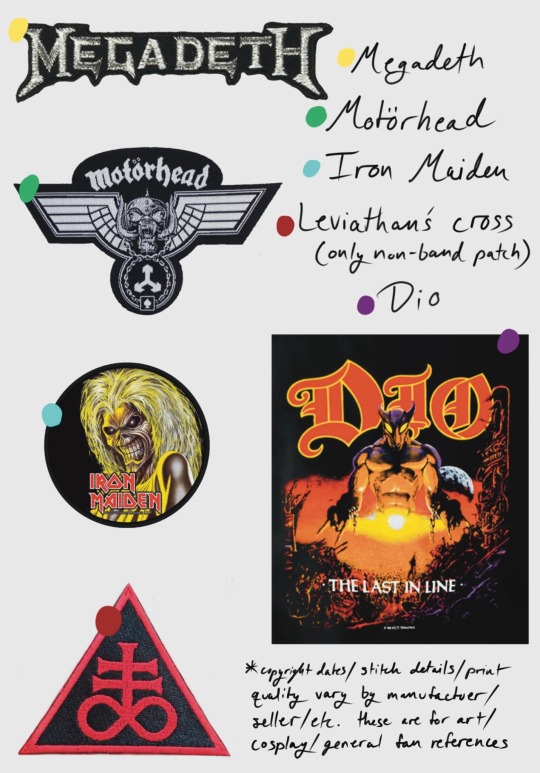
These pages may seem a little redundant, but I wanted to include actual shots for placement notes and good clear individual shots of the patches for drawing reference ; a lot of the scenes are dark, people are moving around, etc. and a few of the patches are on the sides of the jacket, they’re not fully visible a majority of the time anyway. Most of these can be found pretty quickly and easily on the internet, like the pins. Even the Dio shirt should still be easy enough to obtain for a cosplayer, although a special vintage shirt was donated to the team for wardrobe. Iron Maiden and Megadeth are still active, Dio and Motörhead are not, though.
So, here we have a nice little collective post! Hope this helps some other artists/cosplayers/fans and saves you some time digging on your own. This was a lot of fun to do!
20 Jul ‘22 ~ Mad
#eddie munson#stranger things#character analysis#character design#cosplay reference#art reference#character reference#character ref sheet#madmonroe
1K notes
·
View notes

Text
Tonight I'm starting an ambitious project (for me): tailored high-waisted pants! Entirely necessary for my Juri cosplay, and also I need to redeem myself.
The last time I tried to sew pants from scratch, I basically botched the whole job. My attempts at tailoring made them a full three inches too small at the waist because I didn't factor in either ease or the bulk of the fabric itself, and it was only because the waistband was trapped under about four layers of shirts and belts that i wore them at all.
So far I've been trying to wrangle a vintage pattern and I decided to write out my process since I'm combining techniques in a way that took me ages to figure out.
After two muslin mock-ups, the pattern would fit well on the waist, but turn way too baggy around the thigh. My alterations between the two mockups focused on changing the width at the outer side seams, and they didn't seem to fix this issue at all.
After a lot of head-scratching, I changed tacks. I pulled up a youtube tutorial on how to draft a pants pattern using a premade pair of pants that already fits you, using a pair of jeans that are snug and non-stretchy. Then I overlaid the resulting pattern onto the pattern I had been using.

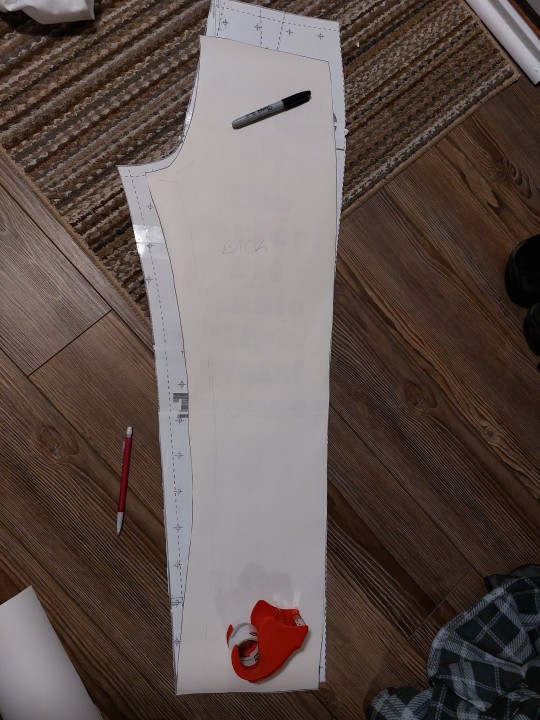
And the culprit reveals itself! The front (first picture) is smaller all around, but both the front and back on my pattern have a much shallower crotch curve and a lot less space at the inseam than the printed pattern. Basically, they're making room for ass and thighs that I just don't possess.
Now I'm frankensteining what I want from each pattern and making a new mockup. I'm taking the higher waist, darts, and straight legs from the commercial pattern, and altering them to more closely match the crotch curve and leg width of my handmade pattern.
13 notes
·
View notes
Last Seen Blogs

folyxfanart
Folyx

occatorcreator
Occator Creator

knacoyahh
Nana/Mark the Super Himejin


nyxdruid
Just Salt