#cr2032
Text

i feel like i ate the stuff growing at the bottom of a month old cup of coffee but in a good way
#i want to be a turtle when i grow up#casement block castles#i will smile when i want too#cabbagetown#radiator water#cr2032#three fingers mumblelard#in the outside picture it looks like fallie has a length of pipe within reach just in case things get out of hand#sleigh bells#human people#i was going to introduce her to buffy the vampire slayer's stunt double#i like the sound of glass when it smashes#balkchain#hand drawn horrible#breeeaking brekkkkie#rambles#mugs#mumblelard#pandemic era#fourth spring
24 notes
·
View notes
Text
i love you battery backed realtime clock i love you timecode that stays consistent across powercycles and dead batteries i love you drinking-age CR2032 finally going into retirement
2 notes
·
View notes
Text
어려울 것 없는 배터리 교체입니다.
그래도 정확한 포인트에 정확한 도구를 사용해야지요.
엉뚱한 곳에 힘을 가하면 깨지거든요.
추가로 스마트키 관련 증상 소개하자면
1. 인텔리전스 도어 버튼 작동이 늦음 (스마트키 배터리)
2. 1번 현상과 사이드미러 락폴딩이 늦음(자동차 배터리)
3. 키 인식 거리 짧아짐(스마트키 배터리)
4. 트렁크 오픈 스위치 반응 늦음(스마트키/자동차 배터리 모두 해당)
제가 경험한 내용이고 경우의 수가 많지만 키 반응이 늦으면 교체해보세요.
0 notes
Text
Why in the fuck do I have CR2016 batteries?? What are they for??
#i thought they were for my keyfob#but i was wrong#girl that opened her keys up to replace the battery only to find out that it doesnt have the correct one#cr2032s are mostly for micro red dots and my 1-6x on my rifle#also i guess my galaxy tags#cr1632s are for a single micro red dot#WHAT THE FUCK ARE THE 2016s FOR??????
2 notes
·
View notes
Text
btw i am a shivering wet cat of a man rn so like. if you wanna chat about something or ask random questions feel free to hop in my inbox or something idk
#does anyone want skyblock screenshots like the prev reblog. my 1.8 folder is uhhhhhhhh 1GB! and that's only after i downloaded essential-#anyways the reason i am a shivering wet cat of a man. Job. i have acquired job#did god's toughest battle today (interview) and for my efforts i am rewarded with a cr2032 battery to replace the one in my sad old laptop#but i cant work on that rn so im just sitting here winding down from that kjghfdk#i was finishing the Official Application part but im stuck now bc i need management to get back to me before i can continue :V#also drug tests taste really bad. in case you did not know that#WHY ARE THEY SO BITTER#chat
8 notes
·
View notes
Text
Eteily Technologies India Pvt. Ltd.
3V BR2032 Panasonic Coin Cell
SKU: ET-BR2032
For More Info - https://eteily.com/75-power-battery-charger
#coin battery#coin battery holder#coin battery cr2032#coin battery size#coin battery 3v#coin battery price#coin battery button#coin button cell#Lithium Coin Battery 3V#Lithium Coin Cell Battery#CR2032 3V Lithium Coin Battery#3V Lithium Coin Battery Online#Coin Cell Battery
0 notes
Text
#coin battery#coin battery holder#coin battery cr2032#coin battery size#coin battery 3v#coin battery price#coin battery button#coin button cell#Lithium Coin Battery 3V#Lithium Coin Cell Battery#CR2032 3V Lithium Coin Battery#3V Lithium Coin Battery Online#Coin Cell Battery
0 notes
Note
I finally found my 1989 bracelets, what batteries did you use to replace ?
I went to rep, but I assume some kind of button batteries. there’s some really good videos that show the process and what tools you need. Just make sure you specify what tour cause the bracelets are all slightly different.
Good luck :)
#just make sure you specify what your bc they are all slightly diff#all I know is that they are easier to work than the rep ones#idk if you need IR to get it to start again but 1989 are easiest to hack#rep ones were so hard to open#I assume 1989 and rep are close enough in terms of battery type tho#edit: it is CR2032 and you need 2
0 notes
Text
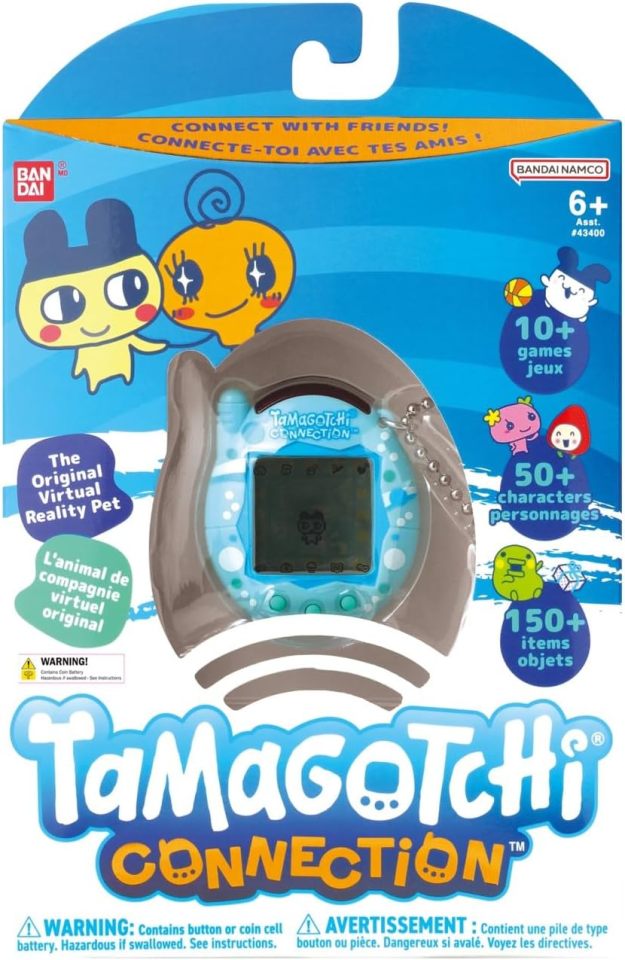
Bandai Introduces the Tamagotchi Connection with a 20th Anniversary Global Re-Release
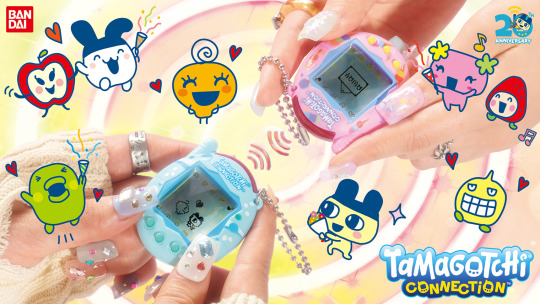
The moment we’ve been waiting for is finally here! Bandai has officially announced the re-release of the Tamagotchi Connection with a 20th anniversary device! That’s right, can you believe it has been 20 years? We’re BEYOND ECSTATIC, and Bandai did NOT disappoint!

Physically the design of the Tamagotchi Connection 20th anniversary looks like a Tamagotchi Connection V3 with the iconic antenna, but it’s clear that Bandai has put together this model to give us a taste of what the Tamagotchi Connection was like! We’re not entirely sure on the programming, but it looks like it will take characteristics from the Keitai and Tamagotchi Connection V3.
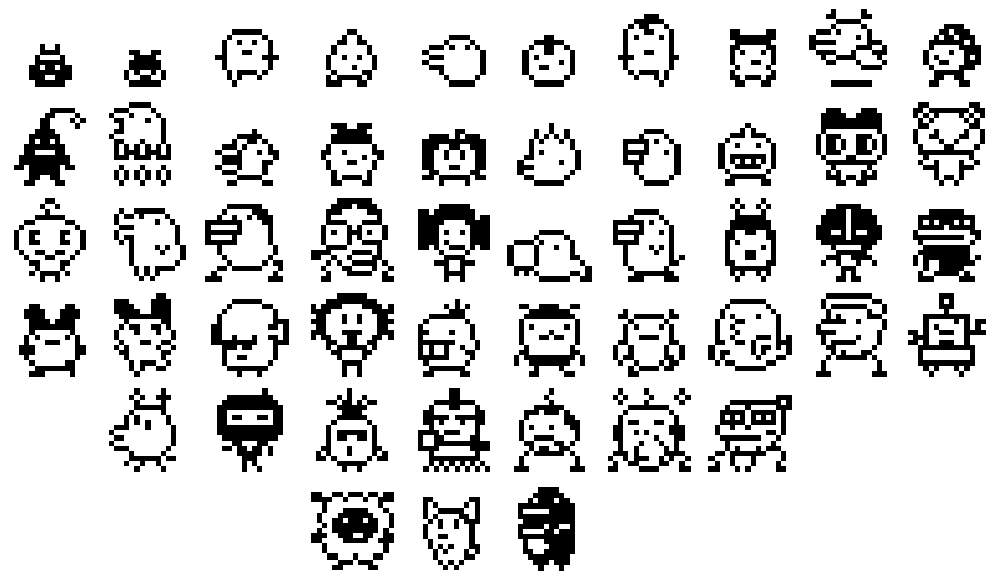
The re-release of the Tamagotchi Connection for the 20th anniversary features unique programming that includes over 50 characters, 10 mini games, and 150 items! Your favorite characters will be back and raisable, and of course you can connect them together!
Lets talk packaging, reminiscent of the Tamagotchi Original packaging, the Tamagotchi Connection 20th anniversary ditches the early 2000’s plastic packaging in favor of a more eco friendly paper packaging with. Brand new Tamagotchi logo, and yes look at the beautiful Connection graphics on the packaging! Colors of packaging include blue stripes that faces into white.How cute are Mametchi and Memetchi in the upper left-hand corner?
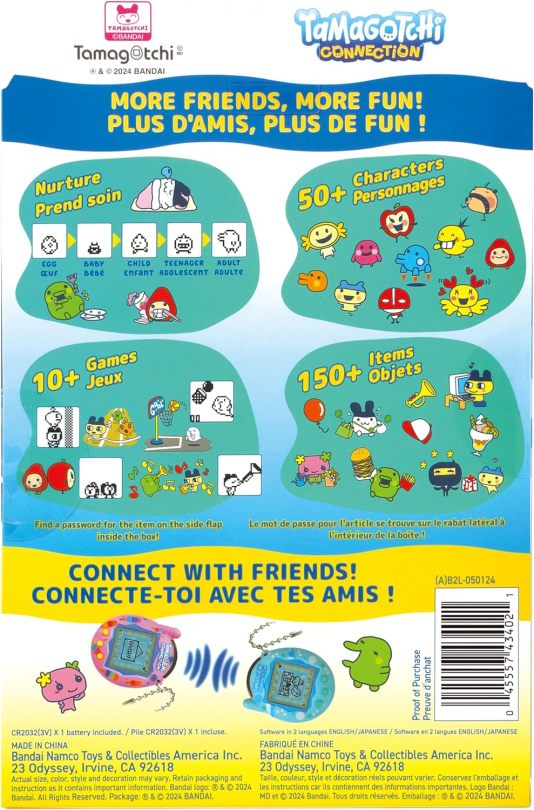
The back of the packaging is super cute as it details the functionality of the Tamagotchi Connection which includes detailing the growth chart, samples some characters and some mini games, along with items. The packaging also mentions that there is a password for the item on the side flap inside the box, so perhaps we’re going to get some new passwords?
The packaging does call out that we will be able to shop for new items directly on the Tamagotchi, so the shop has returned. You’ll earn those Gotchi Points and then purchase some new items to spoil your Tamagotchi!
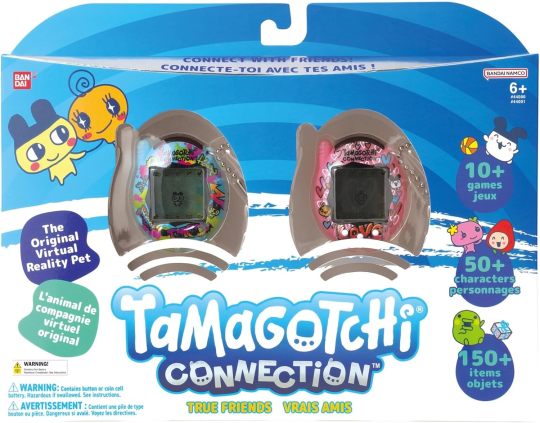
Unpack your CR2032 batteries, because the Tamagotchi Connection 20th anniversary is powered by the same batteries you know and love. The packaging also calls out that programming is in both English and Japanese. Perhaps it’ll ask which language on boot, which would make the most sense, similar to the Tamagotchi Uni.
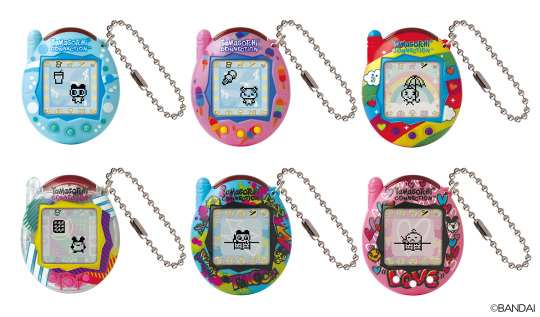
Let’s talk shells! Bandai is releasing the initial Tamagotchi Connection 20th anniversary wave with 6 shells. Two of which are returning from 2006, these include Bubbles and Ice Cream. The new shells include Clear Retro which features a clear translucent shell and cute retro like graphics in white, orange, purple, and green around the display along with pink buttons. Then you’ve got Rainbow Sky which is so cute and features a shell completely painted in a red, yellow, green, and blue rainbow along with some clouds and hearts, purple buttons and the top of the antenna is blue.
Lastly, Bandai has brought back the True Friends pack, how creative is that? These two graffiti shells are unique as they are excuse to the true friends two pack, one is a blue graffiti shell, the other is a pink graffiti shell. They both feature Tamagotchi characters include Mametchi, Kuchipatchi, Memetchi, and Mimitchi.
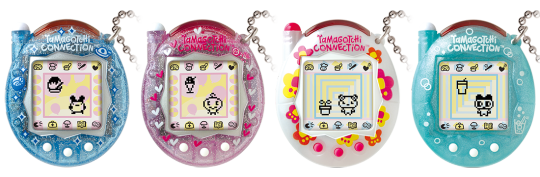
There will be four shells exclusive to Japan that are all reminiscent of shells released in the 2000’s! That includes the iconic melon soda!
The Bubbles shell includes a password to download soda, the Ice cream shell includes a password to download ice cream, the Rainbow Sky shell includes a password to download an umbrella, the Clear Retro shell includes a password to download a waffle, and the True Friends Blue Graffiti and Pink Graffiti True Friends pack incudes a password to download a pencil!
All of the shells include the new logo to match the packaging of the Tamagotchi Connection 20th anniversary.
It is important to note that the wallpaper behind the screen on these will be a bit different from one another. Both Bubbles and Ice Cream uses the numbered background featured on the Tamagotchi Connection V1, whereas the new shells have backgrounds that are unique to their shells. That’s an awesome attention to detail.
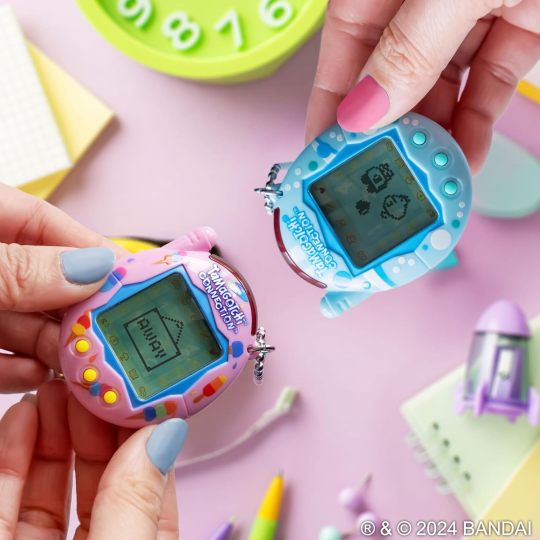
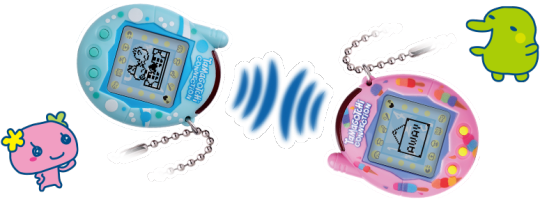
Another thing to call out is that the chain on these devices is the same as the Tamagotchi Original, or Tamagotchi Connexion in Europe. This model does not feature the same chain as the Tamagotchi Connection with the chainlink design and ring.
Pricing! The Tamagotchi Connection is priced at $29.99, and the Tamagotchi Connection True Friends pack is priced at $57.99. This is a global release and preorders are already open on Amazon with an official release date of July 9th, 2024. Japan will be releasing them a bit later on August 3rd, 2024! It’s about to be an AMAZING SUMMER! The Tamagotchi Connection is already the Amazon #1 Best Seller in Toys & Games before it was even officially announced by Bandai! Don’t call it a comeback, call it a takeover.
#tamapalace#tamagotchi#tmgc#tamagotchiconnection#tamagotchi connection#connection#tamatag#virtualpet#bandai#news
298 notes
·
View notes
Text

I ordered some batteries, and it turns out they sent me the picante CR2032s!
280 notes
·
View notes
Text
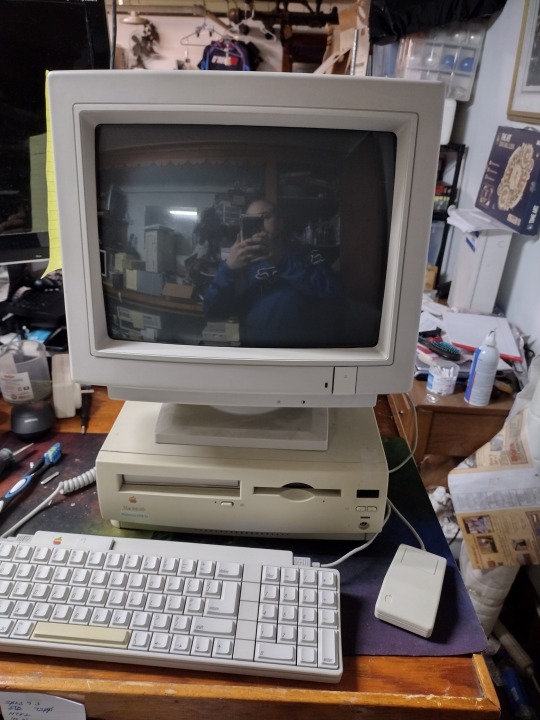
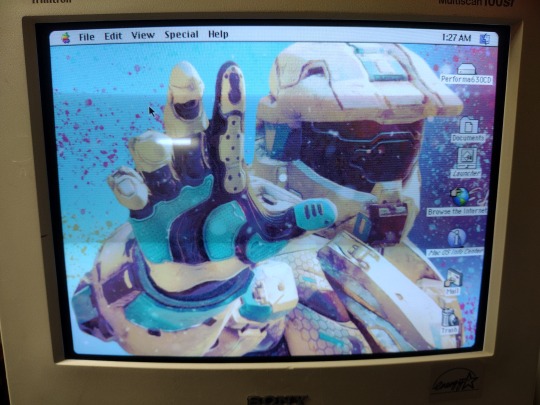
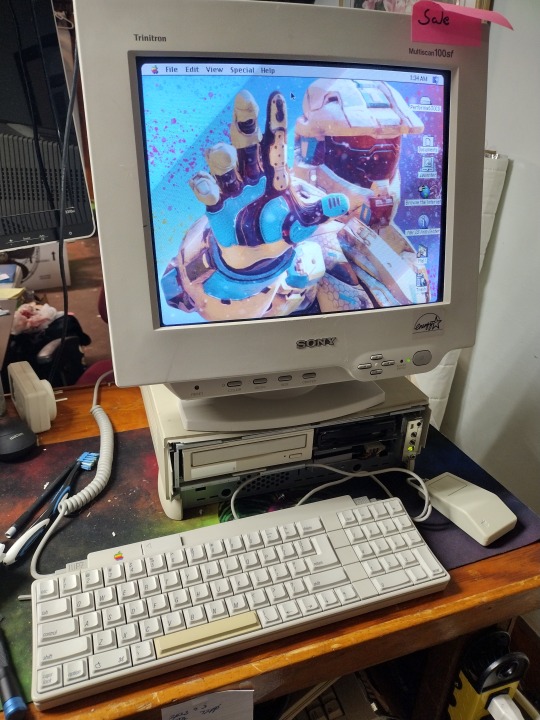

One of the last 68k based Macintosh and a fairly forgotten unit in the Macintosh line up.
Powered by a 68040, this machine was intended to go to bat with multimedia PC's of the day. It is cost reduced in some ways, it features an IDE PATA harddrive in place of SCSI, (CD ROM is still scsi) and uses standard Fast Page 72 pin DIMM's for RAM.
It does lack an FPU with no provisions for one to be installed unlike PC's which the 486dx and the Pentium's had their FPU's onboard.
Graphics are about what you'd expect, here with a standard VGA monitor, it's locked in at 640x480 at 256 colors.
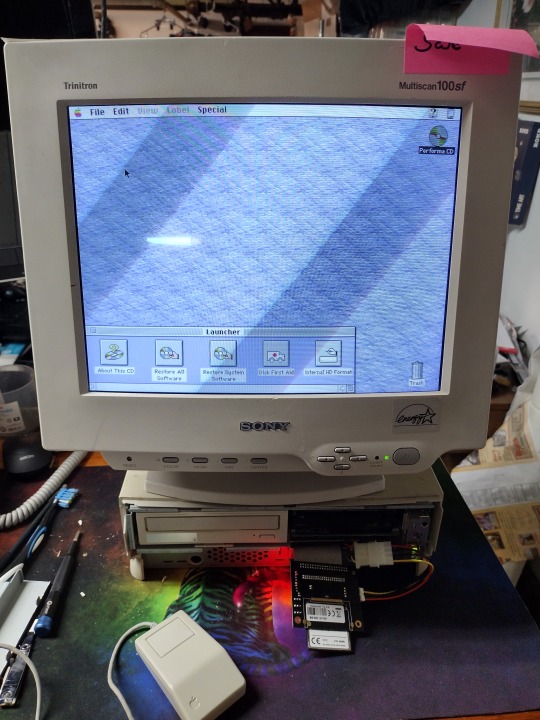
This machine came to me with it's matching monitor. The monitor did not work and will need to be repaired so right now it's paired with my Sony Trinitron Multiscan CRT.
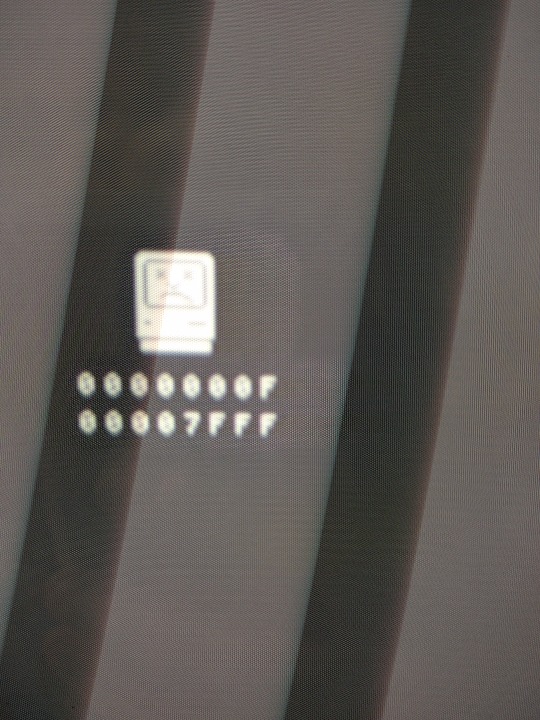
The system did not boot, coming up in a sadmac fatal error. It was traced to a mangled install of the OS, refreshing that cleaned up the sad mac but the fight was not over yet. The PRAM battery was flat and needed replacing. The Performa does not use a CR2032 or a coin cell battery at all, but a 4.5 volt special purpose battery connected to the motherboard, thankfully it had not leaked. 3 double A's in a holder resolved that. A RAM upgrade gave the machine a considerable boost, followed by a IDE to CF adapter allowing the machine to boot from solid state storage although it's a little how-ya-doing in the drive bay.
The other thing these macs are know for are brittle plastics and mine is no exception, the back panel is broken off and the front catches are loose. The machine is unfortunately held together with tightly stretched packing tape.
The background is because I'm a dork.
To Do:
Software and Games
Upgrades
PPC upgrade card
Networking
Long Term To Do:
New case plastics?
21 notes
·
View notes
Text
Things that my coworkers have accepted as money:
Money from foreign countries
A translucent plastic penny that said SCHOOL MONEY on it
A cr2032 battery
An actual Nazi penny
3 notes
·
View notes
Text

I repaired this sick ass digital clock I got from a thrift store very cheaply a few years ago. It's just a floating LCD panel and I think it looks so frigging amazing. (Really makes me think of that cool Dutch YouTuber, Posy, and his love of LCD panels. (And I'm like "hell yeah!! There's so much beauty in the mundane!!! Just look how frigging cool this clock is!!"))
Anyhoo, it wasn't working when I got it. Probably why it was so cheap.
It has a little on/off switch on the back, but nothing would happen when you flipped it, but sometimes if you held its solar panel under a very bright light the clock would turn on
...for one second
before turning off again
and then back on again.
Very rhythmically.
So there was still some life left in the old girl... somewhere... 🤔
Unscrew the back of it and have a look see.
Discover a pair of circuit boards, one of which has a cr2032 coin cell clamped onto it. Hooray, a Vital Clue!
Fortunately, I have one of those batteries lying around. A second spare from when I replaced the batteries in some Digimon v-pets.
So I replace it.
Aaaaand nothing happens...
:(
Next step: fully disassemble the clock to look for More Clues.
Discover that its LCD panel isn't wired in to anything. There's just a row of teeny tiny contacts along its base which press up against a matching row of teeny tiny contacts along its control board, held together by the frame of the clock and a kind of thin pink foam buffer ring around the contacts. Very cool!
(Like two mouths kissing but only one of them has any lips. 😆)
Examine the two circuit boards under a loup. Maybe there's a visibly-broken component!
(I hope there's a visibly-broken component, else I have to dig out my multimeter and start systematically testing them one by one)
(I hope there aren't any visibly-broken components. If it's the quartz crystal or one of the two capacitors, then I might be able to replace it, because those are regular-sized, through-hole, components; but if it's one of the surface-mount resistors then I'd have to scrap the whole clock, because I just don't have the tools, experience, or know-how to deal with those microscopic little guys... :/ )
There aren't any visibly-broken components. Phew, but also consternation, because now what?
But hmm, there are some teeeeny tiny white flecks of crusty residue here and there over the circuit boards... I guess the old battery must have leaked at some point?
I gently scrape them off with the tip of a very fine pair of tweezers and then reassemble the clock enough to test it.
(LCD panel & solar panel back into front-frame, control board back over them to hold them into place and make contact with the LCD; everything else [coin-cell daughterboard, piezo buzzer, and the user-input buttons] dangling free in the breeze Winnie-The-Pooh-style)
It turns on! It chirps out a happy little song of high-pitched beeps!! It blinks "12:00" at me!!!

I fully reassemble the clock with a song in my heart and set its time and date.
Goddamn this clock looks so cool. 🥰
7 notes
·
View notes
Text
https://sciplus.com/pkg-50-sets-cr2032-panasonic-battery-pkg-50/ you could buy 1200 CR2032s for less than $50 just saying
13 notes
·
View notes
Text
Good news, they made the packaging on CR2032 button cells even more annoying to open!
3 notes
·
View notes
Text
Как заменить батарейку в ключе

Одним из очень неприятных сюрпризов для водителя может стать ситуация, когда он обнаруживает, что ключ от его автомобиля перестал работать, одной из причин может быт разрядившейся батарейки. Но не отчаивайтесь, замена батарейки в ключе довольно простая процедура, с которой справится каждый. В этой статье мы подробно рассмотрим, как самостоятельно заменить батарейку в ключе автомобиля.
Шаг 1: Определите тип батарейки
Первым шагом необходимо определить, какой тип батарейки установлен в вашем ключе. Обычно в ключах автомобилей используются литиевые батарейки CR2032 или CR2025. Если вы не знаете, какой тип батарейки нужен для вашего ключа, обратитесь к инструкции по эксплуатации вашего автомобиля или поищите в интернете.
Шаг 2: Подготовьте необходимые инструменты
Для замены батарейки в ключе вам понадобятся следующие инструменты:
- Нож или отвертка для открывания ключа
- Новая батарейка того же типа, что и установленная в ключе
- Ткань или сал��етка для чистки внутренней части ключа
Шаг 3: Замените батарейку
После того, как вы подготовили необходимые инструменты и определили тип батарейки, можно приступать к замене. Для этого необходимо:
1. Откройте корпус ключа, используя нож или отвертку. Обычно для этого достаточно вставить нож в разъем на корпусе ключа и аккуратно развернуть его.
2. Вытащите старую батарейку из ключа. Для этого можно использовать плоскую отвертку.
3. Установите новую батарейку в ключ. Убедитесь, что контакты батарейки совпадают с контактами в корпусе ключа.
4. Закройте корпус ключа обратно.
Шаг 4: Проверьте работоспособность ключа
После замены батарейки необходимо проверить, что ключ снова работает. Для этого просто попробуйте открыть и закрыть дверь автомобиля, используя ключ. Если все сделано правильно, ключ должен работать без проблем.
Советы
- При покупке новой батарейки обратите внимания на срок годности и храните ее в сухом месте.
- При установке новой батарейки наденьте перчатки, чтобы избежать загрязнения контактов.
- Если после замены батарейки ключ все равно не работает, обратитесь к специалисту.
Замена батарейки в ключе автомобиля – довольно простая процедура, которая не требует особых навыков или специального оборудования. Следуя нашей пошаговой инструкции, вы сможете быстро и легко вернуть ваш ключ к жизни и продолжить пользоваться им без проблем.
#авто#ремонт#ключавто#советы#безопасность#уходзамашиной#поделитесьопытом#глория#ключ#глорияключ#цинк#цинкование#гальваника#защитное покрытие raptor#как заработать#горячеецинкование#металл#кольца
2 notes
·
View notes
Last Seen Blogs

kinkmom
Welcome to the Quarantine Zone (18+)

stasmayson
Мальчик с вагиной

suga-army-bts
btsugarmy

xblubotx
-BLUBOT-
The X's are just there to fill space...

papa-bjohn-a-venir
Adekson Babatunde aka "Papa Bjohn a-venir"