#crafting tutorials
Text
Squishy dice tutorial [text only,for now]
What you'll need:
The dice mold(you can find the 3d model to print here)
A liquid silicone kit
Something to dye your silicone with. Preferably pigment powder,but liquid silicone dyes or watercolor paints in a tube will work aswell. Just don't add too much liquid colorants,or you'll disrupt the curing process!!! that's very very important!
A mixing stick to stir up the silicone
Two plastic cups(preferably measuring cups. Remember,only use plastic for this one because silicone will stick to silicone!!)
A cup of water
Gloves,if you need to use them for crafts
A flat surface to work on
Some extra silicone made in a constrasting color,to fill in the dice's numbers with
Some electrical wiring tape to cover the mold with(just incase,so you can avoid silicone leaks)
Steps:
Assemble the mold parts together.
Put tape around the edges of the mold. Cover up any spots that don't fit as tightly
Pour equal amounts of silicone into the two separate cups respectively,part a and part b
Combine the two parts into one cup,scraping the sides with the stiring stick to get all of uncured liquid silicone out into just that one cup
Add materials that you're using to color the silicone
Take your mixing stick,and stir up the mixture. You will have to do this for about 6 or more minutes,depending on the type of silicone kit you use. Some cure faster than others,so just watch out!
Carefully pour the mixture into the mold,do this slowly and try to pour it slightly high above the mold so it comes out thinner(it's much less messy that way,you'll avoid over filling the mold hopefully this way)
Don't touch the mold for the estimated curing time,just leave it be after that previous part.
Try to leave it alone for a few extra hours just to be safe,then poke the silicone gently with your finger. If it's hardened to the touch and won't stick to your finger at all,then congrats your squishy should be done!
Very carefully unmold your squishy. Test it some more to make sure it's fully cured. Expose it to the air for a bit,then it's time to make your extra silicone for the numbers!
Mix up equal amounts of a tiny bit of silicon,then add your pigment or liquid dye.
Mix this up extra well,then carefully use a toothpick or paint brush to add on the numbers in silicone.
Let each side cure first before making another batch to color the other numbers,so that you can rest the unpainted sides down on the table to let your extra silicone cure.
Once everything is done curing,carefully give your stress ball a test squeeze.
Congrats! You've just made a very cool dice stim toy.
#text#long post#stim toy tutorial#crafting tutorials#diy stim toys#autismposting#mine#op#original post
3 notes
·
View notes
Text
Upcycling :: from scraps to twine!
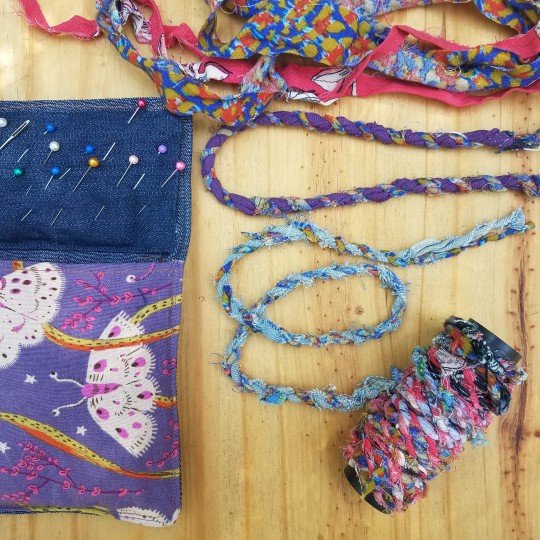
As I create sewing kits, mend, and make clothing, little bits of fabric begin to pile up.
And by little bits, I really do mean little, tiny bits. I have a bag or two of tiny strips of fabric and oddly shaped squares. I wanted to do something useful with them.
I had come across this DIY project to transform scraps into twine a while ago and only recently got the motivation to give it a try. To my surprise it was much easier than I had imagined and also quite fun.
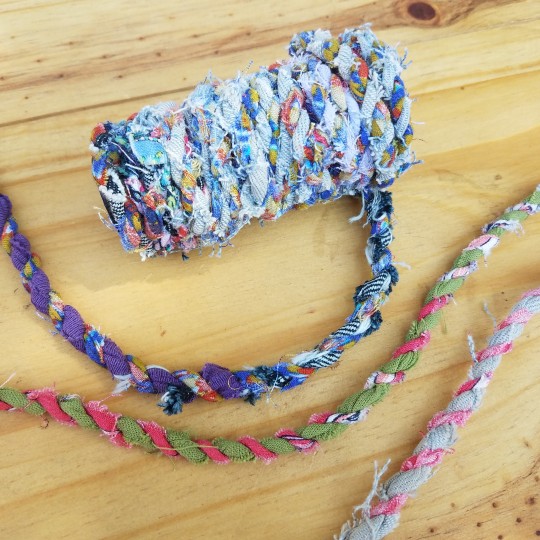
This is the kind of activity that is great for doing while listening to a long talk or podcast, or while sitting by the fire on a cold night. Once you get the hang of spinning, you can even carry on conversations while making this upcycled craft!
Although I am quite proud of my work, I think it is important to link directly to the crafter I learned from, Cintia of My Poppet Makes. Here is the link to the specific how-to blog post.
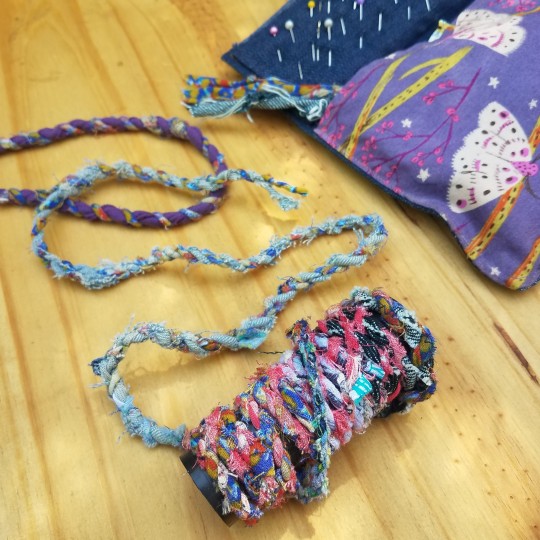
I truly hope you find this project useful or inspirational. And if you are interested in acquiring a sewing kit as featured in the photo I have several available in the Calendula Craft Etsy shop!
#diy#cottagecore#mending#crafting#handmade#upcycling#recycling#wasteless craft#cottage crafts#crafting tutorials#tutorial#slow fashion
16 notes
·
View notes
Text
#asmr relax#asmr#oddly satisfying#diy#tutorial#do it yourself#tutorials#crafts#diy ideas#diy projects#easy diy#origami#video tutorial#craft#diy videos
110K notes
·
View notes
Text
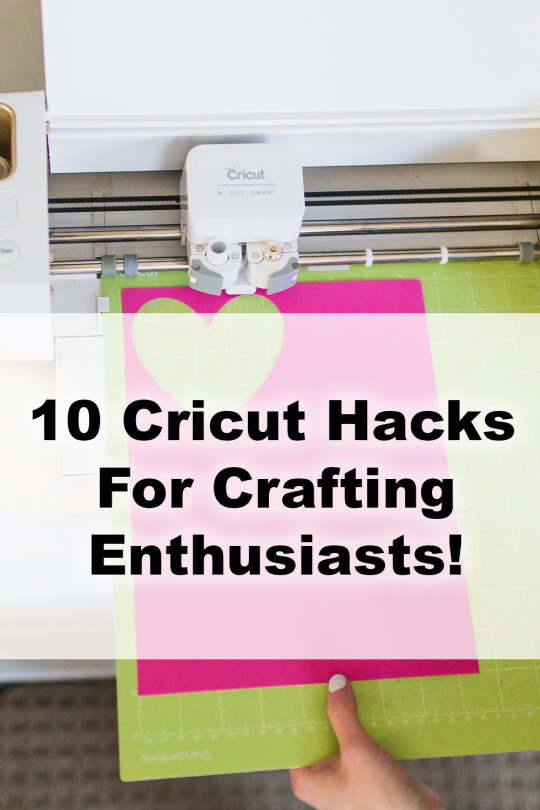
To help you make the most of your Cricut machine, we've compiled a list of the top 10 Cricut hacks. Whether you're a seasoned crafter or just getting started, these tips and tricks will enhance your crafting experience and unleash your creativity. Let's Get Started!
0 notes
Text
Hello! I’m a maker of the once popular 3D wire mandala trinket from the 90’s era. During those “ancient” times, people would often enjoy this as a nifty hair piece, or fashionable bracelet. Nowadays it is more commonly used as a fidget toy and/or desk ornament. What makes this special is its hyper-versatility and the freedom of being able to use this however you can imagine.
I invite you to discover my handmade Fidget Blooms, and browse my hundreds of styles and colours favourited & reviewed by thousands of happy customers. Very demurely, use code TUMBLR at checkout for a special discount. Thank you for discovering my art, I do hope you enjoy it! :)
“The entire point of life is to take chances on dreams that seem crazy to most but feel like destiny to you.” -Timothy Shriver
I wanted to share this quote as it relates to my journey as an artisan specializing in wire art. It is a statement about pursuing one’s passion, even when others might find it unconventional or risky, as long as it feels personally meaningful and aligned with one’s purpose. <3
PS: 90s kids, don’t forget to take that Ipuprofen today for that back pain. XD
#artists on tumblr#90s nostalgia#tickle my brain#dopamine decor#random cool#de stigmatize fidgets#visual stim#crafts#video tutorial#witchcraft they say#handmade on Etsy#stress relief art#rainbow horizon x dark grey wire x standard size
646 notes
·
View notes
Text
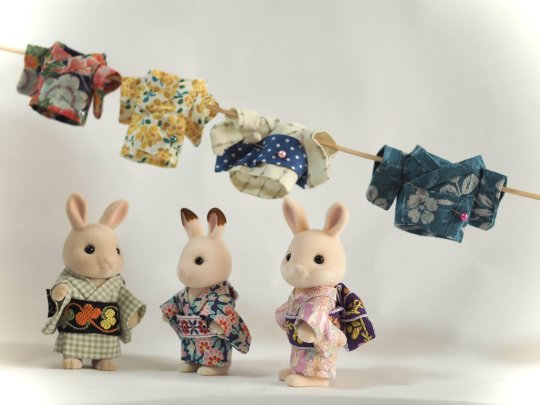
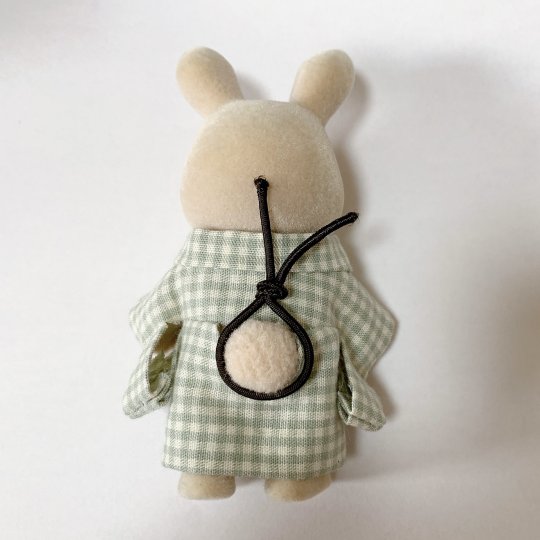
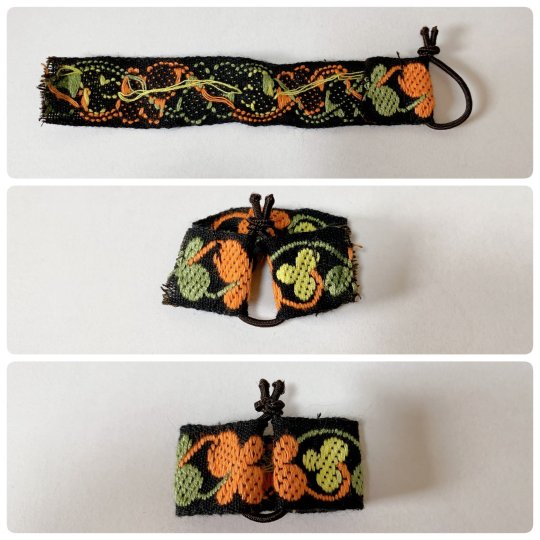
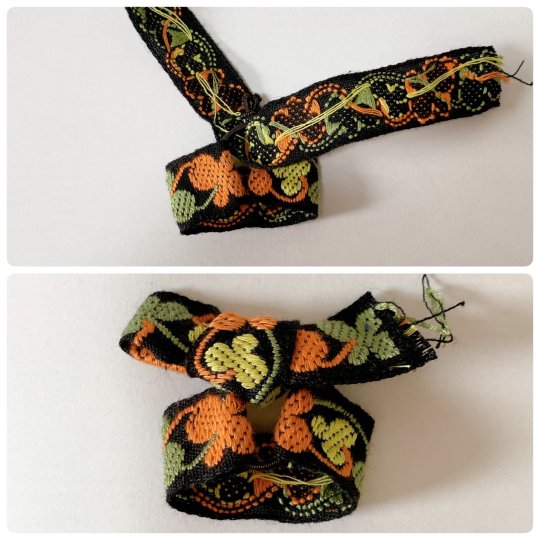
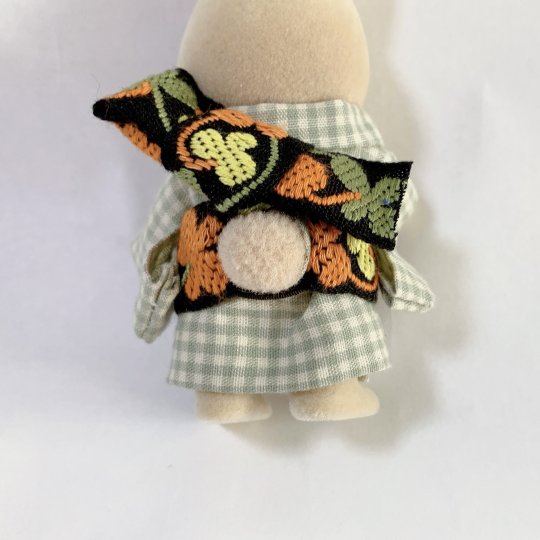
To complete past diy kimono dressing for Sylvanians Families/Calico Critters I shared before (see 1 / 2), here is a new step by step by @haluchobin to create cute easy to put on obi :
Tie a thin elastic into a loose loop around the tail
Slip both ends of a ribbon through the loop and sew into place
Tie another ribbon around the elastic covering the knot. Style it into a bow, you can try to mimic real musubi if you want
Put on the finished obi and enjoy!
#japan#art#craft#sylvanian families#doll#figurine#doll clothes#sylvanian family clothes#diy#step by step#tutorial#kimono#obi#着物#帯
877 notes
·
View notes
Text
hey punkz here's a tut for wrist cuffs/bracelets since some of u are new 2 tha scene

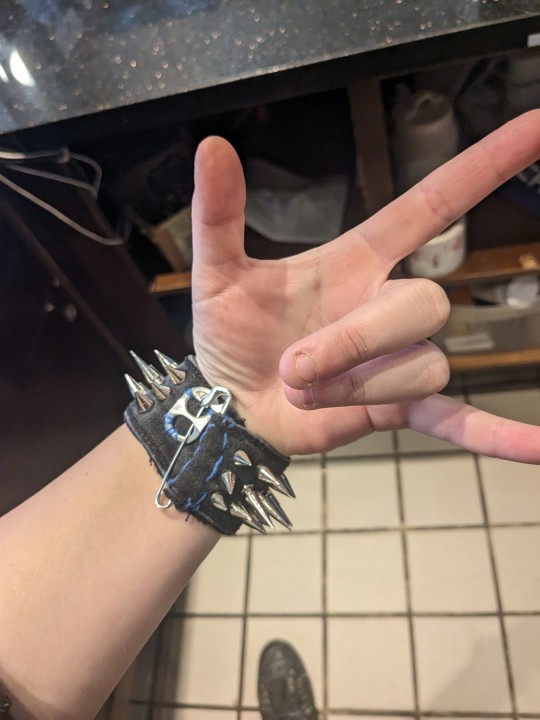
written out 4 ease of access
HOW TO: WRIST CUFFS DIY
Step 1: Old Jeans Waistband
- Cut off waistband from rest of pants
Step 2: Cut to Wrist Size (X2)
- measure around your wrist and cut
Step 3: Add Closure
-button + buttonhole or safety pin + soda tab works best imo
- Sew down soda tab to one side, safety pin to other
Step 4: Add Hardware
- good options are spikes, more safety pins, more soda tabs, staples, chains, and whatever else you can find
Step 5: SHOW OFF!!!!
feel free 2 add any other tuts on this thread or tag #punk tutorials
2K notes
·
View notes
Text
Some old childish shit (I love that and I love Sun so much, someone please treat me like this)
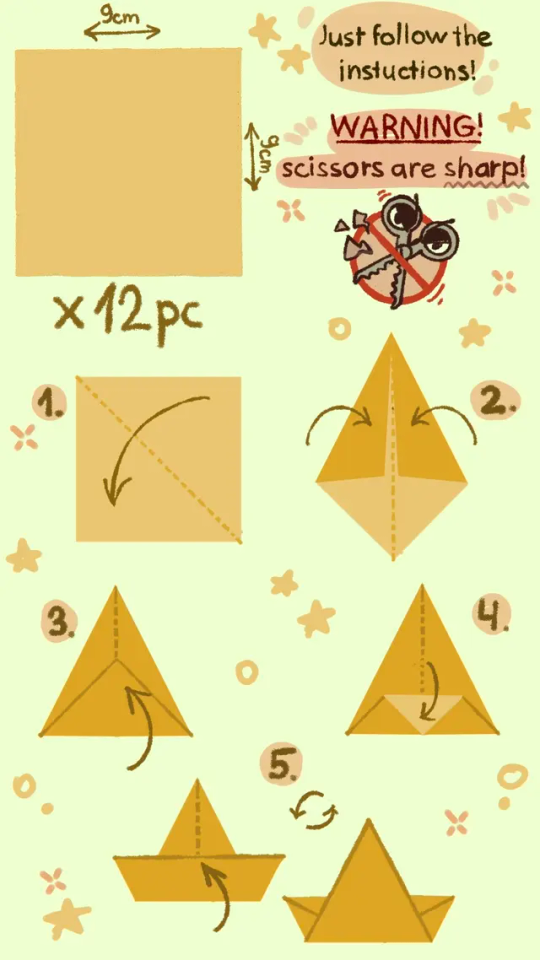
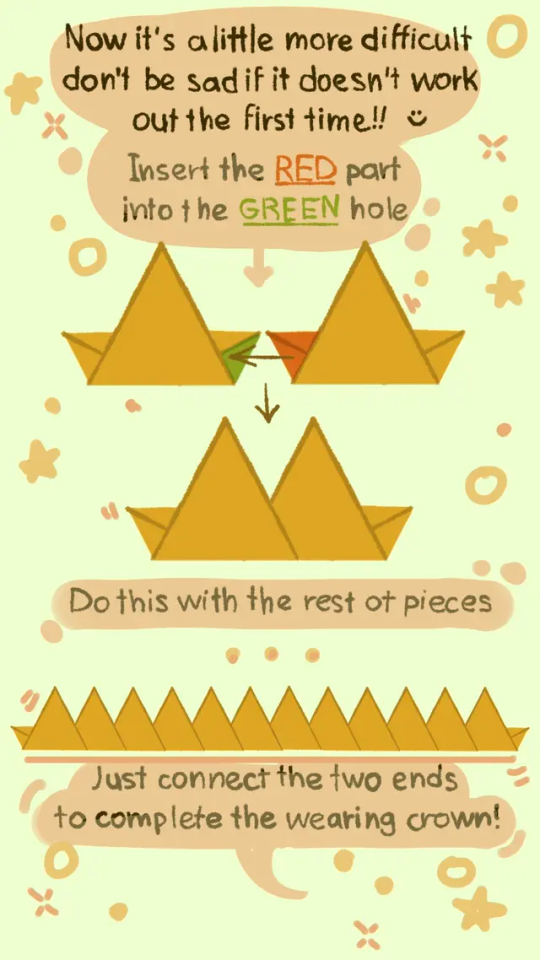
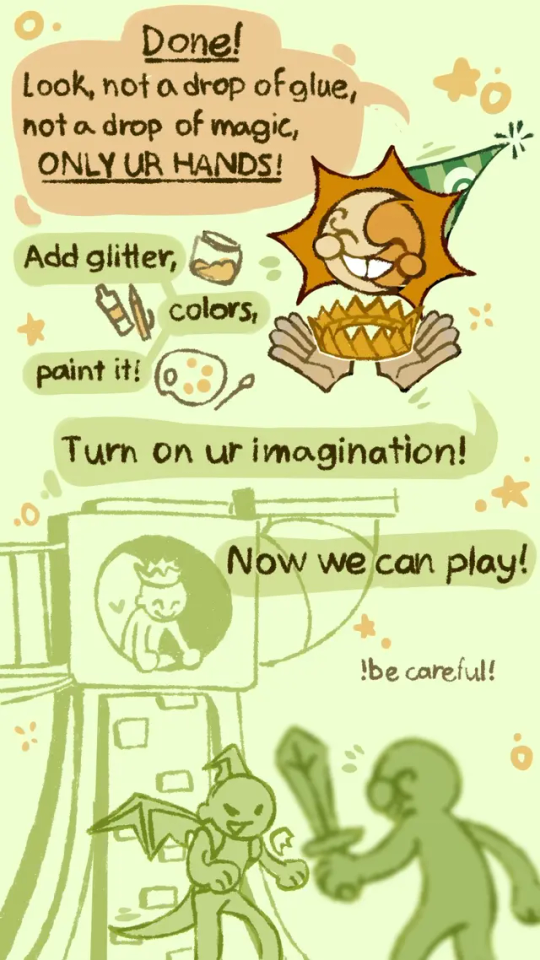
Paper crown tutorial 👑:P
#please treat me like this I'm begging u#hur hur hur hur hur#sundrop#sun#fnaf 9#fnaf 9 security breach#sun fnaf#sun fanart#fanart#tutorial#origami#origami tutorial#crown#paper craft#paper crown#so much tags
2K notes
·
View notes
Text
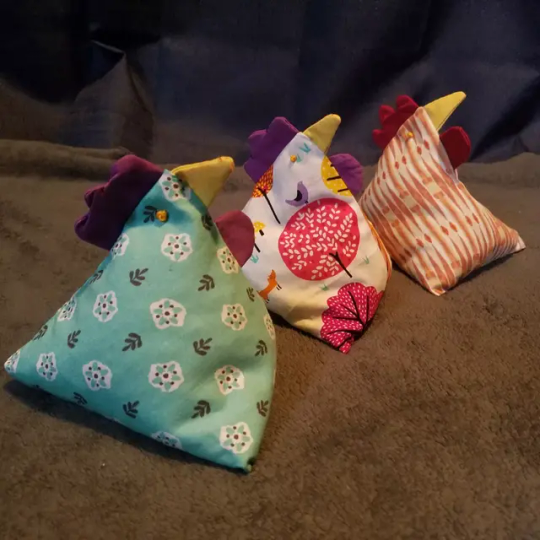

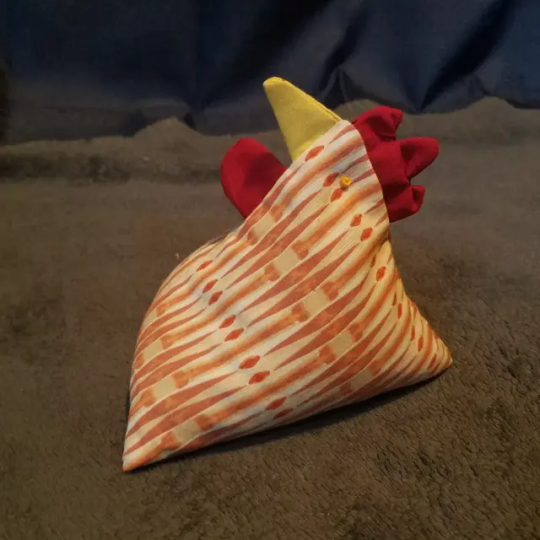
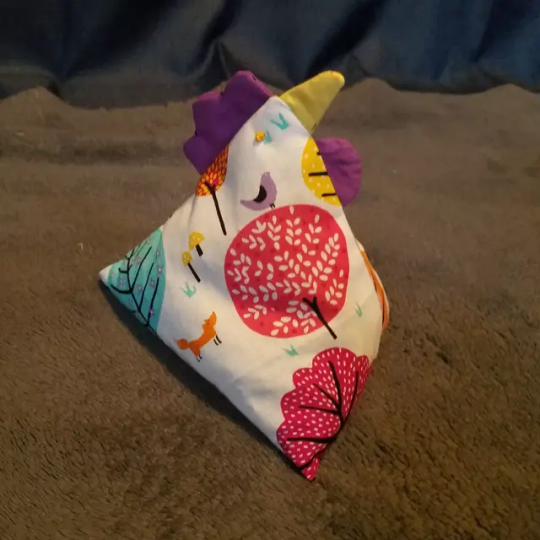
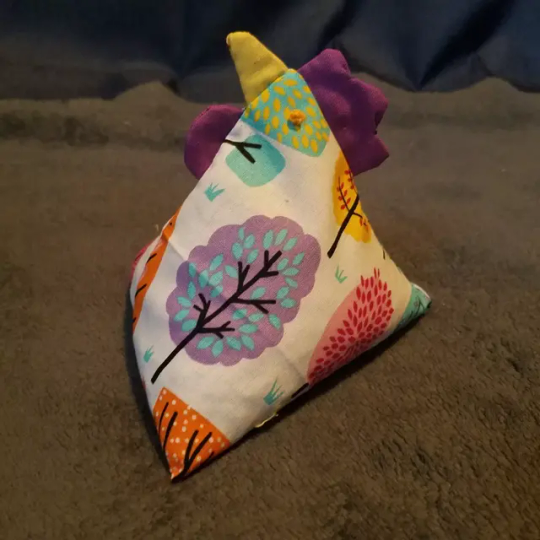
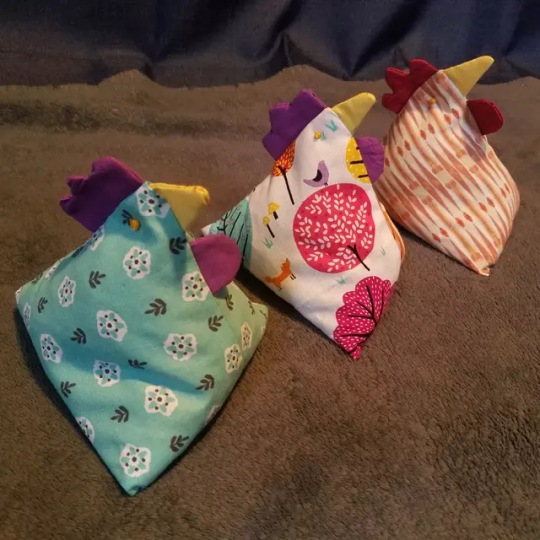
Forgot to post these simple little chicken hacky sacks/heat packs i made for my siblings for christmas. 100% cotton and filled with sunflower seeds (the chickens did NOT appreciate me borrowing from their stash but i was out of rice) so they can be heated up for hand warmers or to ease aches and pains
(or for balancing it on your head i guess)
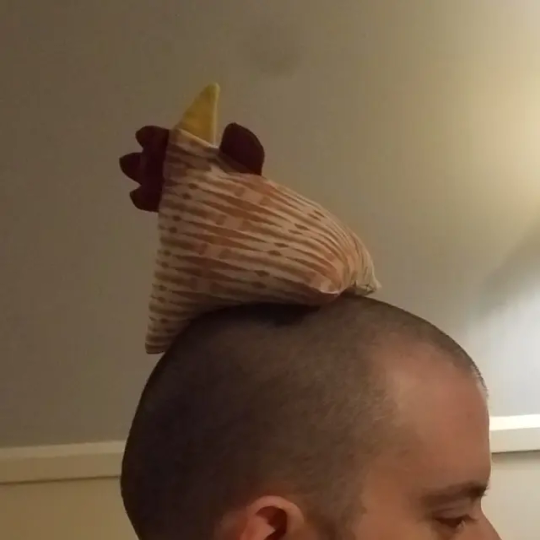
#brother why#chickens#tiny fluffy dinosaurs#the BEST animals#chickenblr#sewing#hacky sacks#they are so easy to make#maybe I'll make a tutorial if i make some more#arts and crafts#textiles#makenna made a thing
1K notes
·
View notes
Text
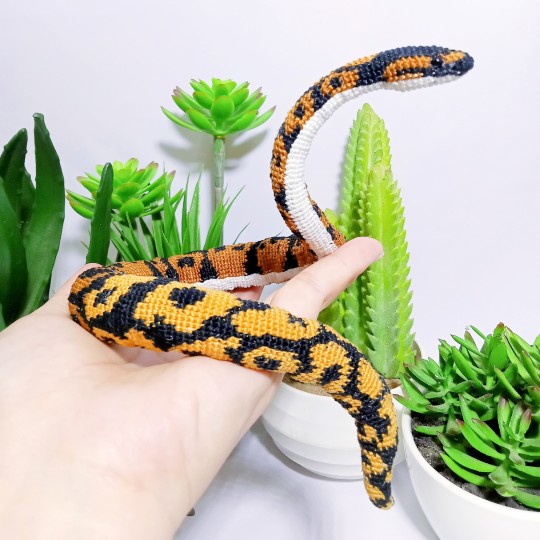
Hello, everyone! 👋
I wanted to share with you all a pattern, which is an amigurumi crochet ball python snake. You can find the free tutorial on my YouTube channel and the PDF pattern on my Etsy shop.
Thank you so much for stopping by and have a great day! 😊
799 notes
·
View notes
Text
Wednesday, November 29.
You reap what you sew.
Never have truer words been spoken. But they come as good news for Tumblr's sewing community, however, who have been sewing some absolute delights. Some real œuvres d'art. Some winner-winner chicken dinners.
As luck would have it, #sewing is trending. And it's trending right now, so we have reaped a selection of these very dinners for your eyes only. We have then asked ourselves just what did we do to deserve y'all, and your resplendent talents.
#today on tumblr#sewing#sew#sewblr#crafts#sewing machine#crafting#sewing project#textile arts#crochet#sewing patterns#sewing tutorial#sewing tag#craftblr#contemporary art#artists#artists on tumblr
1K notes
·
View notes
Text
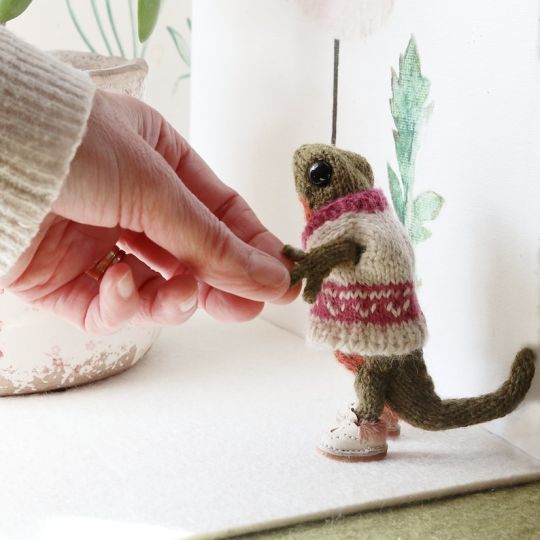
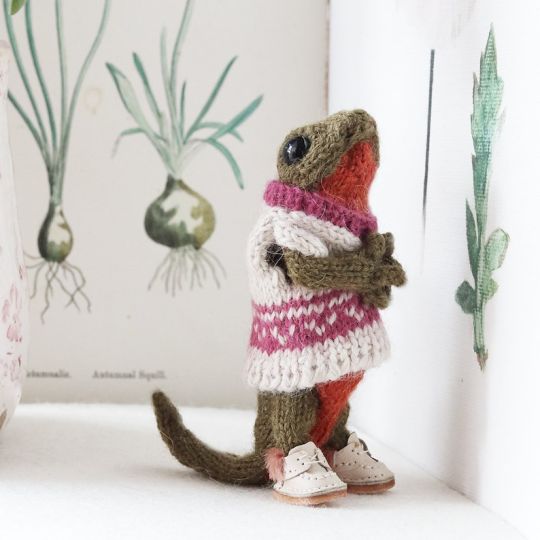
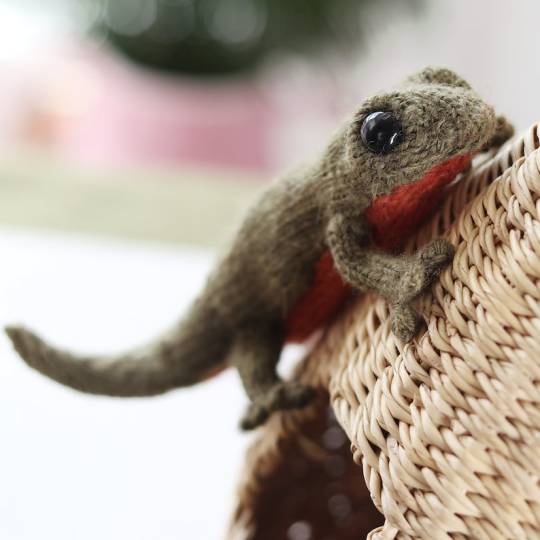
Newt Knitting Pattern by DotpebblesKnits
#DotpebblesKnits#newt#knitting pattern#knitting patterns#knitting pdf#knitting download#knitting tutorial#pdf download#pdf pattern#pattern pdf#craft#diy
547 notes
·
View notes
Text

screw it hits ur haikavetham with the dnp crafts beam
nothing more invigorating than drawing something that caters to my brain only (plus the four people who this caters to i hope u enjoy). something about holding the knife your loved one used to carve out your heart with one hand and holding their hand in the other all while an ominous presence looms behind you reminded me of them idk
#kavetham#haikaveh#alhaitham#kaveh#genshin impact#what do i tag this…..#dan and phil crafts#tagged reluctantly#thank u DanAndPhilCRAFTS - Slime tutorial for one of the fav haikavethams i’ve drawn this year🙏
690 notes
·
View notes
Text
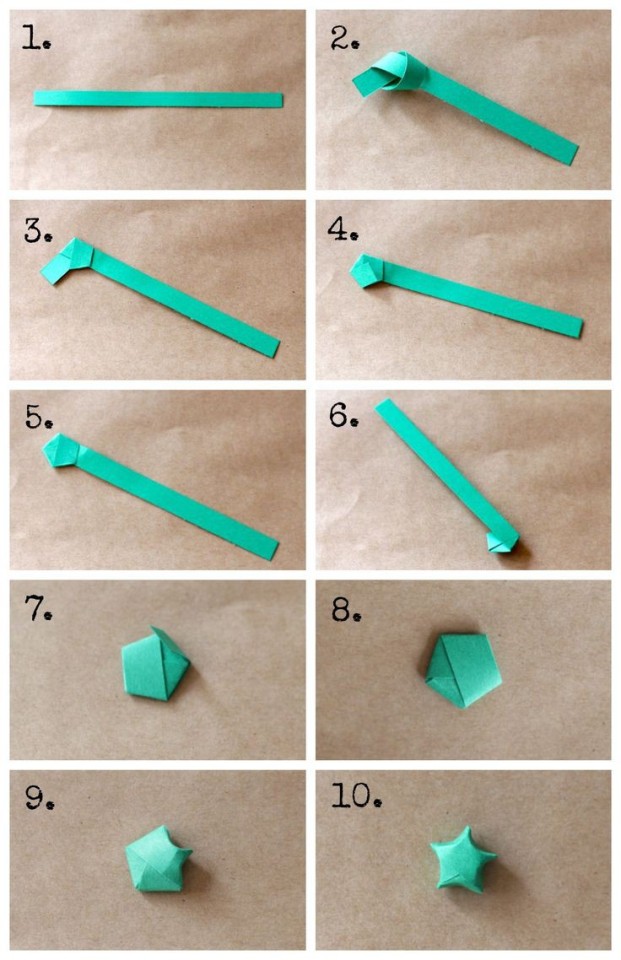
➩ Tutorial on a Paper Star 🌱
#tutorial#paper stars#paper star#star#papercraft#paper art#origami#aesthetic#greencore#green aesthetic#handmade#diy#crafts#starcore#design#art#goblincore#goblin aesthetic#green#green goblin#fairycore
1K notes
·
View notes
Text
Who wants to make a peller box?
Guess what! I finally gathered my pages of scribbled notes, my camera of haphazard in-progress pictures, and finally compiled a set of instructions for making one of these bad boys!
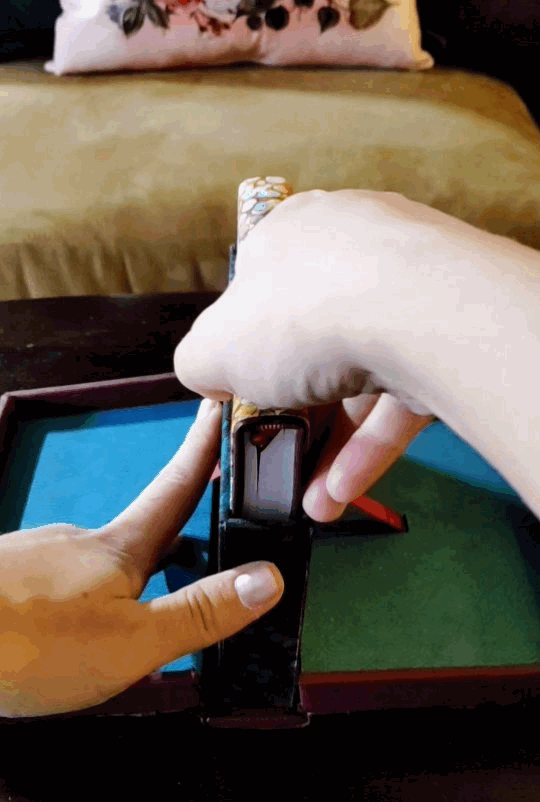
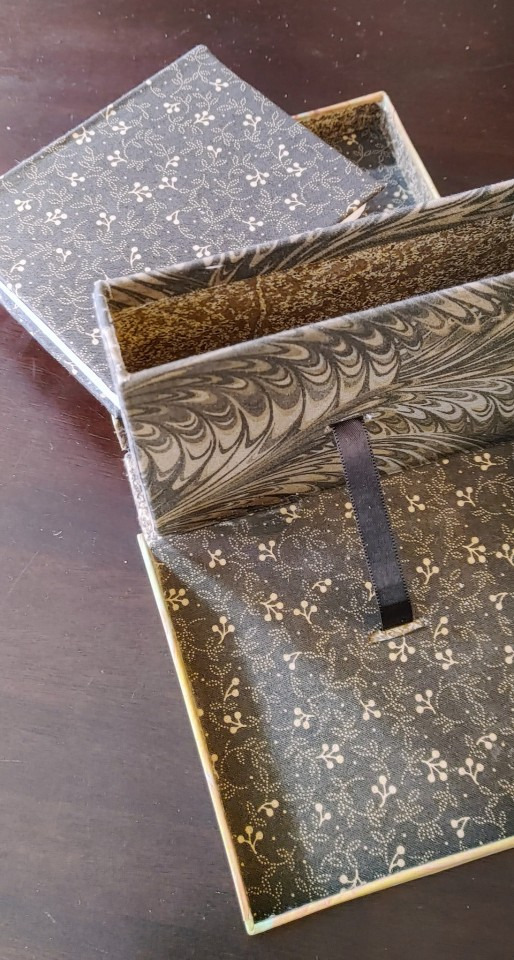
And not only that, but I've got two versions of this baby. I like mixing and matching my unit families because sometimes 1/32 inch sparks joy and sometimes 14 mm is just so convenient, but especially since all of my chipboard comes in english thicknesses, here's a version of the process for my fellow imperial units weirdos:
And here's one for the sensible folks of the world, raised on a base-ten system rather than dividing everything in half and then in half and then in half-- I won't subject you to inches, when there's a workaround, but I was tempted! Have your localized version of the story and have fun with it:
Mad credit of course goes to Hugo Peller, who developed these things in the first place, but also to Jack Fetterer, who preserved a set of notes from a 1990 class, which, as far as I can tell, are the most complete set of instructions available online. But I'm an engineer, I couldn't be satisfied there, I had bludgeon it into a system of equations, sorted by usage and material. And I also go into some of the hiccups I ran into trying to follow those class instructions, like being a green amateur at leatherwork, or not having the equipment to saw plywood boards in my apartment. These instructions still do make some unfair assumptions about the base knowledge level of anyone who wants to give this a try, like using bookcloth rather than plain cloth, but I may try to loop back and adjust that soon.
I can't claim any kind of expertise in this type of work, but I beat my head against an interesting problem, and it's time to share what I got out of it! And, secret goal, I want to help more people make more cool things, and maybe improve on my process in ways I can absorb and chew on in the future. Save my work, change it, I dare anyone who sees this to improve it!! I want it to be better. Credit would be cool, and of course the actual experts I leveraged for this deserve all the credit in the world, but that's not my priority. I want the world to have more exciting things in it, and I want more people to have exciting skills. Go forth and go nuts!!
6K notes
·
View notes
Text
how to make origami ninja stars out of sticky notes
574 notes
·
View notes
Last Seen Blogs

blog-eds
Untitled

shegallagher
moving forward

femmeterror
terrible femme

richardjmv
Richard JMV

ygokhaapl
Real or not Real?