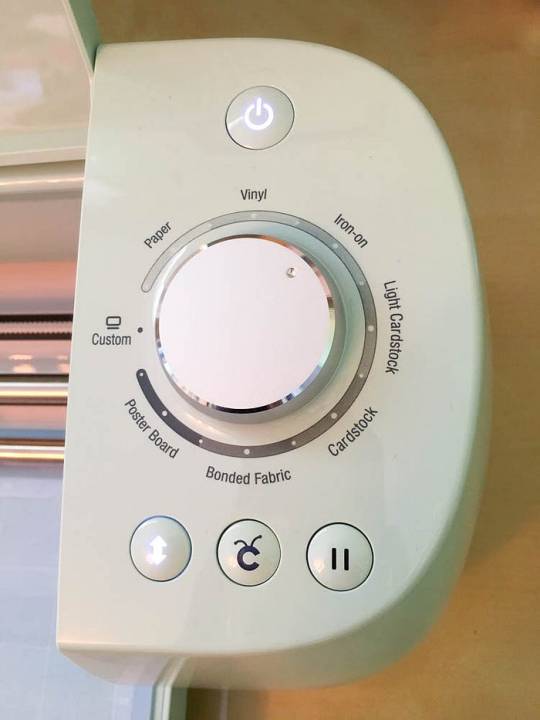
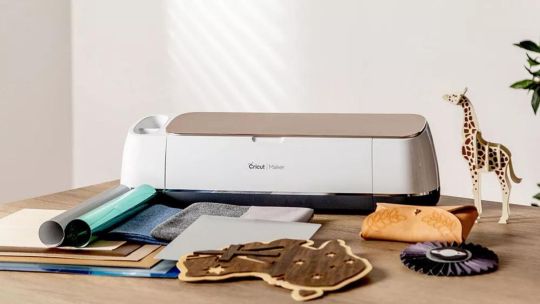
#cricut explore air 2 accessories
Text
9 Creative Cricut Easter Projects to Celebrate the Holiday
It's a leap year, and the excitement of celebrating Easter is on the next level. This year, I will celebrate the festival with my newborn grandchildren. Ever since he came into our lives, I have become much more active and participate in daily routine work. As her grandma, I made the day special by creating custom Cricut Easter projects with my crafting machine.
Ever since I got the Cricut machine, I have taken plenty of orders and started my own business, which has made me independent and improved the family's financial condition. But this time, the reason for many crafts is slightly personal, as I will make projects for my grandson. In this blog, I share my favorite Cricut projects for Easter that you can easily make at home within a few minutes.
1. Basket
Collect your eggs and keep them safe from getting damaged by storing them inside the personalized basket. You can make one of these Cricut Easterprojects with any cut-die machine using Smart Materials & other crafting tools. Besides, you can easily decorate the design on any basket. Also, you can use this custom-made bucket to store items in future days.
2. 3D Card
If you love simplicity, you should make a 3D card and give it to your loved ones. The cards are one of the easiest and simplest crafts any DIYer can make from their crafting machine. With the help of this project, it will be more accessible for users to pen down their feelings into words. Most crafters prefer to use a Cricut Joy machine and card mat to complete this project.
3. Table Runner
Subsequently, decorate your dining table by placing a personalized table runner. There are several Cricut Easter projects, but making this DIY craft is my favorite. The crafter can make this project from any crafting machine using the sewing tool kit and design the runner according to their table size. In addition, users can give it as a present to loved ones.
4. Candy Box
Surprise your children by giving them sweet candies of different flavors. Place the candy box on the table and let your children choose their favorite candy. Users can also make this craft in various sizes and decorate it with colors. Moreover, users must use a Cricut cutting machine, materials, and other supplies to get the best results.
5. Lollipop Holder
If you love lollipops, you need a holder by your side. The holder allows users to handle and take the candy anywhere easily. A DIYer can easily do this project with a Cricut model, materials, and other supplies. The craft machine can also make a holder of any size, shape, and color.
6. Plate
Serve your guests delicious lunch on a customized plate in your dining area. Among the variety of Cricut Easter projects, I prefer this craft as it gives them a new look and makes them look much more classy. Plus, users can make this do-it-yourself craft using a Cricut machine, materials, and other items.
7. Doormat
Make your guests feel at home by placing a personalized Happy Easter doormat. This craft might seem complicated to make, but it isn't. You have to be a little patient while doing this DIY project. Users must have a Cricut machine, specific materials, and other tools.
8. Welcome Porch
Equally important, decorate your home by placing an eye-pleasing welcome porch near the front door. Apart from the front door, you can also put it in your garden, near your room or backyard, while preparing for the house. If you intend to make one of the Cricut Easter projects, you need a cut-die machine, materials, etc.
9. Mason Jars
Finally, discuss the last Cricut project you can make with the cut-die machine. By decorating the mason jars, you will preserve the food items and give the kitchen a new look by organizing them. Also, all users must decorate the jars by sticking labels, decals, and stickers.
Final Words
This blog will help you understand the various projects made from cut-die machines for this festival. However, all DIYers must use compatible tools while making any craft. The Design Space app will help users design the project and transfer it to the Cricut machine for the cutting process.
FAQs
Question: Which Easter Crafts Can I Make With Cricut?
Answer: Cricut is a smart cutting machine that can cut hundreds of materials in any shape and size for various occasions. Various Easter crafts can be made out of Cricut, which are as follows:
Colorful pillows
Monogram sign
Garden flags
Wreath
Table runner
Pop-up card
Bouquet
Question: Can I Start My Own Business by Selling Cricut Easter Projects?
Answer: If you are enthusiastic, you can start your own business by selling Easter crafts. To make the desired craft out of the cut-die machine, you must have complete knowledge about the craft machine, its tools, and how to make a perfect craft for the event. They should also know what's trending in the market and how to fulfill the customer's needs.
Question: Do I Need to Have Cricut Design Space While Making Any Easter Day Craft?
Answer: Yes, all DIYers must-have Cricut Design Space on their respective devices while making any Easter craft. This Cricut app offers thousands of images, fonts, and ready-to-make projects that help users create the design of their preference.
Source Url :- cricut easter projects
#cricut.com/setup#cricut explore air 2#cricut accessories#cricut joy app#cricut machine#best cricut machine#cricut access#cricut explore air 2 accessories#cricut easter projects
0 notes
Text

Take Your Projects to the Next Level with Explore Air 2 Accessories
What if you had a crafting machine that could organize and decorate every basic item in your home and office? It's not just a dream anymore; the Cricut machine can make it a reality. Simply choose a Cricut model that fits your needs and budget, then complete the setup process. After that, visit cricut explore air 2 accessories to download the Cricut software, then connect the Cricut machine to your computer or mobile, and start your DIY projects.
Visit here for more Information :- https://mycricutspace.com/
#cricut accessories#cricut explore air 2 accessories#cricut.com/setup#cricut explore air 2#cricut joy app#cricut machine#best cricut machine#cricut access
0 notes
Text
Are you looking for an alternative to expensive Cricut brand blades? Look no further! Duryeo Replacement Blades are just as good as Cricut brand blades, but you can get them for half the price of Cricut brand.
Duryeo Replacement Blades are fully compatible with Cricut Explore Air /Air 2 /Explore 3/One /Maker and Maker 3.
Duryeo Replacement Blades come in three styles: Premium Fine Point Blades, Fine Point Blades, and Deep Point Blades. They are made of German-quality alloy material with high hardness and toughness for sharp, precise cuts. They are superior to ordinary blades and last 3-5 times longer than ordinary cutting blades.
Premium Fine Point Blades can cut most lightweight materials such as vinyl, iron-on, card stock, poster board and foam card stock. Deep Point Blades can cut most materials up to 1.5mm thick such as fabric, poster board, thick card stock, craft foam, magnets, stamp material, and glitter card stock.

#cricut#cricut accessories#cricut blades#cricut blades maker#blades for cricut explore air 2#cricut fine point blades#circut premium fine point blades#cricut deep point blades
2 notes
·
View notes
Text
How to Make Cricut Wedding Card: 4 Easy Steps
Are you getting married but can’t decide which Cricut wedding card will be best? I was hoping you wouldn’t stress as I will help you by teaching you how to make them out of the Cricut machine. Weddings are all about reuniting with close ones, singing their favorite songs and dancing.
I have been in the crafting business for the past two and a half years and have done tons of DIY projects for various events. But this is the first time I am going into custom-made wedding invitations. Thanks to Cricut machines, invitations will be a lot easier and a memorable craft for me.
Every crafter will agree that to make any craft out of a Cricut machine; they must have a specific set of tools to help them give the project the perfect shape. Follow the blog to learn in-depth about making personalized invitations.
Step 1: Creating a Cricut Wedding Card
To create your favorite invitation design, switch on your device and open the Design Space app. After that, tick New Project, press the Projects tool, and type Invitations into the search box. Now, select the design, read the details about the design, and then click the Customize option.
Following this, select the Cricut Foil section by going to the Operation section and selecting the Pen option. After making the changes, select the text and change its font, style, size, and color. Following this, press Weld, which is visible under the top right side of the canvas.
Once you are done after making all the changes on your Cricut wedding card, click the Make It option. Next, you need to check that the designs are placed properly in their respective places. After checking all the designs, hit the Continue option.
Step 2: Cutting Your Design
Following this, unbox your Cricut cutting mat and place your Cricut material on top of it with the help of the brayer tool. Then, check that you use the correct material and tools before cutting. After that, connect your devices, load the mat into the machine, insert the tools inside the Clamp, and turn on your cut-die machine. Now, you need to wait till the cutting process is going on. Once it is finished, start unloading your mat from the Cricut machine.
Step 3: Assemble Your Materials
Now, peel off the Cricut material from the mat and use a sharp item to remove tiny pieces of material from your Cricut wedding card design. Following this, take your Cricut scoring tool and start folding your envelope. After folding the envelope equally from all sides, stick the sides using strong adhesive glue. You can also use a Cricut glue gun to spread the glue equally. Also, repeat the same steps by folding and sticking the invitation pieces together. Keep the card and envelope aside for a few minutes until the glue ultimately gets dried up.
Step 4: Share Your Final Wedding Invitation
Last but not least, cut the extra sides of your Cricut wedding card and insert them inside the respective envelopes. Now, deliver them to your loved one’s address along with a box of sweets. Alternatively, you can personally visit and invite them to attend your wedding and give you blessings.
Conclusion
See how easy it was to make a Cricut wedding card with the help of Cricut machines. Apart from this DIY craft, you can also do other projects for your D-day with this cut-die machine within a few minutes. Projects that it can make are wine glasses, welcome signs, coasters, table runners, ring boxes, and so much more. You must be patient and focused while working on these projects using the Cricut craft machine.
Frequently Asked Questions
Question: Is Cricut Worth Making Wedding Crafts?
Answer: Absolutely; Cricut is the ultimate cutting machine you can prefer while making any craft for your wedding ceremony. This craft product can cut any material, tissue, or leather within a few seconds. Besides that, Cricut comes with designing software that helps make the design easier.
Question: What Cricut Accessories Do I Need to Make My Invitation Card?
Answer: The total number of Cricut accessories that will help you in making invitation cards more easily are as follows:
Question: Can I Make Money By Selling Cricut Wedding Invitations?
Answer: You can make money by making and selling DIY wedding invitations to your customers. To start your own business, you need to learn every detail about Cricut supplies and how they can be used to make cards. Moreover, you need to be very careful while making crafts and be aware of the customer’s expectations.
Visit: cricut.com/setup
install cricut design space app
www.cricut.com setup login
cricut.com setup mac
Source: https://cutting-setup.com/how-to-make-cricut-wedding-card-4-easy-steps/
#cricut.com setup download#cricut.com/setup#cricut.com sign in#cricut.com design space#cricut.com/create#cricut.com/register#cricut accessories#cricut design space#cricut design space download#design.cricut.com/setup#install cricut explore air 2#install cricut design space app#cricut setup#cricut explore air 2 setup#cricut explore air 2#cricut project ideas#cricut design space app#cricut com setup#cricut design space login
0 notes
Photo

Book Recommendations: National Craft Month
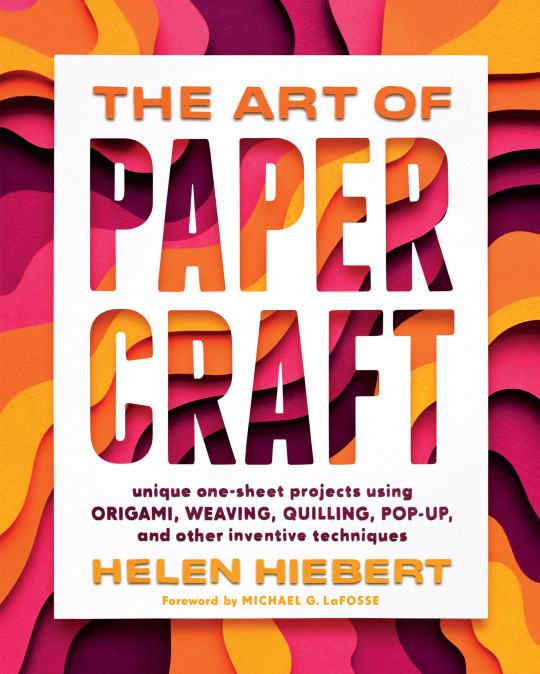
The Art of Papercraft by Helen Hiebert
Paper is the perfect material for all kinds of arts and crafts. In this book of 50 projects, Helen Hiebert offers an accessible guide to turning a flat sheet of paper into useful and beautiful art. She explores decorative paper techniques like marbling, stamping, and stenciling, and then delves deeper, presenting 12 different dimensional techniques like origami, cutting, folding, quilling, stretching, weaving, and pop-ups for creating dozens of projects. Each section of the book provides a history of the technique, an overview of the process, several how-to projects culled from Hiebert’s own studio as well as the studios of some of the leading contemporary paper artists, and a gallery of works to show the technique’s range of possibilities. Hiebert suggests a unique paper for each project and describe the qualities that make it suitable for the particular technique, as well as practical information on tools, materials, and where to purchase papers.
Chunky Knits by Alyssarhaye Graciano
With big needles and oversized yarn, anyone can knit up fun, stylish patterns in a flash! Alyssarhaye Graciano, knitwear designer and founder of BlackSheepMade, filled this book with quick projects perfect for your friends, family, pets and home.
Especially good for beginners, thick yarn makes it easy to see all of your stitches as you’re working. Even if you mess up, bulkier yarns make it simple to find and fix your mistakes. Experienced knitters can zip through last minute gifts (the Cascades Cowl only takes two hours!) and traditionally time-consuming large-scale projects like the extra cozy Homebody Blanket.
Try your hand at arm knitting with eye-catching knits like the Hella Big Arm Knit Scarf, add a pop of color to your home with Ember’s Circle Rug or even bring some funky style to your wardrobe with cute accessories like the retro PNW Beanie or the striking Radius Hooded Cowl! With this book full of no-fail patterns and a basketful of chunky yarns, you can learn new stitches with confidence and have cool custom pieces in no time at all.
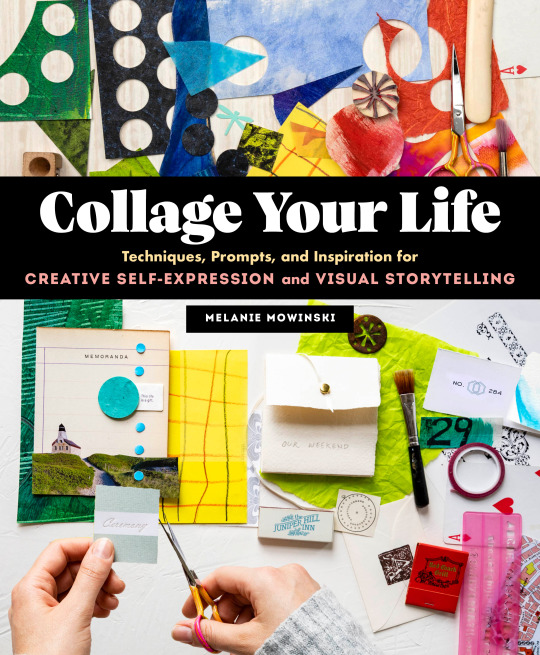
Collage Your Life by Melanie Mowinski
Requiring minimal equipment--just scissors, glue, paper, and pens--collage is an accessible craft that offers limitless creative possibilities. Like meditation or journaling, making collages can be an avenue for self-reflection and artistic exploration.
In Collage Your Life, artist and teacher Melanie Mowinski teaches a variety of core techniques including lettering, stamping, stenciling, transfers, and adhesive methods, and provides dozens of prompts to jumpstart the creative process and encourage crafters to explore the versatility of collage, such as make a self-portrait; disrupt your routine instincts; incorporate text; assemble mementos from a trip; process anger or anxiety; collage with others; or try creating block-out poetry with pages from a magazine.
Inspiring examples of the author's work along with that of other collage artists are featured throughout. Crafters, journaling fans, scrapbookers, and artists alike will find guidance and support for developing their own distinctive collage style, whether the goal is to create a visual record of daily experiences and special occasions or to expand a creative journaling practice.
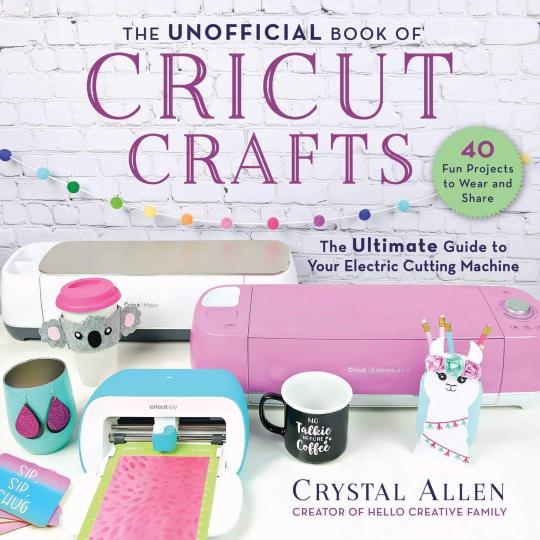
The Unofficial Book of Cricut Crafts by Crystal Allen
Are you new to Cricut crafting? Returning after a hiatus and desperate for a refresher? Perhaps you're an old pro looking for brand-new ideas, tips, and tricks for your crafts? Look no further than The Unofficial Book of Cricut Crafts.
Throughout the more than 300 pages of this book, author Crystal Allen will not only present you with craft ideas that embrace every awesome element of this popular cutting machine, but, perhaps most importantly, she'll start you at the very beginning of your Cricut journey with loads of information about the different Cricut machines (Cricut Explore Air 2, Cricut Maker, and Cricut Joy) so you can determine which is best for you before you buy.
After you unbox your Cricut and have a general understanding of the parts of your machine, Crystal will teach you how to use Cricut Design Space and get images from Cricut Access, and then you'll be presented with projects that use the most popular materials your Cricut can cut. These include fabric (cotton, felt, and fleece); basswood and chipboard; leather; vinyl; paper; and heat transfer vinyl. Crystal even tackles infusible ink!
#crafts#crafting#Arts and Crafts#nonfiction#nonfiction books#Nonfiction Reading#Book Recommendations#book recs#reading recommendations#Reading Recs#Library Books#TBR pile#tbrpile#to read#Want To Read#Booklr#book tumblr#book blog#library blog#new library books
2 notes
·
View notes
Text
How to Setup Cricut Explore Air 2: Easy Steps for Beginners
Hi, I’m Bella, a Cricut expert and DIY enthusiast. Do you want to setup Cricut Explore Air 2 on your device? Well, it’s an easy process, and you can do it in minutes. However, as a beginner, it may not seem a smooth task for you. That’s why I’m here to share the full procedure for setting up your crafting machine.
Cricut produces many machines, and I like all of them. Also, I have tried almost every machine. However, there are certain reasons for me to stick with the Explore Air 2 model. Do you want to know? It has all the great features that make my work easier and provide me with a full space of comfort.
So, without wasting a second, let’s understand how to setup a cutting machine on your device.
Step 1: Unboxing Your Cricut Explore Air 2
To setup Cricut Explore Air 2, you will need to unbox your machine in the first step. Moreover, you should check all the important accessories inside your machine’s box. If you find anything missing in the box, you must contact your manufacturer.
Step 2: Verify Your System Requirements for Setting up Your Machine
Your machine needs certain system requirements to connect to your device. In this guide, I’ll only talk about the computer device, so let’s check the system requirements for that.
When you check all these minimum requirements on your computer, you can proceed with the other steps for setting up your machine.
Step 3: Download Cricut Design Space Software
You know that the machine runs with built-in software called Design Space. Hence, you need to download this software on your computer. Let’s check how to do it.
Step 4: Sign in to Cricut Software or Create a New Account
Once you complete the installation of your software, you must sign in to your Cricut account (only if you’re an existing Cricut user). Moreover, if you are a beginner, you should create a new account. Let’s see how to create one.
Step 5: Setup Cricut on Your Computer
Finally, you reach the most important step. Here, you need to setup your brand-new machine on your desktop computer. Check out the steps for it.
Method 1: With a USB Cable
If you are wondering how to connect Cricut Explore Air 2 to computer, you have two main methods - USB and Bluetooth. We will discuss both steps separately. Check the steps below.
Method 2: Via Bluetooth
This is the second method for connecting your machine to your desktop computer. Check out the steps for it below.
So, that’s it for the connection methods. When the connection is done, hit the Continue button. You must check the other steps to completely setup Cricut Explore Air 2.
Step 6: Check the Latest Updates for Your Machine
After you click the Continue button, your machine will start updating. You need to hit the Update button to run the process. When your machine is updated, you can click on the Next option to move forward.
Conclusion
Finally, you know how to setup Cricut Explore Air 2 on your device. The process is lengthy, but you will have to make a little effort while setting up your latest machine. You have also learned how to connect your machine to your PC via USB and Bluetooth. Don’t forget to check everything inside the machine’s box before jumping to the final setup procedure. In addition, the Design Space software also has a great role in setting up your crafting machine. So, I have mentioned everything about the machine setup. Now, it’s your turn to setup your machine.
Visit: cricut.com/setup
www.cricut.com/setup login
Source: https://cricricutdesigncut.wordpress.com/2024/08/23/how-to-setup-cricut-explore-air-2-easy-steps-for-beginners/
#design space setup#cricut.com/setup#www.cricut.com/setup#www.cricut.com/setup login#cricut setup#cricut design space#cricut design space app#cricut design space download#cricut design space software#cricut design space login#cricut design space setup#digital design
0 notes
Text
How to Set Up Cricut Explore Air 2: A Complete Tutorial
Are you wondering how to Set up Cricut Explore Air 2? If yes, then you are in the right place! With years of experience using the Cricut machine, I am here to guide you through every step of the setup process. The Cricut Explore Air 2 is a versatile tool that allows you to cut and craft with over 100+ materials, like cardboard, paper, cardstock, vinyl, fabric, and leather. To get started, unbox the machine, connect it, and download the Cricut Design Space app. Let’s start the entire procedure in a step-by-step manner.
Unboxing Cricut Explore Air 2
Once you go to set up Cricut Explore Air 2, the first thing you need to do is unbox the machine. Then, remove all the items inside the machine and check whether they are present. Once you have checked all the materials, you can move toward setting up the machine.
Here are the tools and supplies you get inside the box:
Cricut Explore Air 2
USB cable
Power adapter
Guidebook
Accessory adapter
Fine-point blade
Materials for a test cut
LightGrip cutting mat
Cricut Access trial for a month
These are the items you will get inside the box with your machine. To work on DIY projects, you will need other tools and accessories that you will have to buy personally. These tools will be a mat, a scraper, a weeding tool, a lint roller, and the materials required for your crafts.
Set up Cricut Explore Air 2
Once you have unboxed the machine and checked all the items, you can proceed to set up the Cricut cutting machine. For the setup process, you have to follow these steps:
First, you have to take the machine and place it on a flat surface. Try to put it in a place where it is safe, and you can keep it for a long time so you don’t have to move it more often.
Then, plug in the machine using the power adapter. It will give the machine a power supply.
Next, press the power button on the machine and turn it on.
Now, connect the machine to your device using Bluetooth or USB.
Afterward, visit cricut.com/setup and download Cricut Design Space.
Also, open the Design Space and log in with your username and password.
First-time Cricut users need to create an account, as Cricut requires an ID to work on it.
Connect Cricut Explore Air 2 to a Computer
Now that you know the process of setting up Cricut Explore Air 2, you can connect your machine to your computer. Here, we will see how to connect the machine to a Windows computer:
To start the connection, you should first turn on the machine. This will allow the machine to be connected to your computer.
The next thing you need to remember is that you should keep the machine within 10–15 feet of range.
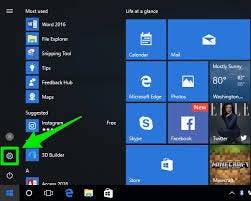
After that, you should click on the Start menu and go to Settings.
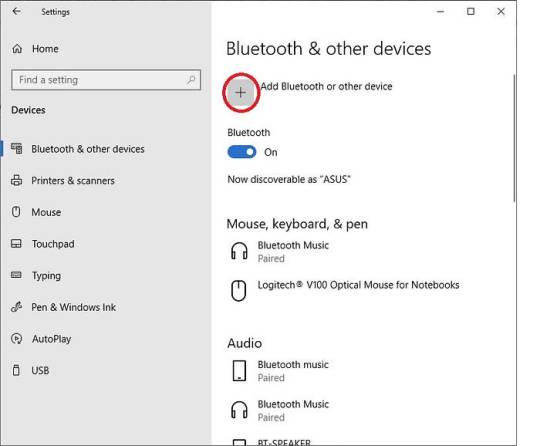
Also, select the machine from the list. If the device asks you to enter a code, type 0000 and then connect.
Your Cricut machine is now connected to your computer device.
Downloading Cricut Design Space on Your Computer
Downloading the Design Space app is important for setting up the Cricut cutting machine. The software helps you control and use the machine on your device. On the app, you have the option to select, create, and upload a design that you will later cut on your machine. The steps to download the software are written below:
Initially, you have to turn on the computer and open a web browser.
Next, visit cricut.com/setup and click Download on the Design Space app. Before that, you will have to tick the box to agree to the Cricut Terms of Use & Privacy Policy.
Then, you should go to the Downloads folder and click on the downloaded file twice.
A new window will pop up on the computer’s screen, which means the computer has started installing the app.
By the way, before the installation starts, your computer may ask you to agree that you trust the app on your computer. If you see it, you have to agree that you trust the app.
Once the app is installed, you have to log in with your Cricut ID.
Conclusion
In short, it is important to learn how to set up Cricut Explore Air 2 if you want to use it for your projects. It is an amazing crafting machine, especially great for beginners. It is simple to use and gives you a lot of options to make your projects. To use a Cricut machine, you need Cricut Design Space on your device. With the app, you can use designs to cut on the machine and create unique designs and projects.
FAQs
What Can I Do Using Cricut Explore Air 2?
This Cricut Explore machine allows you to make multiple projects. It is powerful enough to cut from the thinnest to tough materials. You can cut materials like adhesive vinyl, heat transfer vinyl, sticker paper, cork, cardstock, fabric, and heat transfer vinyl. With all these materials, you can create stickers, mug designs, designs on fabrics, greeting cards, and many more things.
Is It Easy to Set Up Cricut Explore Air 2?
Yes, it is! You will have to follow the steps to set up your Cricut cutting machine. The first thing you have to do after buying a machine is unboxing it and checking for the accessories. Then, you must prepare the machine for the setup process. Once the machine is prepared, you should connect it to your device and then download the Cricut Design app. Once you log in with the app, your setup is complete.
Do I Need Software to Work With Cricut Explore Air 2?
Yes, you will need Cricut software to use the Cricut Explore Air 2 machine. Cricut has two different software programs that you can use. The first one is Cricut Design Space, which is a free app that you can download and use on your device. The other app is Cricut Access. You can also download it from the internet, but it is a premium app, and you will have to subscribe to use it.
Source: Set up Cricut Explore Air 2
Visit here to know More: Cricut Joy Xtra
Pinterest
0 notes
Text
How to Use My Cricut Explore Air 2: A Complete Guide
When we are beginners to something, we are always worried about it. When I first bought my Cricut machine, I was concerned about how to use my Cricut Explore Air 2. If you have also bought your first Cricut product and want to learn how to use it, I would advise reading this blog, and then you will be able to use your Cricut machine.
When you buy a Cricut machine, there are a few things you need to do before you can start using it. You must first prepare the machine for use, or in other words, you have to set up the machine. To use a Cricut Explore Air 2, you will need to download the Cricut app on a device. With the help of the app, you can easily use the machine.
Introduction to Cricut Explore Air 2
Cricut Explore Air 2 is an excellent machine for making crafts. It can cut over 100 materials. It is versatile and the best in its price range. The machine is known for its precise cutting. Unlike its old Cricut models, it has a Smart Dial, so it can choose the material itself while cutting it.
This Cricut cutting machine has built-in Bluetooth connectivity, so you will not need to buy an external Bluetooth adapter. Its speed is adjustable for writing and cutting, so you do not have to worry about it. The machine is available in multiple colors, so you can pick a color you like.
After buying a Cricut product, when you open the box, these are the items you get inside the box:
The Explore Air 2 machine
A power adapter
A USB cable
Fine-point blade
Blade housing (Pre-installed)
Pen and other accessories.
A welcome book
Quick start book
A cutting mat
Materials for your test cut.
How to Set up Cricut Explore Air 2?
When I look to learn how to use my Cricut Explore Air 2, the first thing I am concerned about is how to set it up. Similarly, to use your Cricut machine, you first have to unbox the machine, check for the item, and then set up the machine for use. To learn the procedure to set the machine up, you need to follow these steps:
First, plug the Explore Air 2 machine into an electric socket using the power adapter.
After that, turn the machine on by pressing the power button.
Now, connect the machine to your operating device with the help of a USB cord or Bluetooth.
Next, you need to download the Cricut Design Space app on your device.
Follow the app instructions and sign in with a Cricut ID.
Your setup has been completed soon after the log-in.
Now, you can go on to use the Cricut machine and create beautiful DIY projects.
How to Connect Cricut Explore Air 2?
When you have learned the process of setting up the Cricut cutting machine, you should connect it to your device. To connect Cricut products, you can use both a computer and a phone. For connection, you can use either a USB cord or Bluetooth. Here, I am writing the wireless procedure.
Option 1: With Bluetooth
To connect your computer to Cricut, you should be following this procedure:
First, give the machine a power supply and turn it on. Keep the device and the machine within 10-15 feet.
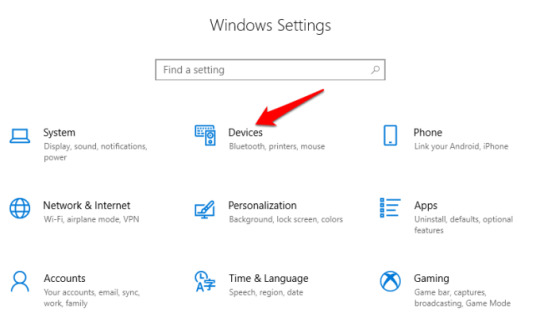
Now, open your computer and go to Settings. There, select the Devices option.
Next, open Bluetooth and make sure you have turned it on.
Then, click on Add Bluetooth or other device.
After that, select the Bluetooth option.
Also, you will see the Cricut model has appeared along with the other nearby devices.
Lastly, click on the machine, and it will connect to the computer.
Option 2: Via a USB Cable
A USB is very simple and easy as compared to a Bluetooth connection. You can simply connect them like this:
First, get the machine and your device ready for the connection.
Then, take the USB cable and connect it to your computer.
Also, connect the other end to your Cricut cutting machine.
Now, the USB connection is complete.
Your Cricut setup is not complete even after you connect it to your computer. To use a Cricut machine, you will have to download the Cricut Design app to your device. To download it, head over tocrictut.com/setup. When you have downloaded the app, sign in with your account. Once you have signed in, you are ready to use Cricut and work on your projects.
How to Use My Cricut Explore Air 2?
Once you log in with a Cricut ID on the Cricut Design Space app, you can start using the machine. The software has thousands of images, fonts, and pre-created projects that you can use for your crafts. You can also customize these designs however you want.
This is how you can use the Explore Air 2 machine:
Open the app on your device and select a design. You can edit the shape & size of the image. You can also upload a design if you want.
Then, follow the instructions on the screen and click on Make It.
Next, put the material on a Cricut mat and place it inside the machine. Check whether the fine-point blade is installed. Press the Load/Unload button.
After that, open the Design Space app again and tap the Go button.
The cutting process will begin. When it is completed, press the Unload button.
Remove the mat, pick a design up, and use it on your project.
Conclusion
How to use my Cricut Explore Air 2 would have been solved by now if you had read the blog. Using a Cricut machine has a procedure, and if you follow it well, you will be able to use it effectively. In this guide, I wrote everything regarding the Cricut setup and using it. When you purchase the machine, you first install it and connect it to your device. To use the Cricut cutting machine, you need to download the Cricut Design Space software. After installing it on your device, you can start crafting with your Cricut.
FAQs
What Are the System Requirements for Cricut Explore Air 2?
To use a Cricut Explore machine, you will need to download Cricut software on your phone or computer. Your computer needs to have some features to run the device. It should have 4GB RAM and 2GB disk space. Bluetooth or USB connectivity is a must to connect your Cricut machine. You need to have a 1024 x 768-pixel resolution. The device has to have a speed of 2-3 Mbps to download and upload the images.
Can I Use My Own Designs on Cricut Explore Air 2?
Yes, you can! To use your own designs or just to use a Cricut machine, you will have to install the Cricut Design Space app on your device. Usually, you pick or select a design from the app, edit it however you want, and then cut it on the machine. But if you want, you can even upload a design or an image to the Cricut app. Similarly, you can customize the design as well. Finally, you can cut it using the uploaded design.
What Are Some Things I Can Do With Cricut Explore Air 2?
With the help of Cricut Explore Air 2, you can do a lot of things. You can cut over a hundred materials and make amazing projects. Also, you can use over 370 fonts and create beautiful handwritten notes. You can create other things, like greeting cards, stickers, decals, bookmarks, keychains, tote bags, phone covers, and many more. You can create these things for yourself and can gift them to your friends and family members as well.
Source :- https://cricutnewmachinesetup6.wordpress.com/2024/06/21/how-to-use-my-cricut-explore-air-2-a-complete-guide/
0 notes
Text
5 Best Cricut Machine Reviews: Which One is Worth the Pick?
A few years ago, you asked me what the Best Cricut machine is. I probably wouldn’t have answered. Back then, I was unfamiliar with each Cricut machine model, so I couldn’t give the best Cricut machine reviews. But today, after many years of crafting experience, I have tried almost all Cricut machine models.
On the contrary, I am only talking about the Cricut cutting machine, not the Heat Press. Since I have dedicated half my life to crafting, I think I am the perfect person to give YouTube Cricut craft machine reviews. Therefore, I would like to introduce you to different Cricut machine models and their key features through this blog. Also, I would like to share its pros and cons to help you decide before buying it. Let’s get into this blog to explore these models in detail.
1. Cricut Explore Air 2
The Cricut Explore Air 2 is one of the oldest models in Cricut’s lineup. Also, this particular Cricut model is the most suitable one for beginner crafters. I always recommend novice crafters to start with Explore Air 2, and then further they can advise with the latest version. With this machine, you can easily craft stickers, and it is also affordable for everyone.
Pros:
Cuts 100+ materials
Compatible with 6 tools to score, foil cut, write, and more
Bluetooth wireless technology
Built-in tool holder
Extra storage to hold extra tools and accessories
Decent performance
Beginner-friendly
Cons:
Noisy
Unsuitable for pro crafters
2. Cricut Explore 3

In all these best Cricut machine reviews, I can’t miss this amazing Cricut Explore 3 machine, which is one of the best machines available at an affordable price. However, the main difference I know about this model is its compatibility with Smart Materials. So, let’s see why you should consider it as the best option and why you shouldn’t.
Pros:
Works with 100+ materials + Smart Materials
Best fit for home inkjet printer for Print Then Cut feature
Cuts complex designs with accuracy
Bluetooth wireless technology
Cricut Manufacturer Warranty
Performs operations such as writing, drawing, foiling, scoring, and more
Smooth and quiet
Has adaptable cutter
Cons:
Can cut up to 100 materials only (less than Cricut Maker 3)
Less powerful than Cricut Maker 3 but better than its predecessor
Extra investment for extra attachments
3. Cricut Maker
Here comes an advanced model, or we can say it is better than all Explore models. But it is suitable for those crafters who have a good budget and want something advanced. I don’t think the Cricut Maker model is the right investment. Let’s explore the best Cricut machine reviews to learn more about the Maker model.
Pros:
Works with 300+ materials
Performs different operations, including writing, drawing, foiling, scoring, and more
Works with 13 tools to cut, write, score, foil, engrave, deboss & more
Cuts complex designs with preciseness
Best for Print Then Cut projects
Seamless customer support via phone or chat
Cricut Manufacturer Warranty
Bluetooth wireless technology
Cons:
Outdated technology, meaning Cricut no longer supports it
Can’t cut Smart Materials
Slow performance and less power
4. Cricut Maker 3

Cricut Maker 3 is an updated version of its predecessor. In addition, it uses the same process, and the Cricut app and attachments are similar. Only one thing makes it different from other Cricut models: it can cut, score, and engrave Smart Materials without using the cutting mat.
As a result, you can cut up to 12 feet. Also, in terms of speed, it cuts much faster than the original Cricut Maker.
Pros:
Works with 300+ materials + Smart Materials
Cuts complex designs with precision
Best for a consistent outcome
Compatible with Bluetooth wireless technology
Writes, engraves, embosses, draws, foils, and more
Suitable with a home inkjet printer for the Print-Then-Cut feature
Cricut Manufacturer Warranty
Online courses & beginner’s cheat sheets
Seamless customer support via phone or chat
Cons:
Expensive
Materials are costly
Too much investment for beginner crafters
5. Cricut Joy

Okay, here are our Cricut Joy machine reviews to help you determine why this is best for you. Ever since I decided to write about the best Cricut machine reviews, Cricut Joy was at the top of the list. This is compact and looks really cute! In addition, it is designed for crafters who travel a lot and want a portable cutting machine.
Thus, let’s see why it could be the right choice for you!
Pros:
Works with 50+ materials
Writes, draws, and foils
Seamless customer support via phone or chat
Bluetooth wireless technology
Cuts design in detail with precision
Cricut Manufacturer Warranty
Compact and portable
Adaptable
Ideal choice for paper crafts
Cons:
Weak and small size
No USB connection
Extra investments for pens, blades, and engraving tips
FAQs
Question 1: Which Cricut machine is the best?
Answer: My overall best pick is the Cricut Explore 3. It is because I know Cricut Maker models are the best and most robust. But still, I’d say Explore 3 because it is also robust, and you can get this cheaply. It is a great tool for intermediate crafters, including beginners. So, if you want something cheap and basic, you should go with Cricut Explore 3.
Question 2: Which Cricut machine is apt for beginners?
Answer: If you want a Cricut machine for beginners, then you will need to use the Cricut Explore Air 2. This machine is designed for beginners and doesn’t cost too much. So, start using the machine and create anything with Explore Air 2 when you have no time. Overall, Cricut Explore Air 2 is the best for beginner crafters.
Question 3: What do I need when buying a Cricut for the first time?
Answer: If you are buying a Cricut machine for the first time, you will need to gather many other accessories. Thus, below are the items you will need with your Cricut machine:
StandardGrip Mat
T-shirt
Weeding Tool
BrightPad (optional) or Light Box
EasyPress or Heat Press or Iron
EasyPress Mat
Everyday Iron-on
Conclusion
Finally, this write-up covers all the best Cricut machine reviews. Be it Cricut Explore models Maker or Joy; I have given my honest reviews about all of them. So, the main aim of writing this blog was to help you decide which Cricut model is the best from others. As you move further into the blog, you will find a lot of pros and cons. Explore them in detail and make purchases accordingly.
Source: best Cricut machine reviews
#best Cricut machine reviews#Cricut machine for beginners#Cricut Joy machine#Cricut Explore Air 2#design space signin
0 notes
Text
How to Use Transfer Tape With Cricut: A Beginner’s Guide
I’m glad you are here to learn how to use transfer tape with Cricut. Using transfer tape for your regular Cricut projects is very simple. I will cover a real project that I made using transfer tape. This accessory is as important as any other Cricut supply. However, if you haven’t used transfer tape before, I’ll ensure that you understand everything about it.
When I first started, I was a newbie, too. But, gradually, I came to understand all the important accessories and tools of Cricut. One thing that most crafters face is that they often get confused about which transfer tape to use. If you are one of them, don’t worry – I will explain it to you too.
What Is a Transfer Tape?
Before learning how to use transfer tape with Cricut, you need to understand what it is. A transfer tape is a strong grip tape to transfer iron-on vinyl onto the material. It holds the vinyl and then smoothly transfers it to the desired material. Generally, there are two types- Regular and Strong Grip transfer tape.
The regular transfer tape is great for general projects, whereas the strong grip tape will be useful for glitter vinyl, where you need extra effort to pull off the tape. So, if you are using a strong iron-on vinyl, you should use a strong grip transfer tape.
Where Do I Get Transfer Tape From?
Well, I use Cricut’s brand for all my craft needs. Cricut’s things suit my projects, and it has become my all-time favorite stuff to use now. But it’s all about someone’s choices. So, if you find some other brand good, go for it. Try different types of brands until you find your perfect one. I have been using Cricut’s transfer tape from the start, so I have never gone to other brands.
How to Use Transfer Tape With Cricut?
To get started with the transfer tape, you need to make a cut with your adhesive vinyl with your Cricut machine. I often use my Cricut Explore Air 2; you can use other Cricut machines, too. As you are a Cricut user, you know how to cut vinyl with your Cricut machine.
Once you cut your vinyl, weed out the excess of vinyl from the final design. So, when you get the design you need, it’s time to apply the transfer tape using my easy steps.
Step 1: Cut the Transfer Tape
In the first step, you need to cut a large piece of transfer tape compared to your design. You can use a transfer tape multiple times before disposing of it. There is one benefit to using transfer tape.
Step 2: Peel off the Backing Paper
After that, you need to peel off the backing paper. You can apply the transfer tape back to the backing paper to use in the future. Let’s move to the next steps to learn how to use transfer tape with Cricut.
Step 3: Apply the Transfer Paper to Your Design
In the final step, you need to transfer the design and smooth it down using a scraper so no wrinkles or bubbles are left. If you don’t have a scraper, you can use your credit card or a gift card, too.
Step 4: Peel off the Backing Paper
Now, turn your piece and peel off the backing paper once again. Next, the tape will only be left with the design. You can press the transfer tape once again to take a neat and clean design. When your design is ready on the transfer tape, you can apply it to your material. Now, let’s proceed to the next step to complete the process of how to use transfer tape with Cricut Maker.
Step 5: Apply the Transfer Tape to Your Material
Then, you need to peel off the transfer tape once you place it on the material. Ensure that the vinyl sticks well to the surface of your project. If it does not stick well, remove it and burn it well once again. And then reapply on the material.
Conclusion
Finally, you have learned how to use transfer tape with Cricut. I am sure you will find this process easy peasy. A transfer tape is really necessary to apply adhesive vinyl correctly. So, if you are a regular Cricut user, a transfer tape is a must have for you. So, wait no more to get a suitable transfer tape for you, either regular or standard grip, to make a perfect project.
FAQs
How to Use Transfer Tape With Iron on Vinyl?
To use the transfer tape on iron-on vinyl, you first need to prepare a design with your Cricut machine. Transfer tapes are used to transfer the vinyl design onto the material easily. To make a perfect iron-on project, you should use a transfer tape. You just need to peel off the transfer tape, apply it to the design, and then apply the design to the material.
Why Do You Need Heat Transfer Tape?
Heat transfer tape is needed while you are using heat transfer vinyl to make sure that the vinyl sticks to the fabric or material easily. As there are various types of transfer tapes available, the heat transfer tape is specifically for the HTV. It makes the design adjustment easy while using an iron-on project.
Do I Need Transfer Tape in All Cricut Projects?
No, transfer tape is only to be used with vinyl projects. The purpose of transfer tape is to transfer the design from the vinyl to the final project. So, if your project doesn’t include vinyl, you don’t need to use transfer tape. There are plenty of other accessories and tools to be used with Cricut to make a variety of projects.
Visit: Cricut.com/setup
www.Cricut.com setup login
cricut.com setup mac
install cricut design space app
cricut new product setup
Source: https://explorenewmachine.com/how-to-use-transfer-tape-with-cricut-a-beginners-guide/
#cricut.com/setup#cricut explore air 2#cricut setup#cricut#cricut.com/setup login#install cricut design space app#cricut.com setup mca#design.cricut.com/setup#cricut new product setup#setting up your cricut maker#cricut create connect to computer
0 notes
Text

Elevate Your Projects: Unleashing Creativity with the Cricut Explore Air 2
Want to elevate celebrations on special occasions? Well, Cricut has something for you. The top-notch Cricut Explore Air 2 accessories have versatile features, allowing you to easily cut 100 to 300 materials in less time. However, depending on your project type, you can get your machine from Cricut’s official website. Further, the machine has to be set up by going to Cricut Explore 3. On this website, you can select the device you are willing to set up and thus follow the screen’s prompts to complete the setup.
Visit here for more Information:- https://cricutmakerdesign.space/
#cricutdesignspace#cricutdesignspacedownload#cricutdesignspaceupdate#downloadcricutdesignspace#designspacecricut#cricutaccessories#cricutexploreair2bundle#cricutheatpress#cricutheatpresguide#cricutheatpresssettings
0 notes
Text
Cricut Setup for PC on Windows 10 [A Beginner’s Guide]
Cricut machines are revolutionary in the crafting business. These machines are creative, economical and help users to create thousands of creative things. You can choose from a wide range of Cricut machines like Cricut Explore 3, Explore Air 2, Maker, and Maker 3, as well as heat presses. The setup is common for all the machines. But, there can be a slight difference in the setup according to the Cricut model and the Windows version. We will see the Cricut Setup for PC on Windows 10
Cricut Design Space has a big role in the Cricut machine setup. It’s software in-built with Cricut machines. You need to download and install this software to access your machine. Let’s learn more about it.
What is Cricut Design Space?
Cricut Design Space is an app designed specifically for the Cricut Maker and Explore family of cutting machines. You can use this app on your desktop or mobile device to create various DIY projects.
This software has limited features but enough to get started with your Cricut machine. With the Cricut Access subscription, you can get unlimited features such as images, free fonts, and read-made projects. However, if you aren’t professional, you can skip taking that subscription.
You are also allowed to create your own designs by using the free fonts and images in the Design Space library. So, to get this software, you will need to install it on your device, and then you’re all set to make anything. Apart from Design Space, you can also use some alternatives like Adobe Illustrator and then send it to Design Space to format it.
How to Set Up Cricut on Windows 10?
Setting up the Cricut machine involves a few steps, from its unboxing to running a test cut. If you got a new Cricut machine recently, you should set it up properly. Here are the steps to set up your machine.
Step 1: Unbox Your Machine
When you get your machine, the first thing you do is unbox it and check all the important accessories inside the box. Check that it has USB, power cord, blades, cutting mat, and sample materials. So, when you are done with checking, install your Cricut machine in a safe, clean place near a power source.
Step 2: Connect the Machine to Your PC (Windows 10)
Use the USB cable you received in the package. Then, connect your machine and computer to it. Connect one end of the cable to the Cricut machine and another end to your computer. So, you have connected both devices to each other.
Step 3: Install Cricut Software
As we learned about the Design Space, it’s necessary to download and install it. After connecting your Cricut machine to the computer through a USB cable, go to Cricut’s official website to download and install the Design Space software.
Go with the described steps to get the software on your Windows 10 computer:
First, ensure that your computer is connected to a wireless network.
Then, open an internet browser and search cricut.com/setup.
Now sign in with your Cricut ID. If you don’t have an ID, create one by clicking the Create ID option.
Select your Cricut machine from the option and click the Download button.
Wait until the software gets downloaded completely.
Your file will be saved under the Downloads folder. Move there and double-click your file to open it.
Run the installation when an installation window pops up.
That’s how you can get Design Space software on your computer and use it for creating designs for your projects.
Step 4: Pair Your Machine to Design Space
Now, you need to connect your Cricut machine to the computer. This process may vary according to the Cricut model you have. So, select your machine’s model from the list of available devices and go with the on-screen instructions.
Step 5: Calibrate Your Cricut Machine
Once you pair your Cricut to the Design Space, the setup is complete. But what if the machine doesn’t work well? To avoid this, calibrate your machine. Calibration helps you get precise cuts. The machine itself will help you to be calibrated. You will require a calibration sheet to follow this step.
Once you complete calibration, you’re ready to do anything with your Cricut machine and create unlimited crafts and DIY projects.
Conclusion
Wrapping up Cricut Setup for PC on Windows 10, we can say that it’s easy and doesn’t require any additional skills. All you need is to connect your machine to the Windows 10 computer. Then, visit Cricut’s official website and then install the Design Space on your PC. Then, use your Cricut ID to log in or create a new account. After that, pair up your Cricut machine with the Design Space. Now, you are good to go. It would be better if you calibrated your machine before starting to use your machine.
Source: Cricut Setup for PC on Windows 10
0 notes
Text
How to Make a Cricut Mat Sticky Again: A Comprehensive Guide
Do you want to learn how to make a Cricut mat sticky again? This guide will show you how to clean your mat and get its stickiness back. I remember the day one of my friends, Alex, called me and asked me to help him regain mat stickiness. I said, “We have to meet so that we can figure it out.” When he finally came to my home with his mat, I helped him clean it. I also advised him to use cleaning agents and scrapers wherever required. In addition, I told him to use a Cricut scraper to remove the scraps after every project.
Well, I have known Alex since childhood, so I am not sure whether he will follow my tips or not as he is kind of a lazy person. But I believe you are not like him, so it would be better if you do something that helps your mat restore its stickiness. There is nothing much to do, just simple tips that I will be sharing in this write-up. Let’s get started!
3 Tips to Protect Cricut Mat Stickiness
Do you think we can permanently restore the stickiness? The answer is No. The Cricut mat can withstand up to 50 cutting uses. However, I would like to share some tips so that you can understand how to make a Cricut mat sticky again.
So, there are basically three tips I have mentioned below:
1. Clean Mats Using a Lint Roller/Scraper
Here, you can use a Cricut scraper or an older credit/debit card. A plastic gift card will also work so that you can remove the scraps from the mat easily.
2. Frequently Replace the Plastic Protector Sheet
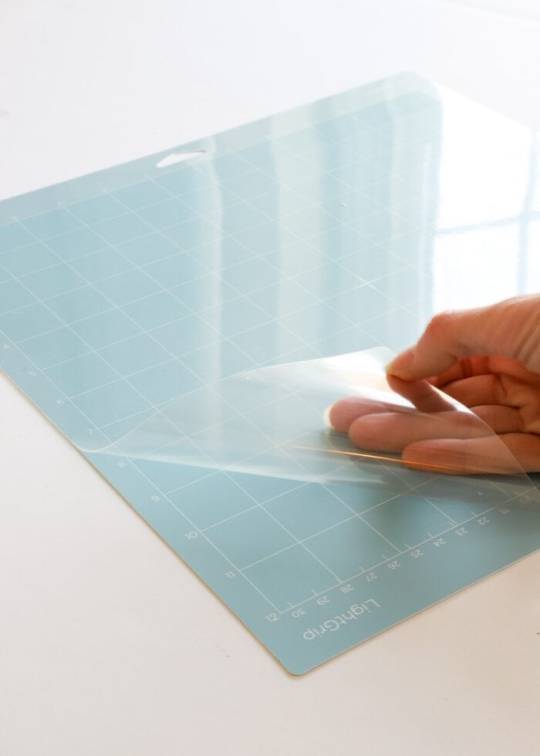
Cricut mats come with a transparent protective sheet that you can remove while using them and then reapply on the mat after every use. This protective layer protects your mat from dust and debris when not in use.
3. Use the Right Mat With the Suitable Material
Using the right materials is a must. Simply put, you should use the LightGrip mat for delicate papers and the FabricGrip mat for clothes or fabric. Plus, StrongGrip should be used for heavy-duty materials only.
How to Clean Cricut Mat With Baby Wipes or a Lint Roller?
Now, let me teach you how to make a Cricut mat sticky again. To teach this, I will give you the instructions step-by-step. Let’s first start gathering the supplies:
Step 1: Gather Supplies
Here are the essential supplies that you will need for cleaning your mat. Make sure you collect all of them to get your mat stickiness back:
Lint Roller
Plastic Cricut Scraper Tool
Dish Brush
Dawn Dish Soap
La’s Awesome Cleaning Spray
Alcohol-Free Baby Wipes
Step 2: Clean After Finishing Your Project
Whenever I do a project on my Cricut cutting mat, I always ensure that I clean it after every use. As a result, my mat lasts longer. So you can also clean it using the Cricut scraper.
Using this tool, you can take off the small pieces of extra materials, fuzz, and hairs.
3. Use the Right Mat With the Suitable Material
Using the right materials is a must. Simply put, you should use the LightGrip mat for delicate papers and the FabricGrip mat for clothes or fabric. Plus, StrongGrip should be used for heavy-duty materials only.
How to Clean Cricut Mat Using Dish Soap and Awesome Spray?
Don’t worry if the above methods don’t work for you! I have another two methods below. To learn the procedure of how to make a Cricut mat sticky again, try the below-mentioned methods carefully:
Method 1: Using Dish Soap
In this method, I use dish soap and warm water. I like to use mild dish soap such as Blue Dawn for better results.
First, you need to clean the mat using a scraper.
After that, you have to lay the mat on a flat surface.
Then, take a dishcloth or soft brush to rub the surface gently.
Now, rinse in warm water and leave it in the air for a while to dry.
Method 2: With Awesome Spray
Follow the steps below to clean the mat with awesome spray:
Spray the liquid.
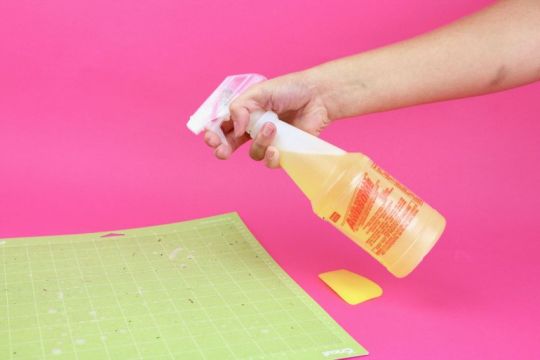
Then, leave it for a while.
Also, use the scraper to remove the extra material from the mat surface.
Rinse with warm water and let the mat dry in the air.
Final Words
In this write-up, I am explaining how to make a Cricut mat sticky again in a simple manner. All the stepwise methods will help you clean your Cricut mat. Be it a light grip mat or a strong grip mat; you should always start from the scraper and then move accordingly to the last steps to use dish soap and awesome spray.
FAQs
Question 1: Why is my Cricut mat losing its adhesive ability?
Answer: It is because you are not cleaning it, or maybe it has been used more than required. Repetitive use and debris can reduce the mat’s stickiness over time. However, you can extend the life of your mat; all you need to do is clean it using the right materials. To clean, you have to use a cleaning agent and a Cricut scraper.
Question 2: What is the lifespan of a Cricut mat?
Answer: Your Cricut mat can be used up to 50 times, meaning you can cut anything on it 50 times. Meanwhile, you should regularly clean your mat after every use. The better you keep it clean, the more sticky the mat will be. Also, sometimes, it depends on the materials that you have cut on it. For example, felt materials always leave some debris, and removing that is a tedious task.
Question 3: What glue can I use to make my Cricut mat sticky again?
Answer: If you want to regain the stickiness of your mat, you should use the Zig 2 Way Glue Pen. You can also use removable tape, such as painter’s blue or washi tape. Ensure the tape is wide enough to cover the outer edges of your cutting mat.
Source Url :- how to make a Cricut mat sticky again
Visit here for more Information :- Cricut Design Space
cricut explore air 2
cricut accessories
cricut heat press
cricut joy app
cricut explore 3
#Cricut Design Space#cricut explore air 2#cricut accessories#cricut heat press#cricut joy app#cricut explore 3#cricut explore air 2 accessories#cricut design space not working
0 notes
Text
8 Unique Cricut Thanksgiving Projects 2023
After celebrating Halloween, Cricut Thanksgiving projects keep crafters on track to continue their crafting. Whether you are hosting an intimate family gathering or celebrating a larger party, these Cricut Thanksgiving crafts will add a personal touch to the decor. With the festival only a week away, I'm excited because I want to take advantage of this golden opportunity to make custom projects on my own.
However, with my do-it-yourself ideas, renovating my home for this special occasion will become more manageable for me. Are you having trouble deciding which project will be the best for your environment? Then, I am here to solve this puzzle for you. Some of my favorite Thanksgiving crafts that you can make with a craft plotter are available below.
1. Candle Holder
If you want to have a romantic dinner date with your partner, then try to create a custom candle holder. With one of these Cricut Thanksgiving projects, you can not only make the table look more graceful and appealing, but you will also be able to share your inner feelings without any shyness.

Alt Text: Candleholders
2. Custom Pillow
Further, make your guests comfortable by arranging customized pillows on your couch or sofa. Apart from that, you can also keep the pillows in your wardrobe and reuse them for next year. It would help if you had a Cricut Maker, iron-on vinyl, blanks, and other supplies to make your pillows. Other than that, you can also add text, making the guest feel at home and sharing festive vibes.

Alt Text: A customized pillow
3. Frame
Designing a personal frame is also one of the best Cricut Thanksgiving ideas. With the frame by the side, I can save precious moments for a more extended period. However it seemed harsh in the beginning, but soon, I was able to access my craft plotter and made my first personalized frame. Now, to enlighten you more, I chose Cricut Maker as a cutting machine and cardstock as a material. However, it will be your decision which craft plotter you will be using to create the frame.

Alt Text: A DIY Frame for Thanksgiving
4. DIY Shirt
In addition, if you want to look perfect on Thanksgiving, then you should give it a shot by designing a customized shirt. After wearing the shirt, you will become the center of attraction for everyone. Other than that, the DIY shirt will also show your artistic side to everyone. Now, to create one of these Cricut Thanksgiving designs, you need to have Cricut Explore along with Design Space, tools, and Heat Press.

Alt Text: Personalize the "Happy Thanksgiving" logo shirt
5. Napkin Rings
Are you a person who loves to organize dining tables for any occasion? Then, you must be aware of the napkin rings. If you are a crafter, then you can design your own Thanksgiving napkin rings. Through this list of Cricut Thanksgiving projects, one can give shape to the time as per their napkin size. Besides, you can create napkin rings with Cricut Joy in just minutes.

Alt Text: A custom napkin ring
6. Coasters
Give your dining area a new look with Cricut Thanksgiving designs for designing personalized coasters. Also, the coasters will help you transform your dinner table into eye-catching and breathtaking. In addition, you can make these Cricut ideas for Thanksgiving with Cricut Explore Air 2 and Heat Press, along with tools and supplies. Besides, you can gift them as a token of love to your guests.

Alt Test: Coasters for Thanksgiving
7. Apron
If you love to cook, then the kitchen must be your favorite place to spend time. Talking about the list of Cricut Thanksgiving projects, I know it's tough to keep your clothes safe while cooking. I want to say that the apron makes me feel like a chef, and everything is under their control. If you are passionate about crafting, then try to design a customized apron. Just like me, you can also save money by making a personalized apron. For that, you need a Cricut Maker 3, Heat Press, and accessories.

Alt Text: DIY Thanksgiving Apron
8. Cutting Board
To keep my kitchen surface safe while chopping, I decided to create a personal cutting board for my kitchen. Among the vast choices of Cricut Thanksgiving projects, I preferred this craft. No doubt, the board has encouraged me to think of something creative and unique and share my crafting skills. You can make the board with your choice of wood and stencils with the Cricut Venture.

Alt Text: A cutting board for Thanksgiving
With such a fantastic choice of Cricut Thanksgiving ideas, you will be able to make this festival unforgettable.
Frequently Asked Questions
Question: Can I Make Money with Cricut Thanksgiving Crafts?
Answer: Yes, it is possible to make money with Cricut crafts. If you are a dedicated crafter, you can create and then sell it to the buyers. Apart from that, you need to ensure that you've all the crucial supplies with you while doing the projects. By selling the Thanksgiving projects, you can also start your own business or expand it.
Question: What Cricut Thanksgiving Projects Can I Make with My Cricut Machine?
Answer: It doesn't matter whether you are a beginner or an expert in accessing the craft plotter. Some of the fantastic Cricut crafts that you can make and give to your loved one are as follows:
DIY shirt
Napkin rings
Coasters
Apron
Cutting board
Gloves
Banner
Wood sign
Doormat
Personal baby bib
Hat
Custom gift bag
Question: What Supplies Are Needed to Make Cricut Projects for Thanksgiving?
Answer: If you are planning to make Thanksgiving projects with the Cricut machine, then you need some of the crucial supplies. They will help them in molding the craft as per their choice. Some of the primary supplies are as follows:
Cricut cutting machine
Design Space
Cricut tools and accessories
Cricut cutting mat
Material
Cricut blanks
Cricut pens & markers
Transfer tape & tools set
#Cricut Thanksgiving projects#cricut.com/setup#cricut explore air 2#design.cricut.com#cricut new machine setup#cricut design space login#Cricut thanksgiving designs#Cricut thanksgiving crafts#Cricut ideas for thanksgiving#Cricut thanksgiving ideas
0 notes
Text
Cricut Black Friday Deals: Get Creative Savings Now!
Black Friday is on its way. Are you prepared yet? Well, it's going to be so fun and enjoyable with the heavy discounts on your favorite things, isn't it? We will be focusing on the Cricut Black Friday deals you'll get on Cricut. I know how much you have waited for this opportunity to purchase your favorite products with your hard-earned money. Users will be saving a lot this year so that they don't have to look at the price tags every time.
If we talk about the Cricut machines, it has been 50 years since it was launched. This machine is going to be a great choice to get on this Black Friday season. You'll have hundreds of great features in the Cricut machine you choose. So, now I think I should disclose the pretty offers in front of you. Here we go!
Where Do You Get the Best Cricut Black Friday Deals?
There are plenty of options to get the best deals on Cricut machines and their regular accessories. We have made a small list of the best retailers that may offer you a great deal.
Amazon
Wayfair
Best Buy
Michaels
Target
Walmart
Hobby Lobby
Cricut's official website
Cricut's official website is the best platform to get some crazy deals on machines and accessories.
What Are Some Cricut Machine Black Friday 2023 Deals?
When you know where you get the best Cricut Black Friday deals, it's time to check out the offers and discounts you're going to have on the Cricut machines. So, let's get started with each Cricut machine and learn about the discount they are offering you.
1. Cricut Maker
The Cricut Maker is available at $299 at Cricut. You'll be saving $100 on this Black Friday. This can be the best deal this year. However, it was $150 off last year, and this year, Cricut is offering it as a best-selling cutting machine. Although this machine is an old Cricut model, it's still an effective machine with which you can make various projects.

2. Cricut Maker 3
This incredible Cricut machine is available at $399 at Cricut. You will save about $30.99 on this leading Cricut machine. Well, this isn't a heavy discount, though, but as the Cricut Maker 3 is the latest machine, it's worth it. Users who were expecting to get this machine on Black Friday will be happy to see their favorite machine at a lower price than the original.

3. Cricut Venture
It's a new addition to the Cricut lineup, and it hasn't been a long time since it launched. You'll get this machine at $1,199.99 at Cricut and save around $77.41 on it. The great thing is you'll get materials bundle along with the machine. So, if you were wondering about purchasing a new huge Cricut machine like Cricut Venture, the time has come. With decent pricing, this professional machine is completely worth it to consider.

4. Cricut Joy
This amazing portable craft machine is available at $149.99 at Cricut. You'll save about $30 on this tiny machine, which is no doubt less than last year's discount, but still, it's not less than everyone's expectations. So, it will be one of the best Cricut Black Friday deals you can get.

5. Cricut Joy Xtra Materials Bundle
The Cricut Joy Xtra machine is the successor to Cricut Joy, the tiny Cricut machine. Well, this is to confirm that the offer is on the machine's material bundle only. Cricut is offering you the material bundle at $249. Here, you'll save $22.94. Being a new addition to the Cricut lineup, we can't expect a heavy discount on the machine. But, on the materials, you will get more than enough discount this Black Friday.

6. Cricut Explore 3 Material Bundle
This machine is lightweight and hassle-free, which cuts with precision, and works faster than its predecessor. Explore 3 cuts two times faster than the Cricut Explore. Unfortunately, this machine doesn't get any discounts this year, but its Everything bundle has a big saving. At Cricut, it is available at $375.99, which is almost $141.93 less than its original price.

7. Cricut Explore Air 2
After the Explore 3, here comes the Explore Air 2, which has great value in the market. This Black Friday, you can get it at a lower price than the original. However this machine is a little old in the Cricut lineup, but it's one of the most excellent machines Cricut has ever made. You will get it at $229.99 at Cricut and save $20.

When Does the Cricut Black Friday Sale Start?
Well, the Black Friday sale hasn't been disclosed yet. But, based on the previous years, we can anticipate it to be released in the month of December 12-18 and will continue till the 26th. So, you have enough time to check out Cricut deals for Black Friday and select a product you wish to buy this Black Friday.
Conclusion
So, you looked around for the best Cricut Black Friday deals in 2023. There are many Cricut machines you can get this Black Friday at a hefty discount. Starting from the Cricut Maker to Cricut Explore Air 2, you'll get almost all machines at a lower price than the original. All these offers you'll be getting on Cricut's official website. However, there are some models, such as Cricut Joy Xtra and Cricut Explore 3, which have no offer on the machine; instead, their bundle has a decent discount.
0 notes
Text
Cricut.com/setup
Cricut Inc. has introduced a new machine, Venture. It is the fastest and the largest Cricut machine with many tools and accessories. The machine can cut over 100 materials while running at a commercial speed. Moreover, you can keep using this solid and well-designed machine with Cricut’s software, Cricut Design Space. It also includes a docking stand and built-in Bluetooth technology to make crafting more convenient.
install cricut design space app
cricut.com/setup mac
cricut maker software
Cricut.com/setup
cricut design space for mac
cricut design space for windows
cricut explore air 2 software
how to setup cricut maker
how to setup cricut explore
cricut setup for pc
Cricut Design Space software
#cricut setup for pc#Cricut Design Space software#how to setup cricut explore#cricut explore air 2 software#cricut design space for windows#cricut.com/setup#install cricut design space app#cricut.com/setup mac#cricut design space download#cricut design space#cricut explore air 2#cricut design space login
1 note
·
View note
Last Seen Blogs

keepfaith-thrudarknezz
flourished

skyarcher
Upādāna

sickan-chan
Sickan-Chan

plumpboybellies
Eat Up Bro!

sightseeingpanda-blog
Things