#csharp tutorial
Explore tagged Tumblr posts
Visit Tumblr Blog
Explore Tumblr blogs with no restrictions, modern design and the best experience.
Last Seen Tumblr Blogs


Fun Fact
China blocked Tumblr because of pornography and censorship problems in 2013.
Text
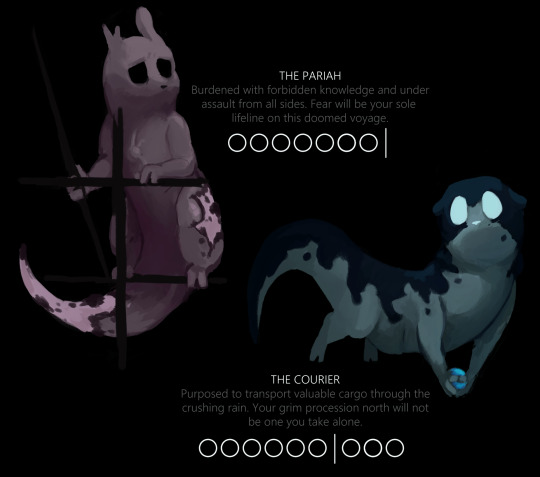
rain world consuming my brain a little lately... slugcat oc time :]
#rain world#rain world oc#slugcat#slugcat oc#my ocs#the pariah#the courier#clenching my teeth and opening the w3schools csharp tutorial. i want to make them real. so bad
68 notes
·
View notes
Text
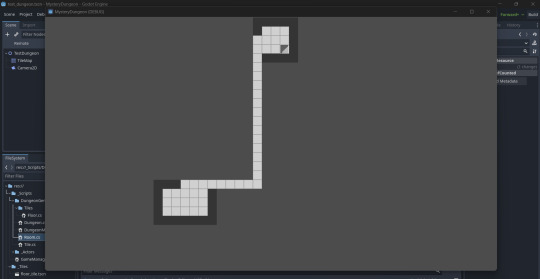
10/1/2023 Update
Howdy! I made a lot of progress this week regarding developing my room algorithm. I accomplished most of my initial goals. It isn't pretty, but it is functional and that is what matters. There is a lot to be improved, as the way I generate the hallways and similar is not very robust and breaks really easily, which in turn can cause a lot of issues, such as many crashes (seriously, I'm trying to fix the problem since I crash almost every 4th time I try running in debug mode or regenerate the rooms).
As always, here are some cool WIP screenshots during the development this week.
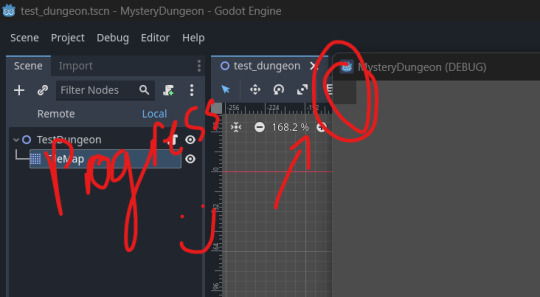
This was the first ever test of actually trying to spawn walls lol! It wasn't long before I managed to get it to actually work!
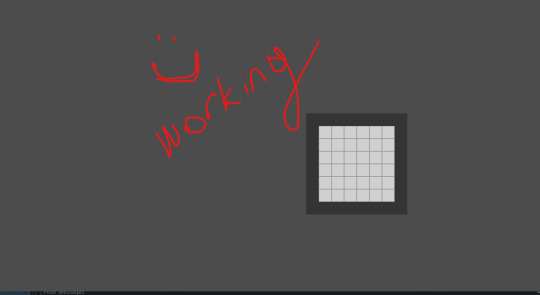
Godot has been pretty straight forward so far and it really helps that they have native C# support, else this all would've taken a lot longer. After I managed to get 1 room generated, I then implemented the logic for other rooms.
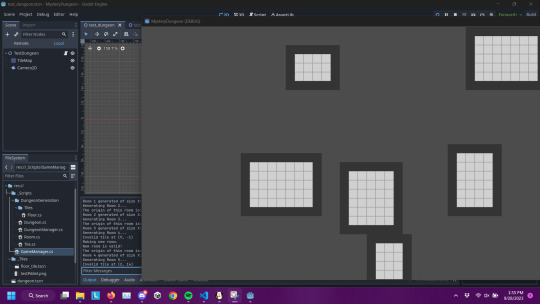
I got a proper algorithm to ensure no rooms would generate on top of each other, and it has worked well so far! Once I knew I could make multiple rooms, I then focused really hard on getting the hallways. I am not 100% happy with how my code works for the paths, as it only really works for L hallways and I already want to try and work on refining the dungeon algorithm before I go super far into developing other mechanics for the game. However, what I have works for now.

The corridors were backwards! This was a headache to fix mainly due to sloppy code. But eventually...

I ironed out a few more cases afterwards, but I had it good enough I wanted to implement spawning in the player/ other actors within the dungeon. It made me really learn how the node system worked in Godot and it actually is very intuitive, I like it a lot. This all culminated in this short video!
And that is where my development is! I am having a lot of fun and really proud I figured out most of this stuff on my own, only looking up some basic stuff or what a function is called.
My current goals are going to mainly comprise of refactoring and cleaning up the room generation and tile placement. But the next big hurdle is figuring out how to handle the Turn-Based combat & updating. Definitely a big goal but I am excited to figure it out! Gonna be busy this week with more schoolwork, but should have plenty of time to keep developing.
#gamedev#indiedev#godot engine#godot#video games#game development#mystery dungeon#pokemon mystery dungeon#coding#clawing out of tutorial hell#c#programming#csharp#pmd#roguelike#indie developer#indie dev#devblog#developer
2 notes
·
View notes
Text

MASTERING C#: FROM BASICS TO ADVANCED
This infographic offers a clear roadmap to Mastering C# tutorial, covering everything from basic syntax and object-oriented programming to advanced topics like LINQ, async/await, and .NET frameworks. Ideal for beginners and intermediate developers, it visually breaks down key concepts, practical tips, and learning milestones to accelerate your C# journey.
CONTACT INFORMATION
Email: [email protected]
Phone No. : +91-9599086977
Location: G-13, 2nd Floor, Sec-3, Noida, UP, 201301, India
Website: https://www.tpointtech.com/c-sharp-tutorial
0 notes
Text
0 notes
Text

C# - "this" #keyword | #csharp #tutorial Class 10 in اردو/हिन्दी
Watch Video: https://youtu.be/nyv5ekQx5nI
0 notes
Text
I'm baaaack
can't catch a break from my wifi, it just dies for entire weeks sometimes >:(
I'm trying to fix it
but I have made some progress on the Ivory Game, it has a sonic, and he can stand on the ground :D
I haven't made a player controller yet, but csharp is hard and I've never used unity before, so having something at all is amazing for me
super excited tho, and bc my wifi is kinda back I can download more tutorials yippee
3 notes
·
View notes
Text
APIs with Entity Framework Core: PUT
Continue the tutorial about APIs with Entity Framework Core and in particular how to implemente the #PUT to update a record with dependencies. #efcore #minimalapi #csharp
Continuing the topic, I want to give a complete example of minimal APIs in Blazor with Entity Framework Core with complex objects.I always struggle to have a solution working when my model has dependencies with other object. Here I show my test and my code. The code is in NET9. In the Microsoft documentation, there are some examples, but it is not complex enough. A few days ago, I posted about…
0 notes
Text
Unity Game Development: A Beginner's Guide to Building Your First Game
Introduction
Unity is one of the most popular game engines in the world, and for good reason. It’s versatile, powerful, and accessible to both beginners and seasoned developers. Whether you’re dreaming of creating the next indie hit or just want to dive into game development as a hobby, Unity is an excellent place to start. In this blog, we’ll walk you through the basics of Unity game development, share tips for getting started, and explore why Unity is such a beloved tool for game creators.

Why Choose Unity?
Before diving into the technical aspects, let’s talk about why Unity is such a great choice for game development:
1. Cross-Platform Support: Unity allows you to build games for multiple platforms, including PC, consoles, mobile devices, and even AR/VR. Write once, deploy everywhere! 2. User-Friendly Interface: Unity’s drag-and-drop interface and visual editor make it easy for beginners to get started. 3. Strong Community: With millions of users, Unity has a vast community of developers who share tutorials, assets, and solutions to common problems. 4. Asset Store: Unity’s Asset Store is a treasure trove of pre-made assets, scripts, and tools that can save you time and effort. 5. Powerful Scripting: Unity uses C#, a beginner-friendly programming language, for scripting. It’s both powerful and easy to learn.
Getting Started with Unity
1.Download and Install Unity Head over to [Unity’s official website](https://unity.com) and download Unity Hub. Use Unity Hub to install the latest version of the Unity Editor. You can also install specific versions if needed.
2.Learn the Interface Familiarize yourself with Unity’s interface. Key panels include: Scene View: Where you design and build your game world. Game View: A preview of what your game will look like when played. Hierarchy: A list of all objects in your current scene. Inspector: Displays properties of selected objects. Project Window: Where all your assets (scripts, textures, models, etc.) are stored.
3. Create Your First Project — Open Unity Hub and create a new project. Choose a template (e.g., 3D, 2D, or VR) based on the type of game you want to make. Name your project and click “Create.”
Building Your First Game
Let’s create a simple 2D platformer to get you started:
1. Set Up the Scene Import 2D assets (like a character sprite and platforms) into your project. Drag and drop your character sprite into the Scene View to create a GameObject. Add a Rigidbody2D component to your character to enable physics.
2. Add Movement Script Create a new C# script (e.g., `PlayerController`) and attach it to your character. Write a simple script to handle movement: ```csharp using UnityEngine;
public class PlayerController : MonoBehaviour { public float speed = 5f;
void Update() { float move = Input.GetAxis(“Horizontal”) * speed * Time.deltaTime; transform.Translate(move, 0, 0); } } ``` This script allows the player to move left and right using the arrow keys.
3. Add Platforms Create platforms using sprites and position them in the Scene View. Add BoxCollider2D components to the platforms to enable collisions.
4. Add a Camera Ensure the Main Camera is following the player. You can write a simple script to make the camera follow the player’s position.
5. Test Your Game Click the Play button in the Unity Editor to test your game. Make adjustments as needed.
Tips for Success in Unity Game Development
1. Start Small : Don’t try to build a massive game right away. Start with small projects to learn the basics. 2. Use the Asset Store : Leverage free and paid assets to speed up development. 3. Learn C# : While Unity’s visual tools are powerful, knowing C# will unlock the full potential of the engine. 4. Follow Tutorials: Unity Learn and YouTube are great resources for step-by-step tutorials. 5. Iterate and Test : Game development is an iterative process. Test often and refine your game based on feedback.
Advanced Unity Features to Explore
Once you’re comfortable with the basics, dive into Unity’s more advanced features: Animation : Use Unity’s Animator to create complex animations for characters and objects. Lighting and Post-Processing : Enhance your game’s visuals with realistic lighting and effects. Physics : Experiment with Unity’s physics engine to create realistic interactions. Multiplayer : Explore Unity’s networking tools to build multiplayer games. AR/VR: Unity is a leading engine for augmented and virtual reality development.
Conclusion
Unity game development is an exciting journey that combines creativity, problem-solving, and technical skills. Whether you’re building a simple 2D platformer or a complex 3D world, Unity provides the tools and resources you need to bring your vision to life. Remember, every great game starts with a single line of code — so start small, keep learning, and most importantly, have fun!
For more information
0 notes
Text
How Can Selenium Tutorials Enhance Your Automation Skills?
Selenium is one of the most used frameworks in web application testing. It supports multiple programming languages, ensuring that the testers can write the scripts in languages that they understand best. There are a lot of tutorials for you, whether you are new to automation, have already been automated for some time, or are even a professional. For instance, a Selenium Java Tutorial is crucial to recruits who go for Java, whereas there is a Selenium csharp tutorial, which is ideal for testers who operate in C#.

Learning Selenium with Java
If you are a Java user, this would greatly help the Selenium Java Tutorial. This tutorial takes the Selenium novice through the installation of the versatile tool and writing complex scripts. The development approach details are also explained to the testers, and they learn how to work with web elements, work with pop-ups, and include JavaScript in their tests. A Selenium Java Tutorial also covers frameworks such as TestNG and JUnit and the organization and execution of test suites.
Automating with Python and Selenium
Python is another language that fits well with Selenium automation because of its readability. A Python Selenium tutorial explains perfectly how to install Selenium with Python. This involves code to install the required packages, configuration of the WebDriver, and simple and complex tests. The Python Selenium tutorial cares about such practices as, for example, creating a Page Object Model (POM) in order to have appropriate test scripts.

Exploring Selenium with SpecFlow
Any person who wants to explore Behavior-Driven Development (BDD) will find a selenium specflow tutorial handy. SpecFlow is the. TestCafe is the NET equivalent of Cucumber and lets testers write the tests in the Gherkin language. Selenium specflow tutorial shows the testers how to work with Selenium alongside SpecFlow, write feature files, and create step definitions. This approach simplifies the test scenarios to a reusable form that is readily understandable by a business analyst so that he can collaborate more effectively with other team members.
Learning Selenium with C#
A selenium csharp tutorial is more relevant to testers because C# is the language they use mostly. It is a step-by-step guide to using Selenium WebDriver, from configuring the environment to finding elements and writing scripts. Some more complex scenarios that may be covered in a Selenium csharp tutorial are dealing with dynamic elements, handling frames and Iframes, and using testing frameworks such as NUnit or MSTest. In particular, with the help of Selenium combined with C#, testers receive a powerful tool to implement and test practical approaches to robotic web applications.
Introduction to Robot Framework
For those searching, the Robot framework tutorial is handy for those with a keyword-oriented approach to testing. The Robot framework tutorial allows and teaches the testers how to install the framework, create test cases, and use keywords when working with web elements. It works in perfect harmony with Selenium: empowered with this tool, even relative novices in coding will be able to write more sophisticated and detailed testing programs. This makes it easy to be understood even by non-technical staff members in the team.
Combining Python and Selenium
The Selenium Python tutorial is analogous to the Python Selenium tutorial and aims to teach the usage of Selenium WebDriver in Python. In this tutorial, the author discussed pragmatic topics of writing a test script, exception handling, and various actions such as clicking, typing, and others. When performing the Selenium Python tutorial, the use of libraries such as pytest is often demonstrated for test organization and test execution, as well as methods of data-driven testing.
Enhancing Skills Through Tutorials
Through the Selenium Java Tutorial, Selenium Csharp tutorial, Python Selenium tutorial, Selenium spec flow tutorial, and Robot framework tutorial, testers can develop a set of knowledge of Selenium automation. Each tutorial offers perspectives and useful tips, helping testers make the right choice of strategies for their work. These tutorials enable continuous learning to guarantee that skill degeneration and rendering obsolete do not affect the testers.
0 notes
Link
Cancellation Tokens in C#: Best Practices for .NET Core Applications
With the help of Cancellation Tokens, a potent feature of the.NET environment, developers may gracefully terminate asynchronous processes. We will examine the best practices for utilizing Cancellation Tokens in.NET Core apps in this extensive tutorial. We will go over the fundamentals, explore more complex situations, and offer real-world examples to help clarify these ideas.
Asynchronous programming is a core idea in contemporary software development that improves the performance and responsiveness of applications. In situations like I/O-bound activities, network requests, or complicated calculations where tasks may take an unpredictable length of time to finish, asynchronous operations are essential. But asynchronous processes necessitate strong task management, especially when it comes to effectively and neatly handling job cancellations. This is where C#’s Cancellation Tokens are useful...
Learn more here:
https://nilebits.com/blog/2024/06/cancellation-tokens-in-csharp/
0 notes
Text
Unlock the Power of React Native: A Complete Guide to App Development Success
Introduction to React Native
React Native is a revolutionary framework that allows developers to create mobile applications using JavaScript and React. Since its inception by Facebook in 2015, React Native has transformed the landscape of mobile app development by enabling cross-platform compatibility without sacrificing performance or user experience. This comprehensive guide will delve into the myriad benefits of React Native, its core features, and best practices to ensure your app development project is a resounding success.
Why Choose React Native for App Development?
Cross-Platform Development
One of the most compelling reasons to choose React Native is its ability to build applications for both iOS and Android from a single codebase. This reduces development time and costs significantly, allowing for a more streamlined and efficient workflow.
High Performance
React Native leverages native components to ensure high performance. Unlike hybrid frameworks that rely on WebView, React Native’s architecture bridges the gap between JavaScript and native code, resulting in smoother animations and faster load times.
Rich Ecosystem and Community Support
The extensive ecosystem of libraries and tools available for React Native accelerates development and problem-solving. Moreover, the active and vibrant community provides ample resources, tutorials, and forums for support.
Key Features of React Native
Hot Reloading
Hot Reloading is a feature that significantly enhances developer productivity. It allows developers to see changes in real time without rebuilding the entire application. This leads to quicker iterations and more efficient debugging.
Modular Architecture
React Native's modular architecture enables different developers to work on separate modules, enhancing collaboration and project manageability. This modularity also makes it easier to maintain and upgrade the application.
Live and Hot Reloading
React Native supports live and hot reloading, allowing developers to inject new versions of files while an app is running. This feature is particularly useful for tweaking the UI and fixing bugs on the fly, ensuring a seamless development process.
Getting Started with React Native
Setting Up the Development Environment
Before starting with React Native, you need to set up your development environment. Here are the essential tools and steps:
Node.js and npm: Ensure you have Node.js installed. npm (Node Package Manager) is included with Node.js and is necessary for managing packages.
React Native CLI: Install the React Native CLI using npm.
java
Copy code
npm install -g react-native-cli
Android Studio/Xcode: Depending on your target platform, install Android Studio for Android development or Xcode for iOS development.
Integrated Development Environment (IDE): While you can use any code editor, Visual Studio Code is highly recommended due to its robust support for JavaScript and React Native.
Creating Your First React Native Project
Once your environment is set up, create a new React Native project by running:
csharp
Copy code
react-native init MyNewProject
This command sets up a new project directory with all the necessary files and dependencies.
Running the Application
Navigate to your project directory and start the application:
arduino
Copy code
cd MyNewProject
react-native run-android
or
arduino
Copy code
react-native run-ios
This will launch your application on an emulator or physical device connected to your development machine.
Best Practices for React Native Development
Code Organization
Maintaining a well-structured codebase is crucial for scalability and maintenance. Follow these practices:
Component-based architecture: Break down your UI into reusable components.
Folder structure: Organize your files logically, separating concerns like components, screens, services, and utilities.
State Management
Managing state effectively is vital for building dynamic applications. While React Native comes with built-in state management, libraries like Redux or MobX can be used for more complex state management needs.
Performance Optimization
Ensure your app runs smoothly by adhering to performance best practices:
Avoid unnecessary renders: Use PureComponent and shouldComponentUpdate to prevent unnecessary renders.
Optimize images: Use appropriate image sizes and formats, and consider using tools like FastImage for better performance.
Reduce memory usage: Profile and monitor memory usage, and avoid memory leaks by cleaning up resources appropriately.
Testing Your React Native Application
Unit Testing
Unit tests verify that individual components of your application work as expected. Libraries like Jest and Enzyme are popular choices for unit testing React Native applications.
Integration Testing
Integration tests ensure that different parts of your application work together. Detox is a powerful library for end-to-end testing, offering robust features for testing user interactions.
Continuous Integration (CI)
Implementing CI tools like CircleCI or Travis CI helps automate the testing process, ensuring your codebase remains stable and functional as new changes are introduced.
Deploying Your React Native App
Building for Production
Prepare your application for production by optimizing performance and ensuring stability:
Code minification and obfuscation: Use tools like ProGuard for Android and built-in Xcode options for iOS to minify and obfuscate code.
Enable production mode: Ensure you build your app in production mode to take advantage of optimizations.
arduino
Copy code
react-native run-android --variant=release
react-native run-ios --configuration Release
App Store Submission
Follow these steps to submit your application to app stores:
Android: Generate a signed APK and upload it to the Google Play Console.
iOS: Archive your project in Xcode and submit it through the Apple Developer Console.
Conclusion
React Native is a powerful and versatile framework that bridges the gap between web and mobile app development, providing a robust solution for building high-quality, cross-platform mobile applications. By following best practices, leveraging its rich ecosystem, and staying up-to-date with the latest advancements, you can unlock the full potential of React Native and achieve app development success.
0 notes
Text
C# LINQ Streaming
Elevate your C# applications with LINQ streaming!
Discover real-time efficiency, reduced memory usage, and seamless scalability. Master the art of streaming with practical examples and tutorials. 🌐✨ Read more: C# LINQ Streaming Blog 📖🔗 Watch the tutorial on YouTube: C# LINQ Streaming Tutorial 🎥🔍
#CSharp #LINQStreaming #Programming #DeveloperTips
0 notes
Text
youtube
Free Tutorial: Designing Database Connection Settings Page (English Audio) - Part 2
#iBasskung #Programmer #Programming #Coding #CSharp #PostgreSQL #VisualStudio #ProgrammingTutorials
1 note
·
View note
Note
LearnXinYMinutes is a really good reference if you already have some sense of how things are put together, some languages don't require a CS degree to read through the explanation. I even used it myself to quickly review C# since I have barely touched that language in a few years (Elixir, Python, C, Bash, Pascal-like -- are what I use in my day-job).
https://learnxinyminutes.com/docs/csharp/
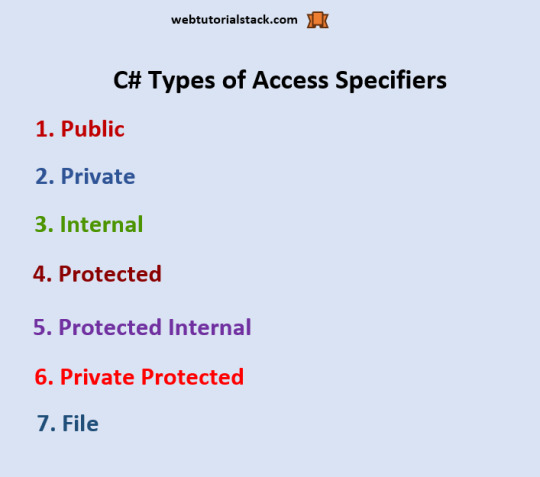
@oneominousvalbatross Jump to "Bicycle" for the visibility (public, private, protected, internal) explanation with Ctrl+F to search.
Microsoft's docs on it are also an *okay* reference, there was a lot in the .NET implementation that I ran into as issues for dealing with raw network and serial connections, it's still documentation.
https://learn.microsoft.com/en-us/dotnet/csharp/language-reference/keywords/accessibility-levels
There's some foundations that need to be found outside of tutorials, here is a summary of a 100 level Computer Science course. C# is going to fall into the realm of OOP (Object Oriented Programming); where rather than writing functions that just do stuff, that stuff is attached to classes as methods. Other stuff that is stored as variables of the class is what are known as properties of a class or object. There is a distinction between class and object, where the class is typically called the blueprint or template; this is a half-truth and a little more complex without getting into how programming languages are designed. The class can contain methods that act on the instance of the class (the object), or methods that act on data fed to a the class itself when they are declared with "static".
FooClass foo = new FooClass(); // Object
foo.someSelfOperation(); // Instance method
FooClass.turnXintoY(bar); // static Class method
// public static turnXintoY(int x) { return y; }
This is where I explain visibilty/public/private.
Public: Any class/object can access the labeled property or method. This can be anything that references it.
Private: Only the class/object itself can access the labeled property or method.
Protected: Only the class/object itself _and_ those that *inherit* it will have access. I recommend reading up on Inheritance early it really helps with code reuse.
// Has Access to protected in Bicycle
class MountainBike : Bicycle { ... }
// Can only access public in Bicycle
class FooBar2000 : MusicProgram { ... }
Internal: Only files in the same Assembly will have access. What does that mean? Files that get compiled into the same final file will have access, like `exe` and `dll`. It doesn't matter so much if you're not building libraries for other people to use, but if you build two projects the `exe` will not be able to access those protected items in the `dll`. `pingle.dll` will similarly not be able to access protected items in `sprocket.dll` if it is linked against it. Really, you might not have to worry about this one until much later.
That's it for what I can provide right now, don't look into C# as C-like because then terminology will get mixed; `static` means something **completely** different in C.
Hi! I'm learning C# right now, and the tutorials I'm using are great, but as a coding expert, I was wondering if you had any off-the-cuff recommendations for like, basic C-language coding terminology explanations. Like, I *sort of* get the public variable distinction, but I don't *really* get it and I'd love to be able to read an explanation for things like that specifically.
Sorry, I'm not really sure where you'd go for that sort of information. Any followers have any advice?
154 notes
·
View notes
Text
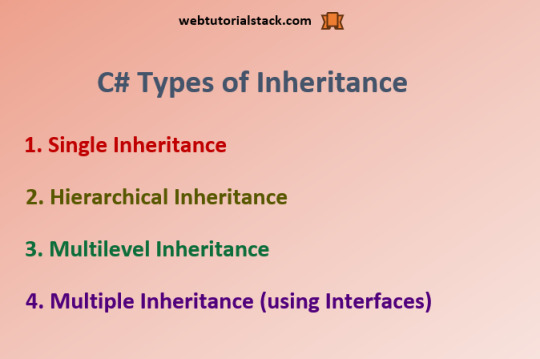
To learning about the types of inheritance in csharp with proper examples please click here.
#csharp tutorials#dot net development company#dot net#webtutorialstack#web development#inheritance series
0 notes
Text

C# - Abstraction in OOP with Examples | C# Tutorial Class 16 in اردو/हिन्दी
Watch Now: https://youtu.be/HmLwxPUfiXI
#programming #csharp #oops
0 notes