#custom menu rpg maker mv
Text
HYPERSOMNIA MARCH DEV LOG : "If you have love in your heart"
Hi! For all of you who follow HYPERSOMNIA, you should already know what the gist is here, but for those of you who are new, or just new to our tumblr, let me fill you in!

For 2024, I am trying to release a dev log about HYPERSOMNIA once a month, may come earlier, may come a little late, but I'm doing this to help give insight on to how the game is going, and to give me motivation to work on the game.
First things first, sorry about the incomplete drawing for this month's log. I've been sitting on this drawing for months and haven't touched it, and I needed a drawing for this months log so I thought "Eh, what the hell."
For this month, things have been a bit up and down, I've been focusing on more smaller stuff in engine this month, and bigger stuff outside of engine. So there's not a lot that's been added but there is new stuff that I'd like to share. :)
I'd like to start with the smaller stuff first, since I feel like most logs I've started with the bigger stuff and kinda run out of steam by the end. So it'll be along the lines of "Small in-engine stuff > Big in-engine stuff > News/closing thoughts".
NOW LET'S GET TO THOSE UPDATES!
Lots of menu work has been done this month, which isn't very exciting sounding but it's nice to be getting this stuff over with.
HYPERSOMNIA has a smaller resolution than RPG Maker MV's default, and the thing about that is a lot of content in menus doesn't scale accordingly, leaving stuff to get cut off and preventing the player from accessing information.
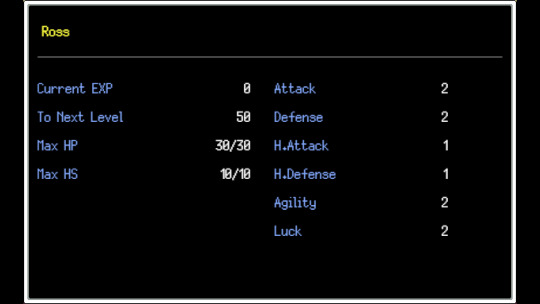
One of the things I've had to do is get the player's HP and HS to appear on the status screen. These usually appear on the main menu of the game, but since I use an alternate menu for screen space, they had to be relocated. (courtesy of SundialShark, I'm not familiar with JS so they've been a super big help with certain things in the game.)

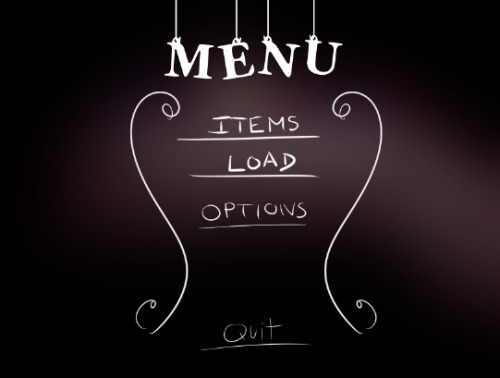
The game's title screen also saw a slight improvement, I found a plugin that replaces the windowed options on the title screen with pictures, making them more customized. The title screen artwork itself will be revised later, as I whipped it up as a placeholder.
Also, do you remember last month's dev log? Specifically, the part of it where I talked about the equip menu in battle? Well shortly after writing that dev log, it was finished!
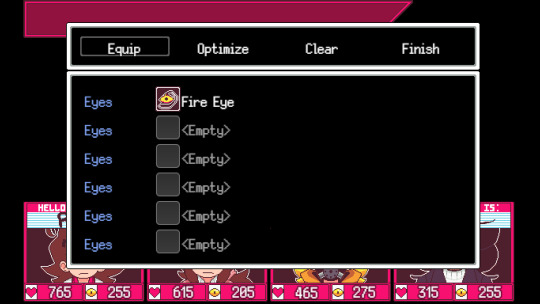
This works how you'd expect it to, you can equip/unequip eyes and give them to other party members. The only drawback to this is that touchscreen isn't fully supported I've been told, which is fine since this is a game intended for PC. It does work with controller though which is nice.
Speaking of battles, I've been working on special attack animations! I have the main 4's offense animations done.


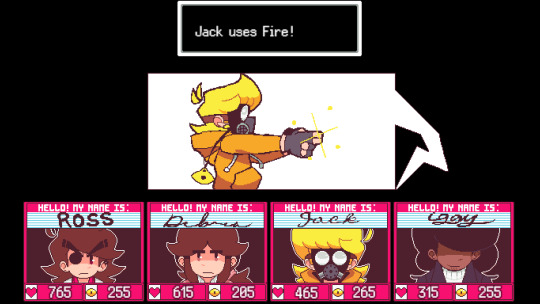
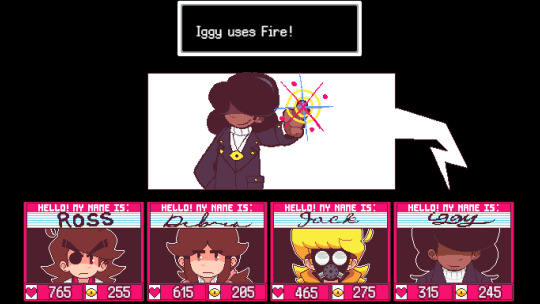
My personal favourite is Jack's. Everyone else does it all cool but Jack aims like he's holding a gun which is cooler. I'll probably touch up Ross' animation, since it looks kinda weird to me. I think his head might be too small.
Also, would you believe me if I told you that isn't all the battle stuff that was done this month? This is where that "Big in-engine" stuff kicks in.

THE BACKGROUND SYSTEM HAS BEEN IMPROVED! (ALONG WITH ME DESIGNING SOME NEW ENEMIES!)
This took a bit of time to configure, but I replaced the old background system for a new one
(Which was originally set up with my buddy Majimjam of HYADES, awesome game that has a demo out RIGHT NOW!)
With Jengamon's EarthBound Backgrounds plugin, it's been really fun to just toy with it and see what I can make. I would try and run down how this works, but the funny thing is I don't even know how this works. Or, at least in full anyways. I know how to configure it and set up new presets for enemies.
That's pretty much all the in-engine stuff I've done this month, but I'm not out of stuff to talk about yet.
First, I recently wrote a thread on the RPG Maker Forums about HYPERSOMNIA, which you can read here!
Secondly, some of you might've seen this already but I decided to cut FIREBALL from the game's soundtrack fully.
There were a multitude of reasons as to why, but the biggest one is I just don't feel like FIREBALL fits HYPERSOMNIA anymore. The vision has shifted since 2021 and I feel like music for battles could reflect it better, so FIREBALL was scrapped.
The song was uploaded to my personal YouTube channel though, so you can still listen to it here.
Third, THE NEW TRAILER IS ALMOST DONE!
There's still a few things that need to be touched up, but the music and footage is all fully recorded! All that's left to do is throw it in the editor and refine it until it's finished.
I'm very proud of this trailer so far, and I think it'll blow every other trailer I've made out of the water. My goal for this trailer was to improve the editing and I think that's definitely one of the highlights for this trailer.
I'd really like to post a quick sneak peak, but everything about this trailer I feel will be such a surprise that I don't want to spoil it. You'll just have to wait for the Mother Direct!

And that's it for this month! Slow but steady progress is how I'd sum up March. I'm definitely looking forward to the future. Mostly because I'm going to a restaurant with family later today, but next month will have more in store. Like my birthday! Big things coming.
Thanks for reading to the end of the dev log, same as always, these are fun to write. I appreciate you reading them!
If this is your first log you're reading, or even your first time seeing ANYTHING relating to HYPERSOMNIA, I got a whole bunch of links for you to check out if you wanna know more about me and my stupid little game.
TWITTER
YOUTUBE
STEAM
UNIQUE INDIE RPG'S [SHOW US YOUR GAME!]
[PREV] [ABOUT HYPERSOMNIA] [NEXT]
23 notes
·
View notes
Note
hi! I'm working on my own rpgmaker game but i can't find any good resources on UI editing or anything like that. I love how duck soup's looks and i was just wondering if you'd be able to share any info or resources on knowing how to edit that stuff. if not though that's totally ok i'm just curious :)
hello !! good luck with your game, and sure !! rpgmakers ui is a bit tricky if you're not familiar with the engine as it doesn't exactly make it intuitive
basically, to get the ui in DUCK SOUP, i did 3 things:
use a plugin to get the portrait busts
use a plugin to get the text
recolor an image within rpgmaker to get the ui outline and style
the portrait busts can be implemented with a plugin outlined here: https://youtu.be/mZARyO-yaz4 !! basically, its just a plugin that allows you to replace the little portrait squares in rpgmaker with busts that can show anywhere you want on screen. It's very flexible and i highly recommend it!
for the custom font, i used the ve_sfont plugin as i used an image file in order to get the font i wanted. this is completely optional as you can just replace the text file within rpgmaker instead, which is far easier, but i was addicted to that old rpgmaker font look so... here ya go ! https://victorenginescripts.wordpress.com/rpg-maker-mv/sfont/
and finally, rpgmaker's ui can be edited by editing the ui file itself! a tutorial can be found here: https://youtu.be/hjo9UOEIWh4 but basically:
rpgmaker has a little file within your game files that looks something like this:

from this itty bitty image, it determines how it'll create the menu ui! you can edit this image to give the ui a different look :>
and that is my knowledge... hope it helps!
20 notes
·
View notes
Text
MOTHERMAKER Progress Report
(WEEK 1)
INTRO:
Ever since 2020, I've been toying with the idea of making an authentic 'MOTHER' engine within the limitations of RPG Maker.
I bounced from engine-to-engine, trying to find the right Maker to start work in, and eventually settled on RPG Maker MV.
You can even see some of my early progress here!
The hyperfixation eventually subsided after some small adventures in the MOTHER fangame scene, and I took a fairly long hiatus.
Fastforward to 2023 and you'll find me. In my room. Really Fucking Bored.
It started off with me brushing up on my event code, making some practice menus and playing with switches and variables. Eventually I ended up with this.
NOW. For the fun stuff...
TECH! TECH! TEEEECHHHH!!!!!!!!!!!!!!!
Going into this project, I had like. Three Fundamental Rules.
Those being;
All CORE systems must be retroactively achievable in previous versions of RM.
Everything must be achievable through RM's default features (i.e. I must utilize the default map editor, database, etc.)
Plugin/Script usage MUST be kept to an absolute minimum.
This will definitely make things difficult moving forward, but if I wish to create some sorta out-of-the-box MOTHER framework (especially one with THIS scale), I think it's important to adhere to SOME kind of design philosophy.
With these principles in mind, allow me to show you some of the duct tape and bubblegum holding the code together!
Starting with;
Menu Stuff!
In RM, developers are very limited when it comes to customizability, at least out of the box. That changed around the time we first received those iconic Don Miguel fan translations. Many developers were dissatisfied with the default systems given to them, and instead opted to use in-game eventing to manipulate pictures to do whatever they wanted. Very interesting stuff!
However, despite me being able to Talk For Fucking Centuries about RM history, I don't wanna lose too much focus on the subject at hand. You can check out my favorite website ever over here to learn more about the early lil seedlings of our community!
Anyways, almost every graphic-based aspect of this project is done through vanilla eventing. Now, as any Well Seasoned RM Developer can attest, THIS IS NOT A FUN PROCESS!! This is done by modifying variables based on inputs, and referencing those variables to determine where your image should be drawn.
This process can range from easy:

to HARD:

(just reference the scrollbar size for an idea of the process, this kinda shit is NOT something you want to see)
Now, for the save system, it was relatively straightforward. I just changed some switches to record which save the player selected, and a few variables to record which 'flavor' the player chose. These are referenced at various points, such as the battle system, the in-game menus, and even small stuff like dialogue boxes.
For the naming system, well, I haven't actually finished that yet. But you'll undersTAND WHY I PROMISE..
Basically, if I wanted to do this in a way I could "easily" downport to other versions, I had to avoid writing a plugin for it. As you can imagine, eventing an entire custom naming system is Not Fucking Fun. It's fairly easy to do however, just mighty tedious. I did some digging in threads for old RPG Maker MOTHER fangames, and I saw a few examples of people explaining how they made their systems.
Let's call my Chosen Approach 'The Roach Method'. This is named after the creator of a long-since-cancelled fangame called EAGLELAND. Essentially, he made different 'Actor' slots in the database for each letter of a characters name, and referenced them in dialogue through text codes. Once set up, it should look a little something like this;

So on and so forth.
The frontend of my keyboard (and a tiny bit of the backend), is functional. Obviously I can make it prettier and more responsive, but I want to make the naming process smooth first.
I'm thinking of making it so that when you press okay, it triggers a switch to move onto the next letter, and then when you press the cancel key it goes back by one? Idk yet this Keyboard Is The Worst Fucking Thing Ever.
Movement:
Most RM devs know this, but 'pixel' movement doesn't really play nice with the way the engine handles collisions. In my (few) years of Mother Fangame Experience, I've come to learn that the weird pseudo-collision detection utilized by RM (iirc its just a coord check to see if you can move or not) doesn't really Provide the Movement Experience we've come to expect from the MOTHER series.
This is one of the many contentious aspects of making MOTHER fangames in RM. A lot of devs treat (newer) makers like this "out of the box" solution to everything, this framework that you can just absolutely stuff to the brim with plugins to achieve whatever functionality you want. However, in practice, this proves to (almost) never be the case.
It's an especially nasty mindset because it contradicts the reality of gamedev (at least within RM) being a constant uphill battle full of compromise. Unfortunately this stuff takes effort, more effort than just dragging and dropping a JS file into the plugins folder.
tl;dr: plugins and scripts should only ever be complimentary to your event code, don't expect them to do everything for you!
RANT ASIDE!! For the most part, unless you want to make a whole new movement and collision system from scratch, you're gonna wanna stick with the grid. Most grid-based diagonal movement plugins allow you to turn on a setting that lets you clip through the corner of tiles (PLUS, the default follower system is 'MOTHER' enough). This is good because it allows you to make pseudo-slope collisions, which is really useful for stuff like fences and buildings!
You can even see an example of this here!
So yeah, when it comes to movement, the main compromise is choosing between functionality and fluidity.
Mapping:
I'll keep this one brief. The default RM mapping system is less than stellar. However, parallax mapping is NOT a good solution. It leads to massive bloated images inflating file sizes like no tomorrow, long loading screens, and occasionally lag. That's why its better to design your games around the limitations of RM, and maintain your project's scope.
That leads us to our....
CONCLUSION
Unfortunately when it comes to fangaming (specifically within RM), you need to be willing to compromise. You (most likely) will not be able to perfectly replicate your favorite game, and that's okay.
This is where The Big Question really rears it's head;
Are you making a good MOTHER game, or a good RPG Maker MOTHER game?
This is the main conflict when it comes to developing one of these weird lil things, and it's been the death of many a project. After all, you'd have to be Fucking Insane to put yourself through all the eventing bullshit that comes with the territory of anything custom being done in Rm. I mean, sometimes even *I* wonder if i even like doing this, or if I just REALLY wanna flex. Usually it's a lil bit of both. ;)
HOWEVER, it's important to manage your expectations and work ALONGSIDE the limitations of the engine, rather than forcing it to do something it can't and ending up dissatisfied with the final product.
Good read? Good read. See You next week (maybe) mwuaHAHAHAHAHAHAHAHAHAHAHAHAHAH
13 notes
·
View notes
Text
Okay, I want to go into more detail on this post. On last week's episode, I hooked RPG Maker's character generator onto a post about generators to use other than Midjourney and pals. This is about making sprites like these-


Note that these were all edited (some more than others- I only made light edits to Jovie (the middle one) today, so he's most along the lines of what you're getting if you don't edit).
Though RPG Maker has a generator that does a lot of the work for you, I highly recommend editing the sprites. They have colored eye highlights and other symptoms of strangeness. Plus it lets you do more with the character design! But if you just want to generate characters, here's a quick and dirty guide.
First of all- this is for RPG Maker MV and MZ. They work pretty much the same. VX Ace only lets you generate faces, which look like this-

MV and its sequel MZ allow for more customization options. I used VX Ace years ago, but its generator was nowhere near as good as these two. It's also super old and might not run correctly, so don't bother.
Faces are updated automatically with the rest of your sprite sheet, so I wouldn't worry too much about them.
Another thing to note is that those fancy sprites come in a 9x6 grid that looks like this (watermarked so it can't be used in someone else's game)-

This sheet contains 54 sprites for three-stage animations. Unless you're making a game, you don't need all this shit. The sprite in the top left should do. Although you can use any single sprite you want.
Whether you are using MV or MZ is irrelevant, as the generators work the same. Make a new game project (you don't need to put anything in it), then click the person's head in the toolbar. There are male and female adult/teen options, along with kids (the sheet above is a kid sheet).
When you save- first click "Save Settings". This creates a json file, which you can put wherever. By clicking "Load Settings", your character will appear in the male, female, or kid tab with all your settings intact. You need to click "Battler" to get the type of sprite I use. There's also "Face Image" (if you want a face), Walking Character (for smaller sprites- a 3x4 grid) and Damaged Character (for if your character is knocked out- useful for RPG Maker cutscenes and nothing else).
The side menu has all this shit on it-

In order of appearance-
Face: Adjusts the shape of the face. Only works on the face image. You can also change skin color from here, but the options are shitty (I'll talk more about that later).
Front Hair/Rear Hair: Hair comes in two parts. If you have both of these set to empty, the character will be bald. Eyebrows will be the same color as the hair, and attempting to change eyebrow color will change hair color.
Beard- Gives your character a beard if you want. Only on the male tab. Like eyebrows, the beard color is linked to the base hair color.
Ears- For elf ears and the like.
Eyes- Changes eye color and eye shape in the Face sprite.
Eyebrows/Nose/Mouth- Effects the face sprite only. This is pretty self-explanatory, with each function changing the body part it describes.
Facial Mark- Allows you to put things like tattoos and scars on your character's face.
Beast Ears/Tail/Wing- For non-humans. Beast Ears gives your character kemonomimi ears (catgirls and catboys). Tail and Wing give your character exactly those. You can change the color of any of them.
Clothing/Cloak/Accessory Tabs/Glasses- Everything your character wears. You can choose one accessory form the 1 and 2 tabs, and also change the color of all these things. A word of caution- the clothes tend to get muddy when you alter their color. Clothes have multiple tiers of color, so it might take some trial and error until you find the color you want. Some accessories (coughhatscough) clip weirdly. If you give your character no clothing, they'll be Barbie doll nude (MV) or have only undies on (MZ).
Once you finish and export, the sprite sheet is like any other png, and you can edit to your heart's content. You can just clean up pixel trash, alter expressions, change any color, or completely change everything. You can use any program, too. I use Krita, but if you prefer a different program like pirated Photoshop, then use that instead.
Here's a comparison of Generic Shonen Boy 13 and my character Jonas.


You can also add custom parts to the generator! These can easily be found online. Some parts have terms of use that ask for creator credit, but you don't have to worry about that unless you plan to post the character (in which case just mention the person's name). There's parts that let you make anything, including furry characters.
Now, RPG Maker's generator does have some huge problems, namely-
Price- RPG Maker MZ is $80 on Steam. Watch for Steam sales which drastically decrease the price. Official DLC that upgrades the generator will also set you back 10-15 bucks a pack. If you have MV, it's basically required to buy DLC just to make kid characters (otherwise, you can only change the colors of the same girl). MZ is a lot less mean in this regard.
Generator Corruption- This happened to me in MZ, unfortunately. Adding parts wrong or trying to transplant from MV into MZ (or vise versa) may corrupt your generator. This means absolute wacky shit will happen- clumps of weird pixels, overlapping parts, missing pixels etc. etc. This is easily fixable in an outside program. But if you can't draw/sprite, then just stick to the default parts.
(As side note- here's what generator corruption looks like. Red hair is my OC Moira. Blond hair is the generator character I edited. Note the block of brown pixels between the legs, a transparent pixel on the jacket fur near her leg, and what appears to be an extra arm emerging from her back. I've even found sprites with missing/overlapping arms and hands or extra feet.)

Diversity- The big problem is race. There are a million skin tones that basically translate to "white". But there are only three dark skin tones in MZ, and only one doesn't look like rotting flesh. I had to edit one of my characters pretty heavily just to make him brown. Also, not all male and female parts are interchangeable. This- again- means going to an outside editor. Gender isn't as much of an issue for kids- all the parts are available for them regardless of gender.
And that's pretty much it! If you want to use RPG Maker as an alternative to AI, here's your starter guide. Sites like Reddit and RPG Maker Forums have more parts and can answer extra questions.
#character generators#my art#spriting#rpg maker#fuck ai#soren#jovie#jackie#jonas#please don't feed the model#moira#yes all the characters from pandaemonium are named after dystopian novel characters#except one that's officially a utopia but i consider it a dystopia
0 notes
Text
Tower of trample wiki

#Tower of trample wiki how to#
#Tower of trample wiki code#
This will return the current TP mode the battler is using. Here is a list of Script Call(s) that you may use:įor those experienced with JavaScript, you can use these new functions toĬall upon and change various aspects related to TP Modes.
#Tower of trample wiki code#
Script Calls are event commands that are used to run JavaScript code during an event to call upon unique functions, usually added by the related plugin. This will make Party member 2 remove all TP modes. This will make Actor 1 remove all TP modes. This will make Party member 2 unlock all TP modes. This will make Actor 1 unlock all TP modes. This will make Party Member 2 remove TP Mode 10. This will make Party Member 4 unlock TP Mode 8. This will change the TP mode of Party Member 2 to TP Mode 6. This will change the TP mode of Actor 1 to TP Mode 5. This will enable/disable the TP Mode in the Skill Menu. This will show/hide the TP Mode from the Skill Menu. You can use the following Plugin Commands to alter Enhanced TP. Here is a list of Plugin Command(s) that you may use: Plugin Commands are event commands that are used to call upon functions added by a plugin that aren't inherently a part of RPG Maker MV. This will make the TP mode available in the TP menu. When this skill is learned, unlock TP mode x (to y) in the process of also This will cause the target to unlock TP mode x (to y). Upon the default unlocks already preset in the plugin's parameters. This unlocks what TP modes the actor can use by default. Then the actor will default to the mode within the plugin's parameters. This will set the actor's default TP mode to x. You can use the following notetags to adjust the various settings for TP. Here is a list of Notetag(s) that you may use. Notetags are used to work around such limitations by allowing the game dev to tag certain traits/properties using specific Notetags declared by the related plugin. RPG Maker MV's editor is unable to allow for custom traits/properties that a game dev may wish to associate with a database object, event, map, etc. This is how much TP is generated whenever the user manages to evade an This is how much TP is generated during the Regen TP timing if the user This is how much TP is generated from the player losing a battle. This is how much TP is generated from the player escaping a battle. This is how much TP is generated from the player winning a battle. This is how much TP is generated if an enemy member dies. This is how much TP is generated if an allied member dies. If the user and origin are on the same team, ignore this. This is how much TP is generated from the user gaining a state from aįoe. If the user and target are on the same team, ignore this. This is how much TP is generated from the user issuing a state on a foe. This is how much TP is generated from an ally taking MP damage. This is how much TP is generated from the user healing MP damage. This is how much TP is generated from the user dealing MP damage. This is how much TP is generated from the user taking MP damage. This is how much TP is generated from an ally taking HP damage. This is how much TP is generated from the user healing HP damage. This is how much TP is generated from the user dealing HP damage. TheĪmount of damage taken can be retrieved from the 'value' variable. This is how much TP is generated from the user taking HP damage. Typically, the regeneration phase occurs at the end of each turn. This is how much TP is regenerated during the regeneration phase for the Previously, this was reserved for non-preserved TP values. This is the formula to determine how much TP is gained at the start ofīattle. If set to false, the at the start and each of each battle If set to true, then the user carries any earned TP from on battle to This is the help description used for the TP Mode in the TP Mode This is the icon used for the TP Mode in the TP Mode selection menu in Selection menu in the Skill Menu (if you have it enabled). Here is an overview of what each TP Mode Parameter does: You can decide the rulings for each TP Mode. Instructions - TP Mode Parameters TP Modes are given to your actors for them to decide how they want to gain Various actions, different TP modes, and letting players selecting and pick Plugin gives you the ability to adjust how much TP battlers will acquire Gain a battler can receive from particular actions and situations. Hardcoded in giving RPG Maker MV users very little control over how much TP Introduction The TP system in RPG Maker MV is rather limiting. This plugin is a part of the Yanfly Engine Plugins library. Place the following plugins below this plugin located in the Plugin Manager if you plan on using them. The following plugins are Extension Plugins that require this plugin as its Parent Plugin. Got errors with your RPG Maker MV plugin? Click here.
#Tower of trample wiki how to#
This is a plugin created for RPG Maker MV.įor help on how to install plugins, click here.įor help on how to update plugins, click here.
0 notes
Text
Mitty's unprofessional guide to Menus in RPGMakerMV

Hello guys, Mitt here!
I'm here to give you guys some tips and tricks on how to tackle menus in RPG Maker MV! This will be another one of those big posts yeee!
Disclaimer: I'm far from being a good programmer, but I've learned a few things from trial and error, and I hope my tips will help anyone out there!
I'll also explain exactly how I did Marinette's current menus, and give you a few tips on how you can make something different from a simmilar concept.


I would like to first quickly mention the “Luna Engine”, which came out a while ago. I have never tried it, but it looks handy, and might be the way to go if you're willing to spend a few monies. I can't really give any advice on it though, so do your research first.
This post will be divided in 3 parts:
1. Evented Menus - Common technique, practice makes perfect, try new things.
2. Marinette's Menu - Combination of specific plugins.
3. Making your own menu
So let's get into it!
1.Evented Menus
I figured I would talk about these here!
There are many ways to go about evented menus in any version of RPG Maker. It’s usually quite easy to adapt the method from diferent engines.
Sadly, I'm not very skillful with evented menus, so I can’t directly teach you how to build cool shenanigans, but I remember I made a very simple one for one of Marinette’s previous builds by following some tutorials. These might give you a heads up on how to start with interactable image buttons/ image based layout: [1][2][3][4]
After you get the hang of the mechanics, just start experimenting!
- MV has some performance issues, so it's important to fix those as well when using this technique (or similar) to avoid blinking pictures. There are some preloading plugins out there, but you can also manually load pictures beforehand.
- You can get plugins to the mix to make the job easier. (there are for example plugins that let you call events like they were common events, and another one that lets you assign common events to keyboard keys etc.)
- It's important to practise with dummy menus in projects, mess around with variables, conditions and pictures, and have a ton of patience. This is how you learn to make fancier stuff.
- It's better to pull off this kind of menus in shorter games, otherwise it can get really confusing when it comes to certain mechanics you might want to implement. Be cautious when deciding on making an evented menu for a longer game. (I’m primarily refferencing a fully evented items menu)
- If you find a developer with a really amazing menu out there, it's always nice to ask if it's evented, as you might get some tips from them! A few devs in the discord group are very skillful with evented menus of all kinds, so keep an eye out for them!
- If you just want to event the main menu, use the following script calls to call the other scenes: (Also check out this helpful list)
SceneManager.push(Scene_Item); //Opens Items scene
SceneManager.push(Scene_Save); //Opens Save scene
SceneManager.push(Scene_Load); //Opens Load scene
SceneManager.goto(Scene_Title); //Goes to title
SceneManager.exit(); //Closes the game
The point is, you can do nearly everything (and sometimes better!) with events, as you can do with plugins. All it takes is a lot of patience and practise.
Marinette's current menus could’ve definetely been made with events to have animations and nifty details, but the approach I took was way simpler for me, personally, since I don't have much experience with detailed evented menus, especially when we go into the items, options, save... I honestly have no clue on how to make all those features work properly yet. It would be nice to study the subject one day, though.
2. Marinette's menu
This is the part where I talk about our menu!
- I started by making a few mockups, which are just images with concepts for menus, from which I posted some in a previous post.
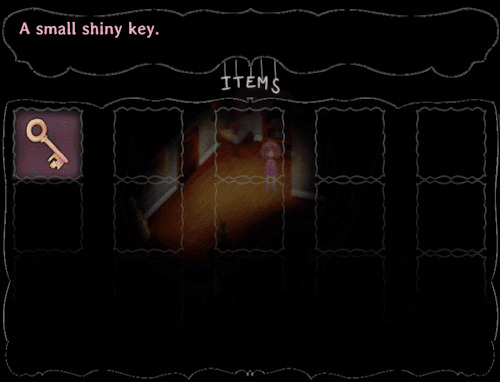
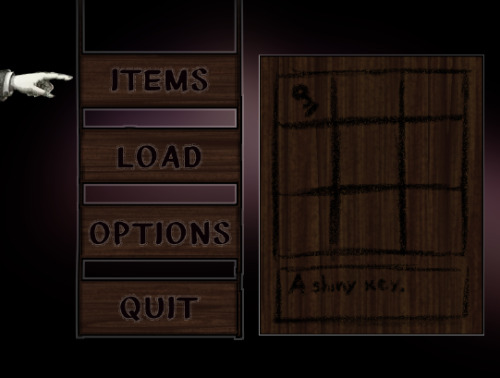
I knew I wanted to keep the map behind the menu visible, preferably either with the default MV blur effect or darken the screen a little. I also knew I wanted to be able to use the items from the menu since the begining.
For both the items menu and the main menu, I used a combination of different plugins.
-Soulpour777's "Horror Menu Customizer" to draw out the simple options in the main menu, replacing the default ones. I also made a plugin myself, with heavy help from an online tutorial, that added an invisible window on the top left to center the image.
-Jiffy's "Grid Inventory" to make the item menu's layout.
-Nelderson's "Replace window with Picture" to draw out the images attached to each window. This was the only plugin that I found that worked with transparent images. Be mindful though, some windows overlap, and the images are centered on the top left of each window/ box. If I remember correctly, though, the "Menu Backgrounds" by SumRndmDde is also a good option to do this, but it turns transparency into black, which didn't work for Marinette. Also, disable the game's textbox frame unless you want it to be drawn on top of the images.
-Finally, SumRndmDde's "Super Tools Engine" was used to move around and delete certain windows/boxes that got in the middle of the layout I wanted initially. Basically it edits the boxes’ placement on previously made menus, like the grid items' menu and the main one.

This is how I went about the current menu, and it works wonders! ahaha
Even though I still have some images to finish for it, the layout is final for the most part.
Now...
3. Making your own menu
This is where you'll make a menu of your own!
The reason I explained Marinette's menu like that, is because you can use a simmilar combination of plugins to get any layout you want, with a little searching! Using this kind of approach makes it honestly easier for people like me who...sadly haven't learned how to code yet, but are eager to play around with it.
The first step would be to sketch out some mockups, having in mind the plugins that are available to you. There are a few instances where features you might want are harder to pull off yourself without knowing how to code for being extremely specific. An example of this is menus which open moving menus on the side or something like that.
This is an example of that kind of menu:
This one would probably work best with eventing, if you don’t know how to code.
Be aware of your own limitations, but try to innovate!
With all this in mind, the steps to make a menu would be:
1. Pick a plugin (or just use the default?) that draws out a layout that you can edit with the Super Tools Engine. There are numerous plugins out there that do this, so it isn't hard to find one! Look for cool features in those plugins! Here, have a bunch
2. Edit that plugin with the Super Tools Engine to rearrange the windows or remove any you don't want.
3. Use Nelderson's "Replace window with Picture"or SumRndmDde 's "Menu Backgrounds" to attach images to each part of the menus, like a puzzle. Might require some trial and error, screenshot the window to get it right a little more easily.
Aaaand that's it! You can probably change the text or replace it with images as well, but that calls for more plugin hunting.
Try to mix and match plugin features, ask for the help of coders and be patient! It won't be that much of a headache, and you'll be happy and relieved after finishing a pretty different menu! Also, go past page 1 in google ahaha
If you get stuck on something for too long, leave it and come back later when you have evolved your skillset like the programmer pokemon you are!
I hope this little guide helps anyone out there, don’t be afraid to contact me if you need help. I’ll try to help if I can!
Thank you so much for reading, I’ll see you guys later!
-Mitty
130 notes
·
View notes
Text
Progress Update - 8/22/2020
Hey, everyone, welcome to the first progress update and character spotlight of Plush! This should give you a basic idea of what these will be like. Remember, the next one is in two weeks - 9/5/2020!
So, with that, here’s the nutshell version for those who don’t want to do extensive reading:
- I’ve finished programming all available plushies and enemies for the demo I’ve been working on!
- I plan on designing maps next; I’m currently in the process of hiring an artist for map-related purposes!
To those who are okay with extensive reading? Read on!
Disclaimer: Any maps in the background of screenshots are being made with placeholder assets.
What I’ve Been Working On
I’ve started working on the demo, which will encompass the first dungeon of the game, the Tenebrous Taiga. I started with the different plushies you can obtain, which will receive spotlights in the future for sure. Plushies will work a little differently in the demo - normally you buy them from a plush store with a separate currency from the one dropped by enemies, but there’s actually no real world segment in the demo from what I have planned, so instead you’ll be getting them with the standard RPG currency!
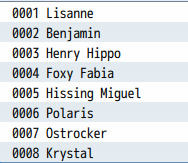
As shown above, there are seven plushies - Lisanne is our main character. You get Benjamin for free (he’ll be spotlighted next update!), but the others will need to be bought. More details will follow in the future about each plush individually!
I’ve also finished programming each enemy into the demo! There are a total of eight enemies that are planned to appear in the demo - five regular enemies, one miniboss, one boss, and a boss assistant. I can’t say much else other than that right now, but know that they exist - though they may need some rebalancing when I actually playtest the demo fully, they’re at a satisfactory state for now!
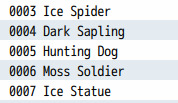
Here are the regular enemies. I’ll leave the other three a mystery!
What I Plan To Work On Next
This is an easy one. What good are plushies and enemies without a map to fight on? I’m going to be working on designing the maps for the forseeable future! I have everything planned out for the Tenebrous Taiga, so it’s only a matter of actually transferring it into the game.
That said, I do not have an artist for maps - my current artist, Ioana, focuses on stuff like battle sprites, portraits, and overworld character sprites. I’ve been searching hard for a map artist and have found a few good candidates, so another part of my next step is hiring someone to fit that role! By the next update, I’ll definitely have a new face on board.
Now, then... let’s get to the fun part, shall we?
Character Spotlight: Lisanne Wolfgang
What better character spotlight to start with than of our main character?
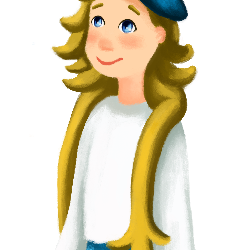
Introducing Lisanne Wolfgang, the protagonist of Plush! Lisanne is 12 years old and just starting middle school - she’s had a big imagination ever since she was a kid, and hasn’t let go of it just yet!
Lisanne is as you’d expect a kid to be - sweet, a little naive, but well-meaning and more intelligent than people give her credit for. Her parents are pretty good people too; her mother Beatrix and her father Ulrich take great care of her and she idolizes them... to the point where they’re king and queen in her imagination world.

(Pictured: Lisanne and Mom talking.)
Lisanne is the only party member in the game you have from start to finish. Plush toys have durability - every time they lose HP, their durability drops, and if it hits zero, they’re ruined! But Lisanne is, well, a human being, and isn’t subject to that. As the person who’s there for a long time, I wanted to make her an incredibly versatile party member, and this comes with some unique mechanics!
Using some of Yanfly’s RPG Maker MV plugins, Lisanne has two things that make her easy to customize. The first is a skill learn system; Lisanne can learn skills with items called Pure Crystals that come in three varieties - Pure Rubies, Pure Emeralds, and Pure Diamonds. Those are in order of value - you can get stronger skills with more valuable ones! Lisanne has three different skill trees - physical, magical, and support, so you can build her in one specifically... or build her in all of these; it’s all up to you!
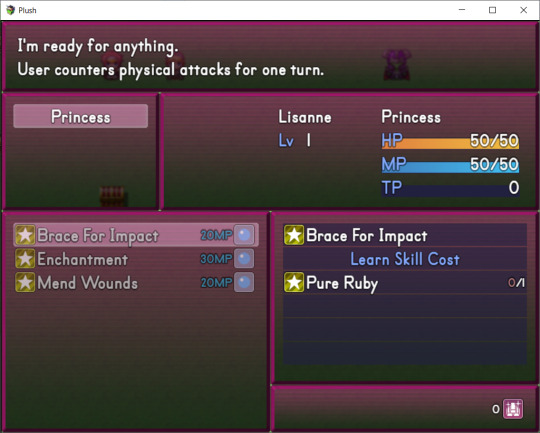
Lisanne starts off a little lacking in options, but you get a Pure Crystal every time you defeat a boss, so you can quickly build her up to be very versatile. You can also obtain them through completing sidequests - and if you have enough money, you can straight up buy them, though you’ll need to find an NPC who can convert them into the more valuable varieties in that case!
The second thing that helps make Lisanne a versatile party member is a stat allocation menu! You can distribute her stats however you’d like, and you don’t need to do anything special to get stat allocation points (”AP”). Just level up and you can pump up her stats as you see fit!
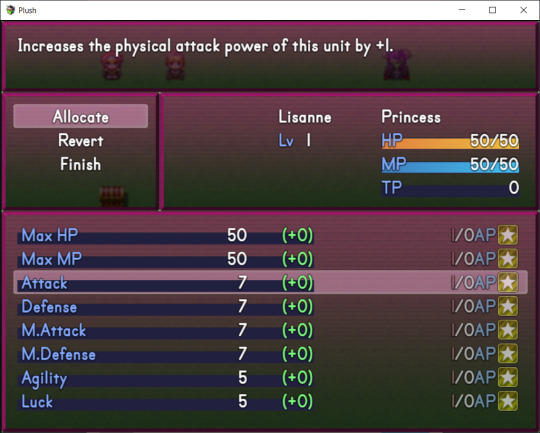
She’s level 1 in this screenshot, so... she doesn’t really have anything to boost in her stats. You’ll have to take my word for it. Using this and the skill learn system in conjunction, you can build Lisanne pretty much however you want; she can work with any plush toy! You can also revert her AP at any time if you’d like to try a different build... though you can’t refund Pure Crystals, so spend them on your skills carefully.
And that’s pretty much all I have for Lisanne! Thank you all for reading, to those who made it this far. Next time, the character spotlight will be on Lisanne’s trusty assistant and the current avatar of this blog, Benjamin!
See you all then, and I hope you continue to enjoy the world of Plush!
1 note
·
View note
Note
I'm here to recommend a few game devs to check out and/or get into contact with: Teal Crown (Currently working on Marinette in RPG Maker MV; ask the lead on the project for pointers about the custom main menu situation) and Lydia (Creator of Aria's Story and currently working on Midnight Train (The former game is a favorite of mine and she works in RPG Maker VX Ace). Hope you find this ask helpful in your game dev journey!
Thank you for the recommendations!
I’ve actually been following both of them and their games for a while already (I still got to play the games tho, but it’s in my to do list).
I’ve just never talked to them ever before and feel it could be weird to just, pop in their ask box like “hi I’m a dev too! would you mind giving some help on how to do custom main menus?” as a first interaction.
I’ve been wanting to approach other game devs and interact more with the rpg maker dev community, but I’m just kind of bad at interactions and anxious the first times.
But! I’ll keep this in mind for the future :)
4 notes
·
View notes
Text
RPG MAKER SERIES STEAM SALE - HALLOWEEN 2017
...with the lowest price I’ve seen for MV so far!


All engines are on sale this time around, so if you wanted a super cheap copy of VX Ace and XP you are finally in luck. RPG Maker 2003 is the cheapest as usual, and has had a recent update to the engine to make custom menus easier, as well as implement a whole new host of graphical effects if you’ve ever wanted to check that out.
Popular RPG Maker games are also on sale this weekend, including but not limited to LISA, Rakuen, To the Moon, Mad Father, LiEat, Alice Mare, World’s Dawn, Ara Fell, Always Sometimes Monsters, Angels of Death, Hylics, Stray Cat Crossing, & Cornnie Cross’s Dead & Breakfast.

The sale ends November 1st @ 10am, 2017, so get ‘em while they’re hot!
#rpg maker#rpg maker mv#rpgmaker#rpg maker vx ace#rpg maker 2003#rpg maker xp#it's late but i've been busy and didn't know about this OTL
508 notes
·
View notes
Text
Dev Diary: Day 6
Hello folks!
Today...
A video!!!
https://www.youtube.com/watch?v=c8QZvloci6g&feature=youtu.be
In this video you can see lot of things:
- The character of yesterday fully coloured and animated!
- The character can move diagonally (even with mouse) and with pixel movement (so you don’t have to move through square anymore)
-the character have a idle animation!
What is missing?
- Diagonal animations;
-Idle animation when you idle longer
the video will show the character in a empty room (for testing,the real room is WIP).
What do you think?
I am really customizing RPG Maker MV and my game!
And you don’t see the menu!
I realized a menu but...
I want to improve it tomorrow!
...maybe.
...let’s see.
Thanks for your time,
Michael Primo
0 notes
Photo


MegaBite game update!
I’m going to try to update at least every second Friday or Saturday.
First gif of the game, with the new lights, plus updates on the tileset.
JD got new sprites since I made them first they didn’t match with the other characters newer ones.
Another new feature is the health hearts at the top, it’s still a bit buggy but now you can keep track of your health easier than before.
Rough Walking animations for JD are done! They no longer slide across the floor when walking.
Custom text windows.
By the way, if anyone knows tutorials on how to do custom in-game menus for RPG Maker MV please share them with me! I’d truly appreciate it, I’m still having a lot of problems with that.
Demo Alpha version 1 will be up to play on December Sunday 10!
And as always thank you for following the development of MegaBite!
18 notes
·
View notes
Last Seen Blogs

tellytantra
TellyTantra

ky0n4
a
fandom-yaoi-at-your-service
Yaoi Fanservice

sports-photography-in-india
Ajit Kumar Srivastva

wedlockjunctionlko-blog
WedLock JuncTion