#free pattern in link
Text

Crochet Mini Pumpkins. You can make these a little taller by adding more rows between the increase and decrease rows. Personally I like the little fat squashed looking ones! 😄🎃
33 notes
·
View notes
Text
I'm currently knitting in my favorite coffee shop and so far 2 middle aged dudes in trucker hats have stopped to ask me about my project and how knitting works. Normally only little old ladies or other knitters talk to me about it, so this has been a fun change of pace
Like, this project is pretty complex so I get that it invites questions, this just isn't who I would expect them from

The project in question with my blueberry cornmeal muffin and floral lemonade
#knitting#fiber art#food#food tw#this is a blanket from a free ravelry pattern#if this post gets any notes ill reblog with a link to the pattern i just don't feel like digging for it now
444 notes
·
View notes
Text


More sprites from the iam8bit Undertale vinyl.
#no real pattern just ones I felt inclined to do#all free to use without credit obv since they're not actually my sprites#although I guess link back to this post if it's convenient?#undertale#wd gaster#undyne#everyman#froggit#ice wolf#burgerpants#grillby#dress lion#mettaton ex#undertale redacted
516 notes
·
View notes
Text
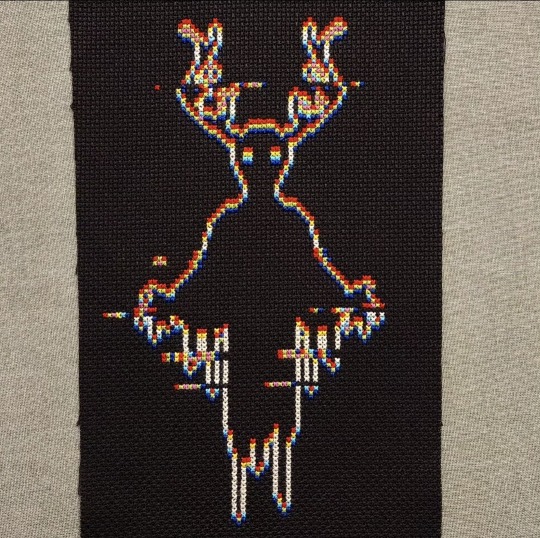
Just finished my first spooky cross stitch of the season. It honestly wasn't so hard on the eyes until the last two colors, and then... ouch.
The (free!) pattern is Lost, based on a design by BlindCherub.
#cross stitch#art#embroidery#lost#glitch#blindcherub#pattern#free pattern#xstitch#spooky#ghost#glitchy#spirit#haunted#halloween#stitch#it won't let me link to both the pattern and BlindCherub's art#sorry about that#if you look up glitchy lost blindcherub#you'll be able to find the reddit post
272 notes
·
View notes
Text

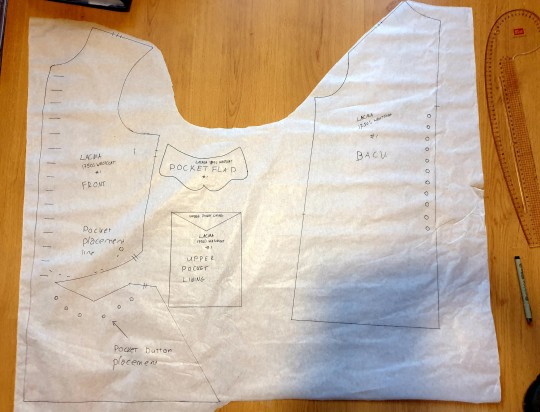
Guys guys guys!!! A fantastic colleague gave me this beautiful fabric to make something with. She said she got it in China ten years ago with the intention to learn to sew and she still hasn't learned so I could have it 😭
I immediately started drawing a pattern for the 1750s waistcoat from the LACMA pattern project, as I'm planning to drag some friends to a costumed picknick party.
Have you seen the hidden mermen and sea monsters??
#my colleague is the absolute best#a talia original#talia's adventures in dressmaking#excerpts from my life#1750s waistcoat#added the link to the LACMA project#they have free scaled patterns!
46 notes
·
View notes
Text
suddenly feeling very ill after interpreting tianlang-jun and su xiyan's relationship and qijiu's as foils to bingqiu's. all three relationships suffered greatly because of a horrific big misunderstanding, aggravated further by a lack of communication thereafter.
su xiyan, yue qingyuan, and shen yuan are all similar in their decision not to communicate the truth out of guilt, believing that they have failed and have (though unwillingly) abandoned their loved one thus deserve no forgiveness, just suffering.
meanwhile, the common denominator between tianlang-jun, shen jiu, and binghe is the self-loathing born out of the fact that despite the perceived betrayal of their loved one, forgiveness still won out (even before they knew of the truth and received the apology they were due) and the love they feel have persevered.
unfortunately for tianlang-jun and su xiyan, tianlang-jun didn't even get to find out the truth in the original plot, and it had simply been too late in the svsss universe.
same goes for qijiu, shen jiu doesn't get to find out the truth in pidw. meanwhile, yue qingyuan musters the courage to confess his truth too late in svsss; the shen qingqiu that awoken from that one qi deviation all those years ago is no longer the same one he'd loved—which interestingly can be, in some way, paralleled with how shen yuan initially believed that the luo binghe who emerged from the abyss is no longer his beloved white lotus binghe and thus his own lack of attempt to ask forgiveness and explain his actions to binghe upon his return.
#svsss#bingqiu#bingyuan#qijiu#tianxi#luo binghe#shen qingqiu#shen yuan#yue qingyuan#shen jiu#tianlang jun#su xiyan#brain dump#the brainworms are acting up again i am unwell#realization came to me after suddenly remembering a hualian/tgcf meta i've read months ago#sadly it seems like i didnt get to bookmark or reblog it so i can't link but if anyone knows which meta i'm talking about feel free to hmu#it's a meta about how in tgcf hualian is surrounded by pairs of almost similar flavors but have met tragic / bad ends#anyway that meta forced a space for itself in my pea brain and would simply occasionally surface my consciousness to feed my brainworms#category of brainworms it's able to feed expanded after i've realized the whole pattern is also observable in mdzs (and now svssss too)#my case is terminal im afraid godddd
369 notes
·
View notes
Text
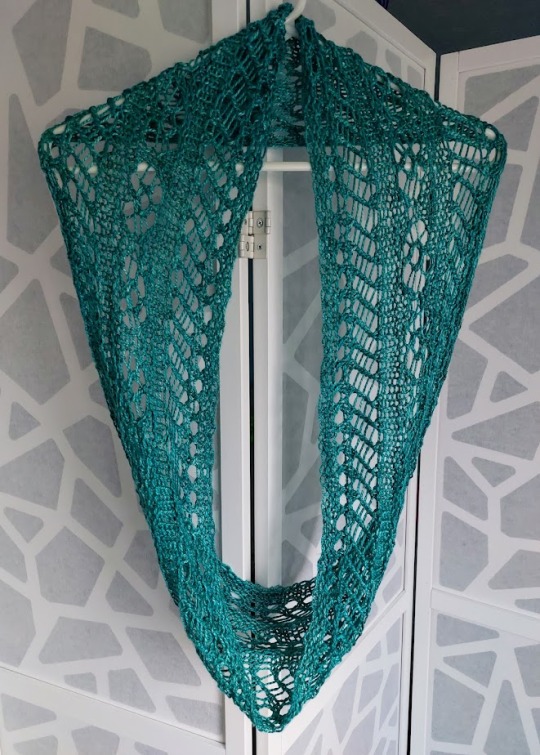
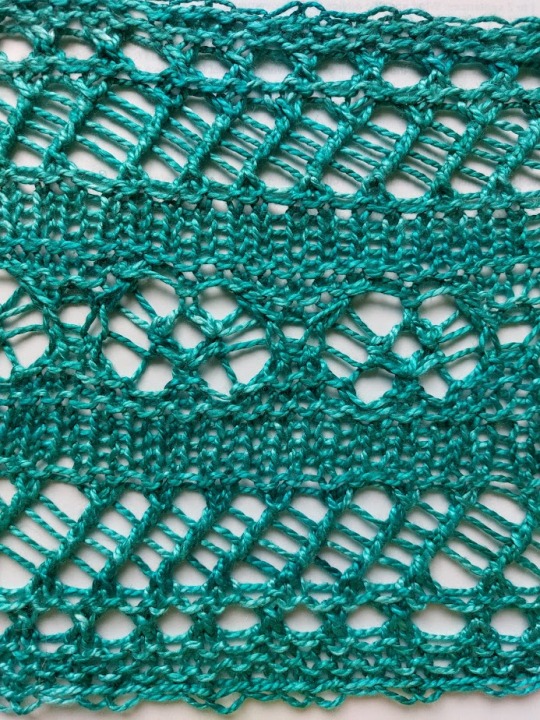
Garland Cowl by Galzanne Knits.
Made this delightful cowl for a friend's birthday using hand-painted pure mulberry silk by Araucanía Yarns (which appears to be a thing they no longer make?? We won't talk about how long I've had this stashed). The big worsted-weight lace was a lot of fun and worked up quickly once I got my gauge issues sorted out. I'd never worked with silk before! I'm a fan. Learned a new cast on for this, and I turned my bamboo knitting needles and fingers VERY blue, but I sort of like when my crafts stain my hands--it's bright evidence that I'm Out Here Making Things, y'know?
#knitting#my knitting#garland cowl#my photography#it was fun!!#it was scary to block!!#i had great interstate support for it!!!#(shout out to asexualbookbird's mom for care instructions and silk hacks)#(ez whatever would i do without you two???)#pattern is linked in the title!!#free pattern on ravelry#i did add a couple garter repeats because i figured i'd have some extra yarn to use up#(i did)#i tried this on 11s and that was a Mistake#10.5 was perfect#(and i do knit VERY tightly so like. be forewarned lmao)#great news: silk is easy to frog!!#(we won't talk about how many times i had to do that either lmao)#seriously i do love when yarn dye bleeds onto my fingers or when i get pen ink all over my hands#like yeah i'm over here and i'm creating something out of either string or NOTHING#witness meeeee
25 notes
·
View notes
Text
does anyone wanna see my tit themed wiskers kandi cuff pattern? originally made it 4 the shits n giggles but I actually really like how it looks lmao
#its private on my kandi pattern profile cause actually making stuff that ppl can see is spooky scary#but. if anyone wants it I can post the link n image on here#only going 2 my show in JAN. AAAAA#phan#<- 4 fandometrics#the beads im gonna use r gonna cost SO MUCH (in my broke world. around 20 quid) but its worth it#do NOT mention spoilers in the notes. I am trying 2 be a spoiler free man#kandi#the kat speaks#terrible influence tour#dan and phil
8 notes
·
View notes
Text
someone left a comment that i should sell my patterns for "passive income" so "money keeps streaming in"
and i genuinely never wanted to do anything less in my life so i'm gonna start throwing some retired patterns out for free
#honestly making patterns with instructions is so much work it was already more a labor of love and i rather just unleash then#gor free and link my ko-fi/patreon if anyone wants to tip me a little
117 notes
·
View notes
Text
Tried my hand at embroidery for the first time by making this little llama! I'm relatively new at hand sewing and the fabric was kinda old and loosely woven so it looks a little messy but it was fun to make. :)
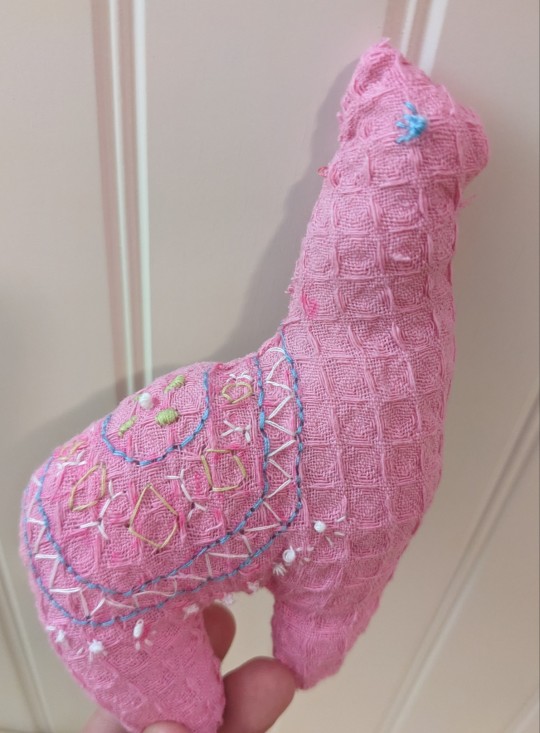
#I spent the time listening to a really bad detective radio show#I have no idea why I kept listening#it was not good#I listened to like 10 episodes in a row#pro tip don't make things out of old towels#it's not fun#if you look at the embroidered parts you'll see what I mean because all the holes kept expanding#and the edges were fraying badly#if you've gotten this far you should give me name suggestions#I'll link the free pattern I used in the comments#sewing#hand sewing#embroidery#llama#sewblr
13 notes
·
View notes
Text

Mini crochet Witches Cauldron. I never seem to come across cauldron ornaments so I made one instead. I added a few little needle felted fluffy wisps to the top and the bubbles popping out of the potion are sequins glued to toothpicks. 🧹🪄🧙♀️
#crochet#cauldron#witch#Halloween#needle felting#craft#all hallows eve#amigurumi#free pattern in link
15 notes
·
View notes
Text


!!!!!! observe and admire splendid serendipity by the loopy stitch!!!!
god they both turned out GORGEOUS!!! even tho that wasn’t my original plan, i think i want to make a blanket with these. i might take a few other afghan square patterns into the mix so it can be a really cool differently textured and colored blanket!
the orange (left) square was done with Lana Grossa Cotonella 100% pima cotton in color 004. i ended up having to cut the yarn eventually after the last bobble stitch round (everything before that was one continuous thread!!), because it a) changed color mid round into b) a reeeeeally long stretch of brown-orange that didn’t fit with the rest of the square. so i ended up doing some cuts to get the yellow and orange out of the rest of the yarn!
blue (right) square was done with Lang Yarns Merino+ Color Extrafine Superwash / No Mulesign, in color 926.0210 — similarly as with the orange square, the yarn ended up changing color mid round for the last three rounds and I ran out! so the border is done in Lang Yarns Merino 120 Extrafine - Superwash Color 34.0372 (light blue) and Merino 120 Fine Superwash color 34.0272 (dark blue).
due to the different fibers, the orange cotton square is much much much more stretchy and thus a bit larger than the blue merino wool square, but that’s honestly okay, especially if i end up making this into a cool patchworky blanket!
#fiber crafts#fiber art#crochet#crochetblr#afghan block#sunny crochets#sunny crafts#sunny’s afghan blanket#these are unblocked btw so they’re wonky in some places#if anyone reading knows large square patterns that have fun stitches like splendid serendipity!#please feel free to link em in the notes!!!
7 notes
·
View notes
Text

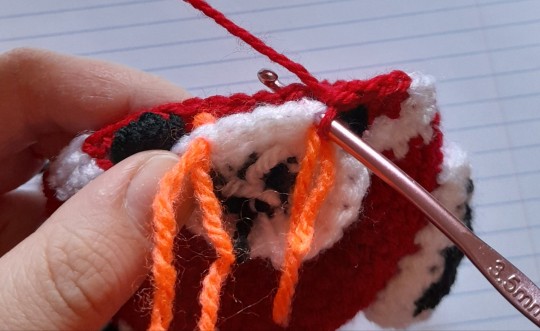
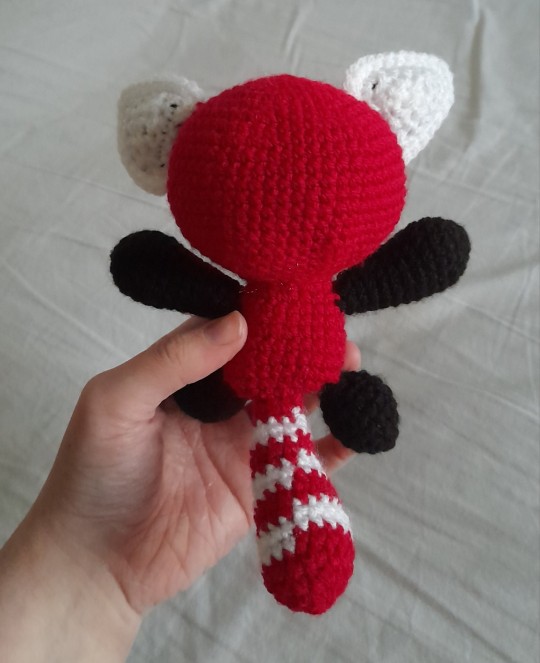
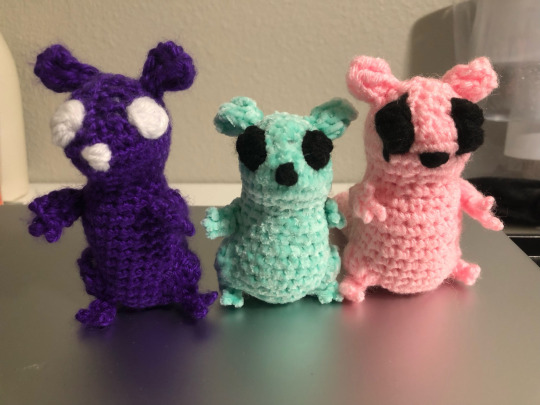
Red Panda free crochet pattern
Ravelry link -- free pdf download
My red panda pattern is no-sew and its parts are attached with single crochets. This written pattern contains photos.
Made with DK yarn and a 3.5mm hook, but can be made with any size yarn and appropriate hook.
Pattern also under the cut:
YOU WILL NEED:
DK yarn in the following colours:
- red/orange (less than half a ball/50g/150m)
- black (less than 25g)
- white (less than 25g)
3.5mm crochet hook
Stuffing
Scissors
OPTIONAL:
Stitch markers (or scraps of yarn) to mark the start of each round
If you don't like the no-sew yarn eyes, safety eyes or buttons
If desired, a darning needle for hiding yarn ends
TECHNIQUES USED:
Single crochets, increases, decreases
Single crochet through two pieces
Colour changes
The loose parts are made first, before the head and body, so that we can sc them together later.
EARS
Middle ears x2 (black)
1. Chain 6. Turn.
2. Skip 1 chain. 3sc, dec. Chain 1 and turn.
3. 2sc, dec. Chain 1 and turn.
4. 1sc, dec. Chain 1 and turn.
5. Dec. Finish off. No need to hide the ends yet.
Outer ears x2 (white)
1. Chain 6. Turn.
2. Skip 1 chain. 3sc, dec. Chain 1 and turn.
3. 2sc, dec. Chain 1 and turn.
4. 1sc, dec. Chain 1 and turn.
5. Dec. Don't break the yarn.
During the next couple rows, hide the yarn tails inside as you go, or leave them hanging and hook them inside later.
6. Line up a black triangle behind your white traingle and go into both of them. Sc them together around the whole triangle and put 3sc into every corner.
7. Sc around again just into the white stitches, putting 3sc into every corner. Finish off and pull the yarn ends inside with your hook.
You may notice there is no given stitch number. This is because it depends on how you sc around. When you get to it, continue the pattern of attaching the ears to the head onwards if you have more than 7 stitches between the corners.
EYES (black)
(Alternatively, use safety eyes, embroidery, buttons, etc.)
1. 4sc into a magic ring [4]
Tighten ring, slip stitch and finish off.
Note: knotting the yarn tails together will keep the slip stitch from loosening.
MUZZLE (start in black, have white nearby)
1. in black, 6sc into a magic ring [6]
2. in white, (inc x2, sc) x2 [10]
3. (inc x4, sc) x2 [18]
4. sc around [18]
ARMS x2 (black)
1. 6sc into a magic ring [6]
2. inc x6 [12]
3. (1sc, inc) x6 [18]
4-5. sc around (2 rounds) [18]
6. (4sc, 1dec) x3 [15]
7. sc around [15]
8. (3sc, 1dec) x3 [12]
9. sc around [12]
10. (2sc, 1dec) [9]
11-12. sc around (2 rounds) [9]
Finish off and tuck/fasten the ends inside. Stuff.
LEGS x2 (black)
1. 6sc into a magic ring [6]
2. inc x6 [12]
3. (1sc, inc) x6 [18]
4-5. sc around (2 rounds) [18]
6. (1sc, 1dec) x6 [12]
7. (2sc, 1dec) x3 [9]
8. sc around [9]
Finish off and tuck/fasten the ends inside. Stuff.
TAIL (start in red, have white nearby)
1. in red, 6sc into a magic ring [6]
2. inc x6 [12]
3. (1sc, inc) x6 [18]
4. sc around [18]
5-6. in white, sc around (2 rounds) [18]
7. in red, sc around [18]
8. (4sc, dec) x3 [15]
9. in white, sc around [15]
10. (3sc, dec) x3 [12]
11-12. in red, sc around (2 rounds) [12]
13. in white, sc around [12]
14. (2sc, dec) x3 [9]
15. in red, sc around [9]
Stuff
16. (1sc, dec) x3 [6]
Finish off and tuck/fasten end inside.
HEAD AND BODY (start in red, have white nearby)
1. 6sc into a magic ring [6]
2. inc x6 [12]
3. (1sc, inc) x6 [18]
4. 1sc, inc, (2sc, inc) x5, 1sc [24]
5. (3sc, inc) x6 [30]
6. 2sc, inc, (4sc, inc) x5, 2sc [36]
The next round will begin connecting the ears to the body along one edge of each ear. Skip the stitch right on the corner and begin with the next stitch. Ensure ears are facing inwards (first ear faces away from start of round, second ear faces opposite way). Don't worry if they twist around after the first stitch, after 2 or 3 rows they should hold straight.
7. 5sc, inc, 1sc through an ear and the body, 4sc, inc, 5sc, inc, 2sc, 1sc through an ear and the body, 2sc, inc, (5sc, inc) x2 [42]
Careful not to accidentally skip stitches while attaching parts, it can be hard to see the head stitch after you put your hook in the ear stitch. Count the stitch number after each round if you're unsure.
8. 3sc, inc, 3sc, 1sc though ear and body, 2sc, inc, 6sc, inc, 5sc, 1sc through ear and body, inc, (6sc, inc) x2, 3sc [48]
9. 7sc, inc, 1sc through ear and body, 6sc, inc, 7sc, inc, 2sc, 1sc through ear and body, 4sc, inc, (7sc, inc) x2 [54]
10-12. 9sc, 1sc through ear and body, 19sc, 1sc through ear and body, 24sc (3 rounds) [54]
13. 9sc, 1sc through ear and body, 3sc, change to white and 3sc, in red 7sc, in white 3sc, in red 3sc, 1sc through ear and body, 24sc [54]
Ears should now be completed. Remember to leave the corner stitches unworked. If you have more or fewer ear stitches, no matter. Keep attaching them in a straight line until they are connected enough.
14. 12sc, in white 3sc, in red 9sc, in white 3sc, in red 27sc [54]
The next round connects the eyes, if you're opting for yarn ones. They may be fiddly due to their size. If you're sewing/snapping on alternate eyes, replace every connecting sc with a regular sc.
15. 11sc, in white 3sc, in red 1sc, 2 stitches through an eye and the body, 5sc, 2 stitches through an eye and the body, 1sc, in white 3sc, in red 26sc [54]
16. 10sc, in white 3sc, in red 2sc, 2 stitches through eye and body, 5sc, 2 stitches through eye and body, 2sc, in white 3sc, in red 25sc [54]
Pick 5 stitches across the top of the muzzle and mark them. The muzzle is slightly wider than it is tall.

When you come to it, place the muzzle wrong-side-out against the body and sc along the marked stitches, as the photo depicts.
17. 10sc, in white 3sc, in red 4sc, 5sc through both muzzle and body, 4sc, in white 3sc, in red 25sc [54]
18. 3sc, dec, 5sc, in white 1sc, dec, in red 2sc, 2sc through muzzle and body, 5sc, 2sc through both muzzle and body, 2sc, in white dec, 1sc, in red 5sc, dec, 6sc, dec, 5sc, dec, 3sc [48]
19. 3sc, dec, 4sc, in white 2sc, in red dec, 9sc (no muzzle stitches), dec, in white 2sc, in red 4sc, dec, (5sc, dec) x2, 2sc [42]
20. 3sc, dec, 3sc, in white 1sc, in red dec, 2sc through muzzle and body, 5sc, 2sc through muzzle and body, dec, in white 1sc, in red 3sc, dec, 4sc, dec, 5sc, dec, 1sc [36]
You have now finished the white stitches. You can cut and secure your white yarn.
21. dec, 3sc, dec, 4sc. Stuff muzzle a little. 5sc through muzzle and body to complete it. 4sc, dec, 3sc, dec, 2sc, dec, 1sc, dec, 2sc [30]
22. (3sc, dec) x6 [24]
23. 1sc, dec, (2sc, dec) x5, 1sc [18]
Stuff the head.
24. (1sc, dec) x6 [12]
25. inc x12 [24]
26. 3sc, 5sc through an arm and the body, 6sc, 5sc through an arm and the body, 5sc [24]
27. 4sc, 4sc through arm and body, 7sc, 4sc through arm and body, 5sc [24]
28. (3sc, 1inc) x6 [30]
29-31. sc around (3 rounds) [30]
32. 4sc, 5sc through a leg and the body, dec x5, 5sc through a leg and the body, 4sc, dec [24]
The next round will begin attaching the tail. Angle the tail so its jog is hidden from your preferred angle.
33. sc, dec x2, 4sc through leg and body, dec, sc, dec, 4sc through leg and body, dec x2, 2sc through the tail and the body [18]
Stuff the body.
34. sc through tail and body, dec, (1sc, dec) x4, sc, 2sc through tail and body [13]
35. sc through tail and body, dec x6 [7]
Finish off. Use your hook to pull the yarn through the front loops, pull to cinch and hide the end inside.


10 notes
·
View notes
Text
constantly thinking abt my ttrpg idea that involves crocheting a little guy and then going on adventures with them
#🥺#njknfdjg#corvid caws#thats it thats the whole idea at this point#but can u imagine 🥺#idk itd b smth like heres four or five free crochet patterns for small friends#and a link to a good tutorial video that shows u the basics#and then you like make their backstory depending on the color of yarn you use#n the different patterns are different playbooks#so if u make a little mouse ur a squeak guy#n have squeak moves#idk im just thinkin abt it#and then u and your friends play make believe with the dolls youve made ok#listen listen listen#take my hand#look into my eyes#actually no jk dont do that#eye contact gross#dkfjsngjfbg#look approximately at my face area#u and your friends make little guys#and then you play make believe with them#do u see my vision#🥺🥺🥺🥺
53 notes
·
View notes
Text
have you seen the pictures of these slugcat dolls i've made and thought wow, i'd love to have one of these myself? if you know how to crochet, you now can your own! you can access the pdf for the pattern here. this pattern is a little looser in some parts than my other pattern; if anything is confusing i am more than happy to clarify.
the current release of the pattern doesn't have sizing for gourmand, sorry! they are planned though and i will update the pattern with sizing recommendations for them as soon as i can.
#pattern is free. it's just a file garden link#i actually made spearmaster first. then hunter then estranged#i was Going to make gourmand over winter break :) and then :) my god i'm so smart#i brought my crochet supplies. fully intending to do this#cause i'm currently at a relative's place. ie not at home#and then ON THE FUCKING PLANE#IS WHEN I REALIZE. I FORGOT TO PACK YARN.#i'm here for another two weeks so gourmand is going to have to wait until then :|#also i wrote like half of the pattern on the plane. bless#rain world#crochet shenanigans#ID in alt text
8 notes
·
View notes
Text
Sweetheart Beanie
Hi, Sweet Friends!
https://www.ravelry.com/projects/CJDSign/sweetheart-beanie
I joined a 4 Week Crochet A Long!
I just finished this beautiful Sweetheart Beanie CAL- Crochet A Long for week 1 and I really do love the way it turned out!
I really love the Sweetheart Beanie! It is perfect for Fall in Colorado! Thanks for the fun Crochet A Long! I’m starting the next one today This is a wonderful…

View On WordPress
#Afternoons With Gramma#CJD.Sign#crochet#crochet-pattern#Crocheting#Free Pattern Link#Free Patterns#Intermediate Crocheting
2 notes
·
View notes
Last Seen Blogs

mesamm
Meta, fic, etc
mesamm
Meta, fic, etc

bakaiju
BaKaiju

old-older-than-dead
он же мёртв — куда ещё старше?