#game guide
Text

so, since I got all the achievements, here's how to get all the achievements and endings on "a date with death" under the cut!

ALL ENDINGS:
ending 1, semi bad ending. It's honestly the fastest to get. Choose whatever answer you want for the first two days, but during the soul connection on day 3, choose the panicked options as in: “Grim… ma—maybe this is a bad idea…”, and then “I… I think something’s wrong… this doesn’t feel right…”, then “Please… stop…”. The story will finish and you'll get the achievement.
ending 2, you lose the bet (bad ending). Be distant and dismissive, and pick more negative choices throughout the game, don’t water your plant on any of the days. don't open the window to get the flowers until it's your only choice when he shows up with the bouquet, then on day 6 choose: “Vaguely, yeah.” just before the first call, and “I don’t mind. I’ll take the sickness. The taint.”. The story will go on and you'll get the achievement.
ending 3, you win the bet. Be flirty all the way through, do your worst girlie, on day 6 choose: “You really know how to sweep me off my feet.”, “You’re cute. Cute and stupid.” and “How do I stop? What if I give it all away?!”. Once the story is completed you'll get the achievement and a super cute CGI of Grim.
ending 4, dual reapers. Since it's the DLC ending, it doesn't give you an achievement. If you decide to buy it, just choose DLC choices throughout the game, you'll recognise them immediately because there's a ★ next to them, for example: "Do you like me, Casper? ★"
ending 5, wedding. As soon as you suggest what's going to happen if he loses the bet, choose "Your hand in marriage." Joke about a wedding if given the change within the next day. On day 5, choose: “Want to meet the in-laws, Grim?”, and on day 6, choose: “I feel touched!”, and then, “How about a shotgun wedding?”

ALL ACHIEVEMENTS
First Chance at Death: this achievement will pop up as soon as you are finished creating your MC.
The First Day[...] The Sixth Day: you get these achievement as soon as you complete your day in game.
My Little Baby: interact with the pet you choose.
Serenity: water the plant on your bedtable, once is enough for this achievement.
Blooming Flowers: you'll need to water the plant once every day. It's easier if you do this while following any of the good endings.
Untrustworthy: you'll get this achievement once you get ending 1.
Take My Soul: you'll get this achievement once you get ending 2.
Dead Roots: do ths while going for ending 2, don’t water the plant at all. check on it on day 6 and on the last day before chatting; if you click on it by mistake during the previous days, choose not to water it.
Sealed with a Kiss: you'll get this achievement once you get ending 3.
Our Wedding: you'll get this achievement once you get ending 5.
Eavesdropping Champion: interact with the door every single day, and always choose to eavesdrop.
Patience: wait for the very last day. check your Internet browser in game before starting the chat with Casper, and wait for about a minute with the browser open! you'll see a white screen and the text changing from something like "there's nothing here" to "okay, click here to get your achievement", you click on the text and it's done!!!
I really hope this was helpful!!
#a date with death#gaming#― rea's gaming corner 🎮#guide#game guide#achievement#visul novel#otome#dating sim#a date with death guide#a date with death achievements
1K notes
·
View notes
Text


i've recently been playing a TON of cult of the lamb, the brainrot is so real... so real to the point of me 100%ing the game and then writing a steam guide about how i killed the bosses without taking damage! whew~
anyways, along with that steam review i made some custom icons in the style of the game's achievements! i think they turned out pretty cute :3
#zilluart#digital art#cult of the lamb#cotl#cult of the lamb art#cotl art#cotl lamb#cotl fanart#fanart#steam guide#game guide#cotl guide#cute#icons
369 notes
·
View notes
Text
Copy/Paste-able Minecraft Brew Guide
Since y'all seemed to like the Basic Brew Guide, how about one you can bring in-game with you?
(Ok the main thing the last one had going for it was prettiness and this one isn't but I tried)
(it looks funny now but don't worry - the beakers will turn into potion bottles)
P1
🧪 Basic Brew Guide 🧪
-------------------
Key . . . . . . . . . . . . . . 2
Bases & Bottles . . . . 4
Simple Potions . . . . . 5
Enhancements . . . . . 7
Complex Potions . . . . 9
P2
Key
-------------------
🧪w = water bottle
🧪a = awkward potion
🧪[ ] = [ ] potion
⚗ = splash potion
☀ = gunpowder
✴ = redstone
✳ = glowstone
P3
Key - Cont.
-------------------
♅ = netherwart
♣ = rabbit paw
❄ = sugar
☽ = glistening melon
❦ = ferm. spider's eye
♭ = ghast tear
☉ = magma cream
☼ = pufferfish
^ = golden carrot
♯ = turtle shell
♮ = phantom membrane
P4
Bases & Bottles
-------------------
Most potions require an awkward potion base:
🧪w + ♅ = 🧪a
You can also add gunpowder to make it a splash potion:
🧪a + ☀ = ⚗
P5
Simple Potions
-------------------
🧪a + ♣ = 🧪leaping
🧪a + ❄ = 🧪swiftness
🧪a + ✳ = 🧪strength
🧪a + ☽ = 🧪healing
🧪a + ❦ = 🧪poison
🧪a + ♭ = 🧪regen.
P6
Simple Potions - Cont.
-------------------
🧪a + ☉ = 🧪fire res.
🧪a + ❄ = 🧪swiftness
🧪a + ☼ = 🧪w. breath
🧪a + ^ = 🧪darkvision
🧪a + ♯ = 🧪turtle
🧪a + ♮ = 🧪feather fall
P7
Enhancements
-------------------
Extend time with ✴:
🧪 Poison
🧪 Swiftness/Slowness
🧪 Leaping
🧪 Strength/Weakness
🧪 Turtle
🧪 Nigiht Vision
🧪 Feather Falling
🧪 W. Breathing
🧪 Fire Resistance
🧪 Regeneration
P8
Enhancements - Cont.
-------------------
Strengthen with ✳:
🧪 Poison
🧪 Swiftness/Slowness
🧪 Leaping
🧪 Strengt
🧪 Turtle
🧪 Regeneration
🧪 Healing/Harming
P9
Complex Potions
-------------------
🧪w + ❦ = 🧪weakness
🧪heal + ❦ = 🧪harm
🧪poison + ❦ = 🧪harm
🧪night + ❦ = 🧪invis.
🧪swift + ❦ = 🧪slow
🧪leap + ❦ = 🧪slow
#mineblr#minecraft#minecraft tutorial#minemath#video games#minecraft related#game guide#minecraft guide
288 notes
·
View notes
Text
Most Profitable Stardew Valley Crops
(plus best flower for honey)


Made by Zoe on twitter!
8K notes
·
View notes
Text
Master List Of Game Guides :)
Just a heads up a lot of the games on this list are for people 18 years old or older. Please proceed with caution.
Seduce Me: The Otome
Seduce Me: The Demon War
The Price Of Flesh: Celia
The Price Of Flesh: Mason
The Price Of Flesh: Derek
The Price Of Flesh: Fox
Boyfriend To Death 1: Rire
Boyfriend To Death 1: Sano/Akira
Boyfriend To Death 1: Strade
Boyfriend To Death 2: Vincent
Boyfriend To Death 2: Cain
Boyfriend To Death 2: Lawrence
Boyfriend To Death 2: Ren
Till Death Do Us Part : Jack
Till Death Do Us Part : Marcus
Till Death Do Us Part : Chris
Till Death Do Us Part : Aria
Till Death Do Us Part : Ellen
Lover's Trophy: Wade
Lover's Trophy: Jak
L.A. Noire
Stardew Valley Upgrades/Buildings
Doki Doki Literature Club Word Guide
Little Inferno Combos
#boyfriend to death#boyfriend to death 2#boyfriend to death guide#boyfriend to death 2 guide#seduce me the otome#seduce me the demon war#seduce me the otome guide#seduce me the demon war guide#till death do us part#till death do us part guide#lovers trophy#lovers trophy guide#guide#game guide#ending guide#endings guide#seduce me james#seduce me erik#seduce me sam#seduce me matthew#seduce me damien#seduce me diana#seduce me naomi#seduce me suzu#seduce me andrew#btd rire#btd2 ren#btd cain#btd strade#strade btd
380 notes
·
View notes
Text
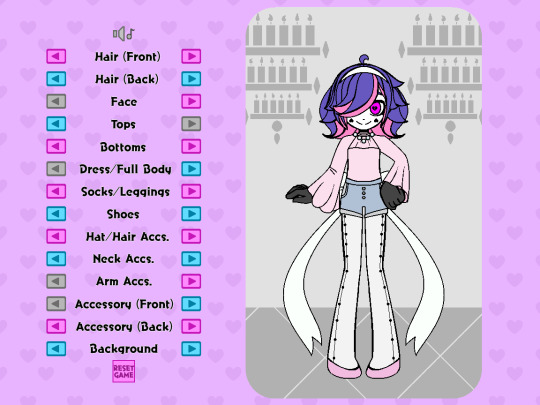
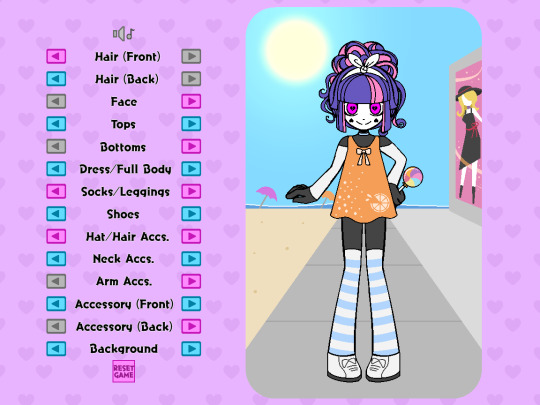
How I created a dress-up game in RPGMaker!
At least one person asked me to make a guide for this and that’s enough for me! Though, bear in mind, I may not be the best at explaining things and I used an example from assets I already had.
I made the dress-up game pictured below using RPGMaker MV, but I’m sure this method is applicable to versions above MV as well. I will be writing this post specifically through the lens of using MV (You’re also going to need some plugins, but not a lot!). At the time of typing this post, all RPGMaker engines are on sale until October 5th (just to let you know!)
(Please note: This method does not account for a game where you can freely change the colors of characters hair/clothes)
(Please note x 2: this is not a tutorial for learning RPGMaker, but a tutorial on how to make this specific type of game within the engine. Prior RPGMaker experience and familiarity is required when following this tutorial!)
I’m not the best at explaining things, but I’m sure going to try my best!
List of things we’re going to need:
-An RPGMaker Engine, preferably MV (or MZ) since they already come with mouse support.
-An art program
-A tileset consisting of words and arrows
-All your dress-up accessories as PNG images
-A blank PNG image
-2 plugins
First things first is you’re going to want to decide on the canvas size of your game. Keep in mind with the way RPGMaker works, there’s a high chance you’ll wind up with black bars on the side of your screen. If your game is intended to be played in browser on itch.io, it shouldn’t be much of an issue as you can choose the display size on the game’s page to match the visible game. (I also just personally wasn’t concerned about the black bars for a dress-up based game anyways)
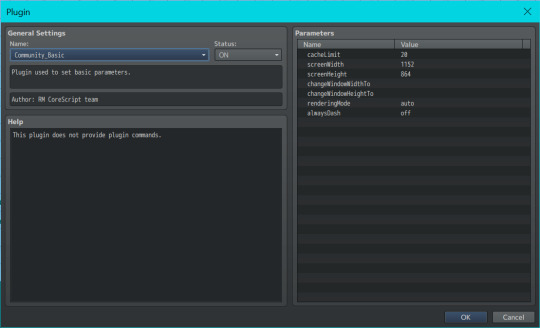
The canvas I chose to work with for this game was 1152 x 864, but you can choose whatever size you feel will help you draw most effectively(just keep in mind how it might appear in browsers or if the player will have to zoom out!) If using MV, you change your canvas resolution by going into the plugin list and selecting “Community_Basic”

When making the assets in your art program, I find it easiest to have your canvas match the canvas size of the game. We’ll use Nova as our example character for everything. I drew them and all their assets in the center of the screen (for easier mirroring). The position of all the items can be adjusted later in the engine
I would start by doing a few test assets and putting those in the engine to make sure you get the hang of the whole thing, but this is where you’ll be making all your assets for a given character! (So if you wanna make some test assets and then move down to the “Putting it together in the engine” section, that might be a good idea!)
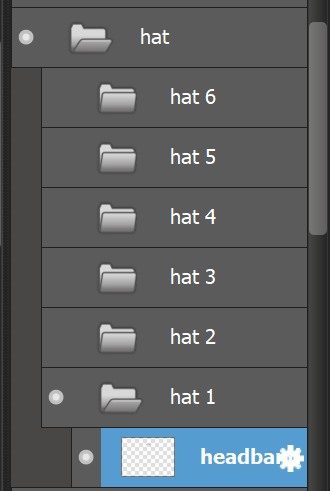
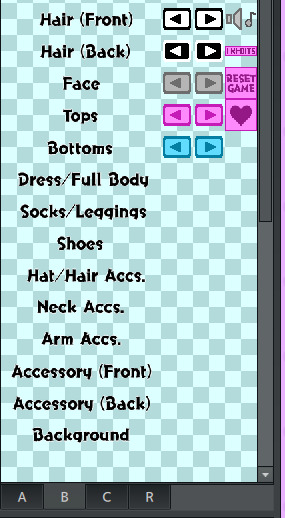
Here I create and separate every asset into their own folders(categories) and subfolders. For example, hats get their own folder labeled “hats”, and the subfolders “hat 1” “hat 2” “hat 3”, etc, each containing their own individual hat asset.
You can make as many or as little categories for clothing as you like. When you have everything you need, make at least one asset from all your categories visible, and make sure all the categories are ordered in the way they are meant to appear in game. This way, you can make sure nothing is overlapping in the incorrect way(at least for what your intentions are). When your categories are properly ordered, keep them in that order, as you’ll use it for a basis later when importing the assets into the engine.

Alright, this next part is a little tedious. Now you’re going to save every asset individually by hiding every other folder/layer except for the one you’re saving. It might help to have a naming convention for your assets, for example all of Nova’s assets follow the scheme of “dressup nova-shoes 4.png” “dressup nova-shoes 5.png” “dressup nova-shoes 6.png” etc etc.
NOTE: In addition to these files, remember to include a BLANK png image with nothing on it! This will help later!

Once this is done, we can start importing them into the program!
Putting it together in the engine:
Open up your RPGMaker project’s file directory. Find the folder named “img”, and in that find the folder named “pictures”. Drop all your clothing/hair/face/etc assets into this folder.
Now we need to set the scene. The scene being…a map! I used multiple characters so my game has a different map for each one.
Since Nova is our example character, let’s focus on Nova’s map.
Make sure the width and height of your map is large enough to cover the whole screen (sans any black bars you might have on the sides). You can fill in the back with tiles, or you can do what I did and add a small parallax backing that loops across the screen. I made a small one with two hearts in the corners for a nice scrolling effect!

To start this map, let’s put in some of the categories to choose between. I did this by laying out the words on a tileset, and drawing that tileset onto the map. The order of categories I chose does not reflect the layer order of clothing items, but rather was organized by what I felt was a natural start-to-finish order progression in a dress-up game.
Don’t worry about putting the choice arrows next to the categories yet, though! We’ll do that in a little bit.
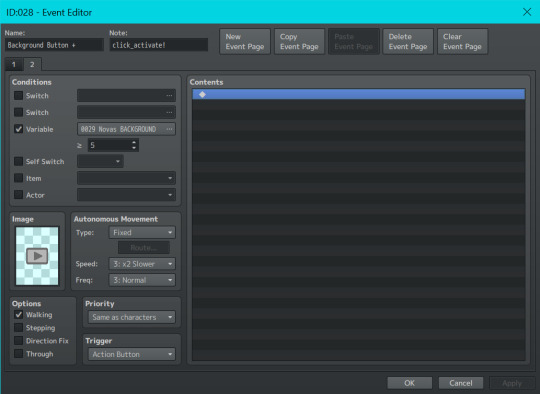
Now we’re going to start with actually putting your character and their clothes/hairs/etc into the map. Double-click anywhere on the map (where you won’t put any other buttons) to create an event.
We are going to set this event to autorun. In this event we are going to set up all your layers, even if nothing needs to be presented on them yet. To start, I added some comments to help me keep track of them.
For context, when you choose to show an image in RPGMaker, it asks you for the image number. The image number is essentially the image’s “layer”, with 1 being the bottom-most layer and 100 being the top-most layer. Up to 100 images can be displayed on an RPGMaker screen at any given time. Even though 1 is the bottom-most layer, I chose to start at 10 just in case I wanted to add more layers underneath later. So layer 10 is my bottom-most layer, and layer 24 is my top-most layer.
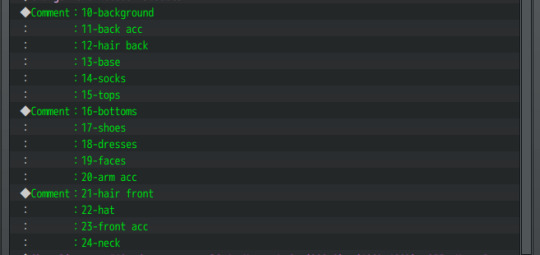
Let’s start with our bottom-most layer, the background asset.
The background is this pink rectangle behind Nova.

Even if you change its appearance, this background itself is always visible. So we are going to show the first background on layer 10 with the Event Command “Show Picture”.
(Note, because I wanted all the dress-up assets to be on the right side of the screen, every picture’s X position is offset by 200. You may want to offset your game in another way, or keep it centered.)

Because this is an asset that is always visible on the screen, we are also going to set up its variable. Select “Control Variables” in your event commands, set it to a constant of "1" and add it underneath the "Show Picture" command,

Don’t worry about the #number of the variable, all that matters is the number of what the variable equals. As you can see we are showing “dressup nova-BG 1”, so our variable should equal 1 to correspond to this.
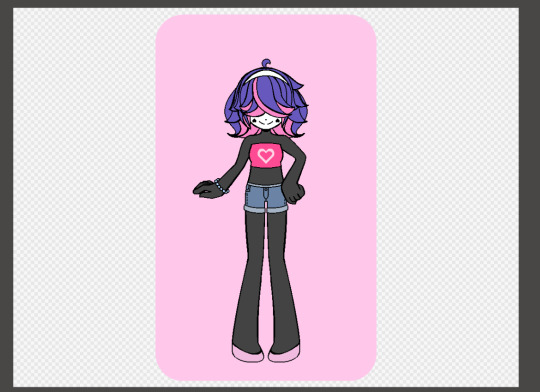
The next asset up from that is our back accessory on image layer 11. (Nova can have fairy wings or a yoyo accessory, for example.) The back accessory doesn’t always need to be present, so we will simply set this image as being our BLANK png asset.

We will continue going down the column like this! Any asset that doesn’t need to be present will be set as a blank, and any asset that does need to be present (like Nova’s background, Nova’s hair in the front and back, Nova’s face, and Nova’s base) will be set as the corresponding image and have its variable set to “1”.
(Note: The base does not require a variable as it does not change)

And because this is an autorun event, we have to close it off. Add a control self-switch A, and then add a new event page. On the 2nd event page, merely click off self switch A in the conditions box

Doing this will ensure that the autorun event won’t keep trying to show the images in an endless loop.
Go into your database tab and under system, check that your starting position is on the correct map (if you have more than one) and start your game. Your autorun event should show all the images you asked it to. (I was gonna have a pic here but I'm limited on pics so)
Now, using our category list that we placed as tiles onto the map, we are going to be adding the arrows next to them to make them function.
Even though it's at the bottom, we’ll start with the category Background as an example since that was the first we implemented.
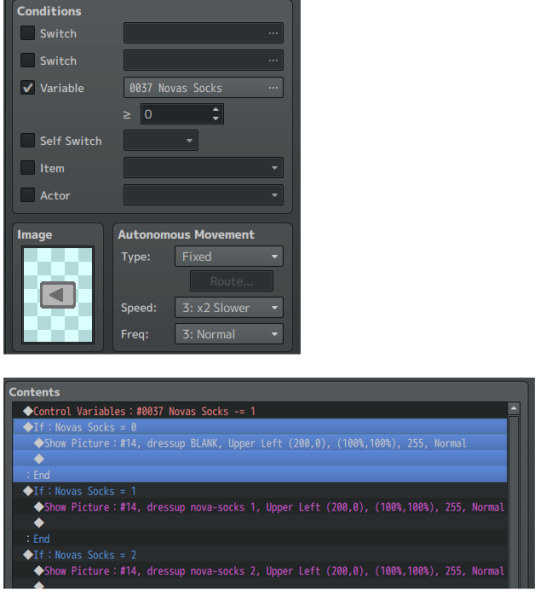
Create an event on the left side of Background and make its event image a grayed-out, left facing arrow, to communicate that the player cannot click anymore in that direction. Set its condition to be variable activated, with your Background variable being greater than or equal to 1. Leave the event page contents blank.
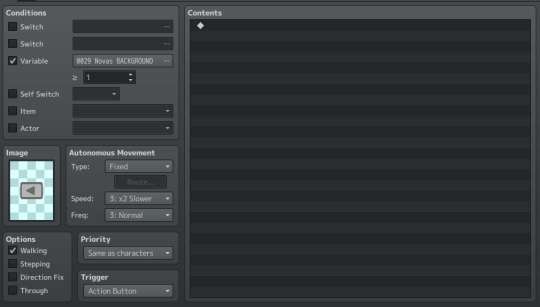
Create a 2nd event page on this event. On this 2nd page, replace the grayed-out arrow with a colored arrow, and set the Background variable to be greater than or equal to 2. This means that as long as the variable is 2 or above, the player can press the back button and go back to see the previous Backgrounds.
This time, we WILL fill up the contents on the event page.
First we are going to put a control variable command. Set your Background variable to subtract a constant of 1. This means that every time the event is clicked, it will subtract 1 from your Background variable (since this is your “Back” button).

Next, we are going to include a conditional branch command like so!
Under this Conditional Branch we put a Show Picture command, where we show an image on layer 10(the same from our autorun event). We can see that if Nova’s Background variable is equal to 1, then layer 10 is going to show the first background–that pink rectangle from before.
Let’s copy-paste this conditional branch and edit it slightly!
Repeat this for every asset you have for a specific category. (In this case, Nova has 5 different backgrounds, with one background needing to be visible at all times.) So our 2nd event page should look like this:

This button event is now ALMOST complete–but we’re missing something!
We need this event to activate when we click on it! Normally in an RPGMV game, when you click on an event, the player character will walk to the event before it can activate. But for a dress-up game, we want the event to activate as soon as it’s clicked on!
Therefore, we need a plugin! You’ll need a plugin that makes events activate based on a click trigger. For me, I downloaded the “TDDP_MouseSystemEx” plugin for MV found here: https://forums.rpgmakerweb.com/index.php?threads/mouse-system-ex.46511/
(Remember to follow the terms of service for whatever plugins you use!)
After adding it to my in-game plugin list and turning it on, I added the “click_activate!” notetag to the event (as instructed by the plugin) and now it works as soon as it is clicked on.
Next, we have to make the Forward Button! This is easier now that we have the Back Button as a base.
To make your Forward Button, we’re going to copy the 2nd Event Page of the Back Button event, and make it the first page of our Forward Button event. We are then going to change three things:
-Remove the condition variable
-Change the image to a right-facing colored arrow
-Change the control variable from a “subtract constant of 1” to an “add constant of 1”
So your first Forward Button event page should look like this!
For the 2nd event page of your forward button, remove all the contents in your content box. Change the arrow to gray-right-facing arrow, and add a condition variable equal to your number of assets for the category.
Because Nova has 5 Backgrounds, our number is 5. If Nova had 7 Backgrounds, this number would be 7. If Nova had 3 Backgrounds, this number would be 3, etc.
This ensures that when a player has clicked to the last asset, they can’t continue increasing the variable past what is needed.
You then continue making these types of Back Buttons and Forward Buttons for every asset, until you have everything you need!
But WAIT!!
For objects that don’t always need to be present, we add one extra conditional statement!
Let’s use socks, for example. Nova does not need to wear socks to complete an outfit. So for the socks’s back button, we make sure to set the variable condition to 0.
After that, under the event contents of our sock buttons, we make sure to add an extra conditional statement for the sock variable. When the variable is zero, we show the BLANK image–so there are no socks to be seen! (Remember to apply this extra statement to both the back and front buttons!) Do this for every asset that doesn’t always need to be present such as socks, dresses, hats, etc etc.
That’s pretty much the basics of all the mechanics you need to get it to work!! I won’t be going over other things like the reset game button/disabling menu access/hiding the player walksprite, as those are things you probably know how to do already if you’re familiar with the engine.
But I WILL share one last piece of optional advice that I feel makes a big difference.
While testing things out you might notice that there is slight lag between changing images, a blip between pictures. This is because RPGMaker doesn’t preload images, and loads in an image as soon as it’s called.
In a downloadable version of a game this slight lag is negligible. However, if you intend for your game to be browser-based, this lag will be significant and noticeable. In order to fix this problem, I’d recommend downloading Galv’s Image Cache plugin found here: https://galvs-scripts.com/2017/04/26/mv-image-cache/
This plugin will help pre-load images so there’s no lag!
However, you will have to write the name of all your assets manually in its plugin menu. If you have a lot of images (which you will, for a dress-up game) this could take a very long time.
My advice is to go into your game’s picture folder, select all, and select “copy file path” from your folder options. Paste this list into an excel sheet, remove the directory name and file extensions, and then paste it into a google doc.
Edit the names together until there is no spaces between image names and they’re all separated by commas. Then, select all and paste your list into the Image Cache plugin’s settings. If you spelled something wrong or placed a space incorrectly, the game will not start and will tell you what image it was struggling to find. So having this to refer back to is very helpful and also means you don’t have to retype everything in the event of an error!
(Below is just a preview of how my list of image names looks for my dress-up game and what i copy-pasted into the plugin settings for the Image Cache plugin)

And thaaaaat should be everything! I hope this wasn’t too hard to follow, or messily formatted! But I tried my best and will try to answer any questions one may have about it!! Good luck creating your dress-up game!
#im so sorry i feel like this is so hard#but i hope it makes at least a little sense!!#i also apologize for the combo images tumblr doesnt let me have more than 30#guide#rpgmaker#rpgmaker mv#dress up#dress up game#dress up guide#game guide
86 notes
·
View notes
Text

( Nintendo Power 2001) Pokemon Crystal
#pokemon crystal#pokemon#nintendo power#ethan#gold#silver#kris#bill#prof oak#prof elm#kurt#ursaring#game guide
22 notes
·
View notes
Text


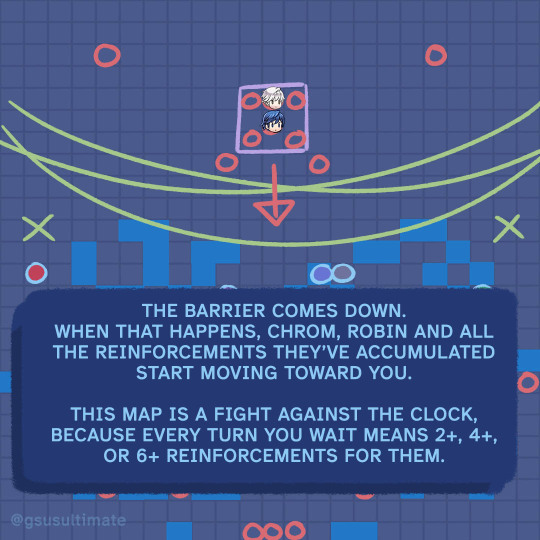

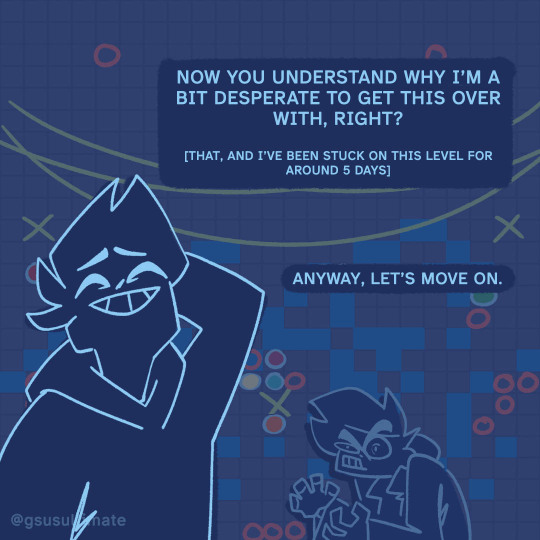
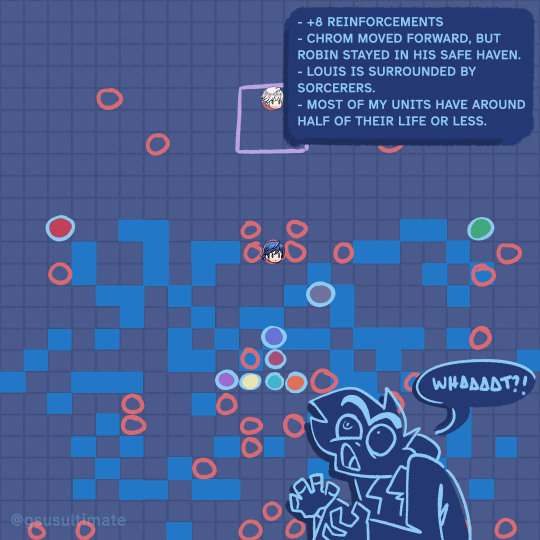
[PART 2/4]
I honestly don't understand why the main menu estimates 30 turns for this map when it all goes to shit in 5 or less.
#fire embem awakening#fire emblem awakening chrom#fire emblem awakening fanart#fire emblem engage#fire emblem#playthrough#video games#art#digital art#artists on tumblr#fanart#illustration#chrobin#m!chrobin#game guide#fe engage#fe17 fanart#fe17
21 notes
·
View notes
Text
Mario RPG Post Game Bosses Quick and Dirty Guide
Okay, so I can't promise the tactics I'm going to suggest here are the best effective tactics in the game for defeating each of the bosses in the post game. But I will say they let me roll through all of them pretty fast. Also bosses are pretty much in the order I encountered them. If at any point you're unsure if what boss you should be fighting you can go talk to Frog Sage at tadpole pond to be hinted at where to go.
Before Any Fights
Make sure you've fought and defeated Jinx three times and beaten Culex in Montro town and got the Jinx Belt and Quartz Charm accessories.
Level up as much as possible. You can buy the EXP Booster from the frog coin merchant in Seaside Town which doubles the XP of the person who has it equipped even if they're not in battle. The Lucky Egg bought from the Treasure Hunter in the Moeville Item Shop can be used to double your XP earned a lot for the party if you're good at the shuffle game.
Buy the Earlier Times item from the Frog Coin Merchant in Seaside Time. When RNG just goes bad or you mess up this will let you restart the fight right away rather than having to slowly die and resume from the last save point.
Make sure you have a Feather. If you didn't get won from beating Dodo in the statue mini game you can buy one, or if you want a second buy a second one from the Treasure Hunter in the Moeville Item Shop.
Make sure yo have the Lazy Shell (Weapon and armor) and Safety Ring.
Get as many Kercolas, Red Essences and Rock Candies that you can.
Practice timed hits and perfect blocks because both are required for multiple boss fights and will be the difference between life and death.
Consider getting the Star Egg from Grate Guy's Casino if you can stand the torture that is winning 100 Games of Look the Other Way. It deals a flat 100 damage to all enemies so isn't the best damage but it's reliable and reusable so comes in handy when you need something to damage everyone.
Now to the bosses.
Belome
Fought in Belome temple. Don't be an idiot like me and immediately run through all of Kero Sewer and then have to do Midas River because he's not there. Frog Sage told me he was up to his old tricks. So old tricks made me think the sewers. It was the temple. Travel to Monstro Town and enter the temple from there to get to him instantly.
Belome is frustrating but easy. But you can get rid of most of the frustrating part. Take any party members you want but I recommend including Peach for healing like I will for every fight. You don't need any special preparations to beat him but immunizing your entire party to sleep will save you a lot of grief. I did not, I only had Peach immune to sleep. She had the Safety Ring. Belome spams Sleep attacks so Mario and Geno went to sleep A LOT.
Belome's main gimmick this time is that he can't be injured by any attack as long as he has a clone out. He'll basically bounce back and forth between creating a clone, attacking and attempting to put the party to sleep. If you're prepared (unlike me) and immune to sleep 90% of this fight is solved. Just need two characters who hit hard to rip through the clone as soon as it comes out and beat down Belome. He doesn't really have anything dangerous and aside from not taking damage and so much sleep spam is really not that different from previous fights.
Jinx
Since I was already in Monstro Town decided to go visit Jinx yet since based on the wishes I read on the Pink Stars (You'll see them when you start the post game and follow the story leading to the boss rematches) that he was one of them.
Preparation
Jinx is going to spam mortal blows on your party. Accessories like the Safety Ring and the Quartz Charm are absolutely mandatory unless you have flawless mastery of timed hits to the point you never miss, even so good to have them for safety on the occasion you mess up and they're both really good accessories. Party members, someone, anyone that you're really good with their timed hits and Peach for healing.
Jinx is a bit different in that you're not looking to deplete his HP. All you have to do is use a Team Attack and you instantly win. But before you try to be a smarty pants and go in with a 100% gauge prepped he will set your gauge to 0 when the fight starts. It doesn't matter if the team attack actually deals damage, Jinx wants to duel you to see how to get in synergy with your partners to do a team attack and so you will instantly win as soon as you use any attack. Recommend Lazy Shell and Safety Pin go specifically on Peach.
Jinx hits fast and hard as usual. Anytime you miss a timed hit rather it be attacking or healing Jinx will counter with an instant death attack. This is why you want protection from Mortal Blows. Basically, this entire fight is just a practice of your timed hits and defenses. His attacks can deal massive damage and sometimes one shot characters but all of them can be negated to 0 damage with a properly timed block. There's really no trick to it beyond that. Just used timed hits and blocks to build up your gauge and fire it of as soon as its full. Make sure all party members are up and able to perform the attack. Summoning Toad is not what he needs, you need all three party members. Peach with the Lazy Shell and Safety pin will survive anything he throws at her, so just use her to heal up and revive anyone that goes down while you build up that gauge. Don't lose your cool and keep that timing up and victory will be yours.
Punchinello
Preparation: Not a whole lot you can prepare to do on this fight. Like Jinx this fight is going to revolve entirely around getting your Timed Hits right. And you'll mostly be dealing with attacks that can kill you instantly if you fail to block. But they're not guaranteed 9999 damage like some later bosses they're just really strong attacks, might be survivable with something like Lazy Shell + Ghost Medal. Speed is probably the most important factor here though so the Lazy Shell armor can be a liability. Since Speed is important Geno is naturally one of the best fits for the party. And again I make Peach the third for reviving and healing others.
The Fight Itself
So like I said this game revolves around timed hits. You can't damage Punchinello directly. You can only attack the bombs he throws out. If you do a perfectly timed hit, the bomb will change the direction its facing and face him. Then when the bomb goes off it will explode on Punchinello and damage him instead of you. Be careful to watch the bombs before you attack them some of them will already be pointing at him leave those untouched. This is why speed is important. You only have four party members and he'll drop four bombs. And of course only perfectly timed time attacks will turn them around so if you screw it well hope you can go again before that bomb goes off. The bombs can be killed if enough damage is done but this is kind of a last resort sort of thing and you're more likely to kill one on accident from it taking damage when you damage all enemies with your perfect hits. Mastering the timing for a perfect block against the bombs is mandatory to survival. If you have a hard time feel free to use Earlier Times if you have it to restart the fight until you get it down. Basically hit A right before the bomb hits you. But if a bomb hits you and takes you down you either have to swap that party member out or waste a turn reviving them and lose up to two attacks possibly resulting in more bombs going off on you. Because your timing has to be perfect you they won't spin around loses happen sometimes. Just, best of luck with the perfect blocks and perfect timed hits.
Boster
Preparation
I hate this fight, with all of my hate. This is the first fight to kill me in the entire game. You must bring Geno for this fight, and equip him with a Feather to boost his speed. This fight is just... not a good fight, and is absolutely terrible design in an otherwise wonderful game because there is a very specific solution to the fight and it's just, screw you if you don't know it. Super fast Geno is that solution. Bring Peach for healing, and give Mario the Quartz Charm for damage.
The Fight
So at the start of every round Booster will start building his train. If it gets to his turn he will finish building the train and crash it into your party for 9999 damage. Coincidentally, every turn one of his Sniffets will cast Morale Boost that increases his speed every single turn. See why I hate this fight? The trick is Booster must be attacked before his turn each round to interrupt his building. Which is why you need Geno because the fight will quickly get to the point where no one can out speed him but a speed boosted Geno. Make sure he gets interrupted each round. Then I murdered the Sniffets next, in hind sight it might have been easier to go straight for Booster. Either way just deal as much damage as fast as you can. Rock Candies are useful to deal significant damage to everyone, Geno Flash, Psych Bomb (but only if Peach doesn't have the lazy shell) and of course if you're good at it Super Jump is always amazing. If you're not, kick a lazy shell into them. Just kill the Sniffets or Booster as fast as possible and be aware you might have to restart. If your backline party tags in I recommend immediately restarting the battle with an Earlier Times (You can buy it with Frog Coins in Seaside Town) because Mallow and Bowser will not be fast enough to really do anything unless Booster is low on health and they can finish him off right there. I don't know his HP but you can always have Mallow use Thought Peak once to see his HP if you go for killing Booster first to track the damage on him and know how close you are to killing him. Also, can charge a team attack before coming to the fight and swap Peach out for a turn to Mallow or Bowser to do a damage dealing team attack. I do not reccomend swapping out Geno because you want him there to interrupt Booster from building when the next attack starts. Roselina freaking Luma this fight is easily the hardest in the game for me and just so obnoxious. Best of luck.
Now then whose next... I honestly forget so I had to go google the post game fights. And it turns out it's the freaking cake again in Marrymore. Make your Portal references now.
Bundt Cake
Preparations: Not a ton of prep work here, Quartz Charm and Black Belt are recommended. Peach will put this fight into easy mode so should be included for something other than her healing. Other than her big your favorite damage dealer. Probably put Safety Ring on Peach as usual. She won't be focusing on damage.
The Fight
So the goal is to put out the candles just like last time. The catch this time, the chefs are there and will keep lighting the candles and if they light all the candles bad things happen. Which I never found out what would happen because I never let them get that far. So, you need Peach or as many sleep bombs as you can carry. Peach is better, because you're going to cast Sleepy Time to put both chefs to sleep. I believe if you spin the stick enough to max it out it's 100% chance of putting both of them to sleep but I'm not 100% sure. All I know is I never saw it fail when maxed out in the fight. I also never failed to max it out.
After you put the chefs to sleep, it's just a matter of dealing damage to the cake and healing up as needed. Chefs will wake up every now and then and need to be put back to sleep but as long as you keep them under control this fight is easier than the original fight with the cake. No wonder I forgot this one. I don't know when I actually did it. Just make sure to play it safe and keep yourself healed up and those chefs asleep and you'll be good.
Johnny Jonathan Jones
Preparation
This is going to be a one on one fight between Mario and Jones. Prepare accordingly and equip Mario with your best accessory. Quartz Charm is my preference. Can also do Lazy Shell Armor and Safety Ring if you want to try to turtle your way through the fight. Just a quick warning, there's no way to heal in the fight at all. You can't use items, and only Mario can fight. I guess Jones is a Melee player. Anyway before the fight you'll be asked to choose which party members you want cheering you on. You won't get anyone to fight but you will get buffs from the party. Best way to beat Jones is to take him down as fast as possible so I took Geno and Bowser for damage up and I guess defense up but mostly damage go up.
The Fight
This fight was the second one to kill me. It can be rough. It's going to test your ability to do perfect blocks. Jones will attack with both spells and physical attacks so you need to be ready to block them... And that's really all there is to this fight. Be able to block his attacks and strike back till he's dead. He doesn't have a lot of HP thankfully since the fight is 1 v 1. If you're a master of Super Jump you can probably kill him in one turn. I don't know I'm not good at Super Jump. Though I finally found out it was because unlike what Toad told me it's not hit the button right before the attack lands but actually when it lands. So with that new knowledge I will have to go back and try super jumping things again and get to 100. Right back to Johnny. So, again it might take you a few tries but you just keep practicing his fight until you can block all his attacks with the correct timing and then take him out. There's not really any shortcut or trick to this fight (Besides Super Jump) just gotta learn the timing.
Culex
Preparation: Here's the one we've all been waiting for. Let's get down to it. Culex is the main course and all the other bosses were just an appetizer before him. So first off, Lazy Shell and Safety Ring on Peach. Second, Geno with Quartz Charm and Mario with Black Belt or Safety Badge. Might want to also consider Zoom Shoes or Feather on Geno and give the Quartz Charm to Mario instead depending on how you want to play it. Finally, go into the fight with your Team Gauge already charged to 100%. We're going to be using Mario, Geno and Peach's Team Attack A LOT this fight. Savs-Us-All blocks the next attack each party member takes and will work on anything.
The Fight
Culex is as expected a beast. And the third and final character I have met my end by. Oh wait, no I didn't because every time I was in danger of dying I used Earlier Times. HA! Take that Culex! You technically never sent me to the game over screen, and I technically beat you on my first try. Anyway, his newest jerk move is to use an HP that deals your max HP -1 in damage. This is important. His new spell Meteor is not HP to 1, it is your max HP -1. If you have even a single point of damage on you the spell will kill you. Now, after he opens the fight with that he'll use it every five turns and give you a counter, and responding to that is going to be a large part of our strategy for how to beat him. Finally, make sure you are maxed out in your inventory on Red Essences, Rock Candies, Kercolas, and Pick-Me-Ups.
First off, surviving the first round is the most important and hardest part of the fight. Once you make it past the first round the fight becomes a lot easier. The largest problem is that depending on your set up there is a high chance that Culex will open the fight dropping your party's HP to 1 and then the Wind Crystal will go off and use an AoE killing your entire party. It's that kind of fight. So, you have two choices here, can keep using the Earlier Times item to restart the battle till you have at least two characters alive or can give Geno the Feather pre-fight so he can move faster and have him use a Kercola. Regardless of which method you use Geno will go first and use a Kercola to get the two or if if you're really lucky your entire party up to max health. Peach on her turn if anyone is dead use Come Back unless the living characters are in need of healing because they will get KOed if you don't keep yourself healed up. Basically priority is as follows
Negate or Survive Culex's Meteor Attack > Heal HP > Revive Down Allies > Deal Damage.
Now, on negating Culex's attack. There are a couple ways to do it. Peach should be going last each round while Culex goes first meaning she'll always go off before him. When the first Cooldown hits 1, have Peach use the Team Attack Save-Us-All on her turn and you'll just straight up negate Meteor when Culex uses it on 0. Other options is once you have someone guaranteed to go after Culex is to use Kercolas, but remember you only have three. Another is to throw a Red Essence on Peach and then have her heal everyone and the two others use Max Mushrooms as needed. Try to save Pick Me Ups for reviving Peach if she dies and use Comeback to revive your other allies, but if you need to get everyone up fast use it. Anytime you have your team gauge fully charged use Save-Us-All with Peach right before Culex casts Meteor. Obviously it won't be charged every turn and that's why you'll need to make do with Kercolas and Red Essences. Save the Red Essences for Peach you don't have enough of them to use on your entire party and last till the end of the fight.
Now... As for actually defeating the enemies. I recommend starting with the Wind Crystal it's weak to special attacks, all special attacks so Geno Flash or even just Geno Beam will make quick work of it. If you're good at Super Jump you can probably take out the Wind Crystal right away.
From there I took out the Water Crystal but I think it may have been a better choice to go after the Earth Crystal. One of them can summon Bowyer's button locks and seal one of your commands. I think it's the Earth Crystal that does it but not 100% sure. Fire Crystal felt like the least threatening of them so saved it for last.
While this is going on always be aware of when Meteor is coming and prepare accordingly. Remember that if Meteor goes off any character with damage on them will die unless Save-Us-All is active. Mario and Geno should focus on damage and killing as much as possible. In the rare event the party doesn't need healing on Peach's turn she should use a Rock Candy to damage everyone, or if you run out of those the Star Egg. You can also use the Fire and Ice bombs just be aware the naturally a the fire crystal resists fire and the water crystal resists water.
Once all the Crystals are down the fight becomes much easier to deal with. Culex will replace Meteor with Final Claw, an attack that deals 9999 damage, but it only targets one person, and it can be blocked with a perfect block. Timing is a bit tricky but it can be done. But either way losing one person is a lot better than the entire team and you have a countdown till he uses it just like Meteor so whenever Team Attack is charged can just use Save-Us-All and bam no Final Claw. So like the previous fight when Team Attack is charged always pop it with Peach when Culex's counter is on 1 to just negate his ultimate instant kill attack. At this point it's just a matter of keeping yourself healed and beating Culex down. Keep persisting and use that Team Attack anytime its charged to negate Final Claw and victory is finally yours.
And with that, you get a completely useless key item per Final Fantasy Superboss tradition that just says you beat the hardest boss. Huzzah! Hope that helps. Not a perfect guide by any means but this is what worked for me.
#Mario RPG#Super Mario RPG#SMRPG#MarioRPG#Boss Fights#Game Guide#Mario#Geno#Peach#Belome#Jinx#Booster#Punchinello#Bundt#Johnny Jonathan Jones#Culex#super mario rpg remake
23 notes
·
View notes
Text
So, a friend of mine decided to pick up RLCraft, (that nuts Minecrsft modpack where everything wants to kill you), but as some of yall might know, it has a bit of a learning curve.
I decided to make a visual guide for beginners! Hopefully this helps at least someone out there!


Page 1/2
24 notes
·
View notes
Text
Halfling Dale Interactive Fiction - Quick Route Guide
This is a quick guide to the main routes in Halfling Dale. It will tell you how to get on, and stay on, each character's special plot line - with as few spoilers as possible. As a general rule, most of the routes are decided at the end of Chapter 2: The Harvest Festival during the Bonfire fireworks display.
If you would like more help with each route (information on how to succeed in specific things, start romances, or how to get the 'good' endings), I'll be publishing more detailed walkthroughs for each character in the future.
Mum Route
To begin the Mum Route you must choose the option "Mum and Ida. I know they're embarrassed, but they can't miss the fireworks! I go back home to fetch them." and then "I admired Hugo a lot." or "Hugo was my brother, that's how siblings are." In Chapter 2: The Harvest Festival.
To continue the Mum Route you must choose the option "Mum doesn't need to be in the WWA to do good in the Dale. Why don't we make our own group?" In Chapter 3: Autumn turns to Winter.
Hugo Route
To begin the Hugo Route you must choose the option "Nobody. I feel very outside this celebration. I don't think anyone will notice if I'm missing. I'll go to the next hill and watch the fireworks from there." and then "Remain by yourself." and then "I can hold onto hope that he'll come back, and next time he won't slip away without me." In Chapter 2: The Harvest Festival.
To continue the Hugo Route you must have a good relationship with him by Chapter 7: Another Birthday Arrives (Hugo Guide will be published with more details).
Tom & Ida Miller Route
To begin the Miller Route you must choose the option "Mum and Ida. I know they're embarrassed, but they can't miss the fireworks! I go back home to fetch them." and then "Tom was always kind to me, he was my friend." In Chapter 2: The Harvest Festival.
Wilibald Fairburrow Route
To begin the Wilibald Route you must choose the option "Wilibald Fairburrow. Though it wasn't me who stole his sword, an apology from my family would probably mean a lot to him." and then "Offer to help with the repairs." In Chapter 2: The Harvest Festival.
To continue the Wilibald Route you must choose the option "It was rather fun, I'd love to help more!" In Chapter 3: Autumn turns to Winter.
Garrance Prosper Route
To begin the Garrance Route you must choose the option "Nobody. I feel very outside this celebration. I don't think anyone will notice if I'm missing. I'll go to the next hill and watch the fireworks from there." and then "Follow Garrance." In Chapter 2: The Harvest Festival.
To continue the Garrance Route you must choose the option "Yes! That sounds like fun." or "Maybe a little lesson would be interesting…" In Chapter 3: Autumn turns to Winter.
Lily & Mayor Goldworthy Route
To begin the Goldworthy Route you must choose the option "The Goldworthys. Just because the contest is over doesn't mean I've stopped trying to reclaim my reputation! I'll ask the Mayor if there's anything I can do to help the night run smoothly." In Chapter 2: The Harvest Festival.
To continue the Goldworthy Route you must choose the option "I want to become important in the Dale." or "I'd like a more permanent position of importance… perhaps on the town council?" In Chapter 3: Autumn turns to Winter.
(Goldworthy Guide will be published with more details if you wish to also romance Lily)
Benny Brownfoot Route
To begin the Benny Route you must choose the option "A friend. One who doesn't mind if I'm respectable or not." and then "Benny Brownfoot; he's always good for a laugh." and then "Roll your eyes, typical Benny, always causing trouble!" or "Laugh along and sit down." In Chapter 2: The Harvest Festival.
To continue the Benny Route you must have a high 'mischievous' stat and good relationship with him by Chapter 7: Another Birthday Arrives (Benny Guide will be published with more details).
Patty Appleton Route
To begin the Patty Route you must choose the option "A friend. One who doesn't mind if I'm respectable or not." and then "Patty Appleton; she's the only other halfling standing alone, maybe we could stand alone together?" In Chapter 2: The Harvest Festival.
To continue the Patty Route you must have a good relationship with her by Chapter 7: Another Birthday Arrives (Patty Guide will be published with more details).
Cousin Sissy Route
During Chapter 2: The Harvest Festival: if you knock Sissy's pie on the floor, or Swap your Pie with hers then tell her about it, the Sissy Route will be locked off.
To begin the Cousin Sissy Route you must choose the option "I'll celebrate at home with family, and maybe a few close friends." and then "Maybe we could invite Cousin Sissy." and then choose ANY OPTION OTHER THAN "This is my chance! Take the money, then spurn Sissy and cement her embarrassment, and our rivalry, forever more!". You can then choose "Shift my focus to Sissy." (this option will not always appear) in Chapter 4: Yule Night.
To continue the Sissy Route you must choose the option "What a great idea Sissy, you're so right." in Chapter 6: Summer begins to Bloom.
#choose your own adventure#interactive fiction#interactive novel#text based game#cosy fantasy#interactive game#walkthrough#game guide#fantasy rp#Halfling Dale#multiple endings#text based adventure#halfling#if#if game
8 notes
·
View notes
Text
Disney Dreamlight Valley Cooking Recipes- Desserts
Below are all the recipes I could find, as of right now, for appetizers. There is a chance that there will be additions later on, seeing the game is still in the works. So keep an eye out for updates (I will post something in the title or the top of this post if there has been an update). If I have missed anything, and it has been a while since I have updated this post, feel free to comment/message me about what is missing and I will add it.
Links to the other recipes:
Appetizer
Entree
"My Hero" Cookie: wheat, cocoa bean/vanilla, butter
Apple Pie: apple, wheat, butter
Apple Sorbet: slush ice, apple, sugarcane
Aurora's Cake: raspberry, wheat, egg, sugarcane, milk
Banana Ice Cream: slush ice, banana, milk, sugarcane
Banana Pie: banana, wheat, butter
Banana Split: slush ice, banana, milk, sugarcane, any sweet
Beignets: canola, wheat, egg, sugarcane
Berry Salad: raspberry, blueberry, gooseberry
Birthday Cake: wheat, sugarcane, egg, butter, cocoa bean
Biscuits: wheat, sugarcane, butter
Blueberry Pie: blueberry, wheat, butter
Boba Tea: milk, sugarcane
Candy: any sweet
Caramel Apple: sugarcane, apple
Carrot Cake: carrot, wheat, egg, sugarcane
Cheesecake: cheese, wheat, sugarcane, any fruit
Cherry Pie: cherry, wheat, butter
Chocolate Chip Cookies: cocoa bean, wheat, sugarcane, butter
Chocolate Ice Cream: cocoa bean, sugarcane, slush ice, milk
Chocolate Waffles: cocoa bean, wheat, egg, milk
Coconut Boba Tea: milk, sugarcane, coconut
Coconut Cake: coconut, wheat, egg, sugarcane
Coconut Ice Cream: coconut, sugarcane, slush ice, milk
Crepe: wheat, milk, egg, vanilla
Dream Ice Cream: slush ice, milk, dreamlight fruit
Fruit Salad: any fruit
Fruit Sorbet: slush ice, any fruit
Fruitcake: wheat, any fruit (x3)
Gingerbread House: wheat, ginger, sugarcane, vanilla, egg
Gooseberry Boba Tea: milk, sugarcane, gooseberry
Gray Stuff: any dairy, sugarcane, cocoa bean
Hot Cocoa: sugarcane, milk, cocoa bean
Ice Cream: slush ice, milk, sugarcane
Jam Waffles: any fruit, wheat, egg, milk
Lemon Sorbet:lemon, slush ice
Meringue Pie: lemon, butter, wheat, egg
Minnie's Gingerbread Cookies: wheat, ginger
Mint Boba Tea: milk, sugarcane, mint
Mint Candy: mint, sugarcane
Mint Chocolate: mint, cocoa bean, sugarcane, butter
Mint Sorbet: mint, slush ice
Mocha: coffee bean, milk, cocoa bean
Pastry Cream and Fruits: any fruit (x3), milk, sugarcane
Pawpsicle: slush ice, sugarcane, any fruit
Peanut Butter Waffles: peanuts, wheat, egg, milk
Plain Snow Cone: slush ice
Raspberry Boba Tea: milk, raspberry, sugarcane
Red Fruit Pie: raspberry, wheat, butter
Red Fruit Sorbet: raspberry, gooseberry, sugarcane, slush ice
Shake: any dairy
Snow White Gooseberry Pie: gooseberry, wheat, butter
Sour Snow Cones: slush ice, lemon, sugarcane
Sweet Slush: slush ice, any sweet
Tropical Pop: slush ice, coconut, sugarcane, any fruit
Vanilla Ice Cream: slush ice, milk, vanilla, sugarcane
Waffles: wheat, milk, egg, any sweet
Wedding Cake: wheat, butter, egg, vanilla, sugarcane
Whimsical Pie: wheat, butter, dreamlight fruit
Wonderland Cookies: butter, vanilla, wheat, sugarcane
Yule Log: wheat, cocoa bean, vanilla, cherry
Rootbeer: ginger, vanilla, sugarcane
*Extra (Quest Recipe):
-Extra Fizzy Root Beer: vanilla, sugarcane, dried ginger
#ddlv#dlv#dreamlight valley#disney dreamlight valley#dreamlight valley recipes#dreamlight valley desserts#dreamlight valley dessert recipes#disney dreamlight valley recipes#disney dreamlight valley desserts#disney dreamlight valley dessert recipes#game recipes#cozy gamer#gamer girl#gaming community#videogames#game guide#unofficial game guide#gamer help#game help#gaming guide#unofficial gaming guide
18 notes
·
View notes
Text
Basic Minecraft brew chart - perhaps a text version to copy/paste into in-game-books soon?
#mineblr#minecraft#minecraft oc#minecraft tutorial#minemath#video games#minecraft related#game guide#minecraft guide#ibispaintdrawing
207 notes
·
View notes
Text
Tea saplings are worth 500g!! Giving you a profit of about 300-400g depending on the source.
Sashimi can be made from fish foraged on the beach or from crab pots for a profit (with some exceptions) and is liked by most villagers.
Caroline + Linus + Marriage Candidate of Choice are always my top 3 priorities when I start a new save.
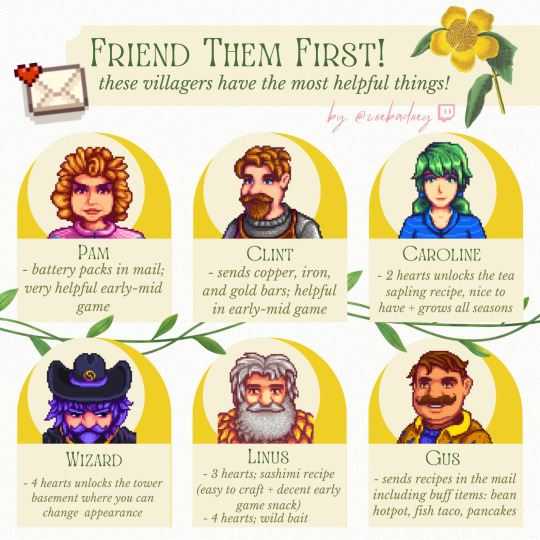
Originally on twitter. Follow Zoe on twitch.
#stardew valley#sdv#sdv villagers#infographic#reference#stardew tips#game guide#sdv pam#sdv clint#sdv caroline#sdv wizard#sdv linus#sdv gus#tea saplings are op
849 notes
·
View notes
Text
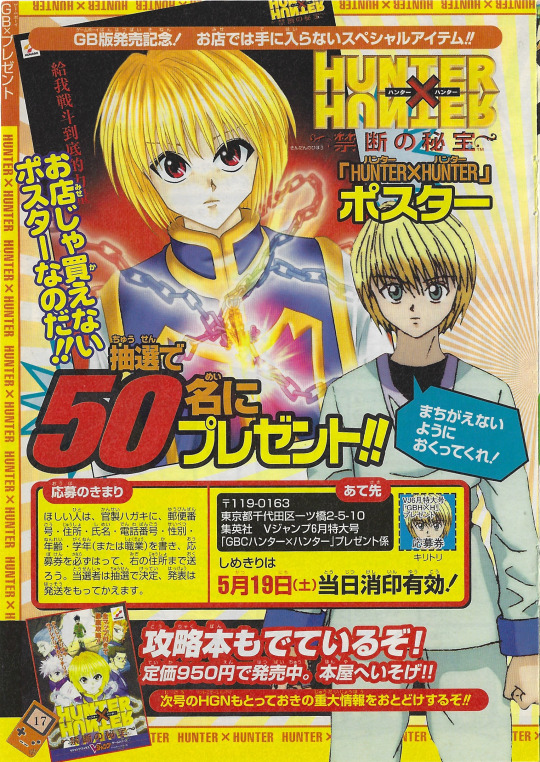
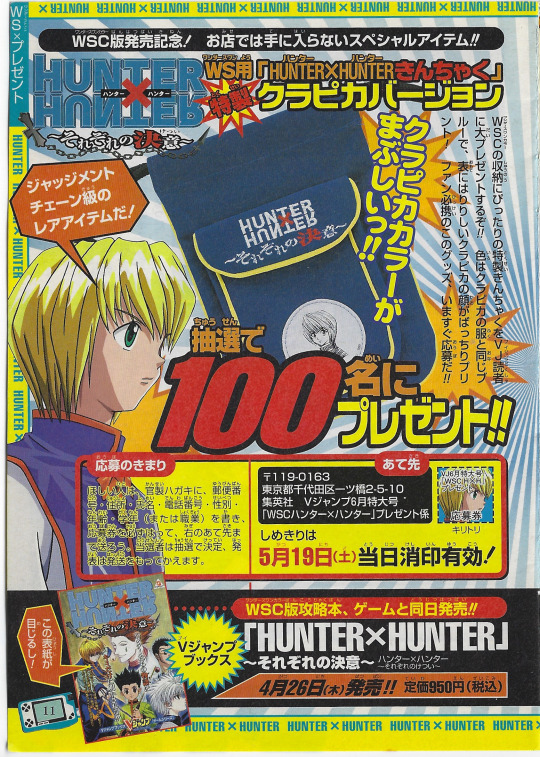
Two different Kurapika related contests. Both required the small Kurapika head be cut out and sent before May 19th, 2001 to receive a poster or Wonderswan Color bag.
17 notes
·
View notes
Text


Half Life 2 - XBOX - Prima Game Guide
7 notes
·
View notes
Last Seen Blogs
nataliatezmoon
natalia tezmoon

softyumih
︵❄️ ყᥙ꧑i ♡ 💭﹖

drako2124
DRAKO
theastroghost
GHOST

kpoplocksblog
Kpop and kdrama wallpaper