#homemade shakes
Text
How to Make a Pineapple Ginger Ice Cream Shake Sweet, Zesty, Spicy & Creamy Perfect Balance
In this video, we're making a refreshing and zesty Pineapple Ginger Ice Cream Shake. Watch as we blend together fresh pineapple chunks, spicy ginger, and creamy vanilla ice cream to create a sweet and spicy treat that's perfect for any occasion. With just the right amount of sweetness and spice, this shake is sure to become your new favorite. So join us as we whip up this tropical delight and get ready to experience a taste sensation like no other!
Here's a recipe for a refreshing Pineapple Ginger Ice Cream Shake:
Ingredients:
1 cup fresh or frozen pineapple chunks
1/2 cup vanilla ice cream
1/2 cup milk (or non-dairy milk)
1 tablespoon grated ginger
1-2 teaspoons honey (optional)
Ice cubes (optional)
Instructions:
Add the pineapple chunks, vanilla ice cream, milk, grated ginger, and honey (if using) to a blender.
Blend on high speed until the mixture is smooth and creamy.
If the shake is too thick, add more milk until you reach your desired consistency.
If you want a colder shake, add a handful of ice cubes and blend again.
Pour the shake into a glass and serve immediately.
Optional: Garnish with a pineapple slice or sprinkle some chopped ginger on top for extra flavor.
Enjoy your Pineapple Ginger Ice Cream Shake!
Pineapple shake, ginger shake, ice cream shake, tropical drinks, refreshing beverages, sweet treats, shake recipes, homemade shakes, creative shakes, dessert drinks, drink recipes, drink vlog, food and drink, food fusion, cool drinks, iced drinks, healthy drinks.
#Pineapple shake#ginger shake#ice cream shake#tropical drinks#refreshing beverages#sweet treats#shake recipes#homemade shakes#creative shakes#dessert drinks#drink recipes#drink vlog#food and drink#food fusion#cool drinks#iced drinks#healthy drinks
4 notes
·
View notes
Text
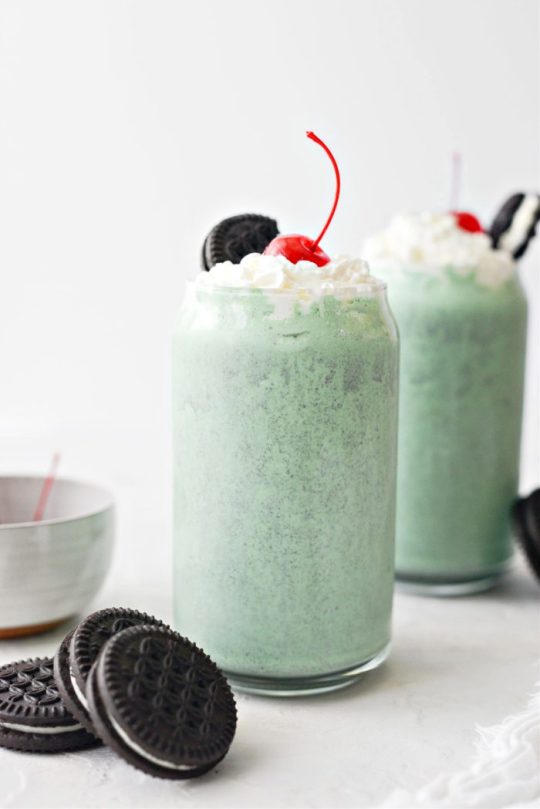
Cookies and Cream Shamrock Shake
#cookies and cream#oreo#shamrock shake#vanilla#mint#green#milkshake#homemade#kids#food#dessert#no bake#summer#st paddys#winter#spring#recipe#ice cream#easy#quick and easy#color#simplyscratch
330 notes
·
View notes
Text


the neodymium microcosmos or the anticipation of received forms
last week was the seventeenth anniversary of my first post in this place and after three thousand one hundred thirty-seven posts, i am pretty sure i'm still not doing it right
my kids and my girlfriend came over friday night and we drank pink lemonade tequila spritzers and ate pizza and shared this week's stories. it was a really nice night
yesterday, a cover of thirteen by big star came on the radio, and i was barely able to explain to cassidy how that song always makes me cry just before i lost my voice
last night i dreamt of quitting, i dreamt of a magazine cover with red stars on a blue field and no words, and i dreamt again of walls filled with pastel fauna absent menace or comfort
today, i am spending the day with finn and fall and they have surprises in store!
this week spans bloomsday, the solstice, the full moon, and midsummer
i'm spending next weekend in the mountains up near the gorge and my anticipation grows

#three thousand one hundred thirty-eight#happy#bloomsday#imaginary constructs#come inside where it's ok#emergent phenomena#the owls are not what they seem#the inconsequential collapse#dazzles gradually#and i'll shake you#happy anniversary mumblelard#perfect days#franz philip kafka dick#summer continues#i remember drainage#rage hats#homemade brownies#egg sammies#frogs from a hidden pond#awkward goslings#gone daddy gone#i want to be a turtle when i grow up#and that would fix everything#second blue moon epoch#first summer#end of messages
33 notes
·
View notes
Text
How to Make a Printing Screen from Home
I wanted to share a quick cute little tutorial for how I made my own screen for making patches (and other things that don't require exact measurements). Cute lil how-to under the cut >:)
Disclaimer: I have absolutely no idea what I'm doing at any given moment. There could be a better tutorial out there for you. I'm just guessing for a lot of the things I do and this is no exception. With that out of the way:
THE SUPPLIES YOU DEFINITELY ABSOLUTELY NEED:
a small/medium canvas (depending on what you have and how big your design will be)
paintbrushes
a tight-woven sheer fabric (preferably not stretchy and STRONG)
a fine-tip pen
water-resistant gloss of some kind (mod podge works, but make sure it's a waterproof kind if you want to make more than one print)
paint that won't come off in the wash (acrylic/spray paint work)
good strong tape
a good sturdy card-like thingy
an easy/cool design for your print :)
THE SUPPLIES THAT ARE RECCOMENDED BUT NOT NECESSARY (aka things I like to use):
a good canvas fabric/thick cotton for printing on
fabric paint (will stay on the fabric best duh)
a 1/2in, 1/3in, and fine tip paintbrush for details (depending on your design)
some company for fun :)
Alright, so first you'll want to figure out the design you want to print out and get a good sketch over it. I'm a detail freak so I like sketching out my design then going over it in a black pen. The ideal is hard contrast and clear and discernable lines/fill-in spots, like pictured below:
(Note how I emphasized which spots were to have thicker lines, which parts of the stripes were to be printed, etc. I tried to think a lot about which portions I wanted to show up on the finished design and how they would look on the fabric as a whole.)
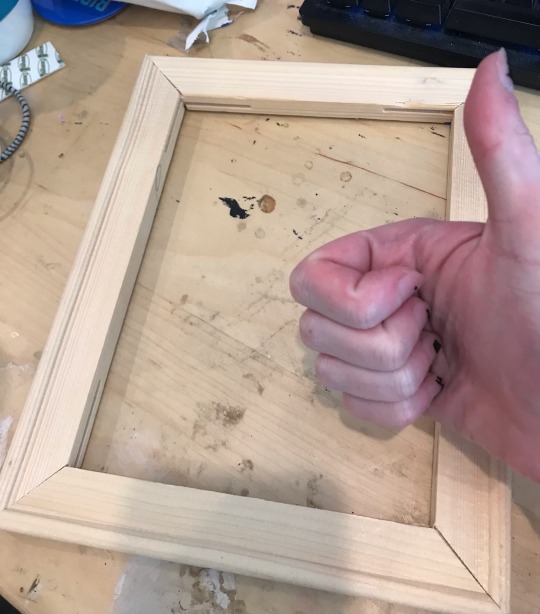
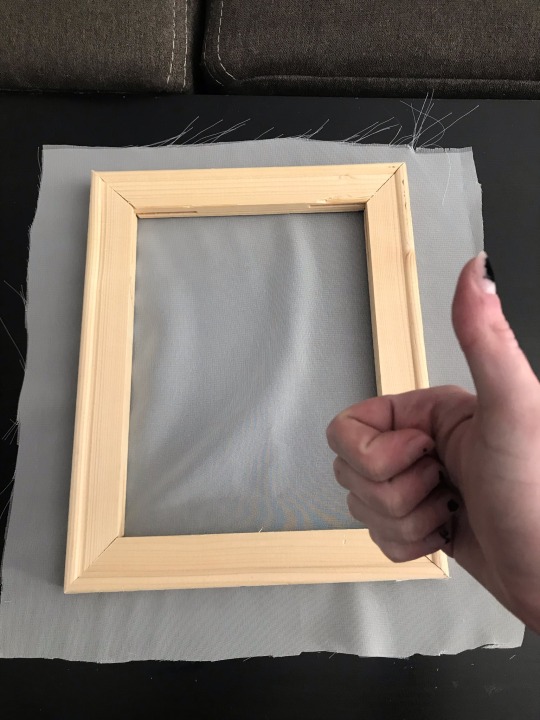
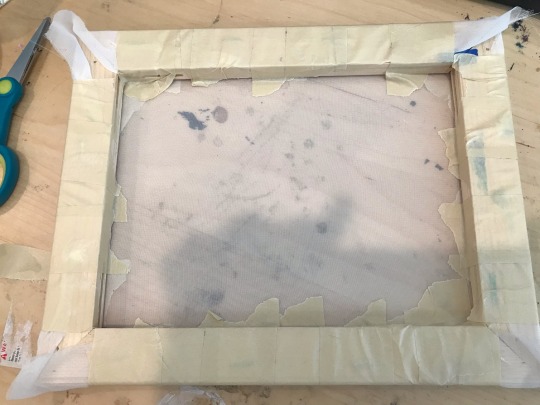
So you've got your design. Great! Next step is a fun one: Grab a canvas you are willing to part with (this one was a painting I made when I was 16. I hate it), and rip all the fabric off of that fucker!! If you pull off some staples in the process, don't worry. Just make sure you can retain the shape of the frame, since that's the part you'll need to keep. You don't need to take off every single bit of the fabric, but as previously stated, I'm a freak, so I did. You'll come out with something like this:
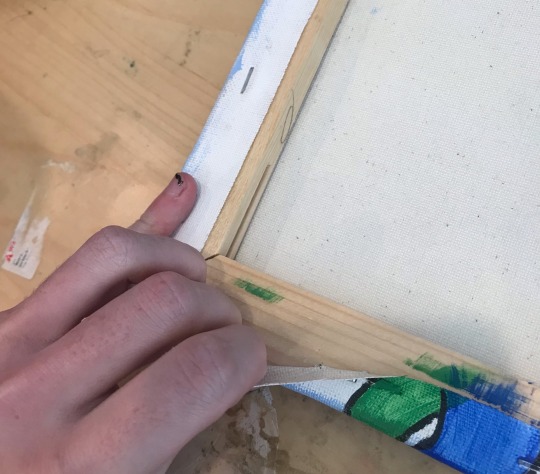
For the next steps you'll need a good pair of scissors as well as your pen and your sheer fabric. You're going to want to set the frame on your fabric and cut about an inch and a half around it so there's extra to wrap around the frame and tape down. You can draw a guideline for where to cut if you want, but once again, I'm a freak:
Now lay the front of the canvas frame (the part without staples on it) face down on the fabric and grab your tape! Now we're going to tape down each end of the frame so the sheer lays taut on the frame. I like to put one or two strips of tape on the ends parallel to each other and pull them tight, then do the same with the other side, then continue adding tape until the whole outside of the frame is covered. See below:
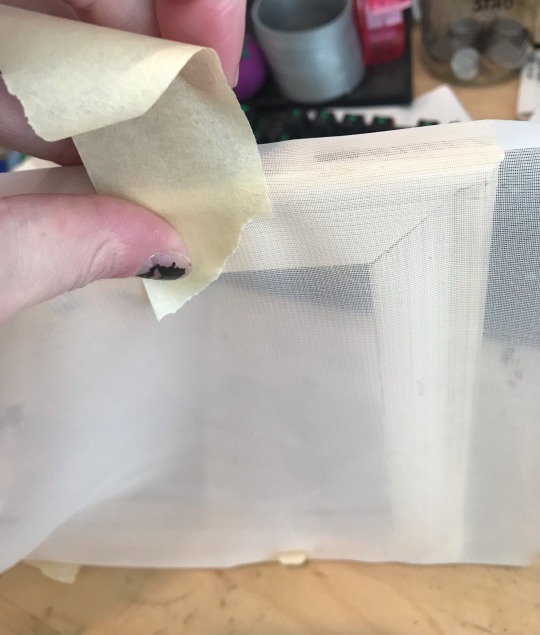
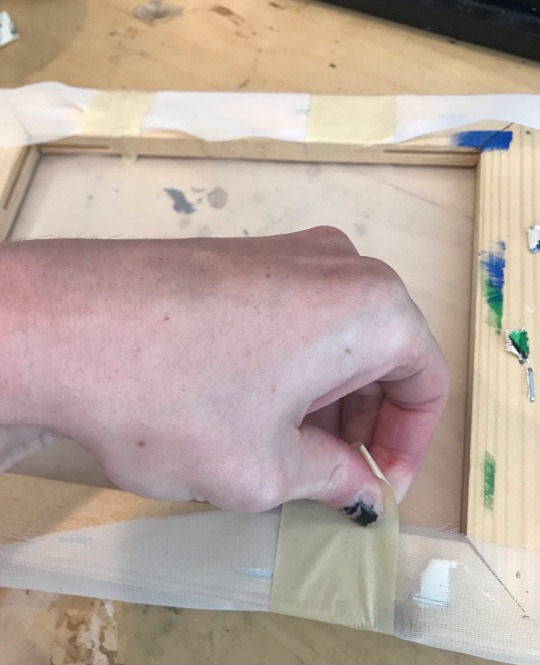
(Note: your goal in this step is to stretch the sheer as tight as it can comfortably go so there are no wrinkles or depressions in the fabric.)
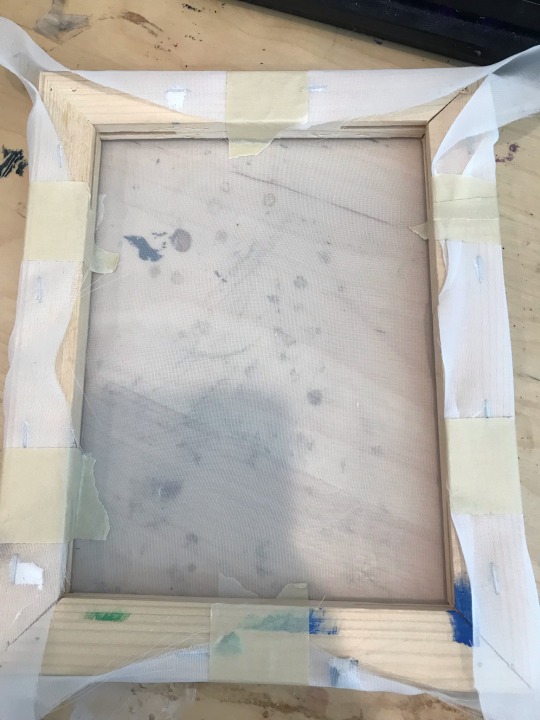
So now you have you're frame. Fuck yes!!! Go ahead and grab the design you came up with as well as your pen (you can use a pencil too, but the pen shows up much better through the fabric so I definitely prefer it), and put the frame front side down onto the sketch.
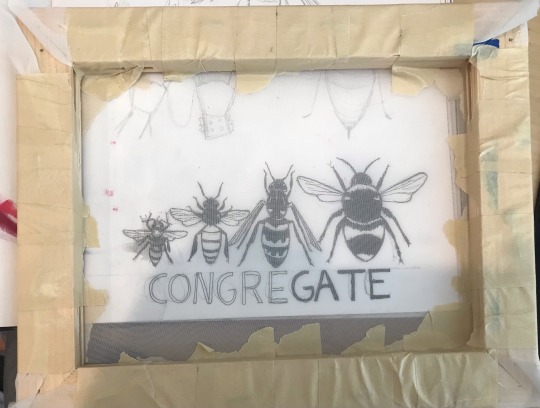
If you're worried about keeping the frame steady, feel free to tape the frame down and go ahead and trace over the design with your pen. Make sure to fill in all the dark parts enough that you can differentiate them from the light parts.
Once you have your sketch copied to the frame, now you can grab your gloss!!! Hurry!!! You're almost done!!!!
With this step I like to start big and go into the details once all the larger portions of the sheer are covered. Pretty much you're going to paint over every part that isn't the black of the pen with your waterproof gloss. This ensures that once you start printing, the only parts that are going to bleed through the fabric will be the black parts that weren't painted over with gloss/varnish/mod podge/whatever you used as long as it's waterproof!!! Take all the time you need, it's not a race. Once you're done and the gloss has dried, your screen is going to look something like this when put up to a light:
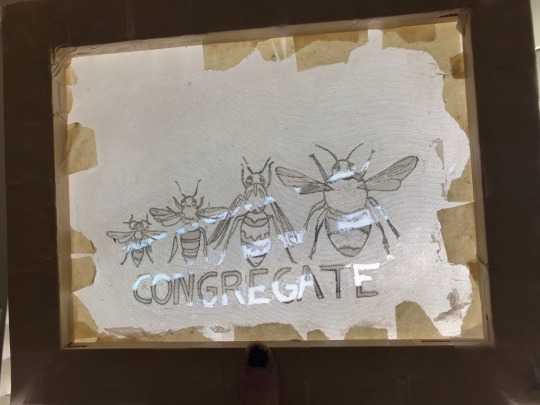
Now that this step is over with, congratulations - you have just made a mesh screen!!! Keep reading to learn how to use it lol
So for the patches that I make I just went with black and white paint, and black and white fabric to keep it traditional, but you can use any colors of paint and fabric you want, truly! The world is your oyster! I do not care! That being said, we're keeping it simple today.
Grab your screen, a piece of fabric that can cover the design and leave at least an inch of space around it, and a surface you won't mid getting paint on on accident. You'll also want to grab that card-like thingy for this as well. It can really be anything that can provide a sturdy, even pressure across the screen consistently. Go ahead and pick up that fabric paint too, I guess. We'll probably need that.
At this point, this is what your workspace might look like:

Next up you are going to center your design onto your piece of fabric-

-and grab your fabric paint. put a thin little stripe over the top (start slow and add more - as you can see I added a little too much and kinda fucked up my design) then grab your card thingy. Make sure you have even pressure on it and swipe it down at a medium speed so you're dragging the paint down the screen:

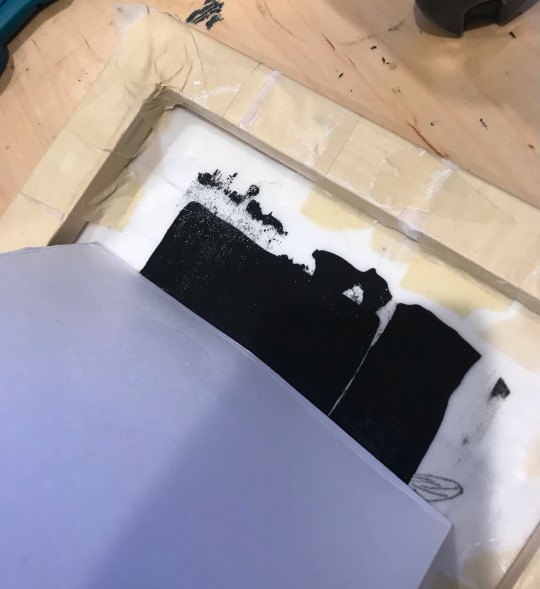

Once you've got everything covered I like to go over it a few more times for even coverage. Then you pull it up from the screen (which you might want to rinse off so no paint sticks to it!!!), wait for that bitch to dry, and you're done!! Congratulations, you have your very own fun silly patch! Go sew it on something! Or not! I do really do not care!!!!!!

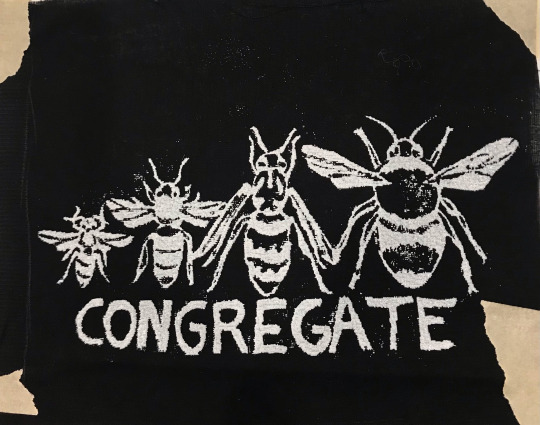
#blog post#cant-shake-it#patches#homemade#punk#punk diy#punk patches#tutorial#how to#screen printing#diy#fashion#if i get hate for this im prepared bc i ride life on the seat of my pants#there are no rules and i am so inefficient
149 notes
·
View notes
Text
I'm away for a bit again in a couple of weeks so pspsps just need a few more non-bot, actually have their age in their bio followers to do this 2k stuffing I'm hyped for
#hutch posts#i think i'm gonna go for fried chicken and wings#do an audio raffle to help fund it#and add some fun stuff like “x amount donated means i'll add a homemade shake to my meal”
9 notes
·
View notes
Note
do you know any songs that you think would fit your wonderland au?
I have some!! I mostly put these based off a few lines from their lyrics for my wl playlist
Also most tend to be shanks centric for some reason 🙈
Fish in a Birdcage - Rule #9-Child of the Stars
Freddy Mercury - The Great Pretender
Halsey - I am not a woman, I’m a god
Jaymes Young - Don't You Know
Lorde - A World Alone
Lorde - Ribs
Lorde - White Teeth Teens
Melanie Martinez - Carousel
Owl City - I'm Coming After You
Ricky Montgomery- Talk to You
Taylor Swift - Wonderland
Troye Sivan - FOOLS
Troye Sivan - YOUTH
Will Stetson - Lower One's Eyes (his eng cover of flower's lower one's eyes)
#im visibly shaking holding back from recommending more Lorde songs that fits shuggy/buggy bc it's not exactly WL vibes#anyway outside of WL au for Lorde song I think Bravado really fits buggy#Glory and Gore Perfect Places Sober II (Melodrama) Swingin Party and Homemade Dynamite for shuggy#buggy in wonderland au#asks#BIWasks#ela's song recs
37 notes
·
View notes
Text
Chu Wanning if he couldn’t make wontons (ft. the uncooked batch in the background) 🥹👍

Hi yes this took SO LONG to make, and I was missing quite a few of the ingredients (like the Black Vinegar and Garlic Chili Sauce) so I had to improvise 🙇🏻♀️ I also didn’t have the wonton wrappers so I had to make them from scratch which was PAINSTAKINGLY time and stamina consuming (but hey, living the canon Chu Wanning experience)
Definitely messed up and it looks nothing like the picture in the RanWan wonton recipe I used but it was super fun to make and I hope my friend and I can enjoy it
Link to the RanWan wonton recipe ↓↓↓
#i vividly remember taking it out on the wonton wrapping dough at one point (it was borderline abusive)#funny how a single series can make you spend 6 hours to make a dish#wontons#homemade#yumemiruuuu/river’s ratchet cooking show LMAO JKJK#with the way i cook things i should be an mxtx protagonist smh#2ha#2ha inspired#ranwan wontons#ranwan#ranwan ranwan grrrr bark bark woofa awooga awooo shakes aggressively#the husky and his white cat shizun#erha#erha he ta de bai mao shizun#二哈和的白貓師尊#literally only have respect flr chu wanning right now because holy hell i don’t think I can get out of bed after all this DBDBSDJBJNWD
10 notes
·
View notes
Text
Summer is for tahini. I don't know why, it just is.
2 notes
·
View notes
Text

Super excited about this gift! It's going in a basket along with BBQ/grilling spice mixes and BBQ sauce.
6 notes
·
View notes
Text
Korean Strawberry Milk
Korean Strawberry Milk
Ingredients500g strawberries, cut in quarters¼ cup castor sugar1 tbsp lemon juice1L coconut milk, sub with full cream milk
MethodHeat up a 20cm pan on the stove on medium-high heat. To the pan add the strawberries, sugar, and lemon juice.Allow to simmer for 15 minutes until the strawberries soften, stirring constantly to prevent it from burning. The strawberries are ready…
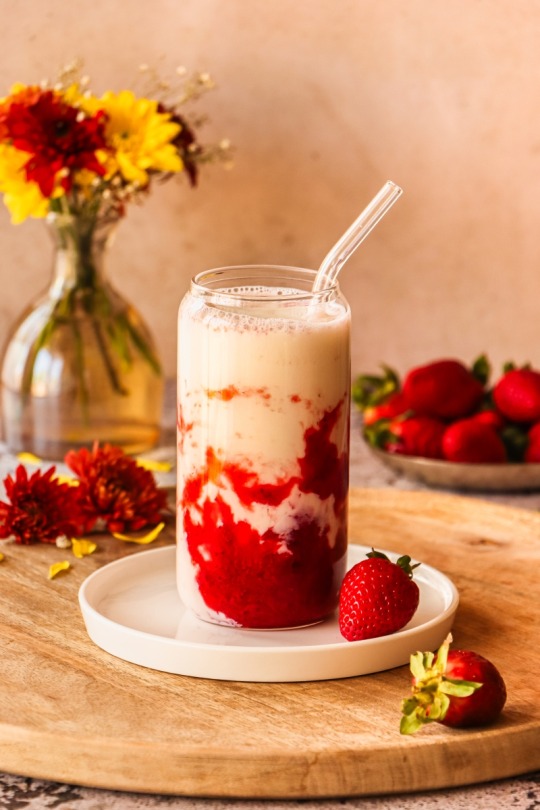
View On WordPress
#delicious#Dessert#easy#food#fresh#fruity drinks#fruity shakes#homemade#Korean drinks#korean strawberry milk drink#korean strawberry milk recipe#non-alcoholic drinks#simple#south African#strawberry milk recipe#strawberry milkshake recipe
10 notes
·
View notes
Text
sorry to be homophobic on main but oat milk isn't good
#ive tried store versions and ive made it myself a few times#its just so. watery#yes i shake it up yes I've added sweeteners to homemade versions yes ive tried it in various drinks#i understand the appeal if youre using it for breakfast smoothies or maybe pancakes or smth were it really doesnt matter#if you add water vs milk#but for smth like coffee? it just tastes like i added water#there is no redeeming flavor and the texture is eh#rambles
1 note
·
View note
Text
A Dreamy Blend of Blueberry, Ice Cream, and Marshmallows - How to Make a Delicious Creamy Milkshake Smoothie
Join us as we make the ultimate blueberry ice cream marshmallow milkshake! Using fresh blueberries, creamy vanilla ice cream, and fluffy marshmallows, we blend up a sweet and creamy drink that's perfect for any time of year. Watch as we mix and match ingredients, adding just the right amount of sweetness and texture to make this milkshake a new favorite. So grab a straw and get ready to sip on this deliciously indulgent treat!
Here's a recipe for a tasty Blueberry Vanilla Ice Cream Marshmallow Milkshake:
Ingredients:
1 cup fresh or frozen blueberries
1/2 cup vanilla ice cream
1/2 cup milk (or non-dairy milk)
1/4 cup mini marshmallows
Whipped cream (optional)
Extra marshmallows for garnish (optional)
Instructions:
Add the blueberries, vanilla ice cream, milk, and mini marshmallows to a blender.
Blend on high speed until the mixture is smooth and creamy.
If the shake is too thick, add more milk until you reach your desired consistency.
Pour the shake into a glass.
Top with whipped cream (if using) and extra marshmallows for garnish.
Enjoy your delicious Blueberry Vanilla Ice Cream Marshmallow Milkshake!
Blueberry milkshake, ice cream shake, marshmallow shake, sweet treats, shake recipes, homemade shakes, creative shakes, dessert drinks, drink recipes, drink vlog, food and drink, food fusion, cool drinks, iced drinks, healthy drinks
#blueberrymilkshake #marshmallowmilkshake #sweettreats #shakerecipes #homemadeshakes #creativebeverages #drinkrecipes #coolbeverages #iceddrinks
#Blueberry milkshake#ice cream shake#marshmallow shake#sweet treats#shake recipes#homemade shakes#creative shakes#dessert drinks#drink recipes#drink vlog#food and drink#food fusion#cool drinks#iced drinks#healthy drinks
2 notes
·
View notes
Photo

Cookies and Cream Shamrock Shake
#cookies and cream#oreo#homemade#shamrock#milkshake#shake#mint#green#kids#no bake#vanilla#color#recipe#st paddys#summer#christmas#easy#simplyscratch
324 notes
·
View notes
Text
i put raw cow's milk in my hair yesterday & it came out so shiny & fabulous & soft & wavy ^_^
#where would i be without dairy#long time not using that tag#& i made homemade cheese it came out kind of bitter thou:-/#i have 0 energy for making butter no way am i shaking a jug for fifteen continuous minutes or whatever i am but 1 Bone#cow's milk is so amazing the lactose taste is out of this world i could drink 1 million gallons of it for breakfast lunch & dinner#i have a screenshot from /ck/ where it says something like ''i stopped eating. just drink this all day'' literally me so much#my classmate told me that she had actually had milk for every meal but she also told me she was born on the same day#& same hospital as me ( we were around 7 when she told me this BTW ) & that she remembered seeing me as a newborn#but then she invited me to mcdonalds for her birthday which was in march in the third grade. & i still have the gift(s) from the party#my ends were screaming for moisture before this & i saved them with the power of Milk
13 notes
·
View notes
Text

she cant even tie her own shoes so she stuck velcro on them
#⚠️#personal#my art#oc: michiko#i love my ocs so much#shes so so silly#i wanna stick her in a snowglobe and just shake her around#shes like my homemade blorbo
8 notes
·
View notes
Text

Homemade Grimace shake. I know I'm late for the trend.
2 notes
·
View notes
Last Seen Blogs
keynes-fetlife-mutual
each hour is a puzzle that must be solved to pass

moongirrrrrl
just a girl in love with the moon

amberliveliferojas
FAITH AND FITNESS

winterton-on-sea
Seaside Village

thecloudcoffee-blog
the cloud coffee