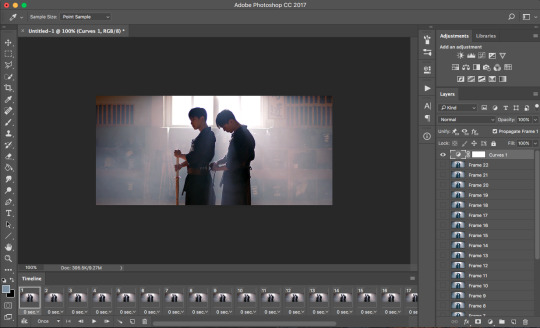
#i just brightened the heck out of it using different adjustment layers and i thought it'd make it trash
Photo


junho + colours 💗
#extraordinary attorney woo#kdramaedit#kdramanetwork#mine#lee jun ho#idk what's happening but tumblr's actually making my gifs look better than they do on my desktop??#then again i'll probably look at these on mobile and cry#but ngl i'm very proud of how the yellow one came out#i just brightened the heck out of it using different adjustment layers and i thought it'd make it trash#but i like it!!#the gifs still lose a lot of saturation like the second one doesn't even look like i coloured it#but whatever#YELLO JUN HO BEST JUN HO#i love him in it
741 notes
·
View notes
Photo


Everything We Had
thought id put something on this empty blog and see if i can find something to talk about. ive done a few shitty streams on my twitch channel ( https://www.twitch.tv/vape__dad ) in which i talked a little bit about how i made some songs and how i made a music video but i havent yet talked about my cover art at all nor have i uploaded them in high resolution anywhere.
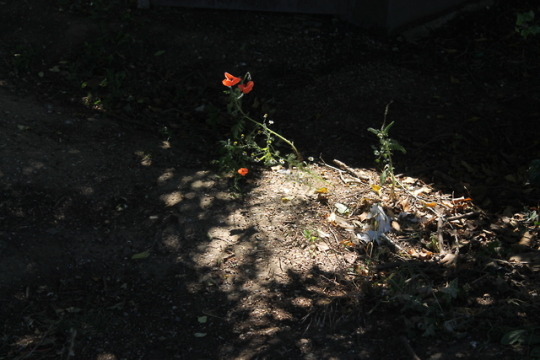
in june 2018 i met up with a friend to take some photos to possibly use as art for my music. i try to do as much as i can myself but all i had at the time to take pictures with was this shitty old nokia phone and, while i had used it to take the photos used for earlier projects, i wanted the visual quality to improve alongside the quality of my music. so we walked around and i was pointing out things that i thought would be cool to take photos of and giving some feedback on stuff like angle and framing, we did this for a few hours and took about 240 photos, i had a lot of fun and it was nice to be out in the sun for once.
the first image is the raw photo. we saw this little spot that was mostly secluded by fences and flora so there were a few little puddles of sunlight on the ground, one of them had this little red flower sitting in it so we’re like “ooh thats pretty *snap*”.
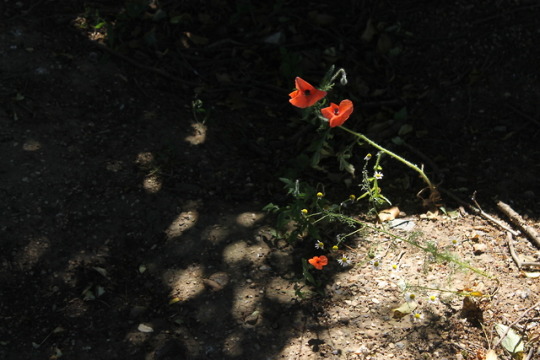
the second to fourth images are the other photos from that day of this specific object which i also considered using.
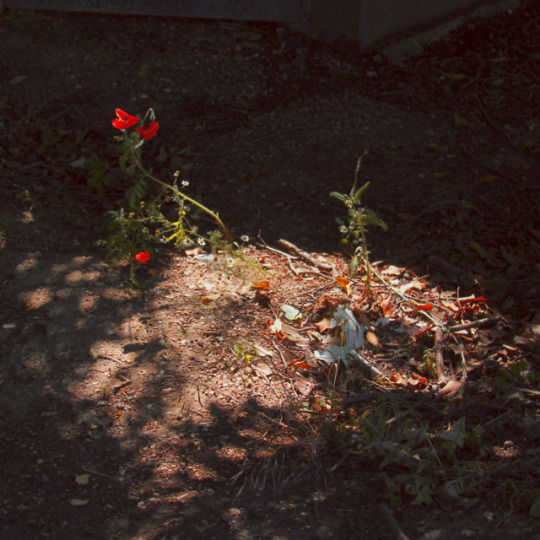
the fifth image is the art for the song. so i had made this song in march 2019 and i was like ok cool, what the heck am i gonna use for the track art, so i looked through all the possibilites i had on my hard drive and saw this photo and was like “perfect!”. i brought the image into photoshop and began working on it. ive used adobe photoshop cs2 since my early teens but havent really ever pushed my skills in it, barely looked anything up and figured out how to do a few things by just trying stuff out. my skillset with it is basic but its enough to get the results i want. anyway, i spent probably too long, not that it mattered since i had no deadline, cropping the image to have a 1:1 aspect ratio and carefully making sure i had exactly what i wanted exactly where i wanted. i then duplicated the base layer and added some chromatic aberration, the image immediately looked warmer because of all the shifted red but it didnt look like you needed to be wearing those old school 3D glasses or anything, it was a nice subtle touch. even though its like something thats “wrong” i think it can look nice, Grand Theft Auto V on PC is a visually beautiful game which has chromatic aberration that is noticable around the edges of the screen but it isnt intrusive and it doesnt result in an unsightly blurriness. the next layer i added was a -8 ° hue shift with 75% opacity. now the reds on the flowers were more red and less orange, and the yellow leaves became more orange, of course everything in the image had been changed but these were the most noticable differences. next layer was +25% color saturation at 43% opacity, the reds popped more and overall the image was less dull. next layer was selective color, which allows you to adjust cyan/red, magenta/green, yellow/blue, and black/white levels within indivudual color ranges. i was trying to make this look pleasant and dope rather than realistic or how a human eye would percieve it, so i went adjusting everything to be just how i wanted it and when i was done it no longer looked liked it was the middle of a summers day but more like an autumn sunset with orange leaves scattered on the ground and warm feel to the whole image. i really liked how it was looking but i still wanted to change a bit more, while i wanted the flower and spot of sunlight to be the main focus of the image i thought the contrast between that area and the shadowed parts was too high and that some detail was kinda getting lost. so what i did next was i merged the layers i had so far and just generated fake film grain which gave it some texture and brightened the image up but it looked a bit too like sharp and crispy so i resized the image to probably like 50% or something then sized it back up to the original size which made it blur together which gave it a kinda retro-aesthetic too. very simple thing but it really changed a lot, and i love how the final image turned out. judging by the date created/modified timestamps in the metadata of the PSD it took me about one and a half hours to edit the photo.
high resolution: https://imgur.com/a/004CtlA
i hate sounding like a pretentious wank but i dont wanna say what i think the art represents or how it links to the song because id like to not influence anyones interpretation.
you can check out the song here:
https://soundcloud.com/bummerneverends/everything-we-had
3 notes
·
View notes
Text
making color palette gifsets
heya guys! i’ve noticed that in the tags on some of my color palette gifs y’all seem to be super impressed with them and so i thought i’d put a bit of a tutorial together about how i actually accomplish them.
the gifsets i’m talking about can be found here: (blue: one | two; green)
as always, my gifs can be found here and my other tutorials here
i generally start by making one gif and working the rest of them around that single gif. for my green palette gifset, i started with this gif of alex:

i colored it how i liked (coloring tutorials can be found here) and moved on to the next gif, which would be the one that ends up sitting next to it in the final gifset (the one that shares the same shade of green)
now the tricky part is getting these greens to match. every time i want two gifs to be the same color, i make sure they sit next to each other in photoshop by dragging the first one i made (this case, the alex one) down in between the timeline and my workspace.
this allows me to see both at the same time, side-by-side and makes matching up the colors a whole heck of a lot easier.
now with just some very basic coloring to brighten up this second gif, it looks as such

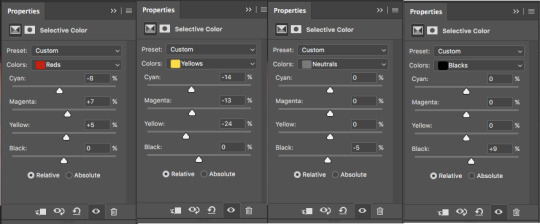
since my first gif is so vibrant, this isn’t going to match up, so i play around with the yellows and greens in the selective color layers (i think i ended up with 3 selective color layers in total) until i start to get a green result that closely resembles the alex gif.
i almost always start off with settings i like in one selective color layer and then duplicate it so i have those same settings twice. this normally makes colors look not-so-great, so i go into that duplicated layer and move some of the sliders around until it fixes the problem.
for example, i generally start with the extreme settings (all the way to +100 or -100) so my first selective color layer has these settings:


when i duplicate the layer with those extreme settings, my gif now looks like this:

in this case, it’s not awful, but a lot of the time this can make parts of your gif look grainy and low-quality. however, since it doesn’t match the greens in my alex gif

i messed around with the settings a bit


now this still doesn’t quite match so i added a vibrance layer to beef up the intensity of the colors, a brightness layer to, well, brighten it, and a levels layer to darken the dark parts.

i added another selective color layer to keep making adjustments, this time working with the neutral settings as well


it made the sign green and i didn’t like that, so i used the layer mask to color over it


and finally, i added hue/saturation layer and played around with that a bit


slow and steady wins the race, my dudes. take things easy, take your time, and be patient. playing around with different settings is the best way to learn, and remember that a lot of these aren’t going to match up completely perfectly. that’s going to be really difficult to achieve and trust me, as a perfectionist, it’s tempting to give up bc you can’t get it right away, but i can’t even begin to tell you how much practice truly helps.
my first attempts at doing gifsets like these (not gradient palettes but matching colors) were about a year ago (you can find them here and here if curious) and they’re, uhhhh, not good, but i kept giffing and look where i am now! <3
anyway enough of the corny pep talk. the next step is getting the other shades. the next gif i made for this gifset was this one:

and then, of course, it’s counterpart:

another thing i always do when getting stuff to match up is to put the gifs in a tumblr draft so i can see how they’ll all look while moving next to each other. this seriously makes all the difference in the world bc as a gif moves, the colors can change slightly depending on the scene’s movement and possible change of lighting.
as soon as i make a gif i add it to the draft.

after looking at this, i realized that the greens varied drastically and i wanted a smooth and subtle shade change throughout, so i decided to add two in between the four i already made.
again, i make sure the gifs are side-by-side while doing my coloring, but instead of trying to match the color, i do this to make sure i don’t match the color, since i want it to be a lighter shade.

once i think i have the gif how i want, i drag them around so they look as below in photoshop

this way i can double check that the shade is truly in between the others before saving it. (although there are quite a few times that i save a gif, add it to my tumblr draft, decide it doesn’t look right, and continue editing it in photoshop)
so that’s essentially it! i added two more gifs that are darker than the alex one by following the same steps. honestly? gifsets like these i almost never finish in one sitting. they take me a whole day (sitting down to work on it two or three times). a big part of this is finding parts of the movie that will work. i try to get parts that have a background that is the color i’m using (so in this case, literally any shade and variant of green) or at least a color close enough that it can be easily manipulated into the color i need.
this gif of charles for example:

with just a curves layer to brighten it, it looked like this:

i knew that cyans can easily be changed to greens, so that worked out for me in the end.
i really really do hope this helps some of you out there. i know a lot of people just hand out their psd’s for y’all to slap onto your gifs, but there’s no learning process there and frankly, i don’t think that’s fun. sure, you have to make adjustments, but why not just do it yourself from the get-go, right? coloring your gif, to me, is why gif making is so enjoyable, and i really want to help people learn to do it themselves so they can find a process and coloring style that works for them (also i’m like,,, lowkey trying to push against the whole pale/b&w fad bc we were given color television for a reason and that’s my tea for, like, the rest of my life)
as always, if you have any questions or would like to see a tutorial on something else, my ask box is open to all (even you shy anons, ily) and i honestly love making tutorials, so don’t be scared to ask, whether you follow me or not. happy photoshopping everyone <33
243 notes
·
View notes
Text
gif tutorial !!!
hello !!!! it’s me, ur resident shownu stan w a gif tutorial !!! no one really Asked but i wanted 2 make it and also it turns out ppl Are interested in one so :D !!! here i am !!!! so under the cut will b the tutorial nd it’s really picture heavy because i’ll be covering a lot,,,,
we’ll be looking at:
downloading the video :0 !!
trimming the video to get the clip you want
actually making the gif
some coloring advice :D !!! (i lov coloring Truly!!!!)
and some exporting advice too :D
and this is what i’m using:
ps cc 17
vlc
and i use a mac :D
part one. getting the clip !!
(also a quick note !! this isn’t my process for speed giffing or performance giffing as thats,,, thats an entirely Different adventure that makes me scream)
so !!! i will be giffing the dramarama music video and what you want to do is download it first :D so go to vlive, copy the url of the music video and i use two sites to download from vlive just because one of them can get a little buggy ?? but i use soshistagram and savieo !!! savieo is usually what i prefer to use but either is fine :D
once you downloaded the video, open it in vlc and go to the part you want to gif. i recommend pausing a few seconds before the actual scene because it’s always better to get a little more than you intended than a little less. currently, my screen looks like this:

and what you wanna do Next is go to playback > record and record the scene you want! when your scene is done playing, just go back to playback and click record again to make it stop.
for me, all my clips end up in my “movie” folder so it’s best to check where your clips go :D i think ?? you can change their destination but i never really played around with that so i’m not sure D:
part two. making the gif !!!
open up photoshop, then go to file > import > video frames to layers. select your clip and this window should pop up:
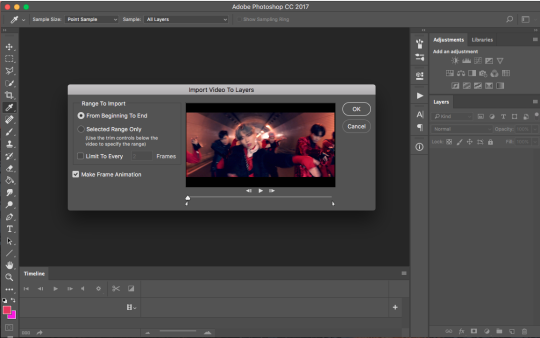
simply adjust the arrows until you get the scene you want and then press OK. a few notes about this part:
some people choose to select “limit to every 2 frames”. i personally don’t do this just because to me, it makes the gif look choppy, but use your intuition and go for whatever you think will suit the gif :D
i Would recommend not using ‘limit to every 2 frames’ if your clip is really short, as you want every frame possible
make sure ‘make frame animation’ is selected
and also the rule of having a little more than you want is important here too! the arrows aren’t very accurate so it’s better to get frames from scenes you don’t want that you can simply delete later
once you’ve hit ‘ok’, photoshop will then process the clip and give you this :D
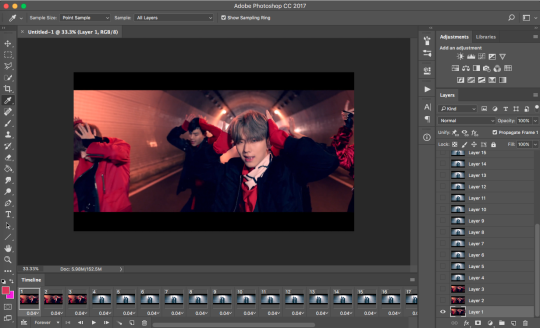
(if you don’t have the timeline, just go to window > timeline. it’s near the bottom :D!!!)
also a quick moment!!! everything in the timeline tab will be called a frame and everything in the layers tab will be called layers :D
moving on! mister kihyun is not part of the scene i want, so i select the frames (not the layers!!!) that i don’t want and hit the trash can button at the bottom. goodbye mister yoo leaving me with this:

aren’t they just,,,, Beautiful :’( ...... anyways !! now we want to Crop !!!! tumblr has certain width sizes that i recommend you use for Ultra Crispness, and you can see a guide of what to use here !!
because the clip i’m giffing is so short (only 23 frames), i can crop it to 540px by 250px without worrying about file size. simply click crop in the toolbar so you get this setup here

where it says 268px by 305px, just change it to whatever your dimensions are! also, make sure ‘delete cropped pixels’ is deselected. then, go ahead and select what you want to be cropped and then press enter :D my screen at this point looks like this

press enter and then :D!! all cropped!!

now we’re going to sharpen! in the timeline tab, there’s a button made up on three lines. i circled it here :D

click that and select “convert video to timeline” so you get this

select all your layers and then convert to smart object! (you can either do this by rightclicking on all the highlighted layers and selecting ‘convert to smart object’ or by going to filters > convert for smart filters
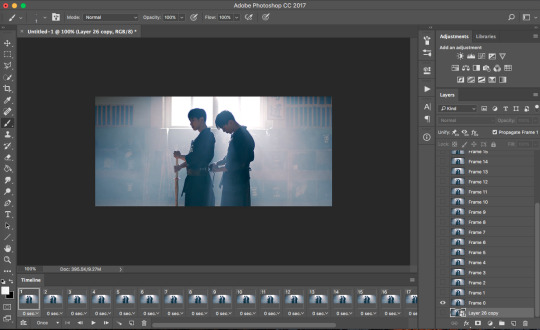
now your gif is ready to be sharpened! i use actions to sharpen my gif and you can find a few of my favorites on this blog !! download a couple and play around with it :D once your gif has been sharpened, select all the layers again and convert it into a smart object again. then click the 3 lined button and click convert frames > flatten frames into clips. then convert back into frame animation (either by clicking the three lined button again and going convert frames > convert to frame animation or by clicking the three squares in the timeline)

you should now be back to where you started :D only this time you have one frame D: but don’t worry! what you want to do next is click the three lined button again and select make frames from layers. delete the first frame in the timeline because it’s just the smart object layer and we don’t need it. you should now have this
and we can officially move onto the best part :D coloring !!!
part three. coloring!!!!!!!!!!
let me preface this Entire Section with saying there is no right or wrong way to color. every gifmaker has their own distinct style, and you’ll develop yours too :D i really recommend looking to see if your favorite gifmakers have any coloring tips and if they don’t, there’s no harm in asking :D (just make sure ur nice abt it nd respect them if they choose not to share their coloring :D)
moving on to actually coloring, you wanna see what kind of colors are in your gif and enhance them. in the case of this gif, it’s very blue toned and blue tends to end up being very grainy in the end. i want to color correct this gif then and there’s a good tutorial that i learned from here :D (i don’t color correct all the time, only when the scene is very heavy in one color)
now we have a more neutral starting point, and you can color as you want from this point! i’d usually just Slap on my psd and adjust the settings until i get something i want, but i’ll go through some of my favorite adjustment layers and what my general coloring process looks like.
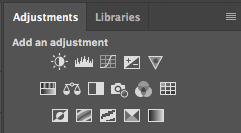
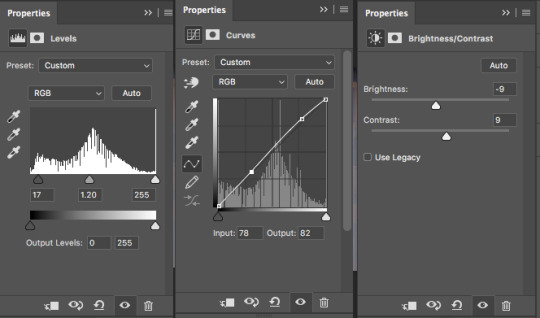
here is the Holy Grail of photoshop, the adjustments tab :D i use these adjustments the most:
brightness (i usually decrease the brightness and up the contrast just a bit)
levels (i take the black arrow down a bit and the grey arrow either increases or decreases depending on the gif)
curves (i use this sometimes!! if the gif is just a bit too dark, i usually bring this up a tiny bit)
vibrance (i usually bring this up to about +15 or +30 depending on how colorful the gif is)
color balance (another adjustment i absolutely need in all my gifs!! it helps to change the tone of the gif (if it’s too red/too blue/etc and lets you neutralize it more) and a good tutorial that explains how to use color balance can be found here)
selective color (i usually have like,,,, So Many Layers of this but this is a Must Have adjustment!!! i always change reds/yellows/cyans/blues/neutral/black)
gradient maps (just to add some more color)
exposure (usually to darken the gif a little and decrease grain)
and just for the sake of this tutorial, i’ll go through how i would color this gif so you can get an understanding of how i color :D
so we go from this

to this

i use the levels, curves and brightness adjustments to increase the contrast and darken/brighten the gif a little. it’s not a noticeable difference but it’s there :D
then, i use a color balance layer to make it more red-toned. i worked in the order of shadows > midtones > highlights and adjusted each slider until i got a result i wanted. i also thought it was still a bit too dark, so i threw in a curves layer too.


resulting in this
and then i added some selective color to enhance/change up some colors!
and because i thought it looked a little too red, i added another color balance layer.

and lastly, i add in an exposure layer!
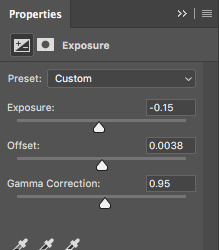
and that’s how i would color that gif :D this is just a really basic coloring but you can always build on it and play with all the adjustments !!! now we’re gonna time the gif and then save it :DDD
part four. timing and exporting :D
timing is easy :D select all the frames in the timeline and then click the number so you bring up this menu:
click other and input the timing. i follow this really rough guide of what timing to use per amount of frames:
15-30 frames: 0.07s
30-60+ frames: 0.05s
i had 23 frames for this gif so i’m using the 0.07s timing :D hit enter and your gif is timed :DDDD !!!!!!
now for exporting!!!
i used to think there was only One Way of exporting gifs but after reading a gazillion tutorials and playing around with the settings myself there’s actually a lot of different ways :D you can ask people what their save settings are and play around with it :D
so to Finally save your gif, go to file > export > save for web and devices and this window should pop up
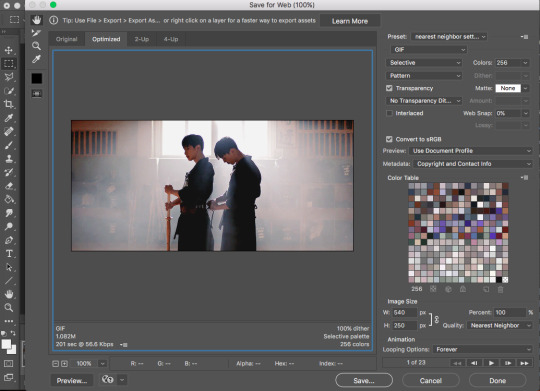
here’s a closer look at the settings i use to save gifs
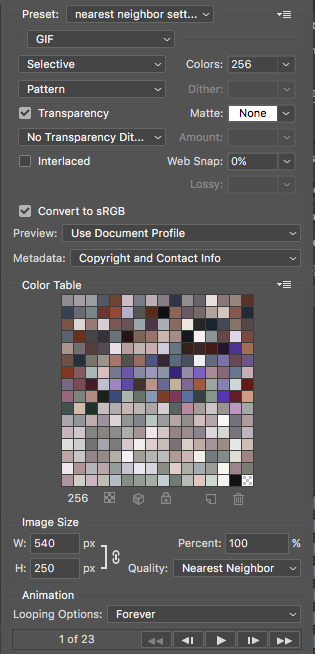
make sure the looping option is on forever otherwise it plays once and then you want to Roll into a pool after you upload it and realize you hecked it up. also, make sure the file size is under 3mb. you can check that here
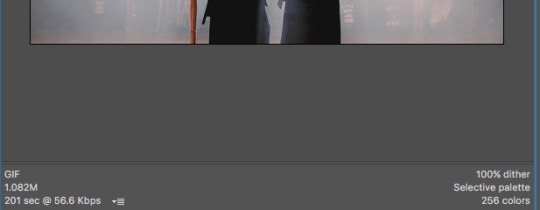
my gif is 1.08mb so it’s fine :D hit save and then name your gif and bam!!!! you made a gif :DDDDD here’s the final result, with a comparison for coloring :D


pat urself on the back and go tackle photoshop :D if you have any questions, feel free to send them my way !!!
79 notes
·
View notes
Last Seen Blogs

ajmtravelflamingo-blog
Blogmingo Travel Spots

waldorfing
zazzy af

co-han
QUEEN COHAN
sam-samuelito
PRADO DE ABEJAS

legendofzeldapolls
TLOZ Polls