#i tried really had and nearly had an aneurysm because tumblr deleted my previous attempts like 4 times
Text
5th try at writing the guide on custom pet paint mode brushes, if tumblr manages to mess this one up i will have a fit
16/10/2023 Edited: Updated to add better hash ID generating practices.
Things you'll need:
Sims 4 Studio
GIMP
Notepad
Guide:
Tools that we will be using:

We'll begin by creating a new, empty package.
Save it somewhere convenient and easy to access.
Once you've saved the package, you'll be met with this screen:

From here, we'll go to Tools > Game File Cruiser
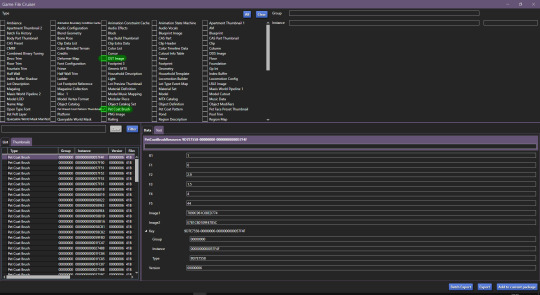
We'll be working with Pet Coat Brush files and DST Image, but for now we'll only select Pet Coat Brush file, so that it's easier for us.
I've selected the first brush file and I've highlighted the piece of data we'll need to use.
We'll have to use the Game File Cruiser search function, but first, press "Add to current package". When you've gotten the hang of this, you can explore the pre-existing brush files and decide which one you'd prefer to use as your base, all are different and correspond to different brushes/stamps in-game.
Once you've clicked on "add to current package" your package editor should look like this:

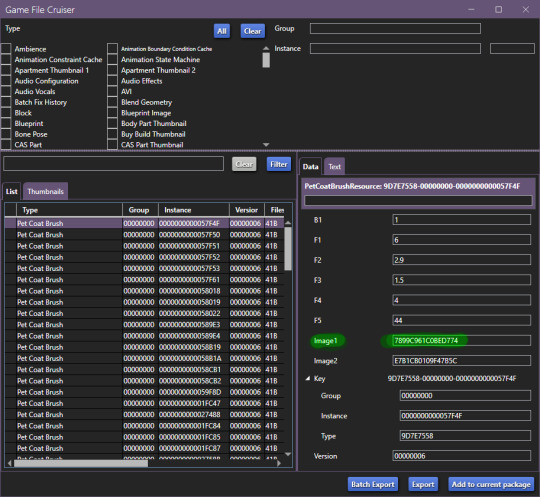
Now we'll copy the Image1 ID and go back to Game File Cruiser, select DST Image from the file type list and enter the ID into the search bar:

Now, click "Add to current package" and now the package file you're working on will look like this:

Before we move further, we need to generate new instance ID's, we'll need 3 of them.
Go to Tools > Hash Generator

Edited 16/10/2023: When generating your hash ID's, please use your creator name ie.: "[YourCreatorName/Blogname]TutorialCustomFurCoat1", this will give you a more unique hash code than hoping to be as descriptive as possible when generating the hashes (in this case instance ID's).
Thanks to Mizore Yukii for this advice, from Creator's Musings.
In the "text" field, enter whatever text you want, I just go with the item name/description + a number, to indicate which ID it is.
We'll need 3 of FNV64 hash codes.
These are the 3 ID's that I've generated:
514EF7FCFA080185
514EF7FCFA080186
514EF7FCFA080187
We'll use the first code for the Pet Coat Brush file, the second code for Image1 (Brush file) and the third for Image2 (Brush icon file).
Your Pet Coat Brush file should look like this now, with the updated ID's.
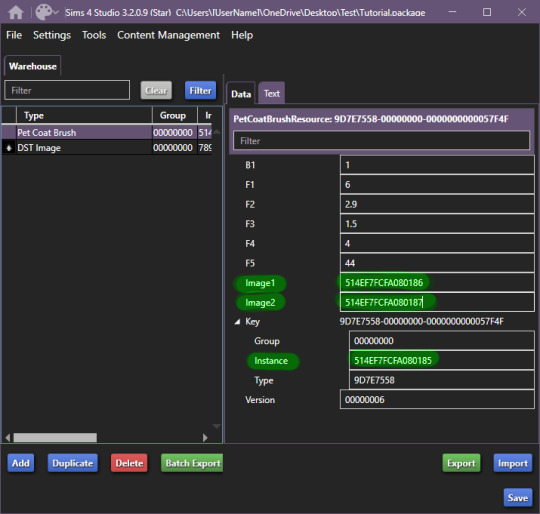
Moving forward, we'll be changing the ID for the DST Image1 (Brush in-game) -

Now that you've done this, you need to right click on DST Images > Duplicate, you'll be prompted with this window:
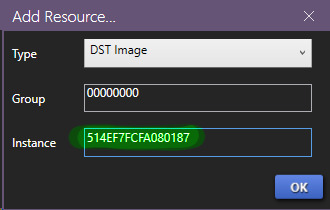
In this window, you'll use the last hash code you generated for the Image2 new ID (in-game icon).
Now! It'll all look like this:

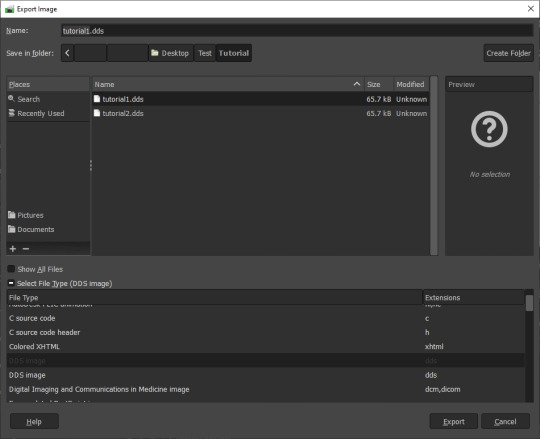
To edit the brush we'll be seeing in-game, we'll now have to edit the image, begin by exporting the image available in DST Image.
Once that's done, open it up in whatever editing software you want to use, I'll be using GIMP, because it has built in DDS exporter, I recommend you do the same, however if not interested in doing so, make sure your program can export DDS images in L8 format, if not, edit in preferred software and use GIMP to export as DDS.
Once you've made your brush, you'll want to do as follows:


IMPORTANT
It MUST be exported in the format L8, it will appear broken in-game otherwise.
Then, import your custom made brush into S4S package editor:
Do the same for the icon:

You've got the easiest part down, now, comes the part with testing how well the brush works and behaves in-game.
The responsibility of this falls onto the values you may have seen in Pet Coat Brush file -
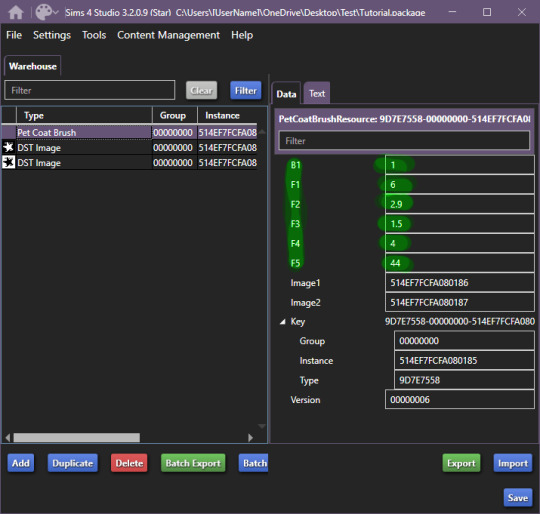
These are the values responsible for how the brush works in-game.
I'll be upfront right now, I can't get the rotation value to work, I'm not sure if I'm doing something incorrectly, but if I figure it out, I'll add to the guide eventually. I haven't had time to test this further, but as far as I've been able to test it, it works like a charm.
These are the value meanings -
Sorry for how lazy this is presented, as once I figured out the basic meaning, I moved forward.
B1 is responsible for sorting on whether your brush is considered a Brush or a Stamp. 0 & 2 - Brush, 1 & 3 Stamp EDITED 24/10/2023: 0 is non-rotating brush, 2 is a rotating brush!
For F1, I do NOT recommend using 0 or 5, when I tested these values in-game, they were extremely laggy when attempting to paint. 1 - Smooth Painting, 2 - Spaced Apart Slightly, Overlap, 3 - Spaced One After Another, Some Overlap, 4 - Spaced One After Another, No Overlap
F2 changes the size of the brush in-game, meaning how small it can be, I believe. 0 - 1px smallest size brush, scaling up changes how small the brush can get.
F3 I suspect is brush rotation, but I could not make it work on any of the brushes I tried making, so I'm not 100 sure. This is one of the brushes you'll have to look at values for in the existing in-game brush files, as I could not get this to work for myself.
F4 is the maximum the size of the brush will become. Maximum size the brush can get, I've tested it from 0 to 5, 5 is quite large, so I recommend that, but go for smaller as well.
F5 I'm not entirely sure, however during my testing, I found that this changes where exactly the brush appears in both stamps and brush tabs in-game. There may be more to it, however, I could not figure it out. The values I tested for this were 0, 1 and 2, this affected where the item appeared - 0 - First Row, First Item, 1, First Row, 2nd Item, 2 - 2nd Row, First Item, I've seen that these can go quite high, ie the base file I used being 44, so keep that in mind while changing this setting. For my personal brushes I use 0.
I recommend comparing existing brush files to the one you're looking to edit.
I believe this is it. If there are any questions, I'll try to answer as best as I can. If anyone wants to add anything to this, please do so, I'll be elated to update and credit you for the information shared.
This all came to be because I could not find a guide, but fortunately for me, I'm too good at figuring things out and even though I didn't quite understand how the Game File Cruiser worked a few days ago, I've consumed so much information it hurts my brain.
Forgot to add: Finished product
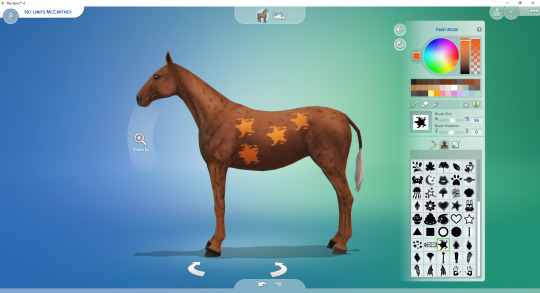
Because I didn't edit the Pet Coat Brush file I was working on, I've made a stamp, I recommend messing around for a while though and finding what you prefer. The values themselves are pretty easy and forgiving to edit.
So account for that, you'll definitely want to edit the values responsible for the brush working correctly. If you have any questions, please let me know, I tried to make this as clear as possible, and I know this is probably over the top for a guide, but I'm the kind of person who needs every small direction, to even know what I'm doing, when I'm following a guide.
UPDATED AGAIN, I FORGOT TO ADD THE ACTUAL VALUES I FOUND.
#The Sims 4 Guide#The Sims 4 Horse Ranch#The Sims 4 Custom Brushes#The Sims 4 CC guide#TS4 CC Guide#TS4 Horse Ranch#TS4 Horses#The Sims 4 Horses#Sims 4 Horses#Sims 4#Sims 4 Horse Ranch#The Sims 4 Tutorial#Sorry if this isn't a great guide#i tried really had and nearly had an aneurysm because tumblr deleted my previous attempts like 4 times
87 notes
·
View notes
Last Seen Blogs

yogajournal
Yoga Journal

yang-in-there
but i'll even the score

xcannibae
kiss me, kill me

a-a-assruleseverything
we don‘t pray for love we just pray for cars

a-tiny-robot
Overthinking Everything