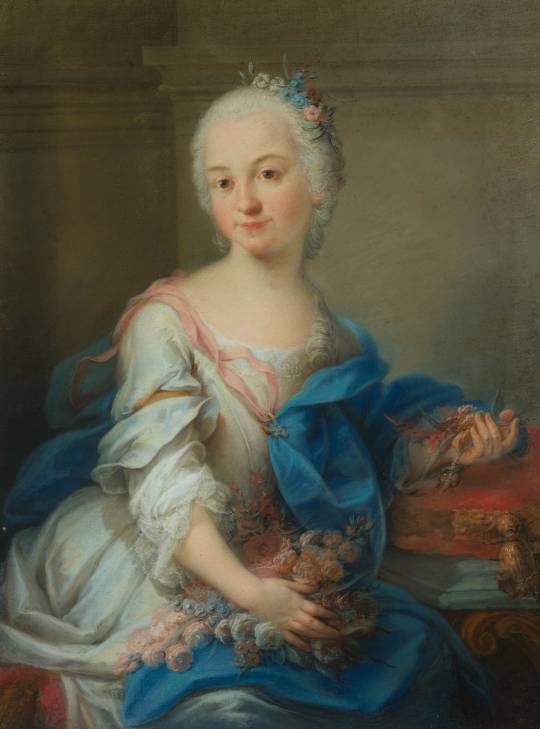
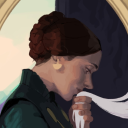
#lace modesty piece-bertha
Photo
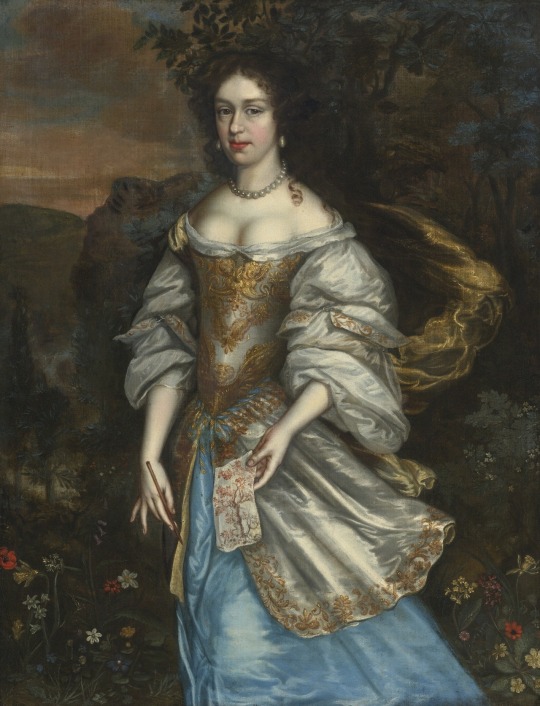


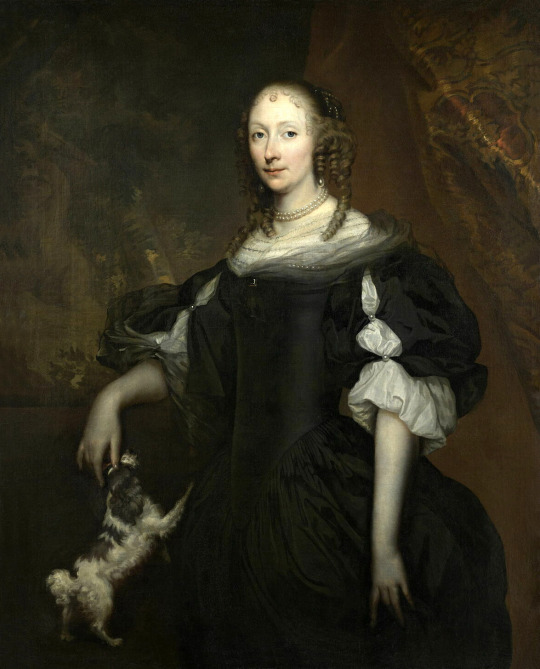
Baroque dresses and a super-celebrity -
Top Lady in a gold and blue dress by Dutch school (location ?). From tumblr.com/catherinedefrance 1280X1673 @72 840kj.
Second row left 1653 Woman by Adriaen Hanneman (State Pushkin Museum - Moskva, Russia). From tumblr.com/history-of-fashion 965X1200 @72 220kj.
Second row right 1670 Dudleia Cullum, née North, Lady Cullum by Sir Peter Lely (St Edmundsbury Museums - St Edmundsbury, Suffolk, UK). From tumblr.com/fashion-inspiration-s; fixed spots w Pshop 989X1200 @72 328kj.
Third row Presumed portrait of Olympe Mancini by French school (Aguttes - 6Dec22 auction Lot 43). From their Web site 2252X2812 @144 4.5Mp. She and her sisters and two related Martinozzi girls made a major splash when Cardinal Mazarin introduced them to the French court.
Fourth row 1660-1680 Noble lady with a dog by Jan de Baen (Louvre). From tumblr.com/history-of-fashion 1176X1456 @72 500kj
#1640s fashion#1650s fashion#1660s fashion#1670s fashion#Baroque fashion#Louis XIV fashion#curly hair#bertha#off shoulder scoop neckline#V waistline#three-quarter length puffed sleeves#over-skirt#Adriaen Hanneman#hair mat#side curl coiffure#hair jewelry#straight neckline#lace modesty piece-bertha#Dudleia Cullum#chemise#Olympe Mancini#hair flowers#off shoulder V décolletage#Jan de Baen
22 notes
·
View notes
Photo
Mrs Mary Fisher (1816). John Constable (English, 1776-1837). Oil on canvas. The Fitzwilliam Museum.
Mary Fisher was the wife of John Fisher, Archdeacon of Berkshire. Mrs Fisher's dress has a lace bertha and modesty piece as well as the typical short puffed sleeves in this 1816 Constable portrait.
42 notes
·
View notes
Text
Another Disney Princess!
Welcome back on my journal! <3
Sorry for the lack of updates recently but I took some days off finally!
I get out of this quarantine way too tired and overwhelmed than throughout the actual quarantine, so I really needed some rest!
Luckly, I started working at full speed again by the middle of June (thanks to all the people that scheduled photoshooting in the Summer!) so I had a lot of order to fullfill but also I worked kinda in a rush to ship everything out before August so I was very tired, phisically and mentally at the end of July...
And actually this post was started in the end of July but never got the time to finish it so...
After some rest, today I wanna show you how I made the Princess Aurora Cosplay last year for the most famous italian convention Lucca Comics & Games (that is still taking place this year but with a lot of changes in the organizations and in the “events” due this well known virus that is still with us all.....)

This entry was kind of “requested” on my Etsy shop as an explanations to go with my Aurora pattern I sold recently so I hope that can also help everyone that is trying to make this costume!
Let’s start with the basic...
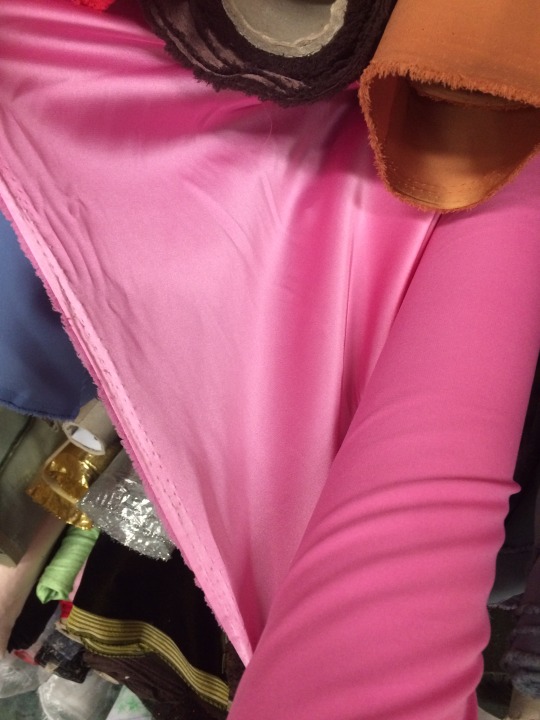
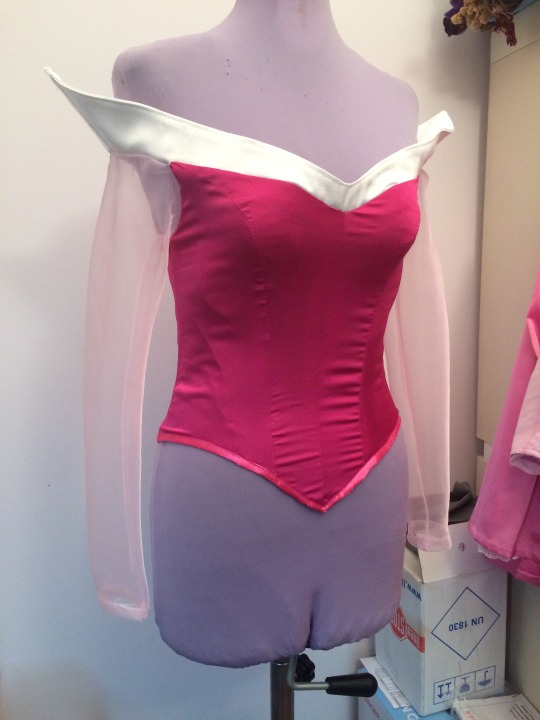
- Materials
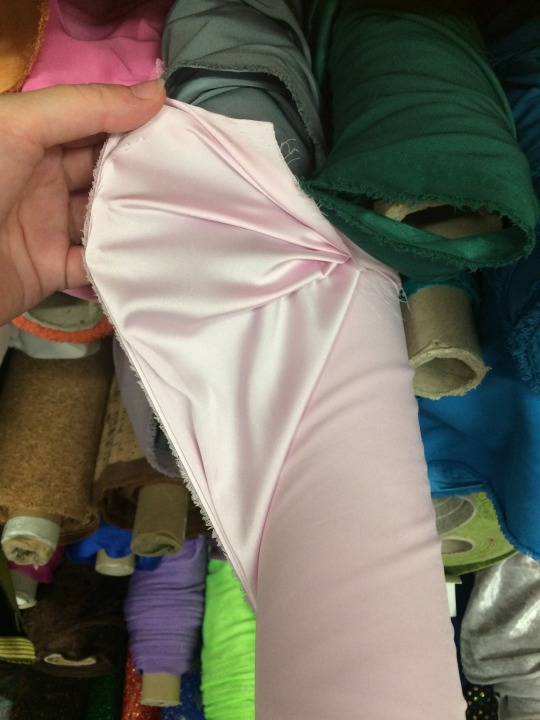
For this costume I used very high quality materials, because she is a princess after all! I made the bodice with a light fucsia silk satin, interfaced with heavy canvas and lined with heavy satin to keep it sturdy; the collar is also in white heavy satin and the sleeves in sheer shiny organdy. For the skirt and the belt I used the same light satin of the bodice but in lighter colors and I also made a petticoat in satin lining and white lace.
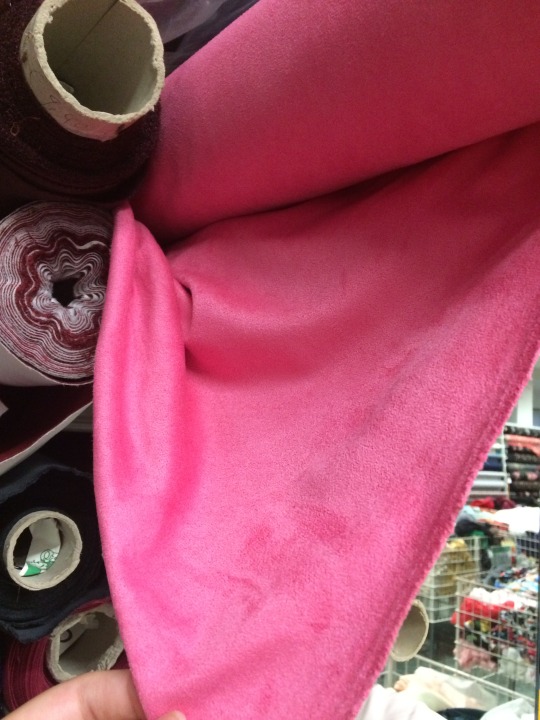
As this convention takes place in Autumn the client also requested a cape to go with the dress and I made it with a fucsia/pink alcantara (fake suede) and white fake fur, along with a small purse to carry her belongings.
So, after discussing materials let go a bit dip in the
- Pattern
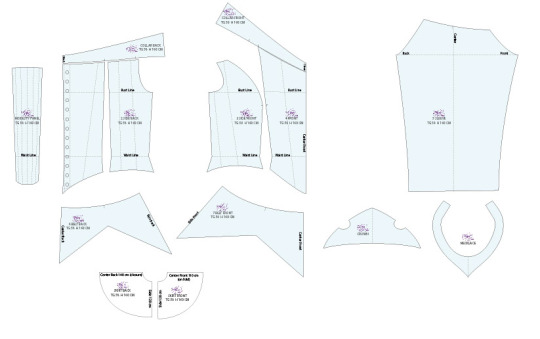
As I said, I have this pattern for sale in my Etsy shop (in a lot of different sizes and I also can make it for your custom measures) so I will not dig very deep into it but let’s talk about its parts.
Bodice: according to the pictures is a 4 panels corset in the front as well in the back, with a V neckline on the front and several V shapes at the hem, at the front, at the back and on the sides.
The sleeves are simple tubolar sleeves with a straight edge on the wrist and in the official pictures they do not seems made with sheer fabric but with the same fabric as the belt.
The collar reminds me a lot of the Belle Ballgown collar, it is called Bertha collar and it is a flat and rounded collar that goes aroun the shoulders (If you want to know more about it you can check the definition on this page).
Skirt: I considered the belt as a part of the skirt so I did not make a separated piece, but if you prefer you can also make two pieces. I did the belt based on the waist measurement and drew the pointed ends in the same places of the corset, but longer this time. As I attached this part to the skirt it closes with the same zipper of the skirt.
For the skirt I did a very full circle skirt as it has very deep pleats in the front, sides and back. I did a little train in the back nothing too long because the conventions are always very crowded and it is not safe to have a long train (the total lenght of the skirt is about 110 cm and the center back is 140 cm)
Jewels: Aurora has a neckpiece and a very cute tiara so I follow the original design and adjust the shapes to my client measures. As usually I used my favourite technique here: golden spandex and foam.
Accessories: as I already mentioned for this cosplay I did a cape and a little purse and I will show them in the second part of this entry.
And now let’s start with the construction of
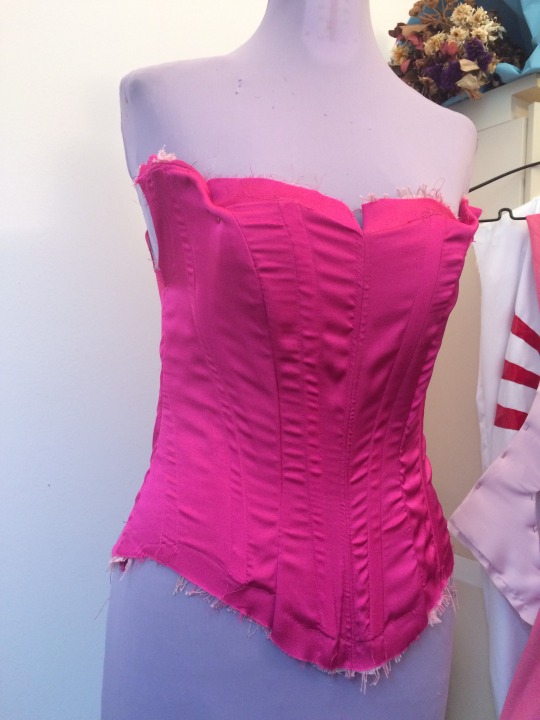
- The Bodice
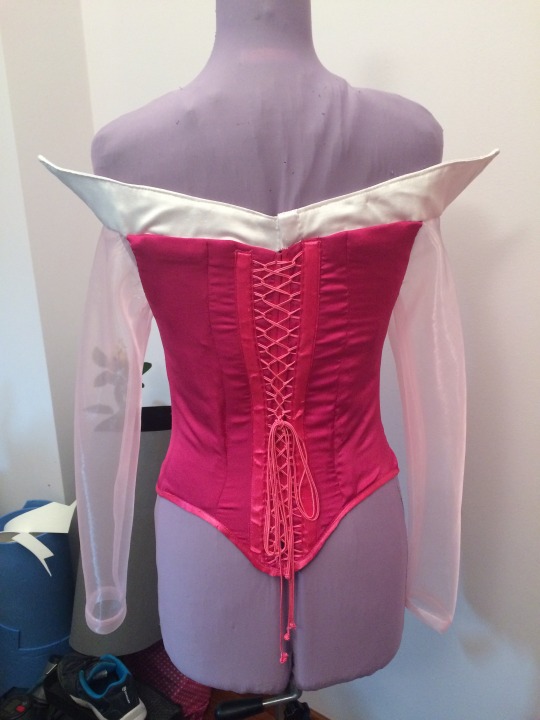
I do not have pictures of the early stages of the construction but is very simple to build: I cut all the pattern pieces one time on the fashion fabric (the fucsia satin), one time in the interfacing fabric (the heavy canvas), one time on the heavy satin and one last time on the satin lining, for a total of 4 layers to put togheter! Well it is a corset after all...

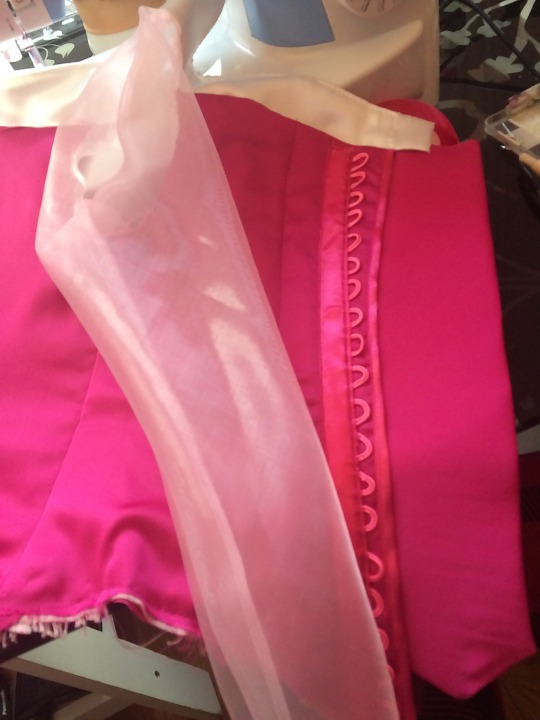
In this picture above you can see the fucsia lining and the heavy satin (the pale pink one) that together are the lining layer of the corset.
I marked the boning placement on the heavy satin with very long machine seams and then I sewn together the sturdy interfacing and this heavy satin to make the boning channels.
The position of the boning was decided during the fitting with the client but you can place wherever you like accordin to your support needs.
This is the rough shape of the corset after the first fitting: you can see the alteration marked on the neckline and the final boning placement.
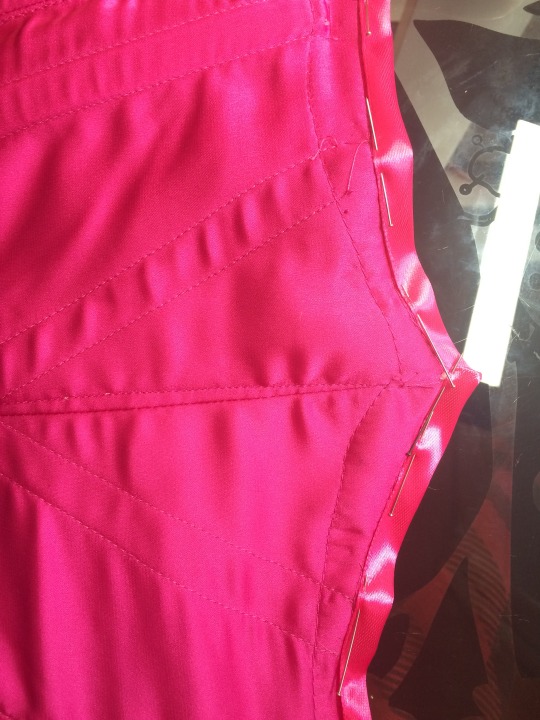
For the back we decided to avoid metal eyelets (as they are not so princessesque) and to go with ribbon lacing, so I marked the position of the loops and I used a soutache ribbon (heavier and stronger than normal cord) to make loops and the lacing.
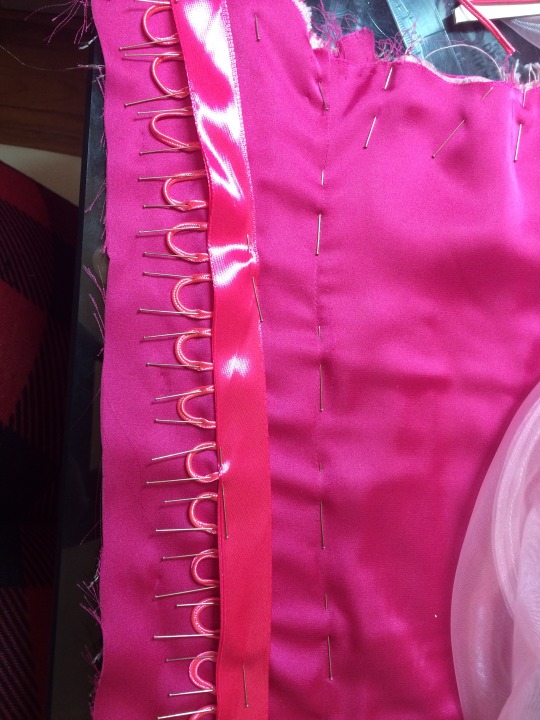
Then I covered the loops ends with a matching satin ribbon and on the inside I put two different bones to strenghten this part.
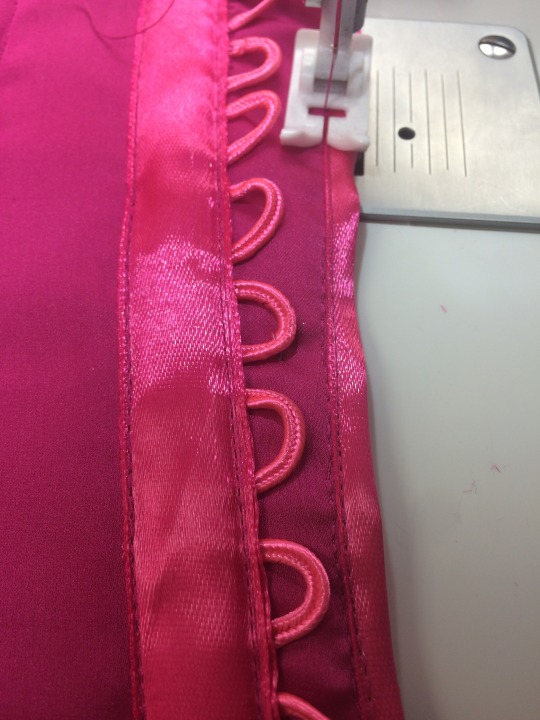
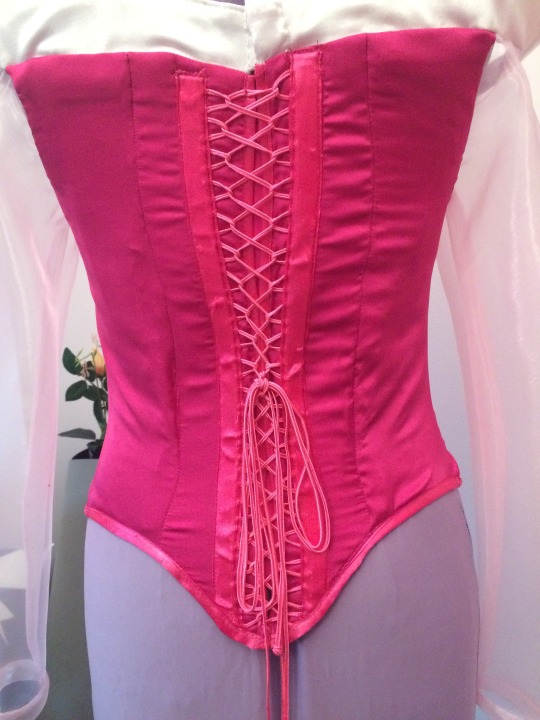
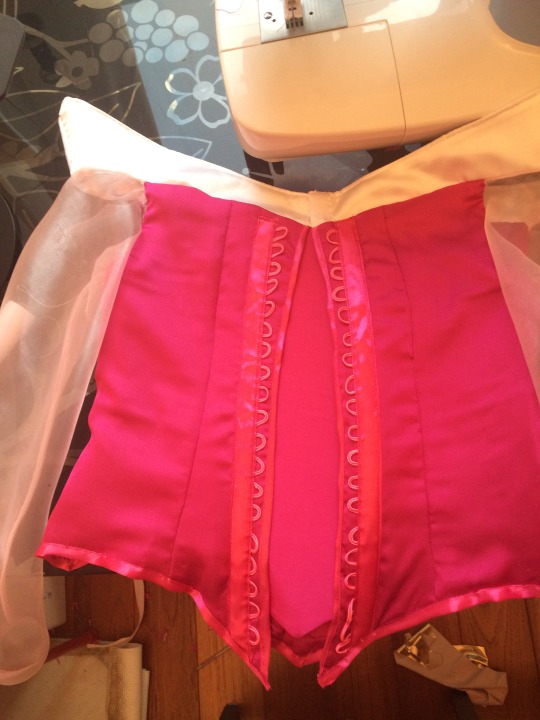
This is the final result of the back closure! All the corset ends (except for the top edge) were finished with bias binding as you can see in this picture.
This is a picture of the corset fully closed (my dress form is a little bit bigger than the girl so it seems very stretched XD)
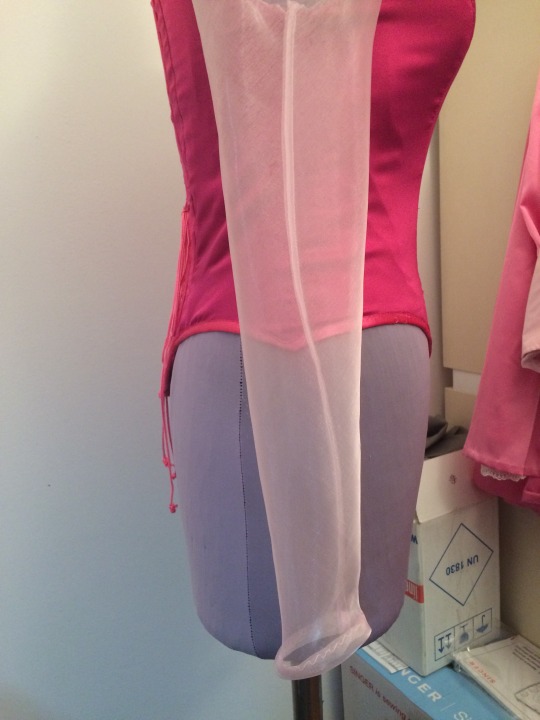
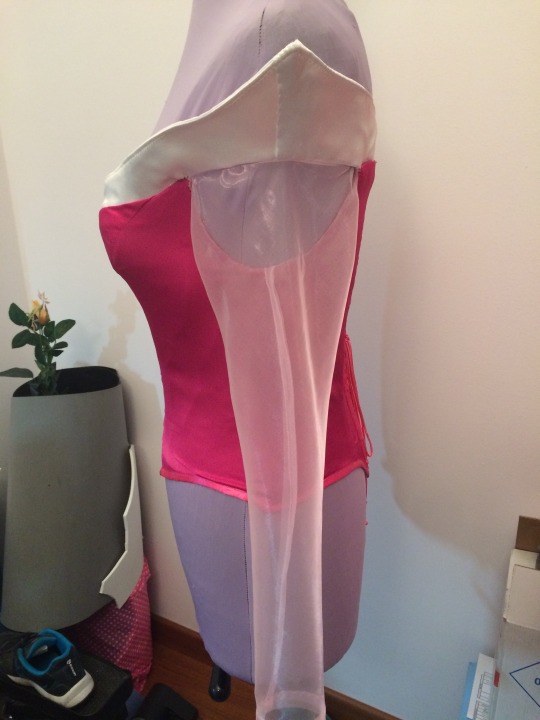
To finish the corset I closed the sleeves and sewn them in the armholes.
The sleeves are very simple sleeves sewn with a french seam and a simple rolled hem.
The last thing to do was attaching the white collar on the top egde, it is really simple as well: it is made with two layers of heavy white satin and one layer of sturdy interfacing inbetween. I inserted also two plastic boning in the side seams to help keep the point up.
I incased the seam between the fashion layer of the corset and the lining, the edge along the sleeves was snipped to change the direction and finished with white bias binding then sewn with tiny handstiches turning upwards (to be hidden by the collar)
Maybe it is a bit complicated to read but I am sure it will be very clear when you will do it yourself!
I decide then to add a big snap button on the center back of the white collar to help also the client to put on the corset.
Finally, I sewn bias binding along the center back and the bottom edge to finish the corset.
I totally forgot to tell you about the modesty panel but it is really a short passage XD
I made it with the same layers of the corset, it has 5 boning channels made sewing together the interfacing and the heavy satin layers and this time I decided to attach it with handstiches on the right side on the lining instead of leaving it stand alone as I usually do.
And this is the finished corset! (it looks a bit weird wthout actual arms inside XD)
And the corset ends part 1 of this entry, in the next one I will show you how I made the skirt and the accessories.
Keep following my social media to be updated with my works and next entries!
I post mainly on my Facebook page and my Instagram!
Have a nice day and thanks for stick around!
See you next time!
Chiara (StregaCorvina)
Bentornati nel mio blog! <3
Eccoci di nuyovo con un aggiornamento dopo tanto tempo ma mi ero presa qualche giorno di vacanza finalmente!
Sono uscita da questa quarantena molto più stanca e stressata che durante l’effettivo tempo di quarantena in casa, perciò avevo decisamente bisogno di riposare!
Fortunatamente, ho ricominciato a cucire assiduamente già verso metà Giugno (grazie a tutte le persone che si sono organizzate per set fotografici in estate!) e ho avuto un sacco di ordini da terminare e spedire prima di Agosto perciò sono arrivata a fine Luglio esausta, fisicamente e mentalmente...
In effetti ho iniziato a scrivere questo post a metà Luglio ma non ho mai trovato il tempo di terminarlo...
Dopo un po di riposo, oggi voglio farvi vedere come ho realizzato il cosplay della Principessa Aurora, fatto l’anno scorso per una delle convention italiane più famose, il Lucca Comics & Games (che si terrà anche quest anno nonostante numerosi cambiamenti all’organizziazione e agli eventi, per via di questo caro virus che ormai ci accompagna da un pò...)
Questo post è stato più o meno “richiesto” sul mio negozio Etsy per accompagnare il cartamodello del cosplay che ho venduto recentemente, perciò spero che possa aiutare anche chi prova a fare questo abito!
Iniziamo dalle basi...
- I Materiali
Per questo abito ho usato materiali di qualità molto alta, del resto è pur sempre una principessa!
Ho fatto il corpino con un raso di seta fucsia abbastanza leggero, irrigidito con una tela all’interno, uno strato di raso più pesante come interfodera e infine una fodera di raso; anche la scollatura è fatta in raso pesante bianco e le maniche in organza rosa brillante. Per la gonna e la cintura ho usato lo stesso tipo di raso del corpino ma in tonalità di fucsia/rosa diverse. Infine ho realizzato una sottogonna in fodera di raso bianco con bordo in pizzo.
Siccome il Lucca Comics si tiene in Autunno la ragazza mi ha richiesto anche un mantello da abbinare all’abito che ho realizzato in alcantara (finto scamosciato) fucsia e eco-pelliccia bianca, inoltre ho aggiunto anche una borsetta a secchiello per aiutarla a portare i suoi effetti personali in giro per la fiera.
E ora, dopo aver parlato di materiali, iniziamo ad approfondire
- Il Cartamodello
Come ho gia detto, potete acquistare questo cartamodello nel mio negozio Etsy (è disponibile in tante taglie diverse ma posso realizzarlo anche sulle vostre misure) perciò non approfondirò più di tanto la costuzione, ma andiamo comunque a vedere i vari componenti.
Corpino: guardando le immagini ufficiali, si tratta di un corsetto a 4 telini per il davanti e altrettanti per il dietro, con uno scollo a V davanti e numerose forme a V sull’orlo, davanti, dietro e sui fianchi.
Le maniche sono delle semplici maniche tubolari con un orlo dritto sul posto e nelle immagini non sembrano realizzate in materiali trasparenti quanto piuttosto nello stesso materiale della cinutura.
La scollatura mi ricorda molto quella dell’abito oro di Belle, si chiama “Bertha collar“ e per sempliicare è un colletto piatto e tondo che copre anche le spalle (se volete approfondire vi consiglio questo link).
Gonna: ho considerato la cintura come parte della gonna perciò le ho unite sul punto vita, ma se preferite potete anche fare due pezzi. Ho costruito la cintura basandomi sulla circonferenza vita e ho disegnato le punte a V negli stessi punti del bustino ma più lunghe questa volta (circa 18 cm se non ricordo male). Siccome io ho realizzato un pezzo unico con la gonna, si chiude con la cerniera nel centro dietro.
Per la gonna invece ho fatto una gonna a ruota intera molto ampia, circa 2 volte e mezza la circonferenza della vita visto che ha delle pieghe molto profonde davanti, dietro e sui fianchi. Ho fatto un piccolo strascico dietro ma non troppo lungo perchè nelle fiere affollate potrebbe essere pericoloso avere uno strascico lungo (la lunghezza totale della gonna è circa 110 cm e nel centro dietro di circa 140 cm)
Gioielli: Aurora ha una collana e una tiara molto carina perciò ho semplicemente seguito il design originale adattandolo alle misure della ragazza. Come al solito li ho realizzati nella mia tecnica preferita: lycra oro e anima in foam!
Accessori: come ho già detto ho completato il cosplay con un mantello e una borsetta, che sicuramente vi farò vedere nella seconda parte di questo post.
E ora inziamo con la costruzione del
- Il corpino
Non ho fatto molte foto nelle fasi iniziali di costruzione ma è motlo semplice da assemblare: ho tagliato tutti i pezzi del cartamodello una volta sullo strato esterno (il raso di seta fucsia), una volta sulla tela di sostegno (un cotone pesante), una volta sull’interfodera di raso pesante e per ultima una volta sulla fodera di raso vera e propria.
Un totale di 4 strati da assemblare insieme! Del resto è sempre un corsetto...
Nella foto qui sopra vedete la fodera di raso (fucsia) e l’interfodera in raso pesante (rosa cipria) che insieme formano lo strato di fodera del corpetto.
Ho segnato con delle lunghe cuciture a macchina sullo strato di interfodera la posizione dei canali per le stecche di sostegno, e ho creato questi canali cucendo insieme la tela di sostegno e l’interfodera.
La posizione delle stecche ha seguito più o meno la posizione iniziale che avevo segnato il cartamodello, con qualche piccola modifica nell’area seno dopo il fitting con la ragazza, in realtà potete posizionarle dove volete in base alle vostre esigente di supporto e sostegno.
Ed ecco la prima forma del corsetto dopo il primo fitting, come potete vedere in alto si notano le modifiche da fare sulla scollatura ed essendo girato dal lato della fodera si vedono anche le posizioni finali delle stecche.
Per il dietro abbiamo deciso di non usare degli occhielli metallici (che non sono proprio così “principeschi”) ma di usare un’allacciautura con nastri ed asole; ho segnato la posizione di ogni asola e poi le ho realizzate con una fettuccia da soutache (molto più dura e resistente di un normale cordoncino).
Per chiudere e nascondere bene la fine degli occhielli ho applicato sopra un nastro di raso in tinta e nella parte interna ho sfruttato le cuciture del nastro per creare altri canali per le stecche.
Ed ecco il risultato finale della corsettatura!
Tutti i bordi, tranne quello in alto, sono stati riginiti con uno sbiego di raso in tinta che potete vedere nelle immagini qui sotto (il manichino è leggermente più grande della ragazza perciò la corsettatura tira un pò più del dovuto)
Per terminare il corsetto sono passata alle maniche! Le ho assemblate con una cucitura francese (o all’inglese, come siete più familiari) e un semplice orlo arrotolato in fondo, poi le ho inserite nel giromanica.
L’ultimo passaggio riguarda la scollatura in alto. Anche questo è molto semplice, realizzato con due strati di raso bianco pesante e una tela di sostegno all’interno, ho inserito anche due stecche di plastica nelle cuciture laterali per aiutare la parte a punta a restare in alto.
Ho nascosto la cucitura della scollatura fra la stoffa del corpetto e la fodera in modo che restasse nascosta, invece per le maniche ho tagliato il margine in corrispondenza della parte trasparente, l’ho bordato con dello sbiego bianco e l’ho cucito verso l’alto con dei punti a mano per nasconderlo sulla parte bianca. A parole forse è un pò complicato ma vi assicuro che se lo farete capirete subito di cosa sto parlando
Infine ho deciso di applicare sul collare un grande automatico (anche se non era necessario ai fini del collare stesso) per aiutare la ragazza ad indossare il bustino da sola.
In ultimo ,ho bordato tutti i margini ancora da rifinire (i centri dietro e l’orlo in basso) con dello sbiego di raso, attaccato a macchina dritto contro dritto e poi cucito a mano all’interno.
Mi sono resa conto di non aver minimamente menzionato il modesty panel ma in realtà non c’è molto da dire XD
L’ho realizzato con gli stessi passaggi del resto del corsetto, all’interno ha 5 stecche inserite in canali realizzati cucendo insieme i vari strati del corsetto e poi ho preferito fermarlo con dei punti a mano sul lato destro del corsetto invece di lasciarlo separato come di solito si usa fare.
Ed ecco il corsetto finito! (Purtroppo le maniche sono un pò cadenti senza delle vere braccia dentro XD)
Con il corsetto chiudiamo qui la parte 1 di questo post, nella prossima vi farò vedere la gonna e gli accessori.
Continuate a seguirmi sui Social per maggiori aggiornamenti sui miei lavori e le novità su cui lavorerò possimamente, soprattutto sulla mia pagina Facebook e su Instagram!
Buona giornata a tutti e grazie a chi continua a seguirmi assiduamente!
Alla prosima!
Chiara (StregaCorvina)
#disney#disneyprincess#disneycosplay#handmadecosplay#handmadedisneycosplay#cosplaytutorial#walkthrough#cosplaywalkthrough#disneyprincesscosplay#handmadedisneyprincess#sleepingbeautycosplay#sleepingbeautycostume#auroracosplay#auroracostume#aurorapinkdress#sewingcosplay#sewingtutorial#handmade#sewing#seamstress#cosmaker#stregacorvina#Aurora#princessaurora#SleepingBeauty
0 notes
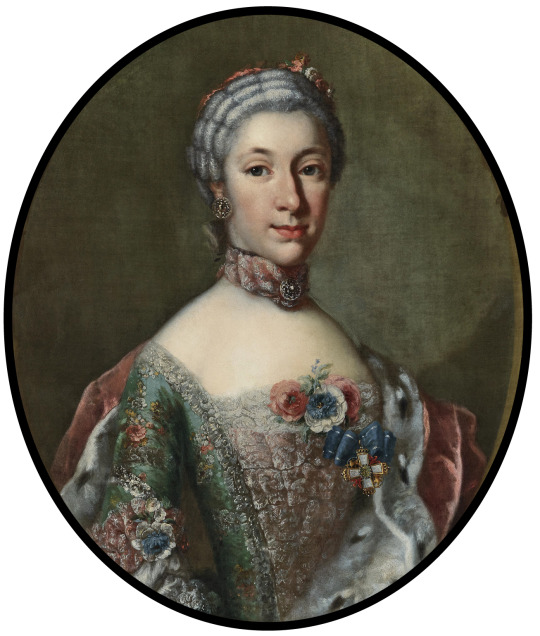
Photo
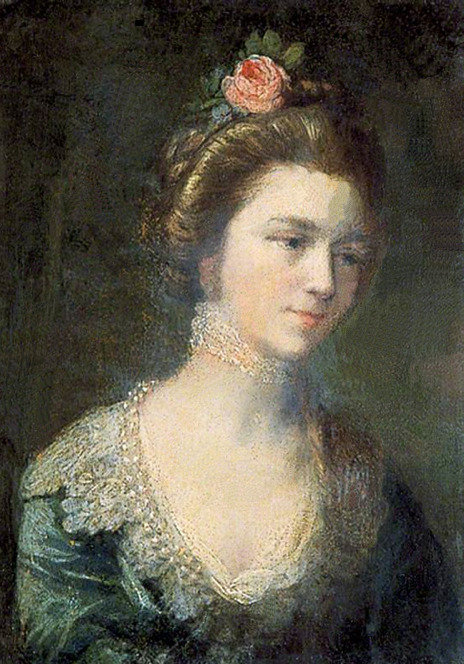
Maria Gunning attributed to Allan Ramsay
Allan Ramsay portrays a conventionally dressed Countess Maria wearing a conventional early 1760s coiffure decorated with a rose, a neck band, and a modesty piece and lace bertha enhanced by two pearl necklaces.
0 notes
Photo

Dagmar displays a middle 1860s half-dome crinoline in this portrait of her showing virtually all of her crinoline dress. Keywords: Maria Feodorovna (1847-1928), Princess, Tsaritsa, Glucksberg family, Romanov family, Danish, curly coiffure, off shoulder vee neckline, modesty piece, pleated bodice, bertha, lace, cap sleeves, vee waistline, crinoline, necklace, bracelets, brooch, bracelets https://www.pinterest.com/source/gogmsite.net
0 notes
Photo


1750s dress (top to bottom) -
1750s Young woman by ? (location ?). From tumblr.com/blog/view/sims4rococo76/693477967144386560; erased most obvious cracks & spots w Pshop 1269X1661 @72 737kj.
ca. 1758 Anna Szaniawska by Marcello Bacciarelli (MNW). From tumblr.com/blog/view/costumedufilm 1529X1889 @72 865kj.
ca. 1758 Letitia Richmond (1734–1784), Aged 24 by John Astley (Lyme Park - Disley, Stockport, Cheshire, UK)/ From tumblr.com/historical-fashion-devotee 1030X1200 @72 147kj.
Maria Elisabeth Auguste, Kurfürstin von Bayern, geborene Prinzessin von Pfalz-Sulzbach by Heinrich Carl Brandt (auctioned by Hargesheimer Kunstauktionen). From the-saleroom.com/; removed spots and smudges and cropped with Photoshop.
Duchess Luise of Brunswick-Wolfenbüttel (1722-1780) by Antoine Pesne (Neues Palais - Potsdam, Brandenburg, Germany). From Wikimedia 1494X1920 @72 5.1Mp.
#1750s fashion#Rococo fashion#Georgian fashion#Louis XV fashion#off shoulder scoop neckline#lace modesty piece-bertha#straight hair#girandole earrings#choker#ruffled sleeves#lace ruffled sleeves#Anna Szaniawska#Marcello Bacciarelli#floral headdress#square neckline#stomacher#elbow-length close sleeves#lace engageantes#V waistline#full skirt#Letitia Richmond#John Astley#hair jewelry#jeweled choker neck band#Maria Elisabeth Auguste von Bayern#curly hair#cap#fur-trimmed vest#three-quarter length sleeves#Luise of Brunswick-Wolfenbütte
24 notes
·
View notes
Photo

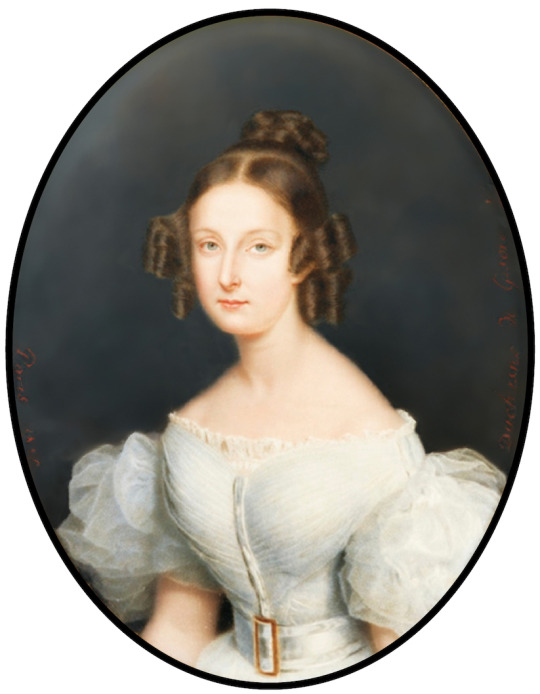
1830 Clementine, Princess of Saxe-Coburg & Gotha by Jean Duchesne (location ?). From tumblr.com-roehenstart; blurred bckgnd, fixed spots, & rotated image w Pshop 1644X2178 @150 518kj.
1835 Marie Duchess of Würtemberg by Jean Duchesne (location ?). From tumblr.com-roehenstart; blurred bckgnd & fixed spots w Pshop 823X1058 @150 141kj.
#1830s fashion#Louis-Philippe fashioin#Romantic era fashion#Jean Duchesne#Princess Clementine of Saxe-Coburg & Gotha#straight hair#braided bun#comb#off shoulder bateau neckline#lace bertha#dual sleeves#belt#Duchess Marie of Württemberg#side curl coiffure#modesty piece#straight neckline#pleated bertha#quarter-length puffed sleeves
18 notes
·
View notes
Text
More early post-Louis XIV fashion -
ca. 1717 Seated woman holding a fan by Antoine Watteau (Metropolitan Museum of Aty - New York City, New York, USA). From their Web site 2400X3882.
ca. 1718 Dorothy Walpole, Viscountess Townshend by Charles Jervas (Dulwich Picture Gallery - London, UK). From the-athenaeum.org; enlarged by half 1161X1416.

Probably Dorothy, Viscountess Townshend, by Charles Jervas (National Portrait Gallery - London, UK). From Wikimedia 2400X3161.

ca. 1719 Maria Clementina Sobieska by ? (National Portrait Gallery - London, UK). From Wikimedia; fixed spots & some cracks w Pshop 2076X2623.
1719 Anna Catharina Herport by Johann Rudolf Huber (private collection). From Wikimedia; fixed spots w Pshop 1693X2067.
#1700s fashion#Louis XV fashion#Louis XIV fashion#Rococo fashion#Georgian fashion#Pierre Mignard#lace bertha#lace ruffled sleeves#lace lappets#Antoine Watteau#corset#Charles Jervas#turban#full skirt#girdle#lace modesty piece#scoop neckline#hair jewelry#Johann Rudolf Huber
4 notes
·
View notes
Photo

ca. 1860 Lady (member of the Aguado family?), half length, Wearing a White Dress and Holding a Pair of Lunettes by Franz Xaver Winterhalter (Rosebery's - 20Mar19 auction Lot 188). From tumblrgallery.xyz-blogview-civilwarfashions.tumblr-3; erased spots. and flaw with Photoshop 2055X2642 @150 856kj.
#early Victorian fashion#Crinoline era fashion#1860s fashion#Franz Xaver Winterhalter#straight hair#center part#side curl coiffure#modesty piece#off shoulder V neckline#pleated bertha#lace bertha#quarter-length sleeves#lace engageantes#V waistline#crinoline#lorgnette
14 notes
·
View notes
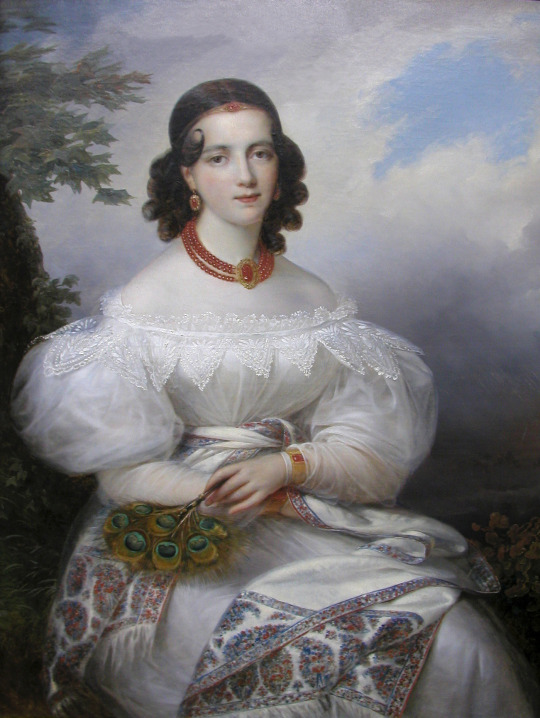
Photo


Some more dresses from 1849 -
Top: 1849-1850 Anna Pavlovna by Nicaise de Keyser (Hermitage). From their Web site 1343X1920 @72 542kj.
Second row left: 1849 Portrait de Louise Marie Thérèse d'Artois, la duchesse de Parme et ses enfants by Prosper Raffy (Château de Chambord - Chambord, region Centre, France) magika42000 photostream on flickr Louise d'Artois 788X1024 @72 475kj.
Second row right: 1849 Natalia Pushkina by Ivan Makarov (Pushkin Apartment Museum - St. Petersburg, St. Petersburg Federal City, Russia). From Wikimedia; removed spots and flaws and fixed edges with Photoshop and enlarged by half 900X1047 @96 322kj.
Third row: 1849 Princess Augusta Wilhelmina Louisa of Hesse, Duchess of Cambridge by Franz Xaver Winterhalter (auctioned by Sotheby's). From mutualart.com/Artwork/PORTRAIT-OF-PRINCESS-AUGUSTA-WILHELMINA-/DF34223E0CB33911; doubled size 804X1020 @96 165kj. Her granddaughter Mary became Queen Consort of the United Kingdom when her husband ascended the throne as George V in 1910. The city of Long Beach, California has a huge monument to her moored at their port.
#1849 fashion#Romantic era fashion#early Victorian fashion#Anna Pavlovna#koningin der Nederlanden#Nicaise de Keyser#tiara#side curl coiffure#robes#regalia#Louise Marie Thérèse d'Artois#Prosper Raffy#lace bertha#Natalia Pushkina#Ivan Makarov#neck band#modesty piece#off shoulder scoop neckline#fur-trimmed wrap#Augusta Wilhelmina Louisa of Hesse#Duchess of Cambridge#Franz Xaver Winterhalter
7 notes
·
View notes
Photo

1744 Frau Johann Alexander Thiele, neé Dorothea Sophia Schumann by follower of Anton Raphael Menga (Dorotheum - 26Sep16 auction Lot 126). Removed spots and flaws with Photoshop 2361X3049 @300 4.5Mj. Her dark hair emerges from her wig.
Madame Henriette, daughter of Louis XV by French school after Jean-Etienne Liotard (Artcurial - 15Feb22 auction Lot 6) 2271X3369 @72 2.2Mj.
#1744 fashion#1740s fashion#Rococo fashion#Louis XV fashion#Dorothea Sophia Schumann#Anton Raphael Menga#cap#curled hair#wig#powdered wig#hair flowers#modesty piece#jewel neckline#neck band#Madame Henriette#Jean-Etienne Liotard#bow#off shoulder neckline#bertha#lace bertha#stomacher#ruffled sleeves#robes
15 notes
·
View notes
Photo
1846 Duchesse d'Aumale by Franz-Xaver Winterhalter studio (auctioned by Christie's). From Wikimedia; a few spots in the background, spots along the left edge, and a flaw at the base of the step removed with Photoshop 1795X2781 @33 1.6Mj. This is the famous Winterhalter portrait, actually a close copy of it.
#Romantic era fashion#early Victorian fashion#Louis Philipe fashion#1840s fashion#Marie Caroline Auguste de Bourbon-Siciles#duchesse d'Aumale#Winterhalter#straight hair#side-curl coiffure#braided bun#hair flowers#modesty piece#off shoulder neckline#off shoulder V neckline#V neckline#floral bodice ornament#lace bertha#double lace bertha#pleated bertha#quarter-length sleeves#bows#lace cuffs#V waistline#full skirt#lace flounces#lace wrap
13 notes
·
View notes
Text
ca. 1828 German Princess by François Joseph Kinsoen (Bowes Museum - Barnard Castle, Teesdale, County Durham UK). From Wikimedia; fixed crinkles in background with Photoshop 1399X1860 @ 72 971kj.
#1820s fashion 1828 fashion#François Joseph Kinsoen#straight hair#ferroniere#side curl coiffure#coral jewelry#lace modesty piece#straight neckline#lace bertha#fan-pleat bodice#sheer Gigot over-sleeves#quarter-length puffed under-sleeves
34 notes
·
View notes
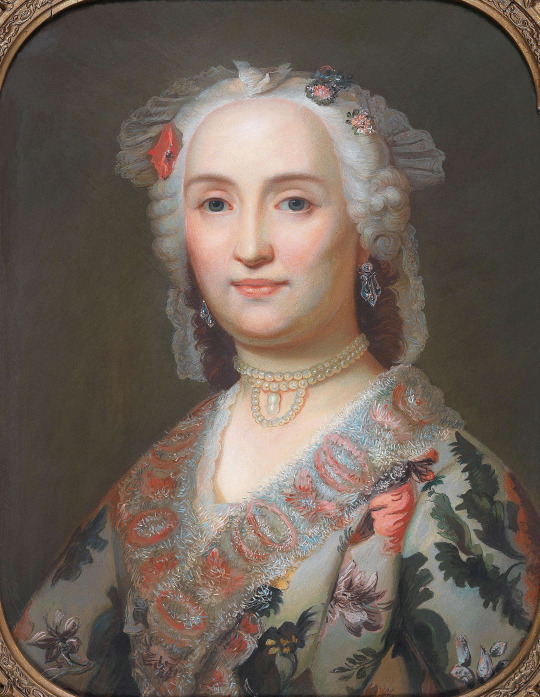
Text

Top: Herzogin Marie Sophie Wilhelmine von Württemberg-Oels by ? (Neumeister - 30Mar22 auction Lot 1418) 1307X1539 @150 778kj. The small curls suggest 1750s. This is one of the Württemberger works that was on auction by Neumeister.
Middle: Noblewoman, probably as Flora by follower of Antoine Pesne (Koller - 1Apr22 auction Lot 3075) 3826X5163 @72 4Mj.
Bottom: Louise-Marie de France, Madame Louise by Franz Bernhard Frey (Artcurial - 15Feb22 auction Lot 11) 2719X3337 @150 2.2Mj.
#Louis XV fashion#Rococo fashion#Marie Sophie Wilhelmine von Württemberg-Oels#curly hair#close coiffure#hair flowers#neck band#square neckline#lace bertha#stomacher#corsage#order bow#robes#Antoine Pesne#chemise#modesty piece#elbow-length over-sleeves#full sleeves#three-quarter length under-sleeves#Louise-Marie de France#Madame Louise#Franz Bernhard Frey#fan
12 notes
·
View notes
Text

Top left: 1838 Marie Luise Augusta Katharina Königin von Preußen Kaiserin von Deutschland by Carl Joseph Begas (Klassik Stiftung Weimar - Weimar, Thüringen, Germany). From Wikimedia 799X960 @72 175kj.
Top right: Unknown woman by Franz Xaver Winterhalter (location ?). From adini-nikolaevna.tumblr.com/post/173721666475/portrait-of-an-unknown-woman-by-franz-xaver; expanded to fit screen 1258X1304 @72 535kj.
Bottom left: 1850s Élégante par Adélaïde Salles-Wagner (location ?). From melodymistblogspotcom-mistyclouds.blogspot.com/2012/09/young-woman-with-lace-shawl-by-adelaide.html 856X1220 @72 513kj.
Bottom right: 1858 Daughter and granddaughter of Mr. Agüero Vélez by Luis Brochetón y Muguruza (Museo de Arte Moderno y Contemporáneo de Santander y Cantabria - Santander, Cantabria, Spain). From tumblr.com/blog/view/history-of-fashion 760X1024 @72 311kj
#early Victorian fashion#1830s fashion#Romantic era fashion#Queen Augusta of Prussia#Carl Joseph Begas#straight hair#side curl coiffure#chemise#modesty piece#off shoulder straight neckline#pleated bertha#off shoulder V neckline#quarter-length tight sleeves#flared lace cuffs#flare cuffs#lace cuffs#order bow#full skirt#Franz Xaver Winterhalter#chignon#lace bertha#flower#V waistline#1850s fashion#curly hair#elbow-length sleeves#lace engageantes#lace flounces#lace wrap#crinoline
12 notes
·
View notes
Photo

Lady by German school (Bonhams - 26Oct21 auction Lot 183). Removed obvious spots and cracks with Photoshop 3091X3878 @150 2.3Mj. This coiffure appears to be from the 1770s.
#picture hat#feathered hat#hat flowers#fichu#U décolletage#lace bertha#modesty piece#modesty piece-bertha#straight hair#large-curl coiffure#tight sleeves#laced bodice
11 notes
·
View notes
Last Seen Blogs

fuckdudeidk
Untitled
tomriddleshoe
what is dead may never die


chucleclerc
⋆。°✩*️✮⋆。°✩
bl33d1ngst4r
𝕾𝕿𝕽𝕴𝕯𝕰𝕽