#like i have a basic map of where i put important ones
Text
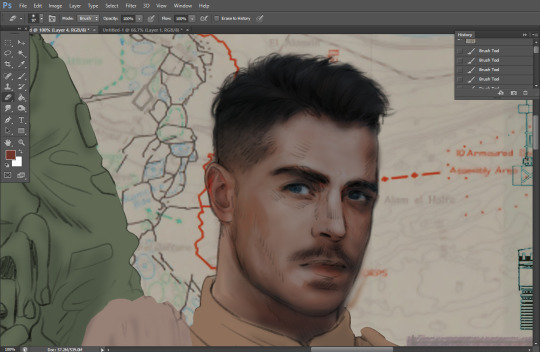
i need to draw a scar chart for my dust so i can do them decently consistently but i have this issue called 'i love giving characters so many scars to a point that i cant actually do them consistently'
#like i have a basic map of where i put important ones#i just. make a lot of dust angst n my variant has a lot of scars bcs of that#also they get glowy when he uses a lot of magic bcs (i think its neat) the healing process is influenced by his magic bcs he has too much#u can tell i love dust bcs i love to angst him#i was like this with error for a LONG time but its currently gone to silly guy error n mentally destroyed dust#i just. like him a lot <3#slaps dust u can fit so much hurt/comfort n hurt/no comfort in this bad boy#dust sans#rambles#my headcanons
10 notes
·
View notes
Text
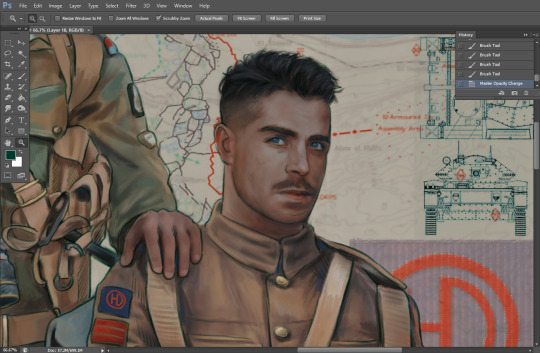
Ok! I've finally decided to put together a (somewhat) comprehensive tutorial on my latest art~
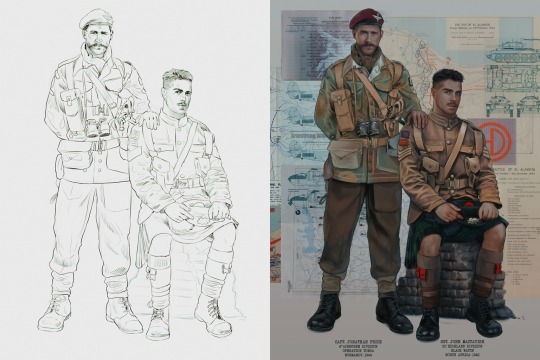
Please enjoy this little step-by-step 💁♀️
First things first--references!
Now I'm not saying you have to go overboard, but I always find that this is a crucial starting point in any art piece I intend on making. Especially if you're a detail freak like me and want to make it as realistic as possible 🙃
As such, your web browser should look like this at any given point:

Since this is a historical piece, it means hours upon hours of meaningless research just to see what color the socks are, but...again. that isn't, strictly, necessary 😅
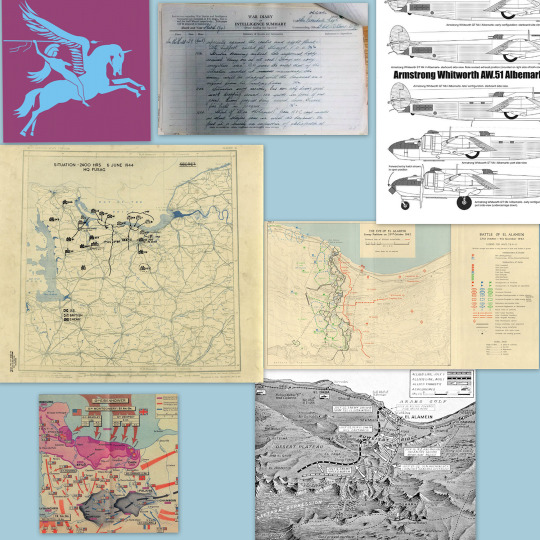
Once I've compiled all my lovely ref pics, I usually dump them into a big-ass collage ⬇️
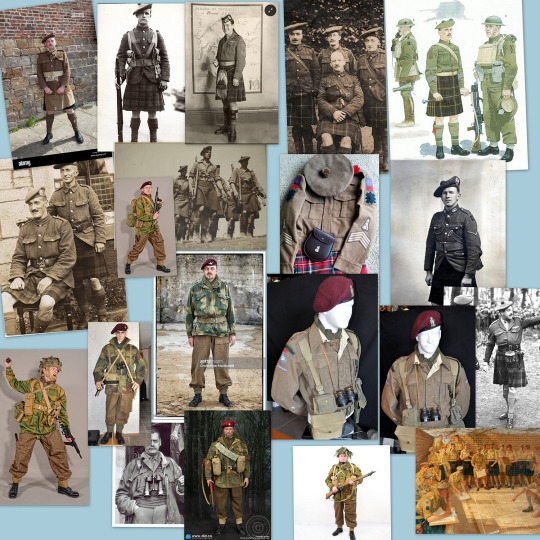
(I will end up not using half of these, alas :'D)
Another reference search for background material, and getting to showcase our models of choice for this occasion~
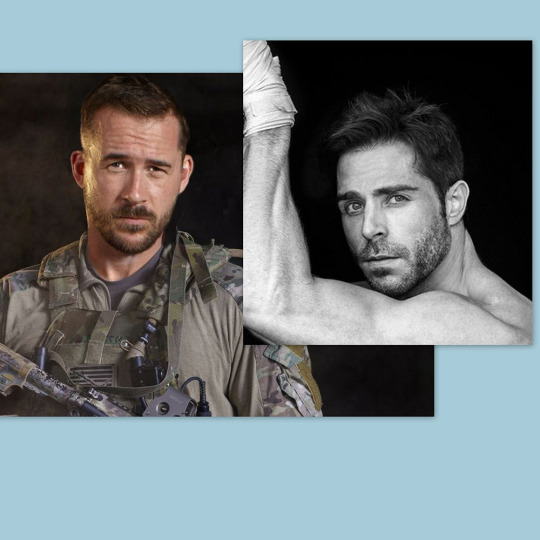
When picking a reference for an actor or model, the main thing I keep in mind (besides prettiness 🤭) is lighting and orientation. Because I already kinda know what pose I'm gonna go with for this piece, I can look for specific angles that might fit the criteria. I should mention that I am a reference hound, and my current COD actor ref folder looks like this:

Also keep in mind, if you're using a ref that you need to flip, make sure you adjust accordingly. This especially applies to clothing, as certain things like pants zippers and belt buckles can be quite specific ☝️
Now that we've spent countless hours googling, it's time to start with a rough sketch:
It doesn't have to be pretty, folks, just a basic guideline of where you want the figures to be.
The next step is to define it more, and I know this looks like that 'how to draw an owl' meme, but I promise--getting from the loose sketch above to below is not that difficult.
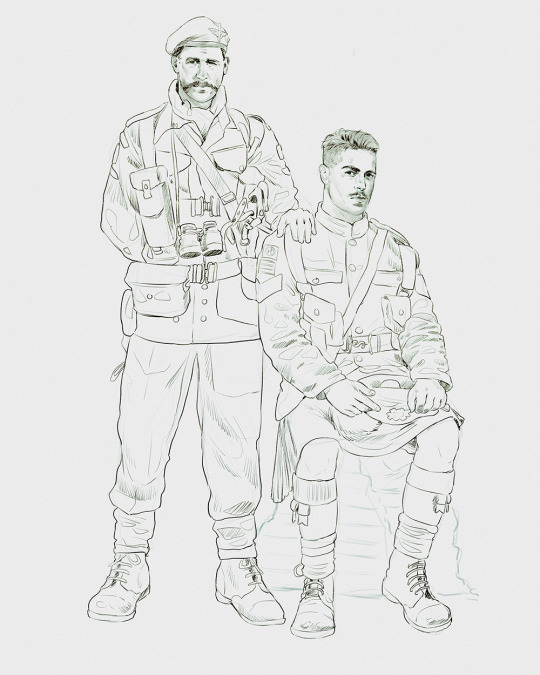
Things to keep in mind are--don't go too in-depth with the details, because things are still subject to change at this point. In terms of making a suitable anatomically-correct sketch, I would suggest lots of studying. This doesn't even have to be things like figure drawing, I genuinely look at people around me for inspiration all the time. Familiarize yourself with the human form, and things like weight, proportions, posing will seem a little more feasible.
It's also important at this stage to consider your composition. Remember to flip the canvas frequently to make sure you're not leaning to one side too often. I'm sure something can be said for the spiral fibonacci stuff, which I don't really try to do on purpose, but I think keeping things like symmetry and balance in mind is a good start ✌️

Next step is just blocking in the figures. Standard. No fuss 👍
Now onto the background!
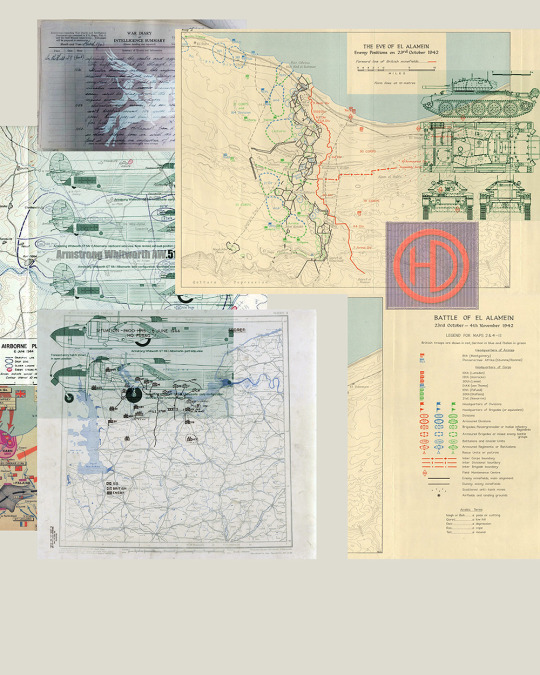
It's frankly hilarious how many people thought I was *hand-drawing* these maps and stuff 😂😂 I cannot even begin to comprehend how insanely difficult that would be. So yeah, we're just taking the lazy copy and paste way out 🤙
I almost always prepare my backgrounds first, and this is mostly to get a general color scheme off the bat. For collage work, it's really just a matter of trial and error, sticking this here, slapping this there, etc. I like to futz around with different overlay options until I've found a nice arrangement. Advice for this is just--go nuts 🤷♀️
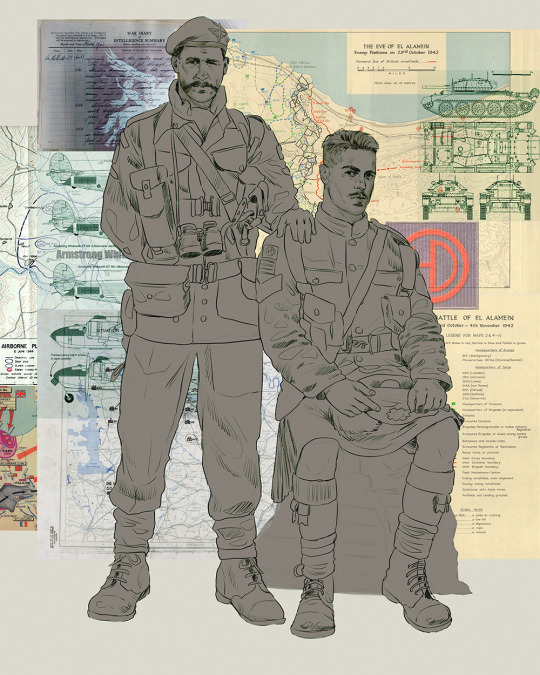
Next, I add a few color adjustments. I tend to make at least 2 colors pop in an art piece, and low and behold, they usually tend to be red and blue ❤️💙There's something about warm/cool vibes, idk man..
Now we move on to coloring the figures. This is just a basic block and fill, not really defining any of the details yet.
Next, we add some cursory values. Sloppy airbrush works fine, it'll look better soon I promise 🙏
And now--rendering!
I know a lot of beginner artists are intimidated by rendering, and I can totally understand why. It's just one of those things you have to commit to 💪
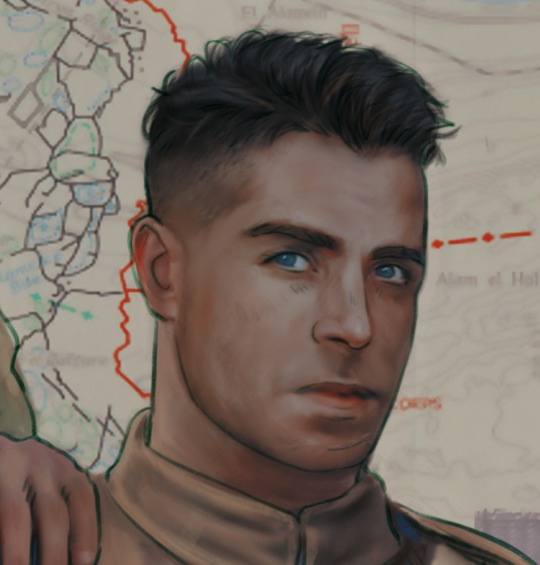
I've decided to show a brief process of rendering our dear Johnny's face here:
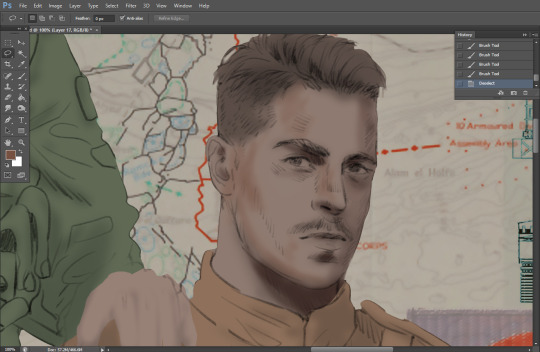
Starting off, I usually rely on the trusty airbrush just to get some color values going. Note--I've kept my sketch layer on top, but feel free to turn it on and off as you work, so as to not be too bound to the sketch. For now, it's just a guideline.
This next stage may look like a huge jump, but it's really just adding more to the foundation. I try to think of it like putting on make-up in a way~ Adding contours, accentuating highlights. This is also where I start adding in more saturation, especially around areas such as ears, nose and lips. Still a bit fuzzy at this point, but that's why we keep adding to it 💪
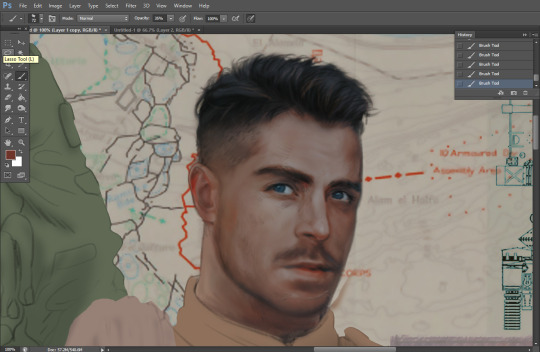
A boy has appeared! See--now I've removed most of the line layer, and it holds up on its own. I'll admit that in order to achieve this realistic style, you'll need lots and lots of practice and skill, which shouldn't be discouraging! Just motivate yourself with the prospect of getting to look at pretty men for countless hours 🙆♀️
I'll probably do a more in-depth explanation about rendering at some point, but let's keep this rolling~

Moving forward is just a process of adding to the figures bit by bit. I do lean towards filling in each section from top to bottom, but you can feel free to pop around to certain parts that appeal to you more. I almost always do the faces first though, because if they end up sucking, I feel less guilty about scrapping it 😂 But no--I think he's pretty enough to proceed 😚
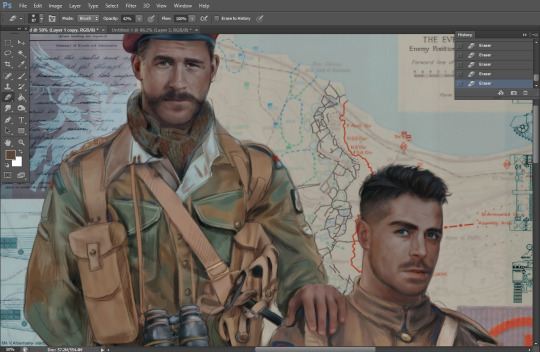
They're coming together now 🙆♀️ Another helpful tip--make sure you reuse color. By that, I mean--try to incorporate various colors throughout your piece, using the eyedropper tool to keep a consistent palette. I try to put in bits of red and blue where I can
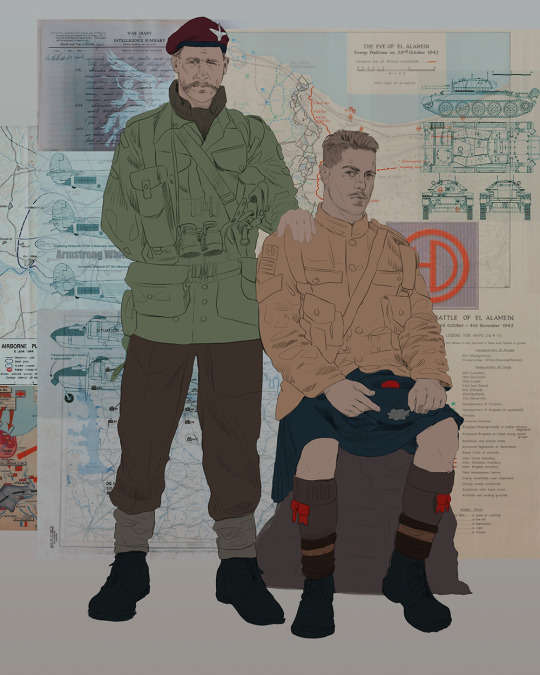
Here they are fully rendered! Notice I've made a few subtle changes from the sketch, like adjusting the belt buckles because I made a mistake 😬 Hence why you shouldn't put too much stock in your initial sketch~
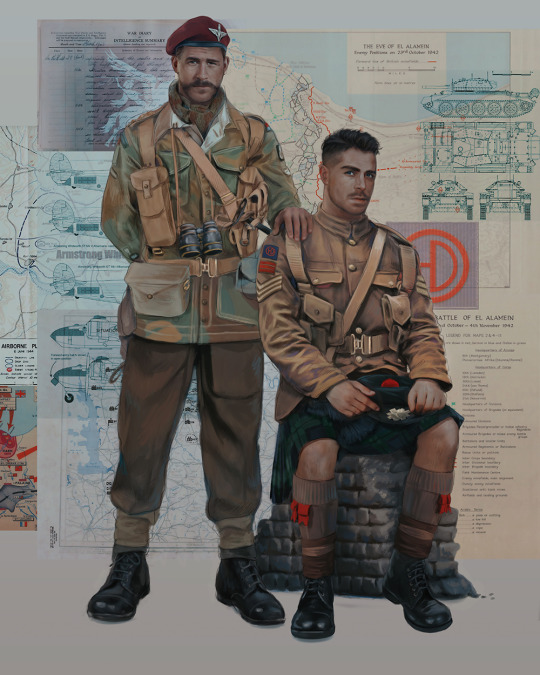
The next step is more of a stylistic choice, but I usually go over everything with an outline, typically in a bright color like green. Occasionally, I can just use my initial line layer, but for this, I've made a brand new, cleaner line 👍
And the final step is adjusting the color and adding some text:
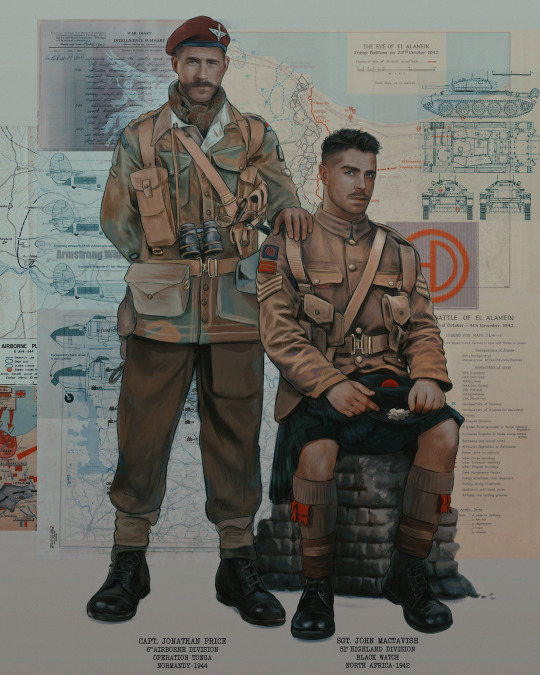
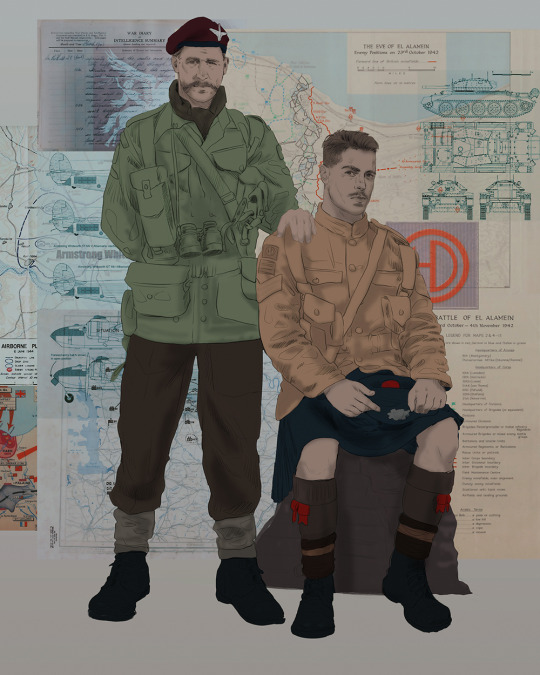
Tada!! It's done!
All in all, this took me the better part of a week, but I have a lot of free time, so yeah ✌️
I hope you appreciated that little walkthrough~ I know people have been asking me how I do my art, but the truth is--I usually have no clue how to explain myself 😅 So have this half-assed tutorial~
As a bonus, here is a cute (cursed) image of Johnny without his mustache:
A baby, a literal infant child !!! who put this wee bairn on the front lines ??! 😭
Anyway! peace out ✌️
#tutorial#my art#art tutorial#since people have been asking#I remembered to save my process from this latest work~#enjoy 🙆♀️
1K notes
·
View notes
Text
Ok so Rebecca did a one hour panel today in Sydney with Lynette Noni hosting, where she asked questions and then they opened it to fans. I've kind of summarised the things I haven't seen mentioned over and over, but I don't frequent the subreddit anymore or use TikTok, so there might be overlap. In any case, it's long. Settle in. I've sectioned it into plot/character relevant first, then themes and interesting facts about her and her writing. Basically, you all came with me. 💗
• In book three (and every book thereafter) we'll be going to more and more new places. She specifically worded it as "watching the map expand" whether that's significant or not, I don't know. (I was thinking Isle Kingdoms for OS, but maybe that's just my wishful thinking).
• She implied Jack will have a reason (explained) for uh...being a power-hungry prick? lol
• She's hella defensive of Dain, which I love. #DainApologistsClub 😌 Some highlights include:
"You guys give Dain so much shit for the same thing Xaden does. You really do and you're so fast to forgive Xaden and not Dain. Why? Is it because he's hot?"
And, "when push comes to shove, all Dain did—yes he violated her boundaries, as does Xaden—but all he did was trust his dad when his best friend no longer spoke to him. That's it."
"When Dain looks at her (in the interrogation chamber) and says 'if you had just told me, none of this would have happened', he's not just talking about the interrogation, he's talking about Liam, he's talking about if she had just trusted him (in Fourth Wing) it never would have happened." 😢
• She was asked about Liam's appearance in the interrogation chamber and definitively put to rest any signet theories involving that. "She's so alone in that moment and...I don't read fan theories but sometimes they reach my ears; she's completely disconnected from her magic in that moment, she can't even reach out for Tairn or Andarna, which are the bonds that are actually most important to her. She can't reach out for Xaden. And that's the one person who would have prevented that from happening the last year, so it's natural that's who her mind would summon."
• She's thought about a spin-off series, but she's just trying to survive this series.
• Someone asked her if there'd be any redemption and romance for Jack Barlowe and honestly, thanks guys, I don't think she's ever coming back to this country 💀 ("Are you getting enough sleep? Uh...I mean, from his prison cell maybe? No.")
• Someone asked "what is Garrick's signet and why hasn't it been shown yet?" (shoutout to this girl, she's the real MVP) to which Rebecca said "it's very much in book three, I love it."
• Someone asked about the orange dragons and unpredictability re: Amber, Jack, Varrish and then Imogen and Brennan. Rebecca said some dragons might look for traits like their own and some look for balance because it's a partnership; and that Brennan as a strategist needed that little bit of unpredictability in his life (lol, I think he got it).
• She didn't always plan for Violet to have two dragons. Originally it was going to be one (Tairn) and the editor had hoped that she would sway towards a weaker, smaller dragon and she thought that was a little too close to Abraxos in ToG, and so they compromised and gave her both. She also went on to say she doesn't like overpowered heroines and since Tairn is extremely powerful, Andarna balanced that out. (I'm not...I'm not sure how that works out? But that's what was said.)
• We are definitely going to find out more about the original six (and Lynette asked if that was a spin-off possibility and was shushed, so she's thought about it at least, but I get the idea she's thought about a lot of possibilities 😂)
• There's no timeframe for the release of the final two books.
• Someone asked if Violet's dad was Malek to which she was kind of shocked. He's not a god, guys. And low-key I JUST WANT TO KNOW HIS NAME. 😤
• On Sgaeyl: "You do (get more of her) but holy crap is she pissed. So—I'll tell you that about Onyx Storm—she is really, really mad at Xaden and she's not exactly speaking to him at the moment. So it's hard for her to speak into that bond when she's not speaking to him." 💔
• She was asked about the Violet dated Halden theory (which was fucking hilarious because the poor girl misspoke and asked if Xaden dated the prince and we were all really confused about which TikToks the poor thing had seen (note to self: consider cam/xaden), anyway after we got to the bottom of that, Rebecca replied, "I think you should read the third book." Which I'm taking to mean, the man is making a damn appearance and we're gonna find out for ourselves 👀 Hey, if I'm lucky maybe we'll even find out his surname
• Finally she said she has EP on the Amazon series, they've all been exceptionally protective of it and that she's happy with how it's going (they're not near casting yet and she doesn't want to really comment on that ever, to leave each role open to as diverse a cast as possible). She said the production team has come to the signings in LA to meet readers and see what they love and are passionate about when it comes to the series to make sure that's honoured.
"Like I mean, I've seen certain...like what can I say without getting tackled to the ground? Let's just say they've already taken steps to make sure that what you guys love about the story is envisioned and that it's not run amok. And I'm very happy with it, they're super protective of it." Which could just be me reading into it, but the first place my brain went was the dragons 👀🐉 and the CGI or whatever.

• She was asked about where the inspiration for the universe came from and she said that when her Entangled decided they were going to do romantasy they asked her for five pitches and Fourth Wing was one of them (she won't say what the others were because she might still write them someday). She said she likes the fated mates trope but she wondered what that would look like if the dragons were the ones mated, not the humans and the humans who couldn't stand each other were forced to be around each other because of this.
• Her first ever book was romantasy but it didn't sell
• She's never really written enemies to lovers before.
• She likes found family themes because she was raised in a military family and moved around a lot, so that makes it hard to keep in touch with your extended family, and after she married her husband and became a military wife, it was their found family that was there for her—it was her found family who helped her move her house, who sat with her when her husband was injured in Iraq, etc, so she thinks it's very important to show that your family is also the people you choose and that can be just as strong as any blood tie.
• She was asked (by Lynette) why she wanted to show death and the reality of war and she said, "I've been surrounded by it. My husband's been at war since 2003, he spent 22 years in the army, first as a 19 Delta cavalry scout and then ten years as an apache pilot and we buried our friends. And I saw what it did to him, and I saw what it did to our friends, I saw what it did to our children, to us, and I love being able to examine it from a fantasy perspective just because I think fantasy gives us a unique environment from which to critique our own world by viewing it through the lens of another. And I've always delved into those themes as to why we do this to each other and where is there hope to stop it?"
• As an author her favourite scenes in Fourth Wing were the dagger stealing scene (very important to their chemistry and romantic development—"she's the only person he's taught ever, how to actually kill him") and the first kiss scene.
In Iron Flame it was the interrogation scene and how that ends with Dain and Xaden and everything coming together.
When asked about a similar scene from Onyx Storm that elicited the same strong emotion from her she said "you're not gonna like it" and that's it 💀
• She would consider writing fantasy again after she's done with the Empyrean world, maybe one of her other pitches, but she won't truly think about it until she's survived this one.
• She spoke about the "kill your darlings" writing advice and how if you love a scene but it doesn't move the plot, you've gotta cut it, and how she did that with the final scene in Fourth Wing, which was originally 7k words of Violet POV pulling information out of Xaden.
• When asked about fan theories she actually said something I found a little sad. "I don't listen to fan theories. One, I'm not on TikTok—it's a little bit more important for me to be alive than to listen to what other people think they know about me, and two, I don't ever want fan theories to bleed into my writing."
〰️ And that's it! If anyone's going tomorrow, please voice record the whole thing and report back lmao 🙏 🫶🏼
ETA: part two is here, x
#fourth wing#the empyrean#rebecca yarros#fourth wing spoilers#iron flame spoilers#onyx storm#onyx storm theories
300 notes
·
View notes
Text
i was asked by @matthew-macfadyens for a colouring tutorial, so here we go ! i've been making gifs for almost 4 years now and finally feel comfortable and confident in my skills to make a full tutorial on my colouring process. there are so many different ways people colour gifs, and there's no wrong way, this is just how i do it ! i learned to gif by reading so many tutorials and picking and choosing what works for me, so hopefully this can help someone out !
if this tutorial helps you, please considering supporting me !
buy me coffee ♡

TUTORIAL UNDER THE CUT
what you'll need:
- photoshop ( i use ps cc 2023 & frame timeline )
- basic ps knowledge ( how to make gifs, how to sharpen gifs, general understanding of adjustment layers, layer masks and blending modes )
- a whole lot of patience
helpful resources:
the beginner's guide to channel mixer by @aubrey-plaza
giffing 101 by @cillianmurphy
gif making for beginners by @hayaosmiyazaki
colouring yellow-tinted shots by @ajusnice
becca's mega colouring tutorial by @nataliescatorccio
@usergif
PART ONE: BASE COLOURING
- step 1: curves
- step 2: exposure
- step 3: colour balance
- step 4: selective colour
- step 5: levels
- step 6: brightness / contrast
- step 7: gradient map
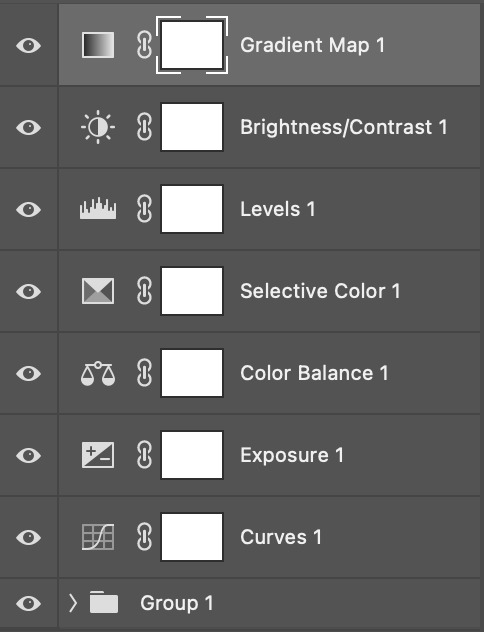
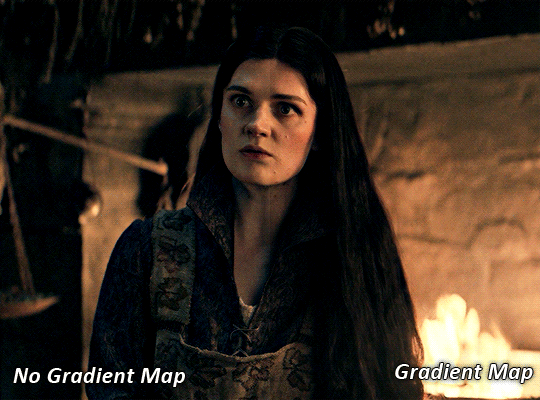
okay so, before we get started, this tutorial is for colouring only. at this point, i've already gotten my screencaps, imported them into photoshop, made the actual gif & sharpened the gif. the above image includes what my typical adjustment layer stack looks like !
STEP ONE: CURVES
a lot of people do the majority of their heavy lifting in curves...i'm not one of those people. i've never gotten the hang of curves and haven't been able to fully taken advantage of everything it can offer. i use curves to mainly brighten up my gif and to start my process.
i use the "auto" button in the curves function - this automatically corrects the curves for your gif ( mainly the brightness / contrast )
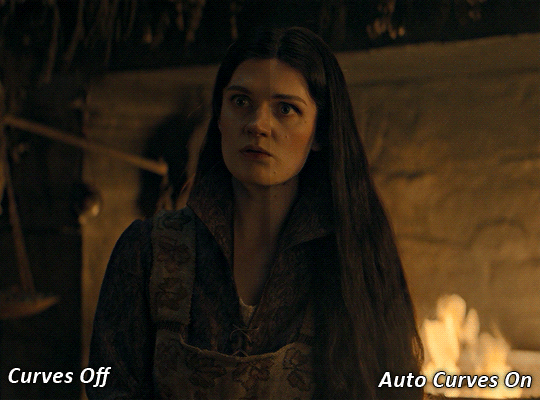
you can see that the auto curves has brightened up the gif and evened out the brightness/contrast. i just find this gives a better starting point for the colouring process.
STEP TWO: EXPOSURE
this step is for, you guessed it, brightening the gif more and evening out the contrast and blacks. i don't have any real rules for doing this, the amount i highten the exposure and contrast is different based on the scene and the show, however, i tend to stay around +1 on both exposure and gamma correction.
exposure effects the brightness of the gif and gamma correction effects the blacks and contrast. this step also effects the saturation of the gif, so it's important not to go too crazy. i often end up coming back to this step every now and again to adjust and fiddle with it.
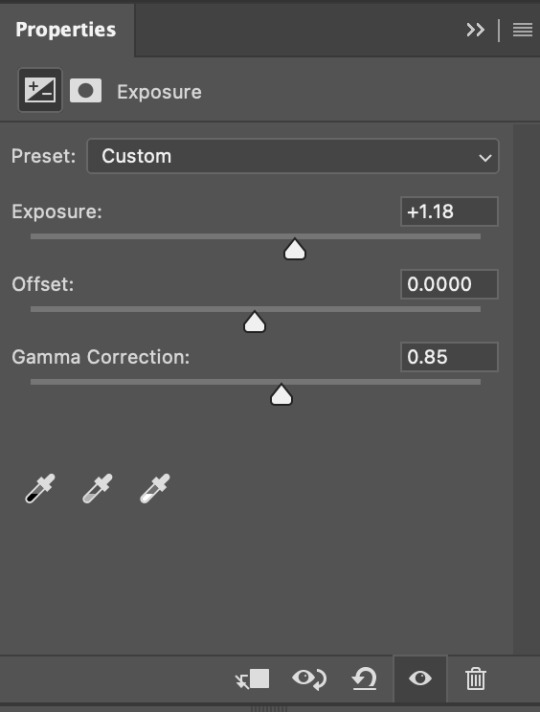
for this gif, i put the exposure at +1.18 and the gamma correction at 0.85
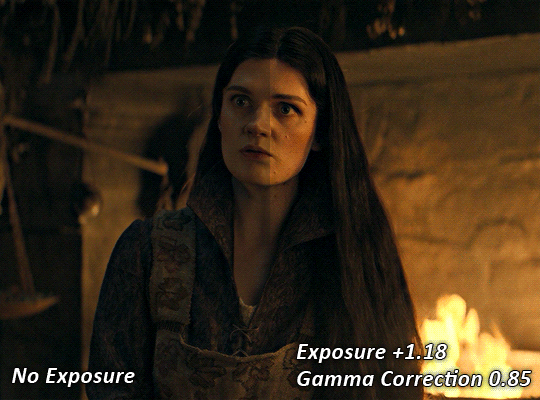
you can see this step serves to add some more brightness and contrast - it also adds some more saturation, that we don't always want, but don't worry, that's what the next steps are for !
STEP THREE: COLOUR BALANCE
i use this step to do a lot of my heavy lifting - i'm a whore for colour balance. this serves to even out the colours and help neutralize the colours for an easier canvas. it's important to understand the basics of colour theory for this, i recommend checking out the channel mixer tutorial i listed above, because a lot of those steps applies to colour balance.
essentially, there's three separate profiles to edit on - highlights, midtones and shadows. in each profile, you have 3 colour sliders. the top one is your cyan to red, middle is magenta to green, and bottom is yellow to blue. the colouring of the scene will decide where to move your sliders.
for example: if your original scene has a cyan tint to it, you'll want to pull your slider to the right, towards the red to help neutralize the cyan. if your scene has a green tint, you'll want to pull it left towards the magenta. as you move the sliders, you'll notice that sometimes it brings out other colours you don't necessarily need, you can adjust the other sliders to help neutralize further.
i always do my main correction in the midtones profile.
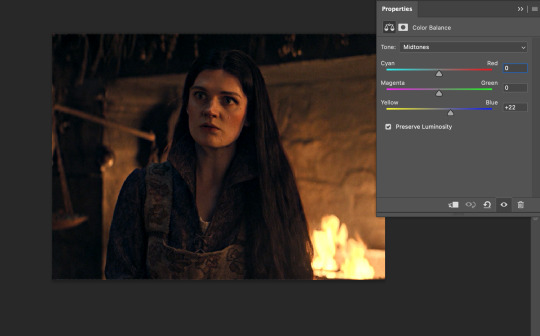
since this scene has a heavy yellow tint, my first step was to adjust the bottom slider. i pulled the slider to the right towards blue at +22. you can see this helped get rid of a lot of the yellow, but adding in the blue warmed up the reds and made it more saturated.
to help with this, i pulled the top slider left towards cyan to help neutralize that red.
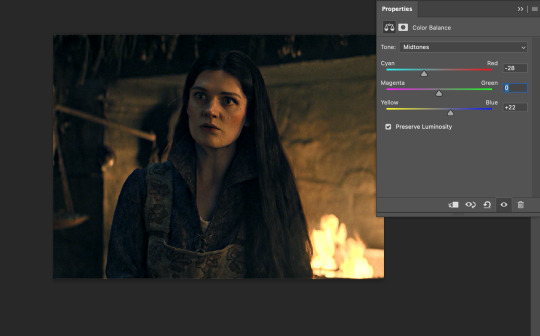
i pulled the top slider to -28 and you can see this cut out that heavy saturation and redness. it's looking a lot better, but now it's a little too green for my liking. this is where that middle slider comes in!
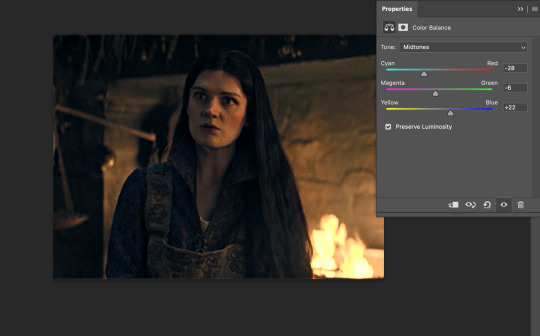
i pulled the middle slider to -6 towards the magenta to help counteract the green that came in. ( i ended up going back in and adjusting the bottom slider to +10 instead, as it was a little to blue )
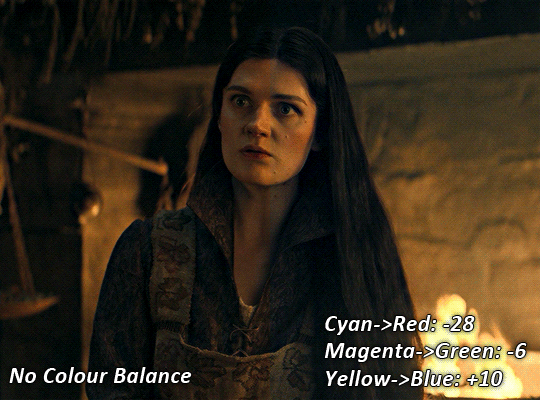
you can see this step really did the heavy lifting, helping to neutralize the canvas so that it's easier to work with...but it's not quite perfect yet!
STEP FOUR: SELECTIVE COLOUR
a lot of the same principles around colour theory apply to selective colour! this is where i go to adjust the colours according to what my colour palette is. for this gif, the overall colour is going to be purple, so i'll adjust the individual colours with that in mind.
i only ever adjust my red, yellow, white and black profiles! sometimes i'll do the other colours, but that's only for tweaking the final colour. i normally don't touch them at all.
ps: you'll notice i prefer a cooler toned gif, and almost always go for a more magenta looking red/yellow.
i always start with my yellows:

in the yellow profile, i pull my cyan towards the left to -38 (this helps eliminate the green in the yellows) and my yellow slider to the left to -27 (this cools down the yellows. i top it off by adjusting my magenta slider to -10, to help lower the saturation of the yellows.
you'll notice this step got rid of most of the green undertones - that's because the green was nested inside the yellows, so by taking out a lot of the cyan and yellow, you're left with a warmer yellow as opposed to a cooler yellow.

next i go on to my reds. this step will mainly effect the alys's skin tone, but i'm going to do pretty much the same as above but with much less dramatic of a change. lowering your colours in your red profile too much can lead to a very saturated gif, which is not what i'm going for.
i pulled my cyan slider to -19, magenta to -9 and yellow to -15. you can see this helped add some more cooler tones to the reds.
the next profiles are your white and black profiles. i use white to brighten the lightest parts of the gif. no rhyme or reason here, i just pull the black slider towards the left...usually around -25. for the black profile, i always move the black slider towards the right. anywhere from +3 to +8, depending on the gif. for this gif, i did +8. this darkens the blacks and, in my opinion, helps the gif pop!
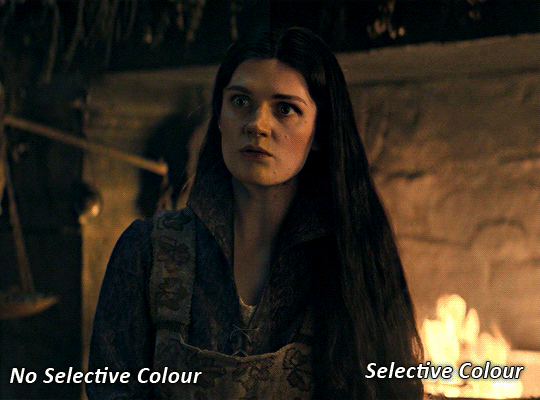
you can see this step got rid of the yellow tint, gave the gif a more neutral look and adjusted the reds to better compliment a purple colour scheme !
STEP FIVE: LEVELS
this adjustment has three toggles - i'm not 100% sure what each toggle really does, i just know that by pulling the leftmost toggle to the right, it darkens your gif, and pulling the rightmost toggle to the left brightens your gif.

this step is so hard to explain, but really i just pull the toggles around until it looks good...sorry !

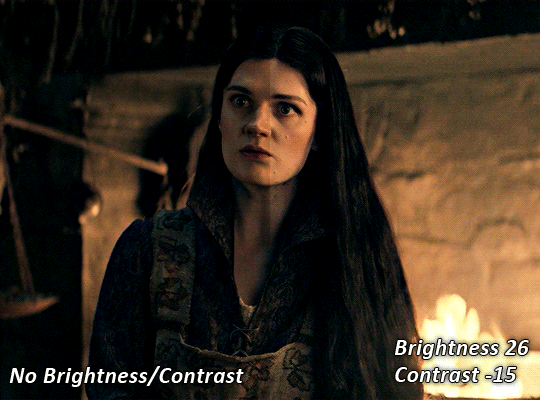
STEP SIX: BRIGHTNESS / CONTRAST
this step is exactly what it says on the tin...it brightens your gif. this step is based on your scene and personal preference, there's no real guide to it.
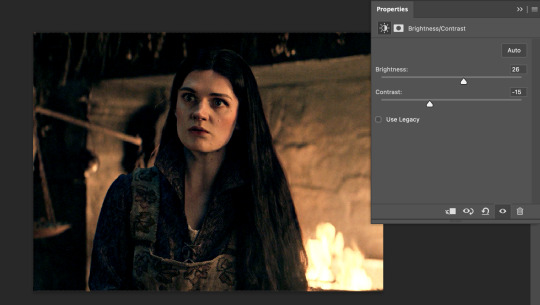
i always pull my brightness slider to the right ( brighter ) and my contrast slider to the left ( less contrast ).
STEP SEVEN: GRADIENT MAP
this last step is something i learned from @nataliescatorccio ! i add a gradient map to the top of my stack, and choose a lighter colour of what i want my overall gif to be. in this case, i used a very light purple!
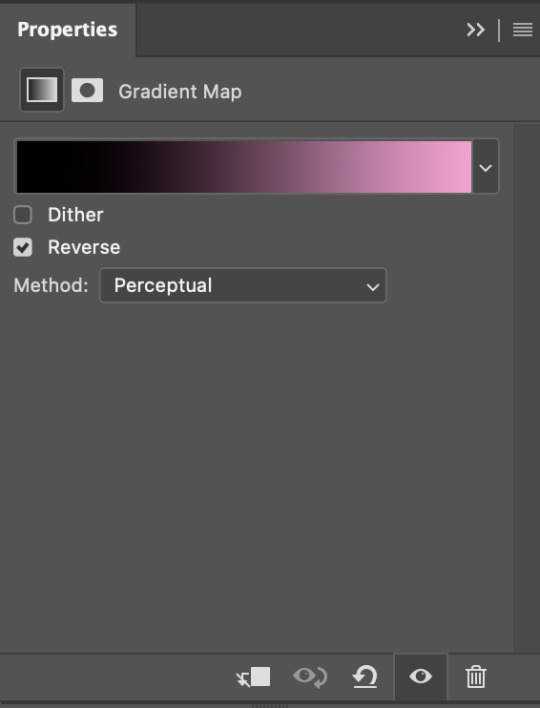
i then set the blending mode to "soft light" and lower the opacity to anywhere from 20-30%. for this gif, i did 30%
this step will help make your colour pop once you do your main colouring!
PART TWO: PAINTING & COLOURING
- step 1: layer 1
- step 2: layer 2
- step 3: layer 3
- step 4: final touches
okay, so my actual colouring process is based in 3 layers. for this gif, i'm using a deep purple/mauve colour !
STEP ONE: LAYER ONE
between your brightness/contrast and gradient map layers, add another blank layer. change the blending mode of this layer to "colour" and set the opacity to 40%.
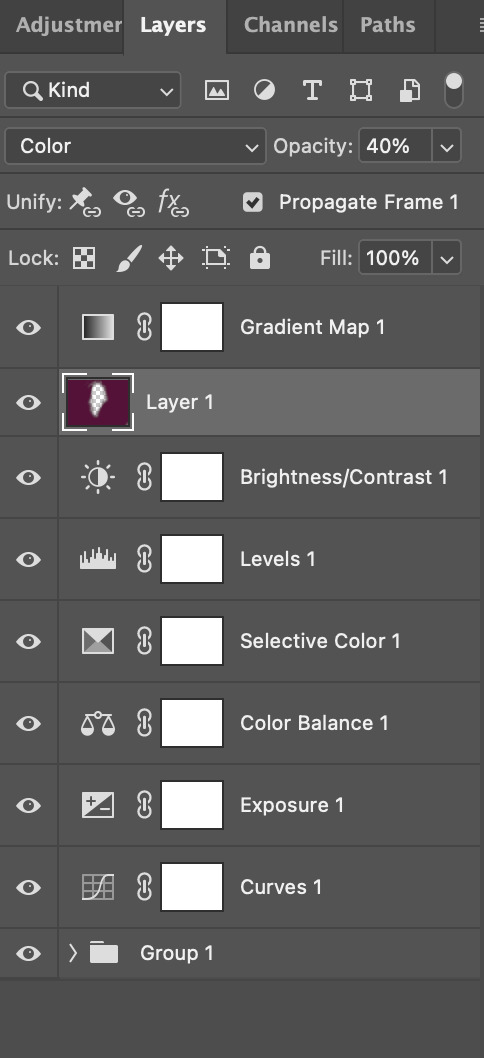
then, using a soft round brush with an opacity of 100% ( size of the brush is your preference, i typically use around 108 ), colour the parts of the gif you want coloured !

you can see this helps us get the canvas to a more uniform purple colour!
STEP TWO: LAYER TWO
for layer two we're going to do the exact same thing. add a layer above your previous, set to "colour" at 40%. we're going to go over the same areas!
you can see this helped get the purple so much more vibrant and closer to what our final colour is going to be!
STEP THREE: LAYER THREE
for our final layer, add another layer above the previous 2, set your blending mode to "multiply" and your opacity to anything from 60%-100%. for this gif, i did 60% !
now, our colouring is pretty much done but you can see that, now that our colour is down, alys's face is still a little too blue/green/yellow for the background purple. the next step, we're going to adjust and add final touches!
STEP FOUR: FINAL TOUCHES
at this point, i went back into my selective colour layer and adjusted my yellows & reds and went back into my colour balance layer to adjust everything overall.

at this point, i'm going to go in and add some adjustments layers above everything - i usually add some brightness/contrast, and a selective colour layer to darken the blacks.
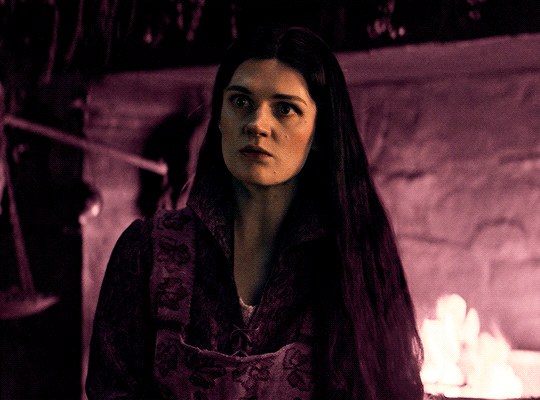
which brings us to our final result:
#usergif#dailyresources#pscentral#ps tutorial#tutorial#coloring tutorial#allresources#userbecca#tusermich#userjoelle#ughmerlin#mialook#*tutorial#**
146 notes
·
View notes
Text
How to set up a research journal
This is just one way you can set up a research journal but it's helping me tremendously so maybe it also works for you. My set-up is partially inspired by this video by Answer in Progress and I suggest you check out their curiosity journal.
Preparation
First you need a notebook. The trick is to find a notebook that you're not afraid to "ruin". We all want a really neat, aesthetic research journal, but the reality looks more like hasty scribbles, but that's okay, that's where the research breakthroughs happen.
I personally bought a cheap lined notebook from Søstrene Grene that I thought looked cute and put a sticker on it. That way I feel good about using it but I also don't mind when my handwriting gets messy because it was only like 3€.
You should also stock up on pens you like writing with. Different colour highlighters and post-its are also a good idea but not a must. Keep it cheap but comfortable.
Title Page
Here you should put down all the really important information: year, title, deadlines, word count, supervisors. Maybe add an inspirational quote to spice it up but keep it simple and relevant.
Key
This should either be your next or your last page. I personally use the last pages of my journal so I can add thing and find it easier. Your key is there to list abbreviations and symbols.
For example, I have different symbols for statistics, dates, new terminology, questions, breakthroughs, important notes and abbreviations for the most important terms in my field. It's shorter to write T9N than Translation.
The trick here is to have enough abbreviations and symbols to save time and effort but not so many that you constantly have to look back and forth between your page and key. They should be memorable and not easy to confuse.
Topic Mind map
If you hate mind maps you can skip this of course or use a different method but what helped me is to visualise all the topics that connect to my research project in a mind map. I then colour-coded the main groups of topics with my highlighters. It helps me to keep an overview on how many topics I need to do research on.
Proposal
If you're writing a thesis/dissertation it can be helpful to have a page set aside for your proposal and take some bullet point notes on methodology, chapter structure, research context, aims and objectives and think of some titles. You can also do this for your lit review and a list of works to include.
Hypothesis and Question Pages
I set aside four pages for this but you can adjust this to your needs. The first page is my hypothesis. It doesn't have to be fully formed yet, it can just be bullet points with five question marks. You can always revise and update it but it is important to keep an eye on what you're actually trying to find out.
The next idea is basically just stolen from Answer in Progress: a section for big questions, medium questions and little questions. These aren't necessarily hypotheses you aim to answer but questions you have about your topic that might be good to look into (maybe they lead somewhere, maybe they don't).
Research Notes
Now comes the big, fun part. Research notes are allowed to be a little messy but you should have some sort of system so you can actually find what you're looking for afterwards. I'm currently just looking at books and articles so that's what my system is based on. You can totally adjust this to include other forms of research.
What I do is that I put down and underline the author and title of my source. Underneath that I use my highlighters and mark the topic of the paper based on how I colour-coded them in my mind map. You might have to do this after you've finished reading. For example, if a text talks about censorship and dubbing in Germany, three of my topics, I will draw three lines in light blue, dark blue and red, the colours I chose for those topics. This way you can easily browse your notes and see which pages are talking about which topics.
When it comes to the actual research notes, I include the page number on the left and then take bullet point notes on whatever is relevant. These are often abbreviated and paraphrased but if something is especially important I will write down a full quote.
As mentioned earlier, I have a key of symbols I use so I can simply put down a '!' in order to differentiate a research breakthrough from a normal note. You can insert your own thoughts much more easily when you know you'll be able to tell them apart later on. At the end of each article, book or even chapter I write down my main takeaway.
Other Notes
This is your research journal and you can do with it what you want. I also added lists of films that might be relevant for my research, a list of databases and publishers to check for papers and tips on research strategy.
If you're working with interviews or surveys you could write down your questions. If you're nervous about your research you could include a list of reasons why your research project is important or why you're doing it. You can include a to-do list or a calendar to track meetings with supervisors. Anything that helps you with your research.
#gradblr#studyblr#studyspo#study tips#research#research journal#dissertation#thesis#thesis writing#academia#academic research#academic writing#journal#bullet journal
1K notes
·
View notes
Text
The Missing Link in Scott's Characterization
(Wrote this in a random document and I think it's good so I'm loosely transcribing it here)
These are some of my thoughts on a crucial facet of Scott's character in the Life Series that I think is overlooked by the fandom.
From my personal viewpoint, people put a lot of emphasis on Scott's caring about his allies over everything else. I think this is an important characteristic. However, I think this being shown as the most central trait is a detriment to how people read his involvement with the overarching narrative. It might be less of a problem if he wasn't directly involved with the final fight of nearly every Life Series.
Because of this combination of things, his main interaction with fans' reading of the final fight is being willing to do anything to make sure his friends win. It gives people the tendency to attribute some victories partially to him, which upsets people who want main read of the story to focus entirely on the winner. But this also has meant that one of Scott's main traits is overlooked.
Just as much, and often, more than Scott values his allies, he values fairness. To showcase this, let's look at Limited and Last Life, where he had the most control on how the final fight took place.
In Last Life, when it's down to the final four, Scott *could* have teamed up with Pearl, his ally all season, to kill Martyn and Ren. That aligns with wanting either your or your allies to win, no? But he doesn't. He suggests they split to the 4 corners of the map and have a fair fight on equal footing. Very fair.
With Limited Life it's even more apparent. Scott and Martyn have an impressive amount of time. They could both still die multiple times. Impulse is running out, and there's a numbers advantage. They could have killed Impulse and Scott could have let Martyn win, or Scott could have given Martyn his time to fight Impulse alone. But instead, he suggests they all go down to the same amount and have a fair fight.
In both situations, Scott puts fairness *over* an alliance victory. Even though Limited Life didn't end up ending fairly, that had nothing to do with Scott.
Double Life certainly has the strongest claim on Scott "letting someone win". That his death is an apology for abandoning Pearl.
But if you listen to what Scott says in the finale, he never apologizes. He says he didn't think they'd get this far, he says she deserves this more than him, and then he says the iconic "Tilly death do us part."
Scott didn't fight Pearl. But I don't think it came out of remorse. I think that too, came from a sense of fairness. Which is that Pearl, by all accounts, DOES deserve this win. If they fought it would basically be up to a draw. To chance. Scott has every chance of winning. But if you go over the events of Scott's final episode, he mostly runs. He survives. While Pearl 1v2'd two separate pairs and won! The only reason Pearl hasn't killed Scott already, who has been her enemy all season, is because they were randomly assigned to be soul-linked. A concept Scott has fought since the very beginning. He knows that while he never hurt their chances, Pearl is the reason they are here, and Pearl is the reason he is here. It wouldn't be fair for Pearl to lose to what is basically a coin flip. So, he doesn't leave it up to random chance.
So yes, Scott is loyal and does care about his allies, he proves that again and again. But the way he is involved in how the series end shows that his sense of order and fairness are equally important. Also, I think viewing his contributions from this angle help remedy some of the reasons people don't like his usual characterization because of how it effects the agency of other characters.
#I've tricked you all into reading an essay that's secretly about why Life Series Scott is lawful neutral#Muahaha#Also I think you can still say he contradicts the nature of the Life Series with this#But instead of “he is nice and doesn't betray his friends”#it's “he embodies order and fairness in a series of chaos and strife”#last life#llsmp#last life scott#double life#dlsmp#double life scott#limited life#24lsmp#limited life scott#life series#traffic smp#trafficblr#smajor1995#scott smajor#lollipopplestalks
320 notes
·
View notes
Text


What if… Optometrist AU / OC… (Oculist Falls)
The GF AU brainworms have been taken hold of me and this happened. AU where One Other Euclydian survived the universe’s destruction, and it was Bill’s childhood optometrist.
A little bit about the Optometrist himself:
His name is T.J. Cross. Definitely not a literary reference from on Bill’s (least) favorite classic. He’s definitely not green for the same reason. I imagine his surname is a common one in Euclydia, as it is a shape. It fits him well though, reflecting his stern attitude.
He became an optometrist because he actually has an eye defect himself. Born with one “normal” eye and one that could see More. Defects are not allowed in Euclydia. He figured out how to blind himself to what he Shouldn’t See.
He’s nearsighted in his 2D eye, so he wears a monocle.
I’ve decided to combine this OC with evil/Blind Eye Fiddleford AUs, since both share the same goal: To Blind and To Forget.
Basic Plot:
The Billford Portal incident still happens and Fiddleford is left with a sight he wishes to forget. Except this time, he gets the idea for the memory gun in a dream, from this strange figure who just appears to give him encouragement. Obviously, he’s seen what happened to Bill and Ford so he’s not too keen on trusting something like this, but continues with the memory gun plans as normal. He won’t fall for flattery like Ford, so it’s important he thinks most of his ideas are his own free will.
Fiddleford still comes up with the idea for the Society of the Blind Eye, except this time— there’s a buffer in his head that’s keeping him from going crazy and subtly limiting his usage of the memory gun on himself. With this buffer (the optometrist) subtly creating blueprints with Fiddleford in his dreams every night, his tech patents make him a boat load of money. So much so he can buy out the Northwests and put Gravity Falls on the map.
He’s now the eccentric rich inventor, reclusive but throws grandiose parties in the manor from time to time to keep up appearances (and ward off the mansion’s curse.) But in the background, he’s leading the Society of the Blind Eye. And getting subtle guidance to expand…
Bonus:

#oculist falls#oculist falls au#gravity falls#dr tj cross#tj cross#gravity falls oc#gravity falls au#gravity falls fanart#fiddleford mcgucket#scalene cipher#bill cipher#can you guys tell I’ve been looping New Money from the Great Gatsby musical on repeat#euclydia#society of the blind eye
75 notes
·
View notes
Text
Deltarune: Fool's Fate Chapter 1 Shopkeep
Okay so this should be the last important character ref for Chapter 1, aka the Attic World. (i need a better name for this Dark World.) After this my plan is to post the minor characters like enemies, NPCs, and Minibosses but once those are out, I'm not sure what to start on next. I have many things I could work on, it's just a matter of choosing. Thus why shortly after posting this, I'll be putting up a poll. Anyways! Onto Jeanie!

The shopkeep of the first area, aka the Dusty Plains, Jeanie (like the spirit) is a mystic snake who lives alone in her tent and tells the fortunes of whoever enters. If we're to think in terms of mapping parts of the Attic World to Chapter 1 of Deltarune proper, imagine Jeanie as the Seam of the chapter. Some of her dialogue even makes mention to the cat plush, even though the two have never met proper.
Her name is a play on "genie", being said the same, just spelled differently, and tying to her mystic, fortune-teller vibe and occupation. As for inspiration, asides from taking on the appearance of a hooded cobra (a lot of the Attic World has some snake ties because of Broadway), Jeanie is an old fortune telling machine. I'm not sure if she's the full machine, or just a part of it, but that is her Light World counterpart. Her connection to tarot cards is likely due to the machine incorporating them into it's gimmick.
Being the first shopkeep, Jeanie's wares are rather basic. A healing item found a few times prior to meeting her, aka the Fortune Cookie, a stronger healing item in the Stitched Stew, a basic armor in the Crystal Lace, and a weapon for Chicago in the Fortune Cutters. I have descriptions for each of those items incase anyone's interested.
For a better look at her character, here's a quote from her shop dialogue when you ask Jeanie about herself.
"The name is Jeanie, like the spirit. Mystical Serpent of Mystery. This tent is my where I sell mystical charms and read palms, paws, and tails. I've seen quite a lot in my time telling fortunes. The past, the present... Perhaps even the future. Hee hee hee..."
Aside from asking about herself, during their first encounter with Jeanie, the player would be able to ask Jeanie about the Magician, ask for a Card Reading, or ask Jeanie how she was expecting the party based on her shop enter dialogue (depicted in the image above). Some of her dialogue will change later in the chapter, mostly after running into her a second time in the second area (the Feathered Forest) or once encountering Dorothy (the secret boss) both before and after fighting her. Under the cut is a list of what Jeanie has to say in her talk options.
You were expecting us?
"Legends have spread far and wide of Lightners who will come to seal fountains. Three legendary heroes who will save both light and dark from calamity. More recently, there have been tales and rumors among the Upper Choir of three young heroes destined to replace the Blue Knight and dethrone the High Priestess.
Call it premotion, call it fate, if you will... I simply call it inevitable that we would meet."
The Magician?
"Hmm? I'm afraid I do not know of the cat you speak off." She grins "Hee hee hee. Just kidding. You mean Magico, correct?
He is quite the trickster, isn't he? I heard he's been trying capture the Lightners who've come to seal the Fountain. All in the name of the High Priestess.
He wasn't always under her reign. None of us were. Our land did not have a singular, set ruler until recently. We were ruled by a collective choir.
Until one day, a mysterious knight appeared, and appointed the highest Choir member, the Priestess, into power. After which, she appointed Magico the Head Magician and her right hand.
It's been quite some time since this land has seen such upset in the Choir. Not since...
Well, perhaps it's better you not learn of that just yet."
Card Reading (Beginning of Chapter, before Broadway joins party)
"The Fool, The Magician, and The High Priestess. It seems your journey is just beginning, young heroes. Yet I sense great potiental and power shining within you. Perhaps such potential will aid you in the facing the powers and entities yet unknown.
Even still, buying a small protection charm wouldn't hurt."
Reading (Encountering Jeanie outside of her shop in Feathered Forest with Broadway)
"I left my cards back at my tent, but I can still read your fate through the vibrations of your soul.
Hmm... Interesting. I sense a lack of control. A slipping of string. Perhaps brought on by someone close to you interfering with your prior norm? ...
I suggest you talk things out with them, young hero."
Card Reading (Back tracking after CK and Remie re-join the party again but before the Chapel)
"Three of Cups, Eight of Swords, and Five of Wands.
It seems the rest of your party has returned to you. Though you've been apart for a time, it's important to remember the value of working as a team.
Especially since a great challenge still awaits you all on the path ahead. The Chapel and Priestess still lie ahead, young heroes.
Be weary not to let your own ambition and feelings get in the way of your collective goal."
Card Reading (Back tracking after entering the Choral Chapel)
"The High Priestess, reversed Nine of Swords, and Nine of Wands.
It seems the final leg of this journey lays before you, young ones.
Soon you shall duel with the Priestess to end her tyrannical reign. Bringing a new light to this land.
However such a battle can wait for a little while. Your adventure has been long and tiring, has it not? Why not take a short rest? I can make some tea and read the leaves before you must set off once more."
Odd Doll (After first talking to Dorothy)
"I sense you three have come across a strange presence oddly familiar but which you've never known.
A strange prisoner whom speaks in stitched together tongue?
... So I see. Seems the Magician couldn't hide her from all eyes forever.
...
I see many paths if you chose to go down this route more, yet oddly enough... The one in which you try and release her holds the most promise. It would not be my personal advice but... The stars have yet to steer me wrong yet.
Perhaps dealing with the doll once and for all will yield a brighter future for everyone. ... Perhaps it was wrong to lock her away to begin with.
A key? I do not hold it, but I have a sense as to were the Magician hid it.
Hidden among the trees, in the thicket of the dark. You'll find the path you seek, if you chose to take the lark.
That's all the advice I can give, so I would advise turning to the Magician if you get stuck further.
I wish you luck on your journey, young ones, and my the stars guide your path."
"Gate blocking your path?
As I said, I can offer no more advise.
Perhaps seek the Magician for assistance."
Odd Doll (After opening Dorothy's cell)
"So you say you've opened the door? That explains the wrathful energy I feel far away..."
I'm afraid can't see where your future leads from here. Do tell me how this plays out, if you can.
Or don't. I merely predict your path, only you can decide it."
About DOROTHY (After defeating Dorothy)
"Judgment, Reversed six of wands, and The Chariot.
I may not have known that doll for long, but I knew her cards, her fate, the path the stars laid out for her.
Or perhaps the path she forged herself…
Once she was nothing more than a blank doll. No face, no name, no path. She was a fool just as you are.
Yet one day, she came across a strange someone and it seemed her stars had finally aligned. She had been gifted an identity and purpose from some higher power, she said.
To this day, I still don't quite understand what she meant by that. Rambling on about the Truth, or our purpose, of creating our own stars…Yet I didn't NOT understand at the same time…
At some point she was let into the Upper Choir, but even they eventually grew annoyed with her ramblings. And so they cast her out. Exiled her back to these dust ridden plains.
She grew enraged, filled with an anger and hatred for all that betrayed her. She had to be locked away before she could hurt anyone else. It shames me that I had to be the one to call the guard…
Ever since, I've mulled over the cards and stars, seeking answers to what she said. Yet the skies shone dark and the cards even darker. The only thing I've come back with are more questions than when I started.
It makes one wonder…How much of the universe and fate can be understood and predicated…
And how much can only be navigated by the blind?"
We Won (After defeating Dorothy)
"The six of wands, the Tower, and the Devil.
So, it is true? You really defeated her? Then you three truly must be the heroes of legend after all…
However be warned, DOROTHY is merely the first step in your fool's journey. There is still a long way to go, and many more obstacles to face.
And one day soon… even the most darkest evil of all.
Hee hee hee…
Well, I can only wish you luck. Perhaps once you reach that point
You can come back here and I shall read your scattered destiny once more."
-------------------------------------------
31 39s 38, 27 6 7 4
50 39 44, 15 19t 21ly
31 39s 38, 27 6 7 5
50 39 44, 16 6 9
31 39s 38, 27 6 7 1
50 39 44, 41 re49 39
31 39s 38, 27 6 7 3
50 39 44, 40 6 2 25
31 39s 38, 27 48 8st 50
50 39 23, 35 32 27 13
31 39s 35 32, 27 34 4feated.
50 39 35 32, 46s 10 47ed.
31 33s 34 39, 27 34 & 29
50r 18, yet 6 2 45ed
31 28s 22, can 35t 6 11ed
50 28 36, of 26 this 10 20s
31 43s the 24, 27 43s 15 in 47,
30 & 42ess, 34ly 14.
31 39s 38, 24ish 27 39ed 6.
50r 47 37 32. 17 39, will 35t 50?
#deltarune#deltarune fan character#Deltarune: Fool's Fate#dr atticworld#dr:ff atticworld#deltarune oc#petra's deltarune take#deltarune au#petra art#fool's fate#jeanie#deltarune shopkeep oc
81 notes
·
View notes
Text
Custom Fur Accessory Tutorial
I have been meaning to put this together for a loooonnnng time, but as there is still a lot of information about the process that is undiscovered, I held off. I didn't have the energy to deep dive and solve those mysteries either, so I just kept delaying and delaying. The circle of procrastination in progress!
It's long overdue though, and even though the mysteries still remain, I am sure there are others eager for even the partial scoop of knowledge I've managed to glean. And also thanks @angelapleasant for helping re-motivate me! I appreciate the patience as I worked through to remember all the steps.
This assumes you already know the main basics of making a mesh and using SimPE, so I won't go over every excruciating detail for this. I personally will be using a cat mesh for this tutorial, but the method is the same for dogs as well (they just have way more meshes/resources).
Tools: SimPE, a mesh editor such as MilkShape, and a photoeditor. I also put together some Custom Pet Genetics Resources, which includes everything pet related I've ever utilized when making pet cc. Everything is separated by cats or dogs, and then sorted even further. For this tutorial, I will be making a cat item, so the resources I'm using will be from there. If you're making an item for dogs, just follow the same steps but using the dog equivalent of each resource instead. I tried to make it organized, but it's probably still messy.
Step 1 - Slaved Vs Recolorable: There are two types of Fur Accessories: slaved and recolorable. I will only go over the process for slaved furcards, but the process for recolorable is pretty much the same except at one part.
• Slaved are my personal favorite fur accessories; they grab their color from that of the pet’s coat color. They don’t require any recolors, just one simple package and they’re all done. The only downside is that they don't have their own textures. Examples of slaved furcards are the furry belly fluff on cats and dogs.
• Recolorable is by far the most tedious of all versions, as it requires an additional recolor of the accessory to be made for every single fur color, and any fur colors that don’t have a recolor made for them will default to white. Do yourself a favor and avoid recolorable accessory furs at all costs. Examples of recolorable furcards are dog beards, dog eyebrows, and poodle fluff.
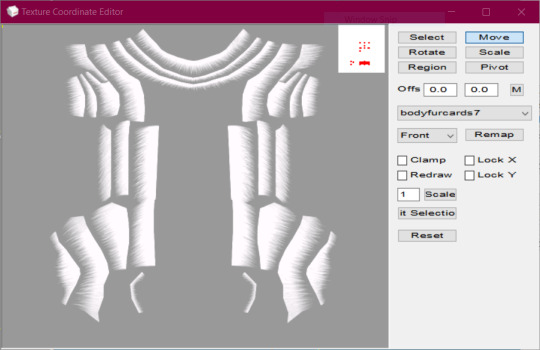
Step 2 - Make the Mesh: Open MilkShape and import "bodyfurcards.5gd" from the zMeshResources folder.* There's 5 groups, don't delete any, just make your mesh on one of the group layers already available. I, personally, put my meshes on the bodyfurcards7 group.

After you've made your mesh, map the textures to "fubodyaccflowingfurcardREMAKE.png" in the zMaterialDefinitions folder. This is from my AccFurCardsTextureOct2018.package, which is a default replacement of Maxis' original body furcard texture. It adds a square in the corner (for the dog equivalent, it adds a teeny tiny rectangle near where the eye texture normally is).
Once you're satisfied with the mapping, then make sure all the comments and joints are correct, and export. As a fair warning, pet weights are super weird, so your mesh might wind up with some strange issues such as morphing or floating.
*There is also a facefurcards version, but my attempts to use that one for custom fur accessories have been unsuccessful. I included it if anyone else wanted to try their hand at it.
Step 3 - Make the Mesh Package: In the zMeshResource folder find the BodyFlowingFurCardsMesh package. Open it in SimPE, Fix Integrity, then Save As under a new name. Then replace the GMDC with your exported Milkshape mesh, and save. Or don't, if you prefer a different way of mesh making. The TRULY important part is the Shape (shpe) file. Click it and make sure it has the correct number of parts in Plugin view. BodyFlowing (Cat) for example has 5 groups, so it should look like this:

Make sure the new mesh is in your Downloads folder, if you haven't already put it there.
Step 4 - Make An Accessory: Open up Bodyshop and make a brand new accessory. To make it easier on yourself, I would suggest choosing an accessory that has only 1 or 2 ages or genders. One age group if you are making a mesh for only adult cats, two if it will be for cats and kittens, etc. That way you won't need to delete unneeded overlays and other resources from the package.
Other than the number of ages, don't worry about anything else. Immediately import the accessory project into Bodyshop, and then close the program.
Step 5 - Clean Out Unneeded Textures: Inside your SavedSims folder should be the new accessory package you just made. Open it, and delete all the Material Definitions (TXMT) and Texture Images (TXTR). The only exception would be if you're making Recolorable Fur Accessories, then skip this step instead and skip step 6 as well. For the Recolorables' case, here is where you would import your recolor. Remember, each fur coat color will require their own recolors of your mesh, which means you will need to make a new accessory in bodyshop for every single fur color.
Step 6 - Link To Furcard Material Definition: Click on the 3IDR resources and let them load. Pick 3IDR, if it has a Resource Node and a Shape listed in the plugin view, perfect. Find the first available material definition line, and change it to the appropriate File type - SubType/Class ID - Group - Instance and delete any material definition lines underneath it.
0x49596978 - 0x08CCE154 - 0x1C0532FA - 0xFF7FC524
It's the same for both cats and dogs for some reason. I also included the "FUBodyAccFlowingFurcards.5tm.xml" in the MaterialDefinitions folder, if you prefer the package method. Repeat for additional 3IDR that have material definitions, ignore 3IDR that don't.
Step 7 - Link Accessory Package to Mesh: If you already know how to link, feel free to jump ahead. While still on the the 3IDRs, pick one that has a Resource Node and a Shape listed in the plugin view. Memorize the chosen 3IDR's instance. I picked the one with an instance of 0x00000801, which is usually the instance for adult female accessories. Click on Tools>PJSE>Body Mesh Tool>Linking Stage. Then select the mesh you made in step 3. Click on any other resource available, then save.
Step 8 - Edit Overlay XML: Click on the XMOL with the same instance as the 3IDR from step 7. As a reminder, I picked the adult female instance of 0x00000801 for this tutorial. Find the family string value, and copy it with ctrl+c and make sure you put it somewhere you won't lose it.
From there, right-click the XMOL and select "replace", then select the "XMOLReference.xmol.xmol" in the main folder. Paste the family value you copied earlier into the new XMOL, then save.
Click on the XMOL again and change the values of any lines necessary. For the Species line use 8 (cats), 2 (big dogs), 4 (little dogs), or 6 (big & little dogs, AKA puppies). For the Gender line use 3 (unisex). For the Age line use 18 (adults & elders), or 20 (kittens/puppies). The Parts line should be 8 or 2 (use 2 for meshes that need to morph and move with the pet's body/face, like the face fur cards). The Category line should be 7, but if they aren't then fix them. Delete the Outfit and Priority line, if they haven't been already. Override0subset needs to say bodyfurcards.
Step 9 - Choose A SubtypexBin: The most frustrating part about pet cc is that they have big limitations. For example, pets can only wear one "collar", and only a small number of custom fur accessories are allowed to be worn at once. You can have as many fur accessories as you want in the game, but if any two fur accessories share the same subtype and bin combo, then they can’t be used together at the same time. Pets can have a total of 10 fur accessories without conflict, but once you exceed 10 eventually some will have to use the same SubtypeXBin combo and thus be unusable together.
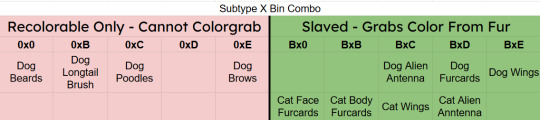
In the XMOL, change the Subtype line to B, if you're making a Slaved Fur Accessory*. If you're making a Recolorable one instead, use 0 as your subtype. Then change your Bin to either 0, B, C, D, or E. Now save.
Depending on your project, I might even suggest you choose a slot already filled instead of a free slot. For example, if you are making a wing accessory then choose BxC (BxE for dogs), or a head accessory that would look terrible with antenna then choose BxD (BxC for dogs), etc.
*There is a way to trick the game into allowing slaved fur accessories to use the 0 subtype. It involves loading the game with the fur accessory as a normal B subtype first, and then changing the subtype after. The game will then use the "old" version of the accessory, but with the subtype permissions of the "new" version.
Step 10 - Repeat Steps 6-9 For Additional Ages/Species: As it says, if you plan on making versions for kittens/big dogs/little dogs/puppies/etc. Have all of them share the same family, so that way they are all connected and can be passed down to offspring.
At the end, each XMOL should roughly resemble this, but with whatever their appropriate values are:

Don't forget to make sure the override0resourcekeyidx is correct for whatever line the material definition is in the 3IDR! ("4" means the 5th line, etc. The first line is number "0", so count the lines then minus 1.)
Step 11 - Delete Cache/Thumbnails/Registry: To quote @angelapleasant who worded it perfectly, pet cc is sticky. The game frequently gets stuck on old versions, and has to be forcibly updated. This stickiness is exactly yeah the subtype loophole mentioned earlier exists, but it can be very frustrating when testing new cc. In your game folder delete the Accessory.cache, Group.cache, cigen.package, ContentRegistry, and Thumbnails folder. Make sure AccFurCardsTextureOct2018.package is in your Downloads folder. Then load up the game, and check out your custom fur accessory.

If it all worked out, congrats! For Dogs if you mapped onto the tiny rectangle, then slaved fur accessory will appear gold with Maxis fur colors but custom colors will work just fine. Recolorable dog accessories on the other hand will require my MaxisAccFurDogFix to work.
I think that's everything, and good luck! Feel free to ask questions or reach out, I'll do my best to help. And if you do wind up making something, please let me know; I love seeing what people create!
87 notes
·
View notes
Text
Famous Steddie Au Recs
Important: READ THE TAGS! Also, leave a comment and kudos! These fics are amazing and I love them and I hope y'all do too 📸
Help I'm Alive
ChaoGarden
Eddie reached a hand out and gently tucked his fingers under Steve’s chin, tilting it upwards and turning Steve’s face just a little to the side as he observed something on Steve’s face with a look of intense speculation. Steve couldn’t say for certain, but there was almost a tiny bit of anger there just along the edges, like he was stifling away anger at whatever it was that he was looking at.
Surely he wasn’t looking at the-
“Somebody put their hands on you, sugar?”
Words : 65,581 Chapters : 9/9 Rating : Explicit
AO3 : x
Somebody To You
tears_for_years
@ bisexual_disaster: i would let eddie munson make me bark like a dog
Words : 4,714 Chapters : 3/3 Rating : Teen and Up Audiences
AO3 : x
you smile that beautiful smile and all the girls in the front row scream your name.
antithetical_dreamgirl
Eddie has three major rules when it comes to working with celebrities: 1. don’t flirt with the talent; 2. don’t hang out with the talent; 3. don’t, under any circumstances, fuck the talent.
He’s had enough rockstars’ managers kick him out of hotel rooms after waking up to an empty bed with cold sheets to have learned his lesson ten times over by now.
He doesn’t even think of adding a fourth rule: don’t fall in love with the talent. Has never even come close to needing a rule like that. Not until he meets Steve Harrington.
Words : 4,510 Chapters : 1/1 Rating : Teen and Up Audiences
AO3 : x
Consensual Catfishing
foresthearts
When Eddie gets a message on instagram from an account claiming to be the famous pop-star Steve Harrington, he knows immediately it's a catfish. He's not dumb. The account has no pictures and people like Steve Harrington don't just randomly DM guys like Eddie.
Still. What would be the harm in letting it play out? It's not dangerous if he knows he's being catfished. No, if he knows about it, then it's basically like a fun little roleplay. No harm, no foul.
Words : 32,108 Chapters : 4/4 Rating : Mature
AO3 : x
abstract
a_little_unsteddie
The break-up had been messy, and long overdue by the time it happened; Eddie had spent the better part of two years avoiding everything in the news including Steve's name, half convinced that Steve hadn't ever loved him at all. So, why was Chrissy sending him an interview that Steve had done at some talk show?
Words : 1,107 Chapters : 1/1 Rating : Teen and Up Audiences
AO3 : x
the night breeze carries something sweet
asbealthgn
Eddie is used to getting recognized in public, but it doesn’t mean he likes it.
That is, until the most beautiful man he’s ever seen in his life sits in the seat next to him, unfurling a giant map that easily shields both of them. Eddie’s fucking savior.
“Hey, you wouldn’t happen to know how to get to Japantown, would you?” the guy asks.
Words : 4,898 Chapters : 1/1 Rating : Explicit
AO3 : x
Your Life, Framed on the Wall
orphan_account
A scrapbook of interviews and articles following Eddie Munson’s rise to fame as the frontman of Corroded Coffin, and his relationship with one Steve Harrington.
Words : 9,379 Chapters : 9/9 Rating : Teen and Up Audiences
AO3 : x
Make Them Feel It
camouflagedlove
Steve Harrington has acted in many romance movies over the years but finds himself yearning for that same kind of love in real life. He struggles to make those connections but feelings start to boil up for him when his co-star, Eddie Munson, wants to rehearse the love confession scene from their movie. It's just a scene...isn't it?
Words : 2,835 Chapters : 1/1 Rating : Teen and Up Audiences
AO3 : x
We're Going The Distance
stevelovers
Steve doesn't know where Dustin got this little idol crush. After seeing world famous Olympic Gold Medalist “Medal” Munson- a geek who has set world records in snowboarding, he begs Steve to take him and the kids to watch him compete in an amateur charity tournament at Mad River Mountain’s Mad Dog snow race. Too bad he's a complete asshole.
Words : 14,732 Chapters : 1/1 Rating : Teen and Up Audiences
AO3 : x
i'll find my soul as i go home
oakenorcrist
Eddie Munson has had a rough go of it -- broken-hearted and uninspired, he decides to leave everything behind in San Francisco and spend some time with his uncle in a small town in the mountains. Little does he know that there he will find not only the peace and rest he's so desperately needed but also everything he never knew was missing from his life up until this moment.
Words : 31,868 Chapters : 5/5 Rating : Teen and Up Audiences
AO3 : x
279 notes
·
View notes
Text
Anonymous asked: I have a few questions as an aspiring writer and a current fanfic writer who publishes.
Okay! But if you write fan-fiction, you're already a writer! I'm guessing you mean an aspiring author? ♥
How would you help with distractions and writer's block? I try to dedicate myself to writing, but then I wander off to other stuff and my motivation wanes.
This is not uncommon and there can be a lot of different reasons for why it happens. Understanding the reason behind why it's happening is important for knowing how to fix it. I have a couple posts that will help with this:
5 Reasons You Lost Interest in Your WIP, Plus Fixes!
Feeling Unmotivated with WIP
Writer’s Block
How do you advise me outlining a huge original story plot with world-building in an organized way that isn't just scattered?
Outlining is really just any method that helps you get all the important pieces of the story out, in order, so that you can use it as a reference while writing. Some people use one big beginning to end summary. Some people like scene lists or timelines. Other people like scene cards or mind maps... Different things work for different people, so part of the work you need to do as a writer is figure out which method/methods work best for you.
I often find, though, that the struggle people have with outlining is less about what method to use and more about how to actually fill out the details, which brings me around to plot and story structure. All stories have structure. Fan-fiction is often short, character-driven fiction, which gives it a different structure from the average novel. That said, even if you're a prolific fan-fiction writer, you may still need to take some time to learn about plot and story structure. I'll link a few posts that will help, but once you understand story structure (all the specific plot points a story should go through), it becomes much easier to know how to outline it.
Guide: How to Outline a Plot
Guide: Starting a New (Long Fiction) Story
Basic Story Structure
Beginning a New Story
How to Move a Story Forward
Plot Driven vs Character Driven Stories
Understanding Goals and Conflict
What advice would you give for writing fictional religions and mythology?
First and foremost, it's important to understand the role religion and mythology play in your story... how do they feed into your characters' beliefs? How do they influence your characters' actions and behavior? How do they guide the forces of power in your story's world? How do they impact the story's conflict/s and plot? Ultimately, you don't want to put a lot of time into creating and fleshing out a religion or mythology that's ultimately unimportant to the story. It helps to focus most on the aspects that truly matter.
Also, you might consider using real world mythology and religions as inspiration... just be careful about cultural appropriation. It's best not to use anything that belongs to an active culture or religion unless it's yours, or unless you do intense research and consult with sensitivity readers to make sure you don't do anything harmful.
And lastly, what sources do you recommend to accurately describe buildings (especially castles and manors) battlefields, geographical locations especially when it comes to mountains and rivers, etc), dresses and clothing especially if it isn't modern, and fighting techniques that are believable (for example, how a smaller woman would fight a larger man without being unrealistic)?
1 - Find Inspiration Sources - No matter when and where your story is set, it's important to find inspiration sources for the places in your story, whether that's buildings, towns, regions, whatever. Not only will this help you imagine and describe what you're envisioning, it will help you immensely with research on specific details.
2 - Time and Place Are Important - Many descriptive details are specific to time and place, so make sure you know that about your inspiration sources and/or the elements in your story. You can do a Google search for layout, architecture, and design (along with relevant location and era information) to find the details you need. For example, "medieval European castle layout" or "Victorian era manor house architectural details." Likewise, you can look for "Tudor era menswear" or "Victorian era dress details."
3 - Fighting Techniques - This again will tie into the time and place when your story is set. However, some fighting techniques will be somewhat timeless. I would strongly suggest heading over to @howtofightwrite for the best information and resources about portraying fighting techniques in writing.
Happy writing!
•••••••••••••••••••••••••••••••••
I’ve been writing seriously for over 30 years and love to share what I’ve learned. Have a writing question? My inbox is always open!
♦ Questions that violate my ask policies will be deleted!
♦ Please see my master list of top posts before asking
♦ Learn more about WQA here
86 notes
·
View notes
Text


Today is one of those days that should be a really relaxing sort of day but instead is stressful as fuck for me. See, it's a Friday in the summer, a time that is notoriously slow for me at work which is great, it means one of two things, I can either catch up on work or if I am caught up I can get paid to basically relax and be there in case something catches fire and I have to put it out. Today is the later kind, which is great for me. Every day like that might drag eventually but I love a good day I get paid to entertain myself. Because I can entertain myself. But instead today has been a day where I just want to scream, "Leave me the fuck alone". Just coworkers constantly pestering me, not because of work related things but because they are bored. And here is a universal truth, if you are bored it is because you are boring. Some people might think that is harsh but those people can choke on a dick and die for all I care, you are clearly upset because you're boring and uninteresting and so why the fuck would I care what you have to say. People like you think it's my job to entertain people like you. It's your whole fundamental flaw as a human being, you think entertainment is something that happens to you. You think the structures of the world exist for your benefit, that you exist to be catered to. Get off your ass and do something. We have an entire world full of things you can do for entertainment and in the model world a large number of them are at your finger tips. Learn a new language, read a book, play a game on your phone, research a topic you have always wondered about, plan out your weekend, plan out your meals for next week, organize a private film festival for you and your friend, map out the perfect hike, figure out where you want to stay on your next vacation, look into the issues you find most important in the coming election and how you can support the change you want to see, listen to music, listen to a podcast, count the ceiling tiles in your office ceiling and then figure you what different geometric patterns you can create in them, think about how you would fight off a band of futuristic pirates if they stormed your workplace and all you had was a stapler, think about how you'd impress Natalie Portman if she was lost and needed directions, think about the perfect meal you'd make for a loved one, write a poem, write really hacky porn, sit and look at the wall and allow your imagination to take you where it is. Like, legitimately, engage some level of intellectual curiosity instead of being a tired dullard. Holy fuck, quit making your dull, one dimensional existence everyone else's problem. Since I started writing this I had to check teams three times to see if there was something important going on or if, as was actually the case, someone was bored and needed entertaining. Literally one was, "It's so slow today, I'm bored". Anyway, here is Olivia Dunne, who I have no idea how well she entertains herself. She is a high level athlete in a discipline that you have to start young so I doubt she sits around whining about being bored but maybe she does. Who knows. Today I want to fuck Olivia Dunne.
52 notes
·
View notes
Note
so like. what is majora's mask about (is one of like 3 people who's dodged it on the internet somehow)
ohHO you’ve made a mistake
the basic gist of it is that the moon is about to crash into the earth and you have 3 days to stop it. nevermind being physically or cosmologically realistic that’s not important right now but Moon’s Haunted. not normal moon evil moon. it’s all the work of this like chaos deity or w/e named majora who’s working through this little imp kid known as skull kid bc of the haunted mask he’s wearing. how do you stop the moon from falling? easy. awaken four giants and get them to literally hold up the moon. push that thang back into the sky. did i mention it’s freaky and scary btw. not normal moon.

btw there’s a clock at the bottom of your screen perpetually ticking and at the start of each day you hear a bell tolling which is fun. it’s where these memes come from!


here’s the thing though. you cannot possibly realistically do all of this in 3 days. not unless you’re a hacker or speedrunner who’s built different. so what can you do? well as a matter of fact you can play a magic song on a magic instrument that resets time to the beginning of the 3-day cycle. and you can do so anytime! so yay you can just reset infinitely!!

except that comes with a price. only certain parts of your progress get saved through your time-meddling. you lose most things- money, common items, dungeon quest progress, npc questline progress- when you reset time. if you’ve completed a dungeon or earned a mask (collectibles which you put on to unlock special abilities) those remain in the new timeline but other than that a reset is a reset. so you have to be careful you’ve seen a quest all the way through before going back through time. if you find yourself running short on time but you aren’t done with something you’re either going to have to scrap that precious progress and play the song and try again orrrr let the moon fall and game over lol. so it’s really like. your time is simultaneously infinite and limited.

^uh oh sisters!
you can help the people around you, all of whom have rich inner lives and great characters (in reference to both the main quests and the many incredible side quests which this game is known for), and you may get to keep the fruits of your labor from each endeavor (the magic masks you get, or weapon upgrades, or like. the giants being awakened), but then you reset time and their problems come right back to them. and you know that there’s nothing you can do for them because you simply do not have enough time to do all of this in 72 hours so one way or another you have to abandon almost everyone. you get all the material progress you need but in terms of the underlying story you just have to move on through life with the knowledge of all that suffering…
oh and did i mention the part where the moon is falling??? yeah that’s like. on top of the other personal problems people already have, some of which are related to skull kid’s other mischief and some of which aren’t. the moon. it is always hanging above you

yeah people around town aren’t ignorant of that. some people panic. others are in denial. some people are convinced that if they just do this and that it’ll all be fine. there’s a somewhat political aspect to the arguments in clock town (the heart of the game’s map) where some people are insisting they’re in danger and the mayor needs to order an evacuation and some people saying hey shut up don’t be silly! are you really gonna distract us from our super special carnival we’re about to host? you’re just trying to control people with your conspiracy theory! it feels a lot like a sociopolitical commentary on how different people react to crises. panic, acceptance, denial, trying to take control, drinking away your sorrows, embracing it, still holding onto hope, etc
but by day 3 nobody is denying it anymore. there’s just pure dread. not even evacuation is gonna save you because let’s be real the entire planet is done for. straight up it is the end of the world and there’s nothing anyone can do. you can’t fight the moon. the giants are the only hope and link is gonna fix everything but it’s not like the people of termina know that. so like the apocalyptic, despair-filled atmosphere is heavy. masterpiece of storytelling tbh
a few more things to mention:
-most of your masks are just optional quality of life upgrades or stuff for one very specific sidequest or just a trophy etc. but the main mechanics of the game involve transforming into the other races of hyrule- aka you can become a little tree guy, a fish guy, and a rock guy, by equipping the proper mask. as a matter of fact you start the game by having skull kid mug you and then like curse you into becoming the tree guy so you get to have a body dysmorphia moment for the entirety of the first 3-day cycle before you can break the curse and change freely. oh but fun fact about those masks. yeah those are inhibited by the souls of real actual people of those races who died tragically and their loved ones don’t know they’re dead and they’re convinced you are them. yeah.
oh btw if you get all the masks you can trade them in at the end to unlock a new transformation mask (implying you’re channeling some new mystery spirit. oh boy) called the fierce deity mask and it’s insanely powerful and makes short work of the final boss and we know nothing of the fierce deity’s lore which is a little scary. yippee!!!
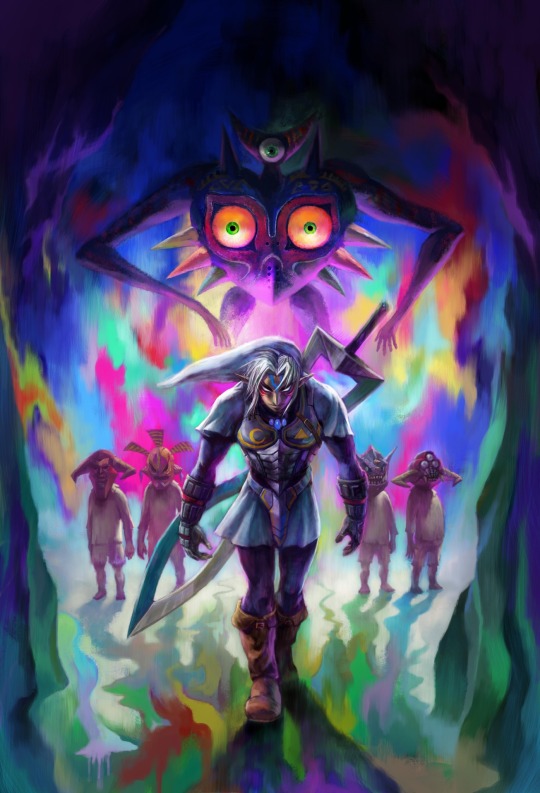
-just in general both games (this is strictly speaking the second of a duology) very much have the recurring juxtaposition of childhood vs adulthood and the traumas of both. the plot of the first game involves being suddenly aged from 10 to 17 (you’re put to sleep for 7 years instead of being oh idk trained or something) and you just have to adjust to life as a child in an adult’s body. (and they’re like ‘wow cool congrats on being a grownup! :D’ as if that isn’t horrifying) then at the end just as you’re getting used to it you’re forcibly returned to being a child and now you’re an adult (kind of) in a child’s body. as a child you’re belittled and as an adult you have people making demands of you that you aren’t ready for and you’re both and neither. but now you’re definitively a child and get to have your childhood back right? yeah no. there’s no going back home anymore after everything that has happened. also one of your last remaining friends just left and now you’re trying to find her desperately. that’s the context going into majora’s mask.
-skull kid himself makes me sad because he’s not even evil he’s being controlled by majora. he is mischievous absolutely and it’s still partially his fault of course but the real him would never do all this. he ultimately just wanted friends and attention and fun and it manifested itself in a bad way (kinda reminds me of ventus in khux with about like 20% more culpability…). you get to be his friend afterward plus his two little fairy friends so yay! gotta say goodbye though.
-the two fairies are a brother sister duo. the sister (tatl) gets stuck as your companion bc she took the time to stay back and bully you extra hard at the beginning of the game and accidentally got separated from the others lol. by the time you catch up to them she wants to stay with you anyway. her brother (tael) stays with skull kid but like he isn’t evil he provides valuable intel to you but he’s just loyal to his friend. anyway tatl warms up to you which is nice and i adore her… but of course you have to say goodbye to her too :(

^child link and tatl the fairy (tatl and tael together sound like ‘tattletale’ referencing the theme of childishness)

^skull kid (wearing majora’s mask) and tael the fairy
so in short to summarize the vibes:
what if you were a terrified lonely child experiencing layers upon layers of dysmorphia and trauma searching for your last friend and a giant moon with a face was about to fall and crush the earth and you alone were the only person who can save everyone by reliving the same three days over and over again, racing against the clock each time, making new friends and solving problems only to have to toss most of it down the drain with each reset, witnessing the fear and dread around you, feeling the weight of the world on you… just. man. lemme share some music too
. x this is the clock town theme. bright and cheery on day one, kind of hollow on day two (it rains that day), by day three it sounds frantic with an ominous undertone. denial and panic etc
x this is the theme that plays between midnight and 6am on the last day (fourth day i guess? the cycle starts at 6am on the first day so the last 6 hours before the dawn of death are technically a fourth day). at this point there is no denial in the world and this track plays everywhere in the world at that time. the world is ending. this is such a masterpiece of a somber track i found the best version i could that included the clock tower bells
x theme that plays when you finally summon all four giants to epically stop the moon after heaven knows how many cycles. no more smug skull kid no more despair it’s time!! baby!!!!!!
x this is the song of healing, another magic song that helps undo corruption in various forms throughout the game (it’s taught to you by a shady weird fellow known only as the happy mask salesman. love him.) it’s such a beautiful track that really kind of symbolizes the heart of this game- yeah it’s dark and scary and chaotic but at its core it’s about healing and hope, recovering from trauma, learning to live again… link manages to do it!!! he saves the world! and while he doesn’t stay in clock town he has a good time with his friends while he’s there. he gets to breathe for a bit. not every problem can be fixed but there is a new tomorrow nonetheless. acknowledge the hurt and work through it. gorgeous
have i said enough words yet. (watch someone) play majora’s mask please
#asks#theforsakenprince#majora’s mask#this is long but i have no regrets. GOUH i have so many feelings#now compare this against what we said about kh4#edit: deleted the paragraph of the thing that i can’t remember if it’s canon or just fanon lol#edit: sorry last 6 hours not 12 hours. the moon crashing into the earth happens at 6am on day 4#writing this took me like 3 hours it was like 1am when i finished lololol
69 notes
·
View notes
Note
I'd looove to hear a little about your worldbuilding process if you don't mind sharing. How do you go about it? I know you have shared in a few posts already but just wanna know moree. Also where did it all begin? What inspired you? (eating it all uppp!!!)
hi!! I know I wrote a big long thing like last year or the year before about the process to making a setting but I cannot be arsed to find it rn so here's some disconnected thoughts
Overall I don't really make Headworlds or Worldbuilding Projects the way a lot of people do (which is why u keep hearing me say 'setting' over and over) because mainly what I make are stories in the order of characters -> plot -> world. those three things have to serve one another in that order of importance, so the world itself bends to serve the narrative. for example, ultimately idgaf where the holy beasts' skeletons come from, that is not important because the beasts are basically just a big plot device to serve the story. i can make some post-hoc justifications for their existence (and i did) but at the end of the day it will not and does not matter how they work or where they come from. the world is full of mysteries that will never be solved because the characters are not in a position to solve them. aside from a single border conflict, the world outside the mezian empire is nebulous and unimportant.
I don't enjoy working in a world -> narrative order because what I want to produce isn't just a series of info posts or artpieces about a setting, but a closed and self-contained story which is the justification for the entire world's existence. Headworlds that are all world and no character don't interest me.
So basically in the process of worldbuilding, I have to serve the story. A while back I made a post about continental history around Inver, all these wars and occupations and schisms and so on. All of those exist solely to provide a particular political climate, justification for Aquitan's theocratic structure, and the spread of the southern church north into Inver. I already had the idea of this church, that it would be integral to the country as a main political faction, so now I have to figure out how it got there and the political ramifications of that. It's all worldbuilding for sure, but it's a support structure underneath the story about how that church eventually changes world history, because i wanted to write a story about a church lol.
I guess if I wanted to explain The Process for a world -> characters setting i'd just be giving you How To Write A Story 101 lol. But basically: I think of a concept which interests me (big mechs yay). Then I think of a conflict that might arise (where does the fuel come from? who controls that supply? what might that do to the concentration of power in this area?). Then I put a character in what I consider to be the most interesting position to observe the effects of this conflict (a knight, an enginesmith, an exile), and honestly the main plot generally writes itself after that. I extrapolate the hook from that.
In terms of characters, I try to avoid calling them 'ocs' because in my mind 'oc' tends to be a very static stand-alone thing. Like I couldn't make a useful ref sheet of my characters because they are all changed by the story. I couldn't say 'he has a carefree personality' because in a few chapters no he fucking won't. in the same way i struggle a LOT to talk about my Siren setting which as close to a specbio 'headworld' as i'm ever gonna get, because I am worldbuilding in vastly different time periods at once in a world which is always changing, i can't make a post about for example a map of Siren because that's just a map from one era, I'd need to make a dozen maps to show how things change, how time affects it all, etc.
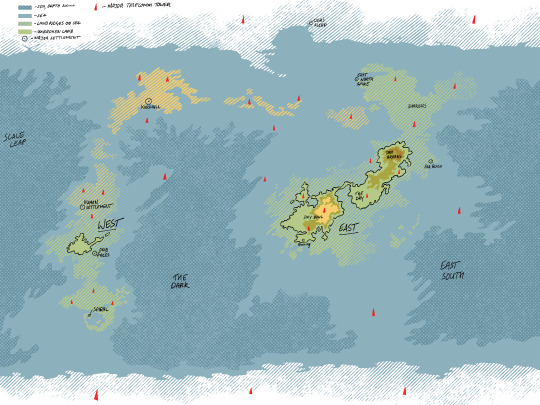
Because nothing is ever static and everything is in flux, pretty much the only way I can handle a setting like this is, again, just to focus on a few small stories centered around a cast of characters separated by time (i have... 4 distinct stories in Siren. maybe more). this is actually a frustrating barrier to me sharing any information at all about this place lol i'm the struggler
Where did it all begin? When I was 11 I used to write stories in my copybooks in class. There has never been a time where I was not making stories and where my stories were not the only important thing at all to me, superseding literally everything else. I learned how to draw digitally in 2011 because I wanted to draw my characters.
What inspires me? Everything lol. I actually don't have time to Consume Media much, I struggle watching movies or tv and I mostly hate video games because I would much rather be productive and sitting and watching a screen feels like a waste of my time. but I like reading books because I can take them with me on my phone. I get ideas from all sources but mostly non-media sources, like obviously mythology but also my history with the church and my scientific education. Usually nonfictional sources interest me the most (i was going to write a whole story that was a post-apocalyptic plague plot based on canine transmissible venereal cancer haha and even to this day that's where "the Immortal Hound" title comes from, little easter egg in inver)
96 notes
·
View notes
Note
about the tutorial: just one about dark scenes in general would be great :)
sure :) here's a tutorial on how I work with dark scenes:
before we start, it's important to mention that working with dark scenes is so much easier when your video/ screencaps are high quality. I personally refuse to gif dark scenes unless I have 4k quality footage lol.
my general coloring tutorial is here in case you want check it out!
alright, let's start! after resizing and sharpening my gif, here's what we're working with:

STEP 1: levels. I use the pipette tool to select the lightest and the darkest parts of my gif, it's a great guide that helps to neutralize the overpowering color:
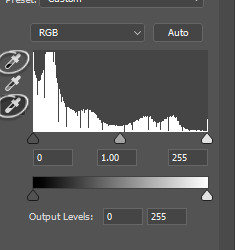
in this case, the lightest part is the little white dot in the corner of his eye and the darkest one is around his hair (if there are many dark shadows in my gif, I just click on a few darkest looking spots and see how it adjusts the coloring and lighting of the gif and just pick the one I think looks the best). basically, this layer is a good guide on how to make the overall look more natural if there is one obvious dominant color and we want to get rid of it (for example, my gif has quite a lot of blues, but it's not too crazy, so I won't need to adjust that much):
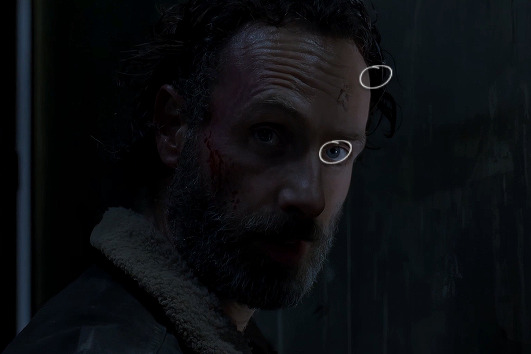
and this is what we've got just after using the levels adjustment:
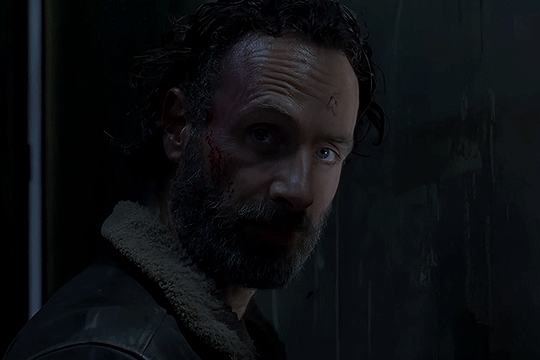
the gif is lighter and the blue was reduced a little bit, the scene now has more green and red undertones. sometimes I mess with the settings myself if I don't like the way it looks, but in this case I'm pretty happy with the automatic adjustments and I didn't even have to do that much!
STEP 2: curves. I do the same thing that I did with the levels, using the pipette tool to select the lightest and the darkest parts and also pull the rgb curve to the middle to brighten my gif even more:
and here's the result after setting the curves layer opacity to 37%:
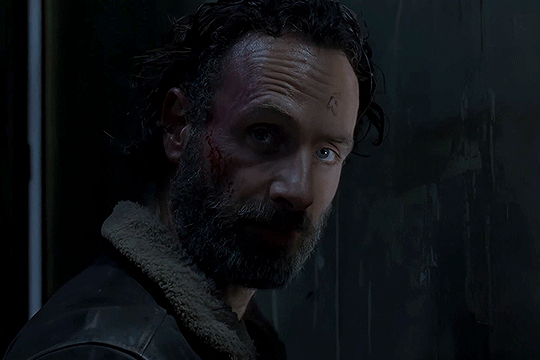
STEP 3: brightness and exposure layers. next up, I just want to brighten the character a little bit more, but not the background, so I'm adding a brightness/contrast layer and an exposure layer, here are my settings:
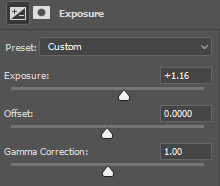
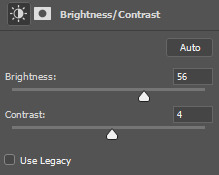
but since it adjusts the whole gif and I don't want that, I select the mask on my brightness layer and pick the eraser tool. I erase the part of my gif that I don't want to be affected by this adjustment, I colored that part bright pink so it's obvious:
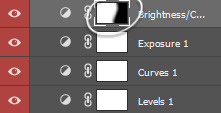
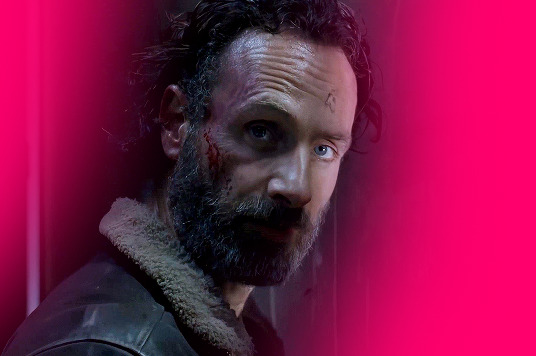
and then I do the same with the exposure layer.
in my gif the character is not moving that much, so it looks pretty natural when I brighten just him. here's where we're at:
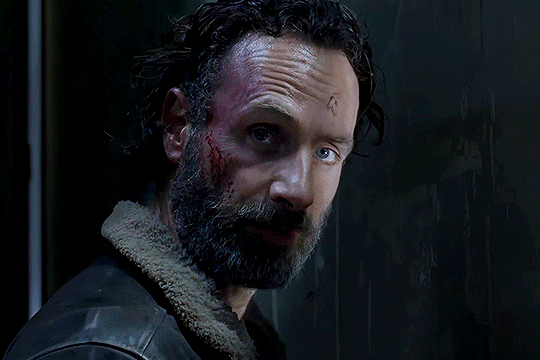
STEP 4: selective color and gradient map. I'm happy with how bright it is, but I do want to deepen the shadows here and just mess with the coloring itself, so next up I'm gonna use a couple more layers.
here are my settings for selective color layer, opacity set to around 40%:
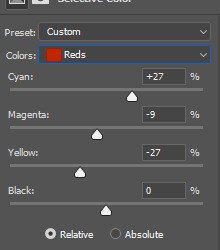
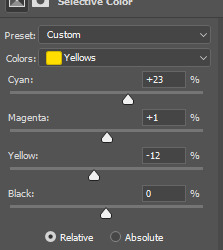
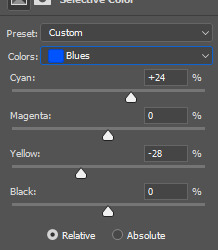
and here are my settings for a gradient map to deepen the shadows:
and here's the result:

ADDITIONAL STEP: I sometimes like to add another layer and just put some soft color gradient to one side of the gif.
in this case I used a soft blue color, set to lighten, 62%:
I'm not very good at tutorials and I put this together pretty quickly, but hopefully this was somewhat helpful, let me know if you have any questions! <3
138 notes
·
View notes
Text
Notes on the World Map: Melini
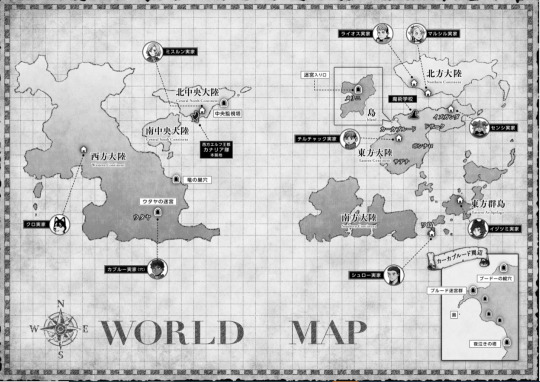
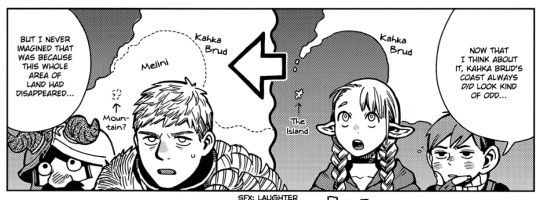
I'm kind of annoyed the complete World Bible doesn't have a version of the World Map with Melini filled in... unless it does and I missed it, but I literally bought it and looked at the relevant pages for this post! Anyway, I think this is the closest we have. I'm looking at this and -- Kahka Brud literally doesn't have a coast anymore. No wonder they're pissed!! Any industry involving the sea, trade, fishing, etc. is basically impossible now - you'd have to get to the coastline on the west side of the continent. That's probably miles!
Speaking of miles... how big is Melini?
This is where I got... really unwell. So first off, let's assume the official Dunmeshi World Map is a Mercator projection. I think the stage cartography in the Dunmeshi universe is at, it's going to be most important that maps are useful for marine navigation. So we can't just drop an approximate scale onto the grid and leave it at that; we have to work out where the equator is.
The way I've done that is via two places that seem like they have a close(ish) real world equivalent - in terms of climate and culture - Utaya and the Island of Wa (Toshiro's home). The Island of Wa is obviously Japan, and I've seen plausible arguments that Utaya is probably a climate/location similar to Nepal.
So, here's the (approximate) location and latitude of those places on a Mercator map of Earth:
If we arbitarily superimpose the two maps, asssuming they're the same size, we can draw a theoretical equator line that puts the two places at the same latitude, though on a different side of the equator. Putting them on the same side as Earth made the equator really low. I feel like that's ... unlikely, so we're going with this.

That puts Melini at a rough latitude of .. ~55? which would, using the same scale as the previous map, make two squares (at that latitude) about 600 miles. Very roughly calculating the size as given on the map based on that, that gives a width of (approximately) 250 miles and a length of 400, coming in at a bit less than 100,000 miles² due to the shape. Probably it's between the sizes of the UK and Aotearoa.
That really helps me visualise what Laios is working with here when I think about post-canon. Though I reckon what I've done here is "Just enough research to really annoy an expert". Sorry if you're that expert. I really don't know much about cartography <3 It's like that xkcd comic:
On distances, as someone who lives in the UK; with a car, you can get almost anywhere in a day if you're prepared to drive until late. But they don't have cars, so getting from one end to the other would take multiple days of travel. It'd take about 7 days to walk the approx "length", 400~ miles (from the top of Scotland to Liverpool) (according to Google Maps) and 2 days cycling, so probably 3-5 days with horses, depending on how you pushed them. That'd vary a bit depending on terrain, of course.
#og post#dungeon meshi#dunmeshi#world map notes#dungeon meshi meta#melini#if anyone DOES have the knowledge to work this out better than i have#please do! please tell me the answer!#but i just couldn't rest until i had an approximate area to work with#when i'm imagining the characters dealing with administration of remote territory#populating and partioning out land; crop failures and ensuring central storage of grain and other staples; collecting taxes and so on#kahka brud is literally a port. this is such a diplomatic nightmare. lmao. not even getting started on the monsters!#good luck with that kabru honey#dungeon meshi manga spoilers#dunmeshi spoilers
77 notes
·
View notes
Last Seen Blogs

beautifulrecipetofallinlove
here comes the sun :)

fan4infinity
Fan4infinity

sweetd3lights
'Imagination will take you Everywhere'
yurnu
🍃Nenúfar🍃🇦🇷
plusultraspecial
All Might, symbol of sweets!!