#mpeg streamclip
Text
was reminded recently that this month is the 10-year anniversary of my Leverage vid Parachute, aka one of the most popular things I've ever made. Happy ten years to this vid! I still adore this OT3.
youtube
AO3 link if you wanna kudos/comment after all this time 💜
a few making-of reminiscences about this vid below!
The sound of Parker's parachute snapping in the wind, at the very beginning, was from freesound.org, and one of the first times I put non-source audio in a vid! I love how that little sound takes you into the soundspace and focuses you on the central metaphor of the vid.
This was also one of the first vids where I edited the music in a levelling-up kind of way. I had cut songs before to make them shorter for vidding, but in this one, I needed to add more song—to make the transition from Parker/Hardison to Eliot have more space to breathe. So I copied the instrumental section from elsewhere in the vid and copied it to create some space between the chorus and the verse introducing Eliot.
I accidentally clipped a WHOLE BUNCH of Leverage in the wrong framerate for this vid? This is back when I was using MPEG Streamclip to make clips for vidding, and I input the wrong framerate. As a result a bunch of clips had extra frames that I had to cut out by hand (reclipping would have taken too long—this was in the last gasp days of using MPEG Streamclip when it would chug and huff away for ages to make a clip, because the footage was getting too big for the program OR my computer to really handle easily).
There's one shot of Hardison that I wish I'd colour-corrected (I colour-corrected some stuff in this vid but it was before my era of being super into colour correction). He's way too green! I notice it every time! Poor green Hardison.
Making this vid really taught me about how important it is to know what kinds of shots you've got and how to spend them—in order to create the OT3 in the vid, it's essential to withhold shots of the three of them in the same frame till almost the end. It's twosomes, twosomes, twosomes, up until the end when SUDDENLY you get these fabulous shots of all three of them in frame and it's such a RELIEF to see that. It's not like, a shot of the three of them in bed together or anything, obviously I didn't have that footage (Leverage Redemption, lookin at you) but the fact that those kinds of shots are withheld throughout the vid and then lavished on the viewer suddenly creates a feeling of something snapping into place, I think, that you wouldn't have otherwise.
When I was vidding the Parker/Eliot section, I struggled a lot, because they had the lyric "hand behind my neck/arm around my waist" and I was looking and looking for stuff where they touched, but the interesting thing about them is that they DON'T touch much, Parker just doesn't touch people who aren't Hardison very much, and the vid flowed much better when I gave up on matchy-matching that lyric that was literally about touch and instead showing the moments where Eliot is helping and respecting Parker (eg teaching her to fight, giving her a boost). Sometimes the lyrics should be disobeyed!
I loved making this vid so much that I made another vid right after it, using some footage that I hadn't used in this vid because it was a little too slow or too sad, and I love that vid too but it gets less attention. Anyhow if you like Parachute and you read all this way, please enjoy my other Leverage OT3 vid, which is called "too peculiar for love."
357 notes
·
View notes
Note
You just broke my heart in so many pieces, no way mpv (the one that doesn’t glitch) isn’t compatible with newer mac updates 😭😭 i used to use Adapter and i also used mpeg streamclip if i’m not mistaken
omg i completely forgot about mpeg streamclip 😭 i used mplayer osx or whatever it was called for an embarassingly long time even though it had been abandoned by its developer YEARS ago... and before that i exclusively used vlc player to video record and transform frames to layers (which took literal ages on my old intel mac)... dark dark times indeed
and yeah i was thankfully just able to fix the config and get mpv to screencap properly! but it's kinda crazy that in 2023 (nearly 2024) it's still such a pain in the ass to find a decent media player that screencaps frames or even just plays content (in HDR no less) especially for macos.
and the fact that 1080p is still used/considered the standard for a lot of youtube videos and streaming services too is so weird to me, even though i get the logistical/business reasons and that the majority of users can't really tell the difference. but to me it's so easy to distinguish 2160p from 1080p, so it's always bothered me.
#not to go off topic lmao. but i could rant about that forever!!! uhd 4k should be the standard imo#it's so weird to me that the majority of movie/tv trailers are still uploaded in shitty 1080p quality#💌 answered 💌
1 note
·
View note
Text
How to Change the Creation Date on a Video
If you’ve ever filmed a video on your phone, you know that the creation date is automatically set to the day that you filmed it. But what if you want to change the creation date? Whether you’re trying to make a video appear in chronological order on your phone or upload it to a specific album on social media, there are a few ways that you can change the creation date of your videos.
Keep reading to learn how to change the creation date on a video using an iPhone, Android, or computer.
How to change video creation date
There are a few methods that you can use to change the video creation date. The first is to use a video editing program like Adobe Premiere or Final Cut Pro. With these programs, you can simply change the date that the video was created. Another method is to use a file conversion program like Handbrake or MPEG Streamclip. These programs will allow you to convert the video file into another format which will often reset the creation date. Finally, if you have access to the original camera files, you can usually change the creation date directly on the camera itself.
Why you should change your video creation date
If you’re anything like me, you have at least a dozen videos sitting on your phone that you never post. Why? Because they’re not perfect. The lighting is off, or the sound quality isn’t great, or you just don’t look your best. But here’s the thing: no one’s videos are perfect. And if you’re waiting for perfection, you’ll never post anything. So today, I’m going to tell you why you should change your video creation date and start posting those videos!
The first reason is that it will force you to be more spontaneous and creative with your content. If you only have 24 hours to film, edit, and post a video, you won’t have time to overthink things or worry about making mistakes. You’ll just have to go out there and do it! As someone who tends to overthink everything, I can tell you from experience that this is a good way to get yourself out of your head and into the moment.
The second reason is that it will help improve the quality of your videos over time. As with anything in life, practice makes perfect. The more videos you make, the better (and faster) at editing themyou’ll become . And as your skills improve , so too will the overall quality of your video production . Finally , changing regularly setting a newvideo creation date challenge for yourself will keep things interesting both for yourself as well as any viewers who tune in regularly to watch your content . So next time basketball season starts getting stale , try switching up filming schedules and see how it shakes things up !
When to change your video creation date
If you’re like most people, you’ve probably watched a video that was clearly not filmed recently, but still had a relevant message. You may have even shared it with your friends, thinking it was new. But how old is too old? When does a video need a date change?
There are different schools of thought on this matter. For some, any video over six months old needs to be updated. Others believe a year is more appropriate. And there are those who say two years is the limit. Obviously, the time frame depends on the topic of the video and how quickly things change in that industry.
Some factors to consider when deciding whether to update the creation date on your video:
– How often do changes occur in your industry?
– Is your video about evergreen content or something that will go out of style?
– Was the information in your video accurate at the time it was filmed?
– Would changing the date make viewers think less of your company?
– Do you want people to know how current your company is?
As technology advances and our world gets faster paced, outdated videos can make companies look bad. If someone watches an educational series from two years ago and sees out-of-date equipment or practices being used, they might question if they should really be following along with what’s being shown. The same goes for product demonstrations; if customers see that you’re using an older version of their would-be purchase, they might wonder why you haven’t upgraded yet – making them second guess their own decision to buy from you
How changing your video creation date can improve your online presence
If you’re looking to improve your online presence, one thing you can do is change the date of your video creations. Why would changing the date improve your online presence? Well, fresh content is always king and by changing the date of your videos, you’re essentially giving them a fresh start. If you have videos that aren’t performing well, this is a great way to give them new life and get them in front of more viewers.
Additionally, if you have a lot of old videos on your channel that never got much attention, changing their dates could help them show up in search results more often since YouTube favors newer content. And finally, if you want to create an artificial sense of urgency around your content (to get people to watch it before it gets buried), then setting an earlier creation date can help with that as well.
So if you’re looking for ways to improve your online presence, definitely consider changing the dates on your existing videos – it could make all the difference!
Tips for changing your videocreation date
1. If you want to change the date that your video was created, there are a few things that you need to keep in mind. First, you need to make sure that the software that you’re using supports this feature. Not all video editing software does. Secondly, changing the creation date can potentially cause problems with how your video is displayed on certain devices and websites. So if you’re planning on making any major changes, it’s always best to consult with a professional first. Lastly, remember to save your changes before exiting the program!
2. There are a few different ways that you can change the date of your video depending on what software you’re using. In most cases, it’s as simple as opening up the file properties and changing the date there. However, some programs may have more specific options for changing dates or even neutralizing them altogether. If you’re not sure how to change the date in your particular program, doing a quick Google search should give you all the information you need.
3. Changing the creation date of your videos can be extremely useful if you want to organize them in a certain way or ensure compatibility with different devices and platforms but it’s important to use caution when doing so since it can also lead to unforeseen issues further down the line if not done properly.”
Mistakes to avoid when changing your video creation date
There are a few things to avoid when changing your video creation date. Here are three of the most common mistakes:
2. Failing to check for compatibility issues
If you’re thinking about changing your video creation date, be sure to back up your data first. This way, if anything goes wrong, you’ll still have a copy of your original videos. Secondly, check for compatibility issues before making any changes. Some software may not work properly if the dates are changed, so it’s important to test everything out beforehand. Finally, make sure you change the date correctly; otherwise, your videos could end up being out of order or inaccurate.
Conclusion
If you’re still having trouble changing the creation date on your video, don’t worry – you can always ask a professional for help. Just be sure to choose someone who is experienced in video editing and has a good sense of humor, because they’ll need it when dealing with you.
The post How to Change the Creation Date on a Video appeared first on SwiftCreator.com.
https://ifttt.com/images/no_image_card.png
https://swiftcreator.com/video-creation/how-to-change-the-creation-date-on-a-video/
https://ifttt.com/images/no_image_card.png
https://swiftcreator.weebly.com/swift-creator/how-to-change-the-creation-date-on-a-video
0 notes
Text
How to Change the Creation Date on a Video
If you’ve ever filmed a video on your phone, you know that the creation date is automatically set to the day that you filmed it. But what if you want to change the creation date? Whether you’re trying to make a video appear in chronological order on your phone or upload it to a specific album on social media, there are a few ways that you can change the creation date of your videos.
Keep reading to learn how to change the creation date on a video using an iPhone, Android, or computer.
youtube
How to change video creation date
There are a few methods that you can use to change the video creation date. The first is to use a video editing program like Adobe Premiere or Final Cut Pro. With these programs, you can simply change the date that the video was created. Another method is to use a file conversion program like Handbrake or MPEG Streamclip. These programs will allow you to convert the video file into another format which will often reset the creation date. Finally, if you have access to the original camera files, you can usually change the creation date directly on the camera itself.
Why you should change your video creation date
If you’re anything like me, you have at least a dozen videos sitting on your phone that you never post. Why? Because they’re not perfect. The lighting is off, or the sound quality isn’t great, or you just don’t look your best. But here’s the thing: no one’s videos are perfect. And if you’re waiting for perfection, you’ll never post anything. So today, I’m going to tell you why you should change your video creation date and start posting those videos!
The first reason is that it will force you to be more spontaneous and creative with your content. If you only have 24 hours to film, edit, and post a video, you won’t have time to overthink things or worry about making mistakes. You’ll just have to go out there and do it! As someone who tends to overthink everything, I can tell you from experience that this is a good way to get yourself out of your head and into the moment.
The second reason is that it will help improve the quality of your videos over time. As with anything in life, practice makes perfect. The more videos you make, the better (and faster) at editing themyou’ll become . And as your skills improve , so too will the overall quality of your video production . Finally , changing regularly setting a newvideo creation date challenge for yourself will keep things interesting both for yourself as well as any viewers who tune in regularly to watch your content . So next time basketball season starts getting stale , try switching up filming schedules and see how it shakes things up !
When to change your video creation date
If you’re like most people, you’ve probably watched a video that was clearly not filmed recently, but still had a relevant message. You may have even shared it with your friends, thinking it was new. But how old is too old? When does a video need a date change?
There are different schools of thought on this matter. For some, any video over six months old needs to be updated. Others believe a year is more appropriate. And there are those who say two years is the limit. Obviously, the time frame depends on the topic of the video and how quickly things change in that industry.
Some factors to consider when deciding whether to update the creation date on your video:
– How often do changes occur in your industry?
– Is your video about evergreen content or something that will go out of style?
– Was the information in your video accurate at the time it was filmed?
– Would changing the date make viewers think less of your company?
– Do you want people to know how current your company is?
As technology advances and our world gets faster paced, outdated videos can make companies look bad. If someone watches an educational series from two years ago and sees out-of-date equipment or practices being used, they might question if they should really be following along with what’s being shown. The same goes for product demonstrations; if customers see that you’re using an older version of their would-be purchase, they might wonder why you haven’t upgraded yet – making them second guess their own decision to buy from you
How changing your video creation date can improve your online presence
If you’re looking to improve your online presence, one thing you can do is change the date of your video creations. Why would changing the date improve your online presence? Well, fresh content is always king and by changing the date of your videos, you’re essentially giving them a fresh start. If you have videos that aren’t performing well, this is a great way to give them new life and get them in front of more viewers.
Additionally, if you have a lot of old videos on your channel that never got much attention, changing their dates could help them show up in search results more often since YouTube favors newer content. And finally, if you want to create an artificial sense of urgency around your content (to get people to watch it before it gets buried), then setting an earlier creation date can help with that as well.
So if you’re looking for ways to improve your online presence, definitely consider changing the dates on your existing videos – it could make all the difference!
Tips for changing your videocreation date
1. If you want to change the date that your video was created, there are a few things that you need to keep in mind. First, you need to make sure that the software that you’re using supports this feature. Not all video editing software does. Secondly, changing the creation date can potentially cause problems with how your video is displayed on certain devices and websites. So if you’re planning on making any major changes, it’s always best to consult with a professional first. Lastly, remember to save your changes before exiting the program!
2. There are a few different ways that you can change the date of your video depending on what software you’re using. In most cases, it’s as simple as opening up the file properties and changing the date there. However, some programs may have more specific options for changing dates or even neutralizing them altogether. If you’re not sure how to change the date in your particular program, doing a quick Google search should give you all the information you need.
3. Changing the creation date of your videos can be extremely useful if you want to organize them in a certain way or ensure compatibility with different devices and platforms but it’s important to use caution when doing so since it can also lead to unforeseen issues further down the line if not done properly.”
Mistakes to avoid when changing your video creation date
There are a few things to avoid when changing your video creation date. Here are three of the most common mistakes:
2. Failing to check for compatibility issues
If you’re thinking about changing your video creation date, be sure to back up your data first. This way, if anything goes wrong, you’ll still have a copy of your original videos. Secondly, check for compatibility issues before making any changes. Some software may not work properly if the dates are changed, so it’s important to test everything out beforehand. Finally, make sure you change the date correctly; otherwise, your videos could end up being out of order or inaccurate.
Conclusion
If you’re still having trouble changing the creation date on your video, don’t worry – you can always ask a professional for help. Just be sure to choose someone who is experienced in video editing and has a good sense of humor, because they’ll need it when dealing with you.
The post How to Change the Creation Date on a Video appeared first on SwiftCreator.com.
https://ifttt.com/images/no_image_card.png
https://swiftcreator.com/video-creation/how-to-change-the-creation-date-on-a-video/
https://ifttt.com/images/no_image_card.png
https://swiftcreatorcom.wordpress.com/2022/12/06/how-to-change-the-creation-date-on-a-video/
0 notes
Text
Bitdefender antivirus for mac brew

#Bitdefender antivirus for mac brew for mac os x#
#Bitdefender antivirus for mac brew movie#
#Bitdefender antivirus for mac brew install#
Those new, an Emulator sets up an Android environment on your Windows running PC/Laptop and OS X powered Macbook/iMac. This tool is made with proxy and VPN support, it will not leak your IP address, 100% anonymity, We can’t guarantee that.
#Bitdefender antivirus for mac brew install#
How to install Warface on Mac has based on open source technologies, our tool is secure and safe to use.
#Bitdefender antivirus for mac brew for mac os x#
Warface for mac os x 10 11 freeload. WARFACE HACK NEW has built in proxy and VPN for 100% safety and anonymity. But Our main focus is Apple Macintosh operating systems. Because out tools is adapted to all popular platforms, and we working to add more platforms every day. WARFACE HACK NEW will not only work on MAC but it will work on WINDOWS 10 AND 7 and iOS, Android. If that doesn’t suit you, our users have ranked more than 50 alternatives to. The most popular Mac alternative is Team Fortress 2, which is free. Warface is not available for Mac but there are plenty of alternatives that runs on macOS with similar functionality. Tip: To rotate or flip multiple images at the same time, display the images in the same window, choose View > Thumbnails, select them in that window’s sidebar, then choose Tools >. To rotate the image to the right, press and hold the Option key, then click until you’re done rotating the image.įlip an image: Choose Tools > Flip Horizontal or Flip Vertical. Rotate an image: Select the image, then click (or use the Touch Bar) to rotate the image to the left.
#Bitdefender antivirus for mac brew movie#
You can use MPEG Streamclip for macOS to: open and play most movie formats including MPEG files or transport streams edit them with Cut, Copy, Paste, and Trim set In/Out points. MPEG Streamclip for Mac is a powerful high-quality video converter, player, editor for MPEG, QuickTime, transport streams, iPod.And now it is a DivX editor and encoding machine, and even a movie downloader. In the Preview app on your Mac, open the file you want to change. Tip: To resize multiple images at the same time, display the images in the same window, select them in that window’s sidebar, then choose Tools > Adjust Size. Make the image’s dimensions smaller without losing any detail: Deselect “Resample image” before changing the width or height. If you choose a size from the “Fit into” pop-up menu, the image’s width or height may be smaller than the chosen size to maintain the proportions. Resize the image by a percentage: Choose “percent” from the pop-up menu next to the Width and Height fields, then enter the percentage in those fields.įorce the image to keep its original proportions: Select “Scale proportionally.” If you change either the width or height, the other value changes to maintain the proportions. Įnter new values for width and height, or click the “Fit into” pop-up menu and choose a size. In the Preview app on your Mac, if the Markup toolbar isn’t showing, click the Show Markup Toolbar button, then click the Adjust Size button. Pixel Ruler For Mac Os X 10 11 Change an image’s dimensions You can also reduce the file size to save disk space or to download an image more quickly. You can resize or rotate an image opened in Preview to fit into a particular spot. Modifying this control will update this page automatically Preview User Guide
1 note
·
View note
Text
i know it’s good quality and that, but i fckin hate 1080i with a burning passion..
#this is 2 sites i frequent now that are switching to it#i dont understand the appeal#and mpeg streamclip wont open it for screen capping bleh#ignore this
3 notes
·
View notes
Text
Okay, so...I got a new computer, which yay, but now MPEG Streamclip doesn't work on it. Any alternatives for screencaping on mac?
3 notes
·
View notes
Note
which program were you using initially that stopped working??
i was using (well still using) adapter by macroplant. it’s really easy to use but lately it hasn’t been working (at least in my case) for some videos like vlive (which is one place where i gif from mostly bc i feel like the quality is a bit better than youtube). i re-downloaded it last night and it works but i’m pretty sure i’m gonna have to download another program soon.
#i checked out mpeg streamclip but i was too lazy to fully download the whole thing#so i gave up after downloading the startup files lmao#but yeah adapter is what i use#i also checked out km player (which is what a lot of ppl use) but i heard there's been some difficulties too#ask guksuu#celestial mutuals#luminaries
3 notes
·
View notes
Text
Vlc Player For Mac Os Mojave
Being objective: for anyone discovering VLC, it's a great multi-purpose player. But for old users: v3 is not still on a par with v2.2.8!:-o I'm essentially having issues with my TV provider streams: - subtitles: way too big even with 'Smaller' selected in the menu (ok, this was not much better in 2.2.8 as the menu options weren't working at all, but at least the subtitles had the right size. VLC Media Player is a multimedia player that plays almost all multimedia files including Audio, CDs, and DVDs. Although VLC media player cannot play WMV files on Mac OS, it can play the file in Windows Operating System. VLC supports many video, audio, and streaming formats. Vlc download mac os mojave download vlc media player for mac os mojave Visual studio for mac xamarin live player Font book mac application super smash bros ultimate download mac Download mac os x 10.6 snow leopard for virtualbox microsoft word for mac sign in guardar un video de youtube en mac.
Vlc Media Player For Mac
VideoLAN, a project and a non-profit organization. VLC for Mac OS X VLC is a free and open source cross-platform multimedia player and framework that plays most multimedia files as well as DVDs, Audio CDs, VCDs, and various streaming protocols.
The VLC media player, commonly known as VLC, is a free and open-source player developed by VideoLAN. It is available for all the platforms, whether it is Computer or Mobile phones. VLC supports so many audio and video file formats and compression methods, which include DVD-Video, video CD, and multiple streaming protocols.

Since updating to MAC OS Mojave VLC media player has stop loading and always crashes/fails to load. I have tried repeated times to delete the app and reinstall, I have followed suggestion from the VLC team to flush the OS of residual files that could be causing issues but I'm having no success. The closest I have gotten is by accessing the apps Package Content/MacOS/VLC(Unix executable) through terminal which would sometimes load the file but then crash before loading. File type and/or codex doesn't seem to be the issue or solution and other media players will play all the files that I have attempted run with VLC. Now and then usually after a OS Restart, the OS will run a Verification on the VLC app after attempting to load the program but it seem to run the verification, disappear and then do nothing. Any one else having similar issues or can suggest a fix? Thanks for your guys time
I downloaded MPEG Streamclip for video editing and do not wish to uninstall it. But now it is the default application for .wmv files. I already went through other options to change the default video player to VLC but when I try to do it this message is what returns:


'The item is either locked or damaged, or in a folder you don’t have permission to modify (error code -61).'
This file is a DVD for an online class and would prefer not to constantly go back to the DVD folder in Finder and 'Open With' VLC. I read some tips about resetting some files but they were for Leopard and Tiger.
I am currently running OS X version 10.9.2. Thank you in advance.
Vlc Media Player For Mac
Posted on Mar 19, 2014 4:19 PM
1 note
·
View note
Photo


#anushka sharma#ae dil hai mushkil#bollywood2#bollywoodedit#aamirkhn#gifs: adhm#gifs: anushka#mygifs#well coloring this sucks#bleh#but she was so fun#and yes I tried the mpeg streamclip#it's a lot faster tho
175 notes
·
View notes
Note
I use mpeg streamclip. I’ve been using it for many years, I love it!
thank you! i’ve only ever used mplayer (i also used kmplayer when i had a pc) so i gotta look up what settings to use 😭
1 note
·
View note
Text
Free Video Converter For Mac Free

Free Music Converter For Mac
Video Converter For Mac Mkv
Free Video Converter For Mac Os
Free Video Converter For Mac Mp4 Converter
The vast selection of free 3rd party applications available for Mac OS X always surprises people when they’re new to the platform. Among that abundance of software is a collection of free Mac video converters which can cover nearly any situation you could find yourself in.
So you’re sitting there with a video file you can’t use because it’s stuck in a format not recognizable by the editing program you’re using. Bummer, right? Don’t go looking for an expensive piece of software you may only use a handful of times. Instead, take a look at these 6 Mac video conversion tools which are completely free and surprisingly full-featured.
1. HandBrake
Originally only a DVD ripping tool, Handbrake evolved into more of a universal video converter with its most recent release. Now it can handle pretty much anything you throw at it and then spit it back out in a new format. It’s well-polished, solid, reliable, and just an overall pleasure to use. Yes, I’m groveling so go and check it out.
Converter.Files is one if the best free online video converter for Mac. The reason for this is that, it can not only convert a batch of files as opposed to a single file at a time, but can also support a larger range of both input as well as output format. 5 best free iPad video converter for Mac Recommended Last updated on August 14, 2014 by Ada Reed Apple led the development of the tech industry in the past years through their products, by making convenience and accessibility as key features. Wondershare Video Converter Ultimate for Mac The Most Powerful Video Converter Ever. Use this complete all-in-one video toolbox to convert, edit, enhance, download, burn, organize, capture, and play any videos on your Mac.

Version 0.9.3 compatible with Mac OS X 10.5
Meet Free Video to Audio Converter for Mac! It takes full advantage of the latest Mac OS X to make audio extraction easier, quicker and better. It converts all major video formats as well as hundreds of other, popular or rare, to audio so that Macintosh users can grab the audio track and for playback and further processing. Video Converter For Mac is a software running in Mac OS allows you convert any video to any format. MacX is the best video converter for Mac and Digiarty company is giving away the license key of this software until July 25, 2013. Free Video Converter, Video Compressor -VidCompact on PC (Windows / MAC) Download and install BlueStacks or Remix OS Player. Open the installed BlueStacks or Remix OS Player and open the Google Play Store in it.
2. ffmpegX
The great thing about ffmpegX is that it’s based on a large collection of Unix tools which give it excellent power and flexibility, plus it’s wrapped in a simple drag and drop interface. The variety of formats it supports is quite extensive and the level of customization it offers is almost too much. That is, if there was such a thing.
Free Music Converter For Mac
Version 0.0.9y compatible with Mac OS X 10.2
3. MPEG Streamclip
Video Converter For Mac Mkv
Drag your video clip into the window and export to your chosen format — that’s all there is to it with MPEG Streamclip. If you require some extra control over the final product, there are a ton of options for that too. Is it a pretty program? No. Is it functional? Oh yeah.
Version 1.9.2 compatible with Mac OS X 10.2
4. Prism Video Converter
If you’re a beginner who’s easily confused by all the crazy settings that flood some other Mac video converters, Prism might be a relief for you. No, it doesn’t offer quite as much format support as competing software does, but sometimes simplicity overrules feature set.
Version 1.28 compatible with Mac OS X 10.2
5. iSquint
Sadly, development on iSquint has been discontinued, at least in its current form. The good news is you can still get your hands on this helpful utility and it continues to work great at converting videos for iTunes. Eventually a new version will be released under a new name (it’s in open source development at the moment), but in the meantime you can enjoy all of its current benefits.
Version 1.5.2 compatible with Mac OS X 10.3
6. FLV2iTunes
Free Video Converter For Mac Os
Even though FLV2iTunes is quite a bit different than the other programs in this list, I still feel like it deserves a place here. Its name suggests it only supports .FLV files, but that is not the case. It can take a number of video formats and convert them into an iTunes-friendly codec. Not only that, it can import your video directly into iTunes itself after it’s done converting.
Free Video Converter For Mac Mp4 Converter
Version 0.9.11 compatible with Mac OS X 10.5 (older version supports 10.4)
1 note
·
View note
Note
How do you make a gif?
What a fantastic question.
This will be a full-blown tutorial, and I’m going to do my best to keep this as beginner-friendly as possible, but if anyone has any questions, feel free to ask via inbox or DMs or whichever way suits you.
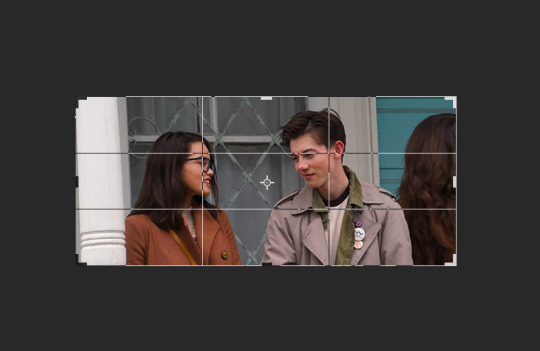
You will need Photoshop to be able to follow this tutorial. I will be using this particular gif as an example:
The rest of the tutorial is under the cut.
Step 1. Download
First we download the video we’re going to gif. It always has to be in HD quality, preferably 1080, but sometimes 720 can work too, but no less. Gifs will not look good if the video you’re giffing is in bad quality.
The idea is to use torrent as little as possible because of the consequences, so, depending on what I want to gif, my method of download will vary. If it’s a relatively recent and well-known movie/tv show, then I usually check out this website for movies, and this one for tv shows.
If it’s something more obscure than that - say an old movie - you’ll have to use torrent, unfortunately.
For youtube videos, I use this app.
Step 2. Screencaps
Now that you’ve downloaded your video, you’ll need to make screencaps. The app I use is MPlayer OSX Extended - it works only for Mac. For both Mac and Windows, you can use MPEG Streamclip, but I prefer the former because it can be used for any format, whereas MPEG Streamclip only works with mp4.
I actually don’t have MPEG Streamclip anymore, so this tutorial will only show how I personally make screencaps, so with MPlayer.
The steps are simple:
Open the video
Find the scene you want to capture
Pause the video
Hold ‘command + shift + S’ until the scene ends
Make sure you choose a folder in which you want your screencaps to save (before you start capturing). To do this, while your video is open, go:
Mplayer OSX Extended > Preferences

This window will open:
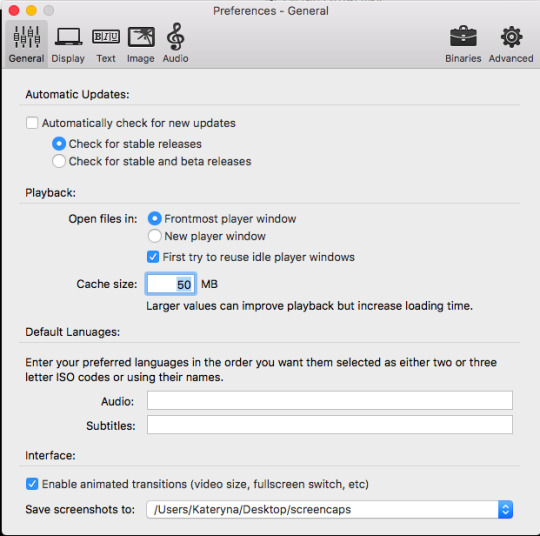
At the bottom, where it says “Save screenshots to”, you can choose your location.
Step 3. Importing Screencaps
Once the screencaps are done, we open Photoshop and go: File > Scripts > Load Files into Stack

Next it’ll open a browsing window, and you find the folder in which you saved your screencaps. At this stage I like to make sure I only upload the shots that will be on my gif, leaving out the extra ones I may have captured (like the beginning of the next scene, for example).
Use Shift to choose a lot of shots at the same time:
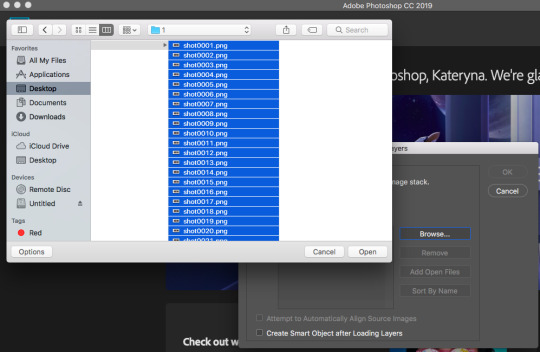
Then click OK.
While they’re uploading to photoshop, make sure you don’t click anywhere until the process is finished because otherwise it might not upload all the shots.
Step 4. Editing
Once your screenshots are in, the first thing you need to do is decide on the size of the gif. There are specific sizes which tumblr supports so that your gifs don’t appear blurred. I’m going to make a list of all possible combinations that I know. This will go from largest possible size a gif can be to the smallest and will show how it will look in gifsets (all the gifsets will be mine, sometimes from sideblogs).
Any number of gifs, one in a row:
540x540 (example)
540x450 (example)
540x320 (example)
540x240 (example)
An even number of gifs, two gifs in a row, side by side:
268x404 (example)
268x350 (example)
268x300 (example)
268x268 (example)
268x220 (example)
268x192 (example)
268x150 (example)
9 gifs:
177x177 for side gifs and 178x177 for the middle gif in each row (example)
In this case, I will be making a standard 540x240 gif.
First we resize the image. Because these are caps from a movie and not a TV show (resolutions are different for TV), the cap is wide but short, that means that I change the size of the image by height. To do this:
Image > Image Size

This window opens:

Where it says “height”, we type in 240 and click OK.
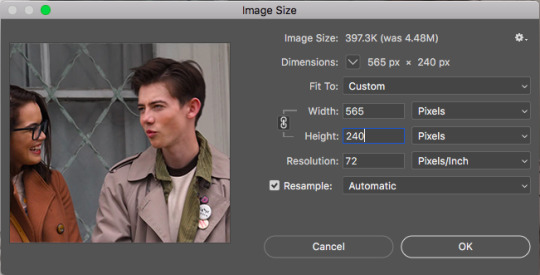
Then we zoom in to a 100%.
Next, we make sure the timeline is open. To do this:
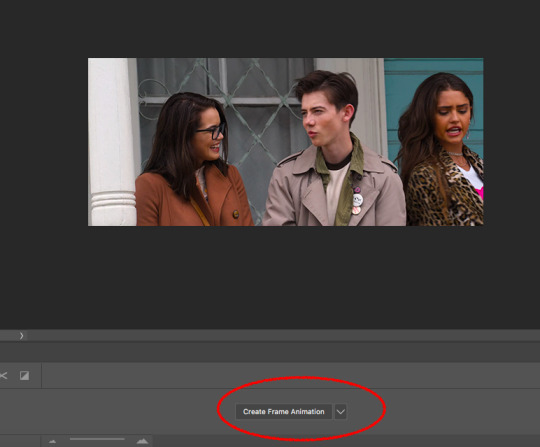
Window > Timeline

Once that’s done, down at the timeline, we click “Create Frame Animation”:
At the right of the timeline, right under the layers, we click on this little thing:
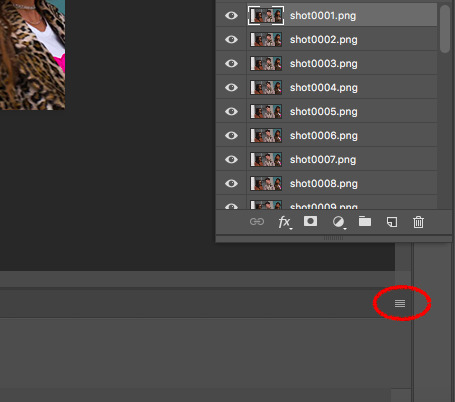
And choose “Make Frames from Layers”

The frames will now be in reversed order because that’s how the layers always upload, so we click on that little four lines thing in the upper right corner of the timeline again and choose “Reverse Frames”:

And now is the time to have a look at your frames and see if you need to delete any. Make sure that if you delete a frame, you delete a corresponding layer as well. The gif will have to be under 3mb for tumblr to display it correctly, so make sure there aren’t too many frames. But this isn’t a huge issue because once you’ve saved the ready gif, you can always reopen it and delete some frames.
In this case I have 36 frames, and I’m going to take it down to 34 just to be safe. This is what the gif looks like at this stage:

Once that’s done, the next step is to set the delay. Every giffer does this according to their personal preferences, but I personally do this. If your gif doesn’t involve any talking - so you won’t be adding text, then set the delay to 0.07. If it involves adding text later, don’t touch the delay at all at the moment, it’ll have to be done later.
Because this gif doesn’t involve adding any text, I’m setting the delay to 0.07. Again, hold Shift to choose all the frames.


The slowed down gif looks like this:
Now it’s time to crop! Choose the cropping tool and type 540x240 where it says “ratio”:
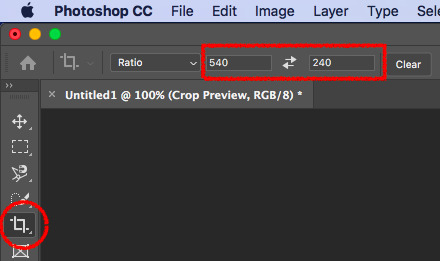
Choose the crop positioning to your liking and press enter.
The gif at the moment:

Now we do last preparations before colouring. For this, click at the little four lines again:
And choose “Convert to Video Timeline”.
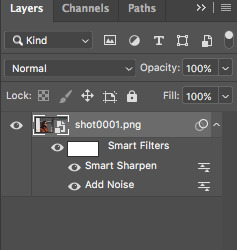
Then choose all the layers and go Filter > Convert for Smart Filters.

Then go Filter > Sharpen > Smart Sharpen:

Which will open the window for smart sharpening, and here are my settings:
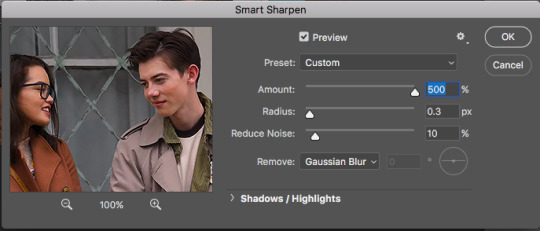
This is another one of those things that is down to each giffer, but what I usually do is, if it’s a really small gif, like 268x150 for example, I set radius to 0.2. If it’s a huge close up to a person’s face or a really big gif, like 540x540, I set the radius to 0.4. For all other gifs I always keep it on 0.3.
Then click OK.
Next, go Filter > Noise > Add Noise. Here are my settings for this:

Then, move the noise layer under the sharpening layer (I don’t know if this changes anything, but I always do it this way lol):
The gif ends up looking like this:

Now the editing is done, and it’s time to colour!
Step 5. Colouring
This is by far the hardest thing a giffer has to do, so if you don’t immediately get the hang of it, don’t be upset. You’ll learn eventually. I’m still learning, personally.
Again, all of this is very much down to each giffer, but here’s the way I do it.
Press the little “fill layer” button and choose Curves:

So the way I use curves is to even out the entire shot’s colouring. So if the scene is too red or too green or too blue or too yellow, it gets rid of the excess of that colouring and brings it down to normal. Can help so much in some cases.
What you do is choose the middle pipette in the window, which is to sample image to set grey point.

There’s also the option to set white point (bottom pipette) or black point (top pipette), but I don’t use those because it screws with your lighting too much.
To choose a point, I usually use the person’s eyebrows or hair. Sounds ridiculous, but it does work. In this case clicking on Dunkleman’s eyebrow makes the image too green:

So what I do instead is click on his hair, where it’s reddish brown, somewhere here.

This makes the image noticeably less red compared to the original:

But also, it made the image less vibrant, so we’re fixing that next. Fill layer > Vibrance:
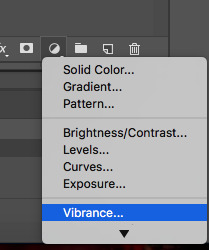
And then I set Vibrance to 100, always. If the image is still not vibrant enough for my liking, I set saturation (in the same window) to 10 or 25 in some cases. And for this gif, I will set saturation to 10.
Here’s how the image ends up looking (just make sure it doesn’t make their faces ridiculously red or something, but if there’s some excess of colour, don’t worry):
Now go Fill layer > Exposure.

Here are my settings for this gif:
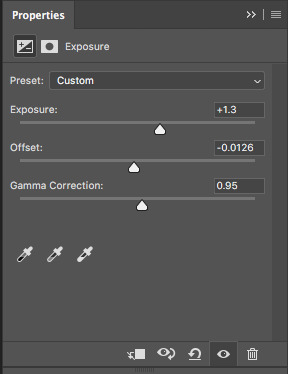
With exposure, it’s just a matter of keeping that balance between lightening it as much as possible but without their faces or bodies looking as bright as a christmas tree, and then adding offset and gamma correction to return normalcy to the picture.
Here’s what the image looks like now:

It’s obvious right now that their faces are a little too red and too yellow, so we’re going to fix that. Go Fill Layer > Selective Colour:
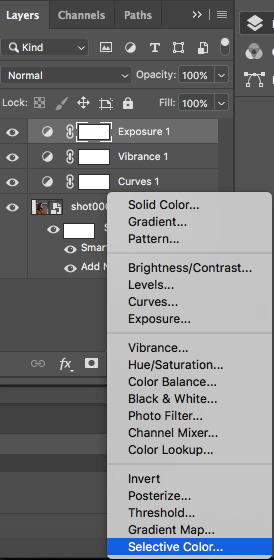
The task here is to make their faces appear as if they’re stood in normal daylight with no other filters. So as close to normal skin colour as possible. Be careful when giffing people of colour so that you don’t whitewash them.
In this case, I’m adding cyan in reds:

And taking down yellow in yellows:

And here’s what the image ends up looking like:
I’m quite satisfied with this result, so I’m going to leave it how it is, but sometimes I will tweak things more and use colour balance and other things.
Step 6. Add Text
Make sure you group your colouring layers at this point and then add your text as the top layer.
Step 7. Save the gif
To save a gif moving, you go File > Export > Save for Web:
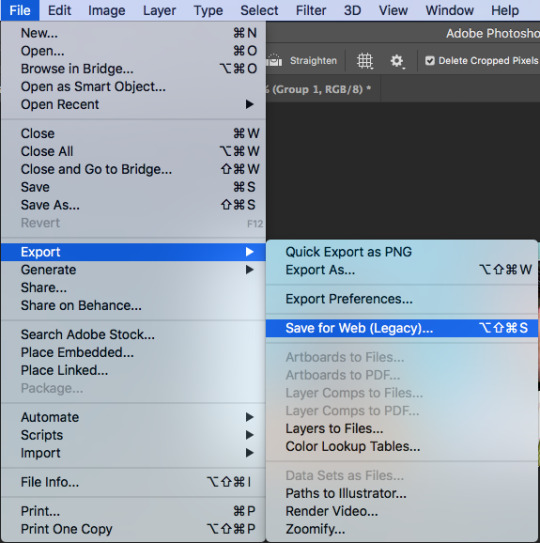
This window opens up, and make sure that in the bottom right corner, where it says “looping options”, it’s set to “forever”:
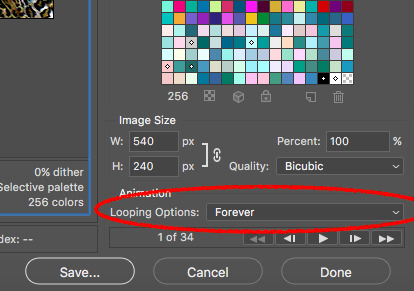
As the last step, I add dither because it evens out the edited colours in the background. I tend to use “pattern”:

Then we press “save” and our gif is done!
Step 9. Reopen
If you added text to the gif and followed my advice, you wouldn’t have touched the delay back at the beginning. This is because converting to video timeline kicks the delay either into 0.03 (too fast) or into 0.07 (too slow for speaking gifs). So you have to reopen the gif now and set the delay to 0.06 (that’s the speed I like for my gifs where someone’s talking on them).
This is also a good time to delete some frames if your gif is 3mb or over. Remember it won’t move if it’s not under 3mb!
Hope all of this makes sense, and let me know if you have any questions!
146 notes
·
View notes
Note
what's the screencapping application you downloaded? 👀
i downloaded adapter! since i have a mac, i’m kinda limited on the screencapping programs that are out there. i also used to use mpeg streamclip however that one you’re limited to only using mp4 files.
check out this list! it was super helpful for me :) let me know if you need any help
1 note
·
View note
Text
GUYS?! MPEG Streamclip for mac isn’t working for my new pc, it’s too old :O What do you guys make screencaps off? How am I supposed to make gifs!?
#itsphotoshop#completeresources#yeahps#chaoticresources#need help#help me#please#personal#text post#help
4 notes
·
View notes
Note
Whats the new program you’re using to make gifs?
i use mplayer osx extended to take screencaps and then photoshop 2020 to make gifs! before updating my computer i used mpeg streamclip and photoshop cs6 which i still prefer and would recommend if you can use them.
0 notes
Last Seen Blogs

cephalopaints
dj octavio irl (now with autism)

green-blog1
Green blog 1

crywankband
Crywank Blog

robbieomg
INVISIBLE

lieutenantkasatka
why do you assume you're the smartest in the room