#new laptop (new dimensions new colors) no idea how this looks lmao
Photo
hobi is me 😌
#trackofthesoul#btshoneyhive#dailybangtan#btsgif#jksource#dailybts#jeon jungkook#jung hoseok#usersky#shirleytothesea#userkelli#heyryen#bangtan#jungkook#hoseok#*bts#yuliagifs#new laptop (new dimensions new colors) no idea how this looks lmao
1K notes
·
View notes
Text
how I make my gifs: a tutorial
Hi everyone! Just in case someone asks in the future + for those curious, I'm here with a tutorial on how I make gifs! If you have any questions whatsoever, please do send me an ask! I’ll be glad to help! The gif I made with this tutorial is the one right here!
So... let’s start this tutorial with the programs I use.
Adobe Photoshop 2020
- To make the gifs, majority of the work is done in this program.
TopazLabs (Topaz DeNoise 6 and Topaz Clean 3)
- To "denoise" and "clean" the gifs, as the names would suggest.
Links for download: Topaz DeNoise 6 & Topaz Clean 3
KMPlayer (an alternative would be PotPlayer, or any other video playing program that allows you to capture the frames)
- To capture the frames.
- I use an older version of KMPlayer, though I don't know which exact version that is.
Now let’s continue onto how I use these programs to create gifs!
Step 1: After you’ve downloaded the necessary programs, download your video. The way to get the best gifs? Quality videos. That’s the first step. For K-pop performances, I recommend this website (the hq files are in .ts form, KMPlayer should be able to open these). Bookmark it! It’s really handy :) Get the video you want to make a gif from and open it in KMPlayer (or PotPlayer or any other program, but for this tutorial I’ll use KMPlayer). Open your video in said program and look for the part you want to make a gif of. Then press CTRL+G (I apologize because I cannot for the life of me remember if this was a standard shortcut or not)
Step 2: After pressing CTRL+G, you’ll be met with this screen:

I’ll briefly explain the numbered parts, but before that, these are my standard settings and just make sure you have them all the same and it should be good!
1: This is where your captured frames will be extracted to. I have them extracted to the standard folder, but you can change this if you want to. You’ll need this folder later when opening the frames!
2: Like it says, this is the image format. I use PNG in the highest quality, as the name would suggest, for the quality.
3: These are the amount of frames the program captures. Say you put in every 2 or 4 frames, you’ll get more choppy gifs. To get the smoothest gifs, put “every frame” (this in turn will increase the gif size as the amount of frames will obviously be bigger).
Once you’ve put in the correct settings and you’ve put the slider where you want the capturing process to start, press “start” (now, before you do this I recommend putting the video on mute as the audio will start to get kinda demon-y the longer you record lol save your ears pls). Then, when you’ve captured all the frames you need, pause the video, press CTRL+G again and click “stop” and close the pop-up/program.
Step 3: It’s time to open up Photoshop! Then go to File > Scripts > Load Files into Stack... (for older versions/another version I used in the past this one didn’t work and I had to use the “Load Multiple DICOM Files...” instead. It should work similarly though, if I remember correctly).
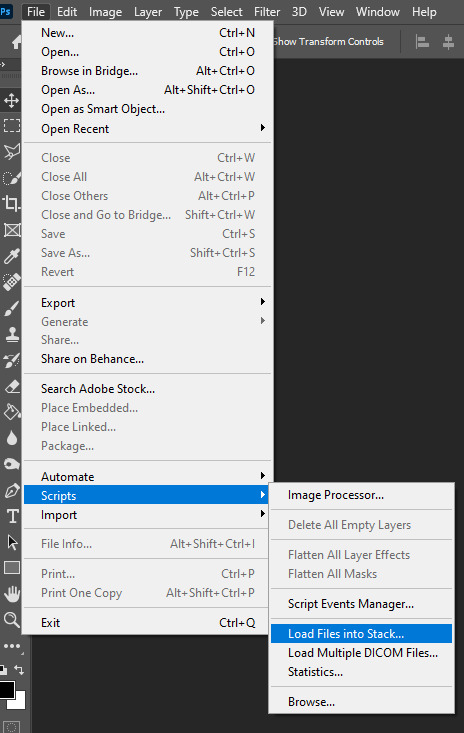
You then get a little pop-up that looks like this:
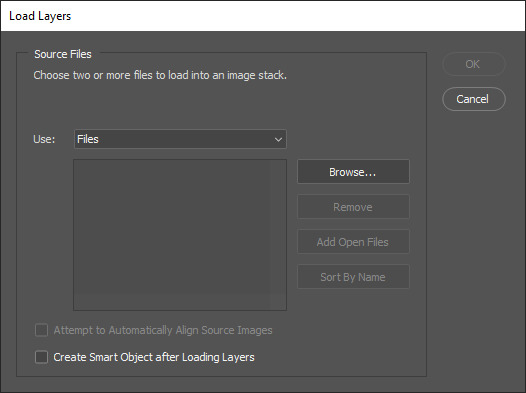
All you have to do here is click “browse” and navigate to the folder where your captured frames have been saved in. Select all the frames you need, wait for them to load in and then click “OK”!
Step 4: Depending on the amount of frames you’ve selected to load in, as well as the beefiness of your PC/laptop, the frames loading part might take a little while. Photoshop is importing every frame as a separate layer into one file, so just... grab a drink or something and wait a bit! When you’re done waiting, if you haven’t already, go to Window > Timeline. This will show you the animation timeline. For older Photoshop versions this is slightly different (I believe it’s called animation). Then click “Create Video Timeline” and click the 3 squares on the left bottom side (in older versions it’s on the right bottom side, not sure).
Step 5: After you’ve done all that, you’ll want to select all your layers. You can do this by pressing ALT+CTRL+A or going to Select > All Layers. With all the layers selected, you have to go to Layer > Arrange > Reverse. You only have to do this if you used the “Load Files into Stack” option!
Step 6: After reversing all your layers, you’ll want to go to the three lines you see in the following screenshot, and click “Make Frames From Layers”.
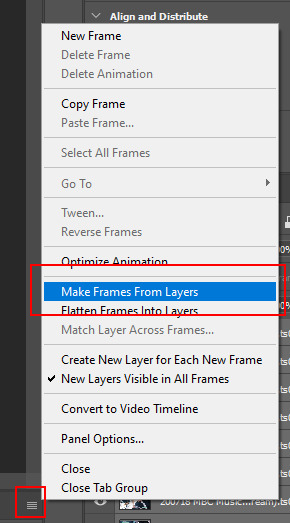
As the name suggests, this turns all the layers into frames. I don’t know why but the first frame will always be 5 seconds long, so to make it easy on yourself when you want to check your gif while editing, just put that on 0 for now. You can do that by clicking the seconds under the frame and clicking “No delay”. After this, check to see if you have the right frames and if you need to delete some (you can do this at any point in the process but I didn’t know where to put it in the tutorial oops).
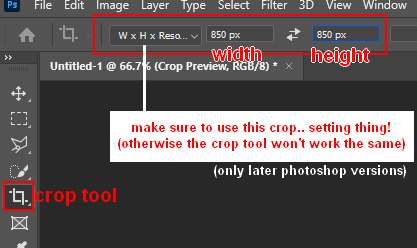
Step 7: Time to crop the gif to the correct size! For this gif I’m using as an example, I’m making it specifically for Twitter, so the sizes aren’t that obvious (for Twitter I usually use a width of 850 px to keep it sharp, for long size gifs (more height than width for example), I add a background so that it eventually still becomes 850x850 pixels). There’s many posts on Tumblr about the correct sizes for gif/photosets, but a brief rundown of my most used sizes: one gif spanning the entire width of the post has to be 540 px in width. Two gifs next to one another need to have a width of 268 px. I use these dimensions the most! For others, you can Google!
Step 8: After you’ve cropped the gif, you can do either of two things: either you first add the coloring of your choice and then sharpen the gif OR you do it the other way around. I usually switch these two around depending on how sharp the gif already looks before sharpening because I can’t stand looking at 2 pixels while coloring (lmao). For this one I’ll do the sharpening first.
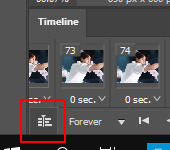
The whole sharpening process is actually quite simple but you need to make sure that you do the following little steps in the right order or else it won’t work! Select all the layers (CTRL+ALT+A or Select > All Layers) and then click this little thingy:
Then you’re going to Filter > Convert for Smart Filters
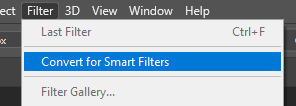
If you don’t do it in this order, your gif will end up... well, not being a gif and not moving. If that happens, track back in your history to see if you did it in the correct order! :)
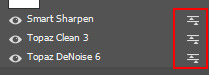
Step 9: The actual sharpening process! After clicking the “Convert for Smart Filters”, you’ll want to go to Filter again and find the Topaz Labs tabs. Personally, I usually do it in the order of DeNoise first and then Clean, but this is a personal thing, really.
I recommend playing around with the settings to see what fits the gif but here are my go-to DeNoise settings (tip: save these as a preset so you only have to click that for faster giffing!):
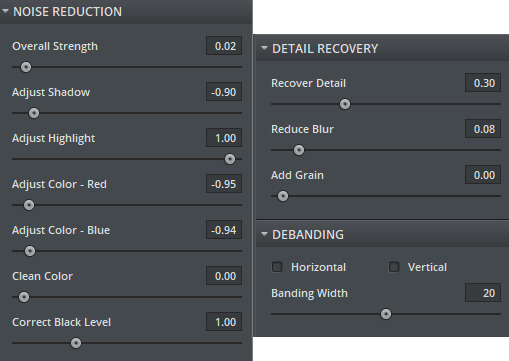
And my Clean settings:
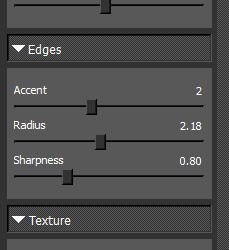
Press OK when you’re done with these and then go to Filter > Sharpen > Smart Sharpen. These are my SS settings (just copy these, and again, save as a preset!):

Depending on how sharp you want the gif to be, you can input the same settings or go to this in the layers and change the percentage.
Now that we’re done with these... it’s time to flatten it! Just follow these little steps:
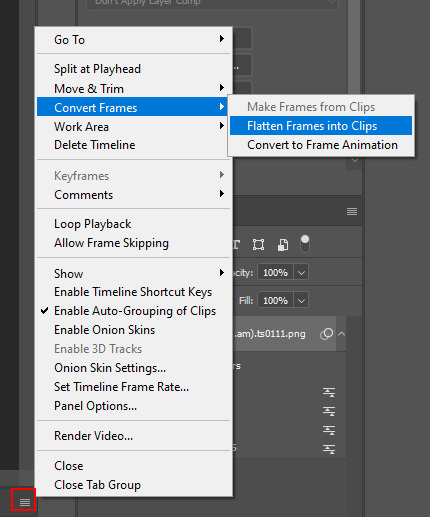
And then you wait. Again. I know.
Step 10: After playing the waiting game, you’ll click the three little squares again and do the same thing you did earlier: “Make Frames Into Layers”. Delete the first frame. Add a coloring of your choice (can be a PSD, can be your own coloring, etc. this is honestly just... playing around with things and see what it can do). After you’ve done coloring, select all your frames (same lines as previous screenshot except now you’ll see a “Select All Frames” option, click it!) and change the time to whatever you like (I usually go for 0.05, 0.06, or 0.07. Again, just play around with this!! Try different things!)
Step 11: Final step! Saving :) I use shortcuts a lot to make things faster so either press ALT+SHIFT+CTRL+S or go to File > Export > Save For Web. Not much to do here, just copy the following settings and save the file!
!!! NOTE: After making a new gif today I realized there’s a weird dotted border on the top of my gifs, it’s a bit difficult to explain but I had no idea what it was. Turns out that the reason why this showed up was because, as shown in the screenshot below, I had “Transparency” selected. If you’re experiencing this too, UNSELECT the transparency and it should be all good!
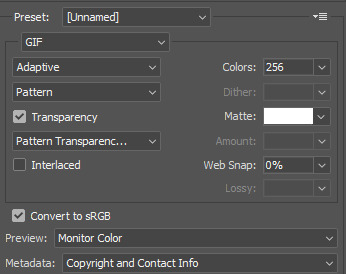
Also make sure that the “Looping Options” is set to Forever, or else your gif will play only once and then stop!
Tip: While making gifs for Twitter I at one point noticed that if I added in a white background, no matter what I’d do, it’d show up as yellow-y in the preview box. After googling I found that going to the options (1 in the screenshot) and then clicking “Sort by Luminance”, then double-clicking the lightest color (not the transparent one, 2 in the screenshot) and selecting white (or FFF) will get rid of this! This likely won’t be that useful for Tumblr gifs but just in case you ever want to have a white background...!

Then just... save, and upload to Tumblr! :)
Final note: Tumblr has a mix gif size of 3MB. If you have a gifset of 4 gifs you want to upload, all 4 gifs can be max 3MB each. Keep this in mind! If you’re over 3MB, delete a few frames and try again, or resize/crop your gif!
As it turns out, Tumblr has increased their gif size to 8MB, however, the quality tends to get compressed with larger gifs like that so per recommendation: keep them below 5MB! (thank you @yeoli for letting me know!)
I hope this helped! If you have any questions, feel free to send me a message and I’ll try my best to answer them.
75 notes
·
View notes
Last Seen Blogs