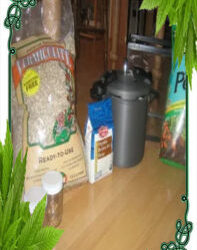
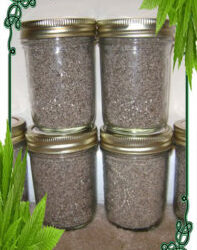
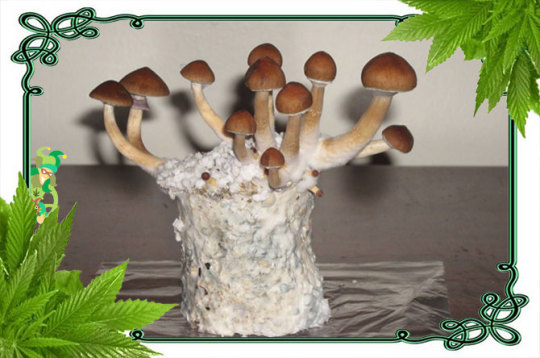
#pf tek jar
Text
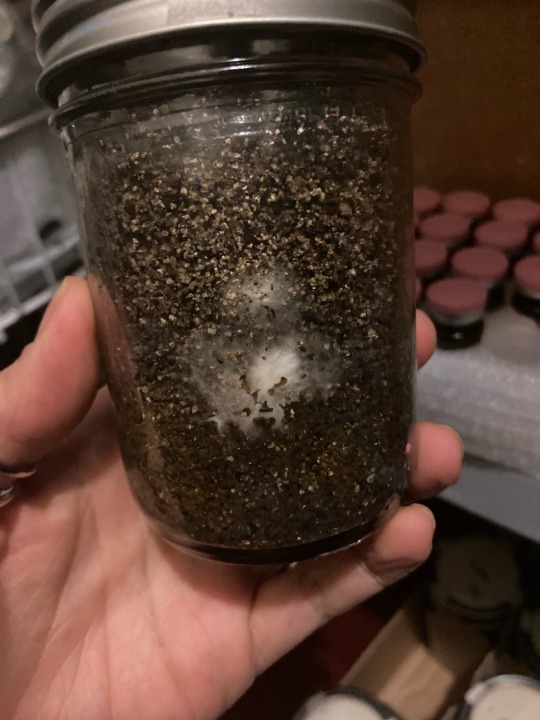

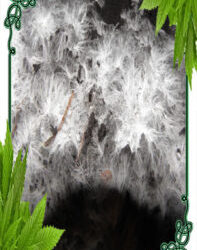
oh my gosh ohmygosh OHMYGOSH. I need to read the manual to this Canon Rebel so I can take an actual picture of the action, but THIS BABY MYCELIUM GLOWS ALREADY! ✨⭐️✨
One major reason I chose <i> #Panellus stipticus </i> was the glow during different life cycles and in different pieces and parts of the fungi main body and the fruit...and science is REAL!
#mushrooms#bioluminescence#fungiphotography#these are modified pf tek jars acidified with citric acid and supplemented with hardwood sawdust
2 notes
·
View notes
Text
Effects Of Ingesting Golden Teacher
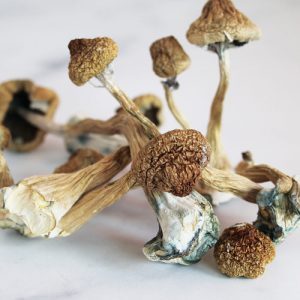
Golden Teacher is a type of psilocybin mushroom that contains the psychoactive compound psilocybin. When ingested, psilocybin is converted to psilocin, which binds to serotonin receptors in the brain, leading to altered perception, mood, and cognition.
The effects of ingesting Golden Teacher can vary depending on several factors, such as the dosage, individual sensitivity, and set and setting. However, some of the common effects include:
Changes in perception: Golden Teacher can alter the perception of time, space, and colors. Objects may appear distorted, and people may experience visual hallucinations.
Mood changes: Many people report feelings of euphoria, happiness, and increased empathy after ingesting Golden Teacher.
Spiritual experiences: Some people report having mystical experiences, feeling a sense of interconnectedness with the universe, or having profound insights about their lives.
Cognitive changes: Golden Teacher can affect the way people think, leading to more creative or abstract thinking. It can also impair short-term memory and cause difficulties with concentration and focus.
Physical effects: Golden Teacher can cause nausea, dizziness, and sweating, especially during the onset of the trip. Some people may experience muscle weakness or tremors.
It's worth noting that ingesting Golden Teacher can also carry risks, especially for people with underlying mental health conditions or those who take certain medications. It's essential to approach psychedelic use with caution and to seek guidance from a trained professional when possible.
How long does Golden Teacher work?
The effects of Golden Teacher can last for several hours, typically between 4 to 6 hours, depending on several factors such as the dosage, individual sensitivity, and set and setting.
The onset of effects can vary, with some people reporting feeling the effects within 20-30 minutes of ingestion, while others may take up to an hour or more. The peak effects typically occur between 2 to 3 hours after ingestion, with the intensity of the experience gradually decreasing over time.
However, it's worth noting that the duration of Golden Teacher's effects can also depend on the method of ingestion. For example, when ingested as capsules or tea, the effects may last longer than when ingested as dried mushrooms. Additionally, when taken with food, the onset of effects may be delayed, and the duration of the experience may be longer.
It's important to note that Golden Teacher, like other psychedelic substances, can have long-term effects on a person's psychological well-being, including changes in mood, perception, and cognition. Therefore, it's crucial to approach psychedelic use with caution, do your research, and seek guidance from a trained professional when possible.
Is Golden Teacher Easy To Grow?
Golden Teacher is a popular strain of psilocybin mushroom that can be grown at home using relatively simple techniques. Compared to other strains of psilocybin mushrooms, Golden Teachers are relatively easy to grow, making them a popular choice among beginners.
Golden Teachers can be grown using a variety of methods, including the PF tek method, monotub method, or the grain spawn method. The PF tek method is the most common method used by beginners and involves growing the mushrooms in jars filled with sterilized brown rice flour and vermiculite.
To grow Golden Teachers using the PF tek method, you will need to purchase spores, which can be obtained from online vendors. The spores are then inoculated into the jars using a spore syringe. The jars are then left to colonize in a warm, dark environment for several weeks. Once the jars are fully colonized, they are moved to a fruiting chamber, where the mushrooms are encouraged to grow.
It's worth noting that growing Golden Teachers, or any other strain of psilocybin mushrooms, carries legal and health risks. In many countries, the cultivation and possession of psilocybin mushrooms are illegal. Additionally, growing mushrooms can be dangerous if proper precautions are not taken to ensure sterility and prevent contamination.
If you're interested in growing Golden Teachers, it's crucial to do your research, follow best practices for mushroom cultivation, and seek guidance from experienced growers when possible.
1 note
·
View note
Text
Growing Mushrooms Using the Pf Tek Method
The Mushroom Pf Tek is among one of the most preferred as well as most convenient to grow. This results from its capacity to be expanded in any kind of type of environment, inside or outdoors. It can additionally be expanded with an inexpensive.
There are many different sorts of mushrooms that can be grown using the Pf Tek approach. One of the most popular are the Shiitake, Oyster, Enoki, Portabella, and also Switch. These can all be grown in a range of methods.
Shiitake mushrooms are very popular for usage in cooking and as a meat substitute. They have a really solid flavor as well as can be utilized in virtually any dish.
Oyster mushrooms are typically utilized in Oriental dishes. They are little as well as white with a sweet preference.
Enoki mushrooms are commonly made use of in soups and salads. They have a light flavor and are very tender.
Portabella mushrooms are very large and have a weighty structure. They are typically offered chopped and also can be utilized in practically any dish.
Button mushrooms are the biggest and also most typical mushroom. They can be located in grocery stores and are fantastic for making soups.
Pf Tek Dish
The Pf Tek technique is easy to use. The first step is to make your substrate. You will certainly require to mix equivalent parts of sawdust and peat moss. The combination ought to be damp yet not damp.
After blending both ingredients you will need to include water. The quantity of water required will depend on the dimension of your container. You will certainly intend to use enough to cover the substratum totally.
Next you will certainly need to inoculate your substratum. For this you will need to take an item of cotton and dampen it somewhat. You will certainly after that place it right into the substrate. The cotton will take in a few of the water from the substratum and also permit it to begin expanding.
You will then put the substratum into a container and also let it sit up until the cotton starts to grow.
When the cotton has actually begun to expand you will need to place your substratum into the light. A fluorescent light will function best. You will certainly then allow it sit for around 2 weeks.
When the cotton has actually grown you will require to cut it off. This is done by taking a sharp knife and also reducing the cotton off of the substrate. You can then utilize the cotton to make a new set of substratum.
Pf Tek Fruitting Chamber
One more means to grow mushrooms is to make use of a fruiting chamber. A fruiting chamber is an unique type of container that enables a regulated environment. It also permits the substratum to be maintained a consistent temperature level.
A fruiting chamber will certainly cost around $100 as well as can be acquired at most home renovation shops.
The main benefit of using a fruiting chamber is the truth that the substratum is always kept at a continuous temperature. This allows for the fungi to grow faster as well as generate more mushrooms.
Mushroom Pf Tek Vs Monotub
There are several approaches that can be used to grow mushrooms. Some are easier than others as well as some are more pricey.
One technique that is really low-cost and also easy to do is called the monotub approach. In this method you merely put the substratum right into a glass jar. After that you put a plastic tube right into the container and cover it with dirt.
The plastic tube is after that covered with an item of fabric and positioned in an area where it will certainly get direct sunlight.
After putting the tube right into the jar you will certainly need to place a percentage of substrate right into the container. This will assist to feed the fungi as well as keep it to life.
The substrate must after that be watered and the jar placed into a dark location. The substratum will certainly begin to grow. As soon as the substratum has actually expanded to about 1/3 of the jar it will certainly be time to harvest.
Mushroom Pdf Tek
There are several guides that can be made use of to help you discover exactly how to expand mushrooms. The Mushroom Pf Tek is one of them. This guide is very basic to adhere to and also will certainly reveal you exactly what you need to do.
The guide shows you how to expand mushrooms in a number of various means. You will certainly find out just how to expand them in a fruiting chamber and in a Pf Tek. You will certainly additionally find out exactly how to expand them inside your home and also outdoors.
The overview is written in a really simple way and also describes whatever you need to know. There is even a video clip available to help you recognize how to use the overview.
Pf Tek Shroomerly
The Pf Tek approach can be made use of to grow mushrooms in almost any environment. This consists of outside, inside your home, and also in a fruiting chamber.
The Pf Tek approach does need a bit of work to get it up and running. You will need to see to it that you have the appropriate substratum. If you do not have the ideal substratum you will not have the ability to grow mushrooms.
If you have an interest in growing mushrooms then you might wish to consider the Pf Tek method.
Inspired by http://ucangrowmushrooms.com/growing-mushrooms-using-the-pf-tek-method/
The article Growing Mushrooms Using the Pf Tek Method first appeared on http://www.66thlondon.org.
http://video-proff.com/growing-mushrooms-using-the-pf-tek-method/
0 notes
Text
How To Grow Golden Teacher Mushrooms?
Just like Marijuana, psychedelic drugs, which were once considered illicit, are now becoming mainstream. Let's begin by providing a brief about the magic mushrooms for those who don't know much about them.
What are Magic Mushrooms?
Magic Mushrooms refer to wild and cultivated mushrooms that contain a psychoactive and hallucinogenic compound called psilocybin. It gets converted into psilocin in the human body, which is the chemical responsible for creating a 'trip.'
How Do You Recognize Magic Mushrooms?
Mushrooms containing psilocybin look similar to ordinary mushrooms with long and slender stems. The stems are mostly wheatish-grey, with dark brown caps and a white or light brown in the center.
Magic mushrooms, including the Golden Teacher mushrooms, can be consumed in a lot of ways. They can be eaten directly, mixed with food and beverages, or even brewed like tea.
What are the Effects of Magic Mushrooms?
Magic mushrooms are hallucinogenic drugs, which implies that they can cause you to see, hear, and feel things that may seem real but are actually not.
The effects of magic mushrooms vary from person to person and are also influenced by environmental factors.
Magic mushrooms, also known as shrooms, have a long history of providing spiritual experiences, leading to self-discovery. Many users believe that naturally occurring compounds, such as shrooms, help to attain spiritual states. Others believe that mushrooms help to get a sense of euphoria and a distorted sense of time.
Golden Teacher mushrooms offer a variety of effects. Users claim to experience enhanced colors, visual distortion, and lightness. It also makes you feel spiritually in tune and euphoric.
How To Grow Golden Teacher Magic Mushrooms?
Golden Teacher magic mushrooms are one of the easiest species to grow. With proper preparation and the right knowledge, you can grow Golden Teacher within two months.
To cultivate this strain, you need to collect materials from scratch or use a shroom growing kit. Precisely, to grow magic mushrooms, you need to get your hands on mycelium and a hospitable environment for it to thrive.
Mycelium is a fungus that grows into edible magic mushrooms. Since growing kits contain a grow box and mycelium, having one makes the growing process easy. Such kits include almost everything you need. However, there is a risk of contamination and even fake products.
Another alternative to growing Golden Teacher mushrooms is through the PF Tek method.
What is the PF Tek Method?
Psylocybe Fanaticus Technique or PF TEK, created by Robert McPherson in 1991 isn't very hard. Firstly, you need to prepare a substrate of brown flour, vermiculite, and water, dividing it between sterile glass jars. The next thing to do is introduce spores and wait for the development of mycelium. This will be the network of filaments, helping you to underpin mushroom growth. Post 4-5 weeks, transfer the colonized substrates to a fruiting chamber and sit back until the mushrooms grow.
Let's understand the process in detail.
Things Required For Phase One
● 10 sterilized jars
● Latex gloves
● Face Mask
● Rubbing Alcohol
● A syringe of mushroom spores
● Hypodermic needles
● Lighter
● Disinfectant Spray
Things Required For Phase Two
● Spray Bottle
● Fruiting Chamber (clear plastic tub with a lid)
● Vermiculite/Perlite
● Hydrogen Peroxide
Phase One
This phase involves creating a birthing cake. It occurs when the mycelium has colonized the jar and wound around the substrate. When you take it out of the mason jar, it will hold together and sprout mushrooms.
Step One: Sterilize
The first enemy in the cultivation of mushrooms is bacteria hijacking the jars. For this, you need to take certain steps to sterilize the jar as well as the surrounding environment.
Select a small space of your house, which can be used as a laboratory. Wear your face mask and close the door. Spray the room with a disinfectant spray, and wear your gloves.
Now, wipe off the jars with rubbing alcohol.
Step Two: Inoculate
Use a lighter and heat the metal portion of the hypodermic needle. Most hypodermic needles come pre-sterilized. So, this is just a preventive measure.
Don't lay the needle down after sterilization and continue holding it until it cools down. Shake the syringe to distribute spores evenly. Now, insert the needle into the port and inject one cc into the jar. Repeat the same process with the remaining jars.
Step Three: Sit Back and Wait
Place the jars in a card box after injecting, close the lid, and put them in a dark place. Make sure that there is a steady temperature of 80-85 degrees Fahrenheit.
After five days, a white substance will begin forming in the jar, which is mycelium. Let it grow for at least 15 days. Once the jars are entirely colonized, wait for a week and then proceed to phase two.
Phase Two
This is the time to remove the birthing cake from the jars. Over the next month, they'll sprout ample mushrooms.
Step One: Birth and Soak Mycelium Cakes
Once the jars are entirely colonized, it's time to birth and place them in fruiting chambers to sprout mushrooms. Since the mycelium stayed in an airtight container for a long period and soaked the moisture, it needs a nice soak for 12-24 hours.
Take a container with a lid or a plastic bag and have some filtered water ready. Put the cake into the jar or bag and avoid touching the cake. Fill with filtered water and put it into the refrigerator for 12-24 hours.
Step Two: Prepare the Chamber
Sterilize the container with a solution of bleach and boiling water. Rinse with plain boiled water.
Now fill the spray bottle with 10 parts of boiled water and one part of hydrogen peroxide. Sterilize the vermiculite by soaking another solution of boiling water and hydrogen peroxide. Now, spread a layer on the bottom of the growing chamber.
Place the mason jar in the vermiculite bed, placing a cake on each lid. Spray each lid with an H2O2 mixture. Leave enough space between each cake so that there's enough space for mushrooms to sprout.
Check the health of mycelium by sniffing the cake. It should smell like fresh mushrooms.
Step Three:
Place a lid on the growing chamber and put it in a place where it would get direct sunlight.
Maintenance
Mist the mushrooms twice a day with water or hydrogen peroxide for the next month. Make sure to maintain a temperature of low 70s and humidity of 85 percent.
Harvesting
When the mushrooms are finally ready for harvest, break them off the birthing cake. Put them in an airtight container and place the container in the refrigerator.
Final Thoughts
Growing Golden Teacher mushrooms may seem like a daunting task initially, but you'll gain experience after growing a batch or two. We advise re-reading the steps until you can picture the whole cultivation process.
Remember, it is a privilege to grow anything. It can also become one of your favorite hobbies. Enjoy the cultivation of Golden Teacher and indulge in self-appreciation when it's done.
16 notes
·
View notes
Text
KISS Method of Growing Psilocybin Mushrooms (PF-Tek)

I have taken all the information I could gather and compiled it into this super sleek yet extremely effective method for fruiting some cakes with your favorite fungus.Such a fungi*snickers*(Magic Mushrooms, Shrooms, Psilocybin)
This article will go over one of the most basic grow techniques for growing a wide variety of mushrooms, including Shaggy Mane, Lion's Mane, and P. Cubensis.
Step 1: Supplies to Begin To begin growing mushrooms
You will need the following for the PF Tek:
-Pressure Cooker
-Organic Brown Rice Flour
-Vermiculite
-Perlite
-Canning jars. (Be sure to use wide-mouthed tapered jars!)
-Spore Syringe
-Aquarium/Terrarium/Large Tupperware (for humidity chamber)
-Hammer and Nail
-Aluminum foil
- Alcohol lamp or lighter
PF Tek is a method of mushroom cultivation pioneered by Robert McPherson, aka Psylocybe Fanaticus, T.P. & Nanook. This technique (Tek) originally utilized organic rye berries, but later included brown rice flour and vermiculite.
Step 2: Preparing Your Jars for Spore Syringes
Spore syringes are the easiest way to get started
growing mushrooms with this technique. They can be
ordered online from a variety of sources.
To prepare your jars, you will need a hammer and
nail.
Remove the jar lid and lay the flat lid rubber side up
on a table.
Take a nail and make 2 - 4 holes evenly
spaced around the edge.

Step 3: Mix the Substrate
The substrate is what the fungus will feed off of. It will consist of brown rice flour, vermiculite, and water.
First, take the dry ingredients and mix them in a bowl.
After they are well mixed add the water.
For 12x 250mL (~8oz): I have heard of adding 'worm castings' (earthworm poop) to substrate to give better flushes of mushrooms.
-9 cups vermiculite
-3 cups brown rice flour
-3 cups water
For my mixing bowl, I halved the amounts above and mixed only half the substrate at a time.

Step 4: Fill the Jars
Once your substrate is well mixed and moist, begin filling your prepared jars with the substrate. Don't pack the mixture down, just loosely fill the jar.
Leave about 1/2 inch of space between the substrate and the top of the jar. I just filled my jars up to the threading for the lid. Be sure to wipe up any moisture/substrate on the 1/2" inside and outside the jar.
Fill the rest of the jar with dry vermiculite. This is to make a barrier between the substrate and contaminants in the air.
Step 5: Get Your Jars Ready for Sterilizing
Now close up all your jars, with the rubber side facing upwards (upside down from how they were designed)
Place a square of foil over the lid covering the holes and sealing the jar from contaminants in the air. Crumple it down nice and tight, forming it around the jar lid.
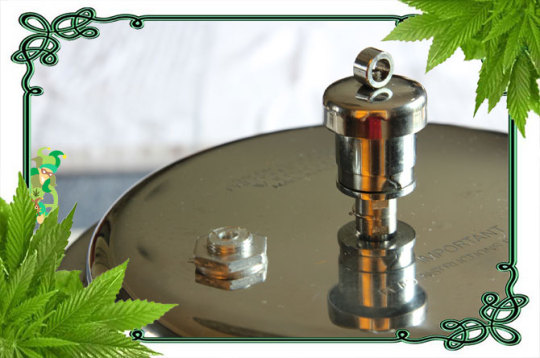
Put about 3 inches of water in your pressure cooker and place as many jars as you can, stacking them if you have to. I had no problem putting jars directly on the bottom of the cooker, but I have seen people put old canning jar rings in the bottom to help prevent jars from cracking.
READ your pressure cooker's manual if you have it! It can be a dangerous tool if improperly used.

Step 6: Sterilization
Close up your cooker and put it on a stove.
Start the stove up and wait until the pressure regulator (the ball/weight on top of the cooker) starts shaking. This is around 11-15psi depending on the manufacturer.
Let the jars and substrate sterilize for about an hour. Once the hour is up, let the cooker stand for about 3 hours to cool down, you can also sterilize in the evening and let it cool down overnight.
Step 7: Inoculation
Inoculation is the process of introducing spores of your choosing into the sterilized substrate to take hold and grow. In this step, be sure to take precautions to prevent contamination of the jars!!
Leave the jars in the pressure cooker until you are ready to Inoculate. It is best to use a cleaned small room (such as a bathroom), HEPA flow hood, or glove box when Inoculating.
Here is the basic order of things during the Inoculation procedure:- Open the pressure cooker
- Remove a jar
- Heat the syringe needle until it is red hot, with either a lighter or alcohol lamp
- Remove the foil
- Insert the needle into the hole you punched with a nail earlier
- Inject some (about 1ml or so) of the spore saturated fluid into the substrate, on the wall of the glass jar. You should be able to see the needle tip and the water run down the side of the jar.
- Repeat with the other nail holes
- Replace the foil and continue with the next jar, reheat the needle if it touches anything unsterilized or every 3 or so jars to prevent contaminations.

Step 8: Incubation
Now that the hard part is over, you just need to let the jars rest somewhere warm and dark. Like in a cupboard above the refrigerator, or a cardboard box by your computer tower.
This allows the spores to incubate into mycelium the body that absorbs nutrients and water. Keep them around 80-86 degrees F. It will just take longer for the mycelium to grow if it isn't near the optimum temperature.
It takes around 3 to 4 days to see the first hairs of mycelium forming as white spots and 3 to 5 weeks to let the fungus get to a 100% foothold in all the substrate, depending on temperature conditions.

https://youtu.be/D4jUTIv0XfY
Step 9: Science
Mycelium Mushrooms are part of the Basidiomycota phylum which reproduce using spores (basidiospores) created on the gills (basidia) of the mushroom. Hyphae is the stringy organic material making up the mycelium.
When hyphae from 2 different mycelium bodies meet they share genetic material and create a dikaryotic, secondary mycelium structure from which the fruit bodies (basidiocarps) form.
That is why we inject spores in multiple places to create more than 1 mycelium body!
Step 10: Fruiting Chamber
A simple fruiting chamber can be fashioned out of an aquarium or a large Tupperware box.
The main purpose of the chamber is to create a high humidity (90% to 100%) environment for our mushrooms to flourish. To easily humidify the chamber, fill a strainer with your perlite and soak it in a bowl of water for 5 to 10 minutes, drain it, and line the bottom of the container with it.
This will allow the water to slowly evaporate to create high humidity. Place squares of aluminum foil where you will be putting your substrate cakes in the next step. Be sure to use some sort of cover to keep the humidity in the chamber.
If you can drill holes into the sides of the container to allow air exchange, the mushrooms produce CO2 and require O2 to live!
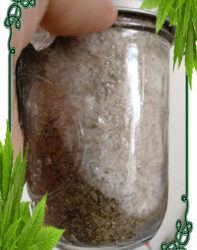
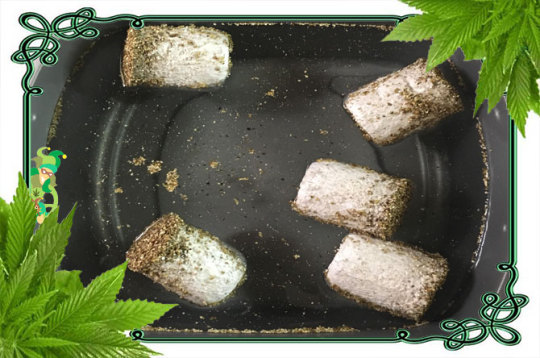
Step 11: Birthing Your Cakes
Once the mycelium has taken a hold over all the substrate in the jar, the next step would be to pop the colonized cake out or birth it.
Birthing is a fairly simple process of taking the foil and lid off the jar, flipping it upside down on a paper plate or piece of foil, and giving it a few smacks downward to dislodge it. After birthing, it is a good idea to soak the cake in water for about 24 hours.
Temperature shocking the fungus by soaking it in the refrigerator causes the fruits to appear quicker than a room temperature soak. I have also seen methods that roll the cake in dry vermiculite after it has been soaked and birthed.
Remember that mushrooms are 80 to 90% water!

Step 12: Wait for Your First Flush
It takes about 2 weeks for the first flush to complete growing depending on the species.
The cakes should last for about 3 or 4 flushes, in which you may "dunk" the cakes for 24 hours between flushes to rehydrate them. If you plan on picking the mushrooms, just grab them from the base with your forefinger and thumb and break them off at the base.
They can either be cooked fresh, freeze-dried or air-dried for cooking later!
Good luck!
https://www.youtube.com/watch?v=2jkZKbip3Po&t=0sClub Cannabliss Newsletter
Be inspired by the unconventional wisdom of our peers and experts as they help us get to a higher state of consciousness.Sign-in and edit your profile. Not yet a Member? Register and claim your spot among the anointed ones!


Indica vs Sativa. Which type of bud comes out on top? You can decide for yourself as we now dive deep into the world of the various types of cannabis strains.
Let's Grow Together!
Please follow our social or subscribe as well to our social channels to stay up to date!

Nirvana Farms Medical
- STONER MORNING SHOW
- D&D Cooking with Cannabutter
Instagram
Linkedin
Twitter
Tumblr
Pinterest
YouTube
- Mix
- Medium
- Flickr
- Email
Read the full article
4 notes
·
View notes
Text
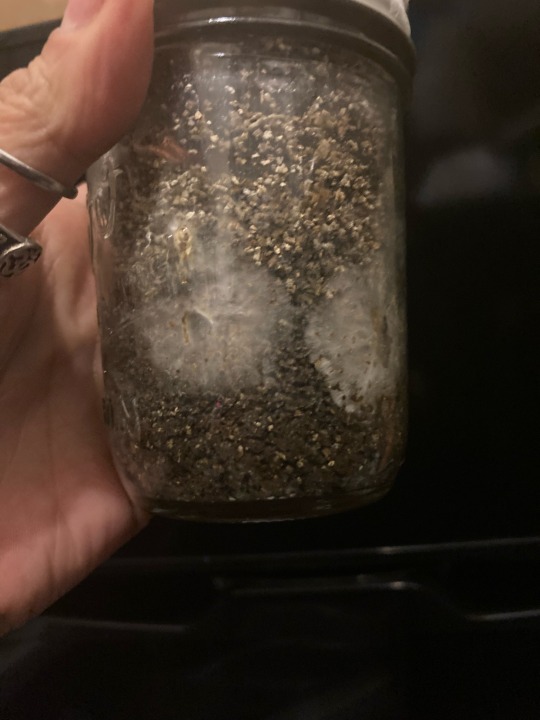
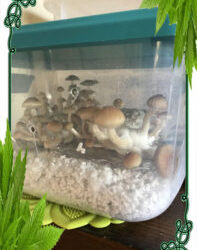
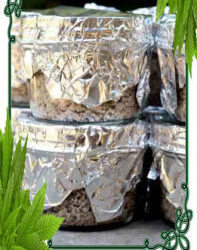
chefruso replied to your photo
you know if you use wide mouth jars you can slide the cakes out of the jars for the fruiting stage, will help you produce much faster.
Thanks! But just so you’re aware, those are ziploc twist n’ loc 1qt widemouth bottles which are being “top fruited” and are not PF cakes and thus don’t need to be birthed/dunked/rolled
google ‘muda’s bottle tek’ to learn more
3 notes
·
View notes
Photo
4.0 out of 5 stars
More Appropriate for the Farm than the Home
5.0 out of 5 stars
Part of the ideal amatuer mycology library!
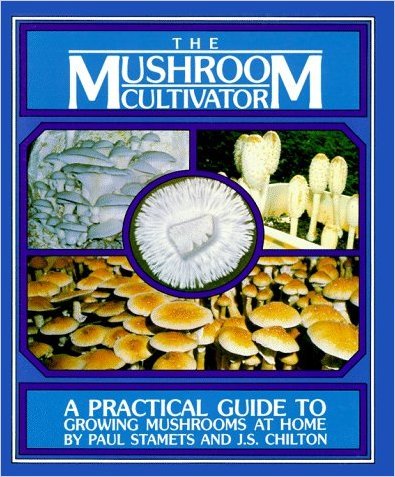
I have read this and several other mushroom cultivation books. This book, coupled with Stamet's Growing Gourmet and Medicinal Mushrooms, makes for the absolute best reference materials for growing your own mushrooms.That said, I'll mention the only thing that may disappoint a reader. His treatment of agar techniques in either of his cultivation books leaves a little to be desired. If you feel uncomfortable working with petri dishes after reading his sections on it, you may wish to check out "Laboratory Excercises in Microbiology" (ISBN 0-697-35443-1) by Harley and Prescott. It is a little more than a fellow needs to know about microbiology, but it is an excellent reference for aquainting on with aseptic agar techniques.Aside from this, Stamets has certainly beaten the competion with this book! Go to Amazon
3.0 out of 5 stars
A Classic for Mushroom Cultivation
If you were to buy only one book on mushroom cultivation, this would be the best choice. It can certainly stand-alone in that it provides all the info the reader needs to cultivate mushrooms. Although psilocybian mushrooms are included these are by no means the exclusive or main focus of this book. For the most part, the book is concerned with legal edible mushrooms that can be grown in the home or yard. Absolute beginners can certainly start with this book and no other book will be necessary to provide all that the reader needs to know from beginning to end of the mushroom growing process. It must be mentioned that this book does not cover the popular "PF tek" (the "Psilocybe Fanaticus technique" also known as the "jar tek"), the simple technique utilizing canning jars full of substrate and inoculating them with syringes of spores suspended in water. Readers interested in this technique (which, after all seems the easiest and most practical) would find all they need to know on this technique at the Shroomery.org web site and others like it. This book was originally published in 1983, years before the "PF tek" was innovated. Among the technique that this book does cover are the use of agar petri dish culture, culture slants, casing, grain spawn, composting, log-plugging and more. There is also a wealth of info on mushroom contaminants - how to spot them and how to deal with them. Therefore we can say that while this book does not cover the most simple of techniques, it certainly covers all other techniques suitable for absolute beginners and for those looking to expand their hobby beyond the beginners' methods. The authors are obviously sincerely interested in mushrooms in general and in the cultivation of edible mushrooms.Read more › Go to Amazon
5.0 out of 5 stars
It's the Mushroom Cultivation Bible
I often refer to this book at the "bible", also. And it's writen by the "Cultivation God" himself. I already knew how to cultivate before i bought this book, and had a fairly wide knowledge of the subject. The amount of information in this book is unbelievable. I was just shocked. And, in a sort of response to the person who said there's too much info - if you're going to cultivate mushrooms, the more information the better. You can get buy with just a step-by-step guide, but you won't be very successful, and if you run into problems, or want to do more, then you're not going to know what to do. If you really want to cultivate mushrooms, and you really want to enjoy it, then you've got to get this book. It's easy to understand, and gives some basic information on the life cycle and properties of mushrooms. Ask anyone that cultivates, and knows a lot about cultivating, and they'll tell you that this is a must have book. It's probably my favorite book i've ever bought. Get it! Go to Amazon
0 notes
Text
Growing Mushrooms Using the Pf Tek Method
The Mushroom Pf Tek is among one of the most preferred as well as most convenient to grow. This results from its capacity to be expanded in any kind of type of environment, inside or outdoors. It can additionally be expanded with an inexpensive.
There are many different sorts of mushrooms that can be grown using the Pf Tek approach. One of the most popular are the Shiitake, Oyster, Enoki, Portabella, and also Switch. These can all be grown in a range of methods.
Shiitake mushrooms are very popular for usage in cooking and as a meat substitute. They have a really solid flavor as well as can be utilized in virtually any dish.
Oyster mushrooms are typically utilized in Oriental dishes. They are little as well as white with a sweet preference.
Enoki mushrooms are commonly made use of in soups and salads. They have a light flavor and are very tender.
Portabella mushrooms are very large and have a weighty structure. They are typically offered chopped and also can be utilized in practically any dish.
Button mushrooms are the biggest and also most typical mushroom. They can be located in grocery stores and are fantastic for making soups.
Pf Tek Dish
The Pf Tek technique is easy to use. The first step is to make your substrate. You will certainly require to mix equivalent parts of sawdust and peat moss. The combination ought to be damp yet not damp.
After blending both ingredients you will need to include water. The quantity of water required will depend on the dimension of your container. You will certainly intend to use enough to cover the substratum totally.
Next you will certainly need to inoculate your substratum. For this you will need to take an item of cotton and dampen it somewhat. You will certainly after that place it right into the substrate. The cotton will take in a few of the water from the substratum and also permit it to begin expanding.
You will then put the substratum into a container and also let it sit up until the cotton starts to grow.
When the cotton has actually begun to expand you will need to place your substratum into the light. A fluorescent light will function best. You will certainly then allow it sit for around 2 weeks.
When the cotton has actually grown you will require to cut it off. This is done by taking a sharp knife and also reducing the cotton off of the substrate. You can then utilize the cotton to make a new set of substratum.
Pf Tek Fruitting Chamber
One more means to grow mushrooms is to make use of a fruiting chamber. A fruiting chamber is an unique type of container that enables a regulated environment. It also permits the substratum to be maintained a consistent temperature level.
A fruiting chamber will certainly cost around $100 as well as can be acquired at most home renovation shops.
The main benefit of using a fruiting chamber is the truth that the substratum is always kept at a continuous temperature. This allows for the fungi to grow faster as well as generate more mushrooms.
Mushroom Pf Tek Vs Monotub
There are several approaches that can be used to grow mushrooms. Some are easier than others as well as some are more pricey.
One technique that is really low-cost and also easy to do is called the monotub approach. In this method you merely put the substratum right into a glass jar. After that you put a plastic tube right into the container and cover it with dirt.
The plastic tube is after that covered with an item of fabric and positioned in an area where it will certainly get direct sunlight.
After putting the tube right into the jar you will certainly need to place a percentage of substrate right into the container. This will assist to feed the fungi as well as keep it to life.
The substrate must after that be watered and the jar placed into a dark location. The substratum will certainly begin to grow. As soon as the substratum has actually expanded to about 1/3 of the jar it will certainly be time to harvest.
Mushroom Pdf Tek
There are several guides that can be made use of to help you discover exactly how to expand mushrooms. The Mushroom Pf Tek is one of them. This guide is very basic to adhere to and also will certainly reveal you exactly what you need to do.
The guide shows you how to expand mushrooms in a number of various means. You will certainly find out just how to expand them in a fruiting chamber and in a Pf Tek. You will certainly additionally find out exactly how to expand them inside your home and also outdoors.
The overview is written in a really simple way and also describes whatever you need to know. There is even a video clip available to help you recognize how to use the overview.
Pf Tek Shroomerly
The Pf Tek approach can be made use of to grow mushrooms in almost any environment. This consists of outside, inside your home, and also in a fruiting chamber.
The Pf Tek approach does need a bit of work to get it up and running. You will need to see to it that you have the appropriate substratum. If you do not have the ideal substratum you will not have the ability to grow mushrooms.
If you have an interest in growing mushrooms then you might wish to consider the Pf Tek method.
Inspired by http://ucangrowmushrooms.com/growing-mushrooms-using-the-pf-tek-method/
The article Growing Mushrooms Using the Pf Tek Method first appeared on http://www.66thlondon.org.
http://pinkribbonmail.com/growing-mushrooms-using-the-pf-tek-method/
0 notes
Text
KISS Method of Growing Psilocybin Mushrooms (PF-Tek)
I have taken all the information I could gather and compiled it into this super sleek yet extremely effective method for fruiting some cakes with your favorite fungus.Such a fungi*snickers*(Magic Mushrooms, Shrooms, Psilocybin)
This article will go over one of the most basic grow techniques for growing a wide variety of mushrooms, including Shaggy Mane, Lion's Mane, and P. Cubensis.
Step 1: Supplies to Begin To begin growing mushrooms
You will need the following for the PF Tek:
-Pressure Cooker
-Organic Brown Rice Flour
-Vermiculite
-Perlite
-Canning jars. (Be sure to use wide-mouthed tapered jars!)
-Spore Syringe
-Aquarium/Terrarium/Large Tupperware (for humidity chamber)
-Hammer and Nail
-Aluminum foil
- Alcohol lamp or lighter

PF Tek is a method of mushroom cultivation pioneered by Robert McPherson, aka Psylocybe Fanaticus, T.P. & Nanook. This technique (Tek) originally utilized organic rye berries, but later included brown rice flour and vermiculite.
Step 2: Preparing Your Jars for Spore Syringes
Spore syringes are the easiest way to get started
growing mushrooms with this technique. They can be
ordered online from a variety of sources.
To prepare your jars, you will need a hammer and
nail.
Remove the jar lid and lay the flat lid rubber side up
on a table.
Take a nail and make 2 - 4 holes evenly
spaced around the edge.

Step 3: Mix the Substrate
The substrate is what the fungus will feed off of. It will consist of brown rice flour, vermiculite, and water.
First, take the dry ingredients and mix them in a bowl.
After they are well mixed add the water.
For 12x 250mL (~8oz): I have heard of adding 'worm castings' (earthworm poop) to substrate to give better flushes of mushrooms.
-9 cups vermiculite
-3 cups brown rice flour
-3 cups water
For my mixing bowl, I halved the amounts above and mixed only half the substrate at a time.

Step 4: Fill the Jars
Once your substrate is well mixed and moist, begin filling your prepared jars with the substrate. Don't pack the mixture down, just loosely fill the jar.
Leave about 1/2 inch of space between the substrate and the top of the jar. I just filled my jars up to the threading for the lid. Be sure to wipe up any moisture/substrate on the 1/2" inside and outside the jar.
Fill the rest of the jar with dry vermiculite. This is to make a barrier between the substrate and contaminants in the air.

Step 5: Get Your Jars Ready for Sterilizing
Now close up all your jars, with the rubber side facing upwards (upside down from how they were designed)
Place a square of foil over the lid covering the holes and sealing the jar from contaminants in the air. Crumple it down nice and tight, forming it around the jar lid.
Put about 3 inches of water in your pressure cooker and place as many jars as you can, stacking them if you have to. I had no problem putting jars directly on the bottom of the cooker, but I have seen people put old canning jar rings in the bottom to help prevent jars from cracking.
READ your pressure cooker's manual if you have it! It can be a dangerous tool if improperly used.
Step 6: Sterilization
Close up your cooker and put it on a stove.
Start the stove up and wait until the pressure regulator (the ball/weight on top of the cooker) starts shaking. This is around 11-15psi depending on the manufacturer.
Let the jars and substrate sterilize for about an hour. Once the hour is up, let the cooker stand for about 3 hours to cool down, you can also sterilize in the evening and let it cool down overnight.

Step 7: Inoculation
Inoculation is the process of introducing spores of your choosing into the sterilized substrate to take hold and grow. In this step, be sure to take precautions to prevent contamination of the jars!!
Leave the jars in the pressure cooker until you are ready to Inoculate. It is best to use a cleaned small room (such as a bathroom), HEPA flow hood, or glove box when Inoculating.
Here is the basic order of things during the Inoculation procedure:- Open the pressure cooker
- Remove a jar
- Heat the syringe needle until it is red hot, with either a lighter or alcohol lamp
- Remove the foil
- Insert the needle into the hole you punched with a nail earlier
- Inject some (about 1ml or so) of the spore saturated fluid into the substrate, on the wall of the glass jar. You should be able to see the needle tip and the water run down the side of the jar.
- Repeat with the other nail holes
- Replace the foil and continue with the next jar, reheat the needle if it touches anything unsterilized or every 3 or so jars to prevent contaminations.


Step 8: Incubation
Now that the hard part is over, you just need to let the jars rest somewhere warm and dark. Like in a cupboard above the refrigerator, or a cardboard box by your computer tower.
This allows the spores to incubate into mycelium the body that absorbs nutrients and water. Keep them around 80-86 degrees F. It will just take longer for the mycelium to grow if it isn't near the optimum temperature.
It takes around 3 to 4 days to see the first hairs of mycelium forming as white spots and 3 to 5 weeks to let the fungus get to a 100% foothold in all the substrate, depending on temperature conditions.

https://youtu.be/D4jUTIv0XfY
Step 9: Science
Mycelium Mushrooms are part of the Basidiomycota phylum which reproduce using spores (basidiospores) created on the gills (basidia) of the mushroom. Hyphae is the stringy organic material making up the mycelium.
When hyphae from 2 different mycelium bodies meet they share genetic material and create a dikaryotic, secondary mycelium structure from which the fruit bodies (basidiocarps) form.
That is why we inject spores in multiple places to create more than 1 mycelium body!

Step 10: Fruiting Chamber
A simple fruiting chamber can be fashioned out of an aquarium or a large Tupperware box.
The main purpose of the chamber is to create a high humidity (90% to 100%) environment for our mushrooms to flourish. To easily humidify the chamber, fill a strainer with your perlite and soak it in a bowl of water for 5 to 10 minutes, drain it, and line the bottom of the container with it.
This will allow the water to slowly evaporate to create high humidity. Place squares of aluminum foil where you will be putting your substrate cakes in the next step. Be sure to use some sort of cover to keep the humidity in the chamber.
If you can drill holes into the sides of the container to allow air exchange, the mushrooms produce CO2 and require O2 to live!

Step 11: Birthing Your Cakes
Once the mycelium has taken a hold over all the substrate in the jar, the next step would be to pop the colonized cake out or birth it.
Birthing is a fairly simple process of taking the foil and lid off the jar, flipping it upside down on a paper plate or piece of foil, and giving it a few smacks downward to dislodge it. After birthing, it is a good idea to soak the cake in water for about 24 hours.
Temperature shocking the fungus by soaking it in the refrigerator causes the fruits to appear quicker than a room temperature soak. I have also seen methods that roll the cake in dry vermiculite after it has been soaked and birthed.
Remember that mushrooms are 80 to 90% water!

Step 12: Wait for Your First Flush
It takes about 2 weeks for the first flush to complete growing depending on the species.
The cakes should last for about 3 or 4 flushes, in which you may "dunk" the cakes for 24 hours between flushes to rehydrate them. If you plan on picking the mushrooms, just grab them from the base with your forefinger and thumb and break them off at the base.
They can either be cooked fresh, freeze-dried or air-dried for cooking later!
Good luck!

https://www.youtube.com/watch?v=2jkZKbip3Po&t=0sClub Cannabliss Newsletter
Be inspired by the unconventional wisdom of our peers and experts as they help us get to a higher state of consciousness.Sign-in and edit your profile. Not yet a Member? Register and claim your spot among the anointed ones!


Indica vs Sativa. Which type of bud comes out on top? You can decide for yourself as we now dive deep into the world of the various types of cannabis strains.
Let's Grow Together!
Please follow our social or subscribe as well to our social channels to stay up to date!

Nirvana Farms Medical
- STONER MORNING SHOW
- D&D Cooking with Cannabutter
Instagram
Linkedin
Twitter
Tumblr
Pinterest
YouTube
- Mix
- Medium
- Flickr
- Email
Read the full article
1 note
·
View note
Last Seen Blogs

alpha4444
Alpha Women

nighttmaire-writing
Nighttmaire's Writing

v-itabrevis
c'est la mort

akis-karanos
Akis Karanos

thelockyfoxy
Locky fox