#plumbing air vent blocked
Text
Toilet Bubbles When Other Is Flushed #Shorts
Ok Drew. I don’t think he heard us. Go ahead and flush it, Drew. That is us flushing the other toilet in the house. And the air’s coming up here. So that means we have a vent that is not working. Now we’re on the hunt for a vent that is blocked.
All right. Just let you know when you start seeing that bubbling anywhere else, you got a vent that’s not working. So keep that in mind.
????…

View On WordPress
#blocked plumbing vent symptoms#fix#handyman#home improvement#house#mobile home#plumbing#plumbing 101#plumbing a bathroom#plumbing air vent blocked#plumbing basics#plumbing basics bathroom#plumbing basics toilet#plumbing tools#plumbing tricks#plumbing vent blockage#plumbing vent blocked#plumbing work#repair#rogers arkansas#sink#Straight Arrow Repair#toilet#toilet bubbles when other is flushed#toilet gurgle#toilet gurgles when flushed septic#trailer home
0 notes
Text


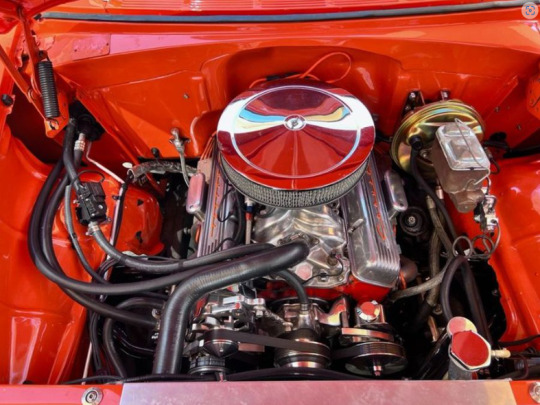

1955 Chevrolet Bel Air Custom
Why This Car Is Special
The 1955 Chevrolet (sometimes referred to as '55 Chevy) is an automobile that was made by Chevrolet in 1955. It is considered a huge turning point for the manufacturer and was a major success.
Fast forward to now and you will see this 1955 Chevrolet 150 Resto-Mod we have at Skyway Classics has a semi-truck load of performance and comfort items added to its gleaming orange and tan exterior.
Features
1955 Chevrolet Bel Air Custom
Restored at Custom Classics
355 cubic inch modified small block Chevrolet engine
Polished aluminum intake
Performance carb with the electric choke
Chrome open element air cleaner assembly
Aluminum finned valve covers with red script Chevrolet
Performance fuel plumbing
Modified electronics and distributor
Serpentine belt drive system with billet aluminum pulleys
Power steering and disc power brakes
Vintage Air
Tube headers
3-inch dual exhaust with Flowmaster mufflers
700 R4 automatic transmission with overdrive
Engine and frame both painted and detailed
Tan custom interior
Handsome bucket seat like but bench-seats
Matching rear seat and door panels
Leather-wrapped steering wheel
Custom center console with the chrome shifter and orange shifter ball
Billet aluminum dash with VDO gauges
In-dash CD player
Vintage Air with electronic climate control
Seatbelts
Tan carpet and floor mats
Finished trunk with custom fitted partitions, carpet, Bow Tie logo back of the cargo area
Hugger Orange and Tan
Full side windows in place of the original vented pieces
One-piece front and rear bumpers
Staggered-diameter Ridler alloy wheels
Performance tires
Mechanical
You will appreciate the 355 cubic inch modified Chevy small-block V-8 residing under the smoothed hood. A showpiece all on its own, it incorporates a polished aluminum intake, performance carb with the electric choke, chrome open element air cleaner assembly, aluminum finned valve covers with red script Chevrolet on them, performance fuel plumbing, modified electronics and distributor, a serpentine belt drive system with billet aluminum pulleys to drive its power steering, power brakes, alternator and Vintage Air accessory drives, and tube headers feeding 3-inch dual exhaust with Flowmaster mufflers to deliver the kind of throaty rumble guaranteed to attract attention.
A 700 R4 automatic transmission with overdrive and four-wheel disc brakes add even more to the 150's performance capabilities with the engine and frame both painted and detailed.
Interior
The tan custom interior has had its once-minimalist accommodations traded for a handsome bucket seat like but bench-seat interior featuring a matching rear seat and door panels, a leather-wrapped steering wheel, custom center console with the chrome shifter and orange shifter ball, billet aluminum dash with VDO gauges, in-dash CD player, Vintage Air with electronic climate control, seatbelts, and tan carpet and floor mats.
It even has a finished trunk with custom fitted partitions, carpet, and a Bow Tie logo across the back of the cargo area.
Exterior
Our 1955 Chevrolet 150 Sedan is a particularly fine example of craftmanship that has went into this show car.
The first thing you will notice is the paint scheme. Tastefully sprayed in Hugger Orange and Tan with carefully considered details such as full side windows in place of the original vented pieces, one-piece front and rear bumpers contribute to setting the car apart from the pack, and new staggered-diameter Ridler alloy wheels and performance rubber give it just the right stance.
Conclusion
This 1955 Chevy show car we have at Skyway Classics was built by Custom Classics that is a nationally renowned restoration facility for customizing show-winning cars of almost any make and model, from American iron to foreign exotics and vintage rarities.
1955 Chevrolet Bel Air Bradenton, Florida | Hemmings
1955 Chevrolet Bel Air Bradenton, Florida | Hemmings
1955 Chevrolet Bel Air Bradenton, Florida | Hemmings
2 notes
·
View notes
Text
Comprehensive Guide to SWR Fittings: Types, Uses, and Benefits
In modern plumbing systems, efficient management of waste and rainwater is crucial for maintaining a hygienic environment. A key component of such systems is SWR fittings (Soil, Waste, and Rainwater fittings), which play an integral role in connecting and directing the flow of waste and rainwater in residential, commercial, and industrial buildings. These fittings, when paired with SWR pipes, form a highly efficient and leak-proof system, ensuring seamless transportation of waste and rainwater to designated disposal or treatment points.
In this comprehensive guide, we’ll dive deep into SWR fittings, their various types, uses, and the benefits they offer for modern plumbing systems.
What Are SWR Fittings?
SWR fittings are components that connect SWR pipes in a plumbing system. These fittings are made from uPVC (Unplasticized Polyvinyl Chloride), which is known for its strength, durability, and resistance to corrosion. The fittings are designed to create secure, leak-proof joints between pipes, ensuring a long-lasting and efficient plumbing system.
By allowing smooth directional flow and preventing leaks, SWR fittings are essential in handling soil waste (from bathrooms and kitchens), general waste, and rainwater in any building.
Types of SWR Fittings
SWR fittings come in various shapes and sizes, each serving a unique purpose in plumbing systems. Some of the most commonly used SWR fittings include:
1. SWR Elbow
An SWR elbow is a pipe fitting that allows a change in the direction of flow. The most common elbow angles are 90 degrees and 45 degrees, making it ideal for redirecting the flow of waste or rainwater at corners or junctions. These elbows prevent pressure build-up and ensure a smooth transition in the plumbing system.
2. SWR Tee
A Tee fitting is shaped like the letter "T" and is used to branch off the main pipe. It allows the system to carry the flow in multiple directions, providing connections to different areas in the building, such as multiple bathrooms, kitchens, or outdoor drainage systems. SWR tees are available in equal or unequal (reducing) sizes depending on the pipe diameters.
3. SWR Coupler
An SWR coupler is a short piece used to join two SWR pipes of the same diameter. It ensures a secure and leak-proof connection between pipes, allowing for easy extension of the plumbing line. Couplers are designed to be strong and durable, ensuring a tight fit without any gaps.
4. SWR Reducer
An SWR reducer is used when there’s a need to connect pipes of different diameters. This fitting ensures a smooth transition from a larger pipe to a smaller one, maintaining proper flow without causing any blockages or turbulence. Reducers help balance the flow rates in systems that require pipes of varying sizes.
5. SWR End Cap
An end cap is used to seal the end of an SWR pipe, preventing any leakage. These are typically used when the piping system needs to be temporarily or permanently closed off at a specific point. End caps are an essential fitting when performing maintenance or making modifications to the system.
6. SWR Bend
An SWR bend is similar to an elbow but is typically more gradual in its curvature, allowing for a smoother transition in the flow of waste or rainwater. These bends are used where a softer change in direction is required, reducing the risk of blockages and maintaining system efficiency.
7. SWR Vent Cowl
The SWR vent cowl is fitted at the top of vertical pipes, usually in ventilation systems. Its primary purpose is to allow airflow into the system, ensuring that gases and odors are properly ventilated from the building. The cowl prevents debris and pests from entering the pipe, while still enabling air circulation.
8. SWR Gully Trap
An SWR gully trap is designed to prevent foul gases from entering the building. It traps waste, ensuring that the gases are safely directed to external drains while maintaining a water seal to block unwanted odors from escaping into indoor spaces.
Benefits of Using SWR Fittings
The use of SWR fittings in plumbing systems offers numerous advantages that contribute to a safe, efficient, and long-lasting setup. Here are the top benefits of incorporating SWR fittings in your waste and rainwater management system:
1. Leak-Proof Connections
SWR fittings are designed with tight seals, often using rubber rings or solvent cement joints. This ensures that there are no gaps or loose connections that could lead to leaks, which are critical in managing waste and preventing water damage in buildings.
2. Durability and Long-Lasting
Made from high-quality uPVC, SWR fittings are highly resistant to corrosion, chemical reactions, and environmental wear. This makes them incredibly durable, with a long service life even in harsh conditions such as heavy rain, waste accumulation, or fluctuating temperatures.
3. Lightweight and Easy Installation
Compared to metal fittings, SWR fittings are lightweight, making them easier to handle and install. Their modular nature ensures that plumbing systems can be assembled quickly, reducing labor costs and time on-site.
4. Cost-Effective
Due to their low maintenance requirements, durability, and ease of installation, SWR fittings offer a cost-effective solution for both small-scale and large-scale plumbing systems. Over time, the system’s resistance to corrosion and degradation ensures fewer repairs and replacements, lowering overall operational costs.
5. Smooth Flow and Reduced Blockages
SWR fittings are designed to offer a smooth flow of waste and water, minimizing the risk of clogs or sediment buildup. The internal surface of uPVC fittings is smooth, which reduces friction and ensures the waste moves efficiently without causing any obstruction.
6. Weather and UV Resistance
SWR fittings can withstand extreme weather conditions and are UV-resistant, ensuring that they do not deteriorate when exposed to sunlight or outdoor environments. This makes them suitable for outdoor rainwater systems as well as indoor plumbing setups.
7. Environmentally Friendly
SWR fittings are made from recyclable materials, making them an eco-friendly option in today’s sustainability-conscious construction industry. Their long service life and low need for replacement also contribute to a reduced environmental footprint.
Common Applications of SWR Fittings
1. Residential Plumbing
SWR fittings are widely used in residential buildings to manage waste from bathrooms, kitchens, and laundry areas. They are also essential in rainwater drainage systems, ensuring the proper transportation of stormwater from roofs and outdoor spaces to drains.
2. Commercial and Industrial Plumbing
In commercial and industrial buildings, SWR fittings are crucial for managing high volumes of waste and rainwater. Whether it's a shopping mall, office complex, or factory, these fittings ensure that the plumbing system functions smoothly and without interruptions.
3. Rainwater Harvesting Systems
In rainwater harvesting setups, SWR fittings help direct rainwater from rooftops and other surfaces to collection tanks or drainage points. Their UV and weather resistance make them particularly suitable for outdoor applications.
4. Sewer Systems
SWR fittings are integral to large-scale sewer systems, ensuring the proper flow of wastewater to treatment facilities or disposal points. Their durability and leak-proof construction make them a reliable choice for municipal and urban drainage projects.
ConclusionSWR fittings are a vital part of any modern plumbing system, offering durability, cost-efficiency, and seamless functionality. With a wide variety of fittings available to suit different applications, these components ensure that waste and rainwater are managed effectively, whether in residential homes or large-scale industrial setups. By choosing high-quality SWR fittings, you can create a leak-proof, long-lasting, and efficient drainage system that will serve your building for years to come.
0 notes
Text
Understanding Your Home's Plumbing System
Your home’s plumbing system is an intricate network of pipes, valves, and fixtures that work together to supply clean water and remove waste. Though it often operates behind the scenes, understanding how your plumbing system works is crucial for maintaining it, preventing issues, and making informed decisions during repairs or renovations. This article will guide you through the basics of your home’s plumbing system, from its components to common issues and maintenance tips.
1. The Basics of a Plumbing System
At its core, a plumbing system consists of two main subsystems: the water supply system and the drainage system.
Water Supply System: This subsystem brings fresh water into your home from a municipal supply or a private well. It operates under pressure, which allows water to flow through pipes to various fixtures like sinks, toilets, and showers. The water supply system includes a network of pipes, valves, and faucets, as well as a water meter to measure usage.
Drainage System: The drainage system, also known as the drain-waste-vent (DWV) system, is responsible for removing wastewater from your home and venting harmful gases. Unlike the water supply system, the drainage system relies on gravity to carry waste and water out of your home through a series of pipes that connect to a sewer line or septic tank. The venting aspect prevents a vacuum in the pipes, ensuring smooth water flow and preventing sewer gases from entering your living spaces.
2. Key Components of Your Plumbing System
Several key components work together to ensure your plumbing system functions smoothly. Understanding these components can help you identify potential issues and communicate more effectively with a plumber.
Pipes: Pipes are the backbone of your plumbing system, carrying water to and from various fixtures. They can be made from materials like copper, PVC, PEX, or galvanized steel, each with its advantages and limitations.
Valves: Valves control the flow of water within your plumbing system. Common types include shut-off valves, which allow you to stop the water supply to specific fixtures, and pressure-reducing valves, which regulate water pressure to prevent damage to your pipes.
Faucets and Fixtures: Faucets, showers, toilets, and appliances like dishwashers and washing machines are the visible components of your plumbing system. These fixtures are where you interact with the plumbing, using water for drinking, cleaning, and waste removal.
Water Heater: The water heater is a vital part of your plumbing system, providing hot water for showers, cooking, and cleaning. It can be powered by electricity, gas, or solar energy, and it’s essential to maintain it properly to ensure efficiency and longevity.
Traps and Vents: Traps are U-shaped sections of pipe located under sinks, bathtubs, and showers. They hold a small amount of water to block sewer gases from entering your home. Vents, on the other hand, allow air to enter the drainage system, ensuring smooth water flow and preventing pressure build-up.
3. Common Plumbing Issues
Understanding your plumbing system also involves being aware of common issues that can arise. Recognizing these problems early can help you take prompt action and prevent costly repairs.
Leaks: Leaks are one of the most common plumbing issues, often caused by worn-out seals, corroded pipes, or loose connections. Leaks can lead to water damage, mould growth, and higher utility bills if not addressed promptly.
Clogs: Clogged drains and toilets are frequent problems that occur when debris like hair, grease, or non-flushable items block the pipes. Regular maintenance and mindful usage can help prevent clogs.
Low Water Pressure: Low water pressure can be caused by various factors, including pipe corrosion, leaks, or build-up of minerals in the pipes. It’s essential to diagnose the underlying cause to restore adequate water pressure.
Running Toilets: A running toilet is typically caused by a faulty flapper or fill valve. This issue can waste a significant amount of water if not fixed promptly.
Water Heater Issues: Water heaters can develop problems like sediment build-up, leaks, or malfunctioning thermostats. Regular maintenance, such as flushing the tank, can help prevent these issues.
4. Maintenance Tips for a Healthy Plumbing System
Regular maintenance is key to keeping your plumbing system in good working order. Here are some essential tips:
Inspect for Leaks: Regularly check for signs of leaks around faucets, pipes, and fixtures. Address any issues immediately to prevent water damage.
Clean Drains: Use drain screens to catch debris and prevent clogs. Periodically flush your drains with hot water and a mixture of baking soda and vinegar to break down build-up.
Maintain Your Water Heater: Flush your water heater annually to remove sediment and improve efficiency. Check the anode rod and replace it if necessary to prevent corrosion.
Monitor Water Pressure: Keep an eye on your water pressure using a pressure gauge. If it’s too high, consider installing a pressure-reducing valve to protect your pipes.
Insulate Pipes: Insulate exposed pipes, especially in cold climates, to prevent freezing and bursting during winter.
Schedule Professional Inspections: Annual inspections by a licensed plumber can help identify potential issues before they become major problems. A professional can also provide advice on maintaining your plumbing system and recommend necessary repairs or upgrades.
5. When to Call a Professional
While many plumbing issues can be addressed with DIY solutions, some situations require the expertise of a professional plumber. Knowing when to call a plumber can save you time, money, and stress.
Persistent Leaks: If you’ve tried to fix a leak, but it keeps coming back, it’s time to call a professional. Persistent leaks can indicate a more serious underlying issue.
Sewage Smells: If you smell sewage in your home, it could indicate a problem with your sewer line or venting system. This issue requires immediate attention from a plumber.
No Hot Water: If your water heater isn’t producing hot water, and you’ve checked the basics (like the thermostat and pilot light), it’s best to call a plumber. The problem could be due to a faulty heating element or other internal issues.
Major Renovations: If you’re planning a major renovation that involves plumbing, it’s essential to consult with a plumber to ensure the work is done correctly and complies with local codes.
Conclusion
Understanding your home’s plumbing system is essential for maintaining it, preventing common issues, and making informed decisions when problems arise. By familiarizing yourself with the basic components, common problems, and maintenance tips, you can keep your plumbing system running smoothly and avoid costly repairs. Remember, when in doubt, don’t hesitate to call a professional plumber to ensure your plumbing system is in good hands.
0 notes
Text
Troubleshooting a Milwaukee Transfer Pump

Introduction
Milwaukee transfer pumps are reliable tools used in various applications, from dewatering to transferring water and other fluids. However, like any mechanical device, they can encounter issues that may hinder their performance. Understanding how to troubleshoot these problems can save time, reduce downtime, and extend the life of your pump. This guide will provide a detailed troubleshooting approach, covering common issues, diagnostics, and solutions.
Understanding the Milwaukee Transfer Pump
Milwaukee transfer pumps are designed to move water and other fluids efficiently. They are commonly used in construction, plumbing, and emergency dewatering scenarios. These pumps feature durable construction and battery-powered operation, making them portable and convenient.
Common Issues with Milwaukee Transfer Pumps
No Power
One of the most common issues is the pump not turning on. This can be due to battery problems, faulty switches, or electrical connections.
Low Suction
Low suction can hinder the pump's performance, often caused by clogged filters, air leaks, or impeller issues.
Overheating
Overheating can damage the pump and is usually due to overuse, blocked cooling mechanisms, or operating in high-temperature environments.
Leaks
Leaks can occur in hoses, seals, or the pump housing, leading to reduced efficiency and potential damage to the surrounding area.
Initial Diagnostics
Visual Inspection
Begin by visually inspecting the pump for obvious signs of damage or wear. Look for loose connections, worn seals, or any visible cracks.
Basic Checks
Perform basic checks such as ensuring the battery is fully charged, the pump is properly assembled, and all connections are secure.
Tool Requirements
Have the necessary tools ready, including screwdrivers, wrenches, and a multimeter for electrical testing.
No Power Troubleshooting
Battery Issues
Check if the battery is properly charged and seated. Swap with a known good battery to rule out battery failure.
Electrical Connections
Inspect all electrical connections for corrosion or loose wires. Tighten or clean as necessary.
Switch Problems
Test the power switch for continuity using a multimeter. Replace the switch if it is faulty.
Low Suction Troubleshooting
Clogged Filters
Remove and clean the inlet and outlet filters. Replace them if they are damaged.
Air Leaks
Check all hose connections for tightness. Apply sealant or replace hoses if air leaks are detected.
Impeller Problems
Inspect the impeller for damage or obstructions. Clean or replace the impeller as needed.
Overheating Troubleshooting
Cooling Mechanisms
Ensure that the cooling vents are not blocked. Clean any debris from the vents.
Usage Limits
Do not operate the pump continuously for longer than recommended. Allow the pump to cool down if it overheats.
Environmental Factors
Avoid using the pump in extremely hot conditions. Provide shade or ventilation if necessary.
Leak Troubleshooting
Seal Inspections
Inspect all seals for wear or damage. Replace any faulty seals to prevent leaks.
Hose Connections
Ensure that all hose connections are tight and secure. Use hose clamps if necessary.
Housing Cracks
Check the pump housing for cracks or damage. Repair or replace the housing if needed.
Motor Issues
Motor Noise
Unusual noises from the motor can indicate wear or damage. Inspect the motor and lubricate or replace parts as needed.
Stalling
If the motor stalls, check for blockages in the impeller or hoses. Ensure the power supply is consistent.
Motor Replacement
If the motor is beyond repair, refer to the manufacturer’s guidelines for replacing the motor.
Electrical Problems
Wiring Checks
Inspect all wiring for wear, damage, or corrosion. Replace any faulty wiring.
Fuse Replacement
Check and replace any blown fuses. Ensure the correct fuse rating is used.
Circuit Testing
Use a multimeter to test the electrical circuit for continuity and proper voltage.
Impeller Maintenance
Cleaning
Regularly clean the impeller to remove debris and prevent clogs.
Replacement
Replace the impeller if it shows signs of wear or damage.
Performance Testing
Test the pump's performance after cleaning or replacing the impeller to ensure proper operation.
Battery Maintenance and Replacement
Battery Life
Monitor the battery life and replace it when it no longer holds a charge.
Charging Practices
Follow the manufacturer's guidelines for charging to extend battery life.
Replacement Guidelines
Use only recommended batteries to ensure compatibility and performance.
Filter Cleaning and Replacement
Types of Filters
Familiarize yourself with the types of filters used in your pump model.
Cleaning Process
Clean filters regularly to maintain optimal performance.
Replacement Steps
Replace filters according to the manufacturer's instructions.
Pump Assembly and Disassembly
Step-by-Step Guide
Follow a detailed guide to disassemble and reassemble the pump safely.
Tool Requirements
Ensure you have all necessary tools before beginning.
Safety Tips
Always disconnect the power source before performing maintenance.
Usage Best Practices
Correct Operation
Operate the pump within its specified parameters to avoid damage.
Preventive Measures
Implement preventive measures such as regular maintenance and proper storage.
Storage Tips
Store the pump in a cool, dry place when not in use to prevent damage.
Regular Maintenance Routines
Scheduled Checks
Perform regular checks to identify and address issues early.
Parts Replacement
Replace worn parts to prevent breakdowns.
Lubrication
Lubricate moving parts to reduce friction and wear.
Signs of Wear and Tear
Identifying Issues Early
Look for signs of wear such as reduced performance or unusual noises.
Impact on Performance
Address wear and tear promptly to maintain pump efficiency.
When to Call a Professional
Major Repairs
For complex issues, seek professional repair services.
Warranty Issues
Contact the manufacturer if the pump is under warranty.
Expert Services
Utilize expert services for thorough inspections and repairs.
Frequently Asked Questions About Milwaukee Transfer Pump
Q. Why is my Milwaukee transfer pump not turning on?
A. Check the battery, power switch, and electrical connections.
Q. How can I improve the suction of my transfer pump?
A. Clean the filters, check for air leaks, and inspect the impeller.
Q. What should I do if my pump overheats?
A. Allow the pump to cool, clean the cooling vents, and avoid using it in high temperatures.
Q. How do I fix a leak in my transfer pump?
A. Inspect and replace seals, tighten hose connections, and check for housing cracks.
Q. What causes unusual noises in the pump motor?
A. Noises can indicate motor wear or damage. Lubricate or replace motor parts as needed.
Q. When should I replace the battery of my pump?
A. Replace the battery when it no longer holds a charge or fails to power the pump adequately.
Conclusion
Maintaining and troubleshooting a Milwaukee transfer pump involves regular inspections, timely repairs, and understanding the common issues that can arise. By following the guidelines outlined in this article, you can ensure your pump operates efficiently and reliably, minimizing downtime and extending its lifespan.
#MilwaukeeTransferPump#PumpTroubleshooting#MilwaukeeTools#TransferPump#ToolRepair#MilwaukeePower#WorkshopTools#PumpMaintenance#DIYRepair#PumpEfficiency#MilwaukeeEquipment#PowerTools#ToolTech#PumpPerformance#ReliableTools
0 notes
Text
How To Dry Out A Crawl Space

If your home has a crawl space that is damp or wet, it's important to address the issue to prevent mold, mildew, and other problems. Letting a crawl space stay wet can lead to structural damage, pest infestations, and poor indoor air quality. Fortunately, there are some steps you can take to effectively dry out a crawl space.
Identify the Moisture Source
The first step is to determine what is causing the moisture in the crawl space. Common culprits include:
Groundwater seeping in through cracks or gaps in the foundation
Plumbing leaks
High humidity levels
Insufficient ventilation
Once you pinpoint the moisture source, you can take the appropriate measures to address it.
Install a Vapor Barrier
Placing a thick plastic vapor barrier over the crawl space floor is one of the most effective ways to prevent moisture from seeping up from the ground. The vapor barrier should overlap seams and be sealed tightly to the walls. This creates a moisture-resistant layer that blocks ground moisture from entering the crawl space.
Use a Dehumidifier
Running a high-capacity dehumidifier in the crawl space can help remove excess moisture from the air. Look for a model designed for damp, enclosed spaces. Make sure the dehumidifier has adequate drainage so the collected water can be properly expelled.
Improve Ventilation
Adequate airflow is key for drying out a damp crawl space. Install vents, fans, or a crawl space ventilation system to increase air circulation and allow moist air to escape. You may also need to insulate the crawl space walls and install a moisture barrier on the ground.
Address Plumbing Leaks
If plumbing leaks are the source of the moisture, those will need to be repaired by a professional plumber before other drying efforts will be effective.
Be Diligent About Maintenance
Once you've dried out the crawl space, be sure to monitor it regularly and take steps to keep it dry. This may involve periodic dehumidifier use, sealing any new cracks or gaps, and ensuring proper ventilation is maintained.
Drying out a wet crawl space takes some effort, but it's an important step for protecting the structural integrity of your home and maintaining good indoor air quality. With the right approach, you can eliminate excess moisture and keep your crawl space dry.
Source: https://bestcrawlspacedehumidifier.com/how-to-dry-out-a-crawl-space/
1 note
·
View note
Text
Maintaining your Crawlspace with a Vapor Barrier and Encapsulation

The crawlspace of your home is this shallow, unfinished area located between the ground and the first floor. It provides access to plumbing, electrical wiring, and HVAC systems, making it easier to perform maintenance and repairs. Despite it being out of sight, it is important to remember to maintain your crawlspace as it is crucial in preventing issues through your house such as mold, mildew, and structural damage. Some effective ways to maintain your crawlspace is through encapsulation and the installation of a vapor barrier.
Understanding Crawlspace Encapsulation
What is Crawlspace Encapsulation?
Crawlspace encapsulation involves sealing the area under your home to protect it from external moisture and temperature variations. This process typically includes:
Sealing Vents: Traditional crawlspaces have vents to allow air circulation. However, these vents often let in humid air, which can condense and cause moisture problems. Sealing these vents is the first step in encapsulation.
Installing a Vapor Barrier: A vapor barrier is a thick plastic sheet that covers the ground and walls of the crawlspace, preventing moisture from entering.
Insulating Walls: Adding insulation to the walls helps maintain a stable temperature in the crawlspace.
Benefits of Crawlspace Encapsulation
Moisture Control: By sealing the crawlspace, you prevent moisture from entering, reducing the risk of mold and mildew.
Energy Efficiency: Encapsulation helps maintain a consistent temperature all around your home, reducing your heating and cooling bills.
Improved Air Quality: Preventing mold growth and sealing gaps reduces the entry of airborne pollutants into your home, making it safer to breathe without risk of damaging your lungs.
Structural Integrity: Moisture can cause wood to rot and attract pests. Encapsulation ensures the structural components of your home are well protected against those invaders.
The Role of a Crawlspace Vapor Barrier
Why Install a Vapor Barrier?
A vapor barrier is an essential component of crawlspace encapsulation. You cannot do without it. It acts as a shield, preventing ground moisture from entering the crawlspace. Its main uses are:
Moisture Prevention: The primary function of a vapor barrier is to block moisture from the soil, in order to prevent mold growth and wood rot.
Temperature Regulation: By reducing the amount of moisture in the crawlspace, a vapor barrier also contributes to maintaining a stable temperature.
Pest Deterrence: Moist environments attract pests. A vapor barrier helps keep your crawlspace dry and less attractive to insects and rodents.
Choosing the Right Vapor Barrier
When selecting a vapor barrier, consider the following factors:
Thickness: Vapor barriers come in different thicknesses, typically measured in mils. A thicker barrier (10-20 mil) offers better protection and durability than its thinner counterpart.
Material: Most vapor barriers are made from polyethylene plastic. Look for reinforced barriers for added strength and stability.
Installation: Proper installation is critical to guarantee its effectiveness. Ensure the barrier covers the entire ground surface and is sealed at the edges and seams.
Steps to Encapsulate Your Crawlspace
Inspect and Prepare the Crawlspace
Before starting the encapsulation process, inspect your crawlspace for any existing issues like mold, pests, or structural damage. You need to address these problems first to ensure the safety of your home and that the solutions you are putting in place will have a real impact.
Seal the Vents
Use vent covers or foam insulation to seal off any vents. As stated above, this step will prevent humid outside air from entering the crawlspace and putting your home at risk with moisture and mold.
Install the Vapor Barrier
Lay the vapor barrier on the ground, ensuring it covers the entire surface. Extend the barrier up the walls and secure it with tape or adhesive. Overlap seams by at least 12 inches and seal them properly.
Insulate the Walls
Add insulation to the crawlspace walls to help regulate temperature and improve energy efficiency. Use rigid foam insulation for best results.
Ensure Proper Drainage
If your crawlspace is prone to water accumulation, consider installing a drainage system or a sump pump to manage the excess water.
Maintaining Your Encapsulated Crawlspace
You have now encapsulated your crawlspace and installed a vapor barrier. Great job! Now all that’s left to do is to maintain your work through time and to make sure the solutions implanted are still functioning as intended.
You can do that by conducting periodic inspections to ensure the vapor barrier and encapsulation materials remain intact. Remember to look out for signs of damage or wear and to repair any issues promptly should they arise. Since you’re already there, take the time to clean the space and to check for pests as well. Another preventative measure would be to install a hygrometer to monitor the humidity levels in your crawlspace. Ideally, the humidity levels should stay below 60% to prevent mold growth.
Conclusion
Encapsulating your crawlspace and installing a vapor barrier are important steps in maintaining a healthy, energy-efficient home. These practices help protect your home from moisture and pests while also improving indoor air quality and reducing energy costs. By following the steps outlined above, you can ensure your crawlspace remains a dry, stable, and integral part of your home’s structure.
For more information on crawlspace encapsulation and vapor barriers, contact Delta Waterproofing. Our expert services can help you achieve a well-protected and efficiently maintained crawlspace.
0 notes
Text
Tips for Insulating Your Attic
As temperatures drop, keeping the heat in becomes a priority for homeowners. Proper attic insulation plays a critical role in retaining heat and ensuring your home remains warm and energy-efficient. If you’re looking to improve your home’s insulation, here are some top tips for insulating your attic effectively.
1. Understand the Importance of Attic Insulation
Attic insulation is essential for several reasons. It helps in:
Retaining Heat: A well-insulated attic prevents heat from escaping through the roof, keeping your home warm during winter.
Reducing Energy Bills: By retaining heat, your heating system doesn’t have to work as hard, leading to lower energy consumption and reduced utility bills.
Improving Comfort: Proper insulation ensures a consistent temperature throughout your home, eliminating cold spots and drafts.
Protecting the Environment: Lower energy usage reduces your carbon footprint, contributing to environmental conservation.
2. Assess Your Current Insulation
Before adding new insulation, evaluate the existing insulation in your attic. Look for areas where the insulation is thin, damaged, or missing. Common signs of poor insulation include uneven temperatures, high energy bills, and visible gaps in the insulation material. If your current insulation is more than 20 years old, it might be time for an upgrade.
3. Choose the Right Insulation Material
Several types of insulation materials are available, each with its advantages and applications. The most common options include:
Fiberglass Batt Insulation: This is a popular choice due to its affordability and ease of installation. Fiberglass batts are available in pre-cut panels that fit between standard attic joists.
Blown-In Insulation: Made of fiberglass or cellulose, blown-in insulation is ideal for filling gaps and covering irregularly shaped areas. It provides excellent coverage and can be added over existing insulation.
Spray Foam Insulation: This is the most effective option for sealing air leaks and providing high R-value insulation. Spray foam expands to fill gaps and cracks, ensuring a tight seal.
Reflective or Radiant Barrier Insulation: This type of insulation reflects heat away from your home, making it effective in hot climates. It can be combined with other insulation types for added efficiency.
4. Seal Air Leaks
Air leaks can significantly reduce the effectiveness of your attic insulation. Before installing new insulation, seal any gaps, cracks, or openings in your attic. Common areas for air leaks include:
Attic Access Doors: Use weatherstripping to seal gaps around the attic access door.
Recessed Lighting Fixtures: Install airtight baffles or covers to prevent heat from escaping through recessed lights.
Plumbing and Wiring Holes: Use expanding foam or caulk to seal gaps around pipes and electrical wires.
Chimney and Flue Areas: Install metal flashing and high-temperature caulk to seal around chimneys and flues.
5. Install the Insulation Properly
Proper installation is crucial for maximizing the effectiveness of your attic insulation. Here are some tips to ensure a successful installation:
Wear Protective Gear: Insulation materials can be irritating to the skin, eyes, and lungs. Wear gloves, goggles, and a mask when handling insulation.
Follow Manufacturer’s Instructions: Each insulation material has specific installation guidelines. Follow the manufacturer’s instructions to ensure proper coverage and thickness.
Avoid Compressing Insulation: Compressed insulation loses its effectiveness. Ensure the insulation is fluffy and not packed tightly into spaces.
Leave Ventilation Openings: Proper attic ventilation is essential for preventing moisture buildup and maintaining air quality. Do not block soffit vents, ridge vents, or gable vents with insulation.
6. Consider Adding a Radiant Barrier
In addition to traditional insulation, a radiant barrier can help retain heat in your home. Radiant barriers are installed on the underside of the roof and work by reflecting radiant heat away from the attic. This reduces the amount of heat that enters your home in the summer and helps keep heat inside during the winter. Radiant barriers are particularly effective in hot climates but can provide benefits in cold climates as well.
7. Maintain Proper Ventilation
While insulating your attic is crucial for retaining heat, maintaining proper ventilation is equally important. Good ventilation prevents moisture buildup, which can lead to mold and mildew growth. It also helps regulate temperatures, preventing your attic from becoming too hot in the summer. Ensure your attic has adequate ventilation through soffit vents, ridge vents, and gable vents.
8. Regularly Inspect and Maintain Your Insulation
Attic insulation requires regular inspection and maintenance to ensure it continues to perform effectively. Check your attic insulation at least once a year for signs of damage, such as:
Water Damage: Look for signs of leaks or water stains on the insulation. Wet insulation loses its effectiveness and can promote mold growth.
Pest Infestation: Check for signs of rodents or insects, which can damage insulation and create air leaks.
Settling or Compression: Over time, some types of insulation can settle or become compressed, reducing their R-value. Add more insulation if necessary to maintain the recommended thickness.
9. Take Advantage of Rebates and Incentives
Many utility companies and government programs offer rebates and incentives for upgrading your attic insulation. For example, the Attic Enbridge Ontario Rebate provides financial assistance to homeowners who improve their home’s energy efficiency through insulation upgrades. These programs can help offset the cost of insulation materials and installation, making it more affordable to improve your home’s energy efficiency.
10. Consult a Professional
If you’re unsure about the best insulation options for your attic or need help with installation, consider consulting a professional. An experienced insulation contractor can assess your home’s insulation needs, recommend the best materials, and ensure proper installation. Professional installation can save you time and ensure the job is done correctly, maximizing the benefits of your attic insulation.
Conclusion
Proper attic insulation is essential for keeping the heat in and maintaining a comfortable, energy-efficient home. By understanding the importance of attic insulation, choosing the right materials, sealing air leaks, and following best practices for installation and maintenance, you can significantly improve your home’s insulation. Don’t forget to explore rebates and incentives that can help reduce the cost of your insulation project. With the right approach, you can enjoy a warmer home, lower energy bills, and a reduced carbon footprint.
1 note
·
View note
Text
The Ultimate Home Maintenance Checklist: Keeping Your House in Prime Condition

A comprehensive guide to maintaining your home's exterior, appliances, heating and cooling, plumbing, security, and electrical systems.
Just like regular health check-ups are essential for our well-being, a home maintenance checklist and schedule are crucial for the upkeep of our houses. By consistently checking on various aspects of our homes, such as the exterior, appliances, heating and cooling systems, plumbing, security, and electrical systems, we can prevent breakdowns, save money, and keep our homes looking their best.
In this comprehensive guide, we will provide you with a monthly, seasonal, and annual home maintenance checklist to help you schedule necessary updates, repairs, cleaning, and other tasks. By following this checklist, you can ensure that your home remains in prime working condition, and if any repairs or maintenance go beyond your skill level, we recommend hiring a professional to assist you.
youtube
Monthly Home Maintenance Checklist
Inspecting your home and completing monthly home improvement projects will keep your maintenance schedule on track and easier to manage. Follow this comprehensive home maintenance checklist each month to help save time and money:
- Air Quality and Vents
- Clean the furnace filter to remove dust build-ups, regulate temperature, and decrease energy bills. - Vacuum heat registers and vents. - Check that indoor and outdoor air vents are not blocked.
- Plumbing and Water
- Check the water softener and replenish salt if necessary. - Clean the garbage disposal by grinding ice cubes, then flushing with hot water and baking soda. - Inspect tub and sink drains for debris; unclog if necessary. - Flush out hot water from the water heater to remove accumulated sediment.
- Home Safety
- Test smoke alarms, carbon monoxide detectors, and all ground-fault circuit interrupters. - Inspect electrical cords for wear.
Fall Home Maintenance Checklist
In many regions, fall is the perfect season to tackle general home maintenance projects. The weather is usually dry, and temperatures are moderate. Before starting your seasonal home maintenance checklist, examine your home's interior and exterior.
Most of these tasks can be accomplished without professional help, but always call for assistance if a project is beyond your abilities. Here are our recommendations for fall:
- Landscaping and Yard Prep
- Rake leaves and aerate the lawn. - Remove leaves and debris from gutters and downspouts. - Practice pest prevention by keeping firewood away from the house, trimming shrubs, and repairing woodwork. - Drain and winterize exterior plumbing, including hoses and sprinkler systems.
- Home Exterior Repairs and Updates
- Mend cracks and gaps in the driveway and walkway. - Touch up exterior siding and trim with paint. - Power-wash windows and siding. - Inspect roofing for missing, loose, or damaged shingles and leaks. - Repair or replace siding. - Clean window and door screens. - Replace old, drafty windows with energy-efficient models. - Seal cracks and gaps in windows and doors with caulk or weather stripping. - Inspect exterior door hardware and fix any issues. - Wrap insulation around outdoor faucets and pipes in unheated garages.
- Interior Cleaning and Inspection
- Have the forced-air heating system inspected by a professional. - Check the fireplace for damage or hazards and have it professionally inspected. - Tune up major home appliances. - Replace batteries in smoke and carbon monoxide detectors. - Clean carpets. - Vacuum lint from the dryer vent. - Check the water heater for leaks.
Winter Home Maintenance Checklist
Winter weather can be harsh on your home, causing various problems such as frozen pipes and roof damage. To prevent winter harm and avoid calling a professional in the middle of a blizzard, be sure to check these items off your home maintenance checklist:
- Exterior Repairs and Updates
- Cover your air-conditioning unit. - Inspect the roof, gutters, and downspouts for damage after storms. - Stock up on sidewalk salt and ice melt.
- Interior Cleaning and Inspection
- Check the basement for leaks during thaws. - Vacuum bathroom exhaust fan grill. - Vacuum refrigerator and freezer coils and empty and clean drip trays. - Clean drains in sinks, tubs, showers, and dishwashers. - Set up mouse traps as needed.
Spring Home Maintenance Checklist
Once the ground has thawed and the trees begin to bud, it's time to prepare your home for spring. Use our spring home maintenance checklist to make sure everything in your home, from the basement to the roof, is in tip-top shape:
- Landscaping and Yard Prep
- Remove leaves and debris from gutters and downspouts. - Have a professional inspect and pump the septic tank. - Inspect roofing for missing, loose, or damaged shingles and leaks. - Inspect the chimney for damage. - Wash windows. - Power-wash siding. - Repair or replace caulking and weather stripping. - Remove insulation from outdoor faucets and check sprinkler heads.
- Interior Cleaning and Inspection
- Clean faucet aerators and showerheads. - Change the air-conditioner filter. - Polish wood furniture and dust light fixtures. - Replace batteries in smoke and carbon monoxide detectors. - Inspect sink, shower, and bath caulking. - Vacuum lint from the dryer vent. - Have the air-conditioning system serviced. - Drain or flush the water heater.
Summer Home Maintenance Checklist
When the sun is out and warm weather is finally here to stay, use our quick summer home maintenance guide to get the hard work out of the way at the beginning of the season:
- Interior Cleaning and Inspection
- Remove lint from your dryer vent. - Clean kitchen exhaust fan filter. - Clean refrigerator and freezer coils and empty and clean drip trays. - Check the dishwasher for leaks. - Check around kitchen and bathroom cabinets and around toilets for leaks. - Replace faucet and showerhead washers if needed. - Seal tile grout.
Regular home maintenance is vital for the longevity and functionality of your house. By following this comprehensive home maintenance checklist, you can stay on top of necessary repairs, cleaning, and updates throughout the year. Remember, if any tasks are beyond your skill level, it's always best to hire a professional to ensure the safety and efficiency of your home.
By investing time and effort into maintaining your home, you can save money, prevent breakdowns, and keep your house in prime condition for years to come.
0 notes
Text
Why is My Toilet Bubbling?

Why is My Toilet Bubbling?
Have you ever seen bubbles coming from your toilet? This can be a sight to see, but why is this happening and what should you do about it if anything? Read on to learn why toilets bubble and what you should do about it.
Reasons Toilet Bubble
Clogs
There are several reasons why a toilet might bubble. The first reason why a toilet will bubble is because the drain or overflow openings have been clogged with debris. If these openings are clogged, over time air cannot flow through them properly. As a result, the trapped air creates pressurized gas that has no other outlet except for up into the bowl of the toilet where it comes out as bubbles in your water.
In order to fix this problem, you will need a plumber to locate and remove any large objects around your main drain pipe and smaller debris that may be stuck in the openings.
Excess Air in the Water Tank
The next reason why a toilet bowl might bubble is because of too much air in the water tank. If you hear gurgling when the toilet is trying to fill up, you most likely have too much air in your tank. Just open the filler valve at the back of your toilet and wait for about five minutes while it drains out some of its own water, then try refilling it again. This should get rid of any excess gas rattling around in there. If these steps didn’t do the trick, call a licensed plumber to inspect your toilet. Calling in a professional can prevent more complicated toilet issues and overflow.
An Obstructed Vent Stack
Blocked vents are a common issue for homeowners. When the vent stack on your roof is clogged, it releases negative air pressure and causes slow draining or sewer gas smells around your house as well as other problems. The common culprit of vent blocks are debris or animal nests that prevent proper air flow.
Fixing this issue is not something we recommend attempting on your own. You are better off having a professional come and inspect the situation.
A Water Mainline Issue
Your home’s plumbing system depends on drain lines and mainlines to operate correctly. Drain lines are connected to the fixtures in your house that need them for draining water outside your home. The mainline carries wastewater to your city’s municipal connection and is located outside your home. Often a mainline issue will require deep digging outside your home to uncover the location of the mainline clog.
The simple truth is that if your toilet is gurgling due to a water main problem, the possibility of fixing it yourself doesn’t exist. It will require the help of a professional plumber or your municipality to address the issue.
A blocked pipe in the mainline causes negative air pressure in the pipe which leads to toilet bubbling and gurgling.
Determining if the bubbling toilet is due to water mainline issues can be done by a professional plumber but you might also notice other signs around your house. Other drains may be backing up, or you might find backup in your lowest level shower.
Any main line issue will require professional tools, including video inspection equipment, to provide accurate diagnosis and resolve your issue with a water line repair.
The Toilet Isn’t Level
The final common reason why a toilet will bubble is if it's not sitting level on the floor or baseplate. Troubleshooting this problem may require enlisting the help of a licensed plumber or contractor to correct the issue.
Mike Counsil Plumbing can help you identify the source of your toilet bubbling. Don’t delay acting on a gurgling toilet or you may end up with more extensive repairs and damages as a result. Count on the professionals at Mike Counsil Plumbing! We’ve been providing quality plumbing services in the South Bay Area since 1994 and are ready to conquer whatever comes our way!
Contact us today to schedule a toilet inspection to find the underlying cause of your toilet bubbling issue!
Read the full article
0 notes
Text
How Plumbing and HVAC Coexist to Provide Comfort and Functionality
In the intricate web of modern infrastructure, two essential systems stand out as pillars of comfort and functionality which are HVAC and plumbing. However, far from being separated from one another, they form a harmonious union where each one affects the other profoundly.
Understanding HVAC and Plumbing: The Core of Contemporary Comfort
In whatever kind of building it may be - commercial or residential, - the HVAC and plumbing systems function as the core components of both comfort and functioning level.
The modern HVAC (Heating, Ventilation, and Air Conditioning) system is a tool of complex design that works by regulating the indoor temperature, humidity, and air quality, creating a comfortable environment for the people regardless of an external condition.
However, the plumbing system, which is meant to manage water supply, distribution and drainage, enables the generation of critical operations such as the washing of clothes, bathrooms, and cooking.
The Symbiotic Relationship: Interaction of HVAC and Plumbing System
The fact that these systems appear to be completely different is that there are very strong connections between them. For example, in a conventional HVAC system, water is frequently employed as a means to convey thermal energy.
This is where the plumbing system steps in with all the required infrastructure to circulate water in radiators, heat pumps or cooling towers. On the contrary, heating, ventilation, and air conditioning (HVAC) systems influence the plumbing in another way by setting the internal level of humidity which may also lead to the failure or the reduction in the lifetime of the fixtures and pipes.
Efficiency and Conservation: Common Aims of HVAC and Plumbing
Both building systems, HVAC and plumbing are intended to achieve greater efficiencies and conservation. About HVAC, energy-efficient equipment and effective insulation will not only cut down the utility cost but will also ease out the stress that the piping systems go through as a result of condensation and moisture buildup.
Also in the same vein, implementing water-saving plumbing fixtures in addition to sustainable plumbing practices contributes to the conservation of valuable water resources and complements the working of HVAC systems keeping the indoor environment clean and comfortable.
The Interaction Between HVAC and Plumbing
Water Heating: Plumbing functions as a significant supplier of hot water, which HVAC systems frequently use to heat homes and businesses. Be it radiant floor heating or traditional radiators, hot water circulated through pipes is one of the main modalities for indoor heating.
Condensate Management: Cooling the indoor air leads to the generation of condensate by HVAC units. Adequate plumbing systems to dispose of and drain out this corrosion-causing moisture as well as sewage collection is needed to avoid moisture buildup, thereby preventing potential losses.
Ventilation and Drainage: Efficient HVAC systems that work with proper air circulation provide healthy indoor air for occupants. This is the stage where plumbing vents come in handy by allowing air to escape thereby avoiding pressure imbalances and maintaining efficient HVAC operation.
Challenges and Solutions: Defining Common Problems
Plumbing and HVAC systems are a phenomenon whereby they go hand in hand, however, they do face several challenges. Leaking, corrosion, or blocking plumbing problems are common occurrences that can affect both comfort and functionality. Nevertheless, precautionary techniques and integration would help us a lot in overcoming these difficulties.
For instance, installing highly efficient HVAC systems can decrease water usage which is going to free the stress of plumbing infrastructure. Implying this, smart lining technologies that help to catch minor leaks can save lots of repair costs to the big amount.
Future Trends: Innovations that are Changing the Scene.
Along with the progress in technology, advancing HVAC and plumbing systems is inevitable. The future holds more integrated features of electronic devices such as smart thermostats and water-saving fixtures, as well as more sophisticated systems that manage just about all areas of building operations.
Sustainability can be easily attained if we employ smart technologies and practices in building design, which makes them the most comfortable, efficient and resilient structures ever built.
Conclusion
Through the use of HVAC and plumbing systems in modern construction and infrastructure, the amenities of convenience, health and sustainability are not only options, but they are the essence of these systems.
By acknowledging this harmonious relationship and promoting it, the constructors, the professionals in engineering and those who own buildings will be competent to craft spaces that not only meet the necessities of today but also can lead to a resilient and sustainable future. So, whether you're designing a new building or retrofitting an existing one, remember: that as for the aspects of HVAC and plumbing, cooperation is the main point.
0 notes
Text
8 Common Causes of Clogged Toilets & How To Fix It - Seattle Plumbing

Dealing with a clogged toilet can be a frustrating and messy experience, especially if it happens frequently. While it is possible to resolve minor clogs with a plunger, there could be underlying reasons that are causing your toilet to clog. If you are experiencing clogged toilets and the problem is difficult to fix, call a professional plumber to handle the issue for you.
Sometimes, it could be something as obvious as a foreign object that found its way into the toilet bowl, but other times, there could be less apparent reasons for the clog. It's essential to understand why toilets clog in the first place and how to prevent clogs from happening in the near future.
Well! In this blog post, we will talk about the 8 common causes of clogged toilets & how to fix them.
So, let’s get started with the basics!
1. Blocked Air Vents
Water circulates through the drainage pipes when you flush your toilet or drain your sink, thanks to fresh air entering your home's plumbing system through a vent on your roof. As well as preventing sewer gasses from entering your home, these air vents also help keep your family safe.
If leaves or other debris block the vent, the toilet will lose its flushing pressure. It is strongly recommended that you hire a professional toiler repair and replacement services to clean air vents because special tools are required.
2. Hard Water Problems
One of the most common causes of clogged toilets is due to the mineral buildup from hard water. Hard water will calcify over time in pipes as its minerals calcify and create white deposits that reduce the amount of space available for waste to pass. It is often necessary for a reliable Seattle plumber to remove this calcified buildup.
Installation of a water softener can help prevent problems like this from occurring in the future. Before your water enters the toilet, this device will treat it. As a result, the water becomes more soft and calcification is reduced to a greater extent.
3. Food waste
It's important to remember that food waste can cause major issues when it comes to blocked or clogged drains. Even though it might seem harmless, food scraps can quickly accumulate & lead to bigger problems. If you're someone who loves to cook frequently, it's important to be mindful of what goes down the sink.
Anything other than water should be avoided, as food scraps can easily stick to the sides of pipes and create blockages. In case you do find yourself with a blocked drain due to food waste, a Seattle plumber should be able to help unblock it for you. Alternatively, you can use a plunger, vinegar, and baking soda to help break up and clear the blockage.
4. Problem with the main line
It's important to keep in mind that clogged toilets can sometimes be caused by the sewer pipes themselves. If your drain line is older, it's more likely for regular waste and non-flushable items to accumulate and cause blockages. It's important to be cautious of this issue because if the main sewer line gets clogged, multiple toilets in the house may be affected at the same time.
If this happens, it's recommended to contact a professional plumber as soon as possible to resolve the issue. Additionally, older pipework is more prone to collapse, so it's important to watch out for sediment backwash in the toilets, as this can be an indication that pipes need to be replaced.
5. Clogged Drain
If you're experiencing a clogged toilet, it's likely due to a clogged drain line, which can be caused by a variety of factors, such as tree roots growing through your pipes or sediment buildup. The overflow of wastewater and waste items into the toilet bowl can create unpleasant smells and pose health hazards due to bacteria buildup, which can lead to diseases like hepatitis.
To prevent clogs from happening, it's important to ensure that there's sufficient water available before flushing and to flush thoroughly after each use. In addition, using a high-quality drain clog remover can help prevent persistent plumbing issues from occurring in the future.
6. Sewer Line Problems
A septic system or municipal sewer system connects to your drain pipes and into your home's main sewer line. It’s common to experience toilet clogs over time with a sewer line. There are a number of factors that can contribute to sewer line clogs, including tree roots, debris, and corrosion.
Having problems with your drainage system can lead to toilet and drain backups, affecting your ability to remove waste from your home safely. Whenever you suspect that your sewer line needs to be repaired or replaced, call a professional Seattle plumbers for immediate help.
7. Flushing Wrong Things
It's important to remember that toilets are designed for one specific purpose - flushing away waste and sending it into a sewer system or septic tank. Anything else that you try to flush down the toilet can create a blockage, especially when it comes to foreign objects like sanitary wipes, paper towels, and cotton swabs. These items may seem harmless, but they can cause your toilet to overflow and create a mess.
To prevent such clogs from occurring, it's best to only flush human waste and toilet paper down the drain. If you need to dispose of something that doesn't fall into those categories, it's better to throw it in the trash instead of flushing it down the toilet.
Even products that claim to be "flushable" like disposable wipes may not break down quickly enough in the sewer system, so it's always best to err on the side of caution.
8. Clogged Toilet Trap
The trap is S-shaped and situated between the toilet bowl and the drain line. It catches objects and prevents them from clogging the drain. There is a high probability of items getting clogged in this section, and plunging may only dislodge them rather than remove them. If this continues down the drainpipe, it may result in a bigger problem.
It is also likely that other things will attach to them the longer they sit there. Whenever this happens, it is better to use a toilet auger to catch the offending items and lift them out or to contact a local Seattle plumber for help.
Conclusion
There is nothing worse for hygiene or waste disposal than a clogged toilet system. The blocked drain pipes and sewer lines can be severely and permanently damaged if you ignore a blocked toilet system for long periods of time. You can also use the correct solution without wasting time on trial and error since you know the exact reason for the clog.
If you notice any significant signs of clogging, you should check your toilet and call a reliable plumber to fix the problem as soon as problem. Seattle Plumbing, Sewer, Septic, Electrical, Heating, & Air is a family-owned and operated plumbing company that offers prompt and reliable toilet repair and replacement services with precision and quality. Are you dealing with a clogged toilet?
Schedule an online appointment with our Seattle plumbers to remove clogs and ensure the smooth running of your toilet. Don’t be shy to contact us today!
#seattle plumbing#seattle plumbers#seattle plumber#plumbers near me#plumbers seattle#plumber seattle
0 notes
Text
Can a Gurgling Toilet Fix Itself?
This common household issue can be both annoying and concerning. But before you break out your toolbox or call a plumber, you may be wondering if this problem will just magically fix itself. After all, no one wants to deal with the hassle and cost of repairing a toilet.

Well, let's dive in and explore whether a gurgling toilet is something that can resolve on its own or if action needs to be taken immediately. Get ready to flush away any doubts as we debunk this myth in our blog post "Can A Gurgling Toilet Fix Itself?" So sit back, relax, and read on for some valuable information on this pesky plumbing predicament!
Understanding the Cause of a Gurgling Toilet
1 . Venting Issue
A common cause of a gurgling toilet is a venting issue. Every plumbing system has vents that allow air to escape, preventing pressure buildup. If the vent becomes clogged or blocked, it can cause air to become trapped in the pipes and result in a gurgling noise. This issue can often be fixed by clearing any debris from the vent or using a plunger to remove any blockages. However, if the problem persists, it may require professional assistance.
2. Blocked Sewer Line
Another potential cause of a gurgling toilet is a blocked sewer line. This can occur due to tree roots invading the pipes, debris buildup, or a collapsed pipe. If this is the case, the gurgling sound may be accompanied by other signs such as slow draining or water backup in other fixtures. A blocked sewer line is not something that can fix itself and will require the help of a professional plumber to properly address the issue.
3. Water Level Issue
In some cases, a gurgling toilet may be caused by a simple water level issue. If the water level in the tank is too low, it can create a vacuum effect and cause gurgling noises. This can easily be fixed by adjusting the water level or ensuring that the fill tube is properly connected to the overflow pipe.
Can a Gurgling Toilet Fix Itself?
Based on the possible causes of a gurgling toilet mentioned above, it's clear that this issue cannot fix itself. Whether it's a venting issue, a blocked sewer line, or a water level problem, all of these require some form of intervention to be resolved. Ignoring the gurgling noise and hoping that it will go away on its own can lead to further damage and potentially more expensive repairs down the line.
Some Tips to Fix a Gurgling Toilet
1 . Check the Water Level
Before trying any other solution, it is important to check the water level in your toilet tank. Make sure that there is enough water for a proper flush. If the water level is too low, simply adjust the float valve to increase the amount of water in the tank.
2 . Look for Clogs
Gurgling sounds from your toilet could be a sign of clogs in the toilet trap or the main sewer line. Use a plunger to try and clear any potential clogs in the toilet trap. If that doesn't work, you may need to call a professional plumber to check for clogs in the main sewer line.
3 . Check the Ventilation System
The gurgling sound could also be caused by a blocked ventilation system. The toilet vent pipe, located on the roof of the house, allows air to enter the plumbing system and helps maintain proper pressure for drainage. If this vent becomes clogged with leaves or other debris, it can cause gurgling sounds in your toilet. In this case, you may need to call a professional to clear out any obstructions in the vent.
4 . Inspect the Toilet Flapper
A damaged or improperly placed toilet flapper can also cause gurgling sounds. The flapper is a rubber valve that controls the flow of water from the tank to the bowl. If it is not sealing properly, water can slowly leak into the bowl, leading to gurgling sounds and increased water bills. Make sure the flapper is in good condition and properly seated in its place.
5 . Check for Plumbing Issues
If none of the above solutions work, there may be a more serious plumbing issue causing the gurgling sounds. This could include problems with the sewage line, septic tank, or even tree roots growing into the pipes. In these cases, it is best to call a professional plumber who can properly diagnose and fix the issue.
FAQs
What Precautions Should I Take With My Gurgling Toilet?
Gurgling toilets are a common issue in households and can be caused by various reasons. If you have a gurgling toilet, there are certain precautions that you should take to prevent further damage and fix the issue.
Avoid flushing foreign objects – Flushing foreign objects such as baby wipes, sanitary products, or even excessive toilet paper can cause clogs in the pipes, leading to a gurgling toilet.
Do not use chemical drain cleaners – Chemical drain cleaners may seem like an easy fix for a gurgling toilet, but they can actually corrode and damage your pipes, making the issue worse.
Regular maintenance checks – It is important to regularly check the pipes and plumbing in your home to ensure there are no blockages or leaks that could lead to a gurgling toilet.
How Much Does It Cost to Fix a Gurgling Toilet?
The cost of fixing a gurgling toilet can vary depending on the cause and severity of the issue. In some cases, a simple fix such as unclogging the pipes may only cost a few dollars. However, if there is extensive damage to the plumbing system, it could cost hundreds or even thousands of dollars to fix. It is always best to consult a professional plumber for an accurate quote and proper diagnosis of the issue.
Can I Fix a Gurgling Toilet Myself?
In some cases, gurgling toilets can be fixed by simple DIY solutions such as using a plunger or drain snake to unclog the pipes. However, if the issue persists or is caused by more complex plumbing problems, it is best to leave it to the professionals. Attempting to fix a gurgling toilet without proper knowledge and experience can potentially cause more damage and end up costing you more in the long run.
Conclusion
So, can a gurgling toilet fix itself? In most cases, no. It is important to address any gurgling sounds coming from your toilet as they could be a sign of potential plumbing issues. By following these tips, you can hopefully fix the issue and prevent any further complications. However, if the problem persists, it is always best to seek professional help for a proper solution. Don't let a gurgling toilet go unchecked – take action to fix it as soon as possible. So, when you hear that familiar gurgling sound, don't panic! With the right knowledge and steps, you can resolve the issue and have your toilet functioning properly again. Remember to regularly check for clogs, inspect the ventilation system, and maintain your toilet's components for proper function.
0 notes
Text
DIY Sink Drain Unclogging: Plumb Nerd's Step-by-Step Guide

Introduction
Hey there, DIY warriors! Jack Thompson, your Plumb Nerd buddy from Denver, is here to rescue you from the woes of a clogged sink drain. If you're tired of that slow-draining sink or dealing with standing water, I've got your back. This step-by-step DIY guide will help you unclog that drain and restore the smooth flow of water. Let's grab our tools and tackle this plumbing challenge together.
Why Unclog Your Sink Drain?
Before we plunge into the steps, let's quickly understand why tackling a clogged sink drain is a DIY essential:
- Restore Functionality: A clogged drain disrupts the normal flow of water, causing inconvenience and potential damage.
- Prevent Odors: Standing water in a clogged drain can lead to unpleasant odors – unclogging eliminates this issue.
- Avoid Costly Repairs: Prompt action can prevent more severe blockages, avoiding the need for professional intervention.
Plumb Nerd's Step-by-Step Guide
Here's your roadmap to becoming a sink drain unclogging expert:
1. Safety First (Always!)
Our golden rule:
- How-to: Put on rubber gloves to protect your hands.
- Why: Keeps you safe from any potential contaminants in the drain.
2. Remove Standing Water
Start with a clean slate:
- How-to: Use a cup or bucket to remove any standing water from the sink.
- Why: Provides better access to the drain and minimizes mess.
3. Use a Plunger
Plunge away the clog:
- How-to: Position the plunger over the drain and plunge vigorously up and down for about 20 seconds.
- Why: Creates pressure to dislodge the clog.
4. Check the Drain Trap
Inspect and clean:
- How-to: Locate the drain trap (P-trap) under the sink and place a bucket beneath it. Unscrew and remove the trap to check for and remove any debris.
- Why: Often, clogs accumulate in the P-trap, and cleaning it can solve the issue.
5. Use a Plumbing Snake or Zip-It Tool
Get to the root of the problem:
- How-to: Insert a plumbing snake or a Zip-It tool into the drain and rotate or pull to dislodge the clog.
- Why: Reaches deeper into the pipes to tackle stubborn clogs.
6. Mix a Homemade Drain Cleaner
DIY magic:
- How-to: Combine equal parts baking soda and vinegar, pour it down the drain, and let it sit for 15-20 minutes. Follow with hot water.
- Why: Creates a fizzing reaction that can help break down organic matter causing the clog.
7. Boil Hot Water
Heat things up:
- How-to: Boil a pot of water and pour it down the drain in stages, allowing hot water to work on the clog.
- Why: Helps dissolve grease and soap scum causing the clog.
8. Check the Air Vent
Breathe easy:
- How-to: Ensure the air vent, usually on the roof, is clear of obstructions.
- Why: A blocked vent can impede proper drainage.
9. Repeat the Process
Persistence pays off:
- How-to: If the clog persists, repeat the steps or try a combination of methods until the drain is clear.
- Why: Some clogs may require multiple attempts for complete removal.
10. Run Water to Test
The moment of truth:
- How-to: Open the tap and let water run to see if the drain is clear.
- Why: Confirms the success of your unclogging efforts.
11. Practice Preventive Measures
Avoid future clogs:
- How-to: Dispose of grease properly, use drain screens, and avoid putting large food particles down the sink.
- Why: Prevents future clogs and keeps your sink draining smoothly.
Conclusion
There you have it, DIY champs! A practical guide to unclogging your sink drain, delivered by Jack Thompson, your Plumb Nerd. If you ever need more DIY wisdom, head over to plumbnerd.com. Now, go rescue that sink from the clutches of the clog. Happy unclogging!
Read the full article
0 notes
Text
Why Does My Bathroom Smell Like Sewage

Introduction
A foul odor can signal underlying issues, particularly when your home carries a sewage smell. When you detect septic tank odors in your bathroom, kitchen or laundry area. It might indicate more than just plumbing problems. The supply might be the sewer itself, necessitating instantaneous action. If a dried-out P-trap is the culprit. In this piece of informative article I will discuss about Why Does My Bathroom Smell Like Sewage that you have to know.
A simple fix may involve running water from the faucet. However if a broken vent pipe is to blame.It is really useful to be seeking expert assistance. Aside from being unpleasant, an unusual sewage odor can pose health risks. Methane, a distinguished fuel line in sewage, can gather in risky quantities, turning into tremendously flammable.
for more: Why Does My Bathroom Smell Like Sewage
Left untreated sewage gasses would possibly introduce methane into your own home doubtlessly main to sewer fueloline poisoning. However pinpointing the source of these odors can be challenging. While most people automatically assume the toilet as the likely culprit or issues can be concealed within various water systems in your home including showers and washing machines.
We have compiled this guide that will help you in tracking down the deliver of a sewage heady fragrance in your home. Once you identify the cause of the odor. We will provide troubleshooting steps to help resolve the issue. Nonetheless some sewage problems may require professional intervention.
Sources of Sewer Odors the House | My Bathroom Smell Like Sewage
Potential Sources of Sewer Odors Inside the House.
Dried-out P-Traps:
The P-trap in your plumbing system is designed to hold a small amount of water creating a seal that prevents sewer gases from entering your home.If a P-lure dries out it is able to permit odors to escape.
Dried-out P-Traps refers to a situation. Where the P-trap in a plumbing system has lost the water seal that it is meant to hold. The P-trap is a curved section of pipe typically found under sinks showers and floor drains.
See More: How Many Blocks To Build A 2 Bedroom House
It is designed to hold a small quantity of water growing a barrier that stops sewer gases from getting into the residing space. When the water inside the P-trap evaporates or drains away. It becomes dried out and this can allow unpleasant sewer odors to escape from the plumbing system and into the house. To remedy this issue, you could surely run water from the tap or fixture to top off the P-lure and reestablish the seal.
Broken or Damaged Sewer Pipes:
Broken or damaged sewer pipes refer to instances where the pipes in your home’s sewage or wastewater disposal system have experienced structural issues. This damage can take several forms including, fractures or physical breakage in the pipes.
Such issues can lead to leaks, allowing sewage and associated odors to escape into your living space. Repairing or replacing these pipes is essential to prevent contamination and odor problems in your home. These repairs are typically best handled by professional plumbers or contractors with expertise in sewer system maintenance and repair.
Blocked Vents:
Vent pipes allow air to flow through your plumbing system maintaining proper pressure and preventing odors from entering your home. A clogged or obstructed vent can result in sewer odors in the house.
Blocked Vents refers to situations where the vent pipes in a plumbing system become obstructed or clogged. Vent pipes are a crucial part of a plumbing system and they are designed to allow air to flow through the pipes.
Which helps maintain the proper pressure and ensures that wastewater can flow away effectively. When these vent pipes become blocked or obstructed. They can no longer perform their intended function and this can lead to various issues including. The escape of sewer odors into the home. Essentially Blocked Vents means. That something is preventing the free flow of air in the plumbing system. Which can result in unpleasant odors entering the living space.
Faulty Toilet Seals:
A Faulty Toilet Seal refers to a problem with the sealing mechanism around the base of a toilet. In a typical residential toilet installation. A wax ring or a rubber gasket is used to create a watertight seal between the toilet and the floor plumbing drain. This seal prevents water and in the case of a faulty seal sewer gases, from leaking out around the base of the toilet.
A faulty toilet seal can occur due to various issues. Such as wear and tear, damage or improper installation. When the seal is compromised, it can allow sewer gases, which contain unpleasant odors to escape into your bathroom and subsequently, your home. To fix this issue the wax ring or gasket must be replaced to reestablish a secure and airtight seal between the toilet and the floor drain preventing sewer odors from entering your living space.
Dry Drains and Unused Fixtures:
Dry Drains and Unused Fixtures refers to sinks, showers or floor drains in your home that are infrequently used or left unused for extended periods. When those furniture aren’t used regularly, the water in the P-entice can evaporate leaving the entice dry.
The P-trap is designed to hold water, creating a seal that prevents sewer gases from entering your living space. When it dries out due to lack of use. It can no longer effectively block these odors potentially allowing sewer odors to escape into your home. To prevent this, it is advisable to periodically run water in these fixtures to maintain the water seal and prevent sewer odors from entering your home.
Blocked Sewer Line:
A blocked sewer line refers to a situation where the main sewer pipe or sewer line. That carries wastewater and sewage away from your home becomes partially or completely obstructed. This obstruction can be caused by a variety of factors. Such as the accumulation of debris tree roots infiltrating the pipe or the buildup of solid materials over time.
When a sewer line is blocked. It can lead to drainage problems, sewer backups and in some cases the release of sewage and unpleasant odors into your home. Clearing or repairing a blocked sewer line typically requires the expertise of a professional plumber to ensure proper functioning of your home’s plumbing system.
Toilet or Sewer Backups:
Toilet or Sewer Backups refer to situations where the plumbing system becomes overwhelmed or obstructed leading to a significant issue. When a backup occurs. It means that sewage wastewater and associated odors are prevented from flowing properly through the pipes. Instead they can flow backward or back up into the home, including into toilets and sinks showers or other fixtures. This can result from numerous causes. Such as blockages, clogs or damage to the sewer system and it often requires immediate attention and remediation to prevent further damage, unpleasant odors and unsanitary conditions in the home.
Sewer Gas Leaks:
Sewer Gas Leaks refers to situations in which there are unintended releases or escapes of gases commonly found in sewer systems. These gases can include methane hydrogen sulfide, and various volatile organic compounds.
When there is a leak in the sewer system. These gases can seep into the surrounding environment. Which may include homes or other structures. If it accumulates in enclosed spaces. Additionally, exposure to sewer gases, especially in high concentrations can lead to sewer gas poisoning causing symptoms. Like weakness headaches, dizziness nausea and in severe cases, loss of consciousness and suffocation. Addressing sewer gas leaks is essential to prevent. These potential dangers and it typically requires prompt professional intervention to locate and repair the source of the leak ensuring the safe functioning of the sewer system.
0 notes
Last Seen Blogs

fizzie
computer, engage cunt mode

canid-kincare
🐾 kin help 🐾

saint-mayhem
*smuggly chuckles*

raety
THE WINRAR TAKES IT ALL

clearblazehottub
Untitled