#raspberry pi pico datasheet
Text
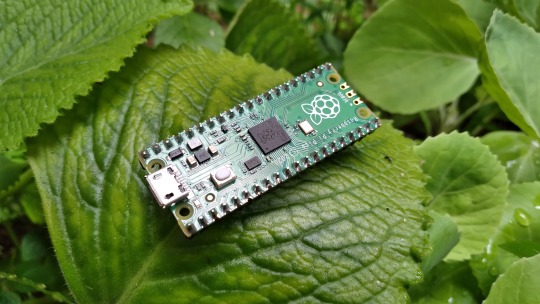
Raspberry Pi Pico: Vale a pena aprender?
Aprenda como usar todos os periféricos do Raspberry Pi Pico, Como instalar bibliotecas no Thonny IDE e ainda veja um comparativo do Pico/Pico W com ESP32, tudo em um único post.
Mais completo que isso somente o datasheet.
O Raspberry Pi Pico desde o lançamento vem sendo muito desejado por muitos projetistas, mas será que realmente vale a pena aprender? Neste post você vai aprender tudo sobre ele.
1 Surgimento do Raspberry Pi Pico
Quem acompanha a empresa Raspberry Pi, sabe que todos seus lançamentos tem um preço base para um determinado produto e o propósito disso é democratizar ao máximo o acesso aos produtos…
Ver no WordPress
#arduino nano vs raspberry pi pico#arduino raspberry pi pico i2c#arduino vs raspberry pi pico#como programar raspberry pi pico#pico raspberry pi#raspberry pi pico#raspberry pi pico adc#raspberry pi pico analog to digital#raspberry pi pico battery#raspberry pi pico datasheet#raspberry pi pico documentation#raspberry pi pico especificações#raspberry pi pico examples#raspberry pi pico pinout#thonny raspberry pi pico
0 notes
Video
youtube
Raspberry Pi Pico Voice Recognition Based Home Automation Using Zigbee - Bluetooth and Android App | Voice Enabled Home Automation using Pi Pico and Bluetooth | Voice Controlled Home Automation using Raspberry Pi Pico | IoT Based Home Automation Using Raspberry Pi | Mobile Voice Recognition Based for Smart Home | Voice Based Home Automation System Using Raspberry Pi | Smart Home Automated System Using Raspberry-Pi | Control Home Appliance Using ESP32 BLE Android App | Android and ZIGBEE based Home Automation with Voice.***********************************************************If You Want To Purchase the Full Working Project KITMail Us: [email protected] Name Along With You-Tube Video LinkWe are Located at Telangana, Hyderabad, Boduppal. Project Changes also Made according to Student Requirementshttp://svsembedded.com/ https://www.svskits.in/ http://svsembedded.in/ http://www.svskit.com/M1: 91 9491535690 M2: 91 7842358459 We Will Send Working Model Project KIT through DTDC / DHL / Blue Dart / First Flight Courier ServiceWe Will Provide Project Soft Data through Google Drive1. Project Abstract / Synopsis 2. Project Related Datasheets of Each Component3. Project Sample Report / Documentation4. Project Kit Circuit / Schematic Diagram 5. Project Kit Working Software Code6. Project Related Software Compilers7. Project Related Sample PPT’s8. Project Kit Photos9. Project Kit Working Video linksLatest Projects with Year Wise YouTube video Links157 Projects https://svsembedded.com/ieee_2022.php135 Projects https://svsembedded.com/ieee_2021.php 151 Projects https://svsembedded.com/ieee_2020.php103 Projects https://svsembedded.com/ieee_2019.php61 Projects https://svsembedded.com/ieee_2018.php171 Projects https://svsembedded.com/ieee_2017.php170 Projects https://svsembedded.com/ieee_2016.php67 Projects https://svsembedded.com/ieee_2015.php55 Projects https://svsembedded.com/ieee_2014.php43 Projects https://svsembedded.com/ieee_2013.php1100 Projects https://www.svskit.com/2022/02/900-pr...***********************************************************2. Voice Recognition Wireless Home Automation System Based On Zigbee,3. Voice recognition based wireless home automation system – IEEE,4. Developing a voice control system for ZigBee-based home automation,5. Voice recognition based wireless home automation system,6. zigbee based voice controlled wireless smart home system – Aircc,7. Voice Recognition Based Home Automation System for - ijarece.org,8. home automation by voice recognition using zigbee – IJSRMS,9. Voice recognition based wireless home automation with intensity,10. Voice Controlled Home Automation Using Zigbee – YouTube,11. Wireless Home Automation System Using Zigbee – Ijser,12. Home Automation solutions - Schneider Electric?,13. voice recognition wireless home automation system based on zigbee ppt,14. voice recognition based wireless home automation system using zigbee,15. voice controlled home automation project report,16. home automation using voice control project,17. zigbee based home automation system project report,18. voice controlled home automation project pdf,19. home automation using zigbee circuit diagram,20. voice control home appliances circuit diagram,21. Voice Recognition Wireless Home Automation System Based on Zigbee,22. zigbee based voice control system for smart home – CiteSeerX,23. Voice Control Home Automation – SlideShare,24. Speech Recognition Module for Home Automation System Based On,25. Implementation Of Zigbee Based Home Automation System,26. Device Control Using Voice Recognition in Wireless Smart Home,27. home controlling system by using voice recognition – Universiti,28. 50 Latest Home Automation Projects For Engineering Students,29. Speech Recognition Module for Home Automation System Based On ZigBee,30. ZIGBEE TECHNOLOGY AND ITS APPLICATION IN WIRELESS HOME,31. Zigbee Based Home Appliances Controlling Through Spoken,32. ECE final year projects for B.Tech
0 notes
Link
2 notes
·
View notes
Text
MAKER Pi Pico #2 - Sensordaten auf einer SD-Card speichern
In diesem Beitrag möchte ich dir zeigen, wie du Sensordaten am MAKER Pi Pico mit dem SD-Card Adapter auf einer entsprechenden Micro SD-Card speichern kannst.
https://youtu.be/HII4YTjos3g
Im letzten Beitrag habe ich dir gezeigt wie du Sensordaten an den IoT Service ThingSpeak senden kannst, wenn du aber einmal keine WiFi Verbindung hast oder aber dein eigenes Dashboard erstellen möchtest dann kannst du mit diesem Feature deine Daten sicher zwischenspeichern.
Den MAKER Pi Pico selber, habe ich dir bereits im Beitrag Maker Pi Pico von Cytron vorgestellt.
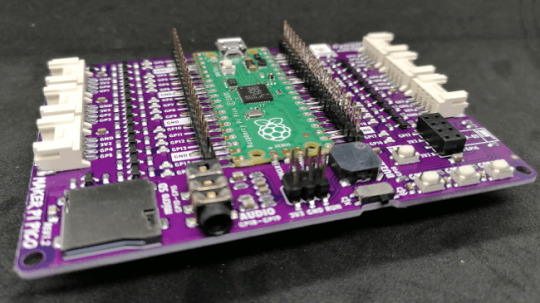
MAKER Pi Pico
Benötigte Ressourcen zum Nachbau
Möchtest du die Beispiele aus dem Beitrag nachbauen, so benötigst du folgende Ressourcen:
- MAKER Pi Pico,- Micro USB Datenkabel,
- DHT11 Sensor,
- SD-Card mit 16 GB,
- USB SD-Card Reader für den PC

MAKER Pi Pico mit Micro SD-Card
Schaltung & Aufbau
In diesem Beitrag verwende ich den DHT11 Sensor mit Grove Schnittstelle. Der DHT11 Sensor hat den Vorteil das diese zwei Werte liefert (Temperatur, rel. Luftfeuchtigkeit), jedoch den Nachteil das dieser nicht zuverlässig Werte liefert bzw. das Auslesen nicht zuverlässig funktioniert.
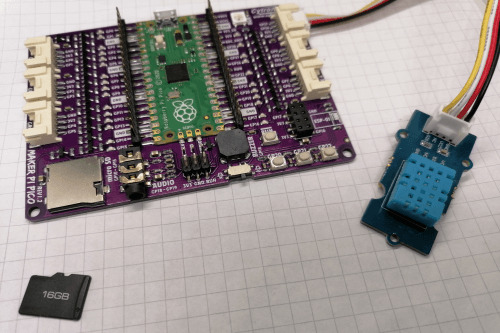
MAKER Pi Pico mit DHT11 Sensor und Micro SD-Karte
Pinout des SD-Card Adapters
Der MAKER Pi Pico hat einen SD-Card Adapter onBoard d.h. wir müssen uns nicht zusätzlich ein Modul besorgen und ggf. umständlich anschließen.
Wenn du "nur" den Raspberry Pi Pico verwenden möchtest dann gebe ich dir hier das Pinout des SD-Card Adapters.
Raspberry Pi
Pico GPIOSD ModeSPI ModeGP10CLKSCKGP11CMDSDI / MOSIGP12DAT0SDO / MISOGP13DAT1XGP14DAT2XGP15CD/DAT3CSnPinout des SD-Card Adapters am MAKER Pi Pico
Auf der Seite Maker Pi Pico Datasheet findest du weitere technische Daten zum MAKER Pi Pico.

Anschluss eines SD-Card Adapters an den Raspberry Pi Pico
In meinem Fall brauche ich nur den DHT11 Sensor anschließen und das Micro USB Kabel anschließen und bin mit dem Aufbau für diesen Beitrag fertig.
Programmieren des SD-Card Adapters am MAKER Pi Pico
Für die nachfolgenden Beispiele verwende ich das Tutorial "Write Read Data to SD Card Using Maker Pi Pico and CircuitPython" als Basis. Dieses Tutorial ist zwar in Englisch, aber durch die recht einfache Skriptsprache CircuitPython kann man den Quellcode gut lesen und verstehen.
Mounten einer SD-Card & schreiben einer Zeile in eine Textdatei
Zunächst wollen wir eine SD-Karte mounten quasi einbinden und in eine Datei eine Textzeile schreiben.
from board import *
from time import *
import busio
import sdcardio
import storage
# eine Pause von 1 Sekunde
sleep(1)
# definieren der Pins der SD-Card
spi = busio.SPI(GP10, MOSI=GP11, MISO=GP12)
cs = GP15
sd = sdcardio.SDCard(spi, cs)
# einbinden der SD Karte
vfs = storage.VfsFat(sd)
storage.mount(vfs, '/sd')
# öffnen der Datei pico.txt zum schreiben
# wenn diese Datei nicht existiert dann
# wird diese zuvor erstellt
with open("/sd/pico.txt", "w") as file:
# schreiben einer Zeile in die Datei
file.write("Hello, world!")
# schreiben eines Zeilenumbruchs
file.write("rn")
lesen von Dateien einer SD-Card
Da wir nun Daten auf die SD-Karte geschrieben haben, möchten wir diese ggf. auch auslesen.
Im Beitrag Python #10: Dateiverarbeitung habe ich dir gezeigt wie man mit Dateien & Verzeichnisse in Python arbeitet. Dieses können wir auf die leicht abgewandelte Skriptsprache CircuitPython anwenden.
from board import *
from time import *
import busio
import sdcardio
import storage
# eine Pause von 1 Sekunde
sleep(1)
# definieren der Pins der SD-Card
spi = busio.SPI(GP10, MOSI=GP11, MISO=GP12)
cs = GP15
sd = sdcardio.SDCard(spi, cs)
# einbinden der SD Karte
vfs = storage.VfsFat(sd)
storage.mount(vfs, '/sd')
# schreiben von 3 Einträgen in die Datei "greeting.txt"
# durch den Parameter "a" (a - append / anhängen )
# wird beim nächsten Start des Programmes die Datei
# NICHT überschrieben sondern 3 zusätzliche Einträge hinzugefügt
for i in range(3):
# Datei "greeting.txt" zum schreiben öffnen, die Daten werden
# an das Ende der Datei geschrieben
with open("/sd/greeting.txt", "a") as file:
# schreiben einer Zeile in die Datei
file.write("Hello World!")
# schreiben eines Zeilenumbruchs
file.write("rn")
# lesen der zuvor geschriebenen Daten von der SD Karte
with open("/sd/greeting.txt", "r") as file:
for line in file:
print(line)
Ausgabe auf der Konsole
Auf der Konsole werden nun die zuvor geschriebenen Daten angezeigt.
code.py Ausgabe:
Hello World!
Hello World!
Hello World!
Sollte das Programm jedoch mehrfach gestartet werden, so werden je Start 3 weiteren Datenzeilen hinzugefügt.
Schreiben von Sensordaten auf der SD-Karte
Möchte man Sensordaten schreiben so empfiehlt es sich diese Strukturiert zu schreiben. Man kann hierfür das JSON Format, XML oder auch das recht einfache CSV Format wählen.
Da wir lediglich die 4 Werte,
- Index,
- Zeitstempel,
- Temperatur,
- rel. Luftfeuchtigkeit
schreiben möchten, reicht für diesen Fall das CSV Format aus. (Mit den anderen beiden Formaten werde ich mich gesondert auf meinem Blog befassen.)
Was ist das CSV Format?
Das CSV Format ist wie erwähnt das einfachste Format. Die Daten werden dabei mit einem definierten Symbol getrennt in einer Zeile gespeichert. Eine Zeile endet immer mit einem Zeilenumbruch "rn".
1;2021-08-22 13:30;13;52
2;2021-08-22 13:31;15;49
Das Symbol zum Trennen von Daten innerhalb einer Zeile ist normalerweise das Semikolon. Aber es kann auch jedes andere Symbol verwendet werden. Ein Problem tritt jedoch auf wenn dieses Symbol innerhalb eines Textes in der Zeile vorkommt, dann kann ein Parser schon an seine grenzen stoßen.
Daten im CSV Format schreiben & lesen
Wollen wir zunächst ein paar Daten im CSV Format schreiben und lesen.
for i in range(3):
with open("/sd/date.txt", "a") as file:
# schreiben einer CSV Datenzeile in die Datei
file.write(str(i))
# Trenner der CSV Datei
file.write(";")
file.write("2021-08-22 13:3"+str(i))
file.write(";")
file.write(str(24))
file.write(";")
file.write(str(48))
# schreiben eines Zeilenumbruchs
file.write("rn")
# lesen der zuvor geschriebenen Daten von der SD Karte
with open("/sd/date.txt", "r") as file:
for line in file:
single_line = line.strip()
# entpacken einer Zeile in die Variablen
index, timestamp, temp, humi = single_line.split(";")
# ausgeben der Daten auf der Konsole
print("Index:", str(index))
print("Zeitstempel:", str(timestamp))
print("Temperatur:", str(temp))
print("rel. Luftfeuchtigkeit:", str(humi))
Ausgabe auf der Konsole
Auf der Konsole werden nun 3 Blöcke ausgegeben mit den zuvor gespeicherten Daten.
code.py Ausgabe:
Index: 0
Zeitstempel: 2021-08-22 13:30
Temperatur: 24
rel. Luftfeuchtigkeit: 48
Index: 1
Zeitstempel: 2021-08-22 13:31
Temperatur: 24
rel. Luftfeuchtigkeit: 48
Index: 2
Zeitstempel: 2021-08-22 13:32
Temperatur: 24
rel. Luftfeuchtigkeit: 48
Zeitstempel für die Sensordaten
Der MAKER Pi Pico verfügt über ein paar sehr nützliche Features aber eine RealTimeClock ist (bisher) nicht verbaut somit müsste man über die Pins ein solches Modul zusätzlich anschließen oder aber über einen aufgesteckten ESP01 und einer WiFi Verbindung von einem NTP Server die Zeitstempel holen.
In diesem Beispiel möchte ich einen Zeitstempel von einem kleinen PHP-Skript auf einer meiner Subdomains lesen (https://zeitstempel.draeger-it.blog/). Der Vorteil ist, dass ich das Format gleich definieren kann und somit der Code im Mu-Editor recht übersichtlich bleibt. Für diese Lösung benötigst du ein aktive WiFi Verbindung zu einem lokalen WLAN Netzwerk.
Aufbau einer WiFi Verbindung und laden des Zeitstempels von der Webseite
Wie du am MAKER Pi Pico mit dem ESP01 eine WiFi Verbindung zu deinem WLAN Netzwerk aufbaust habe ich dir im Beitrag Maker Pi Pico von Cytron bereits gezeigt.
Hier möchte ich dir lediglich das fertige Programm zum lesen eines Zeitstempels zeigen. Dieser Beitrag soll sich hautpsächlich darum drehen wie du nun die Sensordaten mit eben diesem Zeitstempel auf einer SD-Card im CSV Format speicherst.
import time
import board
import adafruit_dht
import busio
import adafruit_requests as requests
import adafruit_espatcontrol.adafruit_espatcontrol_socket as socket
from adafruit_espatcontrol import adafruit_espatcontrol
secrets = {
"ssid" : "FRITZBox7590GI24",
"password" : "abc"
}
timestamp_url = "http://zeitstempel.draeger-it.blog/"
RX = board.GP17
TX = board.GP16
uart = busio.UART(TX, RX, receiver_buffer_size=2048)
esp = adafruit_espatcontrol.ESP_ATcontrol(uart, 115200, debug=False)
requests.set_socket(socket, esp)
print("Resetting ESP module")
esp.soft_reset()
# Aufbau der WiFi Verbindung
while not esp.is_connected:
print("Connecting...")
esp.connect(secrets)
print("lesen des Zeitstempels von ", timestamp_url)
# Endlosschleife...
while True:
try:
r = requests.get(timestamp_url)
print("Zeitstempel:", r.text)
time.sleep(2)
except:
print("Fehler beim lesen des Zeitstempels von", timestamp_url)
In diesem kurzen Video zeige ich dir nun die Ausführung des oben gezeigten Programmes. (Das Passwort zu meinem WiFi-Netzwerk habe ich hier mit einem schwarzen Balken unkenntlich gemacht.)
Auf der Konsole sieht man den gelesenen Zeitstempel sowie ab und zu das nicht erfolgreich gelesen werden konnte. Ich denke das liegt hier vielmehr an einem Timeout der Verbindung, welcher zu kurz gewählt wurde. Hier kann man sich aber Abhilfe schaffen und ggf. eine kleine Schleife von 10 Durchläufen erzeugen und somit 10-mal probieren einen gültigen Zeitstempel zu laden.
Lesen eines Zeitstempels von einer Webseite.
schreiben der Sensordaten im CSV Format
Da wir nun wissen wie wir Daten auf die SD-Card schreiben und lesen, sowie einen Zeitstempel haben ist der nächste Schritt die Sensordaten auszulesen und diese Daten auf die SD-Card zu schreiben.
Damit unser Index (die erste Spalte in der CSV Datei) fortlaufend geschrieben wird, laden wir die CSV Datei beim starten des Mikrocontrollers und speichern und die Anzahl der Zeilen dieser Datei in einer Variable "index".
import time
import board
import adafruit_dht
import busio
import adafruit_requests as requests
import adafruit_espatcontrol.adafruit_espatcontrol_socket as socket
from adafruit_espatcontrol import adafruit_espatcontrol
import adafruit_dht
import sdcardio
import storage
secrets = {
"ssid" : "FRITZBox7590GI24",
"password" : "abc"
}
timestamp_url = "http://zeitstempel.draeger-it.blog/"
RX = board.GP17
TX = board.GP16
uart = busio.UART(TX, RX, receiver_buffer_size=2048)
esp = adafruit_espatcontrol.ESP_ATcontrol(uart, 115200, debug=False)
requests.set_socket(socket, esp)
# initialisieren eines DHT11 Sensors am GP27
dhtDevice = adafruit_dht.DHT11(board.GP27)
# Zähler für den Index innerhalb der CSV Datei
index = 0
# Dateiname für die Sensordaten
csv_filename = "/sd/measurements.csv"
# definieren der Pins der SD-Card
spi = busio.SPI(board.GP10, MOSI=board.GP11, MISO=board.GP12)
cs = board.GP15
sd = sdcardio.SDCard(spi, cs)
# einbinden der SD Karte
vfs = storage.VfsFat(sd)
storage.mount(vfs, '/sd')
# lesen der Sensorwerte des DHT Sensors
def read_dht_values():
result = {}
# Schleife von 0 bis 9
for i in range(9):
try:
# lesen der Sensorwerte
result = dhtDevice.temperature
result = dhtDevice.humidity
# Wenn die Temperatur ODER die rel. Luftfeuchtigkeit nicht vom Typ None ist dann,
# soll die aeussere Schleife verlassen werden.
if(result is not None or result is not None):
break;
else:
# Wenn die Daten nicht gelesen werden konnten, dann eine kleine
# Pause von 2 Sekunden einlegen.
time.sleep(2)
except RuntimeError as error:
print(error.args)
except Exception as error:
# Im Fall eines Schwerwiegenden Fehlers, so wird das Programm beendet.
dhtDevice.exit()
raise error
return result
def setup():
# Zugriff auf die Globale Variable "index"
global index
print("Setup")
# Reset des ESP01 Modules
esp.soft_reset()
# Aufbau der WiFi Verbindung
while not esp.is_connected:
print("Verbindung zu", secrets,"wird aufgebaut...")
esp.connect(secrets)
try:
index = sum(1 for line in open(csv_filename))
print("Datei", csv_filename,"enthaelt", str(index), "Zeilen")
except:
print("Datei wurde nicht gefunden.")
index = 0
# lesen des Zeitstempels von der Webseite
def read_timestamp():
timestamp = "-undefined-"
for i in range(10):
try:
r = requests.get(timestamp_url)
timestamp = r.text
# Wenn der Code bis hier funktioniert hat,
# dann kann die aeussere Schleife verlassen werden.
break;
except:
pass
time.sleep(1)
return timestamp
def loop():
global index
# lesen des Zeitstempels
timestamp = read_timestamp()
# lesen der Sensordaten
dht_values = read_dht_values()
# incrementieren des Indexes
index = index + 1
# Aufbau der CSV Datenzeile
csv_line = str(index) + ";" + timestamp + ";" + str(dht_values) + ";" + str(dht_values)
# Ausgeben der CSV Datenzeile auf der Komandozeile
print(csv_line)
# schreiben der CSV Datenzeile in die Datei
with open(csv_filename, "a") as file:
file.write(csv_line)
# hinzufügen eines Zeilenumbruchs am Zeilenende
file.write("rn")
# einmaliges Ausführen der Funktion "setup"
setup()
# Endlosschleife, welche die Funktion "loop" ausführt
while True:
loop()
# eine Pause von 1 Sekunde
time.sleep(1)
Video - schreiben der DHT11 Sensorwerte in eine CSV Datei auf der SD-Karte
Read the full article
0 notes
Video
youtube
Fire Detection System in Python using OpenCV With Arduino - GSM - Call Alert and SMS Notifications | Fire Detection Using Python OpenCV, CNN - Keras and Tensorflow | GSM Based Fire Alert System Call and SMS Notification Using Arduino Uno | Fire Alarm with Siren and Water Sprinkler System Using Raspberry Pi Pico | Smart Fire Detection using OpenCV and Python | Fire Detection System in Python using Opencv | Fire Detection using OpenCV | Python | Fire Detection System in Python using Opencv.***********************************************************If You Want To Purchase the Full Working Project KITMail Us: [email protected] Name Along With You-Tube Video LinkWe are Located at Telangana, Hyderabad, Boduppal. Project Changes also Made according to Student Requirementshttp://svsembedded.com/ https://www.svskits.in/ http://svsembedded.in/ http://www.svskit.com/M1: 91 9491535690 M2: 91 7842358459 We Will Send Working Model Project KIT through DTDC / DHL / Blue Dart / First Flight Courier ServiceWe Will Provide Project Soft Data through Google Drive1. Project Abstract / Synopsis 2. Project Related Datasheets of Each Component3. Project Sample Report / Documentation4. Project Kit Circuit / Schematic Diagram 5. Project Kit Working Software Code6. Project Related Software Compilers7. Project Related Sample PPT’s8. Project Kit Photos9. Project Kit Working Video linksLatest Projects with Year Wise YouTube video Links157 Projects https://svsembedded.com/ieee_2022.php135 Projects https://svsembedded.com/ieee_2021.php 151 Projects https://svsembedded.com/ieee_2020.php103 Projects https://svsembedded.com/ieee_2019.php61 Projects https://svsembedded.com/ieee_2018.php171 Projects https://svsembedded.com/ieee_2017.php170 Projects https://svsembedded.com/ieee_2016.php67 Projects https://svsembedded.com/ieee_2015.php55 Projects https://svsembedded.com/ieee_2014.php43 Projects https://svsembedded.com/ieee_2013.php1100 Projects https://www.svskit.com/2022/02/900-pr...***********************************************************1. IoT based Fire Detector
0 notes
Video
youtube
IoT Based Energy Meter Reading System With Automatic Billing Using Raspberry Pi Pico-NodeMCU ESP8266 | IoT Based Energy Monitoring System | ESP8266 | Raspberry Pi Pico | IOT based Smart Energy Monitoring System | Smart Energy Meter and Monitoring System using IoT | Raspberry Pi Pico Projects : IOT Based Smart Energy Meter Reading Monitoring System | ESP8266 | IoT Based Energy Monitoring and Management Solution.***********************************************************If You Want To Purchase the Full Working Project KITMail Us: [email protected] Name Along With You-Tube Video LinkWe are Located at Telangana, Hyderabad, Boduppal. Project Changes also Made according to Student Requirementshttp://svsembedded.com/ https://www.svskits.in/ http://svsembedded.in/ http://www.svskit.com/M1: 91 9491535690 M2: 91 7842358459 We Will Send Working Model Project KIT through DTDC / DHL / Blue Dart / First Flight Courier ServiceWe Will Provide Project Soft Data through Google Drive1. Project Abstract / Synopsis 2. Project Related Datasheets of Each Component3. Project Sample Report / Documentation4. Project Kit Circuit / Schematic Diagram 5. Project Kit Working Software Code6. Project Related Software Compilers7. Project Related Sample PPT’s8. Project Kit Photos9. Project Kit Working Video linksLatest Projects with Year Wise YouTube video Links157 Projects https://svsembedded.com/ieee_2022.php135 Projects https://svsembedded.com/ieee_2021.php 151 Projects https://svsembedded.com/ieee_2020.php103 Projects https://svsembedded.com/ieee_2019.php61 Projects https://svsembedded.com/ieee_2018.php171 Projects https://svsembedded.com/ieee_2017.php170 Projects https://svsembedded.com/ieee_2016.php67 Projects https://svsembedded.com/ieee_2015.php55 Projects https://svsembedded.com/ieee_2014.php43 Projects https://svsembedded.com/ieee_2013.php1100 Projects https://www.svskit.com/2022/02/900-pr...***********************************************************1. Multiple Sensors, Multiple Appliances using NodeMCU
0 notes
Video
youtube
QR Code Based Smart Library Management With IN / OUT Books Counting Display Using Raspberry Pi Pico | RFID based smart library management system using Raspberry Pi Pico | smart library management system using qr code | smart library management system using rfid technology | smart library management system using iot | modules library management system project.***********************************************************If You Want To Purchase the Full Working Project KITMail Us: [email protected] Name Along With You-Tube Video LinkWe are Located at Telangana, Hyderabad, Boduppal. Project Changes also Made according to Student Requirementshttp://svsembedded.com/ https://www.svskits.in/ http://svsembedded.in/ http://www.svskit.com/M1: 91 9491535690 M2: 91 7842358459 We Will Send Working Model Project KIT through DTDC / DHL / Blue Dart / First Flight Courier ServiceWe Will Provide Project Soft Data through Google Drive1. Project Abstract / Synopsis 2. Project Related Datasheets of Each Component3. Project Sample Report / Documentation4. Project Kit Circuit / Schematic Diagram 5. Project Kit Working Software Code6. Project Related Software Compilers7. Project Related Sample PPT’s8. Project Kit Photos9. Project Kit Working Video linksLatest Projects with Year Wise YouTube video Links157 Projects https://svsembedded.com/ieee_2022.php135 Projects https://svsembedded.com/ieee_2021.php 151 Projects https://svsembedded.com/ieee_2020.php103 Projects https://svsembedded.com/ieee_2019.php61 Projects https://svsembedded.com/ieee_2018.php171 Projects https://svsembedded.com/ieee_2017.php170 Projects https://svsembedded.com/ieee_2016.php67 Projects https://svsembedded.com/ieee_2015.php55 Projects https://svsembedded.com/ieee_2014.php43 Projects https://svsembedded.com/ieee_2013.php1100 Projects https://www.svskit.com/2022/02/900-pr...***********************************************************1. Raspberry Pi Pico Projects : Smart Library Management System using QR Code Technology,2. QR-Code Based Examination Room Guidance System with Voice Announcement Using Raspberry Pi Pico,3. E-Ration System Using QR Code with Raspberry Pi Pico
0 notes
Video
youtube
Fingerprint and IOT Based Exam Hall Authentication Using ESP32 | Fingerprint and iot based exam hall authentication using esp32 project | Fingerprint based exam hall authentication project report PDF | Fingerprint and iot based exam hall authentication using esp32 example | IoT based Biometric attendance system | ESP32 Fingerprint attendance system | Biometric Attendance using ESP8266 | Biometric Fingerprint Attendance System project | Biometric attendance system over IOT ppt | Iot based exam hall authentication system project with source code.***********************************************************If You Want To Purchase the Full Working Project KITMail Us: [email protected] Name Along With You-Tube Video LinkWe are Located at Telangana, Hyderabad, Boduppal. Project Changes also Made according to Student Requirementshttp://svsembedded.com/ https://www.svskits.in/ http://svsembedded.in/ http://www.svskit.com/M1: 91 9491535690 M2: 91 7842358459 We Will Send Working Model Project KIT through DTDC / DHL / Blue Dart / First Flight Courier ServiceWe Will Provide Project Soft Data through Google Drive1. Project Abstract / Synopsis 2. Project Related Datasheets of Each Component3. Project Sample Report / Documentation4. Project Kit Circuit / Schematic Diagram 5. Project Kit Working Software Code6. Project Related Software Compilers7. Project Related Sample PPT’s8. Project Kit Photos9. Project Kit Working Video linksLatest Projects with Year Wise YouTube video Links157 Projects https://svsembedded.com/ieee_2022.php135 Projects https://svsembedded.com/ieee_2021.php 151 Projects https://svsembedded.com/ieee_2020.php103 Projects https://svsembedded.com/ieee_2019.php61 Projects https://svsembedded.com/ieee_2018.php171 Projects https://svsembedded.com/ieee_2017.php170 Projects https://svsembedded.com/ieee_2016.php67 Projects https://svsembedded.com/ieee_2015.php55 Projects https://svsembedded.com/ieee_2014.php43 Projects https://svsembedded.com/ieee_2013.php1100 Projects https://www.svskit.com/2022/02/900-pr...***********************************************************1. Fingerprint Based Biometric Attendance System using Arduino,2. Fingerprint Attendance System Using Arduino || How To Make Biometric Attendance System,3. Fingerprint Based ATM System,4. Fingerprint Based Exam Hall Authentication System,5. Fingerprint Based Bank Locker System,6. How To Make Fingerprint Based Biometric Attendance System using Arduino,7. Examination room guide using RFID and FINGER PRINT for the jumbling system based EXAMS,8. Fingerprint Based Security System,9. BioMetric Exam Entry Authentication With SMS Alert GSM Based Project,10. Fingerprint Based Exam Hall Authentication,11. Electronics Projects Using Fingerprint Sensor Compilation 2023,12. BIOMETRIC FINGER PRINT BASED BANK LOCKER SECURITY USING ARM7 AND GSM TECHNOLOGY,13. Fingerprint based Exam Hall Authentication,14. Fingerprint Based Car Ignition System using Raspberry Pi Pico and RFID,15. Fingerprint Based Identity Authentication for Examination System,16. Arduino Optical Fingerprint Sensor AS608 Based Biometric Voting System,17. Biometric Security Based Examination Hall | BE / BTech / Diploma Project,18. exam hall authentication using finger scanner,19. fingerprint and iot based exam hall authentication system,20. FINGERPRINT BASED EXAM HALL EXAMINATION AUTHENTICATION || ARDTHON SOLUTIONS,21. Finger print authentication system for exam hall using R307 and PIC Microcontroller,22. Fingerprint based license verification system,23. finger print based exam hall ticket,24. Fingerprint Based Exam Hall Authentication Using IOT
0 notes
Video
youtube
Development of an IoT-Enabled Air Pollution Monitoring | IoT Enabled Smart Industrial Pollution Monitoring and Control System Using Raspberry Pi with BLYNK Server | IoT Based Pollution Monitoring System for Effective Industrial Pollution Monitoring and Control | IoT enabled Environmental Air Pollution Monitoring and Rerouting system using Machine learning algorithms | Development of a Compact IoT-Enabled Device to Monitor Air Pollution for Environmental Sustainability | air pollution monitoring system using iot | air pollution monitoring system using nodemcu | air quality monitoring and alert system using arduino with mq135.***********************************************************If You Want To Purchase the Full Working Project KITMail Us: [email protected] Name Along With You-Tube Video LinkWe are Located at Telangana, Hyderabad, Boduppal. Project Changes also Made according to Student Requirementshttp://svsembedded.com/ https://www.svskits.in/ http://svsembedded.in/ http://www.svskit.com/M1: 91 9491535690 M2: 91 7842358459 We Will Send Working Model Project KIT through DTDC / DHL / Blue Dart / First Flight Courier ServiceWe Will Provide Project Soft Data through Google Drive1. Project Abstract / Synopsis 2. Project Related Datasheets of Each Component3. Project Sample Report / Documentation4. Project Kit Circuit / Schematic Diagram 5. Project Kit Working Software Code6. Project Related Software Compilers7. Project Related Sample PPT’s8. Project Kit Photos9. Project Kit Working Video linksLatest Projects with Year Wise YouTube video Links157 Projects https://svsembedded.com/ieee_2022.php135 Projects https://svsembedded.com/ieee_2021.php 151 Projects https://svsembedded.com/ieee_2020.php103 Projects https://svsembedded.com/ieee_2019.php61 Projects https://svsembedded.com/ieee_2018.php171 Projects https://svsembedded.com/ieee_2017.php170 Projects https://svsembedded.com/ieee_2016.php67 Projects https://svsembedded.com/ieee_2015.php55 Projects https://svsembedded.com/ieee_2014.php43 Projects https://svsembedded.com/ieee_2013.php1100 Projects https://www.svskit.com/2022/02/900-pr...***********************************************************Creating an IoT-enabled smart industrial pollution monitoring and control system using Raspberry Pi Pico and the Blynk app involves several steps. Below is a general outline to guide you through the process. Keep in mind that this is a high-level overview, and you may need to adapt it based on your specific requirements.Components Needed:1. Raspberry Pi Pico2. Sensors (such as air quality sensors, gas sensors, etc.)3. Other relevant sensors depending on the pollutants you want to monitor (e.g., temperature, humidity4. Wi-Fi Module:ESP8266 or ESP32 module for Wi-Fi connectivity.5. Power Supply:Power supply for the Raspberry Pi Pico and other components.6. MicroPython or C/C . Arduino compiler7. Blynk app8. Internet connection9. Power supply for Raspberry Pi Pico10. Other required electronic components (wires, resistors, etc.)Steps:1. Set Up Raspberry Pi Pico:• Install the Arduino IDE on your computer and connect Raspberry Pi Pico.• Write a EMBEDDED C script to read data from the sensors connected to Raspberry Pi Pico.2. Connect Sensors:• Connect the pollution monitoring sensors (e.g., air quality sensors, gas sensors) to the GPIO pins on the Raspberry Pi Pico. Make sure to follow the datasheets and wiring instructions for each sensor.3. Install Blynk Library:• Install the Blynk library on your Raspberry Pi Pico using the Arduino IDE or the terminal.4. Create a Blynk App:• Download and install the Blynk app on your smartphone.• Create a new project in the Blynk app and obtain the authentication token.5. Write Blynk Code:• Write a Python script using the Blynk library to send sensor data to the Blynk app.6. Run the Code:• Save the Python script on your Raspberry Pi Pico and run it.7. Monitor Data on Blynk App:• Open the Blynk app on your smartphone.• View real-time sensor data on the Blynk app dashboard.8. Implement Control (Optional):• If you want to add control features, such as turning on/off a pollution control device, you can use Blynk buttons or sliders to send commands to your Raspberry Pi Pico.9. Security Considerations:• Ensure that you implement proper security measures, such as using secure connections (HTTPS), protecting authentication tokens, and implementing access controls.Notes:• Consult the datasheets of your sensors for accurate wiring and usage information.• Customize the Blynk app interface according to your preferences.• Ensure that your Raspberry Pi Pico has a stable internet connection.This is a basic guide, and you may need to refer to the documentation for each component (Raspberry Pi Pico, sensors, Blynk) for more detailed information and troubleshooting.
0 notes
Video
youtube
IoT Web based Smart Shopping🛒Trolley with ESP32-CAM QR Code Mobile📱Cart Application | IoT based Smart Shopping Cart using RFID and NodeMCU | Smart Shopping Trolley using QR Code and ESP32Cam | IoT based Smart Shopping Trolley with Mobile Cart Application | Smart Shopping Using QR Code and ESP32-CAM | IOT | AUTOMATED BILLING SYSTEM SMART TROLLEY USING ESP32 CAM MODULE WITH THE HELP OF ARDUINO UNO | Scanning QR Codes With the ESP32-CAM | qr code based examination room guidance system using esp32-cam and raspberry pi pico.***********************************************************If You Want To Purchase the Full Working Project KITMail Us: [email protected] Name Along With You-Tube Video LinkWe are Located at Telangana, Hyderabad, Boduppal. Project Changes also Made according to Student Requirementshttp://svsembedded.com/ https://www.svskits.in/ http://svsembedded.in/ http://www.svskit.com/M1: 91 9491535690 M2: 91 7842358459 We Will Send Working Model Project KIT through DTDC / DHL / Blue Dart / First Flight Courier ServiceWe Will Provide Project Soft Data through Google Drive1. Project Abstract / Synopsis 2. Project Related Datasheets of Each Component3. Project Sample Report / Documentation4. Project Kit Circuit / Schematic Diagram 5. Project Kit Working Software Code6. Project Related Software Compilers7. Project Related Sample PPT’s8. Project Kit Photos9. Project Kit Working Video linksLatest Projects with Year Wise YouTube video Links157 Projects https://svsembedded.com/ieee_2022.php135 Projects https://svsembedded.com/ieee_2021.php 151 Projects https://svsembedded.com/ieee_2020.php103 Projects https://svsembedded.com/ieee_2019.php61 Projects https://svsembedded.com/ieee_2018.php171 Projects https://svsembedded.com/ieee_2017.php170 Projects https://svsembedded.com/ieee_2016.php67 Projects https://svsembedded.com/ieee_2015.php55 Projects https://svsembedded.com/ieee_2014.php43 Projects https://svsembedded.com/ieee_2013.php1100 Projects https://www.svskit.com/2022/02/900-pr...***********************************************************1. Smart Shopping Trolley with Automated Billing using Arduino2. RFID Based Smart Shopping Cart Using Arduino | RC5223. Automated Smart Trolley with Smart Billing Arduino | RFID4. IoT based Smart Shopping Cart using RFID and NodeMCU5. RFID based Shopping trolley6. IoT based Smart Door Lock System using NodeMCU7. IOT Based Smart Attendance System Project using NodeMCU ESP82668. DIY Smart Wi-Fi Video Doorbell using ESP32 and Camera9. IoT based Fire Alarm System Project using NodeMCU ESP826610. The Internet of Things with ESP32 | webserver | IoT Design Pro11. IoT based Smart Irrigation System using Soil Moisture Sensor12. Moduino X Series - Industrial IoT module based on ESP3213. Iot Home Automation Using ESP-32 with videos (Hindi
0 notes
Video
youtube
IOT Based Person/Wheelchair Fall Detection System Using Raspberry Pi Pico / Arduino / NodeMCU and MPU6050 Sensor | IoT Fall Detection using MPU6050 NodeMCU ESP8266 and Blynk App Email Alerts | DIY IOT Wheel Chair Person Fall Detection Using Microcontroller IOT Healthcare Project | wireless hand gesture controlled robot || smart wheel chair with fall detection alarm using Arduino.***********************************************************If You Want To Purchase the Full Working Project KITMail Us: [email protected] Name Along With You-Tube Video LinkWe are Located at Telangana, Hyderabad, Boduppal. Project Changes also Made according to Student Requirementshttp://svsembedded.com/ https://www.svskits.in/ http://svsembedded.in/ http://www.svskit.com/M1: 91 9491535690 M2: 91 7842358459 We Will Send Working Model Project KIT through DTDC / DHL / Blue Dart / First Flight Courier ServiceWe Will Provide Project Soft Data through Google Drive1. Project Abstract / Synopsis 2. Project Related Datasheets of Each Component3. Project Sample Report / Documentation4. Project Kit Circuit / Schematic Diagram 5. Project Kit Working Software Code6. Project Related Software Compilers7. Project Related Sample PPT’s8. Project Kit Photos9. Project Kit Working Video linksLatest Projects with Year Wise YouTube video Links157 Projects https://svsembedded.com/ieee_2022.php135 Projects https://svsembedded.com/ieee_2021.php 151 Projects https://svsembedded.com/ieee_2020.php103 Projects https://svsembedded.com/ieee_2019.php61 Projects https://svsembedded.com/ieee_2018.php171 Projects https://svsembedded.com/ieee_2017.php170 Projects https://svsembedded.com/ieee_2016.php67 Projects https://svsembedded.com/ieee_2015.php55 Projects https://svsembedded.com/ieee_2014.php43 Projects https://svsembedded.com/ieee_2013.php1100 Projects https://www.svskit.com/2022/02/900-pr...***********************************************************1. IOT Based Person-Wheelchair Fall Detection System Using Arduino,2. IoT Based Fall Detection System Using arduino and MPU6050 Sensor,3. IoT Based Fall Detection System Using NodeMCU and MPU6050 Sensor,4. IoT Fall Detection system for old/disabled person,5. IOT Based Wheelchair Fall Detection,6. IoT Fall Detection using MPU6050 NodeMCU ESP8266 and Blynk App Email Alerts,7. IoT Based Person Fall Detection from wheelchair project describe the coding part,8. Fall Detection System for Elderly Person Monitoring Using GSM,9. Tech Projects Fall Detection System IoT based Iot fall detection system,10. IoT Based Fall Detection Monitoring and Alarm System For Elderly,11. Wheelchair Fall Detection Using arduino Engineering mini project,12. IoT BASED PERSON FALL DETECTION FROM WHEELCHAIR AND SHOWING BODY TEMPERATURE,13. IOT Based Person/Wheelchair Fall Detection,14. FallingTalk: An IoT-Based Real-Time Falling Detection System,15. wheelchair fall detection using Arduino,16. wheelchair fall detection iot project,17. wheelchair fall detection ieee papers,18. smart wheelchair project ppt,19. smart wheelchair iot project,20. person fall detection,21. iot heart attack detection, heart rate monitor,22. iot heart attack detection heart rate monitor ppt,23. iot based wheelchair fall detection ppt,24. iot based person/wheelchair fall detection report,25. iot based person/wheelchair fall detection project,26. iot based person/wheelchair fall detection ppt,27. iot based person/wheelchair fall detection pdf,28. iot based heart rate monitoring system using Arduino,29. heart attack detection using Arduino,30. heart attack detection system,31. heart attack detection project,32. heart attack detection by heartbeat sensing using Arduino,33. heart attack detection by heartbeat sensing project report,34. heart attack detection by heart beat sensing ieee papers,35. gesture controlled wheelchair project ppt,36. fall detection using mpu6050 arduino code,37. fall detection using iot pdf,38. fall detection using accelerometer arduino code,39. fall detection system project,40. fall detection sensor Arduino,41. fall detection research paper,42. fall detection project pdf,43. fall detection ppt,44. fall detection iot project,45. fall detection github,46. fall detection algorithm,47. diy fall detection,48. applications of fall detection system,49. accelerometer-based fall detection sensor system for the elderly,50. accelerometer fall detection code,
0 notes
Video
youtube
RFID Based Prepaid Card for Cashless Canteen Management System using Raspberry Pi Pico | IOT Based E- wallet Canteen Management System using RFID and Raspberry Pi Pico | Smart Canteen Management System using Raspberry Pi Pico With RFID | rfid based canteen management system pdf | canteen management system | realtime canteen management system | for canteen management system | smart canteen management system | iot based attendance system using arduino | rfid based attendance system using arduino | web based canteen payment system | rfid based canteen cashier system | biometric attendance system using iot | cafeteria management system | using raspberry pi pico | slot detection using raspberry pi pico.***********************************************************If You Want To Purchase the Full Working Project KITMail Us: [email protected] Name Along With You-Tube Video LinkWe are Located at Telangana, Hyderabad, Boduppal. Project Changes also Made according to Student Requirementshttp://svsembedded.com/ https://www.svskits.in/ http://svsembedded.in/ http://www.svskit.com/M1: 91 9491535690 M2: 91 7842358459 We Will Send Working Model Project KIT through DTDC / DHL / Blue Dart / First Flight Courier ServiceWe Will Provide Project Soft Data through Google Drive1. Project Abstract / Synopsis 2. Project Related Datasheets of Each Component3. Project Sample Report / Documentation4. Project Kit Circuit / Schematic Diagram 5. Project Kit Working Software Code6. Project Related Software Compilers7. Project Related Sample PPT’s8. Project Kit Photos9. Project Kit Working Video linksLatest Projects with Year Wise YouTube video Links157 Projects https://svsembedded.com/ieee_2022.php135 Projects https://svsembedded.com/ieee_2021.php 151 Projects https://svsembedded.com/ieee_2020.php103 Projects https://svsembedded.com/ieee_2019.php61 Projects https://svsembedded.com/ieee_2018.php171 Projects https://svsembedded.com/ieee_2017.php170 Projects https://svsembedded.com/ieee_2016.php67 Projects https://svsembedded.com/ieee_2015.php55 Projects https://svsembedded.com/ieee_2014.php43 Projects https://svsembedded.com/ieee_2013.php1100 Projects https://www.svskit.com/2022/02/900-pr...***********************************************************1. GPRS (IoT) Mobile Payment System Based on RFID for Schools / Colleges / Employees,2. Online School / College Id Card Management System using PHP/MYSQL/HTML/ CSS/HTTP,3. IOT Based E- wallet Canteen Management System using RFID and Raspberry Pi Pico,4. IOT Based E- wallet Cashless Payment System using RFID and Raspberry Pi Pico,5. IOT Based E- wallet Canteen Management System using RFID and Raspberry Pi Pico,6. Design of Cashless Payment System with RFID to Improve,7. IMPLEMENTATION OF CASHLESS BUS TICKETING SYSTEM USING RFID AND IOT,8. RFID Based Mobile Payment System GSM-GPRS Network,9. Canteen and Cafeteria Management System using RFID,10. E- CANTEEN payment system Using RFID-GPRS ,11. IOT Based Project: RFID Canteen Management System,12. Canteen Management System | DEMO | Web Based | Star Link,13. Smart Canteen Management System Using RFID – IJREAM,14. Web-based canteen payment system with RFID technology,15. Realtime Canteen Management System,16. RFID based prepaid card for canteen management system,17. school canteen voucher system using rfid technology,18. rfid based canteen cashier system,19. rfid based canteen management system pdf,20. smart canteen management system,21. rfid based petrol pump automation system,22. cafeteria management system project,23. attendance system based on rfid,24. rfid based attendance system project,25. canteen and cafeteria management system using rfid,26. rfid based canteen management system pdf,27. advanced footstep power generation system using rfid for charging,28. attendance system based on rfid project pdf,29. rfid based petrol pump automation system,30. rfid based petrol pump automation system ppt,31. rfid based attendance system project report,32. advanced footstep power generation using rfid for charging,33. College Bus Information to student through GSM,GPS
0 notes
Video
youtube
IoT Enabled Smart Industrial Pollution Monitoring and Control System Using Raspberry Pi Pico with Blynk App | air pollution monitoring and prediction using iot | air pollution monitoring raspberry pi | air pollution monitoring system using arduino | air pollution monitoring system using iot | air pollution monitoring using iot | air pollution monitoring system using nodemcu | iot based air pollution monitoring system using arduino | real-time health monitoring using wearable devices | tracking and alert system for laptop using iot | real time health monitoring system using arduino.***********************************************************If You Want To Purchase the Full Working Project KITMail Us: [email protected] Name Along With You-Tube Video LinkWe are Located at Telangana, Hyderabad, Boduppal. Project Changes also Made according to Student Requirementshttp://svsembedded.com/ https://www.svskits.in/ http://svsembedded.in/ http://www.svskit.com/M1: 91 9491535690 M2: 91 7842358459 We Will Send Working Model Project KIT through DTDC / DHL / Blue Dart / First Flight Courier ServiceWe Will Provide Project Soft Data through Google Drive1. Project Abstract / Synopsis 2. Project Related Datasheets of Each Component3. Project Sample Report / Documentation4. Project Kit Circuit / Schematic Diagram 5. Project Kit Working Software Code6. Project Related Software Compilers7. Project Related Sample PPT’s8. Project Kit Photos9. Project Kit Working Video linksLatest Projects with Year Wise YouTube video Links157 Projects https://svsembedded.com/ieee_2022.php135 Projects https://svsembedded.com/ieee_2021.php 151 Projects https://svsembedded.com/ieee_2020.php103 Projects https://svsembedded.com/ieee_2019.php61 Projects https://svsembedded.com/ieee_2018.php171 Projects https://svsembedded.com/ieee_2017.php170 Projects https://svsembedded.com/ieee_2016.php67 Projects https://svsembedded.com/ieee_2015.php55 Projects https://svsembedded.com/ieee_2014.php43 Projects https://svsembedded.com/ieee_2013.php1100 Projects https://www.svskit.com/2022/02/900-pr...***********************************************************Creating an IoT-enabled smart industrial pollution monitoring and control system using Raspberry Pi Pico and the Blynk app involves several steps. Below is a general outline to guide you through the process. Keep in mind that this is a high-level overview, and you may need to adapt it based on your specific requirements.Components Needed:1. Raspberry Pi Pico2. Sensors (such as air quality sensors, gas sensors, etc.)3. Other relevant sensors depending on the pollutants you want to monitor (e.g., temperature, humidity4. Wi-Fi Module:ESP8266 or ESP32 module for Wi-Fi connectivity.5. Power Supply:Power supply for the Raspberry Pi Pico and other components.6. MicroPython or C/C . Arduino compiler7. Blynk app8. Internet connection9. Power supply for Raspberry Pi Pico10. Other required electronic components (wires, resistors, etc.)Steps:1. Set Up Raspberry Pi Pico:• Install the Arduino IDE on your computer and connect Raspberry Pi Pico.• Write a EMBEDDED C script to read data from the sensors connected to Raspberry Pi Pico.2. Connect Sensors:• Connect the pollution monitoring sensors (e.g., air quality sensors, gas sensors) to the GPIO pins on the Raspberry Pi Pico. Make sure to follow the datasheets and wiring instructions for each sensor.3. Install Blynk Library:• Install the Blynk library on your Raspberry Pi Pico using the Arduino IDE or the terminal.4. Create a Blynk App:• Download and install the Blynk app on your smartphone.• Create a new project in the Blynk app and obtain the authentication token.5. Write Blynk Code:• Write a Python script using the Blynk library to send sensor data to the Blynk app.6. Run the Code:• Save the Python script on your Raspberry Pi Pico and run it.7. Monitor Data on Blynk App:• Open the Blynk app on your smartphone.• View real-time sensor data on the Blynk app dashboard.8. Implement Control (Optional):• If you want to add control features, such as turning on/off a pollution control device, you can use Blynk buttons or sliders to send commands to your Raspberry Pi Pico.9. Security Considerations:• Ensure that you implement proper security measures, such as using secure connections (HTTPS), protecting authentication tokens, and implementing access controls.Notes:• Consult the datasheets of your sensors for accurate wiring and usage information.• Customize the Blynk app interface according to your preferences.• Ensure that your Raspberry Pi Pico has a stable internet connection.This is a basic guide, and you may need to refer to the documentation for each component (Raspberry Pi Pico, sensors, Blynk) for more detailed information and troubleshooting.
0 notes
Last Seen Blogs

coffee-addict-2005
student (majoring in stress)

yogahara
Мир Йоги и Медитации

yayacosplay
Yaya Han's Tumblr

suboogiewitdahoodie
SuBöögie

nerdynurse44
A NerdOfANurse