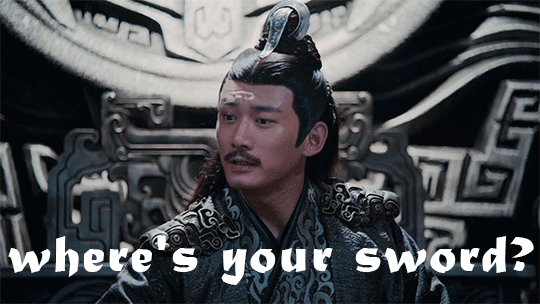
#re post because the gif version got compressed
Text
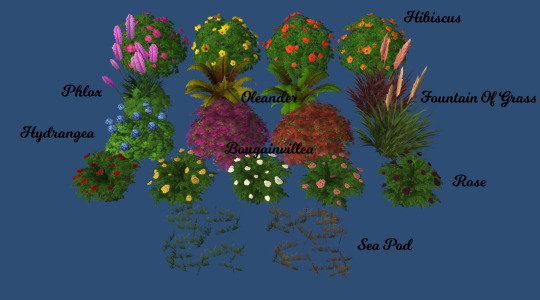
Shrubs Default Replacement + Custom Versions
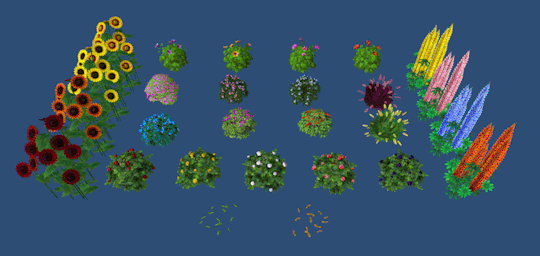
A complete replacement of almost all shrubs found in game. Now they are bigger, more lush and hopefully look more like their real-life counterparts.
There’s also a custom version of each shrub (lupin only has a V2 version as cutom) with all recolors in case you’d like to keep Maxis ones. It can be used alongside default replacement, it’s also seasonal and behaves just like Maxis shrubs but doesn’t need to be trimmed. These were cloned from Bienchen83′s seasonal shrubs that I’ve modified to be recolorable.
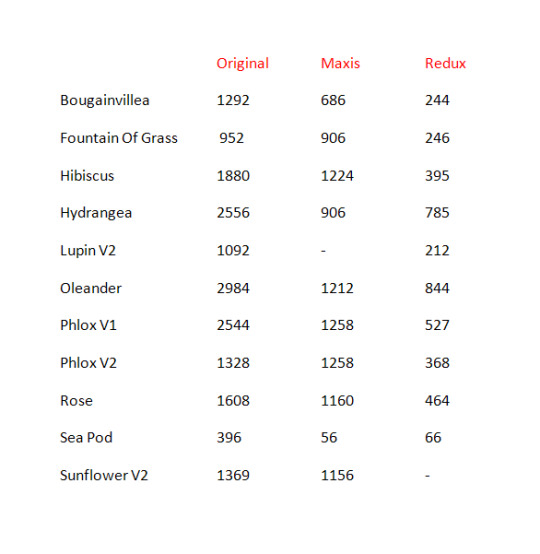
Shrubs replaced: bougainvillea, fountain of grass, hibiscus, hydrangea, oleander, phlox, rose, seaweed called "Big Pond Peddlers Sea Pod”, sunflower and lupin (in V1 they got some minor color tweaks on their leaves but V2 is a complete replacement of their model).
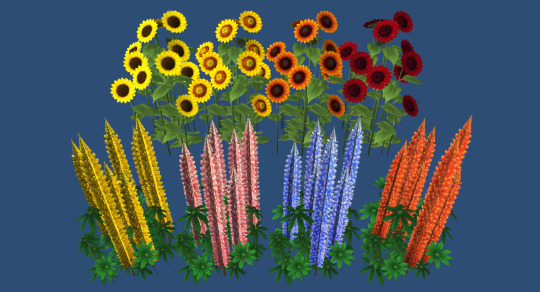
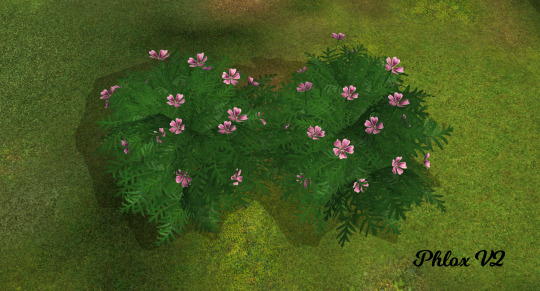
There’s also a V2 version for sunflower, lupin and phlox:

Be sure to choose only one version!
IMPORTANT!
This replacement is incompatible with replacements for shrubs that change their texture, mesh or both. It is also incompatible with @an-elegant-simblr plant fixes (with a few exceptions of shrubs and hedges that I didn’t include in this replacement). All recolors will be broken too. I’ve already integrated my no sheen fix for sunflower and lupin in their packages so you can delete those files if you were using them. The overgrown state of all shrubs looks the same as normal state so visually you won’t see any difference until you click on it. I didn’t test it thoroughly because I use Perfect Plants mod so please report any problems.
- - -
All meshes are my own conversions from The Sims 4 (but sunflower V2 replacement is a Wood For Sims sunflower shrub (original can be found at the booty here) for which I made additional matching recolors). Because they have undersides, polycount became higher for all shrubs but never exceeds 3000 polys. Textures were mostly taken from Witcher 3 (extracted by saricoya and shared here) as well as various images found online. Voeille’s plant fixes were used as reference to create winter states for sunflower and lupin V1.
Everything is separated so you can pick and choose what you’d like to have in your game.
Be aware that one file - Tvickiesims_Hibiscus_DR - has the same name as hibiscus tree replacement I’ve posted earlier. Do not overwrite! Thank you to @plumbtales for letting me know!
NOW HAS A REDUX VERSION - same shrubs and textures but lower polycount. Please note that the way I did it doesn’t necessarily mean it’ll ease the strain on your graphics card (according to wiki). You can always switch to the original version if you have any problems with the new one.
Polycount:
- - - - - - - - - - - - - - - - - - - - - - - - - - - - - - - - - - - - - - - - - - - - -
UPDATE 25/08
For DR only: Forgot to replace phlox’s overgrown state. If you noticed your phlox reverted to its Maxis shape when overgrown - please redownload!
UPDATE 01/09
Slightly reworked Hibiscus’ texture to no longer have that white trim, especially visible when zooming out. Both links were updated, please redownload!
UPDATE 11/09
Added a V2 version for sunflower and lupin default replacement shrubs. Be sure to keep only one version!
UPDATE 24/10
Added a V2 version for phlox, re-fixed phlox’s overgrown state, smoothed out several meshes, added phlox’s V2 to custom shrubs (it can be used alongside V1 only as custom version), changed mod’s description and added polycount.
UPDATE 28/10
Added a redux version of all the shrubs (custom and dr) and adjusted hydrangea recolors (new mesh only, custom and dr).
- - - - - - - - - - - - - - - - - - - - - - - - - - - - - - - - - - - - - - - - - - - - -
Trees replacement is here
Flowers replacement is here
Desert plants replacement is here
Tropical plants replacement is here
Compressed, clearly labelled, pictures included.
Download Default Replacement (SFS)
Download Default Replacement - REDUX (SFS)
Download Custom (SFS)
Download Custom - REDUX (SFS)
Download REDUX-adjusted hydrangea recolors (custom and dr) (SFS)
630 notes
·
View notes
Text
Tutorial: Making a Gif in Photoshop
(Pinboard of all my Masterposts) (Tutorials Masterpost)
Here’s a beginner’s guide to making gifs in photoshop. I’m going with the assumption that 1. you have Photoshop (I do this in Photoshop CC 2021 at the moment, but this isn’t new functionality, so other recent versions should work similarly.) and 2. You want to be able to upload your gifs on Tumblr.
Note: When I name a menu in bold followed by this arrow thingy --> I am telling you what to select from that menu. If I have two arrow thingies, it’s two menu selections deep. Etc.
Super Basic Stuff
1. Capture a video clip in MP4 format (or another Photoshop-friendly format; I use MP4). There are a lot of ways to do this--google it and you’ll find options.
2. Drag the video clip into your photoshop session.
3. Image Menu-->Image Size-->width 540 pixels, with whatever height the aspect ratio assigns. Tumblr compresses your gifs to 540, so doing it yourself is the best way to avoid icky artifacts. Fun fact: iPad retina displays throw white flashing pixel artifacts that other displays don’t, so you may be making beautiful gifs that secretly look incredibly shitty on an iPad. I learned this the hard way when I got an iPad and looked at some of my posts. I learned the 540px resize tip from the good folks in Tumblr’s pixel art community, which fixes about 95 percent of my gifs. *bows down to pixel artists*
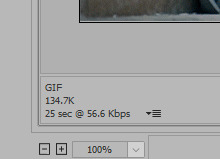
4. File Menu-->Export-->Export for Web. These are my settings.
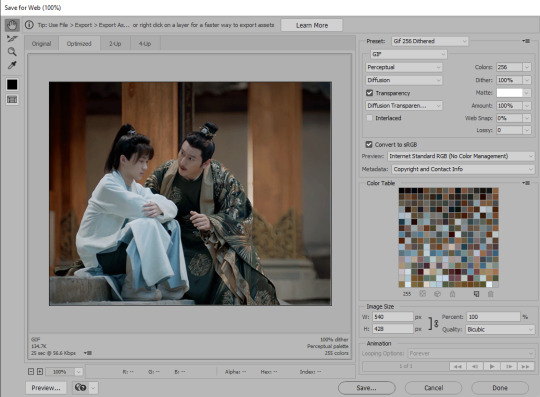
The settings in the top right control the quality of the gif.
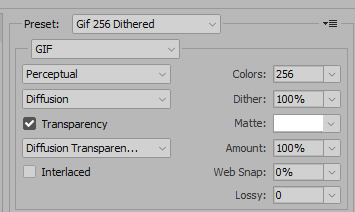
These can be changed around once you get the hang of things, but since this is the super basic version, these are settings I can vouch for. This gets me nice looking gifs without a lot of artifacts. Ignore the preset name; that’s what I call the preset I made for this. On your screen it’ll say “custom” unless you save your own preset. It will remember your settings even if you don’t save a preset.
The size of the gif is at the bottom left. For tumblr, this has to be under 10 meg. UNDER 10 meg, if you make a beautiful gif and save it at 10.0 mb tumblr is very likely to reject it and make you re-save it a few bytes smaller, thanks to rounding.
If it’s too big, just cancel and go to step 5.
5. Window menu-->Timeline. In the timeline, you can trim your video by dragging the ends in, or by cutting with the scissors icon and deleting the extra bit. The controls in the timeline are fairly intuitive and limited to just what’s useful unlike premiere pro cough cough.
6. There’s a context menu in the right upper corner of the timeline window. Select that and choose “set timeline frame rate” to speed the whole video up or down. Higher numbers mean more frames overall and a bigger, slower gif. Lower numbers mean fewer frames and smaller, faster gif.
Slightly Less Basic Stuff
(after the cut)
You can convert your video to individual frames by exporting your gif and re-opening the gif, but you’re going to lose quality when you re-save so that’s not ideal. Better is to create a frame animation in the timeline. That has several steps. I’ve recorded an action for it that looks like this:
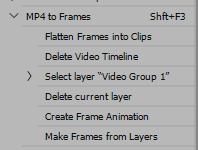
1. Timeline Context Menu-->Convert-->Flatten Frames into Clips. This will make layers out of the individual frames in your timeline video.
2. Timeline Context Menu-->Delete Timeline. This clears the timeline so you can use the layers to make frames.
3. Window Menu-->Layers. Hopefully you already have the layers window open all the time, because it’s a fundamental part of photoshop workflow, but if not, do this to open it.
4. At the bottom of the layers window there is a weird unhelpful video group with a single layer in it, shown in picture. Select it, hit the delete key, and chose “delete group and contents.” Otherwise this will become an annoying blank frame, as I recall.

5. In the middle of the currently-empty timeline window is a button that says “create video timeline” with a dropdown next to it.
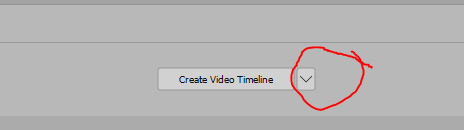
Click the dropdown to change the button to “create frame animation,” and then click that. This will create an animation with a single frame.
6. Timeline Context Menu-->Make Frames from Layers. This puts all of your layers into your timeline. Whew! You see why I made an action for these steps.
7. Now you can delete frames from the ends or middle of your animation by selecting them and using the trash can icon on the timeline. Don’t hit “delete” as that will delete the associated layer, potentially, and cause you a headache while you figure out what happened. With a normal aspect ratio for your frame and 540 horizontal pixel width, you should be able to fit around 100 frames into a <10mb gif. It does vary a lot depending on what’s going on in the scene & how much each frame changes from the one before it. And aspect ratio makes a huge difference - big square gifs are beautiful, but can’t fit nearly as many frames into the <10mb limit.
8. If you changed your frame rate and want to introduce a delay between frames, go to Timeline Context Menu-->Select all Frames. This will grab all the frames so you can apply a delay to all of them at once. While they’re selected, choose the delay dropdown from any frame and it will apply to all of them.

If a gif feels like it’s going too fast, I apply a delay of anywhere from 0.04 to 0.07 (using the “other...” option from the dropdown--all of the default delays are too much). That’s when my gif has a frame rate somewhere between 15 and 30 fps. Try some different settings and save the results out. Note: Always check your speed by loading the gif into a draft on Tumblr, since different previewers play things at different speeds, which is super annoying.
9. When you’re satisfied or want to test, repeat step 4 of the Super Basic Stuff section.
Fun with Layers
1. The order of the frames is the opposite of the order of the layers, which doesn’t matter for basic stuff, but when you start messing with adding text, layer effects, etc, this will definitely matter. You can reverse the order of the layers by selecting all of them in the layers window (NOT the frames in the timeline), and then: Layer Menu --> Arrange --> Reverse.
2. To put text on top of the whole sequence, choose the top layer in your layer window and click “text” to add your text. You can change your font, color, and size as much as you want, but you can’t drag your text around after you create it because it will (usually) only move on the current frame. So if you don’t like where it ends up, delete the text layer and try again. I usually keep text centered and add spaces to either end to put it where I want it.
3. To add text in the middle of the sequence, use the timeline to select the frame where you want the text to appear. Then go look at the layers stack; scroll up and down until you see the visible/selected layer. This corresponds to your current frame. Stick your text layer on top of that layer and -- if your arranged your frame order correctly in step 1 -- the text should appear part way through your sequence. For this gif, each “eye contact” is a separate text layer placed a little further down the layer stack.

4. To make text disappear partway through an animation, go to the timeline and select all the frames where you DON’T want the text. Keep them selected, go to your text layer in the layers menu, and hit the eyeball to make it invisible. That should make it invisible just for the selected frames. For this gif, I put all the text layers at the top but changed the visibility for each one to limit it to a particular set of frames.
5. To change the brightness of your gifs, select your top layer and go to Layers Menu -->New Adjustment Layer-->Brightness/Contrast. Adjustment layers let you make non-destructive modifications, and they affect all the layers below them so you can change the whole gif at one time.
6. To change the color balance, I like to use: Layers Menu -->New Adjustment Layer-->Selective Color. Within the Selective Color controls, choose “neutrals” and give it some tweaks. As you get the hang of it, you can do a lot more with this, but basic adjustments to the neutrals setting will make a big difference.
7. I use the BW adjustment layer to make black & white gifs - it has more options than simply desaturating - and I use a levels adjustment layer for more nuanced contrast changes than you get with brightness contrast. Hue/Saturation is good for resaturating flashback scenes.
8. Any time you like the effect of an adjustment layer, save it (or a group of them) to a new document by going to the Layers Context Menu-->Duplicate Layers and then choose “New document” in the dialog window. Save your new doc, which will just be the adjustment layer(s). Then you can use these layers on other gifs, rather than constantly recreating your tweaks. When you’re giffing a whole show like I am, you find yourself making the same adjustments over and over anyway, so this is a time saver.
All right, that’s all for now! Other tutorials are linked up at my Tutorials Masterpost. It’s small but it’s growing!
124 notes
·
View notes
Last Seen Blogs
dekalko-mania
get ecto rekt

diamdiamjeokay
diamdiamje

kittonmittons
twizzler eater #2

sawatdeeruck
Untitled
dreampixi3
Animated Love