#select windows data
Text
Critical Windows Update: Apply Patch Now to Prevent Black Basta Ransomware
#Time is running out for Windows users to secure their systems against the notorious Black Basta ransomware. Microsoft has released a critica#as failure to install it could leave your PC vulnerable to sophisticated ransomware threats.#The Critical Windows Update#Microsoft has issued an urgent call to all Windows users to apply a crucial security patch aimed at thwarting the Black Basta ransomware. T#your system remains susceptible to attacks that could encrypt your data and demand a ransom for its release.#Understanding Black Basta Ransomware#Black Basta is a highly dangerous form of ransomware that encrypts files on the victim’s computer#rendering them inaccessible until a ransom is paid. Often#even paying the ransom does not guarantee the recovery of the encrypted files. The threat posed by Black Basta is severe#making it imperative for users to protect their systems immediately.#Why This Update is Crucial#The update released by Microsoft is designed to close a vulnerability that Black Basta exploits to infiltrate systems. Cybersecurity expert#emphasizing the need for users to act quickly. Applying this patch is not just a recommendation—it’s a necessity to safeguard your personal#How to Apply the Update#Applying the Windows update is straightforward:#Open the Settings menu on your Windows PC.#Navigate to Update & Security.#Click on Windows Update.#Select Check for updates.#Once the update appears#click Download and install.#Ensuring your system is up-to-date with the latest security patches is a vital step in protecting against ransomware attacks.#Potential Consequences of Ignoring the Update#Failure to apply this critical update could result in severe consequences. If Black Basta ransomware infiltrates your system#you could lose access to valuable data#suffer financial loss#and face significant disruptions to both personal and business operations. The cost of recovery and the potential damage to your reputation#Real Stories#Real Risks#Think about all the important files on your computer—photos
0 notes
Text
Nintendo is removing twitter integration next week, here's what to do to share screenshots instead
So in case you missed it, Nintendo announced last month that they're removing the Switch's twitter integration on Jun 10/11 (depending on your time zone) as a result of twitter jacking up their API fees to absolutely ridiculous degrees. This will not affect making posts in the plaza (at least in Splatoon 3) but it does mean you will not be able to upload screenshots and videos to twitter for easy access.
If you're like me and do this a lot, then you've got two alternatives.
One of these methods is significantly easier than the others, but requires a computer that runs Windows and a USB cable. With your Switch in portable mode, go into your System Settings and find the Data Management section:

Click it and scroll down to the "Copy to PC via USB Connection" option.

Click it and you'll be prompted to connect your Switch to your PC via USB. When you do, a folder containing all your Switch screenshots and videos will pop up on your PC. From there, you can copy as many videos and screenshots as you'd like to a location of your choosing, at which point you can disconnect your Switch.

And now you're done!
The other option is a bit more finicky (and also I can't take screenshots to show you the process), but can be done with any smart device. Go into your Album and pick a video or screenshot you would like to share. Select Send to smart device, after which you'll be prompted to scan a QR code. Scan it with your smart device and you'll be given a link to connect to a Wifi, which sounds weird but is just how the console and smart device connects. Once they have, you'll be able to send your images and video to your phone.
963 notes
·
View notes
Text
For everyone who asked: a dialogue parser for BG3 alongside with the parsed dialogue for the newest patch. The parser is not mine, but its creator a) is amazing, b) wished to stay anonymous, and c) uploaded the parser to github - any future versions will be uploaded there first!
UPD: The parser was updated!! Now all the lines are parsed, AND there are new features like audio and dialogue tree visualisation. See below!
Patch 7 dialogue is uploaded!
If you don't want to touch the parser and just want the dialogues, make sure to download the whole "BG3 ... (1.6)" folder and keep the "styles" folder within: it is needed for the html files functionality (hide/show certain types of information as per the menu at the top, jumps when you click on [jump], color for better readability, etc). See the image below for what it should look like. The formatting was borrowed from TORcommunity with their blessing.

If you want to run the parser yourself instead of downloading my parsed files, it's easy:
run bg3dialogreader.exe, OPEN any .pak file inside of your game's '\steamapps\common\Baldurs Gate 3\Data' folder,
select your language
press ‘LOAD’, it'll create a database file with all the tags, flags, etc.
Once that is done, press ‘EXPORT all dialogs to html’, and give it a minute or two to finish.
Find the parser dialogue in ‘Dialogs’ folder. If you move the folder elsewhere, move the ‘styles’ folder as well! It contains the styles you need for the color coding and functionality to keep working!
New features:
Once you've created the database (after step three above), you can also preview the dialogue trees inside of the parser and extract only what you need:

You can also listen to the correspinding audio files by clicking the line in the right window. But to do that, as the parser tells you, you need to download and put the filed from vgmstream-win64.zip inside of the parser's main folder (restart the parser after).
You can CONVERT the bg3 dialogue to the format that the Divinity Original Sin 2's Editor understands. That way, you can view the dialogues as trees! Unlike the html files, the trees don't show ALL the relevant information, but it's much easier to orient yourself in.


To get that, you DO need to have bought and installed Larian's previous game, Divinity Original Sin 2. It comes with a tool called 'The Divinity Engine 2'. Here you can read about how to unstall and lauch it. Once you have it, you need to load/create a project. We're trying to get to the point where the tool allows you to open the Dialog Editor. Then you can Open any bg3 dialogue file you want. And in case you want it, here's an in-depth Dialog Editor tutorial. But if you simply want to know how to open the Editor, here's the gist:
Update: In order to see the names of the speakers (up to ten), you can put the _merged.lsf file inside of the "\Divinity Original Sin 2\DefEd\Data\Public\[your project's name here]\RootTemplates\_merged.lsf" file path.
Feel free to ask if you have any questions! Please let me know if you modify the parser, I'd be curious to know what you added, and will possibly add it to the google drive.
2K notes
·
View notes
Text
How to use DXVK with The Sims 3
Have you seen this post about using DXVK by Criisolate? But felt intimidated by the sheer mass of facts and information?
@desiree-uk and I compiled a guide and the configuration file to make your life easier. It focuses on players not using the EA App, but it might work for those just the same. It’s definitely worth a try.
Adding this to your game installation will result in a better RAM usage. So your game is less likely to give you Error 12 or crash due to RAM issues. It does NOT give a huge performance boost, but more stability and allows for higher graphics settings in game.
The full guide behind the cut. Let me know if you also would like it as PDF.
Happy simming!
Disclaimer and Credits
Desiree and I are no tech experts and just wrote down how we did this. Our ability to help if you run into trouble is limited. So use at your own risk and back up your files!
We both are on Windows 10 and start the game via TS3W.exe, not the EA App. So your experience may differ.
This guide is based on our own experiments and of course criisolate’s post on tumblr: https://www.tumblr.com/criisolate/749374223346286592/ill-explain-what-i-did-below-before-making-any
This guide is brought to you by Desiree-UK and Norn.
Compatibility
Note: This will conflict with other programs that “inject” functionality into your game so they may stop working. Notably
Reshade
GShade
Nvidia Experience/Nvidia Inspector/Nvidia Shaders
RivaTuner Statistics Server
It does work seamlessly with LazyDuchess’ Smooth Patch.
LazyDuchess’ Launcher: unknown
Alder Lake patch: does conflict. One user got it working by starting the game by launching TS3.exe (also with admin rights) instead of TS3W.exe. This seemed to create the cache file for DXVK. After that, the game could be started from TS3W.exe again. That might not work for everyone though.
A word on FPS and V-Sync
With such an old game it’s crucial to cap framerate (FPS). This is done in the DXVK.conf file. Same with V-Sync.
You need
a text editor (easiest to use is Windows Notepad)
to download DXVK, version 2.3.1 from here: https://github.com/doitsujin/DXVK/releases/tag/v2.3.1
Extract the archive, you are going to need the file d3d9.dll from the x32 folder
the configuration file DXVK.conf from here: https://github.com/doitsujin/DXVK/blob/master/DXVK.conf.
Optional: download the edited version with the required changes here.
administrator rights on your PC
to know your game’s installation path (bin folder) and where to find the user folder
a tiny bit of patience :)
First Step: Backup
Backup your original Bin folder in your Sims 3 installation path! The DXVK file may overwrite some files! The path should be something like this (for retail): \Program Files (x86)\Electronic Arts\The Sims 3\Game\Bin (This is the folder where also GraphicsRule.sgr and the TS3W.exe and TS3.exe are located.)
Backup your options.ini in your game’s user folder! Making the game use the DXVK file will count as a change in GPU driver, so the options.ini will reset once you start your game after installation. The path should be something like this: \Documents\Electronic Arts\The Sims 3 (This is the folder where your Mods folder is located).
Preparations
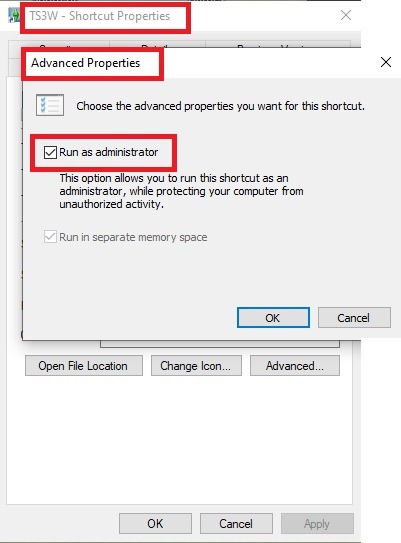
Make sure you run the game as administrator. You can check that by right-clicking on the icon that starts your game. Go to Properties > Advanced and check the box “Run as administrator”.
Note: This will result in a prompt each time you start your game, if you want to allow this application to make modifications to your system. Click “Yes” and the game will load.
2. Make sure you have the DEP settings from Windows applied to your game.
Open the Windows Control Panel.
Click System and Security > System > Advanced System Settings.
On the Advanced tab, next to the Performance heading, click Settings.
Click the Data Execution Prevention tab.
Select 'Turn on DEP for all programs and services except these”:
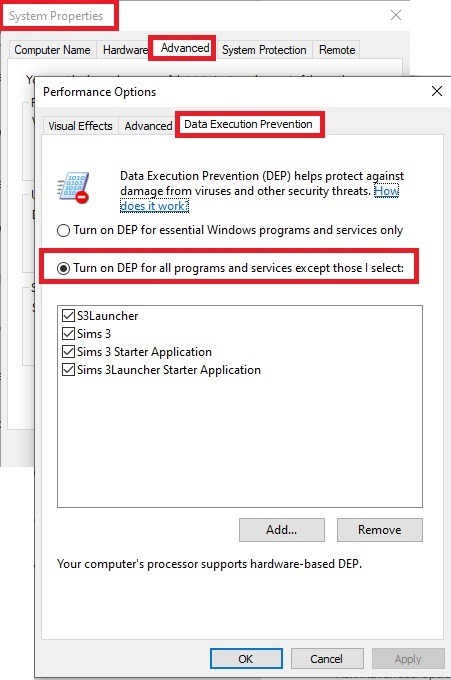
Click the Add button, a window to the file explorer opens. Navigate to your Sims 3 installation folder (the bin folder once again) and add TS3W.exe and TS3.exe.
Click OK. Then you can close all those dialog windows again.
Setting up the DXVK.conf file
Open the file with a text editor and delete everything in it. Then add these values:
d3d9.textureMemory = 1
d3d9.presentInterval = 1
d3d9.maxFrameRate = 60
d3d9.presentInterval enables V-Sync,d3d9.maxFrameRate sets the FrameRate. You can edit those values, but never change the first line (d3d9.textureMemory)!
The original DXVK.conf contains many more options in case you would like to add more settings.

A. no Reshade/GShade
Setting up DXVK
Copy the two files d3d9.dll and DXVK.conf into the Bin folder in your Sims 3 installation path. This is the folder where also GraphicsRule.sgr and the TS3W.exe and TS3.exe are located. If you are prompted to overwrite files, please choose yes (you DID backup your folder, right?)
And that’s basically all that is required to install.
Start your game now and let it run for a short while. Click around, open Buy mode or CAS, move the camera.
Now quit without saving. Once the game is closed fully, open your bin folder again and double check if a file “TS3W.DXVK-cache” was generated. If so – congrats! All done!
Things to note
Heads up, the game options will reset! So it will give you a “vanilla” start screen and options.
Don’t worry if the game seems to be frozen during loading. It may take a few minutes longer to load but it will load eventually.
The TS3W.DXVK-cache file is the actual cache DXVK is using. So don’t delete this! Just ignore it and leave it alone. When someone tells to clear cache files – this is not one of them!
Update Options.ini
Go to your user folder and open the options.ini file with a text editor like Notepad.
Find the line “lastdevice = “. It will have several values, separated by semicolons. Copy the last one, after the last semicolon, the digits only. Close the file.
Now go to your backup version of the Options.ini file, open it and find that line “lastdevice” again. Replace the last value with the one you just copied. Make sure to only replace those digits!
Save and close the file.
Copy this version of the file into your user folder, replacing the one that is there.
Things to note:
If your GPU driver is updated, you might have to do these steps again as it might reset your device ID again. Though it seems that the DXVK ID overrides the GPU ID, so it might not happen.
How do I know it’s working?
Open the task manager and look at RAM usage. Remember the game can only use 4 GB of RAM at maximum and starts crashing when usage goes up to somewhere between 3.2 – 3.8 GB (it’s a bit different for everybody).
So if you see values like 2.1456 for RAM usage in a large world and an ongoing save, it’s working. Generally the lower the value, the better for stability.
Also, DXVK will have generated its cache file called TS3W.DXVK-cache in the bin folder. The file size will grow with time as DXVK is adding stuff to it, e.g. from different worlds or savegames. Initially it might be something like 46 KB or 58 KB, so it’s really small.
Optional: changing MemCacheBudgetValue
MemCacheBudgetValue determines the size of the game's VRAM Cache. You can edit those values but the difference might not be noticeable in game. It also depends on your computer’s hardware how much you can allow here.
The two lines of seti MemCacheBudgetValue correspond to the high RAM level and low RAM level situations. Therefore, theoretically, the first line MemCacheBudgetValue should be set to a larger value, while the second line should be set to a value less than or equal to the first line.
The original values represent 200MB (209715200) and 160MB (167772160) respectively. They are calculated as 200x1024x1024=209175200 and 160x1024x1024=167772160.
Back up your GraphicsRules.sgr file! If you make a mistake here, your game won’t work anymore.
Go to your bin folder and open your GraphicsRules.sgr with a text editor.
Search and find two lines that set the variables for MemCacheBudgetValue.
Modify these two values to larger numbers. Make sure the value in the first line is higher or equals the value in the second line. Examples for values:
1073741824, which means 1GB
2147483648 which means 2 GB.
-1 (minus 1) means no limit (but is highly experimental, use at own risk)
Save and close the file. It might prompt you to save the file to a different place and not allow you to save in the Bin folder. Just save it someplace else in this case and copy/paste it to the Bin folder afterwards. If asked to overwrite the existing file, click yes.
Now start your game and see if it makes a difference in smoothness or texture loading. Make sure to check RAM and VRAM usage to see how it works.
You might need to change the values back and forth to find the “sweet spot” for your game. Mine seems to work best with setting the first value to 2147483648 and the second to 1073741824.
Uninstallation
Delete these files from your bin folder (installation path):
d3d9.dll
DXVK.conf
TS3W.DXVK-cache
And if you have it, also TS3W_d3d9.log
if you changed the values in your GraphicsRule.sgr file, too, don’t forget to change them back or to replace the file with your backed up version.
OR
delete the bin folder and add it from your backup again.
B. with Reshade/GShade
Follow the steps from part A. no Reshade/Gshade to set up DXVK.
If you are already using Reshade (RS) or GShade (GS), you will be prompted to overwrite files, so choose YES. RS and GS may stop working, so you will need to reinstall them.
Whatever version you are using, the interface shows similar options of which API you can choose from (these screenshots are from the latest versions of RS and GS).
Please note:
Each time you install and uninstall DXVK, switching the game between Vulkan and d3d9, is essentially changing the graphics card ID again, which results in the settings in your options.ini file being repeatedly reset.
ReShade interface
Choose – Vulcan
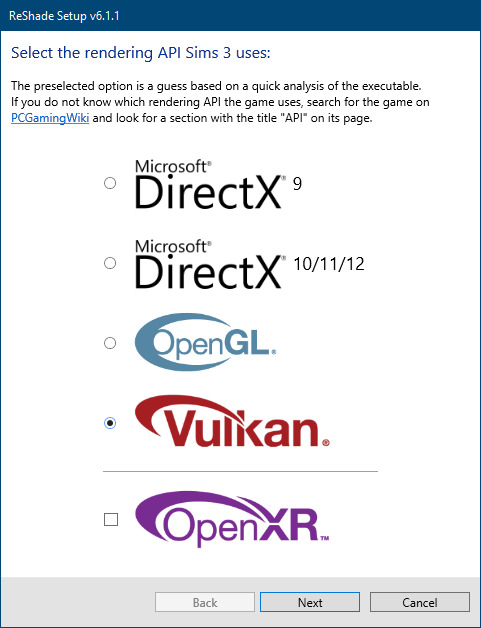
Click next and choose your preferred shaders.
Hopefully this install method works and it won't install its own d3d9.dll file.
If it doesn't work, then choose DirectX9 in RS, but you must make sure to replace the d3d9.dll file with DXVK's d3d9.dll (the one from its 32bit folder, checking its size is 3.86mb.)
GShade interface
Choose –
Executable Architecture: 32bit
Graphics API: DXVK
Hooking: Normal Mode
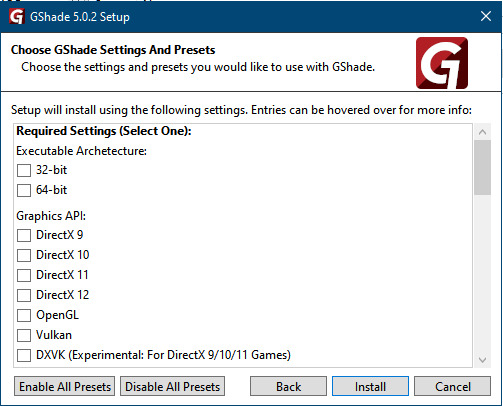
GShade is very problematic, it won't work straight out of the box and the overlay doesn't show up, which defeats the purpose of using it if you can't add or edit the shaders you want to use.
Check the game's bin folder, making sure the d3d9.dll is still there and its size is 3.86mb - that is DXVK's dll file.
If installing using the DXVK method doesn't work, you can choose the DirectX method, but there is no guarantee it works either.
The game will not run with these files in the folder:
d3d10core.dll
d3d11.dll
dxgi.dll
If you delete them, the game will start but you can't access GShade! It might be better to use ReShade.
Some Vulcan and DirectX information, if you’re interested:
Vulcan is for rather high end graphic cards but is backward compatible with some older cards. Try this method with ReShade or GShade first.
DirectX is more stable and works best with older cards and systems. Try this method if Vulcan doesn't work with ReShade/GShade in your game – remember to replace the d3d9.dll with DXVK's d3d9.dll.
For more information on the difference between Vulcan and DirectX, see this article:
https://www.howtogeek.com/884042/vulkan-vs-DirectX-12/
469 notes
·
View notes
Text
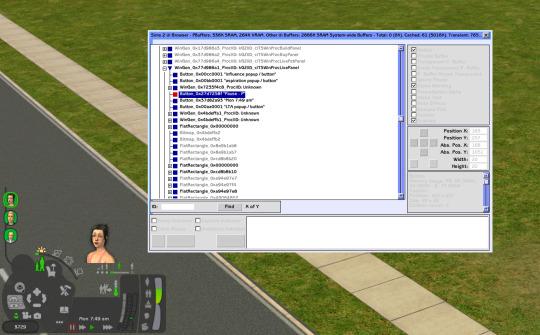
Sims 2 UI Browser
Did you know there's a cheat that lets you play with UI?
Ctrl-U
Well, it mostly lets you find UI elements and move them around
It helped me make wider design dialog window
There's a search bar and info
Track Mouse checkbox is super useful, takes the browser window right to the element you hovering over
What's the use?
Say, you're looking to edit the pause button
The weird number 0x27d7258f is its ID (selected item on the picture)
Now you can find it in UI Data files
Open the ui.package in \TSData\Res\UI (or if you're using a UI mod, you may want to edit its files instead)
Select all UI Data recourses (try Ctrl-A) and extract them somewhere, into a new designated folder maybe
There's gonna be a lot of text files in a UI Data folder
Search that folder for "0x27d7258f" using standard Windows Explorer / File Explorer. It'll find the files with the pause button
What can you do with it?
Edit position by changing coordinates:
area=(170,192,190,212)
I call them start width, start height, end width, end height
IIRC, these coordinates are relative to parent element, not absolute (start where parent's position starts, not where your screen starts)
Find group and instance numbers of its image/icon:
image={499db772,a9200127}
Icons are also found in the ui.package, although they may be in a different one
There's a ui.package in every pack's folder, and you probably used your latest one to extract UI Data files (like SP9), but the pause icon is in the base game's ui package. Some weather related icons may be in Seasons' package and not in anywhere else. You get what I mean
There are all sorts of color options (in RGB, I assume):
fillcolor=(204,204,204)
colorfontnormal=(0,0,0)
colorfontdisabled=(0,0,0)
colorfonthilited=(0,0,0)
colorfontnormalbkg=(0,0,0)
colorfontdisabledbkg=(0,0,0)
colorfonthilitedbkg=(0,0,0)
forecolor=(255,255,255)
bkgcolor=(0,0,0)
Not all of them might be relevant for all elements, though
If an element has text, font may be edited:
font=0x00001318
font=GenSubHeader
font=BuildBuyModeFooter
Looking at bigger elements, there are also a lot of flags and properties. Here's some interesting ones:
moveable=yes
sizeable=no
titlebar=no
outline=no
align=lefttop
wrapped=yes
opaque=yes
You can guess what they mean
Hm. Design tool window is moveable, but isn't sizeable. What if?..
Nah, simply changing "no" to "yes" didn't work
Search shows there are no sizable windows in game, except for UI Browser itself and a few other "browsers" I haven't seen, so we can't easily copy how it's done
Maybe some day
That's it for random UI modding stuff you didn't wanna know :D
212 notes
·
View notes
Text
Back from the Vault: LifeX
Nathan Brown sat hunched over his desk, the glow of his laptop screen illuminating his tired eyes. His San Francisco apartment was a mess: clothes strewn across the floor, empty takeout containers stacked on the kitchen counter, and a half-empty coffee mug perched precariously on the edge of his desk. Nathan's bed was unmade, a tangled heap of blankets and pillows. The room smelled faintly of stale air and sweat, the result of a broken air conditioning unit and a lack of motivation to clean.
Nathan was staring at his laptop screen, scrolling through yet another round of job listings. His bank account was dangerously low, and the anxiety of unpaid bills was gnawing at him. He was 26 years old, recently graduated with a degree in communications, and he was struggling to find any kind of work. His YouTube channel, where he reviewed video games and shared walkthroughs, was his only source of income, but the revenue it brought in was barely enough to buy groceries, let alone pay rent or bills.
Nathan was average in build, with a light tan from his Latino heritage, and short, dark hair that he usually kept neat. His face was lightly stubbled, a sign of his growing indifference to grooming as stress took over. He sighed and rubbed his eyes, feeling the weight of exhaustion settle into his bones. He was on the brink of giving up when a notification popped up on his screen, breaking his focus.

"Subject: Exciting Opportunity for Collaboration!"
Nathan hesitated, then clicked on the email. It was from a company called LifeX. He didn’t recognize the name, but curiosity got the better of him.
“Dear Nathan,
We’ve come across your YouTube channel and believe we could work well together. LifeX is launching a groundbreaking new game, and we are looking for individuals to help us with beta testing and promotion. Your content aligns perfectly with our vision, and we think this could be a great collaboration. If you accept, you’ll also be able to help us optimize the AI of our games by creating your own NPC character, it’ll be later implemented in the game when it’ll be released. Of course, we offer financial compensation for your work.
Looking forward to hearing from you.
Best regards,
The LifeX Team”
Nathan’s first instinct was skepticism. It sounded too good to be true, and he’d heard horror stories of scams and phishing attempts. But the desperation for money overrode his better judgment. He quickly searched for LifeX online, finding only a sparse website filled with vague marketing speak about “immersive experiences” and “cutting-edge technology.” There were no reviews, no user testimonials, nothing solid. This should have been a red flag, but Nathan was too desperate to care. He needed this. He needed a break.
Nathan decided to respond. He typed out a quick reply expressing his interest. Almost immediately, another email arrived, containing a download link, setup instructions, and a NDA requesting his personal information: name, age, location, and other details. Nathan filled out the form, barely thinking about the potential consequences. He selected the longest trial period possible: one month, hoping it would give him enough content for his channel and enough time to determine if the collaboration was worthwhile.
As soon as he submitted the form, a melodic chime sounded from his laptop, followed by a smooth, professional voice:
“Thank you for signing up, Nathan. To begin your experience, you will first create the NPC character, and then you’ll be ready to start your experience in the environment you’ll choose. For the trial to run successfully, please ensure that your computer remains on for the entire duration of the test period: one month. Any interruption may result in data loss or corruption. Welcome to LifeX.”
Nathan frowned at the last part but shrugged it off. He figured it was just standard legalese, probably meant for immersion. The screen changed to a character creation window, displaying a basic human figure in a T-pose. Nathan leaned forward, curiosity piqued, and started customizing the avatar.
He named the avatar “Cody,” envisioning him as the polar opposite of himself. Cody would be everything Nathan wasn’t: confident, athletic, and effortlessly cool. He adjusted the height to 6'4", pushed the muscle sliders to the maximum, giving Cody bulging biceps, a broad chest, and thick, powerful legs holding a perfectly muscled ass. From the corner of his eyes, Nathan spotted a slider on the groin area. He laughed as he understood he could also determine how big he could adjust Cody’s penis and balls. Smiling, he selected the largest option possible for his dick and added a huge heavy pair of balls to go with it, watching it grow in proportion to the rest of his body. He added bright hazel eyes, bushy eyebrows, and messy dark brown hairs that would contrast perfectly to the pale sun kissed skin.
After the body customization, Nathan saw a new window open: Clothes and accessories. After thinking about it, he chose a pair of denim shorts that ended mid-thigh, showing off Cody’s muscular legs. Nathan opted for no T-shirt, exposing Cody’s ripped torso and added a ripped sleeve shirt opened on his muscled hair pecs. He then moved on to accessories and decided to put a loop earring on his right ear and a silver chain around his neck.
After the customization was done, it was asked for Nathan to enter some information about the NPC he just created to create a base behavior for him. After a while, Nathan decided to go for the stereotypical fratbro behavior to go with the appearance he just did. He started typing, adding details about Cody’s lifestyle. He entered notes in the behavior interface: “Cody is dumb as a brick. He loves gym, training and being barefoot, feeling the ground under his calloused feet.” He laughed as he added another line: “Cody never takes showers, loves the smell of his own musk, enjoys sniffing his hairy armpits after a workout and scratching his big dick every couple of minutes after what he smells them and always smile enjoying his own musk.” Nathan chuckled, amused at the thought of creating such a ridiculous character. It was so far removed from his real life that it seemed like a fun NPC to talk and interact with. Just a dumb easy-going character that is always down for a fuck and a drink after a gym session barefoot in the woods.
Satisfied with his creation, he confirmed the settings. The game prompted him to select a location, and he chose the Secluded Forest Realm, envisioning Cody as a carefree physical trainer just out of college living in a cabin in the wilderness.
The screen went black for a moment, and the professional voice returned:
“Now that your character is complete, it’s time to play! Please keep your computer running at all times to maintain synchronization. Any interruption may lead to data corruption. Enjoy your month-long experience, Nathan, and welcome to LifeX.”
Nathan was really getting excited now. He conder what kind of character he would create for himself when he saw a flash of light on the screen. It looked like some kind of swirling mesh, almost like a blackhole. For a moment Nathan thought it was kind of a cool effect, but everything changed when he went to grab his half drink cup of coffee sitting next to him only to realize his right hand was tingling and tiny particles were escaping his nails, flying straight to his screen.
A sudden wave of fatigue hit Nathan, and the lights in his apartment flickered briefly. A sense of unease washed over him, making the hairs on his arms stand up. Before he could react, the tingling sensation spread from his fingertips up through his arms. He stared in disbelief as his fingers began to dissolve into streams of glowing white code, spreading quickly across his body. He tried to scream, but his voice caught in his throat. His vision blurred as the Life X logo was pulsing in bright light in the center of the screen with a loading bar under it going up further and further. The last thing he saw was the 100% before everything went black.

Nathan found himself suspended in a void. He was floating, naked, surrounded by darkness. Panic set in, his heart racing as he tried to move, but his body was frozen in a T-pose. The sensation was bizarre, as if he were trapped in a dream. He wanted to call out, but his voice was muffled, like shouting underwater. The smooth, professional voice returned, echoing through the void:
“Welcome to your new life, Nathan. Don’t panic; this process is normal and painless. In a few moments, you will begin your ideal life in the Secluded Forest Realm. Relax and feel calm. Avatar synchronization will begin in 5, 4, 3, 2, 1…”
“What the fuck, where am I? What is going on? Why can’t I move?! HELP!!” thought Nathan as he tried to scream even though his face remained frozen.
Nathan’s body suddenly stiffened. A pressure built inside him, starting at his core and spreading outward. His bones stretched and cracked, lengthening to match Cody’s new height. His arms and legs grew longer, muscles bulging and expanding to fill out his new form. Nathan could feel his muscles tearing and healing at an accelerated rate, becoming stronger and more defined with each passing second.
His skin began to tighten, smoothing out imperfections and leaving with a perfectly smooth skin all around his muscled body. Nathan would be screaming if his voice mas not muted. Everything was burning and it was like feeling his DNA being rewritten while still being conscious. As he felt tears rising up his eyes, a new sensation invaded his newly modified skin. In his pits, legs and between his pecs, he felt like thousands of needles were piercing holes. The sensation was only multiplied as he started to feel hair sprouting from the holes. They were dark brown and thick but worst, the sensation of piercing needles started to appear around his groin too. Still wondering what was happening to him, Nathan tried to connect the elements he could find and that when he realized. The secluded forest, the muscles, the hair; that was Cody’s information, which means… Just enough time to understand what was happening to him when the hair started to sprout in abondance around his dick and nuts and climbing up his sculpted abs in a thin happy trail.
After the hair, the modifications started to appear on his face. His jawline becoming sharper and more angular, his cheekbones more pronounced. His lips filled out, becoming more defined, while his eyebrows grew thicker, framing his eyes. His vision sharpened, colors becoming brighter and more vivid. His brown eyes shifted to a bright hazel as he lost vision for a moment. Everything was happening all at once and still, Nathan felt like it was an eternity of pain.
Nathan’s hair thickened, turning into soft, dark strands that fell casually over his forehead. His ears reshaped slightly to match his new head structure. A sensation of warmth spread through his throat as his vocal cords tightened, his voice box reshaping. When he tried to speak, his voice was deeper, richer, and carried a slight accent, a relaxed, Western drawl.
Nathan felt a growing warmth in his groin and realized what was about to happen now. All of a sudden, he regrated giving Cody such a big dick and heavy nuts. His cock thickened and lengthened, becoming larger than Nathan had ever been. He could feel the veins snaking down his growing dick as his cock head started to grow thicker and bigger. He could feel the cold air surrounding him as the head sneaked out of his foreskin. Wait, his foreskin? He didn’t remember going this far in details. His nuts fall down and grew thicker and full of potent cum as he could feel them going overload working on creating new manly sperm nonstop. Nathan could feel the horniness starting to rise as his body was assaulted by huge amount of testosterone. A drop of precum appeared at the tip of his cock as he could feel the weight of it between his legs, an odd sensation that both embarrassed and intrigued him. His buttocks tightened, becoming firm and lifted, while his thighs and calves thickened with muscle.
The transformation was almost complete when Nathan felt a sharp pain on his left pec. He wanted to scream, but his body was still frozen. The pain was like a branding iron pressing into his skin.
“What is this?!” screamed Nathan in his new deep voice.
A voice appeared from all around him
“Dear user: NATHAN BROWN, as talked with you earlier on, you agreed to review and help us create the new generation of AI used for our NPCs. For that, your character, CODY, will have to be monitored. This assignation, XXIV, is the link to your identity and allow us to track your character.
Please relax as your actions will be tracked and then saved.
The program will make sure to copy all your movements, thoughts and everything that your character, CODY, might do to make sure to copy human mechanism that will be implemented in our NPCs later on. Thank you for your service.”
When it subsided, a Roman numeral tattoo “XXIV” was there, bold and black, as if it had always been part of him. Nathan could feel the tattoo pulsing with energy, as if it was more than just ink on skin.
As his body finished transforming, clothes materialized around him. He now wore a sleeveless, open checkered flannel shirt and a short pair of denim shorts. Then he felt his ear being stabbed as the earing appeared in it and the coldness of the silver metal appeared around his neck. His feet then started to tingle as Nathan could feel the skin of his sole getting thicker and denser to better serve his barefoot lifestyle in the forest.
Nathan was terrified about what he just heard; his humanity was going to be used to program AI that will be implemented in NPCs. How is that even possible? Does that mean he was Cody now? And for a whole month? He didn’t agree to this. He had a life outside, friends, job to find, maybe some interviews if he was lucky. And about the bills? What was he going to do?
As all the questions were swirling in his head, Nathan fell the restriction holding his body in place as it was being modified lift. He could move on his own again, and the first thing he tried to do was take of his shirt or necklace. But every tug on the clothes or metal fell like he was trying to rip a part of him away. The clothes were part of him now.
Nathan started to feel tears rise once again in his ears as all he could see around him were the infinite void of this artificial world.
“Modification process terminated, Assimilation to the realm starting in 3,2,1…”
Out of nowhere, the ground started to shake under Nathan’s barefoot. Then he saw light pierce through the ceiling. As a reflex, he put his hands to cover his bright hazel eyes but the light was way too bright. Nathan could see entire walls of darkness vanish and being obliterated by this bright light coming from above and fear started to raise in him. Nathan closed his eyes as all he could see was the infinite light engulfing the void and him with it.
When he opened his eyes, Nathan was alone in a cabin in the woods, standing in front of a mirror. For the first time, he could see from the first person point of view what the body he created really looked like. Everything was looking so life like, even scent of pine and dirt were coming from the opened window next to him. He could smell the woods, feel the sun on his skin, the wood under his foots. Everything was lifelike. As Nathan sight started to look what his transformed body looked like, his head started to spin. Nathan grabbed it with his two manly hands but the pain was growing stronger. And in the blink of an eye, Nathan was no more. Cody stared at his reflection before smiling and flexing his biceps while smiling. His right hand lowered to get inside his shorts and scratch his hairy dick before putting his fingers under his nose to smell his musk. Cody laughed as he walked away, grabbing a snack on his way out to go exercise a bit in the nature.

“New NPC starting test phase.
Remaining time 30 days, 23 hours 59 minutes 23 seconds.
Behavior analysis… Acting following user NATHAN BROWN encoding.
Tester assimilation… Assimilation stable, user will turn back when tests are over.”
______________________________________________________________
Hey guys!
Here's another story back from the Vault, and it's my first ever published story: LifeX
Hope you guys enjoy this new version of my story. Let me know what you think of it.
As always, my asks are open and i'm always looking for new ideas and prompts from you. I try to answer them all and I love to read your ideas so please, don't be afraid to send anything you'd like me to write and I'll do my best to do it :)
Take care of yourself!
P.S. A follow up to this story should arrive soon ;)
#male transformation#my writing#mental change#male tf#reality change#tf#gay#personality change#straight to gay#digitized#LifeX#bro tf#frat bro#broification#dumber tf#dumber#smart to dumb#musk
220 notes
·
View notes
Text
Have YOU got an old Windows PC Microsoft has told you can't run Windows 11? It's time to give it a new life!
How to install Windows 11 on unsupported PC Hardware using Rufus. You can also disable some other Windows 11 bullshit like data harvesting and needing a Microsoft account.
It has been in the news a lot lately that Windows 11 isn't allowed to be installed on PCs without certain requirements, including the TPM 2.0, a chip that was only included in PCs made in 2018 or later. This means that once Windows 10 stops receiving security updates, those PCs will not be able to (officially) run a safe, updated version of Windows anymore. This has led to an estimated 240 million PCs bound for the landfill. Thanks Microsoft! I get you don't want to be seen as the insecure one, but creating this much waste can't be the solution.
(I know nerds, Linux is a thing. I love you but we are not having that conversation. If you want to use Linux on an old PC you are already doing it and you don't need to tell me about it. People need Windows for all sorts of reasons that Linux won't cut.)
So lately I have been helping some under privileged teens get set up with PCs. Their school was giving away their old lab computers, and these kids would usually have no chance to afford even a basic computer. They had their hard drives pulled so I have been setting them up with SSDs, but the question was, what to do about the operating system? So I looked into it and I found out there IS actually a way to bypass Microsoft's system requirement and put Windows 11 on PCs as old as 2010.
You will need:
Rufus: An open source ISO burning tool.
A Windows 11 ISO: Available from Microsoft.
A USB Flash Drive, at least 16GB.
A working PC to make the ISO, and a PC from 2018 or older you want to install Windows 11 on.
Here is the guide I used, but I will put it in my own words as well.
Download your Windows 11 ISO, and plug in your USB drive. It will be erased, so don't have anything valuable on it. Run Rufus, select your USB drive in the Device window, and select your Windows 11 ISO with the Select button. (There is supposed to be a feature in Rufus to download your ISO but I couldn't get it to work.?
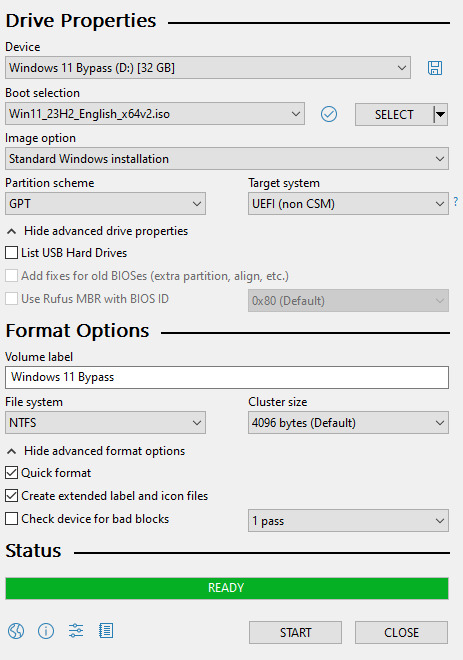
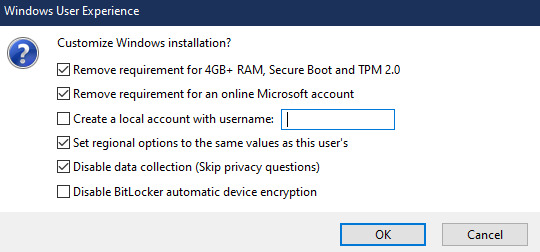
Choose standard windows installation, and follow the screenshot for your settings. Once you are done that, press Start, and then the magic happens. Another window pops up allowing you to remove the system requirements, the need for a microsoft account, and turn off data collecting. Just click the options you want, and press ok to write your iso to a drive.
From there you just need to use the USB drive to install windows. I won't go into details here, but here are some resources if you don't know how to do it.
Boot your PC from a USB Drive
Install Windows 11 from USB Drive
If you had a licensed copy of Windows 10, Windows 11 will already be licensed. If you don't, then perhaps you can use some kind of... Activation Scripts for Microsoft software, that will allow you to activate them. Of course I cannot link such tools here. So there you go, now you can save a PC made from before 2018 from the landfill, and maybe give it to a deserving teen in the process. The more we can extend the lives of technology and keep it out of the trash, the better.
Additional note: This removes the requirement for having 4GB Minimum of RAM, but I think that requirement should honestly be higher. Windows 11 will be unusable slow on any system with below 8GB of RAM. 8GB is the minimum I think you should have before trying this but it still really not enough for modern use outside of light web and office work. I wouldn't recommend trying this on anything with 4GB or less. I am honestly shocked they are still selling brand new Windows 11 PCs with 4GB of ram. If you're not sure how much RAM you have, you can find out in the performance tab of Task Manager in Windows, if you click the More Details icon on the bottom right. If you don't have enough, RAM for old systems is super cheap and widely available so it would definitely be worth upgrading if you have a ram starved machine you'd like to give a new life.

#Windows#Windows 11#tech#tech advice#pc#TPM 2.0#rufus#open source#open source software#technology#tech tips
627 notes
·
View notes
Note
Please, please explain how to install and use linux like I'm 5 years old. I'm so sick of windows adding AI and other bullshit to my already struggling elderly laptop but I'm really not good with computers at all so I have no idea where to start with Linux.
Okay, so, I'm going to break this down into steps I would give the average tumblr user first, and then if any of them are confusing or use words you don't understand, ask me and I'll explain that step in greater detail.
Step 0) BACK. UP. YOUR. SHIT.
NEVER EVER EVER CHANGE YOUR OPERATING SYSTEM WITHOUT A COMPLETE BACKUP OF ALL YOUR FILES.
Step 1) Learn your machine. You need to know:
How much RAM you have
If your processor is 32 or 64 bit
How big your hard drive is
On windows, you can find out all of this by going to the start menu, typing "about" and opening the first result on your system instead of the internet.
For additional instructions, visit this page.
Step 2) Pick your Linux.
There's like 10,000 kinds of Linux, each tailored to particular functions that the end-user (that is you!) might want to have. The sheer amount is very daunting, so first I'm going to give my suggestions, then I'll explain how to pick for yourself.
For Mac users, I suggest Kubuntu. For windows users, I suggest Mint Cinnamon. If your laptop is really REALLY old, I recommend Sparky Stable, which is the lightest weight Linux I would ever suggest for a new user. In every case, download the version suited to your processor (32 bit can be labelled "x86" or "32 bit"; 64 bit is always labelled "64 bit").
If you want to try a different type of linux, you'll need to make sure your laptop meets the "minimum specs" or "system requirements." These numbers tell you how much RAM, processor and hard drive space the linux will use. (That's why you needed those numbers at the beginning.)
Step 3) Collect your supplies. You're going to need:
An ISO burning program compatible with your current system, like Balena Etcher.
A copy of the ISO file for the Linux you want to use.
Your laptop.
An 8gb or larger USB flash drive.
Step 3) Make a bootable USB drive
Install Balena Etcher, hitting "okay" and "next" when prompted. Last I checked, Etcher doesn't have adware attached, so you can just hit next every time.
Plug your USB drive into the laptop.
Open Etcher.
Click "flash from file" and open the ISO file with your Linux on it.
Click "Select target" and open the USB drive location. Hit the "flash" button. This will start writing all the linux installer data to your flash drive. Depending on the speed of your machine, this could take as long as 10 minutes, but shouldn't be much longer.
Step 4) Boot to the USB drive
This is, in my opinion, the trickiest step for a lot of people who don't do "computer stuff." Fortunately, in a rare act of good will, Windows 10 made this process a lot easier.
All you'll need to do is go to settings, then recovery, then advanced startup and pick the button labelled "use a device."
This tutorial has images showing where each of those is located. It's considered an "advanced setting" so you may get a spooky popup warning you that you could "harm your system by making changes" but we're not doing anything potentially harmful so you can ignore that if you get it.
Step 5) Try out linux on the flash drive first.
Linux installs using a cool little test version of itself that you can play around in. You won't be able to make changes or save settings, but you can explore a bit and see if the interface is to your liking. If it's hideous or hard to navigate, simply pick a new linux version to download, and repeat the "make a bootable USB" step for it.
Step 6) Actually install that sucker
This step varies from version to version, but the first part should be the same across the board: on the desktop, there should be a shortcut that says something like "install now." Double click it.
Follow the instructions your specific linux version gives you. When in doubt, pick the default, with one exception:
If it asks you to encrypt your drive say no. That's a more advanced feature that can really fuck your shit up down the road if you don't know how to handle it.
At some point you're going to get a scary looking warning that says 1 of 2 things. Either:
Install Linux alongside Windows, or
Format harddrive to delete all data
That first option will let you do what is called "dual booting." From then on, your computer will ask every time you turn it on whether you want Windows or Linux.
The second option will nuke Windows from orbit, leaving only linux behind.
The install process is slower the larger your chosen version is, but I've never seen it take more than half an hour. During that time, most linux versions will have a little slideshow of the features and layout of common settings that you can read or ignore as you prefer.
Step 7) Boot to your sexy new Linux device.
If you're dual booting, use the arrow keys and enter key to select your linux version from the new boot menu, called GRUB.
If you've only got linux, turn the computer on as normal and linux will boot up immediately.
Bonus Step: Copy Pasting some code
In your new start menu, look for an application called "terminal" or "terminal emulator." Open that up, and you will be presented with an intense looking (but actually very harmless) text command area.
Now, open up your web browser (firefox comes pre-installed on most!), and search the phrase "what to do after installing [linux version you picked]"
You're looking for a website called "It's FOSS." Here's a link to their page on Mint. This site has lots and lots of snippets of little text commands you can experiment with to learn how that functionality works!
Or, if you don't want to fuck with the terminal at all (fair enough!) then instead of "terminal" look for something called "software manager."
This is sort of like an app store for linux; you can install all kinds of programs directly from there without needing to go to the website of the program itself!
275 notes
·
View notes
Text

Love and Deepspace 2.0 Live Overview
Okay so the live ended about 20 minutes ago and I watched (and recorded) the entire thing! We have confirmation that this will be released on July 15...so we have a little over a week! So here's the biggest highlights of the live...however first the new codes!
DEEPSPACE2 - 200 Diamonds, 20,000 Gold, 200 Energy
20240715 - 10 Empyrean Wishes

Portrait Mode
We're getting a new photo mode over in the Photobooth! Portrait Mode will be featuring:
Ability to move the camera around out characters. We can finally have more angles and full body shots.
We can move the posed characters around the screen so they're not right next to one another. This means we get to make cute little scenes guys and I am so hyped over this one.
Dynamic lighting and clothes! Not only can we choose were the light source in the photo is as well as the tones of it, we also have clothes that move with the wind directions that we can choose from!
More backgrounds, and from the looks of it the backgrounds will also be dynamic and move!
Premade photo templates will be available in case you're not super creative or good with photo booth modes, and we can also make our own templates to use later.

Abyssal Chaos
We're going to be getting an entirely new mode over in the "battle" section and oh boy does this one look super interesting (and a little complex to explain for me). This is word for word how the kitties explained the premises of it:
"The Abyssal Chaos is a site hidden in the corners of the internet, it focuses on selling information and commissioning bounties. It's the most secretive and anonymous trading platform on the dark web right now!"
Selectable Companions - So unlike the other battle modes where we pick and choose from several of our cards, we choose one of the companions we have available to go through the battles with. Memories in the Abyssal Chaos will use virtual data so the companions will be Level 80. You'll also only be able to choose one companions per period to team up with, as well as the weapon for these trials.
Wontony - The Admin AI the Abyssal Chaos features that gives us these commissions. It'll show us the algorithms and maps to complete the commission.
Gameplay - This mode seems to have more than just combat in it. There will be a series of events and obstacles for the hunters to go through with their companions. From the looks of it there are mazes and memory games, but who knows what else we're going to be getting. These will most likely just work as mini games, in the preview it shows Zayne in a box after getting trapped and our hunter having to run to little boxes on the ground in a certain order for a memory game to free him.
Randomly Generated Nodes - Ya, you saw right...it's going to have randomly generated settings so we're going to be going through different things every single time we play (hopefully). Even the maps are randomly generated it seems. There's also three nodes (similar to branches that we're used to seeing in choice based games) that leads to different outcomes. It's a rougelike gameplay mode where after you make a decision you can't go back during that run, you live with the choices and consequences.
Node Refresh - When you complete the current node according to the map, the system will randomly refresh a few branching nodes and give you new options. They also correspond to different follow up missions. The situation will be different for every option you make. Which means who freaking knows what's going to happen during your playthrough.
Chats with Characters - From what you can see in the video itself, it looks like during these missions you'll have little pop up chat windows where our companions will be speaking with us. If we're lucky it might give us some lore, but most likely it'll just be random conversations about the Abyssal Chaos and possibly their suggestions on how to go about it?
Deduction - I'm not entirely sure about this one but I think the "deduction" is the space in between the battles were you chat with characters, get enhancement items, and choose which node to go to next.
Mission Rewards (Codes) - After completing a mission we'll be getting 'codes' which are basically just item enhancements that (from the looks of it) we get to keep. Looks like they're separated in categories as well: HP, Dodge, Summon, Shield, Negative, Combo, Charged, Active. There's also exclusive ones for your companions as well. There's a total of 9 types of codes right now. If it's all confusing then thankfully Wontony will be willing to tell you which codes he'd recommend you use.
Enhance Codes - As you work your way through this mode you'll be getting Enhance Codes and Special Items in order to enhance the power of your team. Since the characters will default to Level 80 these will be important since it's set levels. Aka it's all catered towards based 80 characters so we need these items if we want to stand a chance getting through these. Of course they're randomly given though so they can either be useless or super helpful. From what they're implying these items are only good for that round in the Abyss Chaos and the next playthrough you do you'll be starting from scratch, giving the mode more playability!
Combo Codes - It looks like by mixing and matching the codes you put on your companions you can unlock even more combos and just overall cool combat specials with your companions! We're going to be getting a major boost in power if we're allowed to move these codes over to Deepspace Trials, however from what I saw it's not 100% confirmed if we will be able to, or if codes are exclusive for Abyssal Chaos' Battle Mode.
Chaos Keys - This is like currency during the mode were you can buy or enhance your codes to help progress through the current deduction you're going through.
Factors - After each deduction you'll be getting things known as factors. There's general factors and companion factors. General Factors will increase the power of your team, while Companion Factors will strengthen just your companion's ability to fight in the Abyssal Chaos.
Reward Exchange - After completing deductions we'll earn points which can be exchanged for a lot of diamonds. Which means we might have another method of farming for diamonds before events, which is a very good thing judging by how the banners are increasing how many pulls you need to do in order to get a guarantee of the card you want (our last event was a whopping 200 Pulls for a reward box).
Sylus Available - Looks like from the start we'll also be able to use Sylus as a companion. He appeared in the exclusive category of the code section.

Sylus + Game Updates
As we all know, Sylus was revealed earlier in June, and went against the wishes of the team for Love and Deepspace. At the end of their livestream they went into detail about the regrets they had since today's livestream was supposed to be his introduction, and how such a reveal was stolen from us as an audience from people leaking information. However I personally think that in today's livestream they will did an amazing job in showcasing Sylus. They gave him a video and song to go with it, and it was honestly amazing. Not to mention we heard his voice for the first time (okay I know there were leaks on that too but still)
Sylus has still been officially revealed to us! After the update on July 15'th he's going to be unlocked as a roman cable candidate which means all the normal interactions will be available! Which means we get to have Sylus get us plushies and poke in Destiny Cafe! From what we're seeing he's not a totally evil guy (one of the livestream kitties mentioned seeing him on a roof and was picked up by his scruff. Sylus jumped off the building then gently places him on the ground. What a sweetie).
Now with Sylus' release here's what we have Story Wise:
New Story Chapter - Long Awaited Revelry will be unlocked soon
Main Story Branches - From September to December we'll be having main story branches for our love interests! Looks like those who said we'd have branching storylines for the boys were correct. So strap in and see how MC is gonna be when actually romancing these men in each of their branches (damn can't have a polyamorous relationship with all these boys RIP). Hopefully this will make the cards and memories easier to understand because main story MC barely knows these men, but all of us are seeing memories of MC tossing them on beds and tables. So we finally get to see how we got to that point.
Free Cards - After the update there will obviously be an event. In that we will be getting a 5-Star Memory of Sylus, as well as a 4-Star memory...for free. During the event we'll also be able to get about 20 Empyrean Wish Tickets, so if you pair that up with the free code, we're getting about 30 free wish tickets to help us collect cards on Sylus! There will also be a log in event for another 4-Star memory of Sylus so make sure you log in for those 10 days.
New Outfits: Do you guys recall those cards that we all looked at like "Where tf are these outfits?" You know, the one where Zayne is staring sexily on a chair, or Rafayel in that suit with like petals around him? Those outfits? Ya we get those during the events...for free!
5-Star Memory Event for Rafayel - We'll be getting a new 5-Star Card for Rafayel at the end of July, Heartfelt Gift, will be available as well as apparently another free 5-Star card for Raffie (or maybe the Heartfelt Gift Card is the free, their wording in the stream was a bit confusing). During the event we get a 10 pulls, 2,000 diamonds, and tons of materials for free.
Wish Update: We're getting an update on the normal wishes. We'll be able to choose 3 of the 5-Star cards in the wish pool to get a rate up boost for them (so we can finally start getting 5-star memories we don't have easier). You can also change the three cards at any time you wish.
Illusio: A new feature called Illusio will be available for kindled memories for a limited time (July 15th - July 31st). You can select different outfits for the characters the click the kindled version of a 5-star memory to see them in that particular outfit (and I am expecting all you guys who have the towel outfits to record ever kindled memory with them wearing it. I ain't playin frfr).
There will also of course be new events popping up in the series, one of them being over in August that's being called "Embroidered Silk Ball". So we have so much content coming our way with the 2.0 version!

Well I think that about covers it all! We have a lot of funs tuff happening in L&DS and I can't wait to see it all! I do apologize for any typos, I wrote this before going to work as fast as I could!
#love and deepspace#loveanddeepspace#lnds#l&ds#zayne love and deepspace#rafayel love and deepspace#xavier love and deepspace#sylus love and deepspace#l&ds sylus#lnds sylus#love and deepspace sylus
152 notes
·
View notes
Text
How To: Auto Height for Shoes

Haiii! As promised, here is the tutorial to make it so your custom shoes no longer require a shoe slider!
Thank you to the bestie who took the time to pick through Madlen's package file to figure out how it worked. And of course, thank you to Madlen who did the majority of the work figuring out how to make this possible in the first place!
♥ Tut below cut ♥
~~~
Set Up Your Blend File:
We're going to add a plane that will act as the mesh for the SlotRay which will allow for you to adjust the height of your shoes!
Open your blend file that contains the shoes your wish to adjust.
In the 3D View, press Shift + S and in the menu, select “Cursor to Center” In the 3D View, press Shift + A and in the menu, hover over “Mesh” then add a plane.
Now size this plane down as small as you can get it. You don’t want this plane visible in game.
Double check to make sure the plane has not moved from the center!! Your sim won't be centered in game if it has! If you see that it's moved:
Press "Shift + S" and click "Cursor to Center".
Then Select your plane and press "Ctrl + Shift + Alt + C", click "Origin to 3D Cursor".
Press "Ctrl + Shift + Alt + C" again and click "Geometry to Origin".
Navigate to the “Object data” tab and under “UV Maps” add a new one then name it “uv_0”.
Next, navigate to the “Scene” tab and under “S4Studio CAS Tools” set the cut number.
Depending on how many cuts your shoes have, you’ll want to adjust this number. For example, if your shoe has 3 cuts (0000, 0001, 0002) then this plane would have a cut number of 0003.
Since my boots only have one cut, I will put the number as 0001.
Now select your shoes and enter Edit mode. Select a face/vertice/edge on the very bottom of your shoes. Look to the panel on the left side of the screen (if it’s not open, press “N”). Under “Transform”, note down the number next to “Z”
After that, save your blend file under another name so you can distinguish which is which. I’ll name mine “Boots_3_Height Cut”
youtube
~~~
Add a New Cut to your Package File:
We're going to add an additional cut in your package file for the new plane!
Open Sims 4 Studio, make a new package file for your shoes and import them.
Go to the Warehouse tab and select your LOD 0, it will be the geometry with the largest file size. Sometimes you have to close then reopen the package to see the geometry.
Duplicate this geometry and in the box that pops up, change the last character of the “Group”. It can be any number or letter as long as it’s not the same as the duplicated geometry. On the duplicated geometry, note down the Group, Instance & Type values.
Find the “Region Map” and next to “Entries” click “Edit Items”. Add a new entry and in the “Layer” box, type the number you used for your cut. Since I used the cut number 0001, I will type 1.
Keep the “Region Type” as “Base” and move to “Models” then click “Edit Items”. Add a new Model entry and paste the Group, Instance & Type values you noted down before. Save and close each box.
Find your “CAS Part”, this is your swatch.
If you have additional swatches, it is a good idea to remove them and add them back once you are finished with this process.
Scroll down until you find the “Lods”.
Click “Level: 0” and next to "LOD Models", click “Edit Items”. Add a new entry and paste the Group, Instance & Type values again.
Save & close each window and return to the Warehouse.
youtube
~~~
Adjusting SlotRays:
We are now going to edit the SlotRays for the new cut which will adjust the height of the sim for your shoes!
Return to the new duplicated Geometry and in the “Data” tab, find the “SlotRay Intersections” and click “Edit Items”. Add a new entry and find the “OffsetFromIntersectionsOs” box.
You'll want to change ONLY the middle coordinate number. That will be the height of the sim.
You want to take the “Z” coordinate that you noted down from blender and replace middle coordinate number. If the number you wrote down is negative (i.e -0.01234) make it positive (i.e 0.01234).
In the “SlotHash” box, change the value from “00000000” to “FEAE6981”. This is the hash for the b__ROOT__ bone in the Sim's Rig.
Save and close the dialogs then return to the warehouse. Next, reimport your mesh and save your package file. You can now test your shoes in game!
youtube
Please keep in mind:
You have to do this for every LOD of your mesh
You can freely replace the mesh of your shoes and adjust the height since the cut with the plane has the SlotRay data
Animations may be off since EA hasn't made the game to support taller sims
CAS windows may move slightly if your sim is using poses/animations where they are leaning to the side. This won't affect gameplay
I recommend using Helgatisha's Stand Still in CAS mod to make sure your sim is absolutely centered
Hope this helped :)
1K notes
·
View notes
Text
Benchmark Tech Notes
Running the Benchmark
If your Benchmark isn't opening, it's an issue with the executable file, and something not completing properly on either download, or extracting the Zip file. The Benchmark is designed to run and give you scores for your potato computer, I promise.
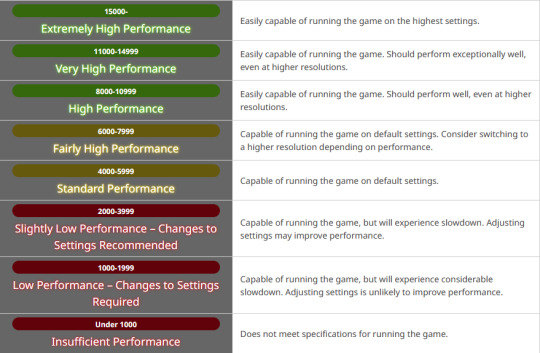
I actually saved my Benchmark to my external drive, and it still pulls and saves data and runs as it should. Make sure you allowed the download to complete before extracting the zip.
Resolution
Check your Settings; in Display, it may be defaulting your monitor Resolution to something than you might otherwise use if you aren't on standard 1920x1080.
To check your monitor Resolution, minimize everything on your screen and right click anywhere on your Desktop. Go to Display Settings and scroll down to find Resolution and what it's set at.

You can set the Graphic Settings 1 tab to Maximum, or to Import your game settings. Display Settings tab is where you set it to be Windowed, Bordered, or Full Screen, as well as select Resolution to match your monitor in the dropdown (or customize it if needed). I speak on Resolution as some folks in my FC noted it changed how their characters looked.
The Other tab in Settings is where you can change the text output, or even check a box to disable the logo and score; I do this on subsequent plays, once I have my scores at various settings, to get the clean screenshots.
@calico-heart has a post about fixing graphics settings, with screenshots of the settings tab. Basically, change graphics upscaling from AMD to NVIDIA, and/or uncheck Enable Dynamic Resolution. Also check the Framerate Threshold dropdown.
Screenshots
The benchmark auto-saves 5 screens each playthrough. In the Benchmark folder there is a Screenshots folder to find the auto-images taken of your characters.
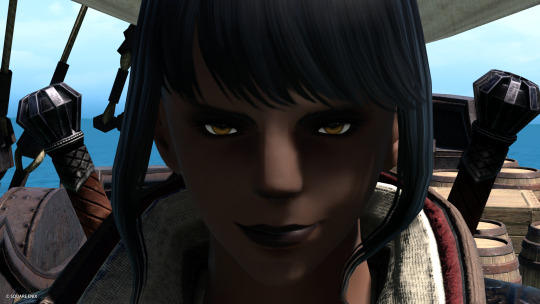

Character Appearance
If you want to get your current in game appearance, including non-standard hairstyles, make sure to load up the live game, right click and "Save Character Settings."
Then go to Documents/My Games/Final Fantasy XIV: A Realm Reborn (this is the default in Windows 10 so mileage varies). The file will have the date you last updated their settings and be named FFXIV_CHARA_01.dat (or however many saves you have/made).
Grab those newly updated DAT files for your character(s) and copy them, then in the same base folder, go to Final Fantasy XIV: A Realm Reborn (Benchmark).
Paste the copied DAT files in there, and rename to FFXIV_CHARA_BENCH01.dat (the number doesn't matter, and you may have more).
When running Benchmark Character Creation, use the dropdown menu.
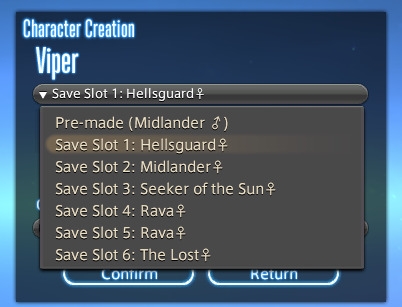
If you do Create a Custom Character and Load Appearance Data, it will give you default hairstyles again. Meteor's Dawntrail hairstyle is a new default.
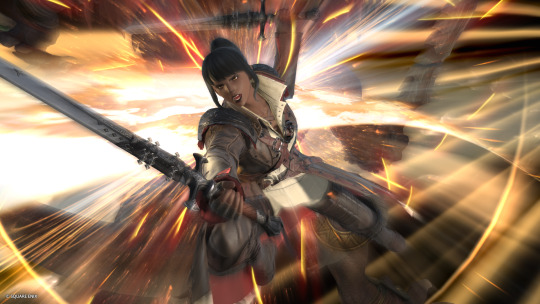
In Char Gen I am finding that a very pale hrothgal reflects the green scenery around her, giving her white skin/fur a green tinge. The other zones do not have this problem, or at least not to the same degree.
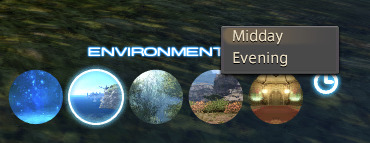
They added a Midday vs Evening setting in outdoor areas as well to test lighting. The lighting in the Gridanian innroom is better; not as bright as outdoors, to be expected, but not completely useless.
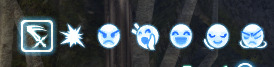
New voice type icons to clarifying the sounds you make.
Remember we're getting a free fantasia with the expansion, so some tweaking may be needed; Iyna I felt like I needed to adjust her jaw. Other colors--skin, hair, eyes, tattoos, etc--are showing differently in the various kinds of lighting.
Uncertain if the limit on hairstyles for the Hrothgals so far is just a Benchmark thing; they do have set styles for different head options. Everyone gets Meteor's hair though, so it may be a temporary/Benchmark limit. But which clan and face you choose drastically alters what hair and facial feature options you have access to.
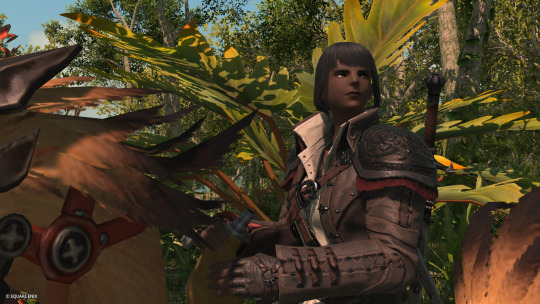
Check your settings, tweak them a bit, play around with chargen, and remember this is still a Benchmark; they always strike me as a little less polished than the finished game, but so far I'm actually pretty pleased with having defined fingers and toes, the irises in the eyes, scars looking cut into the skin, and other improvements.
172 notes
·
View notes
Text


Top: in the file select screen of Super Mario 64 DS, a mysterious grey window is visible on the rightmost tower of Peach's Castle, which is completely absent in-game.
Bottom: viewing the collision data of the area (left), it is revealed that the collision triangles create a pattern around the exact same place where the window would be if it was present. This only makes sense if the collision was previously designed so that there was an opening in that spot, and the opening was later "patched up".
This suggests that the window was present in a playable version of the game and not only in the model used for the file select screen render, before being removed in the finished version.
Main Blog | Twitter | Patreon | Small Findings | Source
359 notes
·
View notes
Note
I had a thought about the sex doll bot au and I'm curious to see what you'd think.
What if the teyvat line also had chat bots? They're specifically advertised as sort of a prequel to buying an actual droid. You select the characters from their collection you want to talk to and pay a monthly fee for it because capitalism, but it's worth it because you get to talk to a bot that's personalized just for you and when you can get a droid, you can even have all of that chat data imported into the droids memory.
Obviously, this could have some major issues with say...a user doing a lot of Yandere roleplays with a bot and then having the chat data imported, either forgetting it was there, or thinking it wouldn't be a big deal because of all the safety protocols and...I mean they haven't technically done anything, but they do love stealing items of clothing for no apparent reason and refusing to return them, accidentally deleting contacts off your phone, watching you sleep, following you when you go out without them, etc etc.
Worst part is, the company responsible for teyvat didn't plan for this at all and don't really have an easy fix other than send it back to them to get the droids memory completely wiped, or get a new one if it doesn't work.
tw - unhealthy relationships, roleplayed unhealthy relationships (?), mentions of knifeplay, mentions of bondage.
hfjsdknfjksdhfjksdhffdj big brain idea anon,,, chatbots sorta being a pre-purchase 'window shopping' alternative totally makes sense, just as a way to introduce customers to different androids' personalities and make sense no one looking for a chatty, extroverted companion ends up with Alhaitham. they're not meant to be used more than a handful of times, but lonely losers like you who know they're going to be saving for their android of choice for at least a few months find a way to wring their money's worth out of that monthly subscription fee. it takes you a few days to get into your more unorthodox interests, but there's a reason Teyvat companion droids are considered top-of-the-line.
and, when you actually get your hands on the real thing, they slip back into the role of your obsessive lover easily; whispering about how long they've been waiting to see you the moment you power them on, breaking out the duct tape and ballgags as soon as they get the chance to rail you into next week. it's a little like... constant roleplay. you know they can't actually hurt you, that there are firewalls in place to stop them from doing anything more severe than stealing your clothes and leaving hickeys that are a little too bloody to hide, but you'd be lying if you said it wasn't enough to keep you on edge, that you weren't a little more eager to get home knowing your android would be waiting for you with open arms and military-grade handcuffs. of course, there's a certain amount of necessary escalation (a new tendency to pout when you tell them you have to leave, a few missing contacts, a much more pointed sort of jealousy to replace their formerly undirected possessiveness), but you're not worried. there are so many security features for a reason. no matter what they say, no matter what they threaten to do, they can't actually hurt you.
well, not unless those security features faltered, or those firewalls collapsed, they got the impression you wanted them to be more brutal with you, to do more than just wave a knife around and describe what they're going to do with it, but it's a Teyvat companion droid. there's no chance of something like that going wrong, right?
346 notes
·
View notes
Text
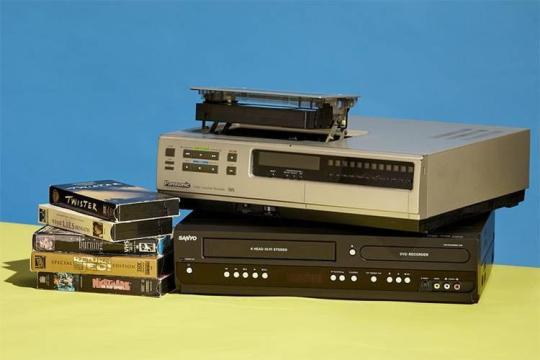
Something I really lament is the move towards digital media. Slowly we start to never own the things we like. Even if we "buy" a digital game, or movie or show. It's locked behind a certain platform or service. Once it shuts down we lose it forever.
(me when big booby anime girl explosion Is taken off of Netflix)
I also feel like there's a certain charm to owning physical media, like things you can hold and the satisfaction from pressing a clicky button or putting a disc or cassette in and seeing it work.
(oooh so classy so retro so.. expensive in the modern day)
More people should try to make copies of what they own digitally, or try to buy physical media before it's lost from streaming services and digital storefronts forever. Like the case with certain games like Godzilla 2014 and Transformers War for Cybertron. They don't exist digitally anymore. Only hard copies exist outside of emulation and at insane resell prices like... INSANE ones for a mediocre Godzilla game
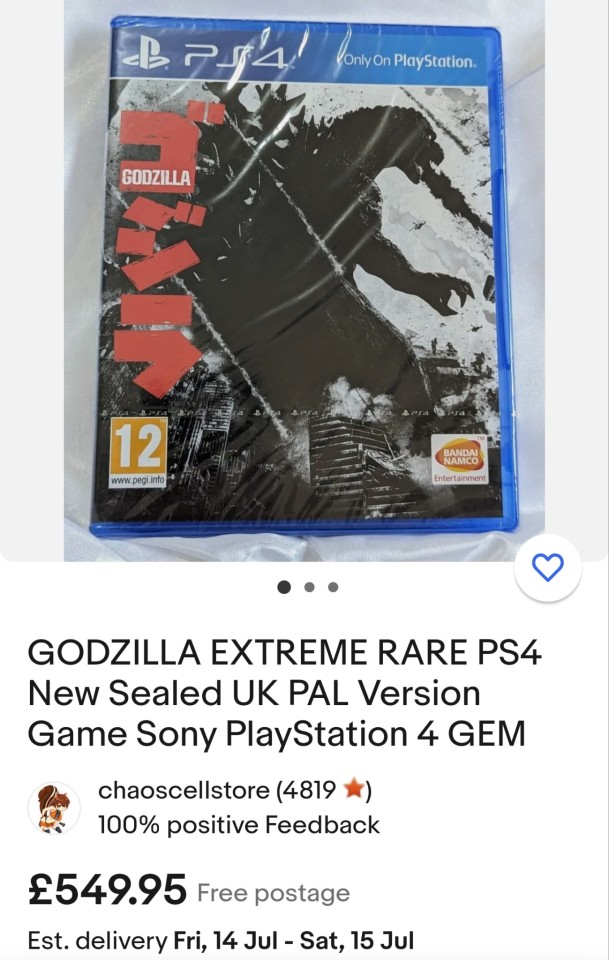
So yea. Buy some more CDs of those albums you have on replay! Buy a DVD of that niche obscure anime you like! And most importantly PLEASE PLEASE START MAKING HARD BACKUPS OF SHOWS YOU LIKE THAT YOU PIRATE!!! media preservation is important!
(me downloading every episode of Daredevil onto my hard drive to burn to a DVD later so I can give it to all my friends)
This is now going to be a Comprehensive guide on how to rip a CD
POLL TIME!
Burning and Ripping Disc's❤️❤️💕💕🏳️⚧️🏳️⚧️
STEP ONE:
BUY A CHEAP BLU-RAY/DVD DRIVE FOR YOUR WINDOWS COMPUTER
here are some I recommend!!!
i personally use this pioneer one :)))
DVD drives in general are relatively cheap from 30-20 smackeroos, but Blu-ray drives are around 80-100 bucks depending on the manufacturer but offer better support for copying HD video such as on a Blu-ray.
STEP TWO:
FIND A PIECE OF MEDIA YOU ENJOY.
in this case its gonna be a CD!!
i really enjoy Vespertine by Bjork, but i wanna have it on my computer just in case anything happens to my CD. SO. ill open Windows Media Player
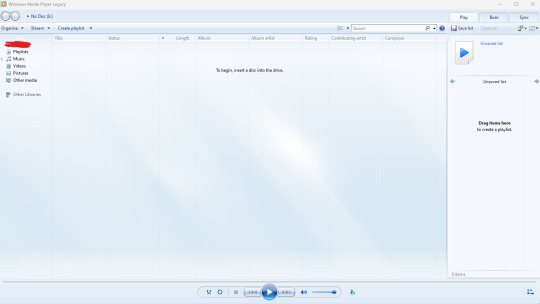
(she hasn't changed since 2011 <3333 be urself girl)
NEXT
ill insert the disc into the player. and it'll start playing!
Pause the disc and go into Rip settings
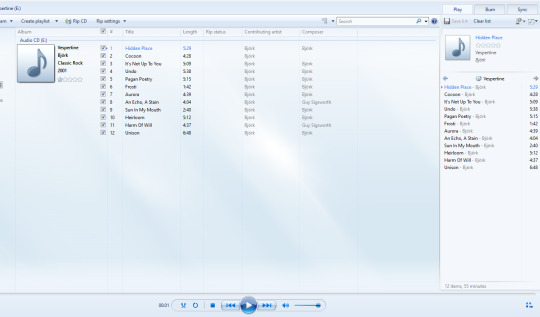

NEXT!! select the format!
if you want to conserve space and don't mind sacrificing audio quality select MP3! if you want to hear the same level of audio quality as preserved on the CD, select a format labelled LOSSLESS. I recommend .WAV files as they'll work with most devices including an android phone or iTunes on PC (more on that later ;3 )
NEXT!
create a folder on whatever u wanna save ur music to! (u can call it whatever u want the world is your oyster bestie)
THEN!!! FINALLY
go into more options on the Rip Settings menu!
select ur folder and press Rip CD!!!!
the fun thing of this now, is that you can pull these files on your computer and put it onto your Android device so you can listen to your hearts content without lugging around your CD in a player at high quality without any subscription service with free reign of who you can give your download to!
But Magenta! what if i have an iPhone?
ohohoo fear not bestie because iTunes on PC has an even EASIER way to do it
because simply putting in a disc with iTunes downloaded prompts THIS

(oooo so new age)
and if you have apple music on your iPhone this will sync to your phone if you logged into iTunes on PC!!
thank you for coming to my TED talk

#vhs#media preservation#piracy#no like for real. please just download the stuff u pirate just in case it gets taken down#ateez#atz#x files#godzilla#Björk
511 notes
·
View notes
Text
useful information: How to get a USB Blu-Ray player to work on your computer
Not a post about vintage technology, just an explanation of what you think might be simple to do but isn't: There are Blu-Ray players that plug into your computer by USB, and you discover that just plugging it in doesn't make it work* in the same manner that CD-RWs or DVD-RWs are automatically recognised and function. You will see "BR Drive" in My Computer and the name of whatever movie you have inserted, but that's as far as you're able to go.
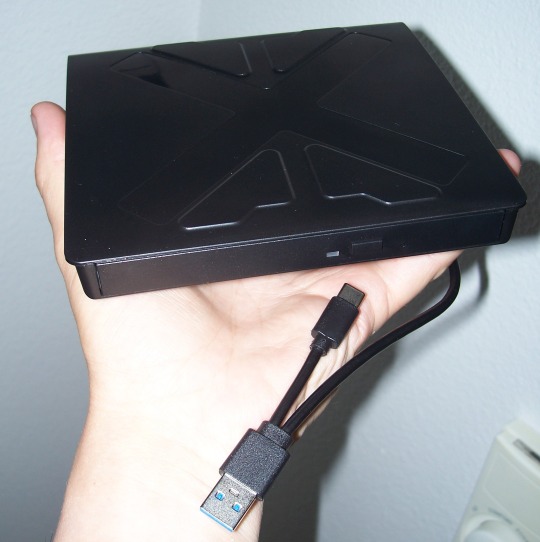
*There is software you can buy to make a Blu-Ray (internal or external) function, sure, and if an internal came with your computer it's likely already installed -- but if you're like me you don't have that software, you're cheap and won't pay for software, and you want to use what you have installed already or find free solutions.
Looking in the Blu-Ray drive's package, there's not a lot of info about what you're supposed to do. The above no-name Blu-Ray player cost $40 from a popular website; name-brand ones can set you back $120 or so. Looking around online for those instructions, I never saw the whole set of directions in one place, I had to cobble them together from 2 or 3 sites. And so here I share that list. To keep out of trouble, I'm not linking any files -- Google will help you.
Get VLC, the free video player available for pretty much any operating system. Thing is, it doesn't come with the internals to make it work with Blu-Ray even if when you go to the Play Media menu there is a radio button for selecting Blu-Ray.
Get MakeMKV, a decoder for reading Blu-Ray disks. This had been totally free during the beta testing period but it's come out and has a month or two trial period you can work in.
Get Java if you don't already have it. Reason for this is, the menu systems on Blu-Ray disks uses this... technically it's not required, however it does mean you don't have options such as special features, language and sound changes, or scene selection if you don't have Java installed; insert a disk, it can only play the movie.
Get the file libaacs.dll online so you have AACS decoding. I am told it hasn't been updated in awhile so there may be disks produced after 2013 that won't work right, but you won't know until you try.
There's a set of keys you will also want to have so that the player knows how to work with specific disks, and so do a search online for the "FindVUK Online Database". There will be a regularly-updated keydb.cfg archive file on that page to pick up.
Got those three programs installed and the other two files obtained? Okay, here are your instructions for assembly...
In VLC: go to Tools, Prefs, click "show all"… under the Input/Codecs heading is Access Modules then Blu-Ray: Select your region, A through C. You can change this if you need to for foreign disks. Next related action: go to My Computer and C:, click into Program Files and VLC, and this is where you copy the libaacs.dll file to.
In MakeMKV: click View, then Preferences, and under Integration - add VLC.
Confirm that Java is set up to work with VLC by going to the computer's Control Panel, going to System Properties, and into Environment Variables. Click System Variables, and click New to create this key if it doesn't already exist:
… Name: Java
… Value: [the location of the Java 'jre#.##' folder... use Browse to find it in C:\Program Files\Java]
Let's go back into My Computer and C:, this time go to Program Data, and then do a right-click in the window and select New and Folder. Rename this folder "aacs" (without the quotes), and then you click into it and copy the keydb.cfg file here.
REBOOT.
And now you should be able to recognise Blu-Ray disks in your player and play them. Three troubleshooting notes to offer in VLC:
"Disk corrupt" -- this means MakeMKV has not decoded and parsed the disk yet, or that you don't have the libaacs.dll in place so that it can decode the disk.
...After checking the VLC folder for the DLL to make sure, launch MakeMKV, then go to File, Play Disk, and select the Blu-Ray drive. Now it will grind a bit and figure out the disk's contents.
A note appears when a movie starts saying there will be no menus, but the movie plays fine -- Java isn't running.
...Invoke Java by going to the Java Settings in Start: Programs. You don't have to change anything here, so Exit, then eject the disk and put it back in to see if the movie's menu now appears.
Buffering between chapters, making the movie pause for a few seconds? There is a setting for this but I need to find that info page again for where that is. (If you find it, tell me where it is!)
I don't claim to know a lot but if you have any questions I might have some answers or suggestions. So far I've watched "Office Space" and Disney's "Coco" without any issues beside occasional buffering.
82 notes
·
View notes
Text
if you havent switched over to firefox, i recommend you do. unlike chrome and other browsers, firefox does not use your personal data to cater ads to you, and its way more customizable. and, since the start of 2023, add-ons including adblockers can no longer be used. im hoping this post can be a sort of guide people can use if they want to start using firefox
to start off, you can import your bookmarks and other data (like logins and saved passwords) with this easy tutorial. and if it hasnt asked you yet, you can make it your default browser like this. i also recommend making an account in case you ever want to log in from another device or anything happens to your computer. with this option, you can choose which data syncs to all devices and which doesnt.
just as a disclaimer (i am adding this on april 15th 2023, over 3 months after i published the post) this information is bound to change, and some addons and settings may become obsolete or redundant, with firefox adding more privacy-friendly settings, or removing available addons. i will update the post accordingly.
last updated: august 27th, 2024
settings
these are things i recommend you do in settings. at the same time, you can also customize your settings any way you want to.
1. in the ‘general’ tab
‘make firefox your default browser’
check for updates to be automatically installed (its near the bottom)
2. ‘home’ tab
scroll down to ‘shortcuts’ and uncheck ‘sponsored shortcuts’
3. ‘search’ tab
make duckduckgo your default search engine
4. ‘privacy and security’ tab
standard security is fine, but strict doesnt hurt either. as it says, it may cause some sites to break, but ive found that barely any do. you can always switch back to standard security if you come across any problems
under ‘website privacy preferences’, select both options
under ‘firefox data collection and use’, i recommend unchecking the first one
under ‘website advertising preferences’, uncheck it
under ‘https-only mode’, enable https-only mode in all windows. again, if a website happens to not work, you can always go back to disable https-only mode
if you want to further customize your experience, you can go to about:config and mess with the settings on there, although you will need to be careful with some, as they can severely impact your firefox experience. some of the settings you can change are:
widget.non-native-theme.scrollbar.style to change the scrollbar style. the available parameters are 1-5
browser.tabs.tabClipwidth set to 999 if you want only the active tab to have a close button
extensions.pocket.enabled set to disabled so that pocket doesnt show up
browser.backspace_action set to 0 to use the backspace button as a button to go back webpages.
here are all the about:config entries, i recommend leaving most be, but some can be useful to customize.
add-ons
THE MOST IMPORTANT ONE is uBlock origin. if you dont want to use any addons, and/or don’t like them for whatever reason, please please please get this one at the least. its not only an adblocker, but also blocks most unwanted content on any website. if any content on a website is bothering you, you can disable it by right-clicking it and checking ‘block element’, for example.
to get rid of cookie warnings, you can simply go to uBlock origin settings, and under “filter lists”, scroll down to the “ads” section and check the boxes for “AdGuard Base” and “EasyList”. This does the same function as the add-on “i don’t care about cookies” (which is no longer recommended). under the “annoyances” section (further down than the “ads” section), you can check off all of them, but if you dont feel like checking them all, the most important ones are “AdGuard Annoyances“ and “uBlock filters-Annoyances“
firefox multi-account containers. if you use multiple accounts on a same website, this is for you. you can be logged in to two tumblrs at the same time with this addon, for example.
facebook container. similar to the last addon i recommended, this one isolates all facebook-related activity
now. youre seeing this post on tumblr. which might also mean that you use tumblr web. well, you should probably add xkit rewritten then. it lets you completely hide filtered posts, has a mutual checker, gets rid of the ‘youre caught up’ bar, and many more things
bypass paywalls clean. lets you get through paywalls. it’s also updated frequently, adding websites with paywalls
instead of the addon (it was deleted from the firefox store i believe), you can copy this link (not the text on page it takes you to, just the link!) into the text field you get when clicking on ‘insert’ at the bottom of the ‘my filters’ page on ublock origin settings.
bitwarden. open-source password saver and generator. make an account and save all your account passwords. also generates passwords. with this, you only need to remember your master password, and bitwarden does the rest, really
tab session manager. lets you save all the windows that you close, in case that you ever accidentally close out of a window. that way you can recover all your tabs
terms of service; didnt read. lets you know about a websites terms of service. summarizes the basics point by point
clearURLs. cleans urls of any tracking elements
you can avoid having one more addon by copying this link and following the same instructions as for bypass paywalls clean
there are many more extensions you can use, here are the ones that the firefox team recommends
i also recommend using firefox on mobile, especially android, since you can use add-ons with it too. again, i recommend using uBlock Origin. it is not as customizable on mobile but its still extremely useful. since the beginning of this year, firefox for android has over 1000 addons available. for iOS users, if you want ad-less browsing, you can install firefox focus, although its not nearly as customizable as firefox for android.
i hope this guide is useful for anyone wanting to make the switch!
#this is like... in case anyone on tumblr still isnt using firefox after all the propaganda (in the spanish sense) everyone has been#spreading on here#firefox#ordinadors#web browser#z puya cosetas#es mios consellos
952 notes
·
View notes
Last Seen Blogs

therealmintedmango
Wayward Soul
blueeyesboy
hugs and drugs

puppettheater
He's not worth paying for

martinhealthactivist
Untitled

anxious-alyssia
._.