#sew historically
Text
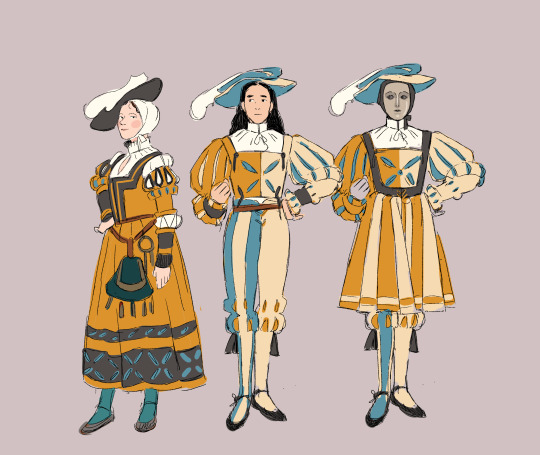

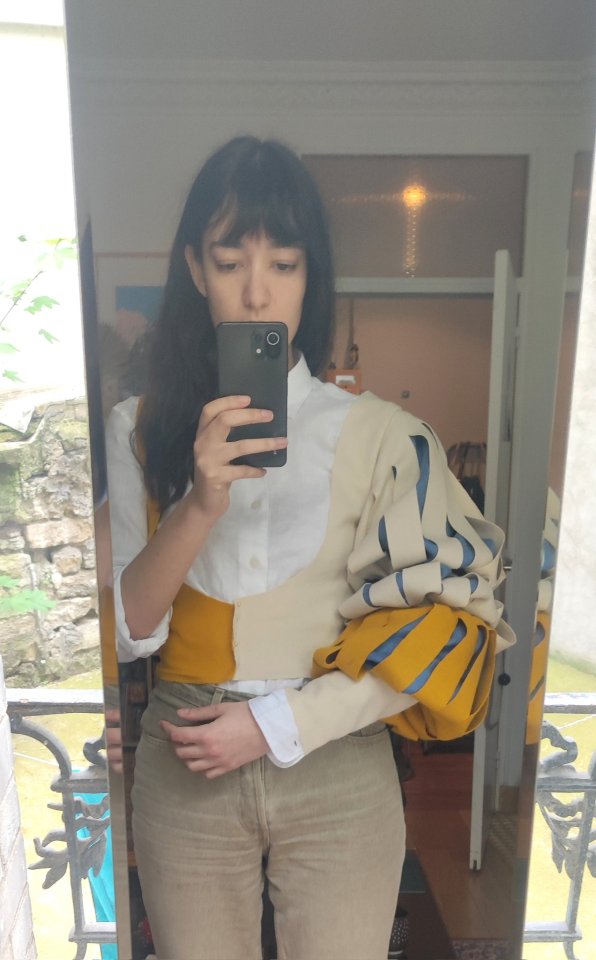
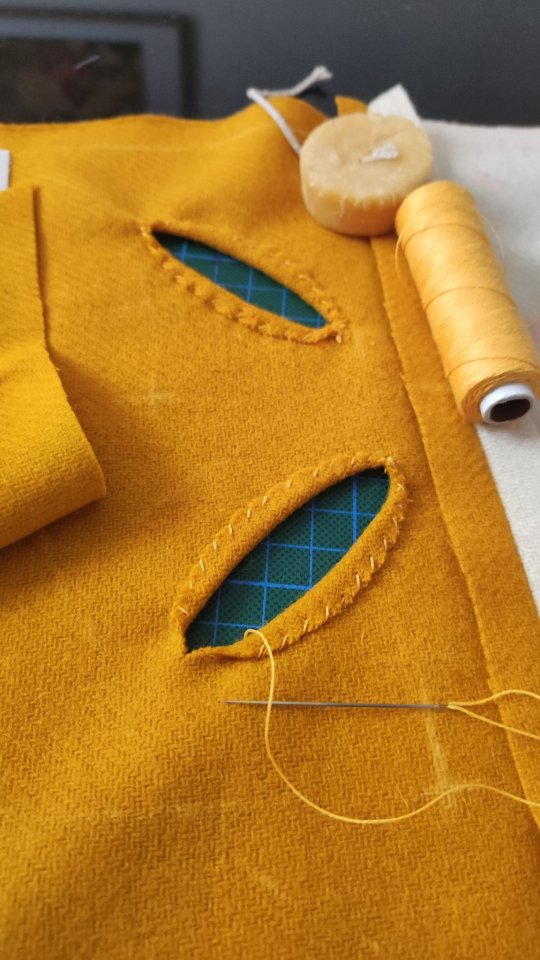

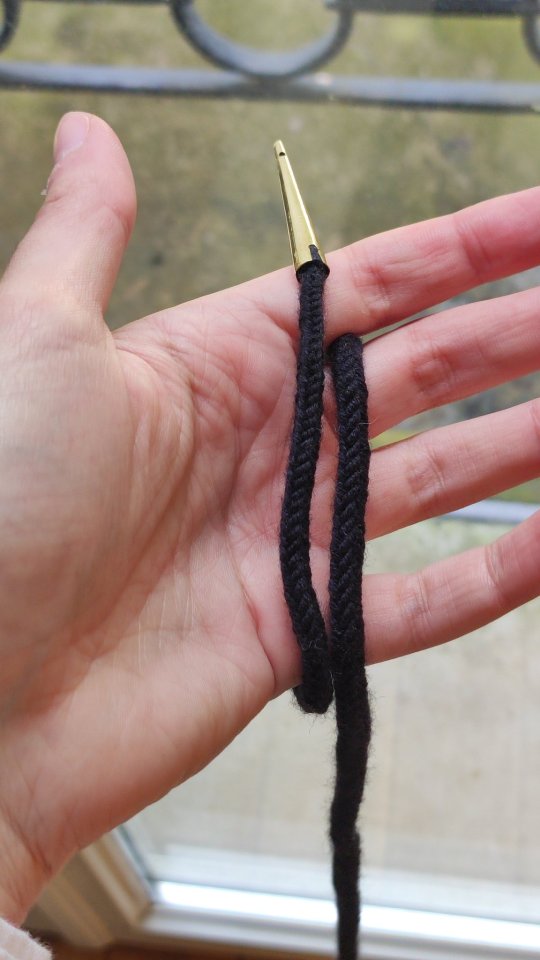
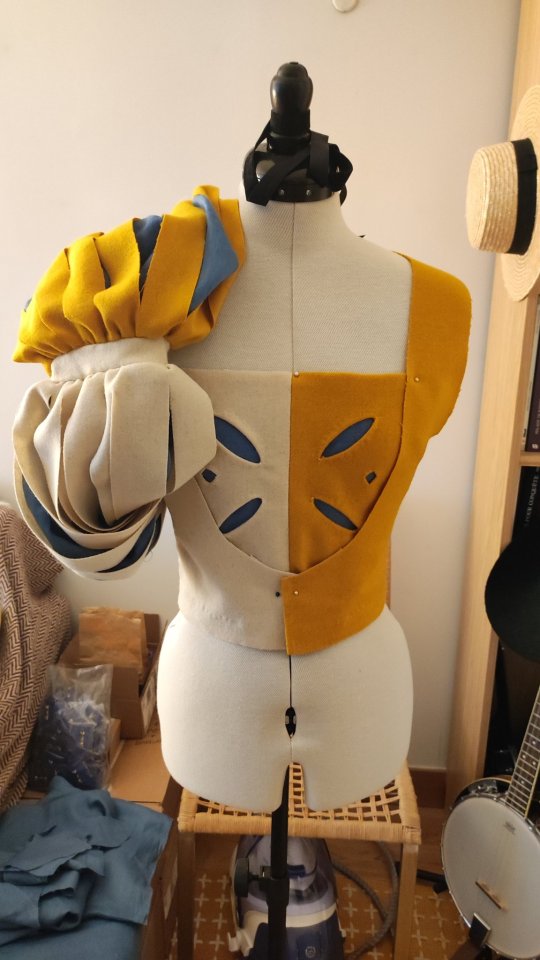


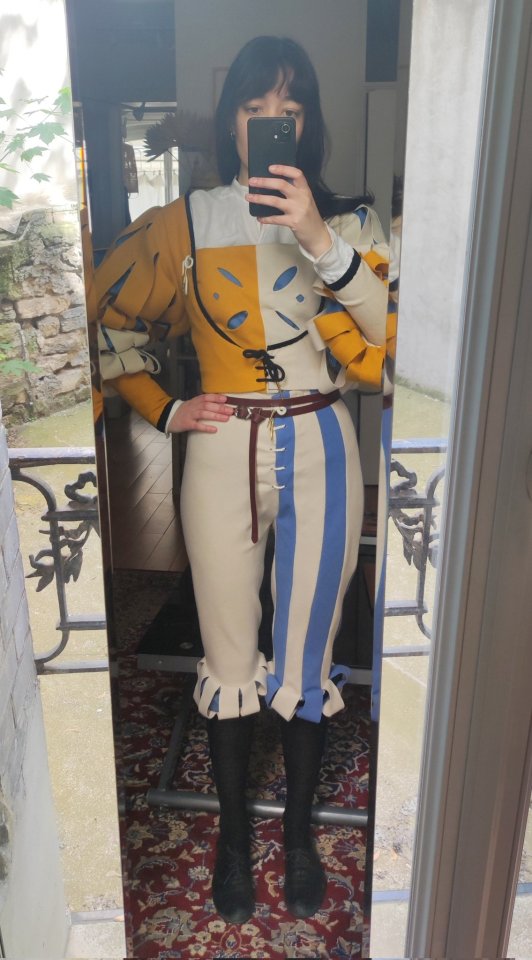
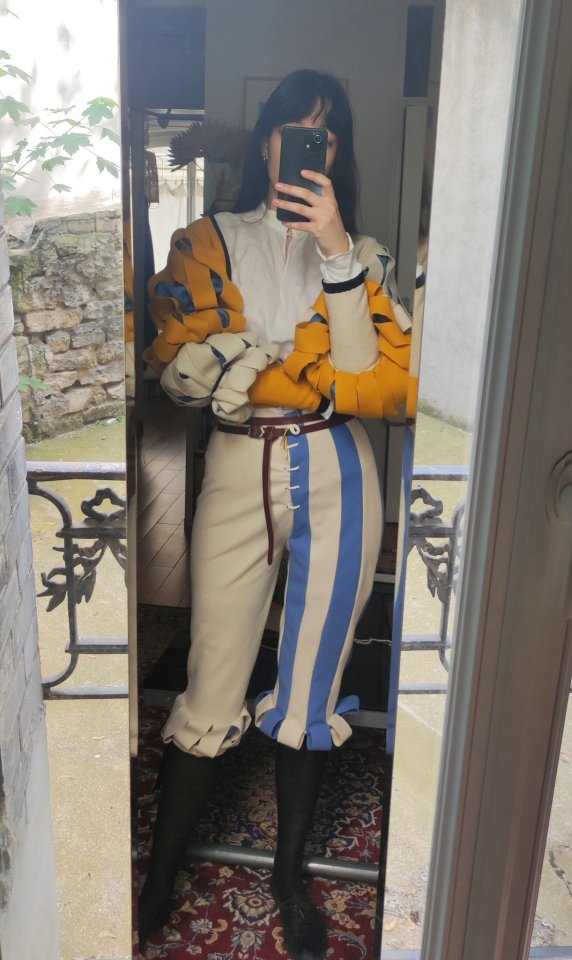

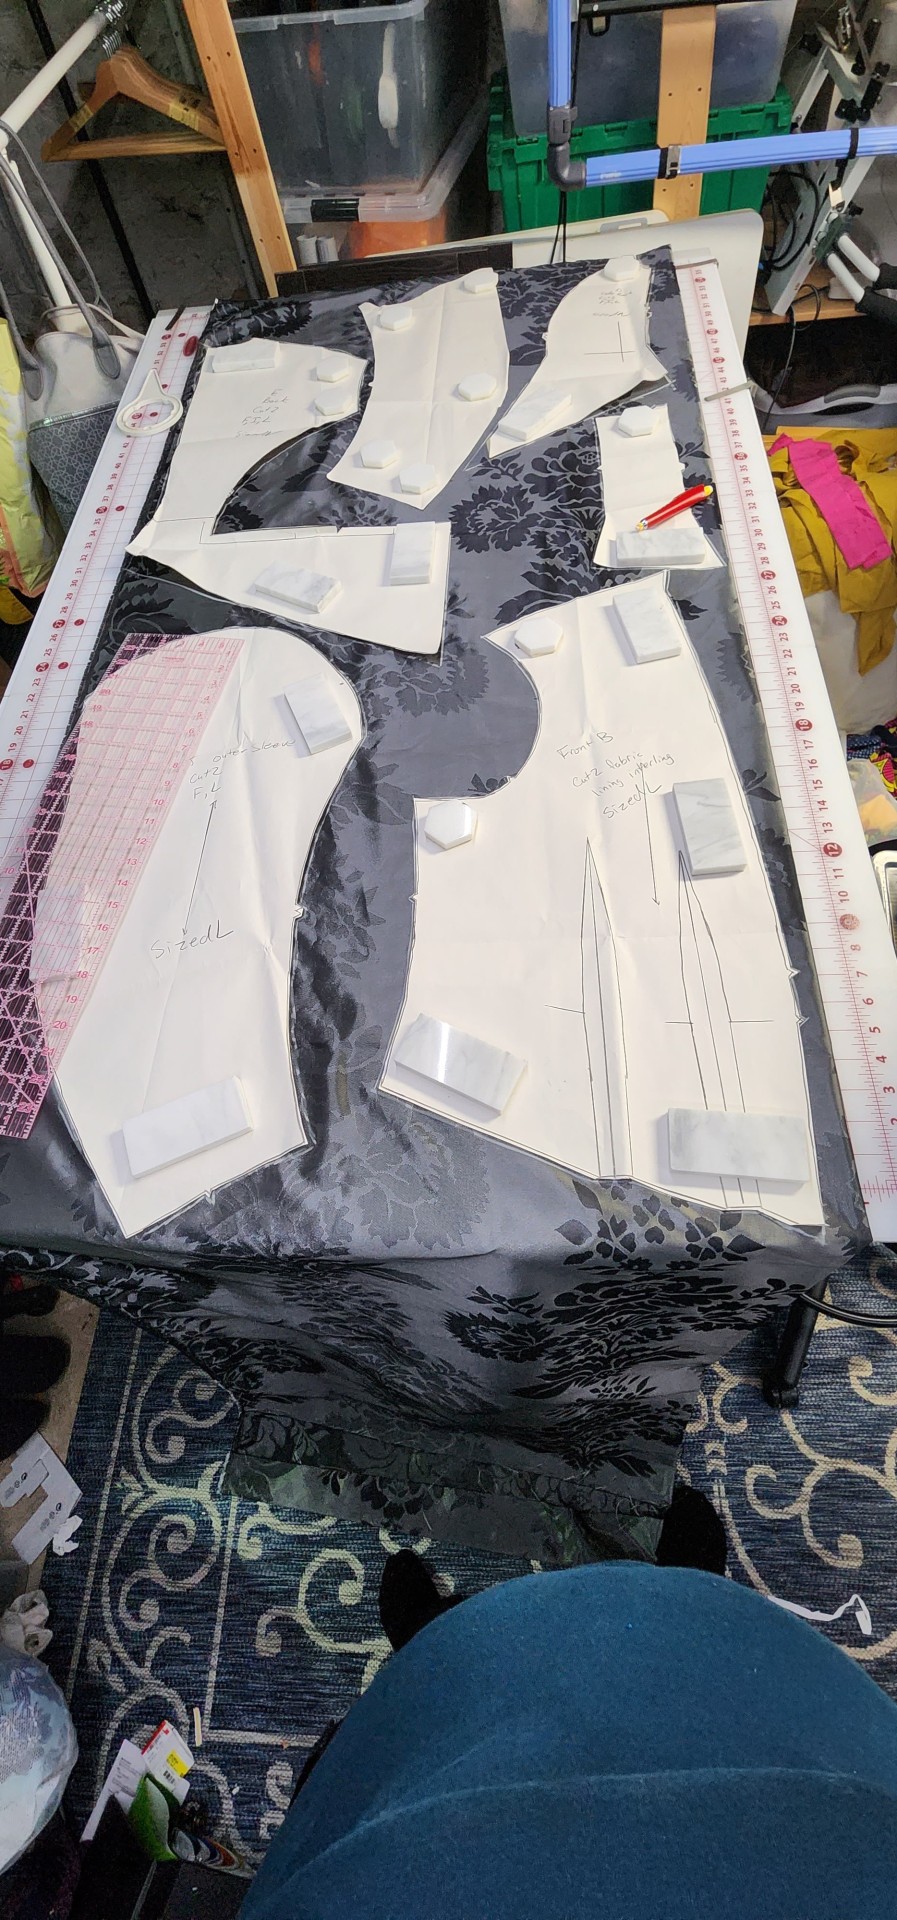
Progress on my current project ! Having some with stripes and slashing this time around. Didn't take any progress photos for the hosen/pants because it broke my brain a little, lol. I also started doing fingerloop braiding for the lacing cords.
I still have to fix a few things on there, including fixation on the brustfleck, and after that onwards to making the hat !
#historical costuming#sewing#16th century#landsknecht#germanic guard#renaissance#it's landsknecht inspired but I also like to think of it as#jestercore#first time draping an drafting everything myself woo !
11K notes
·
View notes
Text


If you’re on mobile, you may have to click on the images for better quality!
Plain text version with image descriptions is under the cut.
Please note that the image descriptions will be reflecting what I am trying to convey with the photo, rather than the total look of the photo itself. For example if I am trying to describe a dress, the hair colour of the person wearing it will be ignored. This is to reduce the total word count of the descriptions, because I have a lot of images to describe. On this note, I have also streamlined the information as much as possible.
[Plain text description:]
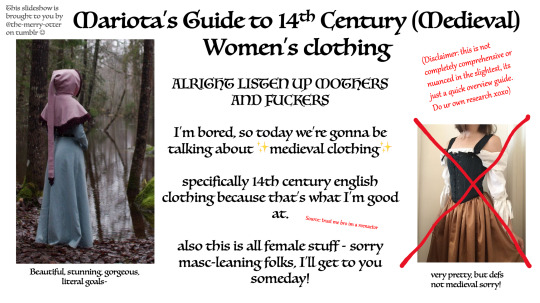
First slide: Mariota’s Guide to 14th Century (Medieval) Women’s Clothing
This slideshow is brought to you by @the-merry-otter on tumblr
ALRIGHT LISTEN UP MOTHERS AND FUCKERS. I’m bored, so today we’re going to be talking about medieval clothing. Specifically fourteenth century English clothing because that’s what I’m good at. (Source: trust me bro I’m a reenacter). Also this is all female stuff - sorry masc leaning folks, I’ll get to you someday!
Disclaimer: this is not completely comprehensive or nuanced in the slightest, it’s just a quick overview guide. Do your own research xoxo.
[Image ID: to the left is a picture of a woman in a light blue dress and a pink hood gazing out at a lake. The hood has a skirt that falls over her shoulders, and there is along thin pipe attached to the back of the hood that dangles to her knees. The edges of the hood are decorated with burgundy crochet. The picture is captioned “beautiful, stunning, gorgeous, literal goals.” End ID]
[Image ID: To the right is a picture of a typical renn faire outfit. It has a white poofy underdress, a black corset, and a brown skirt. There is a red cross drawn over the image. It is captioned “very pretty, but definitely not medieval sorry!” End ID]
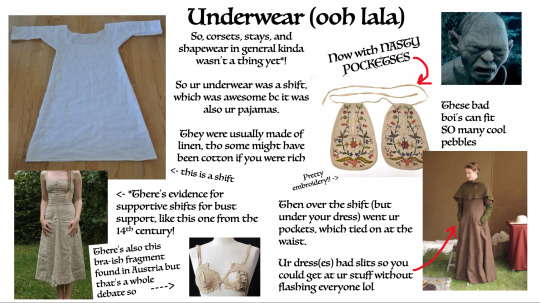
Second slide: Underwear (ooh la la)
Now with nasty pocketses
[Image ID: a picture of gollum, from lord of the rings, snarling in disgust. There is a line in The Hobbit where he asks Bilbo what he has in his nasty little pocketses, which is what I am referencing. End ID]
So, corsets, stays, and shapewear in general kind of wasn’t a thing yet. So your underwear was a shift, which was awesome because it was also your pajamas. They were usually made of linen, though some might have been made of cotton is you were rich.
[Image ID: A plain white linen garment laid out flat on the floor. It is a dress that hangs to about knee length, with elbow length sleeves. An arrow points to it with text reading “this is a shift”. End ID]
There is evidence for supportive shifts for busy support, like this one from the fourteenth century!
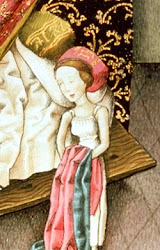
[Image ID: a second shift, worn by a female presenting person. It is laced up the front, and is a lot tighter and more fitted, especially around the bust. It has straps instead of sleeves. End ID]
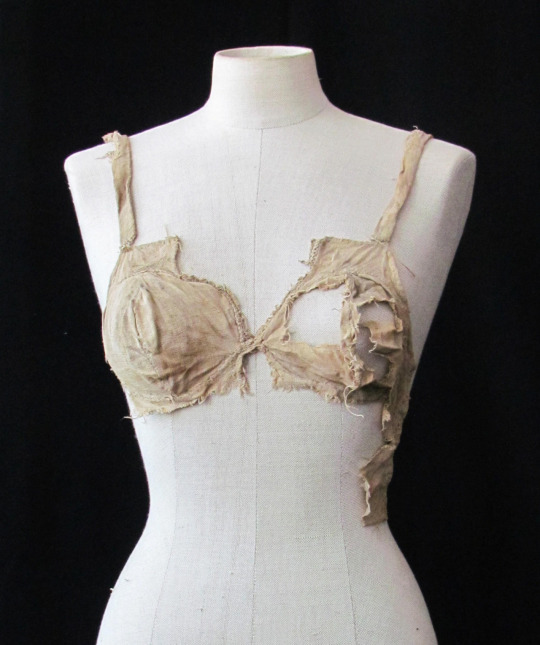
There’s also this bra like fragment found in Austria, but that is a whole debate so.
[Image ID: A bra-like garment fitted to a mannequin. It seems to be made out of white linen, coloured with time. The left cup is damaged, and overall the garment looks incomplete. End ID]
Then, over the shift, yet under your main dress went your pockets, which tied on at the waist. Your dresses had slits do that you could get at your stuff without flashing everyone lol.
[Image ID: A picture of medieval pockets. They are upside down teardrop shaped, but the point is flat and is part of the waist ties. There are slits in the side up the top to access the inside. They are cream coloured with bright floral embroidery. The caption reads “these bad boys can fit so many cool pebbles.” End ID]
[Image ID: A young female-presenting person wearing medieval clothing. She has her hands in the pocket slits of her dress. They are just below hip height. End ID]
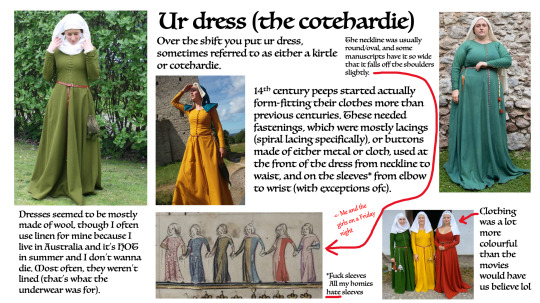
Third slide: your dress, or the cotehardie. (Pronounced coat hardy)
Over the shift you put your dress, sometimes referred to as either a kirtle or cotehardie. 14th century people started actually form-fitting their clothes more than previous centuries. These needed fastenings, which were mostly lacings (spiral lacings specifically), or buttons made of either metal or cloth, used at the front of the dress from neckline to waist, and on the sleeves from elbow to wrist, with exceptions of course.
(Sidenote: fuck sleeves, all my homies hate sleeves)
[Image ID: a woman in a warm yellow dress to the left of the text. The dress is constructed simply, with a single piece of fabric used for the length of the body so there is no waist seam. The skirt is widened by inserting four triangles, one each at the front and back, and one on each side. The front has buttons made of the same fabric as the dress, that go down to the belt at the waist. The sleeves have similar buttons from wrist to elbow, on the outside of the arm. The woman is also wearing a liripipe hood. End ID]
Dresses seemed to be mostly wool, though I often use linen for mine because I live in Australia and it’s hot in summer and I don’t want to die. Most often they weren’t lined (that is what the underwear was for).
[Image ID: in the top left of the slide is a woman wearing a green woollen dress. It is constructed the same as the previous image, except it has spiral lacing on the front instead of buttons. The sleeves are fastened by three small buttons. She is wearing a simple and veil. End ID]
[Image ID: the top right of the slide shows a woman in a teal coloured dress, similar to the one before. This one has metal buttons at the sleeves and down the front. She wears a veil only. End ID]
The neckline of these dresses was usually round or an oval shape, and some manuscripts have it so wide that it falls off the shoulders slightly.
[Image ID: A photo of a medieval manuscript, depicting six medieval ladies in a row holding hands. The neckline of their dresses is wide enough that the tops of their shoulders are visible. The image is captioned “me and the girls on a Friday night”. End ID]
Clothing was a lot more colourful than the movies would have us believe lol.
[Image ID: Three women, each in dresses similar to the ones before. To the left is a forest green, the middle one is bright saffron yellow, and the one to the right is a vibrant tomato red. End ID].
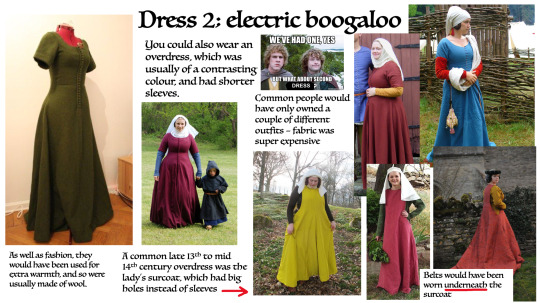
Fourth slide: Dress two; electric boogaloo
[Image ID: Merry and Pippin from lord of the rings. Above them, meme text reads “we’ve had one, yes”, and then continues below with “but what about second dress?”. End ID]
You could also wear an overdress, which was usually of a contrasting colour and had shorter sleeves.
As well as fashion, they would have been used for extra warmth, and so were usually made of wool.
[Image ID: a woman in a maroon coloured dress like the ones on the previous slide. The sleeves stop just above her elbow, revealing a blue dress underneath. End ID].
Common people would have only owned a couple of different outfits, as fabric was super expensive.
[Image ID: various pictures of women with examples of an overdress. They are all constructed the same as the overdress, but with shorter sleeves that reveal a second sleeve of a different colour underneath. End ID]
A common late thirteenth to mid fourteenth century overdress was the ladies surcoat, which had big holes instead of sleeves.
Belts would have been worn underneath the surcoat.
[Image ID: three photos of women wearing surcoats. They are normal dresses, except there is a large D shape cut out of either side, leaving a large hole from the shoulder to below the hip. They have no buttons down the front. One of the surcoats is made of red brocade, and obviously belongs to an upper-class impression. End ID].
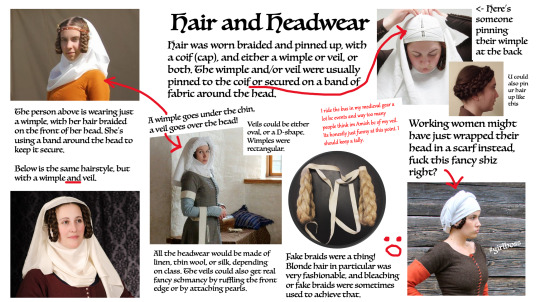
Fifth slide: Hair and headwear
Hair was worn braided and pinned up, with a coif (cap) and either a wimple or veil, or both. The wimple and/or veil were usually pinned to the coif, or secured on a band of fabric around the head.
Veils would be either oval, or a D shape. Wimples were rectangular. A wimple goes under the chin and a veil goes over your head.
[Image ID: a close up of a woman wearing a wimple. It is made of a light fabric, likely silk. The wimple wraps under her chin and is secured at the back of her head. A narrow band of fabric or possibly leather circles her brow, which would have been used to secure the wimple. End ID.]
[Image ID: A picture of YouTuber Morgan Donner wearing a wimple and veil. The wimple wraps under her chin, and the veil is placed on top of her head, draping down past her shoulders. It does not cover her face. Loops of hair are visible either side of her face. End ID]
All the headwear would be made of linen, thin wool, or silk, depending on class. The veils could also be made really fancy by ruffling the front edge or by attaching pearls.
[Image ID: a woman in a wimple and half-circle veil. The edge of the veil that frames her face is elaborately ruffled. The edge of a coif is visible under the veil. End ID]
I ride the bus in my medieval gear a lot because of events, and way too many people think I’m Amish because of my veil. It’s honestly just funny at this point. I should keep a tally.
[Image ID: a woman wearing a St Birgitta’s coif, pinning a wimple at the back of her head. The coif is a simple white linen cap that encloses the head, with a line of lace down the centre of the head. It is secured with a loop of linen around the head. End ID].
[Image ID: a picture of someone with plaits that have been pinned around the head like a crown. It is captioned “you could also pin your hair up like this”. End ID]
Working women might have just wrapped their head in a scarf instead, fuck this fancy shit right?
[Image ID: a woman in a headscarf that has been twisted and then looped around the front of her head. It is captioned #girlboss. End ID].
Fake braids were a thing! Blonde hair in particular was very fashionable, and bleaching or fake braids were sometimes used to achieve that.
[Image ID: two fake braids made of a coarse fibre. They are blonde in colour, and are looped like a hairstyle seen on many of the reenactors. They have white ribbons attached to the top end to help secure them to the head. End ID]
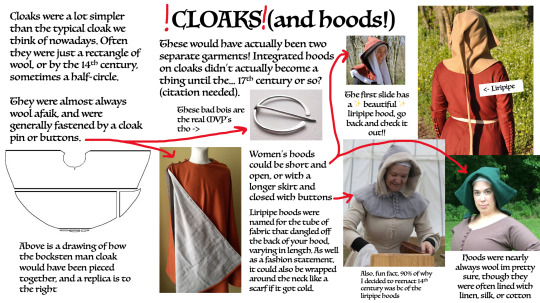
Sixth slide: Cloaks and hoods
These would have actually been two seperate garments! Integrated hoods on cloaks didn’t actually become a thing until the … seventeenth century or so? (Citation needed).
Cloaks were a lot simpler than the typical cloak we think of nowadays. Often they were just a rectangle of wool, or by the fourteenth century, sometimes a half circle.
They were almost always wool as far as I know, and were generally fastened by a cloak pin or buttons.
[Image ID: a metal cloak pin. It is a circle with a small opening at one point. A long pin is attached via a loop, allowing it to slide along the pin. It can fit through the opening in the circle. To use one, you would gather the fabric on the pin, and then slot the circle over the pin and then turn it, so the fabric is trapped between circle and pin. This is much easier to demonstrate than describe. The picture is captioned “these bad boys are the real MVP’s though”. End ID].
[Image ID: a diagram showing the construction of the bocksten man cloak. It is a half circle pieced together by laying strips of fabric together. In the centre of the flat side, a half circle is cut out for the neck. End ID]
[Image ID: a reconstruction of the bocksten man cloak. It is orange wool, and lined with an off-white linen. It is fastened on the right shoulder by three fabric buttons. It would fall to just above the wearers knees. End ID].
Women’s hoods could be short and open, or with a longer skirt and closed with buttons. Liripipe (pronounced leery-pipe) hoods were named for the tube of fabric that dangled off the back of your hood, varying in length. As well as a fashion statement, it could also be wrapped around the neck like a scarf if it got cold.
Hoods were nearly always wool I’m pretty sure, though they were often lined with linen, silk, or cotton.
[General description: a short liripipe hood would be open, with the bottom only reaching your shoulders. They were made from a single piece of fabric that would wrap over your head, with the seam down the centre back of your head. It was flared at the bottom by inserting triangular gores. At the front edge near your face there would be a strip jutting out that went from one side of your chin, over your head, and down to the other side. This would usually be folded back, revealing the lining colour. The bottom of the hood could either just reach the base of your neck, or reach down to just past your shoulders. The former would usually be open at the front, with fastenings optional. The latter option with the longer skirt was almost always able to be fastened up the front with fabric buttons. The liripipe itself was a thin flat tube of fabric fastened at the centre top back of the hood. End ID]
Fun fact, 90% of why I decided to reenact the fourteenth century specifically was because of liripipe hoods.
Seventh slide: Feet (not in a weird way)
Hose were used to keep your legs warm. For women they were usually knee height, and fastened just underneath it with a garter or tie.
[Image ID: a single light yellow hose, belted beneath the knee with a leather garter. The seam is down the centre back of the leg going all the way to your toes, and then around the top of the foot in front of where it connects to your leg. End ID]
Hose usually would have been made from wool, and were cut on the diagonal (bias) of the fabric to get the maximum stretch possible from the fabric. They still were looser than modern tights are though!
Knitted socks were also a thing I’m pretty sure, but I don’t know enough about them. Sorry!
Shoes were simple, usually referred to as turnshoes because of how they were made. Fun fact: the lack of foot support means that turnshoes are similar to going barefoot in terms of how you walk. Some reenactors love it, some hate it, and some are indifferent lol.
[Image ID: a pair of turnshoes made of dark leather. They have a strap that would fasten around the front of the ankle, similar to some modern shoes. The toes are pointed, and it is captioned “pointy toes were fashionable, especially for men”. End ID].
Because shoes were really hard to waterproof, (ask me how I know), and didn’t have solid soles, wooden pattens (pronounced pat-tens) were worn to keep you off the ground while outside.
[Image ID: a person wearing a pair of wooden pattens over their shoes, standing on a drenched cobblestone street. They are wooden platforms with an archway on the bottom, and are attached to the foot with leather straps around the toe, ankle, and around the back of the heel, similar to modern sandals. The image is captioned “ye old crocs”. End ID].
[Image ID: a woman’s leg with the skirts drawn back, revealing the bright yellow hose underneath. It is fastened below the knee with a strip of fabric. She wears a turnshoe with a buckled strap. End ID]
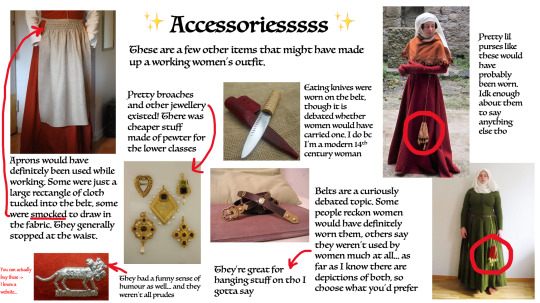
Eighth slide: Accessories
These are a few other items that might have made up a working woman’s outfit.
Aprons would definitely have been used while working. One were just a large rectangle of cloth tucked into the belt, some were smocked to draw in the fabric. They generally stopped at the waist.
[Image ID: a woman in a red dress, with a very light brown apron. It is smocked at the top, and is attached around the waist with a string. End ID].
Pretty broaches and other jewellery existed! There was cheaper stuff made of pewter for the lower classes.
[Image ID: five gold brooches, studded with different jewels and pearls. End ID].
They had a funny sense of humour as well… and they weren’t all prudes.
[Image ID: a pewter broach of a cat carrying a dick and balls in its mouth. It is captioned “you can actually buy these. I know a website.” End ID].
Eating knives were worn on the belt, though it is debated whether women would have carried one. I do because I’m a modern fourteenth century woman.
[Image ID: a small knife with a wooden handle, laying on top of a leather sheath that has been dyed red. End ID]
Belts are a curiously debated topic. Some people reckon that women would have definitely worn them, others say they they weren’t used by women much at all. As far as I know there are depictions of both, so choose what you’d prefer. They are great for hanging stuff on I gotta say.
[Image ID: a coiled up brown leather belt. The buckle and tip are a gold metal, and it has decorative flower studs along its length in the same metal. End ID]
Pretty little purses would have probably been worn. I don’t know enough about them to say anything else though.
[Image ID: two different pictures of reenactors wearing purses. One is brocade and the other a red fabric. They are in the shape of an upright triangle, and both have five tassels hanging from the bottom edge. They hang off the belt with long drawstrings. Unrelated to the purses, one of the women is wearing a gorgeous orange liripipe hood, that is embroidered and dagged on the bottom skirt edge. End ID]
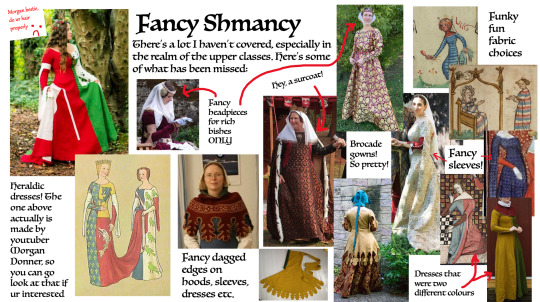
Ninth slide: Fancy Shmancy
There is a lot I haven’t covered, especially in the realm of the upper classes. Here is some of what has been missed. (Buckle up because this section is very image heavy. I will be as concise as possible).
Heraldic dresses! If you are interested, go check out Morgan Donners video on YouTube.
[Image ID: a picture of Morgan Donner in her heraldic dress. One half of the dress is red, and the other is green, except for where it has been cut out by white with an ermine pattern on it. Her hair is unbound and uncovered, except by a small flower crown. It is captioned “Morgan bestie do your hair properly :(“. End ID]
[Image ID: a drawing of two women in heraldic dresses. The first has a blue right half with a yellow printed design. The top left of the dress is yellow with a blue fish, and the bottom left is red with a white fish. Her train is held by the second lady, who’s dress is blue on the right, and white with green birds on the left. End ID].
Fancy headpieces for rich bitches only.
[Image ID: a reenactor doing a high class impression. Her hair is bound up in Pearl studded hair nets on either side of her head like modern earmuffs, with a spiked coronet around her brow. She has a sheer silk wimple on. End ID]
Fancy dagged edged on hoods, sleeves, dresses, etc.
[Dagging description: where the edge has been cut away to make decorative dangly bits. One hood has red leaves around the bottom edge for example, and another just has a pretty geometric pattern. End description].
Brocade gowns! So pretty!
[Image ID: several different pictures of high class ladies wearing brocade gowns of different colours. These are similar to the wool dresses we were looking at earlier, but with longer trains, and often long draping sleeves. There is even a brocade surcoat. End ID]
Fancy sleeves!
[Image ID: examples of different long sleeves. On some, the sleeve is normal until the elbow, and then it falls away to a long strip of fabric that dangles to the ground. Not mentioned on the slide itself is tippets, which was a band of (usually white) fabric just above your elbow, with a thin strip of the same fabric that draped down to the floor. End ID].
Dresses that were two different colours.
[Image ID: examples of dresses that are exactly like the earlier wool dresses, except they are literally half one colour and half another. The manuscript example is a blue and red overdress with fancy sleeves, and the reenactor example is a yellow and green underdress with a red hood. End ID]
And of course, some of the funky fun fabric choices.
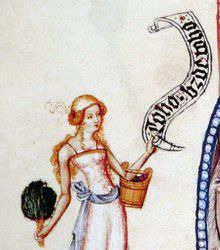
[Image ID: a manuscript depiction of a woman carrying a dead bird. Her hood is red and white striped horizontally, and her dress is dark and light blue striped, also horizontally. End ID].
[Image ID: a manuscript depicting a woman talking to a second lady in a chair. The dress on the first has horizontal stripes of white, red, yellow, and blue, repeated, and the second has horizontal stripes of white, pink, and light blue. Interestingly enough the latter colours are very similar to the transgender flag which would make a very cool dress project. Hmm. End ID].
Tenth (and final) slide: In summery
(Small red text below title reads “I hope you have enjoyed” with a drawn smiling face).
Dis you notice all the “usually” “commonly” and “often’s” in there? That’s because I cannot possibly illustrate everything that we know of the time in only ten slides, nor do I know everything, so I have just tried to show what seems to be the most depicted.
Note: I probably even got some stuff wrong by the way.
If you’re interested in this stuff, I really recommend doing your own research now! Hopefully I have given you a good overview of what a fourteenth century womens outfit might have looked like, so now you can go fourth and know what you’re looking for.
If you have any questions about costuming, reenactment, or anything else, feel free to contact me!! I respond on Timblr decently fast ☺️
[Image ID: a reenactor sitting on a log, staring into the distance with a slight smile. She is wearing a grey-blue dress, belted at the waist with a small purse dangling from it. She has a dark blue cape and a light blue hood, that has fallen back to show a ruffled white veil. There is a pewter broach on her hood. A leather turnshoe peeks out from beneath the hem of her dress. End ID]
A list of helpful YouTubers:
Elin Abrahamsson
Morgan Donner
Opus Elenae
Miss Joss (her instagram is more active).
Now go hydrate!!
[Image ID: a woman in fourteenth century garb drinking from a jug. End ID]
#medieval reenactment#historical reenactment#medieval#medievalcore#medieval aesthetic#14th century#sewing#fashion#clothing#history#historical#sca#i’ll be on my merry way now
18K notes
·
View notes
Text
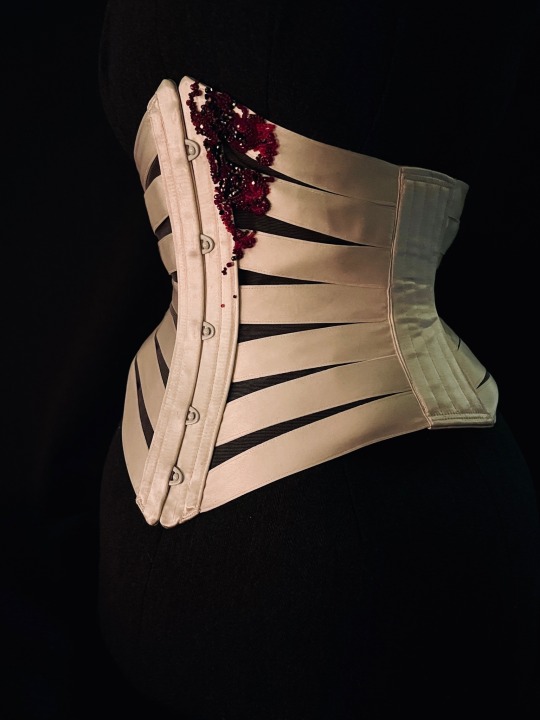
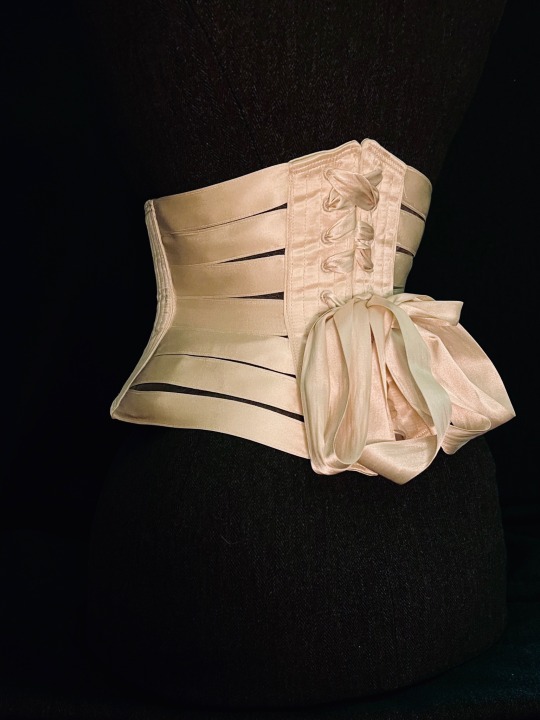
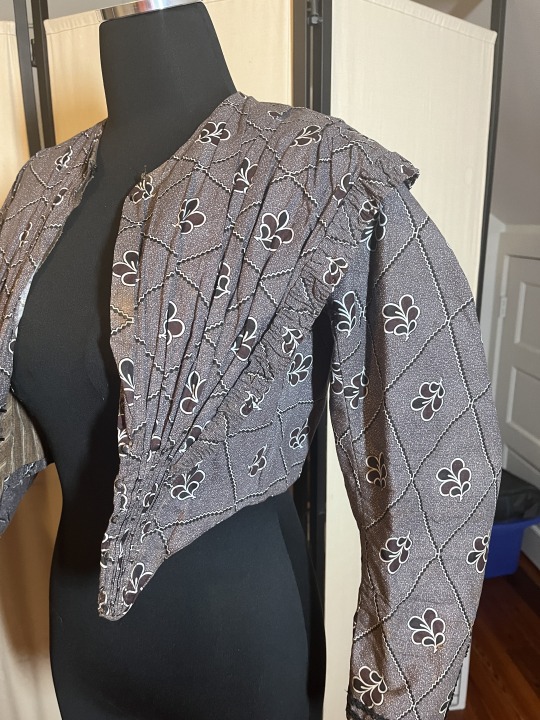
The Saddest Girl In The World
Edwardian-ish ribbon corset with beading, 2023
Silk ribbon, cotton taffeta ribbon, Czech glass beads
#project: crown prince kiriona#project: ribbon corset#project: historical sewing#cosplay#media: the locked tomb#tlt#the locked tomb#historical costume#Edwardian#Nona the ninth#historical sewing#costume#poetry in costume#beading#excuse the iffy lacing I used what I had on hand which is too wide and I didn’t want to unlace Helga#EDIT: upsetti#I captioned it something sensible rather than WHITHER THE HAMBURGER???#there’s time#not sure why this has broken 1000 notes but it is releasing all the brain chemicals
3K notes
·
View notes
Text
Larp shenanigans incoming


#colorful victoriana#historybounding#historical fashion#historical costuming#cosplay#sewing#19th century#afrovictorian
845 notes
·
View notes
Photo
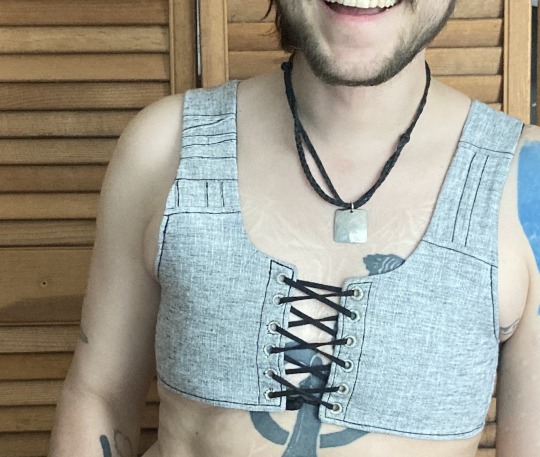
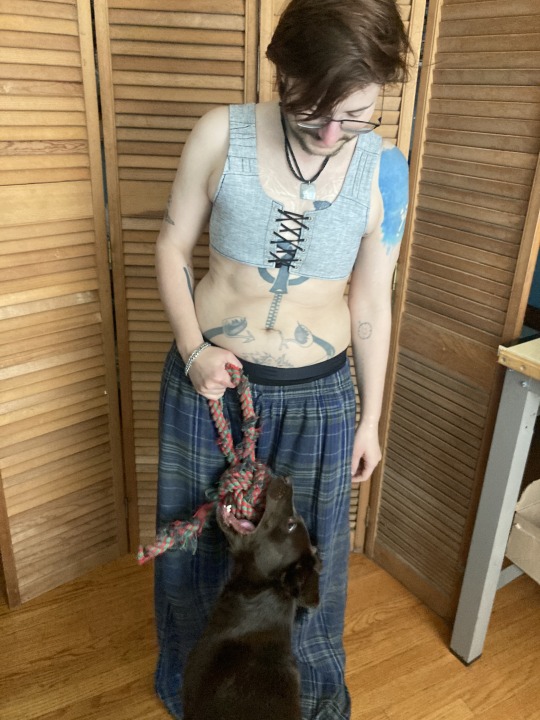
summer binder picture tutorial
this is the third binder ive made for myself recently and the first one i’m writing up. it’s designed to do a few things: 1) allow me to put it on by myself without dislocating my shoulders 2) allow me to breathe well enough to partake in normal activity 3) be cool enough to wear throughout a muggy 90-100F summer 4) not constrict my ribs in a way that aggravates my lack of connective tissue and causes intense pain.
this has become necessary even though i had top surgery many years ago, because when i had it i was extremely skinny and since then i’ve increased in size by about 50%. this has been really fucking good for my health in every single way* except that when my chest is squishy or moves at all it’s So Goddamn Triggering for me. but also since ive had top surgery ive developed and/or been made away of a plethora of chronic conditions that make every single commercially available binding option medically impossible. unbound, my chest is pretty much what you’d expect for a chubby cis guy but venturing out into the world in just a tshirt no longer works for me
*anyone who badmouths weight gain or fat bodies in the notes WILL be blocked
under the cut are a bunch of process pictures and explanations of what they all mean:
first i’ll give you a look at the pieces and measurements:
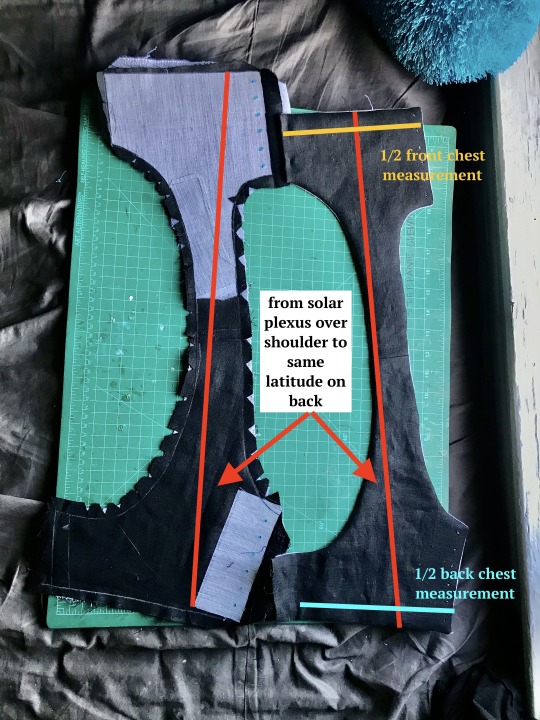
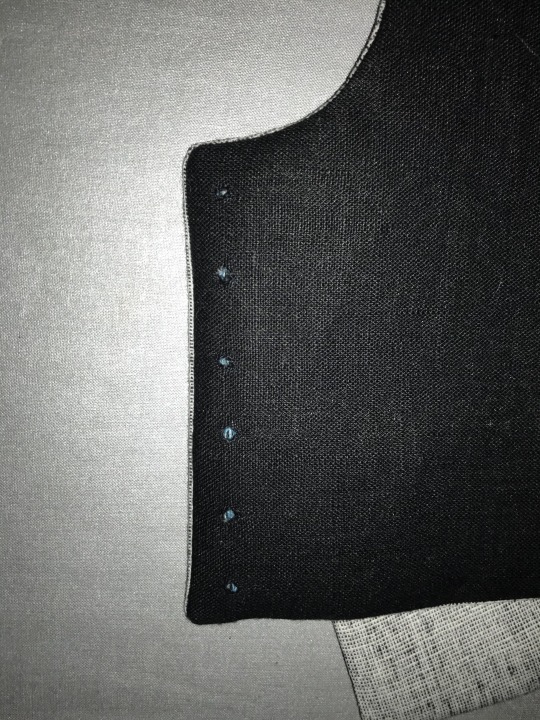
most of the seams are sewn in this picture and one half is turned inside out, allowing you to see both the finished dimensions (right) and the placement of the fusible horsehair canvas that gives this lil scrap of linen any structure at all (left)
to get your chest measurement, you’re gonna have to do some math:
first measure above and below what you want to bind. average these numbers. mine are something like 32 and 34, which average to 33. subtract a few inches--this is to allow the air movement between the laces at center front and back, critical in the summertime. i deleted 3 inches bc i like that number but you can go bigger if you want. the more inches you subtract here, the more youll be able to ratchet all your chest material down later, but at the same time you need to leave enough fabric for a sturdy garment. let’s say a range of 2-6 inches/5-15cm. by taking your measurements this way, you’re essentially measuring the chest you would like to have. that + the horsehair canvas work together to compress any squishy tissue/force anything that doesnt compress up and to the outside (basically into the armpit/lower shoulder--the chest might stick out but it will give a very puffed chest captain america pectoral silhouette)
you can also see how ive clipped my curves and pre-drilled my lacing holes. i used the marlin spike on my knife to open up the holes on the interfacing side, mainly as a way of marking them. this worked well bc the interfacing’s glue kept the linen from raveling
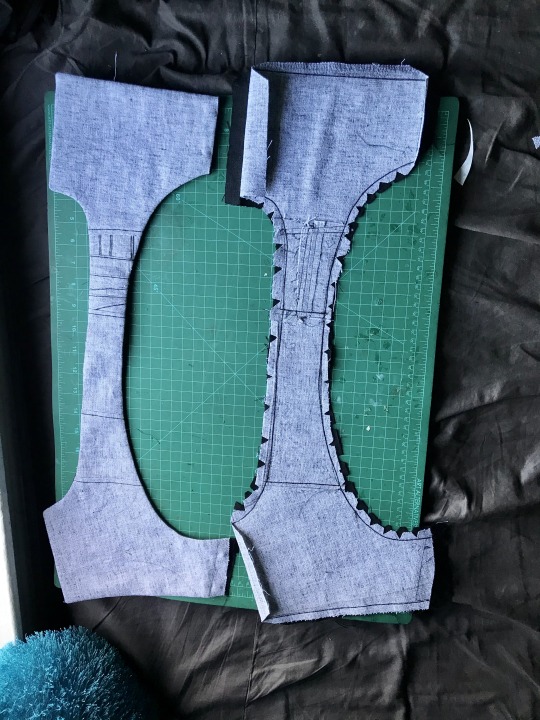
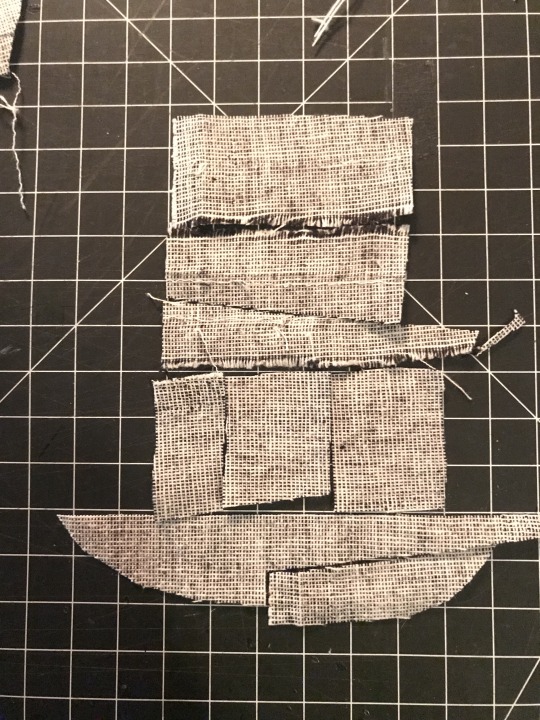
this is the same stage but looking at the non-interfaced grey linen/cotton blend (the black is some 100% linen from my cabbage stash). you can see ive broken the solar-plexus-to-back measurement up into a bunch of pieces to save on fabric but that’s not necessary. my original pattern was just two pieces (front and back) and chopping the straps into thirds on both sides was aesthetic
in the following picture you can really see how this is really just overgrown regency stays:
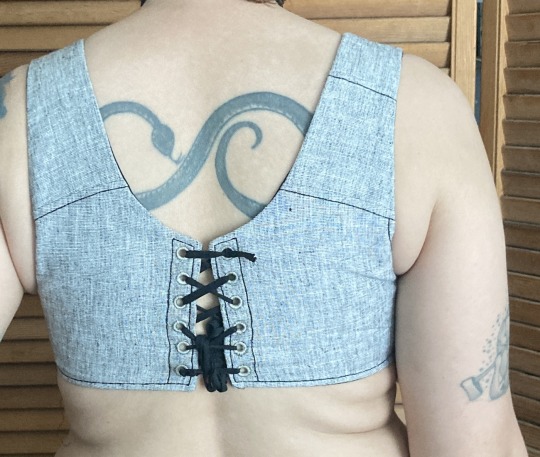
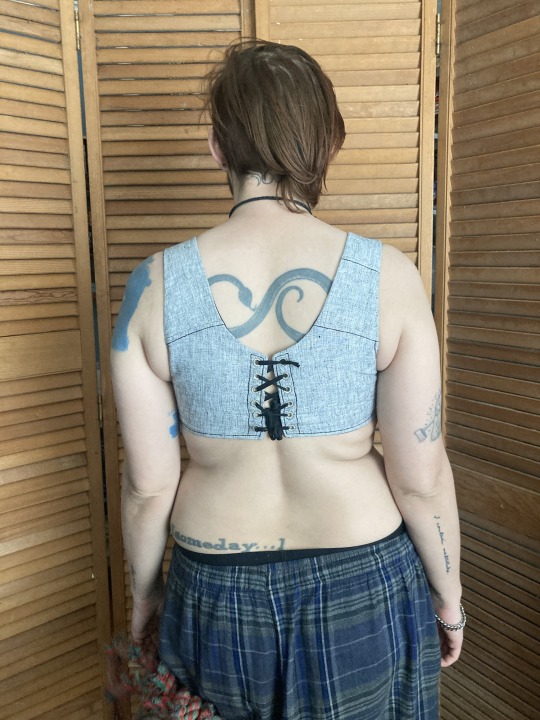
i thought about doing side lacing but didn’t think that would be comfortable for me. on the front, the side seam allowance was pressed inwards before turning to create a finished looking slot. on the back the side seam is left unfinished with an extra wide seam allowance, and is inserted into that slot.
here’s a closeup on it pinned in place (you can adjust the angle of the side seam and the fit during this pinning stage):
that side seam was just topstitched in place once i had the fit how i liked it, and the armhole was reinforced with more topstitching
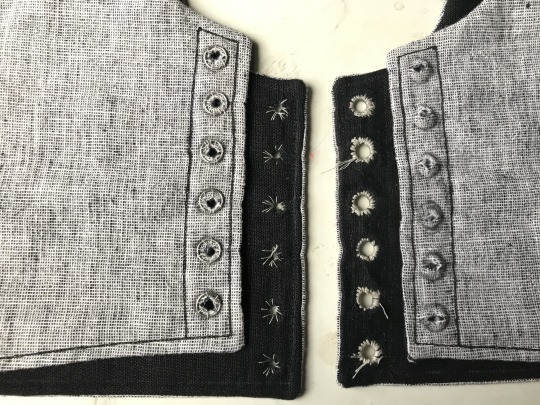
alright, time for eyelets: first, you can see how well the marking worked:
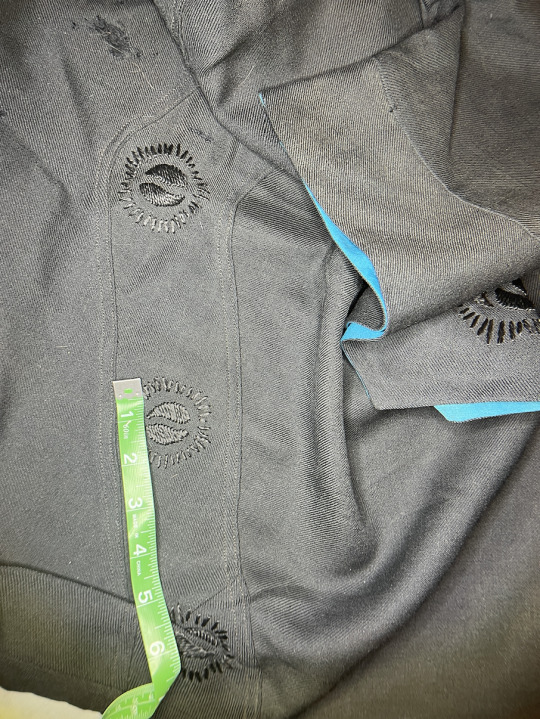
next, two rows of basted eyelets (left), one row of eyelets sewn with a doubled and waxed cotton thread (center right), and one row of eyelets opened and stainless steel rings placed (right).
next time i’m going to mark the eyelets same as i did above, but do this step differently--i’ll mark and baste the steel rings in place BEFORE widening the eyelets. this is bc i had a lot of problems keeping the eyelets on center
eyelets half done on this one! on the left are eyelets sewn with doubled and waxed cotton thread and on the right eyelets sewn with quadrupled and waxed thread. the center is basting again. i was able to force the holes back in line while sewing the eyelets but it was kinda annoying. adding a second picture that doesnt have great focus but hopefully shows how that process worked and shows the spike clearly
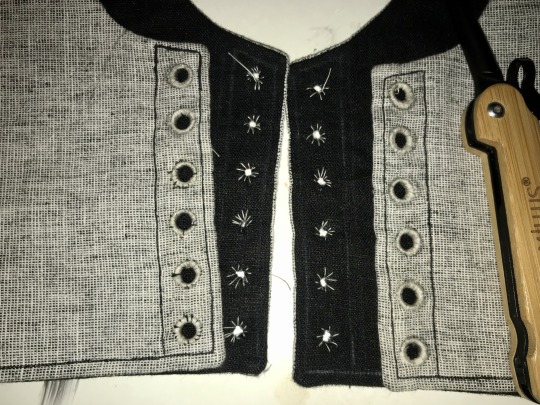

i ended up using this white cotton thread because it’s stronger than my black cotton thread (which the rest of it is sewn with). [eta: after this was first posted, i pressed the whole thing heavily, which effectively de-waxed the thread, and i dyed the whole thing a medium charcoal grey, the thread blends in perfectly on the lighter side and isn’t such a sore thumb on the darker side]
bonus: the piecing layout for that little piece of strap. the whole light gray half of the binder was made from 1/2 of one of the legs i cut off some linen suit pants to make slutty camping shorts last year and i really really didn’t want to break into any of the other three halves for this garment--i have Plans for it
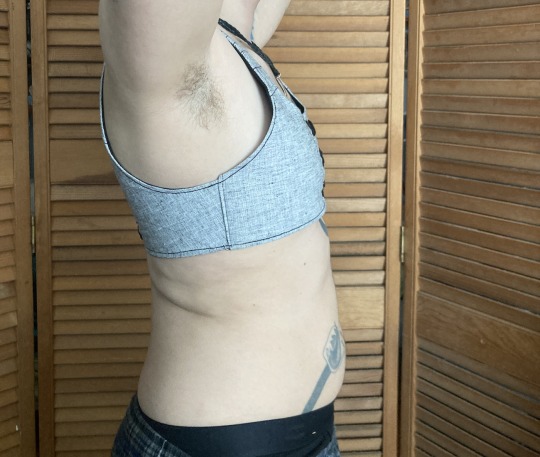
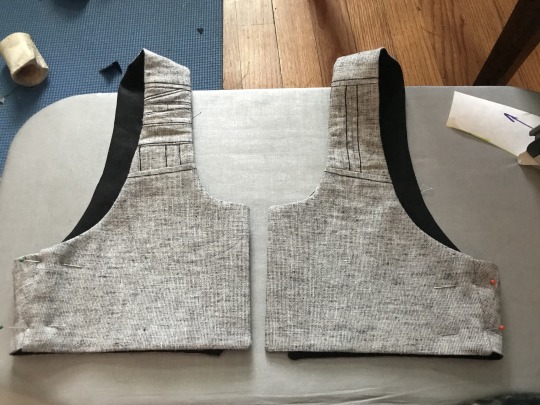
overall the fit of this is incredible. it DOESNT hurt my ribs which every zip-up garment ive been able to find (and it is difficult) does due to really thick elastic at the base. it doesnt aggravate my sensory issues with the synthetic fibers that every commercial option is made of. i can walk up a hill or stairs, or go to pt, without getting too out of breath. i can eat with it tight, or loosen the front easily and without taking it off to make eating easier and less nausea-inducing. it is reversible!
best of all the lacing at the back gives the garment enough movement for me to get it on without dislocating, and the interfacing and steel rings give it structure once it’s on. the shaping comes only from fusible horsehair linen canvas and stainless steel rings like youd use for chainmail, there’s no boning at all, which makes it very quick to sew (except the eyelets, but metal grommets would be sturdy and quick provided theyre of good quality)
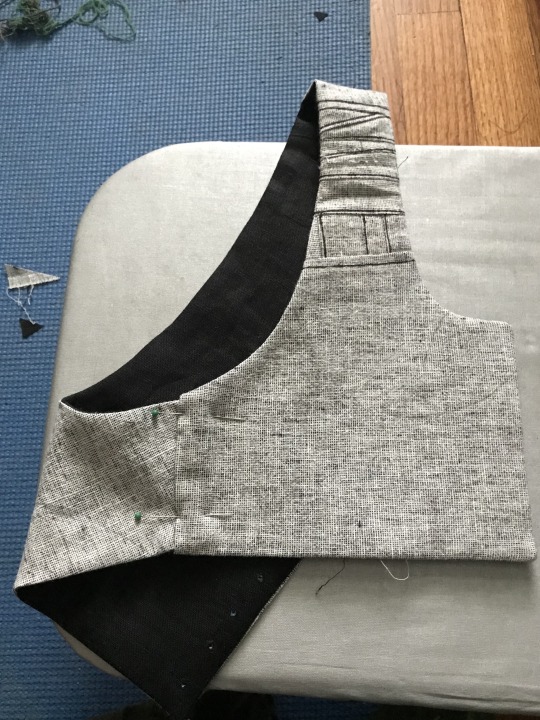
there’s a small amount of gaping on the outside of the shoulder strap, which i plan on fixing with a tiny tiny dart in the armpit, i want to add pockets to tuck the laces into, and i need a better lace for the back, but it’s completely wearable in time for the 90 weather next week which is all i wanted. i’ll do a reblog when it’s perfectly finished with an update on the fit but for now it is done enough
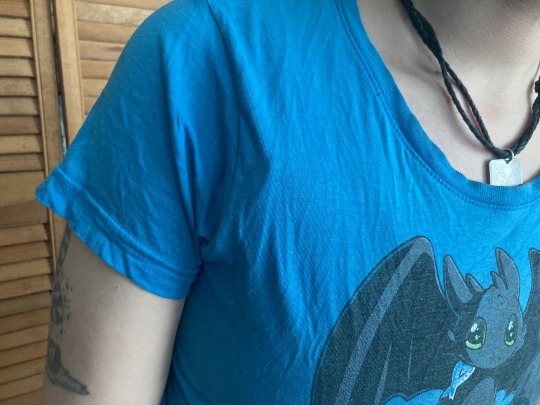
the little ridge where it doesnt lay flat against the shoulder is most visible with just a single t shirt over it. with a flannel or a sweater, it disappears, and by itself, it’s hidden in movement
eta: after dyeing this, i relaced it a bit looser in the back and that gape mainly disappeared. ive decided to leave it in instead of smoothing it with a dart because the loose fabric gives space for my chest to expand when breathing and shapes my silhouette in a way that emphasizes my shoulders
#sewing#trans#trans man#binding#body shaping#cotton#disability accommodations#physical#sensory#eyelets#fusible interfacing#historical fashion#regency#horsehair canvas#lacing#linen#lining#new build#drafted pattern#picture tutorial#piecing is contemporary too#stainless steel#stashbusting#stays#structured garment#treadle machine
1K notes
·
View notes
Text
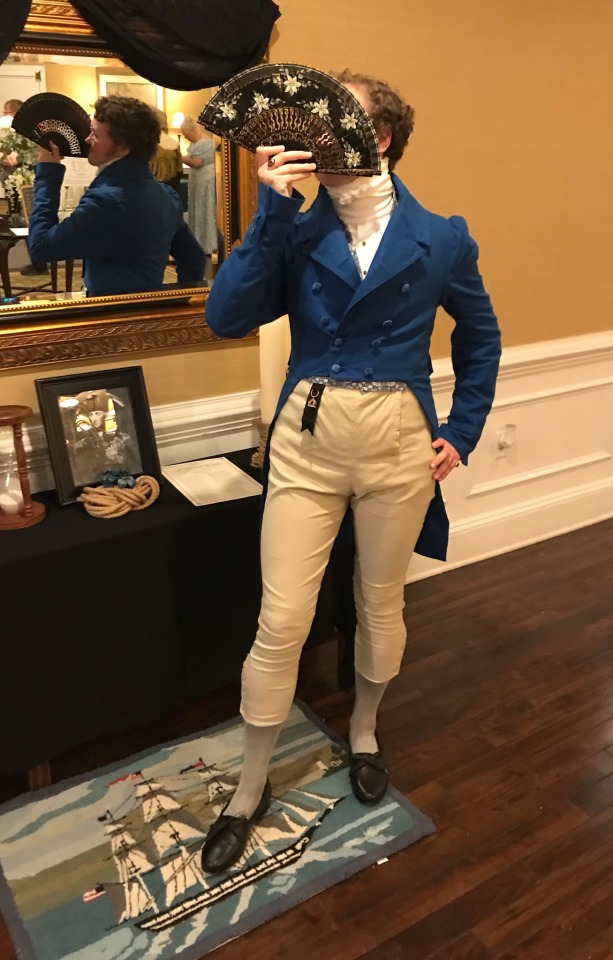
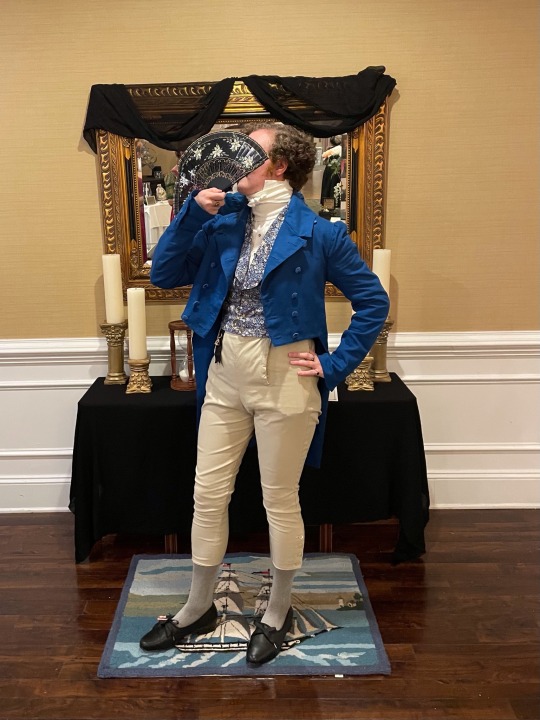

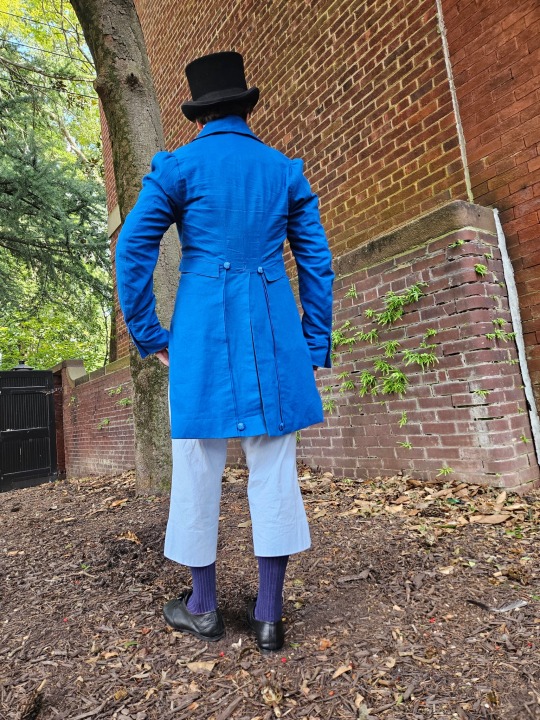
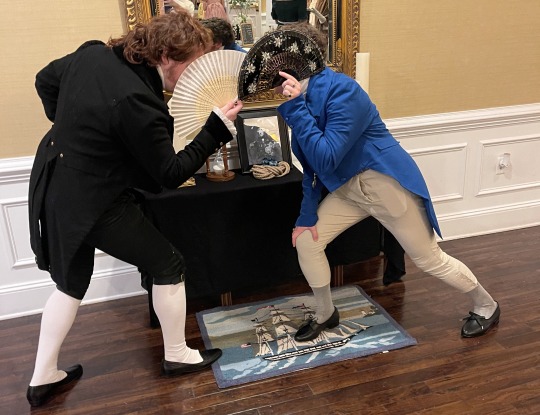
I spent quite a long time on this tailcoat and have gotten very busy without time to work on other projects, so I will dedicate a post to it.
Firstly big thank you to @vinceaddams for his deaths head button video which I used to make mine as well as links for making buckram!
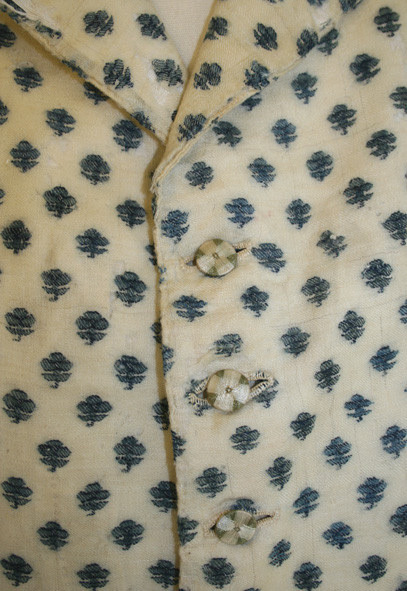
Deaths head buttons weren’t really as popular any more by the regency period, but they still had Thread wrapped buttons for coats as well as one vest example I found for.


I made the buckram from scratch using linen I got at a second hand store and glue.
Decorative interior stitching was based directly off an 1830s tailcoat at the MET.


I used silk thread for all of the visible stitches, and it was like butter to hand-sew with. 100m/110 yds was more than enough for that as well.
(You can see the mutton chops I did :] )
#historical fashion#regency#1820s’ men’s fashion#menswear#regency men’s fashion#sewing#my post#fashion#regency fashion
427 notes
·
View notes
Note
This is kind of random, but would it have been a struggle for a big busted women to wear fashionable silhouettes in the medieval era? I’ve heard some costume historians discuss that there were forms of bust support, but most of what I’ve seen pre-1500s seems like it would have been a nightmare for any ancestor with a similar bodytype to wear. Am I just from a line of women doomed to horrible back pain? (On the flip side of the situation, I’ve found corsets and stays to be rather comfortable, so that’s not a problem)
As a fellow big boob haver, I have good news for you! There were pretty good Medieval bust supporting garments and I have tested one of them.
With sturdy fabric, tailoring and lacing you can create pretty good bust support. Lacing was popularized first in 12th century in form of bliaut, and in 14th century tailoring became standard for everyday garments. I don't know how well bliaut supported the bust, but since it doesn't fit super snugly, I assume it doesn't distribute the weight of the boobs as well as tailored supporting garments and therefore isn't as supportive. I'm also not actually sure if there was proper bust supporting garments before that, I haven't looked into it. I know Romans bound their breasts with cloth wrapped around the chest, so maybe that technique continued (at least for those who especially needed it) till lacing and tailoring became a thing. For more about how supporting garments developed in Europe through history, I have a post about development of lacing, which coincides pretty well with that history from 12th century forward.
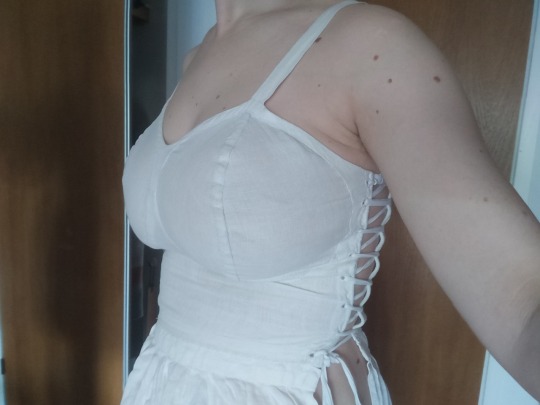
Personally I have experience with Medieval Bathhouse dress, which was used in the Germanic Central-European area roughly in 14th to 16th century. It's called the Bathhouse dress because most depictions of it are from bathhouse settings, but there's depiction also in bed chambers and other contexts, so I think it's pretty safe to assume it was used more generally as an undergarment. It often had separate cups for the boobs (see the only extant garment left of it, the so called "Lengberg Castle Bra"), but not always. Unlike most other undergarments at the time, it was sort of a shift (the lowest layer) and a supporting garment combined into one.
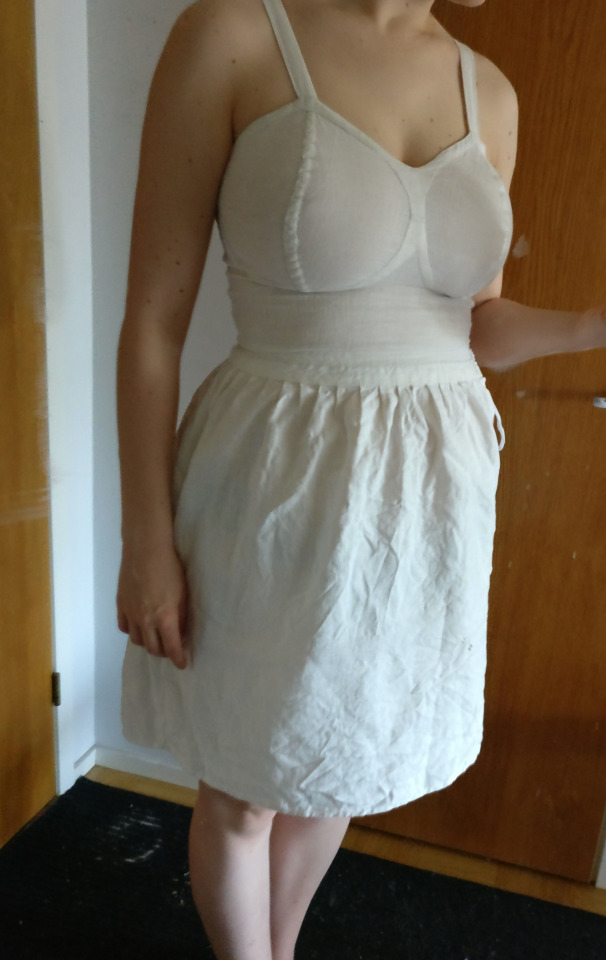
I sewed my own recreation of it (with some alterations because I made it for my everyday use, not as a historical recreation) and did a post about my results, where I go deeper into the history of the garment too. I didn't construct it very well and I did an error in the design of the back, which cause the strain of the shoulder straps to focus too much on very specific spots in the back panel, which eventually made the fabric there break too many times. (There were some other smaller design flaws too, like the waistline is lower than my natural waist so it rose and wrinkled annoyingly.) I did use it daily (except when I washed it) for a fairly long time though and it was super comfortable and helped a lot with back pain (and shoulder pain caused by use of modern bras). I hate that I've had to go back to modern bras because I haven't had the time to remake it yet. (I'll probably make a follow up post once I get around to it, where I go through the issues of the first version and how I addressed them in the next attempt.) Well fitted and shaped bodice which is then laced does surprisingly much even without any additional reinforcements.
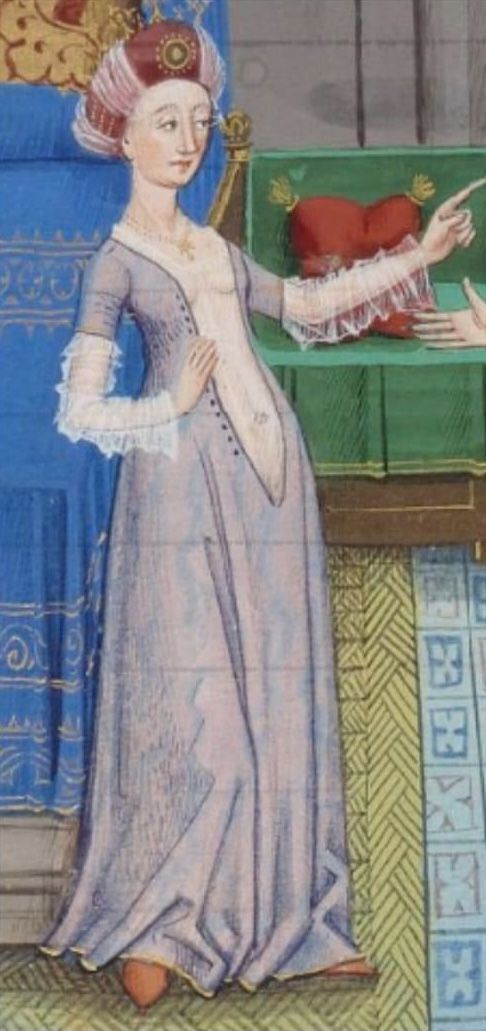
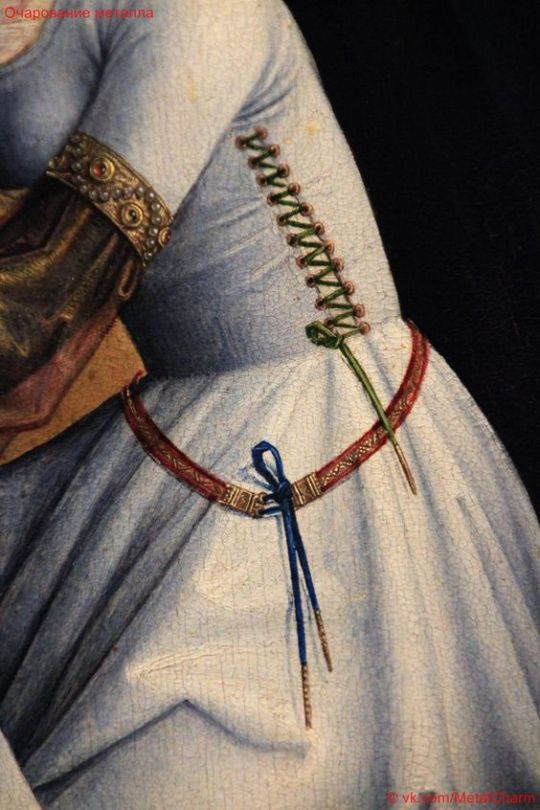
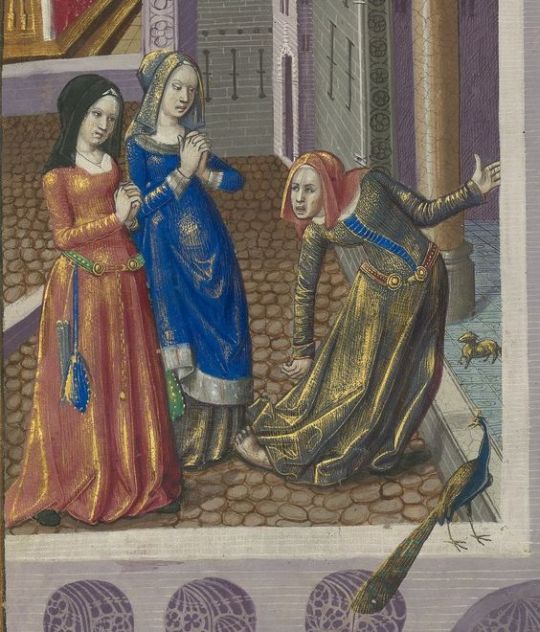
I haven't made a Medieval kirtle (though I will some day), but it was the more widely used Medieval supporting garment, which eventually replaced Bathhouse dress in the area where that was used. Kirtle is worn over a shift, but it broadly works similarly. Kirtles could be front, side or back laced depending on the time period and how the Kirtle was constructed. Multiple layers of kirtles could be used and looser overgarments (like houppelande) were often used on top of it. Kirtle was used by everyone, including men, but for those who didn't need bust support, it's purpose was mainly to create the fashionable silhouette. Here's three depictions of kirtles from 15th century. First unlaced, but has lacing on the front, second close up of the side lacing and third shows nicely how both front and side/backlacing shaped the bust.
Morgan Donner is a costumer, who focuses a lot on Medieval costuming and has a big bust, so while I haven't personally tested the supportiveness of kirtle, she certainly has. The kirtle bodice part needs to be patterned to accommodate the breasts by giving it round shapes and the kirtle needs to be a little too small so there's room to lace it to fit well. Lining also helps to reinforce the fabric and make it more firm and supportive. Here's Morgan's pattern from the tutorial in her website and how the kirtle eventually fits for her. (Also look at the handsome boy in his handsome matching outfit.)
She also has a video relating to the same kirtle project, where she explains her method to pattern a kirtle specifically so it's supportive for big bust.
In 16th century more stiffness was added to kirtles, first with very stiff lining and then with boning, but that doesn't necessarily add to the bust support, rather it just allows the kirtle to shape the bust and the body in general more and better support a heavy skirt. Firm fabric secured snugly with lacing is already very good at distributing the weight of the boobs to the whole torso.
In conclusion, at least since 14th century people with our body type were not doomed to eternal back pain and even before that some ways to help with it were probably used.
#historical fashion#fashion history#dress history#history#historical costuming#historical sewing#sewing#crafts#costuming#fashion#medieval fashion
230 notes
·
View notes
Text
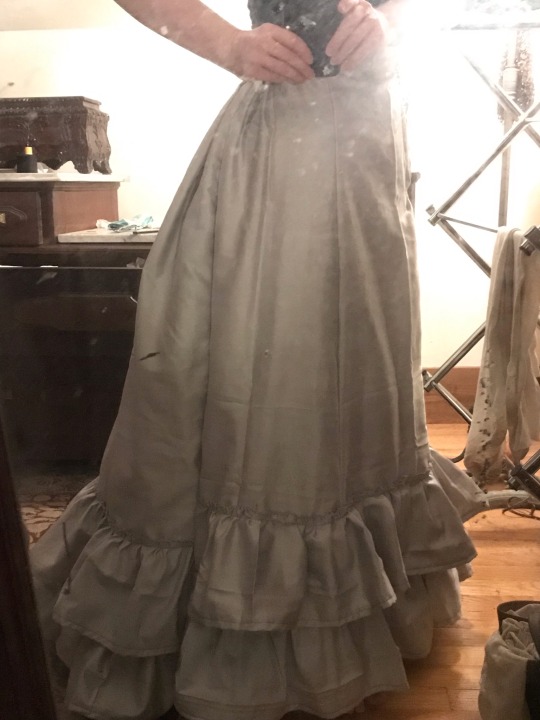
ignore the water spots on the mirror I REMADE MY NATURAL FORM PETTICOAT
HELL YES
NATURAL FORM GOWNS AHOY
#sewing#historical costuming#God I have missed fitting things over a corset#I hate not being able to be a Glove-Fitting Bitch#The joys of being able to craft a silhouette over a comfortable rigid structure
192 notes
·
View notes
Text
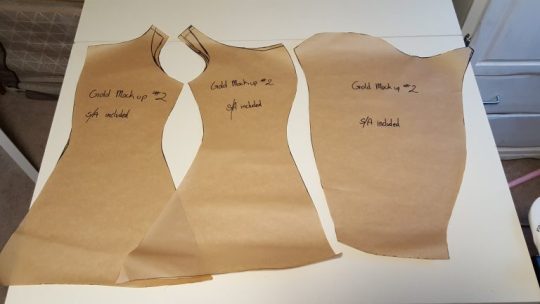
FREE POETSHIRT PATTERN
Some assembly required
Ok so. I made a sewing pattern that involves a lot of maths on the end users part - this is the only way I, a complete pattern making novice, can make this 100% size inclusive. Luckily it’s super simple and it just a whole bunch of rectangles.

Yes it’s written in cm. Bite me.
So to elaborate a bit:
It’s pretty straight forward. You plug in your own measurements in the places it’s needed.
Body x2: should be twice your either shoulder width or your widest point (if you’re more pear shaped you might want to use your hip width) by the length from your shoulder to about mid thigh* (you can make it as long or short as you want. This could probably also work as a shift pattern in a pinch). In one of the pieces, you should cut a slit in the middle, which as shown above should be about from your neck to your sternum.
Sleeves x2: these should be 2-3 times your bicep measure (this will determine the poofiness of the sleeves), by your arm length. Adding a few cm to the length can be a good idea here. I usually just round up to what seems most logical.
Cuffs x4: your wrist measure + 3-4cm of ease, by how ever long you want them - 5-10cm is a good place to start.
Collar x2: your collar measure** by however tall you want your collar. Keep in mind that it will be folded over.
Gussets
Oh glorious gussets. The whole reason this pattern works! But also where it gets a bit mathy
Sleeve gussets: these are square. The diagonal should be about 1/6 of your total armscye (all the way around). Rather a bit too small than too big - it can fuck up the fit (it did for me)
Shoulder gussets: these will depend wholely on how buff your trapezius muscles are. If your neck/shoulder is at a right angle, they’re not strictly necessary, but if you’re super buff, they’re very necessary. I’d say an average shoulder gusset is about 5-7cm, but it’s up to you.
Reinforcements
Again, these aren’t strictly necessary, but if you want your shirt to last it’s a good idea to put them in. You can choose to use between 5 and 10 total. These don’t need to be very big, they just go at any split in the fabric. About 2,5cm is good.
Instructions
I used these videos for assembly instructions
youtube
This is going to be hard without pictures…
youtube
youtube
*you can also keep the body as one piece, which should then be twice the length you want it. The slit at the neck will also have to be cut in the middle of the piece.
**your collar measure is the measurement at your neck going over your collarbone rather than tight to the neck.
299 notes
·
View notes
Text
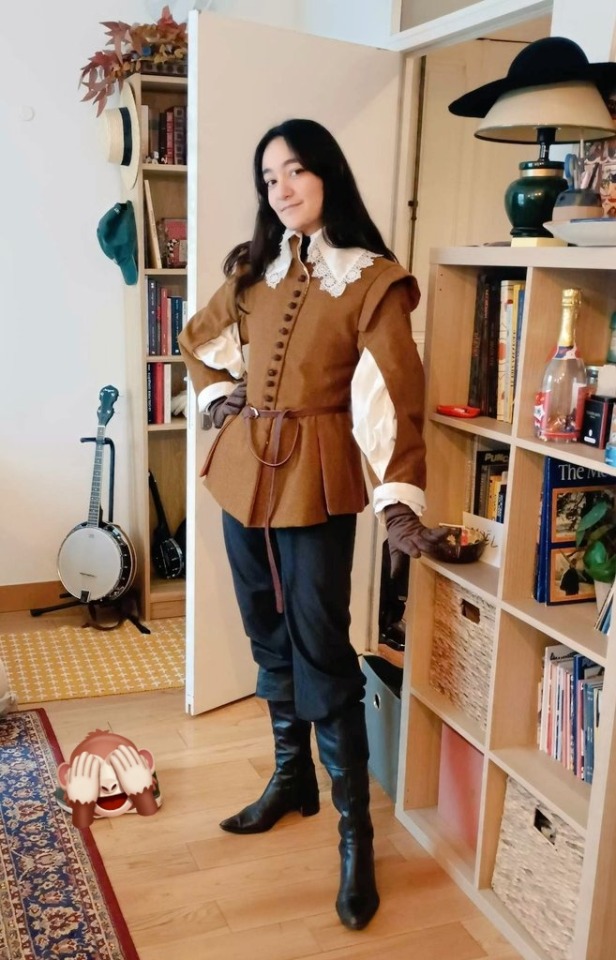
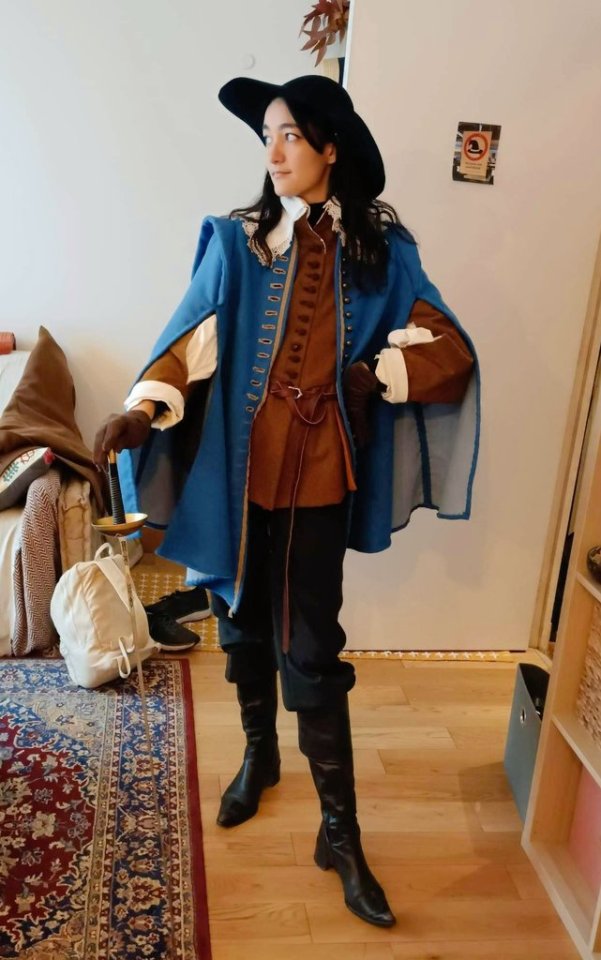
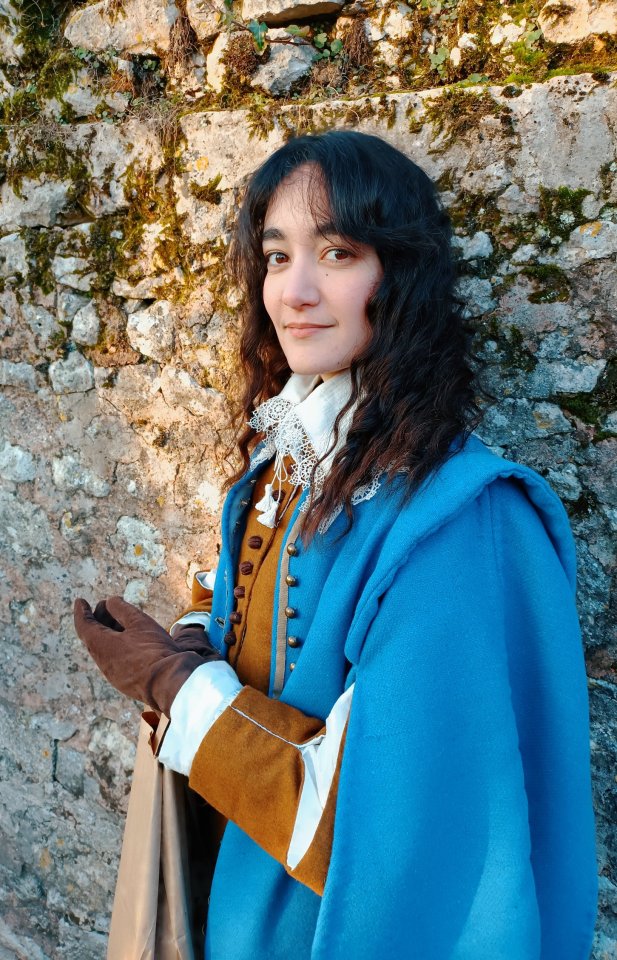
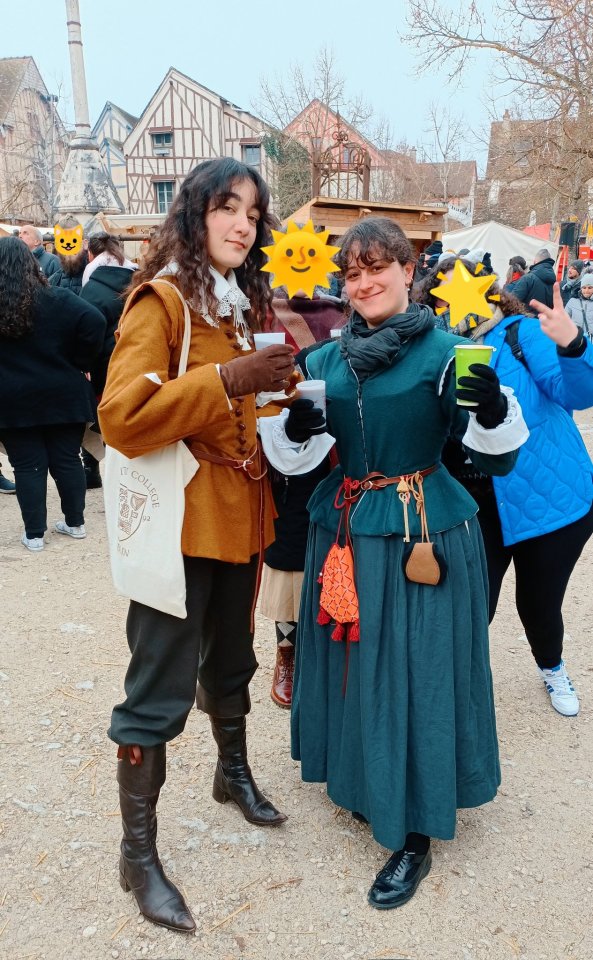
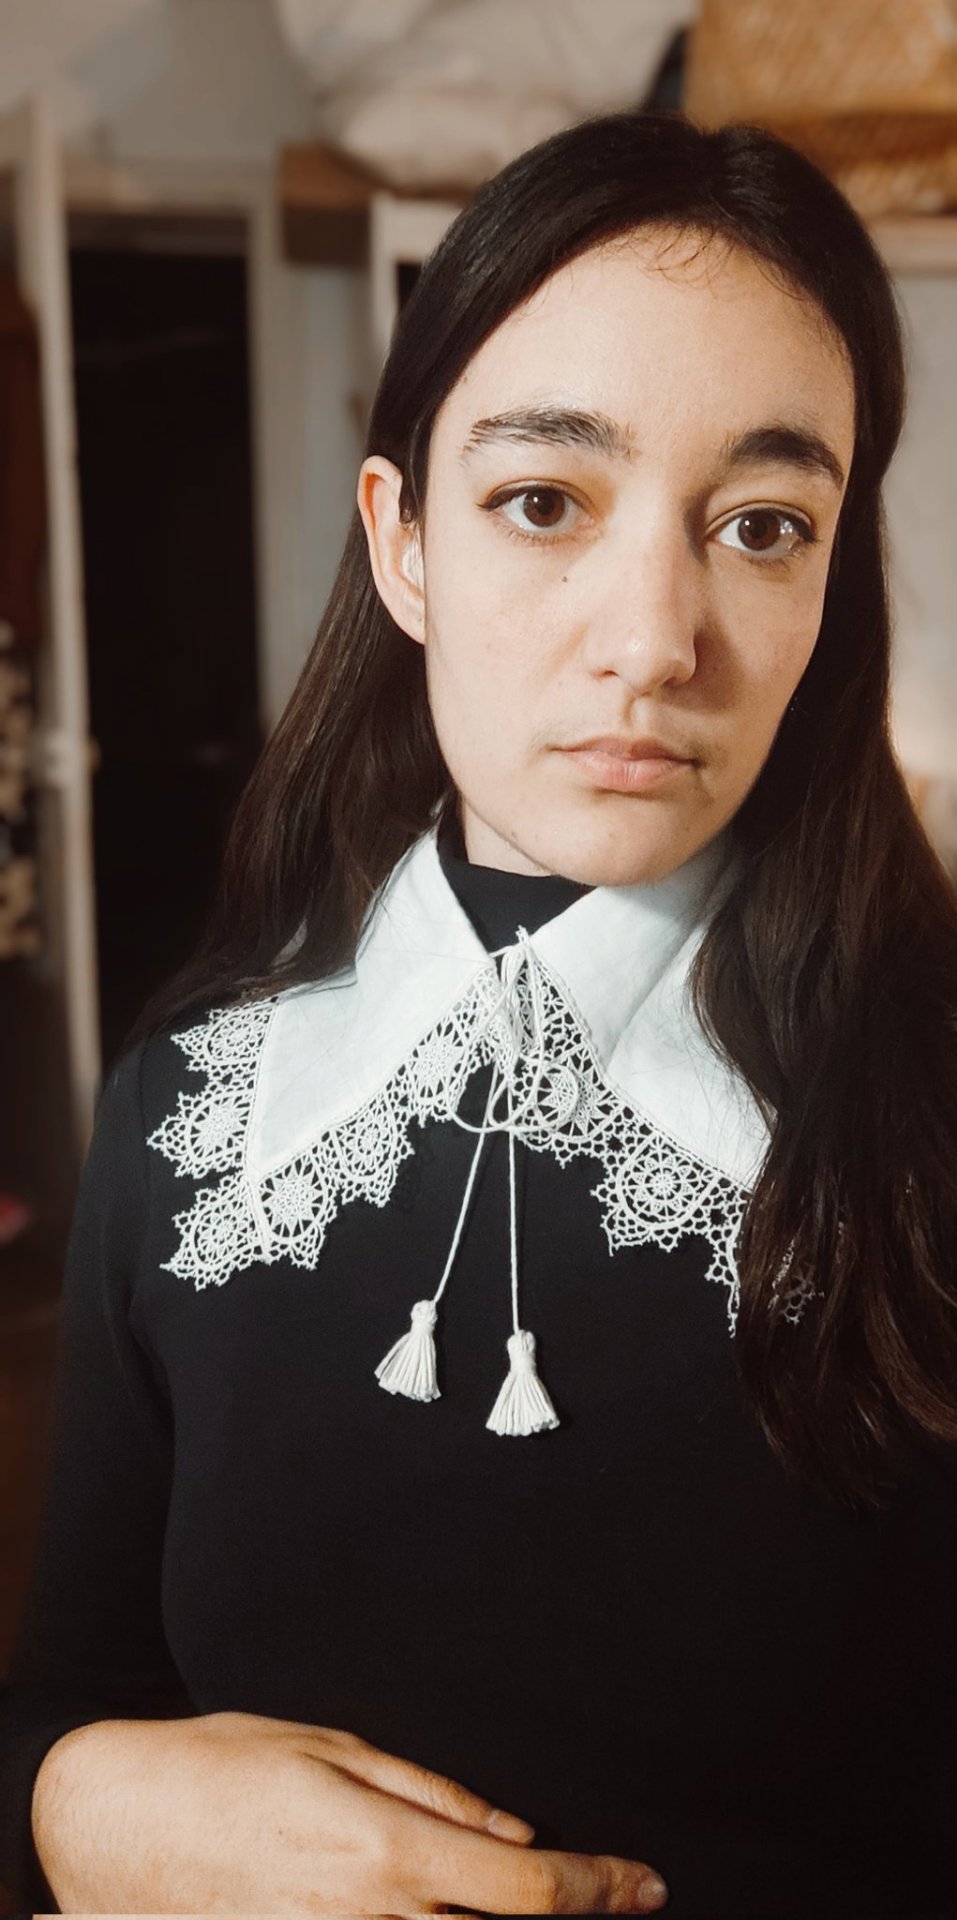
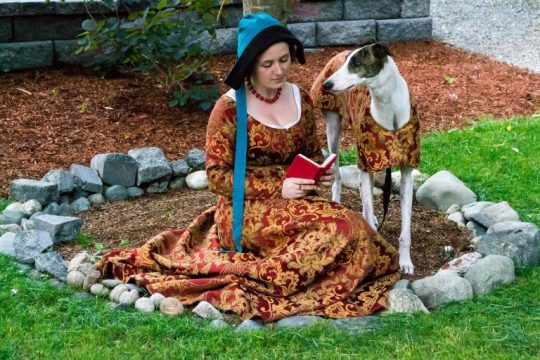
Costume update !! I finally got to wear my 17th century outfit at Provins last weekend. I made the doublet with handmade threaded buttons, the linen shirt, the falling band & tassels, and a very rushed cassock that I'll probably fix or re-make when I have more than a couple of days ahead of me, lol. The lace is from tudor tailor and the boots & pants were thrifted.
I one day I'll find a way to make nice pictures of my costume, too, that'd be nice.
#mine#17th century#historical costuming#cavalier fashion#historical tailoring#sewing#1620s#partner in costume crime is @surikane !#that might be a face reveal for a lot of you lads hehe
7K notes
·
View notes
Text
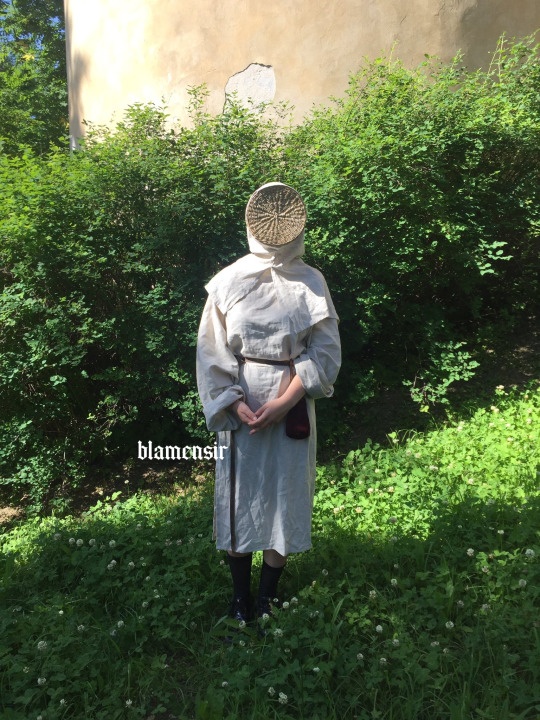

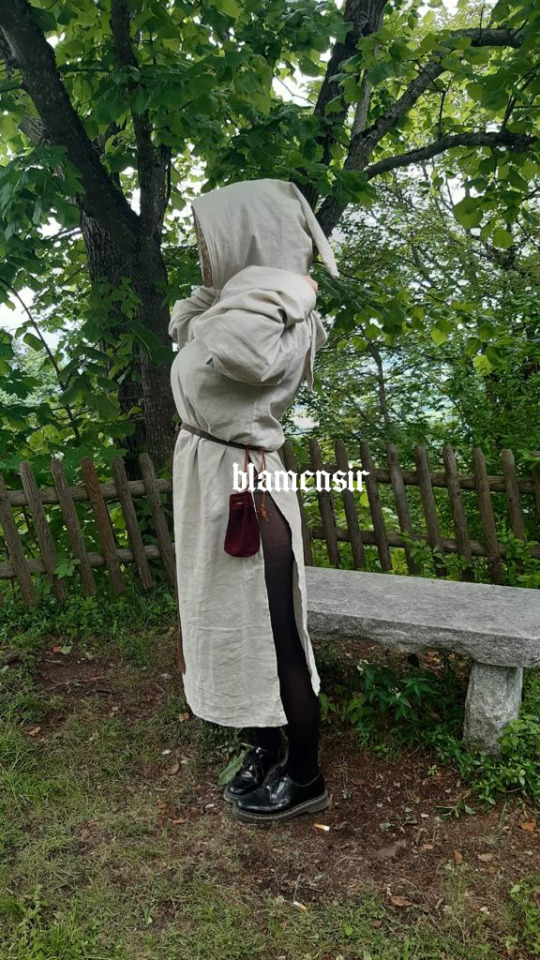
more beekeeper me
#me#beekeeper#medieval beekeeper#my legacy#historical costuming#larp#medieval market#renfaire#renaissance fair#medieval#costuming#sewing#crafts
975 notes
·
View notes
Text

I had to get the image out of my head
(context)
#I love historically accurate Chaos#tl:dr - they both made a shirt (the traditional viking way of proposing) Hiccup is good at sewing. Astrid can't sew for shit.#they both wore the proposal shirt to the wedding#did you know Viking weddings would last for days? imagine Berk partying for a week straight. people would die#vitpost#how to train your dragon#httyd#hiccstrid
311 notes
·
View notes
Text


The past week's work: three digitized patterns from antique garments!
- The 1840s bodice is 34/36" bust - 31" waist (pattern HERE)
- The 1880s is 44" bust - 32" waist (pattern HERE)
- the 1920s dress is 47" bust - 48" waist (pattern HERE)
All three patterns are currently with testers for the next two weeks and after that I will be able to put them up on Etsy!
I have seven other antiques waiting for patterning (and two more on the way) - just have to decide what to work on next....
#historical dress#historical clothing#antique garments#23.4#23.5#21.2#plus-size sewing#plus size patterns
239 notes
·
View notes
Text

Didn’t have my sewing machine in London, so I hand-stitched this tea dress using a 1905 pattern!
#sewing#historical clothing#edwardian#hand sewing#historical costuming#princesscore#royaltycore#light academia
426 notes
·
View notes
Text

Gwendolen took a winter walk through the forest in her brand new coat :)
I've never made a coat before so this was definitely a learning experience but I am very happy with the result!
191 notes
·
View notes
Text
Things are afoot
210 notes
·
View notes
Last Seen Blogs

santarick
Atlanta's Premier Real Bearded Santa
pudgycow
Pudgy Cow

angrygardenpizza
Sem título

naminhakamya
◜♡ 𝒉𝒆𝒂𝒓𝒕 𝒂𝒇𝒍𝒂𝒎𝒆 ◞

ashleysjohnson
@briesidonielarsons