#sewing patterns should be free
Text


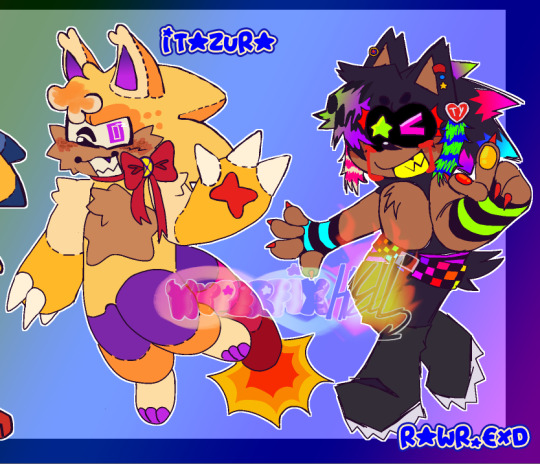

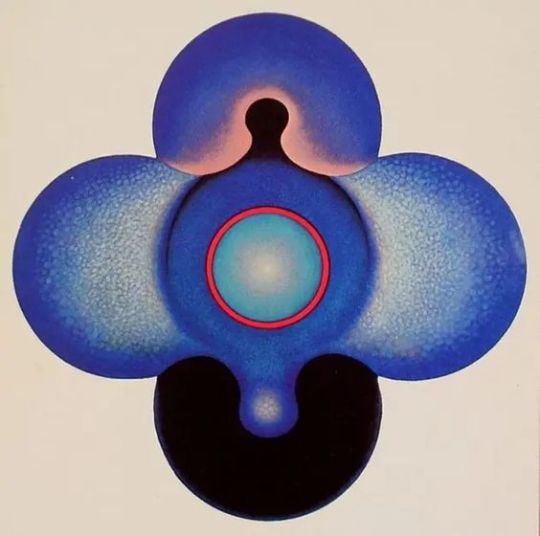
yknow what . i like you . shows you my exe ocs and also gives you little summaries of them underneath the read more cut and in the tags :3 ( desc in alt text 4 the 1st img ! ) - Nicky 🌊
in order:
Rawr.EX3/EXD (any)
imagine sonic.exe + 2010s sparkledog raver culture . that's Rawr. she likes waffles and is a virus exe who lives in a bootleg rom pack of the first 3 sonic games & a sonic crackers prototype
Itazura, Guardian of Mischief (she/they/it/plush)
first ever pc port oc!!! what it says on the tin. secret 8th guardian who loves nothing more than causing problems and playing life-threatening pranks on people. you can tell they're after you if you hear what sounds like jingling bells and giggling around your house in the dead of night. oh and plush's kyofu's kid 👍
Sew (any, no she/her)
amorphous dimension travelling critter that uses sewing / crafting to make it's "skin" , typically based off of pre-existing people in the dimension. saw sonic and his super form and thought he was the COOLEST thing alive, so it chooses to resemble him :]
Sink/Waterhog/Nicky (we use he/it but it doesn't rlly care /ref)
literally just me lol , but from a 3rd person perspective he's a personal take on Mr. DJ's "Sink Sonic" concept . he's like 12-13ish and has way too much lore for me to summarise but fun fact : worldbuilding wise, he's a mish-mosh of the games, the Shogakukan sonic manga and a little bit of sonic x sprinkled in. :3
#scary / weird sonic tag 🩸🌭#sonic.exe#creepypasta#exe community#exe oc#sonic pc port#sink fnf#below the depths#chaos nightmare#scene kid#scenecore#scene oc#fun fact . that sweater i drew sink wearing is NOT the only one he has and every time i draw him he's wearing a different one. always#he never really has the same one on twice in my drawings unless im feeling a vibe and if you ever want to draw him you can also#make up a sweater for him to wear!!! just know he always has on long sleeves so youre free to give him a tshirt layered over a long sleeved#shirt too . you dont gotta limit yourselves like i do i just default to sweaters lmao#you can also do this with rawr but with like. ALL of her parts except the teeth (theyre consistently neon yellow or neon green)#so feel free to go nuts if you draw rawr. like actually. give them cool hoodies or clothes or new bang patterns idc go OFF that's the point#ita and sew are meant to be consistent as possible but tbh you could draw sew with different patch patterns and ita with a different bow#tl;dr I Love Customising My Little Guys and therefore everyone who wants to draw them should also give themselves that joy#also also. please tell me if the alt text is good. im not very good at IDs and i am chronically low on spoons so i never write them#this is to say that if you have the spoons and better descriptive vocab PLEASE write img ids for my art if you feel the need to#i want my art to be as accessible as possible and that includes allowing those with low visibility to be able to visualize my work
45 notes
·
View notes
Text
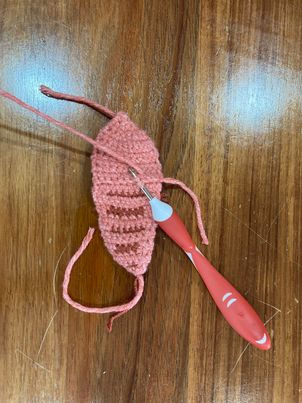
Tried my hand at embroidery for the first time by making this little llama! I'm relatively new at hand sewing and the fabric was kinda old and loosely woven so it looks a little messy but it was fun to make. :)
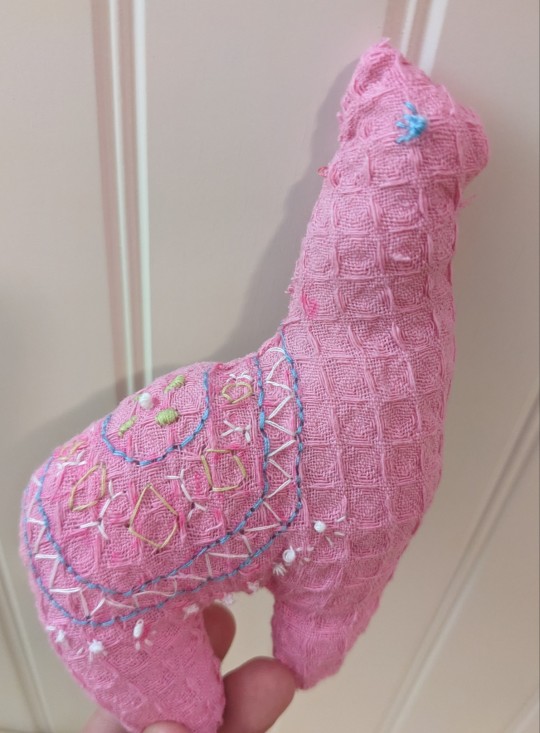
#I spent the time listening to a really bad detective radio show#I have no idea why I kept listening#it was not good#I listened to like 10 episodes in a row#pro tip don't make things out of old towels#it's not fun#if you look at the embroidered parts you'll see what I mean because all the holes kept expanding#and the edges were fraying badly#if you've gotten this far you should give me name suggestions#I'll link the free pattern I used in the comments#sewing#hand sewing#embroidery#llama#sewblr
13 notes
·
View notes
Text
is there an archive of vintage sewing patterns anywhere online? im specifically looking for early victorian style stuff for research, but i have no idea where to start other then looking at images of dresses.
#i think retro/vintage patterns should be up for free#im very annoyed#sewing#sewblr#sewing patterns#crazee talk
6 notes
·
View notes
Note
Sorry if you’ve answered this already, but I’m curious about your Patreon! Are you planning to put crotchet patterns on there as well? Or just plushie patterns?
Hey! I don't think I've ever answered that before, but my crochet patterns are mostly up on my Ravelry. I have a few (including that rainbow dinosaur) that are only here on tumblr, but I do intend to put them all on Ravelry.
I haven't thought about putting them on Patreon? I guess I could, if that's a format people would want?
I should really put more of my sewing patterns on patreon (sorry to all my patrons, I think I got it set up so you're only charged if I actually share patterns). Maybe that's what I'll work on tomorrow?
Honestly, if there was a sewing equivalent of Ravelry, I'd rather have my sewing patterns up there. I don't really want a Patreon because (as people may have noticed) I am terrible at doing creative things at regular intervals, but I couldn't find any other way to put my sewing patterns up for sale that didn't involve figuring out international sales tax or paying for my own website or both (I believe Patreon does sales tax, but don't quote me on that I could be wrong)
#ask away!#I really should get more of my patterns shared#I have. uh. many#dozens of crochet patterns and I think even more sewing patterns?#to be fair I have shared a bunch of my crochet patterns#but international sales tax scares me#ravelry handles sales tax#I think there's a yearly threshold beyond which they will no longer handle it for free#but I am lightyears away from that threshold lol#more than half my patterns on Ravelry are there for free#and all the remaining ones are $2#I do not make many sales on Ravelry
8 notes
·
View notes
Text
aaaa i know i havent been writing v much (read: at all) recently which i feel kinda bad about bc wanting to write more twst content is why i changed my blog url a while back but. my brain is currently on the "sew projects you're underskilled for" rotation of the crafting cycle so it may be a while yet before i pop out a new ficlet
#the news about bridgerton/netflix/etc removing requirements for wearing corsets got me heated#and i went back into the historical corsetry rabbit hole#and found out i can buy the symington pretty housemaid corset pattern from clockwork_faerie on etsy#who offers a version of the pattern that's drafted to your custom measurements#and then i remembered i never finished reconstructing my mom's tank top and that i should finish that first#but i do have 5 yards of muslin that came free with my last fabric order from mood fabrics back around halloween#so i can actually try making mockups!!#anyway. i apologize for dumping sewing thoughts here lol#rose speaks
2 notes
·
View notes
Text
little wrap up of day one of the ofmd bird skirt!
i went into this one with a clear plan for once, even having a cutting plan and an order of operations written in my journal (wow look so prepared. expect to never see this again)

i have faith that this one will actually be a quick project, ive basically achieved all i can do for the moment- which isn't a lot, but its all the prep work at least! ive got to hang my skirt panels for several days now so they can stretch (which is more important than ever because its the /seams/ that are on the bias, rather than the center of the panel)
all my cutting out is done (a MINOR deviation from the cutting plan was made- i wanted to use my mega pocket pattern and i couldnt fit it in the top piece of waste fabric, i needed the extra smidge from the curve of the skirt) ive overlocked my pocket pieces, and stay stitched my waist line on the skirt (though i didn't cut it out as im not sure the pattern fits me absolutely perfectly, and i thought itd stabilise it more!)
i also started on the waistband! i had to re-teach myself how i like to do a petersham waistband, but its still my favourite way to do one! the petersham essentially acts as an interfacing, but itll never fold over on itself!) ive basically followed that as far through as i can too- given that the fabric is velvet i cant press it down so ive topstitched the inside edge but im not sure i want it visible on the outside, so im leaving that one for now
see you all next week when the bias has (hopefully) finished stretching for pockets, invisible zip and the rest of the waistband!
#nyxtalks#nyx sews#i love it when a plan comes together#this has been so stress free for once! i even cut my pieces on the fold which i damn near never do#my tape measure says the pattern should be pretty decent but i havent used it in a couple years soooo#im also hoping im remembering correct and the pattern is a good length- ome of the many. many. MANY fun things about sewing#while plus size is youre endlessly limited by fabric widths#bigger waist = bigger waist radius = longer length needed from corner to hem#this fabric is also narrow anyway so ive done my best!! i think itll be good i just like a knee length skirt so i always struggle#im probably only doing a baby hem on this though so ill get as much as possible outta the width#also the skirt is called that im my journal solely because i didn't just wanna call it. skirt. circle skirt. because ill make a million#of them over time. and i bought the fabric bc of the show so!!#also i had way too much fun picking a font that reminded me of the shows fonts- this one in specific is inspired by the flag font :)
4 notes
·
View notes
Text
Anyways people who gatekeep "free" things behind newsletters and subscriptions and making you input ur personal information as if you were spending money should all fuck off and never market their stuff as "free" again. Literally go to hell
#sorry but it's not free if you're selling my data to ad services#if I want a 'free' sewing pattern I should be able to download it instantly from the webpage where I found it.#not after I give you my name address email creditcard number etc etc etc#armchair speaks
1 note
·
View note
Text
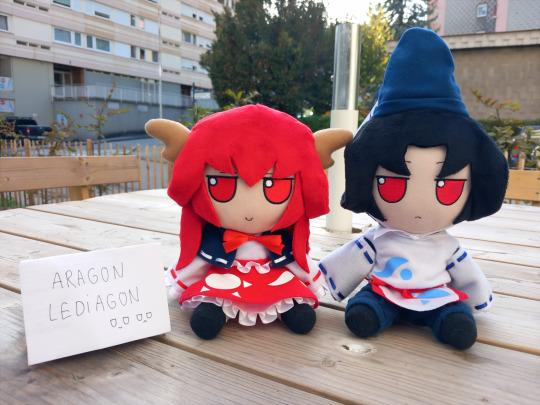
Fumo plush pattern I made for customs making
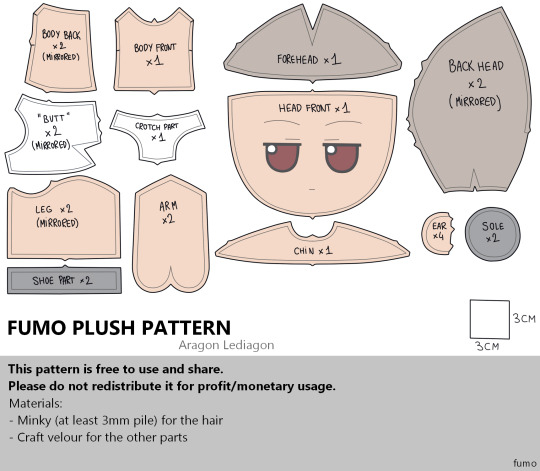
This is a pattern I made from scratch and that I use for making my customs. It is based on the v1.5 models. Its the definitive version since I made tests before, as I said its from scratch, I could never sacrifice a legit fumo and bootlegs arent reliable for patterns snatching imo since their quality varies.
This is mainly for hand sewing and fairly beginner friendly. I havent tried on a machine because I dont trust these for such small details so I cant garantee you it will looks good if you assemble it with a cheap machine.
Seam allowances and other guides to match the pieces are included there.
I didnt include more hair pieces like the bangs because it would be too specific and this is a general pattern, not one for making [specific character]. I do these parts from scratch as well. If anyone would like help with hair of a specific character I can help (as long as its a character I know, else it would require me to use more time studying the design).
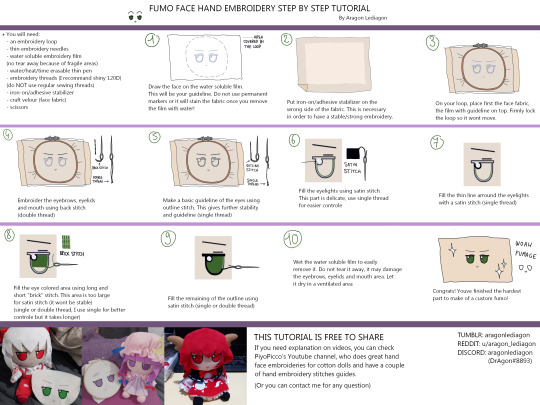
Make the design of the face before cutting the pattern. Methods I recommand using are: machine embroidery (the best), hand embroidery and heat transfert vinyle (require some skills). Ive made a hand embroidery tutorial a while ago. You can also maybe use the face of an existing fumo but its either very costly if you use a legit, or might not get good results if you use a cheap bootleg.
This PNG should be 1:1 scaled but ive added a square on the corner for good mesures. I dont use foot mesures (and i dont know how to use it) so its only cm sorry.
For any additional question, anyone is free to message me.
Customs ive made using this pattern:

Hand embroidery tutorial I mentionned (not at all lazy to link my post):
4K notes
·
View notes
Text
i have. 4 days to sew two plushies. i am going to explode
#i should be able to finish one today#and then i’ll have 3 days to sew the snail#luckily for the snail i found a free pattern AND A MATCHING TUTORIAL!
1 note
·
View note
Text

i found a Creature in my kitchen today
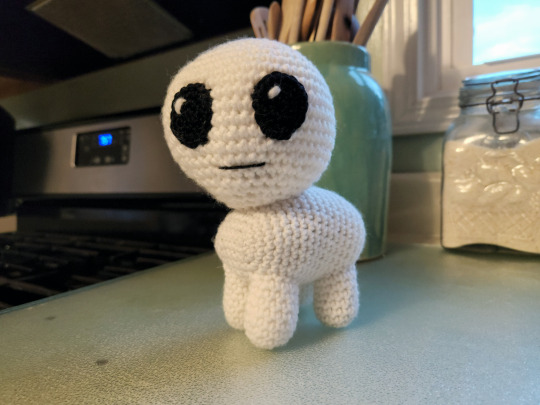
this is my child now
(free pattern below the readmore!)
TBH/Autism Creature Pattern
Materials
White yarn (Any weight)
Black yarn (1 weight size smaller than white yarn)
Fiber fill
Hook sizes appropriate to your yarn and tension style (I reccomend at least one hook size smaller than what is reccomended on yarn label.)
Optional:
Poly pellets
Panty hose
Pattern Terms
SC: single crochet
R#: row #
MR: magic ring
INC: increase (i.e. two SC in same stitch)
3INC: three SC in same stitch
DEC: invisible decrease
CH: chain
SLST: slip stitch
[#] # of stitches at end of row
Ultimate Finish: See tutorial
Invisible Finish: See tutorial
Eyes [x2] (Black Yarn, Smaller Hook)
R1: 6 SC in MR [6]
R2: (INC) x 6 [12]
R3: (1 SC, INC) x 6 [18]
SLST, Invisible Finish, and leave long tail for sewing.
Head [x1] (White Yarn, Larger Hook)
R1: 6 SC in MR [6]
R2: (INC) x 6 [12]
R3: (1 SC, INC) x 6 [18]
R4: (1 SC, INC, 1 SC) x 6 [24]
R5: (3 SC, INC) x 6 [30]
R6: (2 SC, INC, 2 SC) x 6 [36]
R7: (5 SC, INC) x 6 [42]
R8: (3 SC, INC, 3 SC) x 6 [48]
R9: (7 SC, INC) x 6 [54]
R10-R15: SC around (6 rows) [54 x 6]
R16: (7 SC, DEC) x 6 [48]
R17: (3 SC, DEC, 3 SC) x 6 [42]
R18: (5 SC, DEC) x 6 [36]
R19: (2 SC, DEC, 2 SC) x 6 [30]
(i): Begin stuffing with fiber fill.
R20: (3 SC, DEC) x 6 [24]
R21: (1 SC, DEC, 1 SC) x 6 [18]
R22: (1 SC, DEC) x 6 [12]
R23: (DEC) X6 [6]
(ii): Finish stuffing.
(iii): Sl St, bind off with Ultimate Finish.
Legs [x4] (White Yarn, Larger Hook)
R1: Ch 4, 1 SC in 2nd Ch from Hook, 1 SC, 3 SC in last Ch, 1 SC along other side of starting chain, 2 SC in turning chain [8]
R2: 3 SC, 3INC, 3 SC, 3INC [12]
R3-R8: SC around (6 rows) [12 x 6]
(i): SLST, leave long tail for sewing, and stuff with fiber fill, taking care not to overstuff and stretch the legs.
Body [x1] (White Yarn, Larger Hook)
R1: Ch 7, INC in 2nd chain from hook, 4 SC, INC, then working along the opposite side of chain, INC, 4 SC along opposite side of chain, INC [16]
R2: 1 SC, INC, 4 SC, INC, 2 SC, INC, 4 SC, INC, 1 SC [20]
R3: 2 SC, INC, 4 SC, INC, 4 SC, INC, 4 SC, INC, 2 SC [24]
R4: 3 SC, INC, 4 SC, INC, 6 SC, INC, 4 SC, INC, 3 SC [28]
R5-R17: SC around (13 rows) [28 x 13]
R18: DEC, 6 SC, DEC, 4 SC, DEC, 6 SC, DEC, 4 SC [24]
(i): If you want to add some weight and balance to your creature, stuff according to the instructions below. Otherwise, stuff as normal with fiber fill.
(ii): First make a pellet packet. Cut a length of pantyhose, making a tight knot in one end. Fill the pocket with enough poly pellets to give weight to the body, but avoid overstuffing at this will stretch out and make gaps in the body. Close the pocket with a knot on the open end of the pantyhose and cut away any excess material.
(iii): Stuff some fiberfill into the front end of the body before inserting the pellet fill packet, then lightly stuff fiberfill between the packet and top inside of the body.
R19: DEC, 4 SC, DEC, 4 SC, DEC, 4 SC, DEC, 4 SC [20]
R20: DEC, 2 SC, DEC, 4 SC, DEC, 2 SC, DEC, 4 SC [16]
R21: 2 DEC, 4 SC, 2 DEC, 4 SC [12]
(iv): Leave long tail for sewing body closed.
(vi): Finish stuffing, squish sides of end row together and sew closed.
Assembly
(1) Pin the legs to the body with the long side pointed forward and parallel with the body. The left and right leg of each pair should be 2 to 3 stitches apart. Pin the front legs between R4 and R9 of the body. Pin back legs between R12 and R17. Sew to attach, hide thread ends in body.
(2) Pin the head to the body, connecting R3 and R10 of the body to the R22 and R19 of the head, respectively. Sew to attach, hide thread ends in body.
(3) Pin eyes 3 to 4 stitches apart between R10 and R16 of the head. Sew to attach, hide thread ends in head.
(4) Use a long length of white yarn to embroider highlights in the upper left portion of each eyes. Hide thread ends in head.
(5) Use a length of black yarn to embroider mouth 2 to 3 rows below the eyes. Hide thread ends in head.
(6) Fluff up your scrungly little creature (they will be a little squished from all the sewing) and enjoy!
8K notes
·
View notes
Text
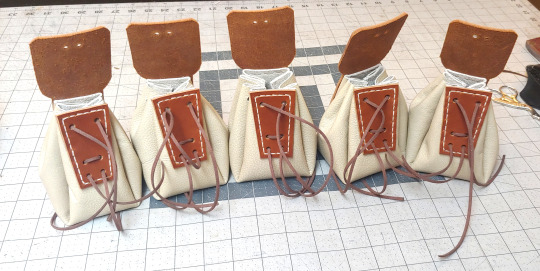
COUCH POUCH!! Free Pattern & Tutorial
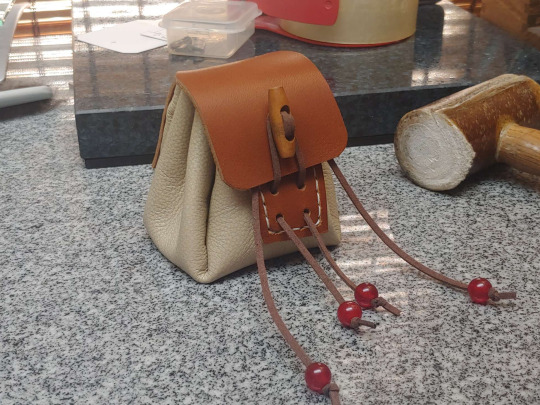
...called thus because they use upholstery-weight leather for the bag body, that in my case was in fact skinned off a couch. 🤣 Turns out they are relatively quick and easy to make, so I tidied up the pattern for printing and took pictures to document the process when I made another five of them.

First off, print your pattern, 100% scale:
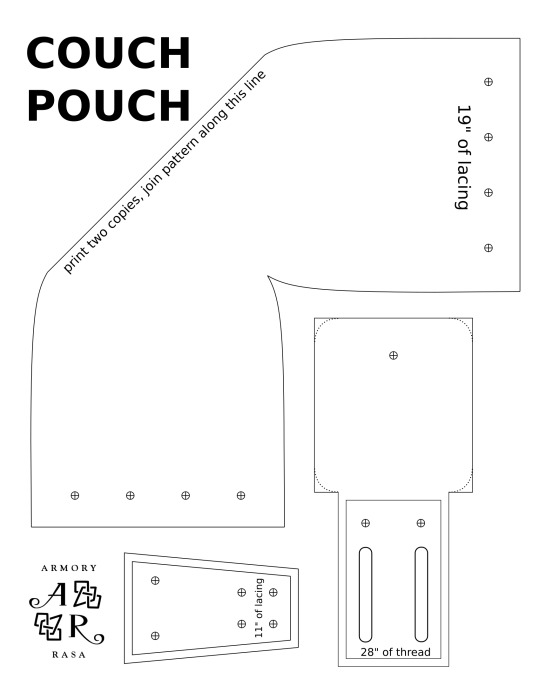
The bag shape was a modified version of the pattern I used for the Morpheus sandbag, but sized to fit in the roughly 11" squares that my couch skin came in. It makes a bag that sits very well on a tabletop, thanks to the flat base.
Though it turned out to not be the most efficient use of material, because that plus-shaped pattern tessellates well, if you're cutting them out of a full hide, but makes a lot of waste when you're cutting them out of squares of material. A more efficient design would have a half-rounded front and back, and a gusset between them, like so:
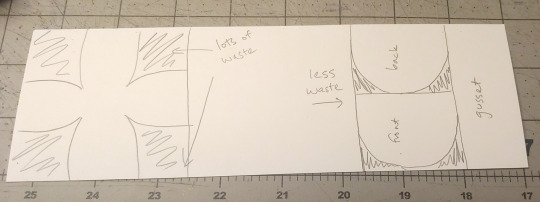
Ah well. It's not like I have any shortage of couch skin, though for the next round I'm going to experiment with a more efficient pattern.
First step, trace and cut out the bag body from your chrome-tan leather:
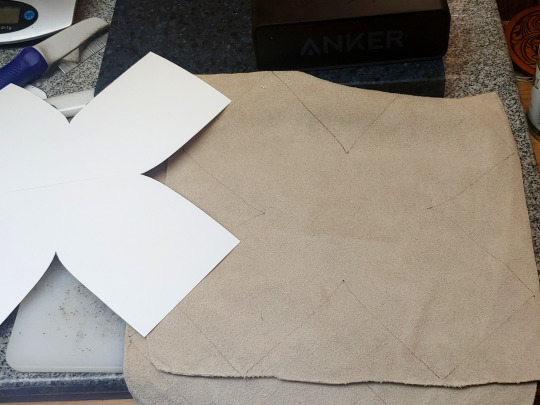
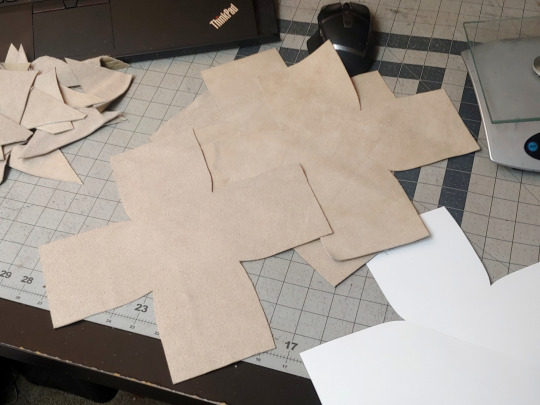
Like I said, this was upholstery leather, but anything that's flexible and ~1.5 mm thick will do.
The flap and front need to be a stiffer leather though -- I used 7 oz latigo, but veg-tan would work equally well. (And then you could ✨tool it!✨)
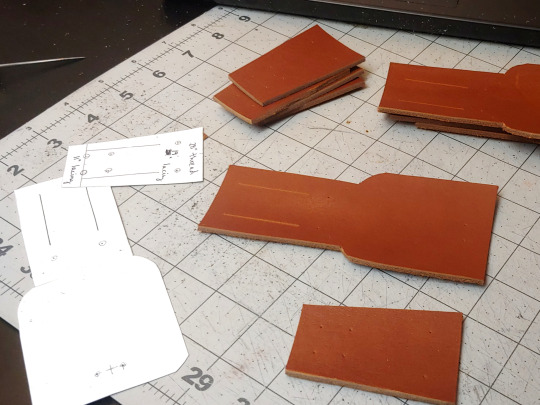
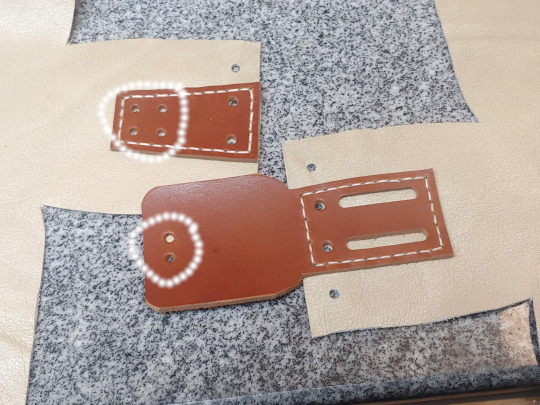
Cut them out, and then use the pattern to mark where your holes are going to be. Mark the holes on your bag body too:
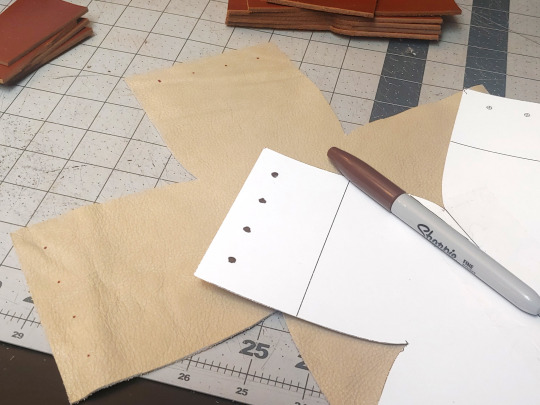
The latigo pieces get hand-stitched to the bag body, so I used a stitching groover to carve out little channels for the thread -- it's not strictly necessary, but it makes your stitches lay a lot more neatly:
Punch the holes shown below:
I used a ~5 mm hole punch for those, and a 1.5" slot punch for the belt loops. Some of the holes on the front piece you're not punching yet, because they need to go through both layers.
I put a dab of contact cement on the pieces (circled in white) to help hold them in place when I go to punch the stitching holes:
(Make sure you're not putting glue between the belt loops)
Wait fifteen minutes for the contact cement to dry until tacky, and then line up the holes and the edges and press the pieces together:
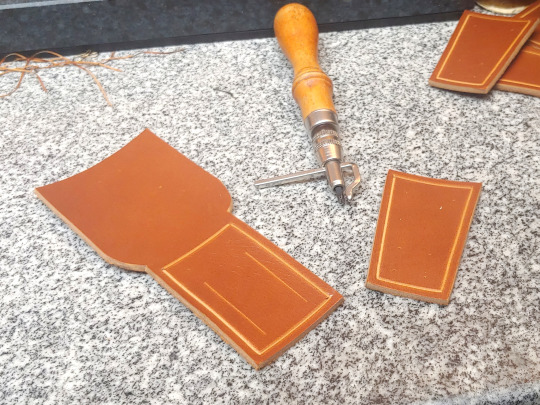
Punch stitching holes:
Saddle-stitch both pieces in place (takes 28" of thread per):
Now you can punch these holes:
(I used a slightly smaller hole punch than for the others, but it doesn't really matter.)
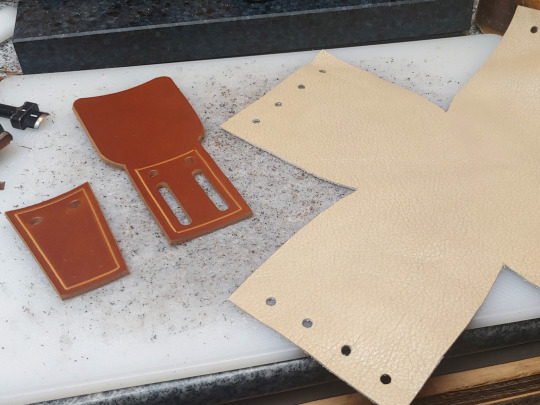
Now press the right sides of the leather together and sew up the seams from the inside:
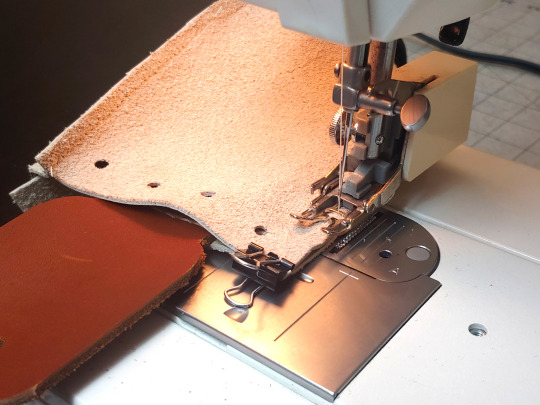
A regular sewing machine should be able to handle this, though you will need thicker thread, a heavy-duty leather-sewing needle, and a walking foot attachment. (If you don't have a walking foot attachment, it is SO WORTH getting one, even if you don't expect to sew much leather. Seriously, I use it for everything -- once you go walking foot, you don't go back. 💀) Because you can't pin leather without leaving permanent holes in it, tiny binder clips can be helpful for keeping your material lined up.
What they look like when you're finished sewing:
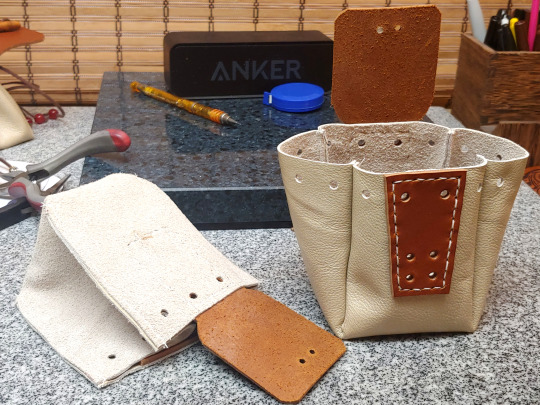
Cut 19" of lacing for the drawstring, and 11" of lacing for the toggle:
I use the 1/8" EcoSoft lace from Tandy, I think it's stronger than real leather would be at that thickness. The only important factor here is that you need something with a bit of texture and friction -- a silk cord isn't going to stay closed, it's going to slip open.
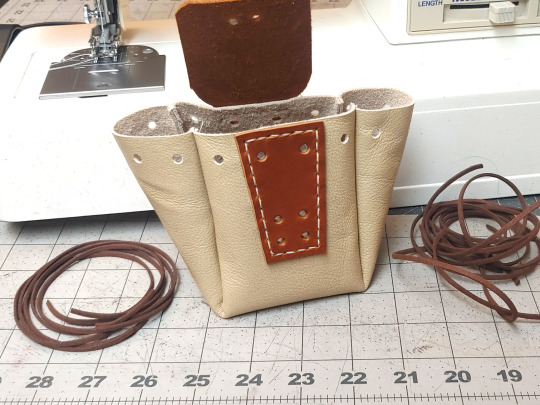
MANY BAGS.
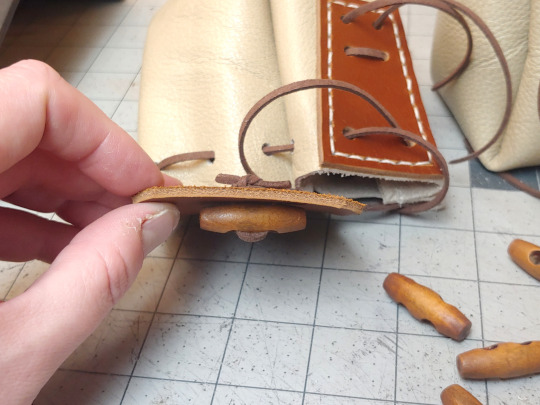
For these I used a wooden toggle -- cut another 8" of lacing, looped it through the toggle twice, and then made a tight square knot on the back:
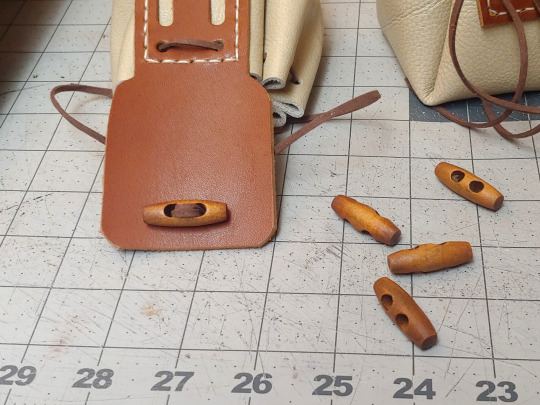
But another option is putting a concho or a large button on the flap. The bag I copied this design from, in fact, uses a concho toggle:

Thread some beads on the laces to keep the ends from getting lost, and you are DONE! 😁
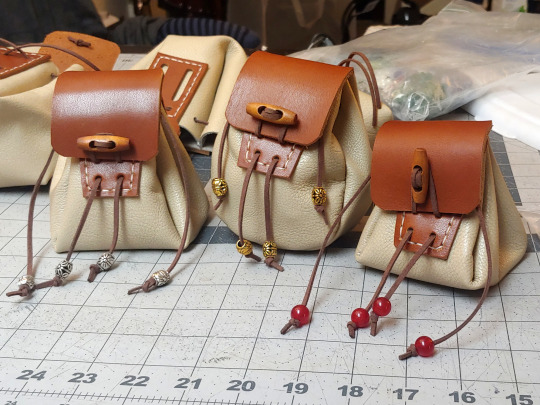
Happy Bagging!
568 notes
·
View notes
Text
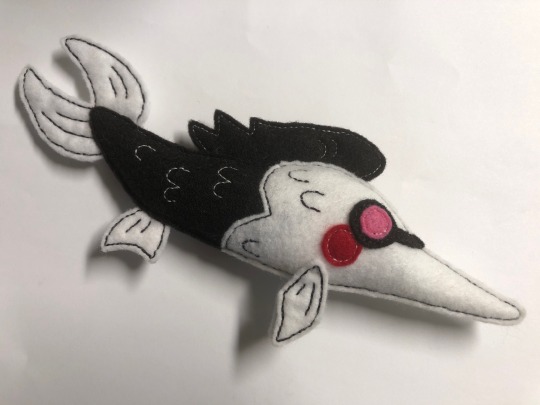

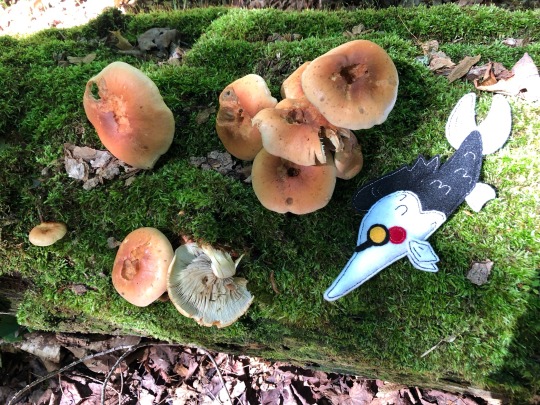
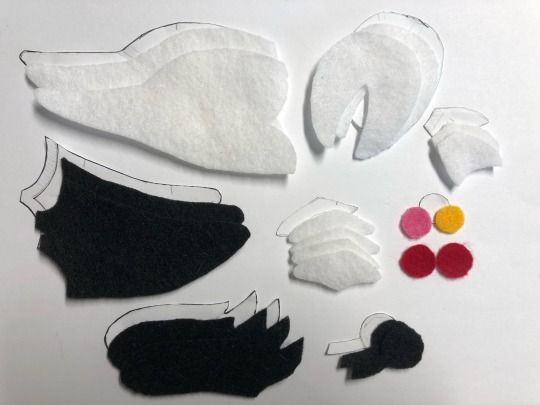
i made a little hand-sewn beast based on everydayspamton's drawing & took it with me on a family roadtrip
if you'd like to make your own, i've included the [[FREE]] pattern & some rough steps below the cut, as well as an Educational Video
EDUCATIONAL VIDEO. THIS IS NATURAL SPAMFISH BEHAVIOR & IT IS NOT SCARED OR IN PAIN.
BEAST CRAFTING INSTRUCTIONS:
disclaimer: i'm an amateur & i've never tried making a pattern before, nor have i ever tried writing directions
materials you'll need:
sewing needle & pins
black thread & white thread
fabric in these colors - black, white, red, yellow, & pink
stuffing
(optional) a squeaker
notes:
for the thread, i suggest something thicker, like whats used for embroidery - i used two different thicknesses on mine, & i think the thicker one; (the black thread); stands out a lot nicer
for the fabric, i used craft felt. its nice because its cheap & malleable, but if you want something that can actually be washed & played with without disintegrating on you, don't use felt. different fabrics will have different results, though, & may not give you a clean-looking edge & lines
you can also just go nuts & use whatever colors of thread/fabric you want, make pattern alterations, whatever
if you make one, feel free to @ me, send an ask or DM me with it, i'd love to see!
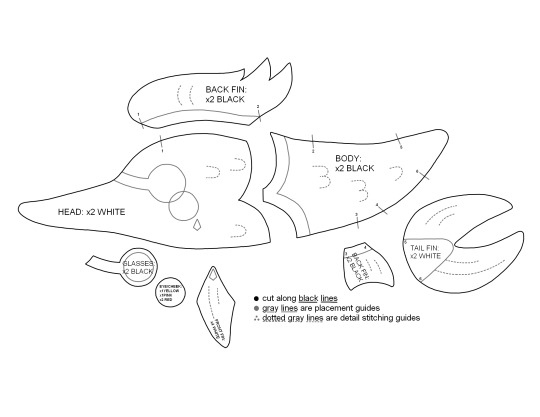
^^^ here's the pattern!
now the actual steps?:
1.) download & print out the pattern - it should(?) fit normally across a regular sheet of printer paper. i don't have exact measurements, i eyeballed this whole thing & then lost the original pattern - (there's only a copy that i scanned & edited left on my computer. woops.)
2.) cut the pieces out. pin the patterns to the fabric color the instructions call for, & cut out the number you need for each
^^^ here's what you should end up with!
now the sewing! for this whole thing i used doubled-up thread & a 'running stitch', then went over it a secondary time with another running stitch to fill in the gaps. you could also try using a 'back stitch' (which i don't know how to do), but that might be tougher. the goal here is to give it an Outlined look, like a drawing
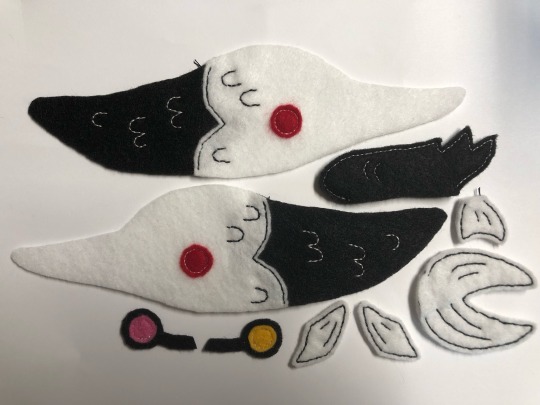
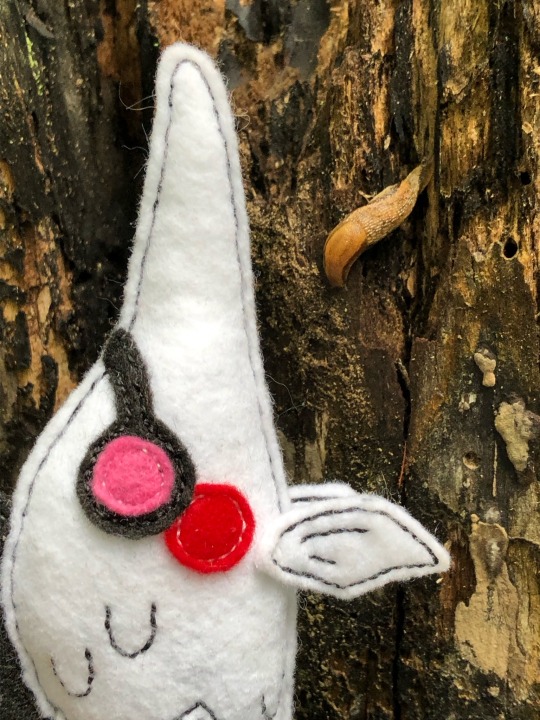
3.) with white thread, sew the pink & yellow eyes onto the glasses - pink is Left, yellow is Right. reference the image above if you're not sure!
4.) sew all the fins pieces together - on the black fin, use white thread; & on the white fins, use black thread. reference the pattern for the detailing. i made my own front fins 'wrong', but you don't really have worry too much about being exact
5.) overlap the Head pieces onto the Body pieces - making sure you have a Left and Right side! pin the heads to the bodies, & compare their lengths by holding them together to make sure you've got it right. sew the heads to the bodies using black thread. detail the head with black thread, & detail the body with white thread
6.) now that you've got the two sides of the body completed, you can hold them together to try to get even placement for the red cheeks. pin each cheek to each side, then sew them on with white thread
7.) using black thread, sew the pink glasses onto the Left side of the body, and the yellow glasses onto the Right side. they'll be slightly overlapping the cheeks
8.) with white thread, sew the front fins on to each side. NOTE: i put mine on wrong, & didn't realize until i was finished. for the 'right' placement on these (closer to the original drawing), reference the pattern, & not the images
you now have all your parts ready for assembly! for me, this is the hardest part. you'll need a bunch of pins - use the guidelines on the pattern and/or reference the below image to get the right placements
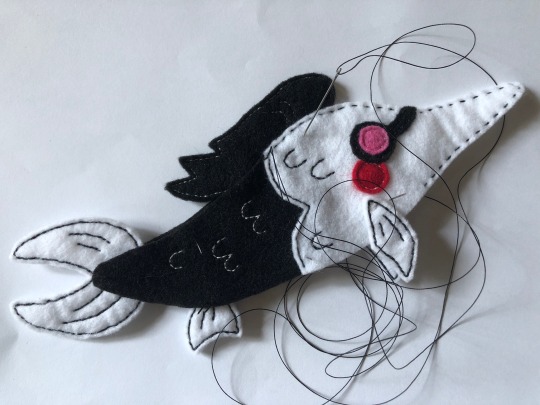
9.) pin in the back fin & the nose. leave some space on the bottom for stuffing when you start, & using black thread, sew together the nose & the fin unto the body - the fin should be sandwiched Between the two body halves
10.) pin in the tail fin. continue sewing down the back with the black thread, & sew the tail fin in - once again, it should be Between the two body halves
11.) pin in the back fin between the halves. continue with the black thread, sew along the tail & sew the back fin in - Stopping once its secured. you should have some good space still open on the belly
12.) time for stuffing. using something thin, but not sharp - like a chopstick or the back of a crochet hook - & push stuffing into the nose & tail portions. stuff the head about halfway. now, if you have a squeaker, put it into the widest part of the head, & stuff a little around it
13.) still using the black thread, sew the belly up a little more so its easier to keep the stuffing in, & then fill up the rest of the body. once fully stuffed, sew the remaining hole together
14.) congrats! you now have a spamfish. if you opted for a squeaker, squeak it thoroughly
don't worry if it's not exact, some individual variation is fun & makes your creature unique! mine has upside-down front fins with upside-down detail lines

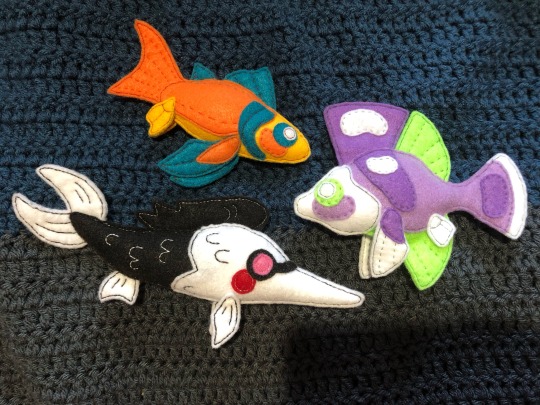
here's the thing with some friends i had made a little bit before him. have fun with your beast!
i am not liable for any damage it causes to you or your property
#spamton#myart#spamfish#i made this thing&took pictures of the process to show my friends a few months back.i finished it a few days after thedailyspamton's post#i had already been making funny little fish&it was just the perfect timing!now i want to share the spamfish with others :)
506 notes
·
View notes
Text
FREE POETSHIRT PATTERN
Some assembly required
Ok so. I made a sewing pattern that involves a lot of maths on the end users part - this is the only way I, a complete pattern making novice, can make this 100% size inclusive. Luckily it’s super simple and it just a whole bunch of rectangles.

Yes it’s written in cm. Bite me.
So to elaborate a bit:
It’s pretty straight forward. You plug in your own measurements in the places it’s needed.
Body x2: should be twice your either shoulder width or your widest point (if you’re more pear shaped you might want to use your hip width) by the length from your shoulder to about mid thigh* (you can make it as long or short as you want. This could probably also work as a shift pattern in a pinch). In one of the pieces, you should cut a slit in the middle, which as shown above should be about from your neck to your sternum.
Sleeves x2: these should be 2-3 times your bicep measure (this will determine the poofiness of the sleeves), by your arm length. Adding a few cm to the length can be a good idea here. I usually just round up to what seems most logical.
Cuffs x4: your wrist measure + 3-4cm of ease, by how ever long you want them - 5-10cm is a good place to start.
Collar x2: your collar measure** by however tall you want your collar. Keep in mind that it will be folded over.
Gussets
Oh glorious gussets. The whole reason this pattern works! But also where it gets a bit mathy
Sleeve gussets: these are square. The diagonal should be about 1/6 of your total armscye (all the way around). Rather a bit too small than too big - it can fuck up the fit (it did for me)
Shoulder gussets: these will depend wholely on how buff your trapezius muscles are. If your neck/shoulder is at a right angle, they’re not strictly necessary, but if you’re super buff, they’re very necessary. I’d say an average shoulder gusset is about 5-7cm, but it’s up to you.
Reinforcements
Again, these aren’t strictly necessary, but if you want your shirt to last it’s a good idea to put them in. You can choose to use between 5 and 10 total. These don’t need to be very big, they just go at any split in the fabric. About 2,5cm is good.
Instructions
I used these videos for assembly instructions
youtube
This is going to be hard without pictures…
youtube
youtube
*you can also keep the body as one piece, which should then be twice the length you want it. The slit at the neck will also have to be cut in the middle of the piece.
**your collar measure is the measurement at your neck going over your collarbone rather than tight to the neck.
302 notes
·
View notes
Text
PAC: What area of your life needs nurturing?

Hello! Felt like doing another Pick a Card/Pile reading.
The topic of the day is: "What area of your life needs nurturing?"
How it's going to unfold is that I'll first narrow down to an area of life, look at the challenges and then the advice on how to nurture this area. This is meant to be a supporting reading that will help you grow in that specific field.
Focus on the 4 pictures above, pick the one that resonates the most (it can also happen that you feel drawn to more than one) and then read more below the pile(s) you selected.
Take what resonates and leave out the rest as this is a general reading meant for multiple people and situations.
Feel free to tell me if that resonates as I wish to improve :)
PILE 1
Cards: 4 of Swords + Valiant Courage: Take Actions with Passion Rx; 4 of Cups Rx + The Chariot + 4 of Pentacles; The Creator + The Shadow + The Mystic
The area of your life that needs nurturing is your mental and perhaps physical health. As in, you are currently depleted and in need of a rest, with a sense that your energy levels are so low that you are unable to take actions towards what matters to you.
Right of the bat I notice you got 3 out of 4 Fours of the minor arcana (Swords, Cups and Pentacles), which indicates a need to go back to the foundation and restructure yourself. Your foundations are crumbling and it's stopping you in your track because you are not tasking good care of your basic needs.
You are not allowing yourself to be bored, to rest and contemplate what's happening within and outside of yourself. So focused that you are on pushing through and advancing your life. I'm getting strong ambition and goals from this pile. You are afraid that if you take time off, you're going to lose what you have so you hang onto it for dear life, but it is counter productive and keeping you stuck in place.
The advice on how to nurture this area of your life is to:
1) get in touch with your creativity in a free, childlike and non-judgemental way. Whether you are a creative person of not doesn't really matter as it is not about skills but about expression, and we all have things to express. Keep your creations for yourself so that you can truly feel free from expectations and results. So whether that is drawing, painting, collages, sculpture, pottery, cooking, music, dancing, acting, sewing, makeup, making floral arrangements of cutting bonsai, whatever it is, pick up something that calls you and start expressing yourself creatively. Doesn't matter if you're a beginner or have done it in the past, as long as it is fun to practice.
2) another important aspect of nurturing yourself is understanding your shadow. In non-esoteric speak, what it means is that there are things withing yourself that you are pushing away because you don't want to accept them. The problem is that by denying these important aspects of yourself, you are cutting your growth short. The most important messages we can receive come from the depth of our own mind, and the shadow, while it may be painful and scary, contains keys that can make you free through understanding, compassion and acceptance. I would suggest meditation and journalling, but something else that's quite cool that ties with the first advice is that you totally can look at your creations and see what themes, thoughts or emotions are naturally emerging. Nothing is ever random when it comes to creativity, there is always something from you that comes out!
3) Once you've started being in touch with those dark thoughts, feelings and patterns, you must learn to sit with them, integrate them and make them part of your full self so that they are not a shadowy treat lurking beneath the surface anymore, but something you are fully aware of and can live in peace with. I'm getting that you should not hesitate to reach out for help if you realize at any point that you need support in order to overcome that. Some traumas are better handled with the help of a professional to guide you through it. I would also highly suggest looking up and reading about the concept of integration in psychotherapy as it could help and empower you on your quest.
Hope that helps Pile 1 and I wish you good luck on your journey! 💚
PILE 2
Cards: Queen of Pentacles Rx + 8 of Swords; 2 of Cups + Page of Swords Rx + 10 of Wands Rx; The Underworld + The Shapeshifter + The Maiden
The area of your life that needs nurturing is your relationship with love.
I'm sensing that this pile is for people who are single, either since birth or for a long time, or people who got out of a relationship and have trouble finding their footing.
What I'm getting is that you feel powerless, stuck and can't seem to see an end to your situation. You are eagerly waiting for things to blossom again but loosing hope because it's taking too long in your mind. It's like you set yourself this goal that you would find love and you're frustrating yourself that it is not happening.
You have a very idealistic view of love and are looking for something perfect and transcending, which is not necessarily a bad thing, I truly believe that we're often better off alone than with the wrong person, but the problem here is that you are being overly defensive and it's stopping the flow of things.
You may have trouble communicating your desires, which again, implies that you found someone willing and able to listen, but there is something in the way you express yourself and come across that feels like a wall between you and potential lovers. You are guarding yourself up at all times and it's not a good strategy.
Also, you are carrying a lot of baggage that you have not faced yet and so long as you don't do it, you will either be stuck where you are or cave in for something that is not the beautiful relationship you're dreaming of. There is again a message to open up, free yourself to let enough space for someone to get in.
Here is the advice on how to nurture your relationship with love:
First, you need to dive within yourself and face those burdens and over-defensiveness regarding forming new connections. The Underworld implies that it is something you dread a lot. It might be scary and ugly at times, but it is so necessary. It's an internal process that may take some time depending on your dispositions and willingness to do the work, but going through your own personal hell will make you stronger when you come out of it.
I'm getting that some of you might have a lot of disgust and shame towards intimacy and sensuality.
Your self is composed of so many facets and it's time to explore those you have been neglecting for so long. Again, I'm getting that you are neglecting your romantic, emotional, and/or sensual side. You don't have to make it your whole personality but it seems that it's important for you and that you should integrate that in your whole self more.
I'm getting that some of you have also either been neglecting their appearance, or been stuck with the same look for a while, so it might be a good idea to switch things up a little! Get a haircut or find a few new outfits. The important thing is not to look like someone else but find something that makes you feel fresh and confident and that expresses a new part of yourself, one that has been hidden for a while. This might take so trial and error as you are lacking practice, so don't expect to find the right thing straight away, but trust in the process and have fun exploring!
The last card asks you to reconnect with your sensuality and candid openness to romance. Whatever gender you are, there is a lot of healing energy in the Maiden archetype you can embody. And you don't need anyone to do that *wink wink* use your imagination or whatever support you want (audio, visual, written, etc...) the goal is to explore your body, your sensations and your emotions, and, again, explore that neglected part of yourself.
As a result you will be more willing to open up to new connections, whether it be from people in your circle or outside of it.
That's it for today Pile 2! Hope that helped and I wish you good luck on your journey! 💗
PILE 3
Cards: 4 of Cups Rx + 8 of Wands Rx + Crossing Bridges Rx; Judgement + The Chariot Rx + 6 of Pentacles; The Creator + The Riddle + The Father
The area of your life that needs nurturing is your own stance towards life. More precisely, I'm getting isolation and refusing to be on the receiving end of things.
Basically, it seems you are shutting yourself off from the world and people around you. Refusing help and advice and shutting yourself off in your own familiar world of self-reliance. You are reluctant to leave this old way of doing things behind, metaphorically crossing the bridge and leaving the past behind.
Perhaps you hold unresolved grudges and resentment towards someone or a situation and you are unable to let it go and move forward. Perhaps you have been a carer for a long time and forgot that you al so need to receive sometimes to keep the balance of things.
It seems like you are stopping the flow of exchanges between you and other people, as in, you refuse to receive and you are giving too much of yourself, your time, your energy and/or resources, and are depleting yourself in a way.
You are getting stuck in your track and unable or unwilling to transcend to a new state of being and looking at the world. You are unable to see that life holds so many possibilities and potential for growth and you are stuck in stagnation.
The advice for Pile 3 is the following:
Like Pile 1 you got the Creator archetype, but I feel like it's way less literal in your case. For Pile 3, I'm getting that you need to focus on yourself and your own self expression more. Do things that make you happy and fulfilled and stop always trying to please everyone. The Creator archetypes creates for their own pleasure and enjoyment, and you need to embrace that stance on life, which might or might not include creative endeavors, but you've been neglecting your own enjoyment of life and it's time to stop.
I'm also getting that you are facing an impossible problem to resolve and you're getting stuck in mind games, trying to find the answer to the Riddle. The truth is, you need to step away from finding the answer to this problem because you are looking in the wrong direction. I'm getting savior complex. You are just one person, you cannot neglect yourself for the sake of your family, your friends, your community or the world. You need to help yourself first before you can help anyone else.
Finally, the Father here indicates me that you are over-focusing on the negative aspects of masculinity, and I'm saying that regardless of your gender, as everyone embodies these qualities in one way or another.
Basically, you need to learn to talk about your feelings and ask for help when you need it. Don't try to be a carer for everyone and find balance in the knowing that you can be taken care of to, and you need it!
If people around you don't accept that, I'm sorry but you're going to need a time out from them until they understand and change their way, or cut them off completely if that's not an change they are willing to make. You deserve so much more than what you are getting Pile 3!
That's it for this reading, I hope it was helpful and I wish you good luck on your journey! 💛
PILE 4
Cards: 2 of Wands + 4 of Swords; Knight of Wands + Page of Cups + X of Pentacles Rx; The Box + The Orphan + The Eternal Child Rx
The area of your life that needs nurturing is towards your career and your future goals regarding prosperity.
It seems, when it comes to your career, that you are stuck in a state of inaction and vague contemplation towards your future.
You feel quite dissatisfied with the state of things but you can't quite tell what it is you need in order to finally feel fulfilled. I'm getting that these thoughts are nailing you down.
You feel like you need to wait for something to happen, to show you the light, and that then you'll be able to find your path.
For the struggles regarding this situation, it seems you are balancing between two states. The first is some type of tense over-activity that pushes you to run towards the first potential opportunity that arises for you. You might jump from one idea of path to another, or one job or education to another, never truly digging deep enough or being committed enough to go anywhere. You're basically running in circles.
The other side is to get lost in your wishy washy stance and drowning in your feelings of indecision. Again, it's like you find a thing that seems cool, you go for it, get cold feet, and opt out. The result is that you are blocking your own prosperity, which by nature takes time and dedication.
The advice for Pile 4 and their career is the following:
First, it seems you are putting yourself into a box made of expectations learned from your upbringing and society. You feel like you need to find THE solution, find it fast, and earn success and/or fulfillment straight away. Reality is unfortunately rarely like that.
So you need to examine these expectations you are imposing on yourself and free yourself from them, because they are hindering you more than they are supporting you. They seem like a good idea to motivate yourself but really they are only making you more confused.
Because at the core, you are not asking yourself what you truly need. Perhaps the reason why you struggle so much to find your path is because you are rejecting what you need the most. Perhaps even it's related to the box because you've been told that this isn't possible or desirable.
This is not for everyone, but I'm getting that some of you have some undiagnosed disorder making it difficult for them to function. In that sense the box is literally you not fitting the mold of society and the best thing you could to is to seek help in order to navigate that because you've been trying for a while and you can't do this on your own.
Lastly, there is a need to grow up, and I'm not saying this to be mean, but rather, to encourage you to take accountability for your life and make decision for yourself. Not what other people wants from you, not what society tries to makes of you, but what YOU want to do. Stop waiting for an answer to fall from the sky, pick a path and work towards it. It doesn't mean that you will forever do that, but at some point you need to get out of your nest and pursue something with dedication.
Voilà I hope it was useful Pile 4! I wish you good luck on your journey! 💚
#pick a card#pick a pile#tarot reading#PAC#pac reading#free tarot reading#pick a picture#general tarot reading
181 notes
·
View notes
Text
Crochet Prawn
For Christmas my (marine biologist) dad wanted some prawns and I could not find any free patterns anywhere so I ended up drafting my own pattern. It has since been approved by my dad despite having no rostrum or antennae (I found these too hard to look good - if anyone has any tips please let me know!).

Also this pattern is NOT made in the round and so does require sewing and has a few fiddly bits. In order to make the legs smaller than the rest of the body without changing the colour, I separated out smaller sections of the ply, much like when using embroidery floss. I'm not sure if proper crochet-ers do this but I've found it works for me as long as it is 2-ply or greater.
Full Pattern under the cut:
INGREDIENTS:
3.5mm and 2mm Crochet Hooks
6mm Safety Eyes
Pinky Yarn (Colour A)
Darker Yarn (Colour B)
METHOD:
Note: ch1 and turn between each row. inc= 2 sc in same stitch. sc2tog= sc 2 together. blo= back loops only
Changes in colour will be denoted using A! (change to colour A) and B! (change to colour B)
MAIN BODY
Using colour A and a 3.5mm hook:
Ch4
sc 3
sc 1, inc 1, sc 1
sc 1, inc 2, sc 1
sc 2, inc 2, sc 2
sc 2, inc 4, sc 2 (eyes will be inserted between row 6 & 7)
sc 12
sc 5, sc2tog, sc 5
sc 11
sc 11
sc 11
sc 11
sc 11
sc 11 in blo (this ridge separates the head from the body)
sc 11
sc 2, B! sc 7, A! sc 2
sc 5, inc, sc 5
sc2tog, sc 8, sc2tog
sc 2, B! sc 6, A! sc 2
sc2tog, sc 2, inc 2, sc 2, sc2tog
sc 10
sc 2, B! sc 6, A! sc 2
sc2tog, sc 6, sc2tog
sc 8
sc 2, B! sc 4, A! sc2
sc 8
sc2tog, sc 4, sc2tog
sc 2, B! sc 2, A! sc 2
sc2tog 3 and finish off
Now using the ridge created by the blo row (shown in picture above), slip stitch across the surface of the prawn to enhance the ridge and accentuate the difference between the head and the body. Your prawn should now look like this (folded):

TAIL x2
Note: all stitches within [] belong in same stitch
The tail might be a bit tricky as it goes up and around the foundation chain like this:
Using colour A and 3.5 mm hook:
ch 6
from 2nd chain - slst, sc, hdc, hdc, [dc, hdc, dc], hdc, hdc, sc, slst then finish off
PLEOPODS (Back Legs) x10
Separating colour A to create a 3-ply yarn and using a 2mm hook:
ch 11
from 2nd chain - sl st 10 then finish off
PEREOPODS (Front Legs) x10
Separating colour A to create a 2-ply yarn and using a 2mm hook:
ch 15 then finish off
ASSEMBLY
Secure eyes between rows 6 & 7 and weave in ends to the inside of the prawn (don't bother clipping the yarn as this can be used as extra stuffing!).
Attach tail at a slight angle at the end of prawn to get the positioning to look more realistic.
Start attaching the pleopods approx. one row back from the head ridge and one stitch in from the side, continuing attaching them ~1 row each until five are attached per side.
Attach the pereopods approx. one row forward from the head ridge and one stitch from the side, continuing to attach them every 1/2 row until five are attached per side.
Whip stitch the prawn together using colour A until you reach the end, stuffing as you go.
Congratulations, you now have your very own prawn!!
Please reblog with pictures if you make your own! And any tips and tricks to make them look even better :))))
290 notes
·
View notes
Text
HEY TUMBLR!!
Guess who you know who fucked up xir paycheck math like never before!!
This particular brouhaha involves me buying concert tickets without realizing a different payment hadn’t yet come out, and I don’t feel comfortable being like “hey y’all, just give me money for my leisure.” BUT. I do have wares, if you have coin, to help me sew up the hole in my pocket.
Please allow me to introduce the CROSS-MY-HEART.
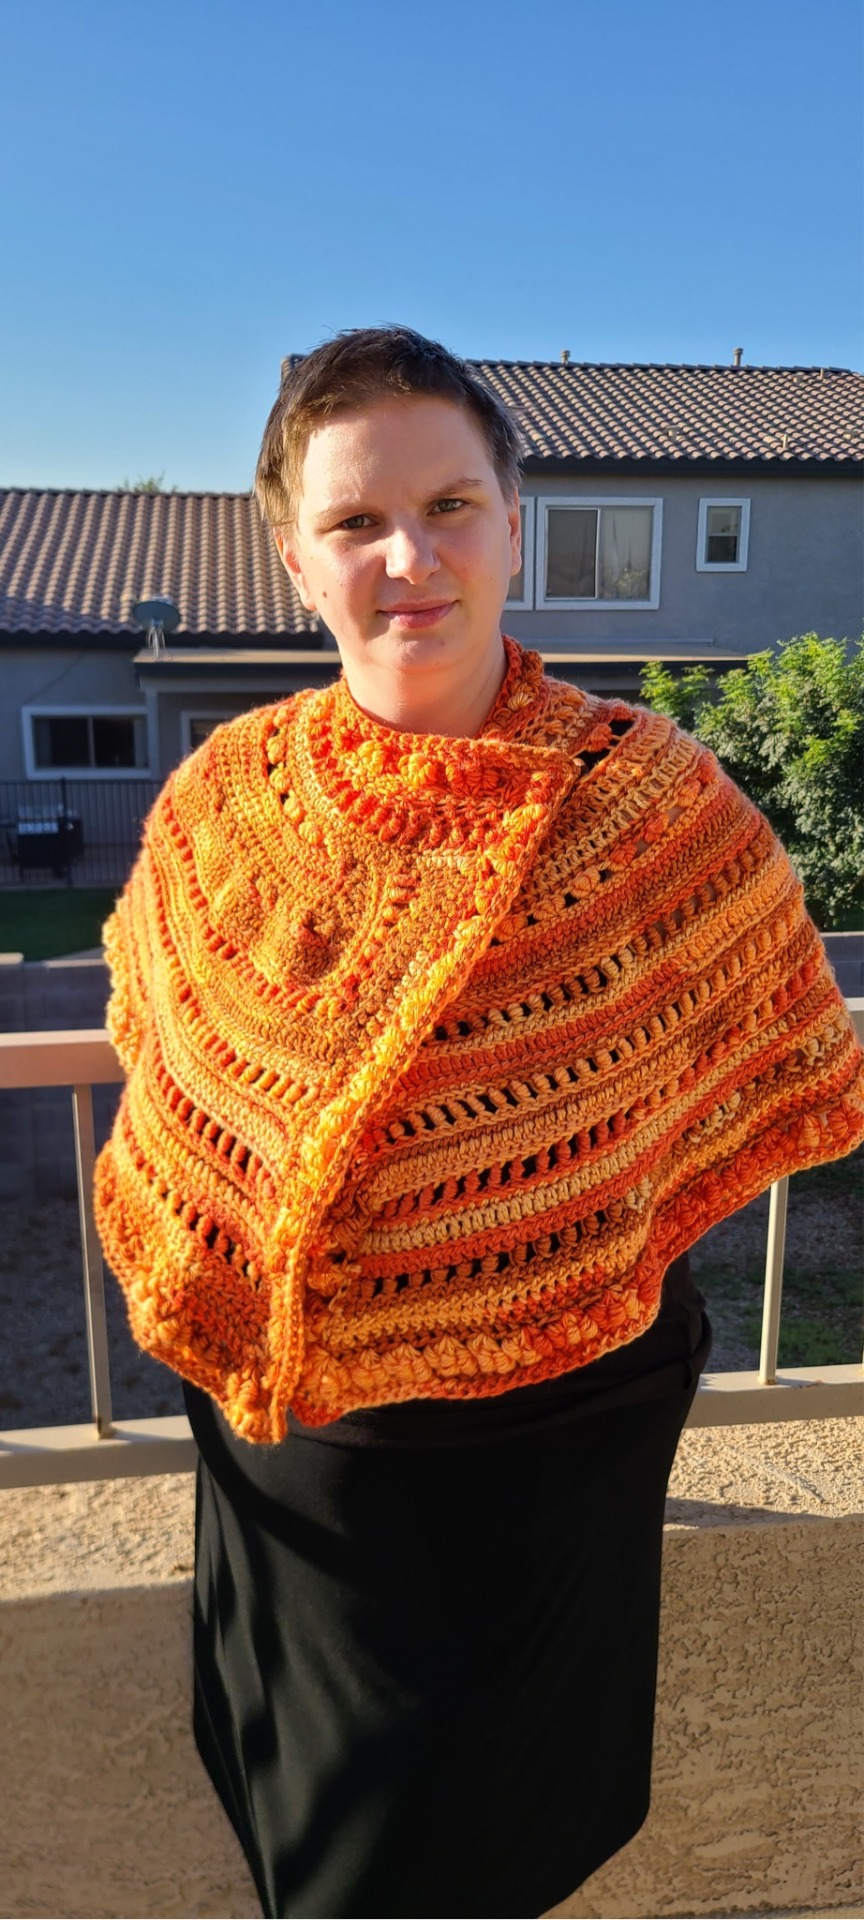


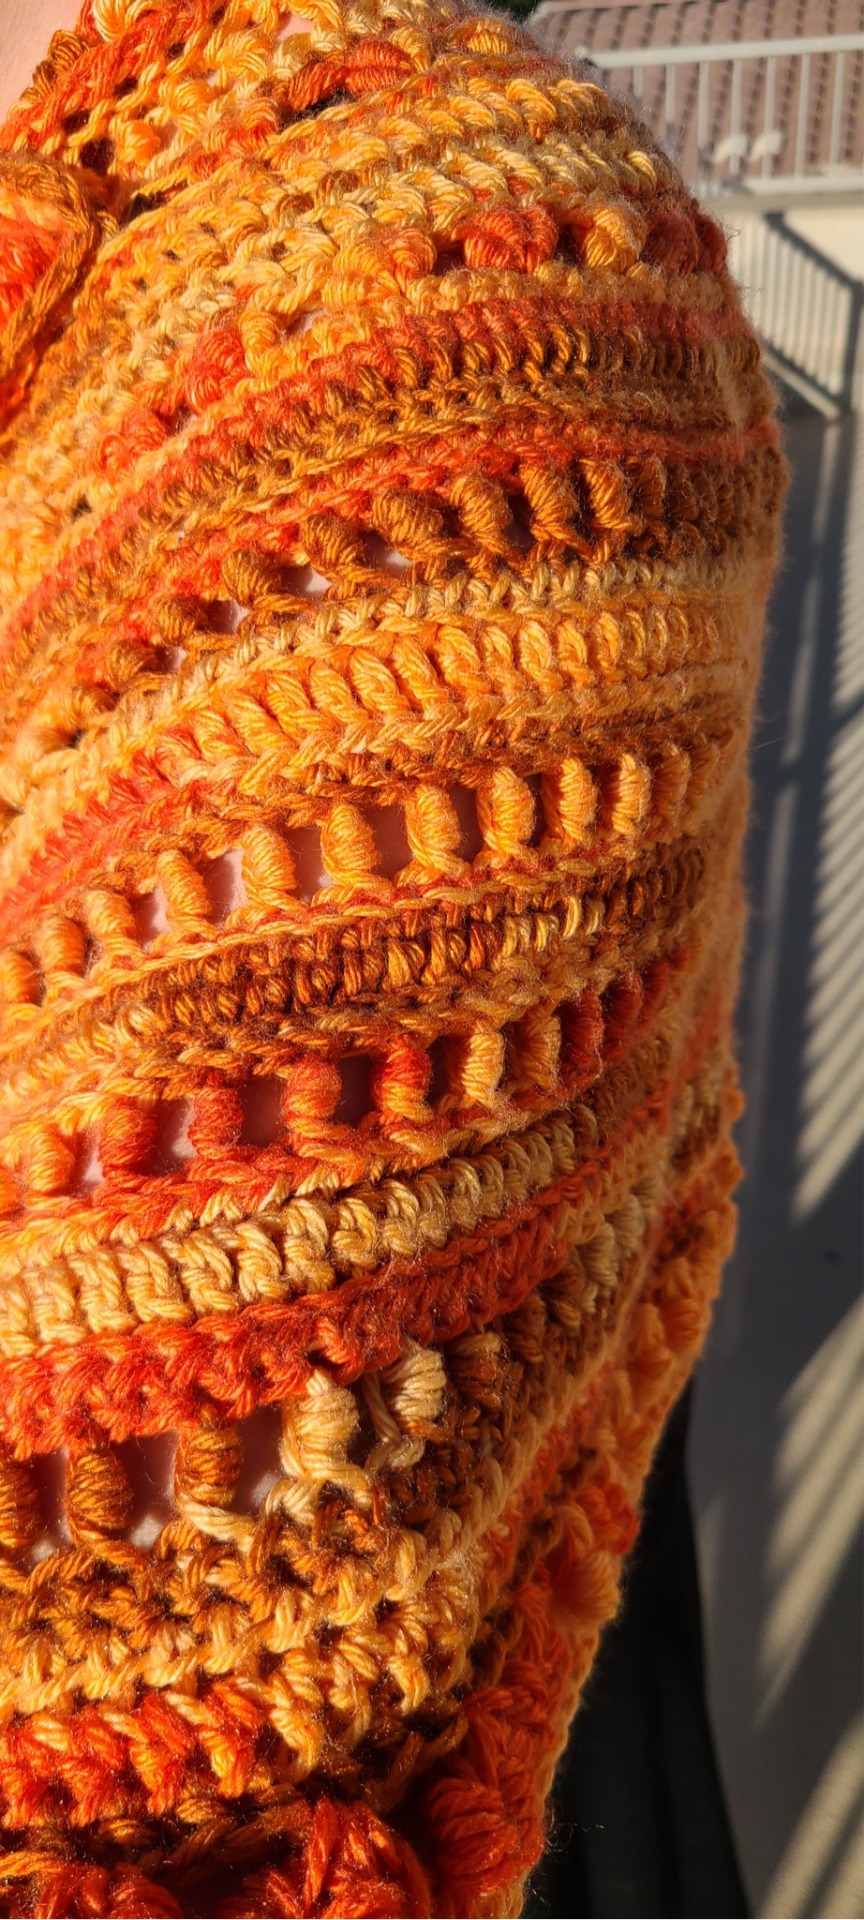
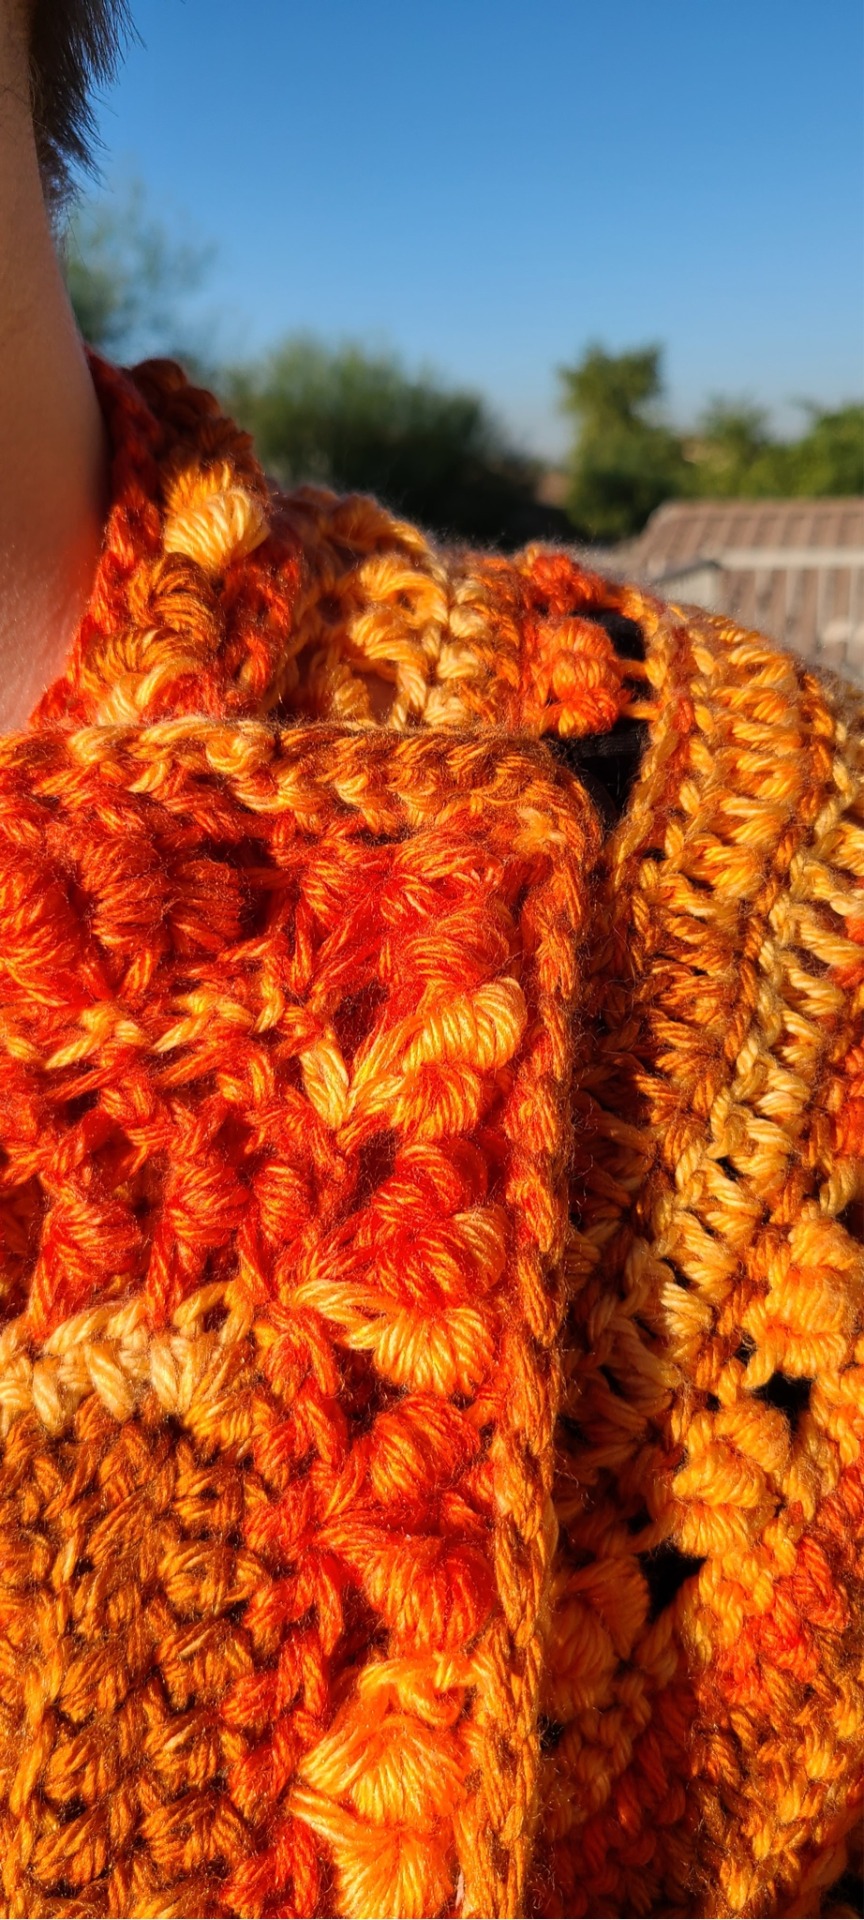

(Don’t mind my facial expression, I was staring almost directly into the sun in a couple of these.)
I first saw one of these in one of my mom’s crochet magazines in the early 90s, and have never seen one since. “Cross my heart” might have even been the name of the pattern, not the item, and this is merely an attempt to reverse-engineer it. But as you can see, this particular heavy shawl does in fact cross the heart, and buttons from the inside in order to adjust wherever you like. (You can also wear it inside out if you want to, but there aren’t two buttons, so it’s not as adjustable in that direction, and also the pattern will look slightly different.)
The cross-my-heart is ideal for times of year when a sweater or blanket is too damn hot and shirtsleeves or bare arms are too damn cold, and is spacious enough for free arm movement. I don’t have access to a wheelchair, but experiments with a kitchen chair show it should also be an ideal length to keep your upper half warm without getting caught in your wheels, if that’s a consideration for you.
The Pumpkin Spice Cross-My-Heart is made of allergen-free acrylic in a smoke-free, dog-free, cat-friendly home, and is available for $120 + shipping (provide an address for shipping calculations). Tips are accepted and appreciated, but not expected.
This particular cross-my-heart was a test pattern due to the whole “had to reverse engineer from something I saw when I was like five” thing, and as such will be entirely unique as I worked out row sizes and, uh, took so long that the entire colorway was discontinued. (Okay, Caron.) In light of this, rather than the usual 12” of extra yarn I normally provide in case of cigarette burns, teething puppies, sharp corners, etc., the Pumpkin Spice Cross-My-Heart will include 24” of spare yarn. I stand behind my work as quality, but also recognize accidents happen.
The cross-my-heart is machine-washable on the delicates cycle. DO NOT WASH WITH ITEMS THAT HAVE HOOK AND EYE CLOSURES, as the item features decorative barrel stitches.
Interested? DM me! Not interested but want to help me fix my mathematical screw-up? Reblog, and keep an eye out later this week for further items!
379 notes
·
View notes
Last Seen Blogs


fasty-slim
Fasty Slim Kapseln Erfahrungen, Test, Kaufen & Preis

tananoyaarchive
♥ yes homo ♥

monarks-friends-germany
➰Monarks Friends Germany➰

galeocerdoc
Ad Libitum