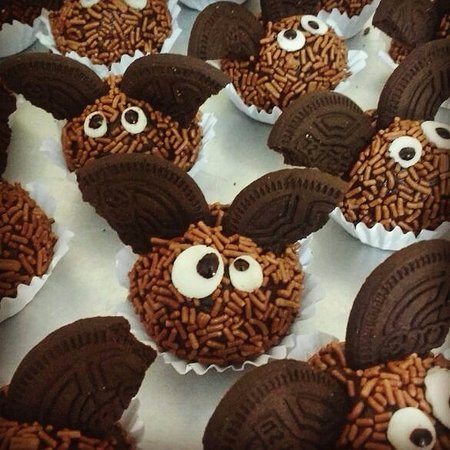
#then roll them on chocolate or sugar sprinkles of your preferred colour and flavour
Note
Trick or treat! :)
Have a spoopy brigadeiro, love 💕
#this is Halloween this is Halloween#tr-ashdog#these are very easy to make btw#melt one tablespoon of butter for every cup of condensed milk youre gonna use#put it in the pan with some cocoa powder on a low fire and stir until it gets all melty and gooey#keep stirring until the cream thickens enough to detach from the pan as you mix it#let it cool down a bit then coat your hands with a thin layer of butter and roll it into little balls#then roll them on chocolate or sugar sprinkles of your preferred colour and flavour#answered
3 notes
·
View notes
Text
Sweet as You
Author’s notes: I’m salty that the event will not give me Lucifer and Luke’s card so instead I’m replacing it with sweet headcanons about the essence of the datables’ kisses and what chocolates you’d give, plus a little bit about how you and Luke teamed up to make them!
Content warning: food, chocolate, candy
Length: 2.4 K
Lucifer
You make a coffee bonbon for Lucifer. The shell is dark chocolate with two streaks of colour painted on—one in your favourite colour and another in his. The filling is an espresso ganache that highlights the bitterness of chocolate and coffee while ensuring the bonbon is never too sweet
Lucifer is both impressed with the flavour and the obvious care you’ve put into crafting this confection. He offers to prepare some drinks so you two can enjoy the chocolate together
Kissing Lucifer is being swept up in each other. It feels like passing by each other in castle walls, then hiding behind pillar to exchange impassioned kisses and whispers of love. The world might be continuing around you, but in that moment only the two of you matter
Lucifer feels clarity when kissing you. Everything else melts away and all that is left is the feeling of your lips and the warmth of your love. Your kisses contain an oasis and Lucifer finally feels like he can relax
Mammon
Mammon gets a fancy gold leaf bonbon that has a glossy shine. And to his delight you’ve gifted him liquor chocolate filled with an expensive Demonus that’s all the rage lately
Naturally, Mammon enjoys the chocolates because they’re fancy. However, the real reason he adores them is that they are proof that, to you, he is someone worth splurging on in both effort and money
Kisses with Mammon are messy and unexpected yet both of you feel like you’ve waited forever for this. The first taste of you isn’t enough, and Mammon becomes addicted pretty quickly. It’s a rush, like betting on a rolling dice or a flip of a card while on a winning streak. He feels like he’s losing all good sense yet so sure this is the right decision
His love for you is neither neat nor compartmentalized and neither are his kisses. It’s bubbling affection that he just can’t contain anymore. No matter how many lies he verbalizes, the blush on his visage and the way he greedily steals kiss after kiss says enough
Levi
You craft a chocolate treat based of a scene in TSL! There was a cute scene between Henry and the Lord of the Shadows where they eat chocolates, sharing one last sweet moment before having to part. You decide to recreate it by creating milk chocolate bonbons with a salted caramel filling, making sure to use a mold which creates the right shape!
Levi is floored. He knows EXACTLY which scene these chocolates are from, down to the page and line numbers. He simply gawks for a while and then proceeds to basically have a photoshoot. When he finally takes a bite, you can see the way his face lights up and it’s worth all the effort
Kisses with Levi are an adventure with ups and downs, bumps in the road, but a treasure chest at the end. When you first kiss him, he’s a blushing mess with brain working overtime to suppress his fight or flight instinct. But in spite of himself, Levi leans in and trusts you because no one treats him with this tenderness
His world is still small, aside from his brothers and Lotan, everything he loves could probably be contained in his room. But your kisses expand his horizons and maybe he thinks it’d be worth it to explore the world a little more, even if it leaves him vulnerable
Satan
You make Satan a combination of brigadeiros and mint discs for Valentine’s day! He enjoys that you’ve made chocolate confections but veered outside the classic bonbons. Satan likes the soft and chewy textures of the brigadeiros in contrast with the crunchy sprinkles and the unique texture of sugared mint atop dark chocolate discs
Satan happily opens the box of chocolate. He admires them for a bit and compliments you on their appearance before popping one in his mouth. He feels both loved and a little smug, Satan knows a bit about chocolate confections, enough that he’s certain you’ve put quite a bit of effort into this, which makes it all the more sweet
Lay on compliments about how he’s just as sweet as the chocolate, perhaps referencing a book he’s reading, and how all that work was worth it for his sake and you might get him blushing
Kisses with Satan are like browsing a library—the nostalgic smell of old books combined with excitement of discovering new worlds contained in pages. You’ve had more kisses with Satan than you can count, but even with that familiarity, you feel like you’re uncovering something new each time your lips meet
Asmo
Asmo knows the value of appearance so you ensure your chocolates look just as good as they taste. You make white chocolate disc in the shape of hearts and adorn them with sugared petals. Additionally, you create passionfruit bonbons with cute heart indents which look picture perfect.
Asmo takes a selfie with you while you each hold a chocolate confection. Sweets for your sweetheart!~ It’s cute.
But then you bring up how you chose passionfruit for its refreshing taste, so its easy to continually eat the chocolates, because just like the bonbons you’ll never get sick of him! It’s such a small detail but it warms his heart and suddenly you’re trapped in a hug
Asmo’s kisses don’t neatly fit into any single category. He is sweet, masterful and practiced, playful and lets you take the lead, but he is always sincere in his affection to you. Kisses are one of many ways to reaffirm your love
His kisses are like eating an assorted box of chocolates. One kiss is light and flirty, the next is sensual and stroking desire, then another which is teasing and light while interspersed with giggles. Yet all of them leave you with a sweet feeling
Beel
You make Beel a big pile of semi-sweet chocolate bark with variety of toppings, one has freeze dried raspberries, another has almonds, some use hellfire peppers, it’s a whole buffet
Beel plants a kiss on your forehead and thanks you so much for the gift! He begins to dig in to the treats you’ve made and has an endearing content grin the entire time he wolfs the chocolate down. He does his best to remember to offer you a bite too!
Many of Beel’s kisses start off as innocent fondness and true devotion. He loves you and you can feel it in the way he holds you close to him and devours all the affection you give.
But many of his kisses turn hungry, because he can never get enough of you, the taste of your lips, your sweet moans, the way your hands roam, the puffs of hot breaths, they all never fail to leave him wanting more. His kisses feel satisfying and fulfilling, because you get to indulge to your heart’s content
Belphie
You make Belphie coconut oil chocolates! They’re so easy to eat, he doesn’t even need to chew. You have to be careful to not melt them when making and handle the individual morsels, but it’s worth it all in the end
You surprise him by popping the chocolate into his mouth! You’re lucky he trusts you, if it was anyone else he’d probably have spit it out. It’s easy to bite through and melts to spread a pleasant chocolate taste across his mouth.
Probably muttered something under his breath, but he makes sure to thank you for the gift too, even if he is a little blasé about it. At least these ones aren’t dusty
Belphie’s kisses are lazy little things with missed lips and little laughs, huffs of air, and that smirk that makes you want to kiss him stupid until he can’t pretend to be relaxed. Random pecks in the morning, between naps, before bed, but if you ever ask why, the answer is “just because”
Occasionally your kisses are salvation and desperation. No life, no relationship, no person is without turbulence. Your hot breaths prove you’re alive and breathing, the love your pour into him as your lips meet prove he is worthy of affection, and he doesn’t intend to let go
Diavolo
You make Diavolo white chocolate matcha bonbons! The inside is filled with a smooth matcha ganache that’s a brilliant shade of green. The shells are painted with the rough silhouette of your favourite flower. The matcha flavour helps balance out the sweetness of the white chocolate, making a delicious treat
Diavolo is delighted by the gift and compliments the taste! But he also enjoys the story that goes with it when you tell him your thought process, how matcha has become popular across the world in the human realm, and what human traditions are attached to the gifting of chocolates
He’s already plotting what he wants to give you in return, but for now he’ll enjoy your heart felt confection while making sure to give you a piece
Kisses with Diavolo are like fireworks. No matter how many times you see them, they never lose their brilliance. Even if they aren’t always in the sky, they bring you joy each time you see their bright colours and sparkling streaks
Diavolo intends to indulge you in kisses. Even the short ones, before meetings, after class, the domesticity tickles his heart. But Diavolo’s preference leans to long kisses where the two of you meld together. Everything is you, your unique scent, the way his name leaves your mouth, the way you hold onto him, your taste alone makes him want to dive deeper
And why stop at one kiss? He should have another for good measure, maybe two, three, four—well now there’s no point counting so you might as well continue
Barbatos
You make strawberry shortcake inspired chocolates for Barbatos. The bonbon shell is made with ruby chocolate with the filling consisting of whipped white chocolate ganache and strawberry preserves.
The several components merge together to make a sweet dessert and Barbatos appreciates how you use the novel ruby cocoa. Barbatos out of everyone knows how much work must have gone to create these bonbons and makes sure to both savour it and compliment you
Kisses with Barbatos are like sharing a secret. You get special access to a gateway into him, and in these kisses you create a special place just for the two of you
His kisses are almost dangerously good, you swear kissing didn’t always feel this good. But his intensity, the way it’s only the two of you, the mere privilege it is to have him whisper sweet words between gilded kisses, it makes it worth all the wait
Simeon
You make Simeon earl grey tea truffles! You coat the truffles with milk chocolate to create an easy to hold shell. Then you have stripes of dyed white chocolate — one in your favourite colour and another in his.
Simeon thinks it’s adorable at how your chocolates have become a matching couple item with the coloured stripes. He thinks it’s lovely how you made him tea flavoured chocolate, given how many fond memories the two of you have which centre around a cup of tea
Simeon kisses make you feel treasured. He peppers your face is soft kisses, he cups your cheek gently, and the adoration in his eyes almost overwhelms your heart
His love is all encompassing and you’ve never felt safer than when you’re in his arms. Beautiful lashes fan his cheeks, contended sighs, and underlying warmth. Simeon feels like home and with his kisses, you’re falling in love again
Solomon
You know Solomon likes cupcakes and poisoned apples so you decide to combine the two! You make him an apple cakepop coated in coloured white chocolate to look like a poisoned apple!
Unlike his cooking, your sweet tastes delicious and leaves the eater happy. You make sure to use granny smith apples to retain some tartness and Solomon happily eats the confection.
Unfortunately, your sweetheart has also made sweets to express his love for you. Don’t let Solomon give you chocolates back or use a trick to dispose of them! It is not romantic to spend the day puking or sick in bed. Or hey, maybe true love is eating it knowing that it spells out nothing less than doom
Kisses with Solomon feel like an exploration. You get to know him bit by bit and each kiss feels like proof he is wiling to vulnerable with you. Some trips result in airy kisses, others feel like rocky days at sea filled with passion and you’re in danger of running out of breath, it’s always an adventure
Sometimes, you swear you can feel his lips form a smug smile. Other times, he approaches you so gently and the touch of hesitancy, like he can’t really believe he got you, makes you want to shower him with enough love to wash away all doubt. He holds you tight, to him you are warmth and intimacy, and he never wants to let go
Bonus: Making Chocolates with Luke
When making chocolates with Luke, it is best to be sweet with him, guide the angel with soft suggestions without sounding like you’re babying him. Generally, Luke is pretty amendable but he can have a stubborn streak if he feels like he has something to prove
He makes for chocolate confections for Barbatos, Simeon, Micheal, Solomon and you! It’s so cute to see him so excited when he thinks about how happy everyone will be when they receive the gift
You two go through many spoons to check if the chocolate is tempered, rapidly tapping the chocolate to see if it has that snap and sighing when it blooms
By the end of it, you two are a mess with chocolate smears on your apron, but you have nice assortment of shiny chocolate sweets
#obey me x reader#obey me lucifer x reader#obey me diavolo x reader#obey me mammon x reader#obey me levi x reader#obey me asmo x reader#obey me satan x reader#obey me beel x reader#obey me belphie x reader#obey me barbatos x reader#obey me simeon x reader#obey me solomon x reader#obey me luke#obey me luke & reader#lucid dreams#cw.food#cw.chocolate
256 notes
·
View notes
Text
Commission#4
For @vchanny-og
Prompt: Makoto teaches the girls to cook. To commission me please click here for information! To see what other people are offering up commissions please see here!
The recipe for peanut butter cookies is fool-proof, three-ingredients. Four, if you added chocolate chips. The first time that Makoto had made them, Usagi had eaten two dozen by herself, and when she’d found out how easy they were, she’d begged and whined and pouted until Makoto had agreed to teach her.
“Mamo-chan would love these, don’t you think? Especially if we add chocolate! And peanut butter is healthy and has lots of protein so he wouldn’t even disapprove!”
Eggs. Crunchy peanut butter. Sugar. Chocolate chips. Parchment-lined baking sheet for 11 minutes at 170 degrees Celsius.
Makoto lines up all the ingredients on the counter, helpfully preheats the oven to the correct temperature. She goes out to her balcony to check on her plants, and is halfway through dead-heading some leggy basil when the smell of smoke comes wafting through the open door. Thoroughly alarmed, she drops her clippings and runs in, yanks the oven open to find lumps of what look to be charcoal. Usagi’s wail could pass for a fire engine careening onto the scene complete with lights and sirens.
“I don’t know what happened, Mako-chan! I didn’t do anything except what you asked, and now everything is ruined and there are NO COOKIES and you are probably going to be mad at me!”
With a long, windy sigh, Makoto checks the counter. Peanut butter, check. Sugar, check. Chocolate chips, check-- and if she’s not mistaken, Usagi dumped in about half a cup more than the recipe called for. A bowl of cracked open eggs, yolks almost mockingly bright orange, winked up at her.
Makoto shakes her head, sends Usagi out to the bakery, and cuts up some peppers and tomatoes, retrieves her snipped basil. It seemed like she’d be having omelettes for dinner.
**
“So we sear the steak at a high temperature in a cast-iron skillet to take advantage of the Maillard reaction for the sake of optimal flavour.” Ami scribbles some type of complex chemical molecule diagram on the margins of the recipe that she’d meticulously copied from Makoto’s cookbook, and does a few equations, and murmurs to herself. “I suppose that makes sense. The temperature of the cooking surface will exceed 140 degrees Celsius, which will cause the reactive carbonyl group of the sugar present in the molecule interact with the nucleophilic amino group of the amino acid.”
“Yeah. Something like that. And then you finish in a low and slow oven so you don’t overcook the meat. This is an expensive cut of steak-- you don’t want it to be cooked to death.”
Makoto did not care over-much about the complex chemical reactions and science behind the process-- it was enough, really, to know that as long as one controlled the temperature and time, and seasoned the pricey cut of beef simply but well (sea salt, coarse-ground pepper and a few sprigs of rosemary), one could have a fancy date night meal in the comfort of one’s own home. “Medium rare is the optimal doneness for steak, in my opinion. Use a food thermometer, cook it to 54 degrees Celsius, then rest for three minutes before slicing, and you’re good to go.”
“I understand the reasoning behind safe internal cooking temperatures,” Ami muses as she follows Makoto’s lead, carefully wiping down the cherry-red surface of her steak with a paper towel to dry it, then sprinkling on salt and pepper on both sides. “Obviously, you don’t want harmful disease-causing microorganisms to grow within your food product, and it either needs to be too hot or too cold for the bacteria and viruses and fungi to survive. But why are there exceptions to the rule? Your recipe says that a rare steak reaches the internal temperature of 51 degrees, a medium rare of 54, a medium of 58 and so on. Doesn’t that put the person who prefers to eat their steak rare at greater risk? How does a restaurant get around that liability? It’s not as though it can do a medical check of the customer to ensure that they have no history of immunological disorders or gastrointestinal problems. And what about nations which choose to ignore these limits altogether? We serve sushi and sashimi here in Japan, which is certainly not cooked to 62 or highter. The French have their Carpaccio and tartare. The Lebanese have their kibbee nayee, and so on.”
Makoto watches as Ami grinds exactly three shakes of pepper onto each side of her steak, then rolls her eyes. “How does your guy like his steak cooked? That’s all I need to know.”
Ami blushes almost as red as the meat she’s fiddling with. “Umm. Medium rare is fine. And he’s hardly ‘my’ guy. More of Mamoru’s, wouldn’t you say?”
“You’ve already split hairs over the science of cooking. I don’t think I have enough energy to argue over the exact nature of your relationship with the mouthy blond menace. Do you think you can put together a nice green salad to go with these steaks? That way we can get done quicker, and I can make myself scarce before he comes here.”
**
Makoto knows better than to attempt to teach Rei anything too outlandish in the kitchen. Rei is a traditionalist in every sense of the word, and probably would not be caught dead in some hipster gastro-pub serving deconstructed salad of micro-greens topped with lobster foam something-or-another no matter how many Michelin stars and James Beard awards the place might have won. Rei is also reasonably competent with her hands and not particularly accident-prone, so something like steamed gyoza seems right up her alley. Sure, making the filling and dough from scratch is an extra effort, but her friend had never been the type to settle for mediocre and ordinary.
Her first warning that things might not turn out quite so well is when Rei takes a full step back when she sets the food processor on the counter. “What is that?”
Her tone could only have been snottier had the food processor been possibly coated in dung and mildew and maybe plastered with boy band stickers. “It’s a food processor. So we can easily chop up the chives, grind up the pork.”
“I have a perfectly serviceable set of knives here.” Rei turns up her aristocratic little nose and points to the knife-block, which, to be fair, holds a set of heirloom-quality blades. Trust the senshi of war to know her sharp objects, Makoto thinks drolly, but she acquiesces. “All right. You can mince the chives with that, I guess. But I’m using the food processor to grind the meat.”
They both get to work, and Rei glares at the machine as soon as it starts up as though the noise offended her on a personal level. She’s not bad-- indeed, her cuts are decent even by chef standards, but by the time Makoto has finished up her meat and mixed in soy sauce and ginger and garlic and a pinch of allspice and an egg, she’s only about a quarter of the way done with her chives. Slowly and stubbornly, she soldiers on as Makoto measures out flour and water and a pinch of salt.
“What in the world is that?”
Now, the question is directed towards the stand mixer plugged into the wall outlet. Makoto doesn’t even dignify that with a response, and dumps in flour, salt and water, lets fly. Sure, she can knead the dough by hand if she wanted to. And stretch it, cut it, roll it out for the dumpling wrappers. And maybe, if he’s very, very lucky, Jun would have gyoza sometime within the next two years. She’s just about ready to start rolling the dough when Rei finally finishes cutting the chives by hand, and dumps them into the bowl of the ground meat mixture, scowling at the way the damp green mince clings to her fingertips. Makoto finishes mixing the filling, then shows Rei, quickly, how to pinch the edges of the dumpling shut.
She waits until the knives are washed and put away and the pot is simmering before turning to her friend with a mischievous look, tongue firmly tucked in cheek. “Well. I’m sure Jun will appreciate your painstaking work on this meal, doing things the old-fashioned way by hand. He’ll know just how much you care from the sheer effort you went through.”
If looks could kill, Makoto would be buried six feet under complete with an ugly angel-shaped monument and an elaborate wreath of flowers on her grave. She manages to keep a straight face while she takes the dumplings out the pot, then excuses herself. She’s still laughing when she arrives at her own apartment a good half-hour later.
**
Leave it to Minako, of course, to want to learn the most complicated, exotic dish of them all.
“I think it would be perfect! He doesn’t eat pork or beef, and I love spicy food, and I know you’ll help me and it will turn out wonderfully!”
Makoto eyes the recipe bookmarked on Minako’s phone-- very heavily starred on Pinterest, and apparently the handiwork of some world-renowned celebrity chef. “Indian lamb curry, though? That’s… quite ambitious of you, Minako.” Indeed, the list of ingredients is daunting in and of itself, even for a seasoned home cook, and Minako’s idea of gourmet home cooking generally involved cracking an egg over her boiling ramen noodles.
“Oh don’t you worry. I’ve watched a TON of youtube videos. And cooking reality shows. That Gordon Ramsay is HILARIOUS. And it all goes into the slow cooker, so it hardly requires fancy techniques and knifework and the like. All I have to do is toss everything in there and push a button and spend the rest of my time making myself look gorgeous and sexy, right??”
Makoto eyes the recipe again. She’s pretty sure that Minako has never heard of the term ‘garam masala’ in her life. “Maybe you should at least let me taste it before you serve it. Just in case.”
Six hours later a mostly-decent-looking sample of the dish is placed in front of her. The curry is an appetizing orange-brown colour, and the kitchen smells invitingly of spices. Minako had even taken the time to toss some finely chopped parsley onto the meat for a pop of bright green. Makoto is pleasantly surprised, and gives Minako an approving smile which lasts all of three seconds-- the three seconds it takes to put a piece of the meat in her mouth. She gags, and spits it out. “Oh, GOD! What did you put in this?! It tastes like the Dead Sea… if the Dead Sea were on fire!”
Minako shoots her a wide-eyed look from those baby blues, thoroughly bewildered. “Welllllll… all these videos said to salt with every step of the cooking pricess. So I did. It was probably like close to half a cup of salt total, because I added some after every other ingredient. And then I didn’t have tomato paste so I substituted ketchup. Basically the same thing, you know? And I didn’t have the tablespoon of fresh ginger, so I used a tablespoon of ginger powder, and shelled pistachios look just like cardamom pods for like a tenth of the price, and I used Old Bay seasoning instead of Bay leaves… But the only thing I absolutely couldn’t figure out at all was this ‘garam masala’ stuff! So I left it out.”
Without a word, Makoto dumps the entire contents of the slow cooker into the trash, picks up her phone, and dials the local Indian restaurant, Within short order, two takeout containers are delivered-- an Indian lamb curry, and an accompanying container of cheese naan and rice.
“Just… put it in your own plates,” Makoto tells the other girl, shaking her head between gulps of water. “The kitchen smells like you’ve been cooking all day. It’ll be our little secret and he will never, ever know.”
12 notes
·
View notes
Text
How Do I Cook Game So It Doesn’t Go Dry?
Venison and pheasant are full of flavour, but it’s easy to spoil them. Here’s how top chefs cook game …
• Got a Culinary Dilemma? | Email [email protected]
— Anna Berrill | Tuesday, 09 November 2021

Pheasants are abundant, affordable and very tasty – so long as you know how to cook them. Photograph: Piotr Krzeslak/Getty Images/iStockphoto
Every autumn, we’re urged to eat more game, but my local supermarket has only venison and pheasant, both of which always end up dry when I cook them. Help!David, London EC2
“Ethically, wild game is a good choice for meat-eaters, because the animals live free and for much longer than farmed or managed animals,” says James Lowe, chef and co-founder of Lyle’s in London. “It also has an incredible flavour.” Game is a lean meat, and so, as David has found, can easily dry out. “Things running through the forest are not sitting there being hand-fed buttermilk, whey, oats and barley to put on a layer of fat,” says chef and restaurateur Richard Corrigan. “If you whack a whole pheasant in the oven, you’ll never get the result you’re looking for.”
The best approach for game birds, Corrigan says, is to treat the breasts and legs differently. He removes the latter, adds coriander, black pepper and orange zest (you could also chuck in some pancetta, squash and chestnuts), then “roasts at 175C for 45-50 minutes, checking to see when they’re tender”.
For Lowe, meanwhile, the key is a digital probe or oven thermometer: Pheasant crown goes in a hot pan with foamy butter to colour, then you transfer to a rack and “roast at 110C until the core temperature hits 57C, which will give you slightly pink meat – think dreamy roast chicken.” Lisa Goodwin-Allen, executive chef of The Game Bird at The Stafford in London and Northcote in Lancashire, also subscribes to the low-and-slow mantra, setting her oven to 120C: “Use a flavoured or herb butter under the skin, so the bird roasts and poaches at the same time, then turn up the heat to 210C for the final 10 minutes, to crisp the skin.”
Corrigan sprinkles the breasts with warmed, crushed peppercorns, grated chocolate and orange zest, puts the lot in a freezer bag and adds orange juice, butter and calvados. “Leave that to marinate for about three hours, then gently steam/poach the breasts in the same bag for eight minutes.” Cool, pat dry, seasonand lay skin side down in a hot pan with olive oil and butter. “Brown it as much as you can – the meat should be cooked through – then put in a 190C oven for a final blast for three to four minutes.”
Venison, on the other hand, should be cooked “rare to medium-rare”, says Lowe, who sears loin, fillet or haunch in veg oil on the hob first. “Once it’s got a bit of colour, add butter and keep rolling the meat in that.” Transfer to a rack and pop in a 110C oven until the core temperature reaches 51C – “It won’t be dry, guaranteed.” Goodwin-Allen also sears venison loin before transferring it to the oven, because it ensures even cooking. Her top tip? “Finish in a hot pan with a touch of icing sugar to caramelise.”
Corrigan, however, prefers his venison carpaccio-style: sprinkle a seam-boned haunch (ask your butcher) with a mix of coriander, cumin, black pepper and lemon zest, “colour the outside, rest, then slice paper-thin”. Essentially, he says, when it comes to game, “treat it with lightness and respect – but be slightly eccentric, too”.
0 notes
Text
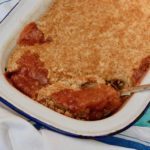
One crumble recipe, eleven different desserts. This recipe for classic rhubarb crumble is made with only four ingredients. But in case you want something a little fancier, you’ll find ten easy ways to add variety and flavour.
Rhubarb crumble is a classic British pudding and everyone seems to have their own version of it. It’s absolutely delicious served warm with custard, although cream is good too.
Classic Rhubarb Crumble
Sometimes, you just want a basic recipe with no frills and furbelows. And this classic rhubarb crumble pares things right down to the basics. It contains only four ingredients and is really quick and easy to prepare. It’s also absolutely delicious.
Pulled rhubarb from our allotment.
It’s the trimmed sticks you need for this recipe.
I adore rhubarb and always look forward to the season. This is the first year for many years that we’ve harvested our own and it’s really quite exciting. With the first of the crop, I just want to make a rhubarb crumble.
Chop the rhubarb into roughly 2 cm pieces.
Scatter the rhubarb pieces with demerara sugar.
The crumble takes a little while to cook, but the hands on bit only lasts for ten minutes. All you need to do is chop some rhubarb. Place it in a greased oven proof dish and sprinkle some sugar over the top. Then rub butter into wholemeal flour along with a bit more sugar and spoon over the rhubarb. And bake! So simple, so quick, so easy.
Crumble topping prior to baking.
Crumble topping once baked.
Don’t worry too much about quantities. After all, this is your crumble and you should make it exactly how you like it or according to how much rhubarb you have. If you’ve got a bit more rhubarb, so much the better. Maybe you’ve got less, that’s fine too. If you prefer to have less or more crumble, just decrease or increase the amounts accordingly.
A good crumble falls into three distinct layers, sometimes four. There’s a rhubarb layer at the bottom, then a layer where the rhubarb juices soak into the crumble as it cooks. That’s the best bit I reckon. Then you have the crumbly top. You can also get a crunchy top layer, but you’ll need to look at one of my ten variations for that.
Rhubarb crumble is best served warm. Leave it for five minutes or so after it comes out of the oven. Because if it’s too hot it’s likely to burn your mouth. Serve it with warm custard, pouring cream, ice-cream or for a special treat, clotted cream. ‘Ansum.
Sugar
Rhubarb is quite sour, so depending on how sweet you like your puddings, you may want to add a little more or a little less than the stated amount of sugar in the recipe. I don’t like my fruit to be too sour, but nor to I like overly sweet puddings.
You can use any type of sugar in this classic rhubarb crumble. Each one will give a different taste and texture. I like to use demerara sugar with the rhubarb as it just seems to work well with it. But I prefer golden caster sugar for the crumble. It’s easy to mix in, doesn’t colour the crumble and the flavour isn’t as overt as most of the others. Muscovado will give varying degrees of caramel notes, depending whether you use light or dark. Other brown sugars will do much the same thing.
How Do You Make Vegan Rhubarb Crumble?
The humble crumble is a particularly easy pudding to veganise. All you need to do is swap the butter for solid coconut oil or a vegan butter. I use coconut oil as it doesn’t have any additives and it also gives a nice coconutty flavour.
Can you Make Gluten-Free Rhubarb Crumble?
Yes you can. Similar to the vegan version, all that’s needed to make this classic rhubarb crumble gluten-free is a simple swap. Use your favourite gluten-free flour instead of wholemeal wheat flour. I really like The Free From Fairy’s gluten free wholegrain flour.
Ten Variations on Rhubarb Crumble
At the start of the season, I always like to go for this basic rhubarb crumble recipe. There’s elegance in simplicity. And I really appreciate that lovely bracing fresh rhubarb flavour. However, when rhubarb becomes more abundant, I like to jazz it up a bit. So here are ten variations you can make to this classic rhubarb crumble if you so wish. You can also mix and match and use several of the variations in one dish. The permutations are endless.
Crunchy Top. Sprinkle a tablespoonful of demerara sugar over the top of the crumble prior to baking.
Ginger. The flavour of ginger pairs really well with rhubarb. You can do one of two things or even both. Chop some stem ginger and add it to the rhubarb along with some of the syrup. Or add some chopped crystallised ginger. If you prefer your ginger in the topping, then add a teaspoonful of ground ginger to the crumble ingredients.
Orange. Orange is another classic rhubarb partner. Squeeze the juice of the orange over the rhubarb before covering it with crumble. Then grate the zest into the crumble topping.
Strawberries. Rhubarb and strawberries isn’t an obvious pairing, but it’s an old one and a good one. Replace 100g of the rhubarb with strawberries.
Rose. Unless you’re a regular reader of Tin and Thyme, rhubarb and rose is a little known but effective partnership. I always use my homemade rose syrup, which is incredibly easy to make. But you can use rose water instead. If you use rose syrup, add two tablespoonfuls to the rhubarb prior to adding the crumble. But reduce the amount of sugar to 20g. For rose water, simply sprinkle a teaspoonful over the rhubarb.
Honey. Rhubarb and honey is another lovely combination, as I know from these rhubarb honey cakes. Just swap the sugar in the rhubarb part of the recipe for three tablespoons of honey.
Cardamom. Although many know about ginger, cardamom is another spice that complements the flavour of rhubarb. Cardamom is quite powerful, so it’s best to er on the side of caution. You can either add a ¼ of a teaspoon of ground cardamom to the rhubarb or to the crumble.
Nuts. Nuts are lovely in a crumble topping. You can either use ground nuts or chopped nuts. Swap 50g of the flour for ground nuts. Or just add 50g chopped nuts after you’ve rubbed the butter into the flour. Ground almonds or chopped walnuts are my favourite nuts to use.
Oats. The addition of rolled oats makes for a chewy crumble topping with a subtle oaty flavour. Use 25g less flour and stir the oats into the crumble after you’ve rubbed the butter into the flour.
Deconstructed Rhubarb Crumble. If you’re entertaining, you might want to serve something a little fancier than a humble crumble. Try roasted rhubarb with a crunchy topping tossed over the top. Cut the rhubarb into slim finger length batons. Sprinkle the sugar over the rhubarb and roast in the oven at 200℃ (400℉, Gas 6) for about ten minutes or until the rhubarb is soft, but still holding its shape.
For the crumble, use the recipe in this apple crumble and custard cakes. Bake on the lower shelf of the oven whilst the rhubarb is roasting. You’ll need to stir it about half way through to make sure it doesn’t burn. Alternatively use the “base” recipe in this apricot whisky honey cheesecake. Sprinkle over the rhubarb just before serving. Or you could allow guests to sprinkle it on for themselves.
Other Rhubarb Puddings and Dessert Recipes
Champagne syllabub with orange rhubarb compote
Mini chocolate & rhubarb pavlovas
Rhubarb & almond cream pasty pie
Rustic rhubarb galette with orange spelt flaky pastry
Waffles with rhubarb & rose compote & rose cream
White chocolate & rhubarb ice-cream (no churn)
And for even more rhubarb recipes take a look at my rhubarb category.
Keep in Touch
Thanks for visiting Tin and Thyme. If you make this traditional rhubarb crumble, I’d love to hear about it in the comments below. Do share photos on social media too and use the hashtag #tinandthyme, so I can spot them.
For more delicious and nutritious recipes, follow me on Twitter, Facebook, Instagram or Pinterest.
Rhubarb Crumble. PIN IT.
Classic Rhubarb Crumble – The Recipe
Classic Rhubarb Crumble
This recipe is for a basic rhubarb crumble and it's made with only four ingredients. But in case you want something a little fancier, you'll find ten easy ways to add variety and flavour in the blog post.
400 g trimmed rhubarb (6-8 sticks) ((14 oz))
40 g demerara sugar ((1½ oz))
120 g wholemeal flour ((4 oz))
60 g salted butter – cubed ((2 oz))
40 g golden caster sugar ((1½ oz))
Chop the rhubarb into 2 cm chunks and place into a greased ovenproof dish.
Sprinkle the demerara sugar over the top.
Place the flour and sugar into a large bowl. Then add the cold butter cubes. Rub between your fingers until the mixture resembles breadcrumbs.
Spoon the crumble over the rhubarb and bake in a preheated oven at 180℃ (350℉, Gas 4) for thirty minutes or so. The top should be golden and the rhubarb juices bubbling up around the edges.
Serve warm with custard, cream or ice-cream.
To make a vegan version, swap the butter for solid coconut oil or vegan butter.
For a gluten-free version, swap the wholemeal flour for gluten-free flour.
You can easily half or double the quantities of this crumble. You’ll need a bit less cooking time for a smaller crumble and about ten minutes more for a larger one.
Please note: calories and other nutritional information are per serving. They’re approximate and will depend on exact ingredients used.
Sharing
I’m sharing this simple rhubarb crumble with Lost In Food for #CookBlogShare.
Rhubarb Crumble – a Classic Dessert with Ten Variations One crumble recipe, eleven different desserts. This recipe for classic rhubarb crumble is made with only four ingredients.
0 notes
Text
Best Cupcakes Near Me
Just the best cupcake shops and suppose to cover your cupcake utilizing white frosting so that it will look like snow. I am going to share some approaches on how to name your cupcake store, some generally used words and a few questions that you should ask yourself when selecting a reputation. Some cupcake shops don't have the title cupcake or bakery but they merely use words like sugar, candy, delight, scrumptious or tasty. Putting the powdered sugar right into a flour sifter, place the stencil atop a cupcake and sprinkle gently; paper doilies work extraordinarily properly for this and the ease in utilizing this technique is appealing for busy mothers. I will certainly use this technique once more. They use such simple elements that you just probably already have in your pantry too - rating! Miffins have develop into extra widespread now. If the consistency is just too thick, add extra heavy cream to the mixture, one tablespoon at a time. Cream together the butter and sugar in a bowl until gentle and fluffy.
Stir Scorching Water and Prompt Espresso in a big bowl till the espresso crystals dissolve. No need to plan ahead, make on the spot cupcakes perfectly every time your friends pop spherical. Before you set about making the cake and finishing the decorations you should be clear on the design of cake that you want to have. Perhaps a little less and you might have some batter leftover, but not much. Thanks for adding to my listing of will need to have soon snacks. You can even add this to the checklist since this may assist the youngsters to enhance upon their vocabulary. In many recipes you may exchange the butter with oil. The chiffon cupcakes are a delightful combination of butter and egg-leavened cupcakes. In the meantime, whisk together the butter and icing sugar till soft. You may create a cosy child blanket cake utilizing some superb flavours and colours. You'll be able to decorate your cupcakes with absolutely anything you employ to decorate bigger cakes.
Muffins are more like candy bread that tastes more like sweet cupcakes. Pizza and popcorn ones are nice! It is best to plan on a variety of various sandwiches, hotdogs, pizza slices, burgers, fried rooster pieces, salads, bread rolls and lots of tasty cakes, sweets, and drinks. As with the cakes and sweets, this is primarily for the youngsters. Whereas planning for such events you can even embody the older youngsters in baking and making such cakes. They can be used to promote your small business, to let someone know you care, to say thank you or to offer as a gift. The secret right here is to let your imagination run wild. I encourage you to practice with a number of cupcakes here and there so that you too can construct your first cupcake bouquet. Sprinkles solely offers cupcake delivery by courier in our native markets; however, we ship our cupcake mixes and other retail gadgets.
A number of cakes for supply portals are working in full swing in lots of cities. Line the underside of every pail with 1 buying and selling card-make sure that they're face down so the gamers can not see them. Individual cupcake containers are usually cube or shaped, depending on the scale of the cupcake, although you is perhaps able to purchase circular packing containers in order that your cakes stand out from the group. Glad you want this cupcake recipe. Additionally I made sure I pinned this recipe and added it to stumbleupon. Ensure to leave the center dowel a bit longer so it will be greater than the decrease outer ring. There's nothing like having "slightly something" as a remembrance of a fun day. For instance, we're having cupcakes introduced on a tiered fashion that looks like a marriage ceremony cake as an alternative of the marriage cake. So my Cookie Monster cupcakes have been successful on Fb. For brunch, cupcakes will be topped with varied fruits, maybe matching a fruit compote served with the meal.
You'll be able to embody video games like gown-up relay races, beanbag games, hula hoop, musical chairs and extra. Cakes can either be bought or baked within the type of a crown or a tiara. For example, the day lily is considered edible and makes a pretty decoration, however it will possibly act as a diuretic or laxative. The cupcake Christmas tree and edible Christmas wreath are also good concepts! Fill the cupcake holders 3/four filled with batter and place them in the oven. Fill the gaps with artificial silk greenery or tissue poufs. On high of each cupcake, place some Easter candy equivalent to Peeps, chocolate eggs or candy coated M&M's are decorations that enhance the delicious flavors that go along with the holiday. The cake inside was darkish chocolate with chocolate frosting. A favorite taste with the young and previous alike is always chocolate. They are cherished by many and have been my favorite for a while. Similar to a buffet restaurant, several totally different dessert options are put on display.
Modern Ideas for Wedding Cupcake Displays
More and more often popular bands are using elaborate cupcake displays rather than traditional cakes for special occasions including weddings, baby showers, birthdays, parties or festive holidays. Cupcakes, being little miniature cakes have become highly sought after simply because they have countless great qualities that set them aside from everyday regular cakes.
In the the past few years, the tradition has become changing however. Flower bouquets seem to be a thing bakery near me of the past. In these contemporary times, the lifestyles of individuals have changed. Their preferences, preferences as a whole have an overabundance of or less changed. A new idea of bouquet has emerged in the modern times: a cupcake bouquet. Cupcakes happen to be popular desserts amongst people from all age groups. Butter cream cupcakes are actually popular amongst kids to teenagers. Cupcakes can be bought in different flavors for example red velvet, vanilla, chocolate, coffee, etc. Once these cupcakes have been prepared, place them in fridge for the cream to and harden.
Another thing is deciding on the ingredients. Do not buy a box of mixes cupcakes then serve them, since the cupcakes might already not fresh. Instead, always only serve fresh cupcakes made out of ingredients that you want, whether you make them all on your own or find the freshly made cakes coming from a bakery. The last thing will be the size the wedding ceremony cupcakes. It is always advisable to keep your cupcakes in small size, as you want to give these to the guest like a small desert. Do not have cupcakes with size larger than a tea cup since they is not going to look good when presented. Big cupcakes may also be expensive of income and more time and energy to make. On the contrary, the cupcakes really should not be too small as well. This will result to the cakes run out before every one of the guests can engage in them.
fl_progressive
BakeriesFind a bakery that makes delicious and healthful gluten-free baked goods it really is those in the community who consume a diet clear of gluten. Besides breads, the bakery may make specialty cupcakes and also other gluten-free desserts. The specialty bakery may develop some successful recipes designed to use grains free from gluten, like rice and corn, as well as other ingredients that increase the risk for gluten-free baked goods possible.

Every guest will likely be enjoying at least one cupcake, and you'd be amazed at how lovely being given one can possibly be. Unlike a sliced cake, no guest ends up using a piece with just plain icing at the top or 50 % of a decorative flower; they're a little hand-made treat for you there, each with detail for everybody to admire in close proximity.
0 notes
Text
Best Cupcakes Near Me
Just the best cupcake shops and assume to cowl your cupcake using white frosting so that it will seem like snow. I'll share some approaches on how to name your cupcake shop, some generally used phrases and a few questions that it is best to ask your self when selecting a name. Some cupcake stores haven't got the title cupcake or bakery however they simply use words like sugar, candy, delight, scrumptious or tasty. Putting the powdered sugar right into a flour sifter, place the stencil atop a cupcake and sprinkle gently; paper doilies work extremely well for this and the ease in using this technique is appealing for busy mothers. I will certainly use this method again. They use such easy elements that you just seemingly have already got in your pantry too - score! Miffins have grow to be extra widespread now. If the consistency is too thick, add extra heavy cream to the mixture, one tablespoon at a time. Cream together the butter and sugar in a bowl until mild and fluffy.
Stir Sizzling Water and Immediate Coffee in a big bowl until the espresso crystals dissolve. No have to plan ahead, make prompt cupcakes completely each time your friends pop round. Earlier than you set about making the cake and finishing the decorations you should be clear on the design of cake that you just wish to have. Possibly a little less and you could have some batter leftover, but not much. Thanks for adding to my list of must have soon snacks. You can even add this to the checklist since it will assist the kids to enhance upon their vocabulary. In many recipes you can substitute the butter with oil. The chiffon cupcakes are a delightful mixture of butter and egg-leavened cupcakes. In the meantime, whisk together the butter and icing sugar till mushy. You can create a cosy child blanket cake utilizing some superb flavours and colours. You possibly can decorate your cupcakes with absolutely anything you use to decorate larger cakes.
Muffins are extra like sweet bread that tastes extra like candy cupcakes. Pizza and popcorn ones are nice! It's best to plan on a variety of various sandwiches, hotdogs, pizza slices, burgers, fried rooster pieces, salads, bread rolls and lots of tasty cakes, sweets, and drinks. As with the cakes and sweets, this is primarily for the kids. Whereas planning for such events you can even embody the older youngsters in baking and making such cakes. They can be used to promote your business, to let somebody know you care, to say thanks or to give as a present. The key right here is to let your imagination run wild. I encourage you to practice with a number of cupcakes here and there so you too can build your first cupcake bouquet. Sprinkles only provides cupcake delivery by courier in our native markets; nevertheless, we ship our cupcake mixes and other retail objects.
A variety of cakes for delivery portals are running in full swing in lots of cities. Line the bottom of every pail with 1 buying and selling card-ensure they are face down so the gamers can not see them. Individual cupcake containers are typically cube or shaped, relying on the scale of the cupcake, although you is likely to be able to purchase circular containers so that your cakes stand out from the crowd. Glad you want this cupcake recipe. Also I made sure I pinned this recipe and added it to stumbleupon. Make certain to go away the middle dowel a little bit longer so it will be larger than the decrease outer ring. There's nothing like having "slightly something" as a remembrance of a fun day. For instance, we're having cupcakes presented on a tiered fashion that appears like a marriage ceremony cake as an alternative of the marriage cake. So my Cookie Monster cupcakes have been a success on Fb. For brunch, cupcakes will be topped with varied fruits, maybe matching a fruit compote served with the meal.
You possibly can embody games like gown-up relay races, beanbag games, hula hoop, musical chairs and extra. Cakes can either be bought or baked within the type of a crown or a tiara. For instance, the day lily is taken into account edible and makes a fairly decoration, but it might act as a diuretic or laxative. The cupcake Christmas tree and edible Christmas wreath are additionally brilliant ideas! Fill the cupcake holders three/4 filled with batter and place them in the oven. Fill the gaps with synthetic silk greenery or tissue poufs. On top of each cupcake, place some Easter sweet equivalent to Peeps, chocolate eggs or sweet coated M&M's are decorations that improve the delicious flavors that go together with the holiday. The cake inside was darkish chocolate with chocolate frosting. A favorite taste with the young and old alike is always chocolate. They are liked by many and had been my favourite for a while. Much like a buffet restaurant, a number of completely different dessert choices are placed on show.
Pointers If You Wish To Bake Cupcakes

In this article, you will find useful information on how to protect your dessert and look after its quality in the box. Are you a fan of organizing parties? You might like to look for cupcake boxes which are affordable for your budget. A box looks like it's a fairly easy thing, but if you decorate it with your personal artistic imagination, it is possible to go on it after dark simple in the fantastic.
Cake pops are defined as cake containing frosting formed into balls and coated with candy, placed on a stick. For you to be able to make this cake pop, you bakeries near me have to gather ingredients like cake mix, frosting, candy melts, colored sprinkles, colored icing tubes, and candy face. First up, you'd must make a cake of your own preference.

The cupcake wedding cake is fast-becoming one of several top choices in cakes for today's brides. A tall tower of cupcakes, can be truly stunning and adaptable to all or any themes and tastes. Each guest may have their own individual cake - devoid of the laborious task of cutting up the dessert. Guests will just help themselves either as soon as the meal or on the evening reception. Don't forget to top your tower which has a top tier cutting cake for that all important cake cutting tradition and photo opportunity.
Hopefully the cupcakes you've made from the favourite recipe tastes great, this way after you obtain the decorating right using the correct texture frosting, your cupcakes will definitely stand out. Your guests will love your great tasting cupcakes and you'll be very pleased with your time and energy. And remember the greater practice you have to produce cupcakes, the better still they're going to taste.
Cupcake couriers are large, plastic, multi tray carriers, which is often adapted to carry a smaller number or many. These are suitable for transporting approximately 36 cupcakes, say to a children's party. The cupcakes are kept outside of the other and arrive safely being properly protected in the plastic outer casing. These carriers come in different colours too! With the interior trays removed a greater cake may also be transported. This makes them very popular due to their flexibility.
0 notes
Text
Wedding Cupcakes
Hi there with the Cupcakes Near Me, Im planing to make three dozen of cupcakes for my youngsters social gathering. The cupcakes may make the kissing a bit messy, but I am sport. When we make sugar cookies I wish to divide this recipe into a number of small bowls and coloration every bowl with a distinct hue of food coloring. Actually, many bakeries around the globe use this cupcake recipe as their go-to vanilla cupcake. Place cupcake liners in muffin tin. I will share some approaches on how to name your cupcake store, some generally used words and a few questions that you should ask your self when selecting a reputation. And a cupcake. This is the reason I am fats. Open the Cupcake Maker lid and pop the crammed cases into the 6 holes. This template comes with over 200 animated slides. My friend’s sister insists on getting the Sprinkle Bomb each time she comes to go to, while my favorite is the purple velvet. Pink velvet cupcakes, what does that imply, you ask?
In addition to you could even have an thought by going by the content material that is obtainable over the website. Since everybody has their very own concept of how buttercream ought to style, I’ve included recipes for the 3 most popular sorts (plus, I just couldn’t assist myself): basic, cream cheese, and meringue. Around the 12 months, there are numerous special deals and circulars that you'll remember of when you enrol for the circular and you're going to get this everywhere in the 12 months. Utilizing a heatproof bowl over a pan of warm water, melt the chocolate, corn syrup and butter, stirring often till easy. That is especially true when using the higher quantity of oil. Wallet Control: At N 500 per cupcake, Honey's Cupcakes doesn't do numerous damage to your wallet. You probably have tasted cupcakes higher than Honey's wherever in Lagos, be a expensive and drop a comment.
Thank you Iris on your visit and taking the time to remark! Nicely, all that's out the window now, for it is nearly time for the return of the splendid Cake & Bake Show. I really left one, uncovered, on the kitchen counter to see how long it'd keep delicate and delicious, and four days later it hadn't dried out ! We left half completed cupcakes on the plate and hastily made our manner out of Katie's Cupcakes and will not be returning! Transfer tins to wire racks and permit to cool for 10 minutes; turn cupcakes onto racks and let cool utterly. Let cupcakes cool before frosting. Let us know any particular directions for delivery in the order notes section of the cart page. After affirmation of your order by 3 hrs we will deliver you, Same Day Supply in Hyderabad. You have made my day! They've already become a lot in style and one of cupcake wars the vital wanted wedding ceremony excel that from different store or cupcakes on-line outlets can simply ship you the desired piece.
Use instead of frosting for cupcakes or muffins. To frost, that is my favorite trick: scoop frosting into a zip-lock baggie, seal and snip off a nook; squeeze out a simple thick rope that may easily create clean swirls atop the cakes, then toss the used bag out. But please give us 24hr to organize your Picture Cakes, Custom Cakes. Besides being fun to take a look at these cakes are also verrry yummy! Cupcakes are made many different ways. Since returning to New Zealand in 2011, Karla arrange Bluebells Cakery and started by promoting cupcakes and other baked goods at Auckland’s boutique French market, La Cigale. In case you need to use recent flowers to decorate the wedding cake, ask if the bakery can present them or in the event you or a florist must deliver them. These tips are targeted not solely in direction of organising a couple’s wedding ceremony excellent, but in addition their connection shifting forward. Are you presently on a low-carb food plan?
How to Bake Perfect Cupcakes in 7 Steps
Modern dating has its own challenges. While many people discover it hard to satisfy people they find romantically interesting, individuals with celiac disease still find it much more challenging to actually embark on dates. The part that makes it difficult is the fact that sharing meals is often among the foundations of dating. Whether it's brunch, dinner, a holiday to a movies or possibly a venture to the local festival, dining gluten-free and explaining the limitations with this food sensitivity can be complicated. For those dating people on a diet free from glutens, working out what's safe and what's not reveals a whole new world. For some, even the notion of making dinner for a romantic interest might be an eye-opener with restrictions. Here are some tips on the way to date someone on a diet free from glutens.

The baby shower cupcakes are the major attraction inside the respective parties, so they must be fabulously designed and made tasty too. There are several fantastic ideas for making and decorating the fabulous cakes. You can follow them and reach your goals in making attractive cakes for that sheer excitement of your guests who are planning to attend your party.
If you would like to prepare cupcakes, you must have the subsequent basic baking implements. To begin with, you must have cupcake pans that can in assorted sizes from mini to jumbo. In addition, you should obtain paper-baking cups which can be found in a number of colors and prints. These fluted cup cake liners is likely to make your cupcakes look prettier, and make them easier to release in the pan. These paper liners also make clearing up a piece of cake. Measuring cups and spoons, an electric powered powered mixer, and an oven can also be essential kitchen implements. If you wish to embellish your cupcakes, also put money into icing bags or tubes. If your affordability is lean, you can even use resealable plastic bags to add designs in your cupcakes.
Know what occasion your cupcakes are for. Is it Halloween, 4th of July or maybe Christmas? Depending on what occasion it is will have a big impact on the colours you need to be using. For example, if it really is Christmas, then festive colours will be so as like red and green. Choosing the right colours to fit the occasion will make your cupcakes that bit special.
Inspired by Angie Dudley's invention, I decided to begin trying out these sweet treats and before long I was making all sorts of designs and flavour combinations. My friends and family kept asking me for further and I even were able to appeal to several parties which led to increasingly more demand. It is worthwhile mentioning that there are two kinds of cake pops in the marketplace, the baked version, along with the considerably more popular non-baked version. Similarly to muffins, the baked pops are manufactured by making a mixture, then rolling it into cake balls and finally baking them in the oven. However my preference is by using non-baked ones. The non-baked version are produced from a cream based mixture, rolled in to a ball and chilled inside fridge. Finally they may be dipped in a crunchy coating (usually chocolate) and after that decorated using various decoration techniques. It takes a bit practice unless you can perfect your technique and start producing very attractive and delicious looking treats, yet it's not too difficult. So move over macaroons and cupcakes and give cake pops a try... give yourself a break to a little bit of heaven today.
0 notes
Text
Homemade Butter Cookies
Buttery, tender and unbelievably light these homemade Danish Butter Cookies are so much better than the tinned version. Loaded with flavor, they’ll literally melt in your mouth and are so easy to make.
Just a few slight changes from my Melting Moments Cookies, you’re going to love these. Why not make up a batch to gift to those you love with some Peppermint Meltaways and Snow Kiss Cookies too.
Homemade Butter Cookies
Danish butter cookies are an absolute classic holiday cookie but why wait for the holidays when you can make them all year round? This recipe takes just 6 ingredients and a few minutes to put together.
There are so, so many reasons to enjoy these cookies;
Soft and tender
Melt in your mouth
Buttery and flavourful
Just 6 ingredients
Easy to make
Pipe or press them into pretty designs
Decorate to your hearts content.
Ingredients in Butter Cookies:
With the buttery flavour of shortbread but with a soft melt-away texture, these cookies have definitely earned their name.
Butter – a large amount and since this is the most dominant flavour, use a quality brand.
Sugar – regular white granulated sugar will do the trick here.
Vanilla extra – make sure to use extract (not essence). You could even go the extra mile and use vanilla bean paste or vanilla bean seeds so you get that gorgeous little black speckles.
Egg yolk and milk – both are used for richness and they also allow the dough to be soft enough to be piped.
All purpose flour – of course you need some sort of flour to create cookies and these ones just need the regular all purpose variety.
How To Make Danish Butter Cookies:
This incredibly simple dough is the work of minutes using a stand mixer, definitely my prefer way to mix this thick dough.
Wet ingredients: mix together the butter, vanilla, egg yolk, most of the milk and the sugar in a stand mixer – just using a paddle attachment.
Add flour: Add the flour in 3 parts, then give it a good beat until it’s forms a soft dough.
Pipe: Transfer the dough to a piping bag, then pipe in any shape you like – see my tips below.
Bake: Bake them at 350F for roughly 14 minutes or until the edges just start turning golden. Let them cool completely before decorating.
Decorate: These are gorgeous dunked in chocolate with some sprinkles. Add any colour to suit the season or whatever you love. You can also sprinkle sugar over them before baking.
Tips and Variations:
The dough: After adding the flour, you give it good beat for 30 seconds or so until it becomes a nice soft dough and everything is fully combined.
Milk: You can add a little more milk if it’s not soft enough to pipe but don’t add too much or they will use their shape as they bake. It should take some pressure to pipe but should not break as you do so.
The piping bag: Use a small piping bag. This is quite a thick dough and easier to pipe when you have a small amount to handle at a time.
Piping: So they keep their shape, pipe them high with the piping bag completely vertical (not at an angle). Hold the tip ½ inch from the baking tray, use both hands on the bag and press firmly to pipe.
Designs: Use a piping bag, cookie press or freeze in logs to make slice and bake cookies. When you pipe use an open star tip like an Ateco 829. Pipe in a small circle so it becomes a rosette. You can also pipe logs of dough or large stars (without making a circle) then add a glace cherry to the centre.
Hold down the paper: Quick trick to hold that baking paper down, dot a little of the dough under the corners and it will assist in holding it in place while you pipe.
When decorating: Be gentle with the cookies when you’re dipping them as they are very delicate.
How Long Will These Cookies Keep?
These homemade cookies are good at room temperature for up to 7 days. Keep them in an airtight container. You can also freeze them for up to 2 months – perfect for getting ahead if you’re gifting them. Again make sure they are in an airtight container.
One last tip: While they’re best known for their pale color, go ahead and ‘over-bake’ a few so they get quite golden – the nutty butter flavor this gives is absolutely amazing.
More Amazing Cookie Recipes:
Spiced Shortbread Christmas Cookies
Cinnamon Roll Cookies
Easy White Chocolate Macadamia Nut Cookies
Almond Thumbprint Cookies with a Salted Caramel Center
Maple Sugar Cookies
Print
Butter Cookies
Buttery, tender and unbelievably light these homemade Danish butter cookies are so much better than the tinned version. Loaded with flavour,they’ll literally melt in your mouth and are so easy to make.
Course Dessert
Cuisine American, Danish
Keyword best butter cookies, butter cookies, butter cookies recipe, danish butter cookies, homemade butter cookies
Prep Time 10 minutes
Cook Time 14 minutes
Total Time 24 minutes
Servings 25 cookies
Calories 154kcal
Author Marie Roffey
Equipment
medium piping bag
Ingredients
8 oz unsalted butter, softened (226g / 2 sticks)
1/2 cup granulated sugar (3.5oz / 100g)
1 1/2 teaspoons vanilla extract
1 egg yolk
4-5 teaspoons milk
2 cups all purpose flour (9.2oz / 260g)
5.5 oz semi-sweet chocolate, melted (3/4 cup, chopped)
Sprinkles if desired.
Instructions
Preheat the oven to 350F. Line two baking trays with baking paper.
WET INGREDIENTS: Beat together the butter, sugar egg yolk, vanilla and 3 teaspoons of milk together for a few minutes until well combined and looking a little creamy.
DRY INGREDIENTS: Add the flour in two or three parts, beating until well incorporated and it turns to soft dough.
PREP FOR PIPING: Transfer a little of the dough to a medium piping bag with an open star piping tip.
TEST: Test pipe a rose holding the bag directly upright and about half an inch from the tray. If it cracks or breaks or you can't pipe it, return it to the bowl and beat in a little more milk. Don't add too much. The consistency should be thick and still require some pressure to pipe but should pipe smoothly. See notes.
PIPE: Once you're happy with the consistency, pipe rosettes of dough about 2 inches wide, leaving 2 inches space between each so they have room to spread.
CHILL: Chilling is optional but doing this for 10-15 minutes may keep your design even more defined.
BAKE: Bake for around 14 minutes or until just starting to turn golden on the edges.Transfer to a wire rack to cool completely.
DECORATE: Line a baking tray with baking paper. Dip half of each cooled cookie in chocolate, scraping the base on the edge of the bowl, then place on the tray and add sprinkles if you like. Let them set in the fridge for 1/2 an hour.
Notes
There's no need to beat the butter mixture too long as it may soften your piped design on baking.
I find a stand mixer best for this thick dough but a handheld electric beater and some elbow grease at the end will work too.
Different brands of flours will absorb different amounts of moisture which matters in this dough. Only add enough milk that, while still requiring pressure to pipe, you can pipe it smoothly. Too soft and you won't get the defined design on top.
Decorating: You can add a variety of sprinkles to suit the season. You could even sprinkle over granulated or turbinado sugar before baking.
Piping: You don't have to pipe these cookies. You could just scoop like regular cookies, or use a cookie press. You can also roll the dough into logs and place in the freezer for 1 hour. Later, slice and bake.
Nutrition
Serving: 31g | Calories: 154kcal
from The Recipe Critic https://ift.tt/3bB7O5M
https://ift.tt/2ZeRtyS
Buttery, tender and unbelievably light these homemade Danish Butter Cookies are so much better than the tinned version. Loaded with flavor, they’ll literally melt in your mouth and are so easy to make.
Just a few slight changes from my Melting Moments Cookies, you’re going to love these. Why not make up a batch to gift to those you love with some Peppermint Meltaways and Snow Kiss Cookies too.
Homemade Butter Cookies
Danish butter cookies are an absolute classic holiday cookie but why wait for the holidays when you can make them all year round? This recipe takes just 6 ingredients and a few minutes to put together.
There are so, so many reasons to enjoy these cookies;
Soft and tender
Melt in your mouth
Buttery and flavourful
Just 6 ingredients
Easy to make
Pipe or press them into pretty designs
Decorate to your hearts content.
Ingredients in Butter Cookies:
With the buttery flavour of shortbread but with a soft melt-away texture, these cookies have definitely earned their name.
Butter – a large amount and since this is the most dominant flavour, use a quality brand.
Sugar – regular white granulated sugar will do the trick here.
Vanilla extra – make sure to use extract (not essence). You could even go the extra mile and use vanilla bean paste or vanilla bean seeds so you get that gorgeous little black speckles.
Egg yolk and milk – both are used for richness and they also allow the dough to be soft enough to be piped.
All purpose flour – of course you need some sort of flour to create cookies and these ones just need the regular all purpose variety.
How To Make Danish Butter Cookies:
This incredibly simple dough is the work of minutes using a stand mixer, definitely my prefer way to mix this thick dough.
Wet ingredients: mix together the butter, vanilla, egg yolk, most of the milk and the sugar in a stand mixer – just using a paddle attachment.
Add flour: Add the flour in 3 parts, then give it a good beat until it’s forms a soft dough.
Pipe: Transfer the dough to a piping bag, then pipe in any shape you like – see my tips below.
Bake: Bake them at 350F for roughly 14 minutes or until the edges just start turning golden. Let them cool completely before decorating.
Decorate: These are gorgeous dunked in chocolate with some sprinkles. Add any colour to suit the season or whatever you love. You can also sprinkle sugar over them before baking.
Tips and Variations:
The dough: After adding the flour, you give it good beat for 30 seconds or so until it becomes a nice soft dough and everything is fully combined.
Milk: You can add a little more milk if it’s not soft enough to pipe but don’t add too much or they will use their shape as they bake. It should take some pressure to pipe but should not break as you do so.
The piping bag: Use a small piping bag. This is quite a thick dough and easier to pipe when you have a small amount to handle at a time.
Piping: So they keep their shape, pipe them high with the piping bag completely vertical (not at an angle). Hold the tip ½ inch from the baking tray, use both hands on the bag and press firmly to pipe.
Designs: Use a piping bag, cookie press or freeze in logs to make slice and bake cookies. When you pipe use an open star tip like an Ateco 829. Pipe in a small circle so it becomes a rosette. You can also pipe logs of dough or large stars (without making a circle) then add a glace cherry to the centre.
Hold down the paper: Quick trick to hold that baking paper down, dot a little of the dough under the corners and it will assist in holding it in place while you pipe.
When decorating: Be gentle with the cookies when you’re dipping them as they are very delicate.
How Long Will These Cookies Keep?
These homemade cookies are good at room temperature for up to 7 days. Keep them in an airtight container. You can also freeze them for up to 2 months – perfect for getting ahead if you’re gifting them. Again make sure they are in an airtight container.
One last tip: While they’re best known for their pale color, go ahead and ‘over-bake’ a few so they get quite golden – the nutty butter flavor this gives is absolutely amazing.
More Amazing Cookie Recipes:
Spiced Shortbread Christmas Cookies
Cinnamon Roll Cookies
Easy White Chocolate Macadamia Nut Cookies
Almond Thumbprint Cookies with a Salted Caramel Center
Maple Sugar Cookies
Print
Butter Cookies
Buttery, tender and unbelievably light these homemade Danish butter cookies are so much better than the tinned version. Loaded with flavour,they’ll literally melt in your mouth and are so easy to make.
Course Dessert
Cuisine American, Danish
Keyword best butter cookies, butter cookies, butter cookies recipe, danish butter cookies, homemade butter cookies
Prep Time 10 minutes
Cook Time 14 minutes
Total Time 24 minutes
Servings 25 cookies
Calories 154kcal
Author Marie Roffey
Equipment
medium piping bag
Ingredients
8 oz unsalted butter, softened (226g / 2 sticks)
1/2 cup granulated sugar (3.5oz / 100g)
1 1/2 teaspoons vanilla extract
1 egg yolk
4-5 teaspoons milk
2 cups all purpose flour (9.2oz / 260g)
5.5 oz semi-sweet chocolate, melted (3/4 cup, chopped)
Sprinkles if desired.
Instructions
Preheat the oven to 350F. Line two baking trays with baking paper.
WET INGREDIENTS: Beat together the butter, sugar egg yolk, vanilla and 3 teaspoons of milk together for a few minutes until well combined and looking a little creamy.
DRY INGREDIENTS: Add the flour in two or three parts, beating until well incorporated and it turns to soft dough.
PREP FOR PIPING: Transfer a little of the dough to a medium piping bag with an open star piping tip.
TEST: Test pipe a rose holding the bag directly upright and about half an inch from the tray. If it cracks or breaks or you can't pipe it, return it to the bowl and beat in a little more milk. Don't add too much. The consistency should be thick and still require some pressure to pipe but should pipe smoothly. See notes.
PIPE: Once you're happy with the consistency, pipe rosettes of dough about 2 inches wide, leaving 2 inches space between each so they have room to spread.
CHILL: Chilling is optional but doing this for 10-15 minutes may keep your design even more defined.
BAKE: Bake for around 14 minutes or until just starting to turn golden on the edges.Transfer to a wire rack to cool completely.
DECORATE: Line a baking tray with baking paper. Dip half of each cooled cookie in chocolate, scraping the base on the edge of the bowl, then place on the tray and add sprinkles if you like. Let them set in the fridge for 1/2 an hour.
Notes
There's no need to beat the butter mixture too long as it may soften your piped design on baking.
I find a stand mixer best for this thick dough but a handheld electric beater and some elbow grease at the end will work too.
Different brands of flours will absorb different amounts of moisture which matters in this dough. Only add enough milk that, while still requiring pressure to pipe, you can pipe it smoothly. Too soft and you won't get the defined design on top.
Decorating: You can add a variety of sprinkles to suit the season. You could even sprinkle over granulated or turbinado sugar before baking.
Piping: You don't have to pipe these cookies. You could just scoop like regular cookies, or use a cookie press. You can also roll the dough into logs and place in the freezer for 1 hour. Later, slice and bake.
Nutrition
Serving: 31g | Calories: 154kcal
from The Recipe Critic https://ift.tt/3bB7O5M
via Blogger https://ift.tt/323PM99
0 notes
Text
Triple Almond Energy Balls (vegan, grain-free, naturally sweetened)
One of my biggest challenges when photographing beige- or blah-coloured recipes is making them look as appealing as they taste…the struggle is real! Dishes like curries, brownies, oatmeal, energy balls, etc. tend to look a bit sad through the camera’s lens. If you want a giggle, check out one of the very first beige/brown recipe photos I ever took on the blog. I posted this Pumpkin Banana Bran & Oatmeal Muffin recipe way back in 2008 (holy cow, I’m a blogging DINOSAUR! lol).
A good trick I’ve learned through countless trial and error (mostly error…and a few curse words) is that I need to add a lot of colour to photos even if the food itself isn’t colourful. It probably seems obvious, but with so many other things going on for a photo shoot (cooking, food styling, camera settings, lighting, etc.) it can be easy to forget the importance of planning for colour. If I’m shooting oatmeal or plain Jane muffins, I try to add some enticing fruit on top and more pops of colour on the table itself—a bright green Matcha tea, fresh flowers, a glass of OJ, or a colourful cloth napkin (without being too busy) can all create a gorgeous photo when the food itself looks pretty blah. This approach helped me photograph these flourless breakfast muffins (recipe to come!) and I’m pleased with how the app photo turned out!
I wasn’t quite as happy with the photo shoot of these energy balls because I had to rush (when naptime’s over, it’s OVA), but they’ll just have to do! I love how the colourful garnishes I added made the energy balls go from blah and beige to vibrant and enticing. I rolled them in fun pops of colour and a variety of textures: beet-coloured shredded coconut, ground pistachios (so pretty and chewy!), hemp hearts, and cocoa powder. I loved them all. I also tried rolling some in Matcha green tea powder, but they were soooo bitter. That one was a big NOPE! Cutting the Matcha with powdered icing sugar might’ve worked better, but I wanted to keep these bad boys naturally sweetened, so I opted to skip the Matcha altogether. To make the pink-hued shredded coconut, I added some beet juice (prepared the same way as my Vegan Sugar Cookies’ Pink Frosting) to the shredded coconut in a bowl. I put a plastic bag over my hand so it wouldn’t get stained in the process (#fancy) and then I “massaged” the beet juice into the shredded coconut until it was dispersed. It worked wonderfully and the result was so pretty! I sprinkled my leftover coconut on oatmeal.
Rest assured though, these nutty energy bites are just as good eaten as-is! I love keeping a stash in the freezer for quick snacking, and find the texture gets even better when they’ve been frozen too.
Also a quick note that I won’t be posting this Friday’s Ask Angela as I’ve come down with the flu (luckily today’s blog post was created last week so I could still share it). It was bound to happen as I’ve been taking care of two sick little ones, while up a lot at night and nursing to boot. I hope everyone has a very happy weekend and that you’re feeling well. I know where I’ll be…curled up with a big bowl of soup (hopefully my Golden Spiced Lentil Soup!) and warm lemon water. I’ll be a bit delayed replying to your reviews, questions, and comments this week, but please know that I will reply as soon as I’m feeling better!
Triple Almond Energy Balls
Vegan, gluten-free, grain-free, no bake/raw, oil-free, refined sugar-free, soy-free
I love energy balls because they’re infinitely customizable and so easy to take on the go. I like to grab a couple straight from the freezer and pop them into a small glass jar to throw in my purse on busy days. They’re perfect for for tiding you over until mealtime, and this Triple Almond Energy Ball recipe is toddler-approved, too—just be sure to cut them up into small pieces as ball shapes are a choking hazard. Their rich, nutty flavour comes from using whole almonds, roasted almond butter, and almond extract. A true triple threat!! You may recognize the flavour from my Triple Almond Thumbprint Cookies in Oh She Glows Every Day. I just can’t get enough of almond extract—I find it really heightens the flavour in almond-based recipes!
Yield
11 to 12 balls
Prep time
15 Minutes
Cook time
0 Minutes
Chill time
60 Minutes (optional)
Total time
15 Minutes
Ingredients:
1 cup (155 g) raw almonds
1/2 cup (75 g) raw cashews
1/2 cup (115 g) tightly packed pitted Medjool dates*
2 tablespoons (30 mL) roasted almond butter or raw cashew butter
1/2 teaspoon cinnamon
1/4 teaspoon fine sea salt, or to taste
1/4 teaspoon almond extract, or to taste
5 teaspoons (25 mL) water, or as needed**
Shredded coconut, hemp hearts, ground shelled pistachios, or cocoa powder, for rolling
Directions:
Add the almonds and cashews to a food processor and process into a coarse crumb. Be sure not to overprocess the nuts into butter.
To the nut mixture, add the pitted dates. Process again until the dates are finely chopped.
Next, add the roasted almond butter (or raw cashew butter, if using), cinnamon, salt, almond extract, and water (starting with a couple teaspoons) to the processor bowl and process again until the mixture comes together into a dough. You should be able to easily roll the dough into balls without them feeling dry or crumbly. If the dough is too dry, add more water one teaspoon at a time and continue processing until the mixture moistens to desired consistency.
Roll the dough into 11 to 12 golf ball-sized balls. If using, roll each ball in your garnish of choice: shredded coconut, hemp hearts, ground shelled pistachios (or other nuts), or cocoa powder.
Chill the balls in the freezer for about an hour to firm up, or feel free to eat them at room temperature if you can’t wait that long! Leftover balls will keep in an airtight container in the freezer for a few weeks. You can also store them in the fridge in an airtight container for several days if you prefer.
Tips:
* You’ll want to make sure the dates are very well packed into the measuring cup. If your dates are very firm and dry, I also recommend soaking them in hot water for about half an hour, and then draining well before using as directed.
** The amount of water you will need will depend on how fresh and sticky your Medjool dates are.
These energy balls have a soft texture. If you prefer a crunchier consistency, you can roll the balls in ground nuts or stir some chopped nuts or chocolate into the dough itself.
To make the pink shredded coconut, I mixed unsweetened shredded coconut with a bit of beet juice.
Comments (0) | function fbs_click() {u=location.href;t=document.title;window.open('//www.facebook.com/sharer.php?u='+encodeURIComponent(u)+'&t='+encodeURIComponent(t),'sharer','toolbar=0,status=0,width=626,height=436'); return false;}Share on Facebook | Tweet | Pin It | Snapchat | Google+
© copyright 2018 Oh She Glows. All Rights Reserved.
Triple Almond Energy Balls (vegan, grain-free, naturally sweetened) published first on https://wittooth.tumblr.com/
0 notes
Text
Triple Almond Energy Balls (vegan, grain-free, naturally sweetened)
One of my biggest challenges when photographing beige- or blah-coloured recipes is making them look as appealing as they taste…the struggle is real! Dishes like curries, brownies, oatmeal, energy balls, etc. tend to look a bit sad through the camera’s lens. If you want a giggle, check out one of the very first beige/brown recipe photos I ever took on the blog. I posted this Pumpkin Banana Bran & Oatmeal Muffin recipe way back in 2008 (holy cow, I’m a blogging DINOSAUR! lol).
A good trick I’ve learned through countless trial and error (mostly error…and a few curse words) is that I need to add a lot of colour to photos even if the food itself isn’t colourful. It probably seems obvious, but with so many other things going on for a photo shoot (cooking, food styling, camera settings, lighting, etc.) it can be easy to forget the importance of planning for colour. If I’m shooting oatmeal or plain Jane muffins, I try to add some enticing fruit on top and more pops of colour on the table itself—a bright green Matcha tea, fresh flowers, a glass of OJ, or a colourful cloth napkin (without being too busy) can all create a gorgeous photo when the food itself looks pretty blah. This approach helped me photograph these flourless breakfast muffins (recipe to come!) and I’m pleased with how the app photo turned out!
I wasn’t quite as happy with the photo shoot of these energy balls because I had to rush (when naptime’s over, it’s OVA), but they’ll just have to do! I love how the colourful garnishes I added made the energy balls go from blah and beige to vibrant and enticing. I rolled them in fun pops of colour and a variety of textures: beet-coloured shredded coconut, ground pistachios (so pretty and chewy!), hemp hearts, and cocoa powder. I loved them all. I also tried rolling some in Matcha green tea powder, but they were soooo bitter. That one was a big NOPE! Cutting the Matcha with powdered icing sugar might’ve worked better, but I wanted to keep these bad boys naturally sweetened, so I opted to skip the Matcha altogether. To make the pink-hued shredded coconut, I added some beet juice (prepared the same way as my Vegan Sugar Cookies’ Pink Frosting) to the shredded coconut in a bowl. I put a plastic bag over my hand so it wouldn’t get stained in the process (#fancy) and then I “massaged” the beet juice into the shredded coconut until it was dispersed. It worked wonderfully and the result was so pretty! I sprinkled my leftover coconut on oatmeal.
Rest assured though, these nutty energy bites are just as good eaten as-is! I love keeping a stash in the freezer for quick snacking, and find the texture gets even better when they’ve been frozen too.
Also a quick note that I won’t be posting this Friday’s Ask Angela as I’ve come down with the flu (luckily today’s blog post was created last week so I could still share it). It was bound to happen as I’ve been taking care of two sick little ones, while up a lot at night and nursing to boot. I hope everyone has a very happy weekend and that you’re feeling well. I know where I’ll be…curled up with a big bowl of soup (hopefully my Golden Spiced Lentil Soup!) and warm lemon water. I’ll be a bit delayed replying to your reviews, questions, and comments this week, but please know that I will reply as soon as I’m feeling better!
Triple Almond Energy Balls
Vegan, gluten-free, grain-free, no bake/raw, oil-free, refined sugar-free, soy-free
I love energy balls because they’re infinitely customizable and so easy to take on the go. I like to grab a couple straight from the freezer and pop them into a small glass jar to throw in my purse on busy days. They’re perfect for for tiding you over until mealtime, and this Triple Almond Energy Ball recipe is toddler-approved, too—just be sure to cut them up into small pieces as ball shapes are a choking hazard. Their rich, nutty flavour comes from using whole almonds, roasted almond butter, and almond extract. A true triple threat!! You may recognize the flavour from my Triple Almond Thumbprint Cookies in Oh She Glows Every Day. I just can’t get enough of almond extract—I find it really heightens the flavour in almond-based recipes!
Yield
11 to 12 balls
Prep time
15 Minutes
Cook time
0 Minutes
Chill time
60 Minutes (optional)
Total time
15 Minutes
Ingredients:
1 cup (155 g) raw almonds
1/2 cup (75 g) raw cashews
1/2 cup (115 g) tightly packed pitted Medjool dates*
2 tablespoons (30 mL) roasted almond butter or raw cashew butter
1/2 teaspoon cinnamon
1/4 teaspoon fine sea salt, or to taste
1/4 teaspoon almond extract, or to taste
5 teaspoons (25 mL) water, or as needed**
Shredded coconut, hemp hearts, ground shelled pistachios, or cocoa powder, for rolling
Directions:
Add the almonds and cashews to a food processor and process into a coarse crumb. Be sure not to overprocess the nuts into butter.
To the nut mixture, add the pitted dates. Process again until the dates are finely chopped.
Next, add the roasted almond butter (or raw cashew butter, if using), cinnamon, salt, almond extract, and water (starting with a couple teaspoons) to the processor bowl and process again until the mixture comes together into a dough. You should be able to easily roll the dough into balls without them feeling dry or crumbly. If the dough is too dry, add more water one teaspoon at a time and continue processing until the mixture moistens to desired consistency.
Roll the dough into 11 to 12 golf ball-sized balls. If using, roll each ball in your garnish of choice: shredded coconut, hemp hearts, ground shelled pistachios (or other nuts), or cocoa powder.
Chill the balls in the freezer for about an hour to firm up, or feel free to eat them at room temperature if you can’t wait that long! Leftover balls will keep in an airtight container in the freezer for a few weeks. You can also store them in the fridge in an airtight container for several days if you prefer.
Tips:
* You’ll want to make sure the dates are very well packed into the measuring cup. If your dates are very firm and dry, I also recommend soaking them in hot water for about half an hour, and then draining well before using as directed.
** The amount of water you will need will depend on how fresh and sticky your Medjool dates are.
These energy balls have a soft texture. If you prefer a crunchier consistency, you can roll the balls in ground nuts or stir some chopped nuts or chocolate into the dough itself.
To make the pink shredded coconut, I mixed unsweetened shredded coconut with a bit of beet juice.
Comments (0) | function fbs_click() {u=location.href;t=document.title;window.open('//www.facebook.com/sharer.php?u='+encodeURIComponent(u)+'&t='+encodeURIComponent(t),'sharer','toolbar=0,status=0,width=626,height=436'); return false;}Share on Facebook | Tweet | Pin It | Snapchat | Google+
© copyright 2018 Oh She Glows. All Rights Reserved.
from Oh She Glows http://ift.tt/2CDOfq9
0 notes
Text
If you like a bit of alliteration, how about “spelt strawberry shortcakes scream summer”? It’s not a lie. And furthermore they’re totally delicious. Knock up a batch, invite your neighbours around and enjoy them in or out of the garden. Serve them warm with whipped cream and macerated strawberries.
International Scone Week
Every year Lavender and Lime hosts International Scone Week. Celia of Fig Jam and Lime Cordial started this rather wonderful event back in 2011, but Tandy has been holding the baton for the last few years. If you blog and love baking and eating scones as much as many of us do, please join in with #ISW2019. If you don’t blog, just enjoy the recipes.
Last year I made these matcha & honey spelt scones. They were really tasty and I loved the pastel colour created by the matcha green tea powder. In previous years, I’ve made emmer scones, chocolate scones, and white chocolate & whey scones, amongst others.
Strawberry Shortcakes
Strawberry shortcakes are a very British summer bake. The first recipe was recorded in the 16th century. Everyone seems to have their own recipe, but really they’re a type of scone – just slightly sweeter and shorter and they’re made with cream rather than milk. They’re really quick and easy to prepare, so just perfect for the summer season. It’s true you’ll need to turn on your oven to make them. But they only take fifteen minutes or so to bake, so they shouldn’t make your kitchen too hot.
Having just said that strawberry shortcakes are scones, there is another version. Strawberry shortcake can also be layers of thin shortbread biscuit, filled with macerated strawberries and cream. My mother made me one of these for my birthday one year. It was terrific and the most delicious birthday cake I’ve ever had. Sadly, I was unable to partake on the day. I’d spent the day in hospital where I’d had a general anaesthetic. This meant that when I arrived home, I was fit for nothing but my bed.
Spelt Strawberry Shortcakes
The list of ingredients may look long, but it’s not as bad as you think. Apart from the strawberries and cream, you’re likely to have everything you need in your store cupboard. I’ve used a mix of bicarbonate of soda and cream of tarter as the raising agent. That’s how I’ve always made scones. But you can use two teaspoons of baking powder instead, if that’s what you have. I’ve also added lemon zest and fresh lemon thyme to the mix. This makes these spelt strawberry shortcakes even more delicious. But if you don’t have lemon thyme, you could try using ordinary thyme instead, or just leave it out altogether.
Wholemeal Spelt Flour Dough
As a whole food baker, I’ve made these shortcakes with wholemeal spelt flour. This means they won’t rise as much as you’d expect scones to rise, but they will taste even more delicious and they’ll be a bit healthier too. You could sieve out the biggest bits of bran, if you can be bothered. I didn’t on this occasion.
If you want to use ordinary wholemeal flour or even plain flour, go carefully with the liquid. You might need to add a little more or a little less, respectively.
Forming the Dough
All you need to do, is place the dry ingredients into a bowl. Grate in the lemon zest. A microplane is best for this. Add cold cubed butter, or as I do, cut it up with a knife once it’s been added to the flour. Then rub it in to the dry ingredients with your finger tips. It’s important the butter is cold as you don’t want it to melt whilst you’re rubbing it in. Some people grate the butter into the flour to make the process easier, but I find this too faffy and it creates extra washing up.
#gallery-0-10 { margin: auto; } #gallery-0-10 .gallery-item { float: left; margin-top: 10px; text-align: center; width: 50%; } #gallery-0-10 img { border: 2px solid #cfcfcf; } #gallery-0-10 .gallery-caption { margin-left: 0; } /* see gallery_shortcode() in wp-includes/media.php */
Add the dry ingredients into a large bowl along with lemon zest & thyme if using.
Cut the cold butter into the flour prior to rubbing it in with your fingers.
Once you’ve got a mixture that resembles rough breadcrumbs, add the wet ingredients. I’ve used a mix of cream and kefir rather than straight cream. Kefir is a brilliant ingredient for baking, but if you don’t have any, use buttermilk or soured milk instead. Bring the shortcake mixture together with a round-bladed knife rather than a spoon, as this will be lighter on the dough. Once it starts to come together, gather it up with your hands and form it into a ball.
#gallery-0-11 { margin: auto; } #gallery-0-11 .gallery-item { float: left; margin-top: 10px; text-align: center; width: 50%; } #gallery-0-11 img { border: 2px solid #cfcfcf; } #gallery-0-11 .gallery-caption { margin-left: 0; } /* see gallery_shortcode() in wp-includes/media.php */
Make a well in the centre, add the cream mix and stir with a round-bladed knife until the mixture starts to come together.
Gather the dough up in your hands and form into a ball of dough ready for rolling.
The main thing to take into account with any shortcake or scone dough, is to handle it as little as possible. The more you handle it, the heavier and tougher your finished bakes are likely to be.
Rolling Out
Ideally, you should roll out the dough for these spelt strawberry shortcakes to about 2 cm (¾”). This will give you eight good sized shortcakes. With this batch, I rolled them out too thinly. I made ten, but they were a bit tricky to cut into halves once they were cooked.
#gallery-0-12 { margin: auto; } #gallery-0-12 .gallery-item { float: left; margin-top: 10px; text-align: center; width: 50%; } #gallery-0-12 img { border: 2px solid #cfcfcf; } #gallery-0-12 .gallery-caption { margin-left: 0; } /* see gallery_shortcode() in wp-includes/media.php */
Roll to 2 cm and stamp out 8 x 6 cm rounds.
Brush with milk and sprinkle on a little demerara sugar.
Once rolled, stamp the dough into 6 cm rounds. You’ll need to roll all the leftover bits together again to make the final one or two. Brush with milk, then sprinkle with a little demerara sugar. This will give a nice crunchy top.
Macerated Strawberries
To macerate strawberries, you just need to let them soak in sugar for a while. This will cause them to release their juice which mixes with the sugar to create a gorgeous sweet, tart and glossy concoction. I’ve used rose syrup instead of sugar which gives a few welcome floral notes. The flavours really pop. If you have the right sort of roses, it’s very easy to knock up a batch of homemade rose syrup. If, however, you’re not able to make your own or can’t find any to buy, just use a couple of teaspoons of golden caster sugar instead. You won’t have those floral tones, but it will still be delicious.
You can also macerate your strawberries in a liqueur instead of, or as well as sugar. Lemon juice is an excellent addition and I’ve added some in this recipe. I find it helps to bring out the flavours.
Prepare the strawberries whilst the shortcakes are baking.
To Serve
These spelt strawberry shortcakes are best consumed on the day of making. Ideally, serve them warm from the oven. Whip up the cream whilst they’re cooling on the rack. Cut each one in half, spoon on some cream then top with the macerated strawberries.
Show Me Your Strawberry Shortcakes
Thanks for visiting Tin and Thyme. If you make these spelt strawberry shortcakes, I’d love to hear about it in the comments below or via social media. Do share photos on your preferred social media site and use the hashtag #tinandthyme, so I can spot them. For more delicious and nutritious recipes, follow me on Twitter, Facebook, Instagram or Pinterest.
Spelt Strawberry Shortcakes. PIN IT.
Spelt Strawberry Shortcakes – The Recipe
Spelt Strawberry Shortcakes

Strawberry shortcakes scream summer. These ones are made with wholemeal spelt flour and flavoured with lemon. You can also include thyme if you're feeling adventurous. Serve with macerated strawberries and whipped cream.
225 g (8 oz) wholemeal spelt flour
1 tsp bicarbonate of soda
2 tsp cream of tarter
pinch of fine sea or rock salt
40 g golden caster sugar + a little extra for sprinkling
1 unsprayed lemon ((I use organic lemons when I can get hold of them))
small sprig lemon thyme (optional)
60 g (2 oz unsalted butter – fridge cold and cubed
60 ml (4 fl oz) kefir, buttermilk or sour milk
60 ml (2 fl oz) double cream + 125 ml (¼ pt) for serving
a little milk to brush the tops with
1 tsp demerara sugar for sprinkling
225 g (8 oz) ripe strawberries – quartered
1 tbsp rose syrup ((can substitute 2 tsp golden caster sugar))
Set oven to 200℃/400℉/Gas6.
Place the dry ingredients into a large bowl and rub in the butter with your fingers until the mixture resembles fine breadcrumbs.
Finely grate in the lemon zest. I microplane is ideal for this. Add the lemon thyme leaves.
Make a well in the centre and pour in the kefir and cream. Stir with a round bladed knife from the inside to the outside until the ingredients are just combined and starting to form a dough. Bring this together with your hands, handling it as little as possible.
Roll out on a floured surface to about ¾” (2cm) thick, then cut into rounds with a 2 ½” (6cm) cutter. Combine the leftover bits, re-roll and cut again until the dough has all been used.
Place onto a greased baking tray and brush with milk then sprinkle with a little demerara sugar. Bake for 15 minutes or until the scones are golden and the bases sound hollow when tapped.
Place onto a cooling rack, but best eaten whilst still warm.
Whilst the scones are baking, place the strawberries in a bowl. Squeeze in a tbsp of lemon juice and add the rose syrup. Stir and leave to macerate.
Whip the cream.
Cut the shortcakes in half and top with the whipped cream and macerated strawberries.
You can use 2 tsp of baking powder instead of the bicarb and cream of tarter.
These shortcakes don’t rise as well as ordinary scones due to the bran in the wholemeal flour, but they are still light and delicious.
Best eaten on the day they are made. Or can be frozen once cooled.
Sharing
I’m sharing these spelt strawberry shortcakes with Recipes Made Easy for #CookBlogShare and Apply to Face Blog for #BakingCrumbs.
Spelt Strawberry Shortcakes with Lemon & Thyme If you like a bit of alliteration, how about "spelt strawberry shortcakes scream summer"? It's not a lie.
0 notes
Quote
Buttery, tender and unbelievably light these homemade Danish Butter Cookies are so much better than the tinned version. Loaded with flavor, they’ll literally melt in your mouth and are so easy to make.
Just a few slight changes from my Melting Moments Cookies, you’re going to love these. Why not make up a batch to gift to those you love with some Peppermint Meltaways and Snow Kiss Cookies too.
Homemade Butter Cookies
Danish butter cookies are an absolute classic holiday cookie but why wait for the holidays when you can make them all year round? This recipe takes just 6 ingredients and a few minutes to put together.
There are so, so many reasons to enjoy these cookies;
Soft and tender
Melt in your mouth
Buttery and flavourful
Just 6 ingredients
Easy to make
Pipe or press them into pretty designs
Decorate to your hearts content.
Ingredients in Butter Cookies:
With the buttery flavour of shortbread but with a soft melt-away texture, these cookies have definitely earned their name.
Butter – a large amount and since this is the most dominant flavour, use a quality brand.
Sugar – regular white granulated sugar will do the trick here.
Vanilla extra – make sure to use extract (not essence). You could even go the extra mile and use vanilla bean paste or vanilla bean seeds so you get that gorgeous little black speckles.
Egg yolk and milk – both are used for richness and they also allow the dough to be soft enough to be piped.
All purpose flour – of course you need some sort of flour to create cookies and these ones just need the regular all purpose variety.
How To Make Danish Butter Cookies:
This incredibly simple dough is the work of minutes using a stand mixer, definitely my prefer way to mix this thick dough.
Wet ingredients: mix together the butter, vanilla, egg yolk, most of the milk and the sugar in a stand mixer – just using a paddle attachment.
Add flour: Add the flour in 3 parts, then give it a good beat until it’s forms a soft dough.
Pipe: Transfer the dough to a piping bag, then pipe in any shape you like – see my tips below.
Bake: Bake them at 350F for roughly 14 minutes or until the edges just start turning golden. Let them cool completely before decorating.
Decorate: These are gorgeous dunked in chocolate with some sprinkles. Add any colour to suit the season or whatever you love. You can also sprinkle sugar over them before baking.
Tips and Variations:
The dough: After adding the flour, you give it good beat for 30 seconds or so until it becomes a nice soft dough and everything is fully combined.
Milk: You can add a little more milk if it’s not soft enough to pipe but don’t add too much or they will use their shape as they bake. It should take some pressure to pipe but should not break as you do so.
The piping bag: Use a small piping bag. This is quite a thick dough and easier to pipe when you have a small amount to handle at a time.
Piping: So they keep their shape, pipe them high with the piping bag completely vertical (not at an angle). Hold the tip ½ inch from the baking tray, use both hands on the bag and press firmly to pipe.
Designs: Use a piping bag, cookie press or freeze in logs to make slice and bake cookies. When you pipe use an open star tip like an Ateco 829. Pipe in a small circle so it becomes a rosette. You can also pipe logs of dough or large stars (without making a circle) then add a glace cherry to the centre.
Hold down the paper: Quick trick to hold that baking paper down, dot a little of the dough under the corners and it will assist in holding it in place while you pipe.
When decorating: Be gentle with the cookies when you’re dipping them as they are very delicate.
How Long Will These Cookies Keep?
These homemade cookies are good at room temperature for up to 7 days. Keep them in an airtight container. You can also freeze them for up to 2 months – perfect for getting ahead if you’re gifting them. Again make sure they are in an airtight container.
One last tip: While they’re best known for their pale color, go ahead and ‘over-bake’ a few so they get quite golden – the nutty butter flavor this gives is absolutely amazing.
More Amazing Cookie Recipes:
Spiced Shortbread Christmas Cookies
Cinnamon Roll Cookies
Easy White Chocolate Macadamia Nut Cookies
Almond Thumbprint Cookies with a Salted Caramel Center
Maple Sugar Cookies
Print
Butter Cookies
Buttery, tender and unbelievably light these homemade Danish butter cookies are so much better than the tinned version. Loaded with flavour,they’ll literally melt in your mouth and are so easy to make.
Course Dessert
Cuisine American, Danish
Keyword best butter cookies, butter cookies, butter cookies recipe, danish butter cookies, homemade butter cookies
Prep Time 10 minutes
Cook Time 14 minutes
Total Time 24 minutes
Servings 25 cookies
Calories 154kcal
Author Marie Roffey
Equipment
medium piping bag
Ingredients
8 oz unsalted butter, softened (226g / 2 sticks)
1/2 cup granulated sugar (3.5oz / 100g)
1 1/2 teaspoons vanilla extract
1 egg yolk
4-5 teaspoons milk
2 cups all purpose flour (9.2oz / 260g)
5.5 oz semi-sweet chocolate, melted (3/4 cup, chopped)
Sprinkles if desired.
Instructions
Preheat the oven to 350F. Line two baking trays with baking paper.
WET INGREDIENTS: Beat together the butter, sugar egg yolk, vanilla and 3 teaspoons of milk together for a few minutes until well combined and looking a little creamy.
DRY INGREDIENTS: Add the flour in two or three parts, beating until well incorporated and it turns to soft dough.
PREP FOR PIPING: Transfer a little of the dough to a medium piping bag with an open star piping tip.
TEST: Test pipe a rose holding the bag directly upright and about half an inch from the tray. If it cracks or breaks or you can't pipe it, return it to the bowl and beat in a little more milk. Don't add too much. The consistency should be thick and still require some pressure to pipe but should pipe smoothly. See notes.
PIPE: Once you're happy with the consistency, pipe rosettes of dough about 2 inches wide, leaving 2 inches space between each so they have room to spread.
CHILL: Chilling is optional but doing this for 10-15 minutes may keep your design even more defined.
BAKE: Bake for around 14 minutes or until just starting to turn golden on the edges.Transfer to a wire rack to cool completely.
DECORATE: Line a baking tray with baking paper. Dip half of each cooled cookie in chocolate, scraping the base on the edge of the bowl, then place on the tray and add sprinkles if you like. Let them set in the fridge for 1/2 an hour.
Notes
There's no need to beat the butter mixture too long as it may soften your piped design on baking.
I find a stand mixer best for this thick dough but a handheld electric beater and some elbow grease at the end will work too.
Different brands of flours will absorb different amounts of moisture which matters in this dough. Only add enough milk that, while still requiring pressure to pipe, you can pipe it smoothly. Too soft and you won't get the defined design on top.
Decorating: You can add a variety of sprinkles to suit the season. You could even sprinkle over granulated or turbinado sugar before baking.
Piping: You don't have to pipe these cookies. You could just scoop like regular cookies, or use a cookie press. You can also roll the dough into logs and place in the freezer for 1 hour. Later, slice and bake.
Nutrition
Serving: 31g | Calories: 154kcal
from The Recipe Critic https://ift.tt/3bB7O5M
http://easyfoodnetwork.blogspot.com/2020/09/homemade-butter-cookies.html
0 notes
Last Seen Blogs

got7gf
reload, we ridin

thewandererwild
Pfffttttt . \o/

delusionalfun-blog-blog
Delusional Fun

misfortunebear2307
Misfortune Bear

curtismadawaworldwide
Untitled