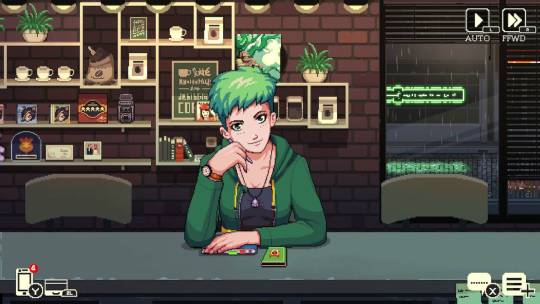
#turorials
Text
OKAY!!!! @somebody-random-lol
I cant tutorial so this is rlly wack im so sorry—

Shape!!!! Idk!!! normally, i add like, another line at the bottom part leaving a bit of space, but. idk im speedrunning this—

BASECOLOR!!!! How pretty, its like a. a muted blue? Idk. Its blue!

Shading!!! Basically kinda…circle around it like the middle is the base color and them slightly shade the ends going darker the more you go out!

Use a lighter color than the base around the base color more of? like- give it a lil silly?

Change the lines! Or dont; thats a me thing, looks better(?) when using colored lines.
The brushes I used vvvv

Layers—

and i kinda altered the the- the pen (fade)- but that one i use for shading!!!

#Bz_Doodles???#< this tag might as well be#wips#and#turorials#idk#its silly#im bad at this#if you dont use ibis paintx#im sorry#this may be helpful#prolly not#i hope i did okay 😭😭😭😭
19 notes
·
View notes
Note
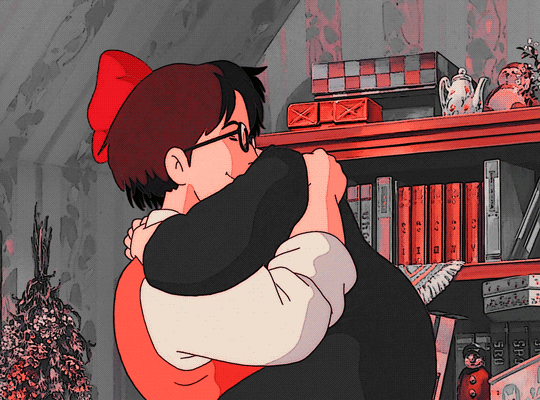
hi!!! I'm a huge fan of your art!! I was wondering if you would ever do a "tutorial" so to speak on how to draw bilbo and thorin. How to capture their essence if you will. I've been trying to draw them and it just never looks like them 😭 absolutely no pressure btw!! I hope you have a lovely day :)


Hello!! I'm thrilled to hear that you like my art! Here's a small guide on how I draw Bilbo and Thorin. I apologize if there are any mistakes in the explanations or if they are confusing, English is not my first language 😭. I hope this helps!
194 notes
·
View notes
Note
Okay so, got any advice on making pixel art? Anything at all?
I want to draw two of my characters in a style of the game they're based from, which happens to be a high-detail pixel game called Coffee Talk (for example, this is Freya, one of the regulars)
I don't have much experience with pixel art so far, I have some, but only minor stuff.
Sure!
If I was planning to do this, I would first search for a clean reference of a character from the game. That means without any jpeg artifacts and not blurry at all.
Then i would bring it into Aseprite (or whatever program you use), take my marquee select tool (M in Aseprite) and select one "pixel".

Doing this I can see that the pixel is actualy 2x2 px, which means the base sprite was scaled up 2x. So I will go to my image settings and scale the image by 50% (ctrl + alt + i) so I can have the art at its original resolution.
This is much much easier to work with and study for a pixel artist.
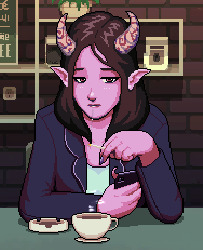
Then I would do my art side by side like this:
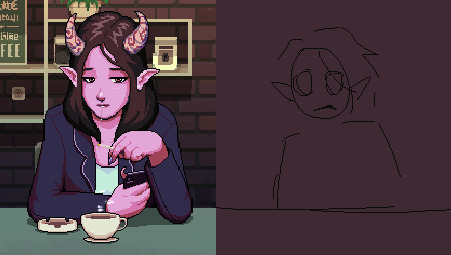
Studying from the original and mimicing stylistic choices when I can
You could also just edit the sprite (this is totally ok to do as long as youre honest/upfront about it, just like any study. So many beginner artists get started with sprite editing, its such a great way of learning).
I want to make a special mention to this website called Spriters Resource, if you're looking for game sprites (especially retro stuff) you may find it here!
If i don't know how to do something i always go on spriters resource and search games I like, so I can learn how they do it. This website is a goldmine for beginner pixel artists
Feel free to ask me any specifics in the future!! and GL
254 notes
·
View notes
Text

Tutorial thingy
#art#digital art#illustration#fanart#tears of the kingdom#zelda fanart#breath of the wild#turorial#art tutorial#artist on tumblr#digital artist#digital painting#video games#nintendo#zelda art#tloz fanart#tloz#botw#study#illustrators on tumblr#artists on tumblr#artists of tumblr#character art#linktober#link
61 notes
·
View notes
Text

firefly in a browser drawing program! her eyes look funny. whatever
#i think god is trying to shield me from furthering my gambling addiction because zzz crashes on my desktop#almost got it to run last night but it crashed when i got to turorial and i got so bummed out i started drawing in random browser programs#this one is called kleki! its surprisingly good#it has all the basic stuff a normal drawing programm has#LET ME IN THE ZENLESS ZONE ZERO PLEASE#firefly hsr#hsr#honkai star rail#hsr fanart#ALSO this is based on that one fish eye miku
24 notes
·
View notes
Text
I had someone elsewhere ask me how I accomplished my lined art-style so I put together a rough guide on my process; admittedly I am very bad at explaining things, but I hope this is useful for someone!
#art turorial#my art#resources#I love talking about my weird process stuff#so if you have any questions feel free to send them my way!
251 notes
·
View notes
Note
question... do you use shapes to draw the turtles' heads or LINES (like breaking each part of their head into shapes or just form their head w lines AM I MAKING SENSE)
I use separate lines.


I start with a box and then go from there.
How I draw their heads Leo Donnie Raph Mikey in that order.


They’re all pretty similar with slight changes.
19 notes
·
View notes
Photo

Hey! In this tutorial I will show you how to make your own morphs for necklaces! I’ve seen a lot of folks struggling with this. Necklaces tend to get wonky when you use a reference for morphs. For each necklace you need to make seperate morphs, it seems that there is no other way. But it’s not a long process, I promise!
Before we start, I want to clarify that this tutorial will NOT teach you how to convert/make accessories! It only covers one of the steps. Okay, let’s go!
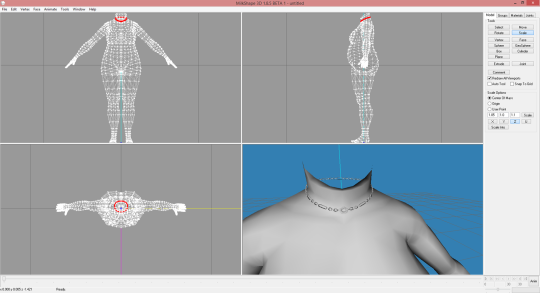
Step 1:
If you have ts3 male and female bodies as .obj to import them to Milkshape, you’re good. If you don’t have them, download them >here<. We will need it later. Now assign bones to your necklace, don’t make morphs! Open up Milkshape and import your wso file with assigned bones. Name it group_base, if you didn’t already.
Step 2:
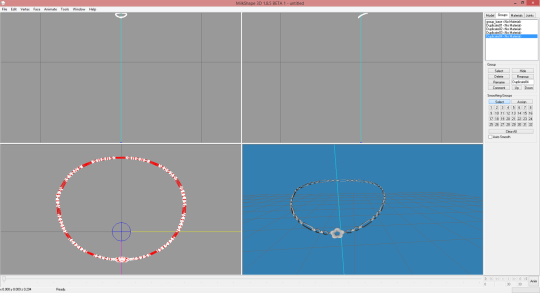
Select the group and click ctrl+D four times. This will duplicate our necklace four times, because we need to make morphs for four groups. If your screen looks like mine, let’s get to step 3!
Step 3:
We need to rename our cloned groups! From the top it goes: group_base, group_fat, group_thin, group_fit, group_special. After renaming, hide every group, so you’re left with empty scene.
Step 4:
Import the fat body and unhide group_fat. Select group_fat and go to Model tab. Here the fun begins! Play with Scale and Move options to adjust necklace to the body as good as you can. After you’re done, delete the body and hide group_fat. Now import thin body and do the same with group_thin, then with group_fit and fit body. Leave group_special as it is, as it’s a pregnancy morph and it stays the same as the base in the neck area. And a small tip - when you make thin morph, you’ll want to make it smaller. When you play with numbers in Scale options, use 0 instead of 1. For example 0.1 and not 1.1. I hope you know what I mean, I’m so bad at explaining x(
Step 5:

After adjusting the size and position, unhide all groups, so you end up with five versions of necklace. Export it as wso, name it as you wish. Time to test in TSRW!
Step 6:

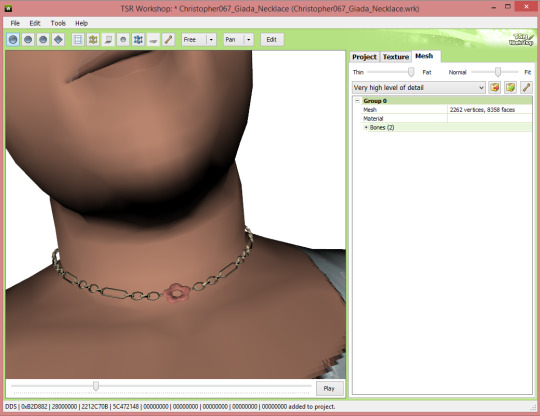
Yay! We have proper morphs, no more wonky and distored necklace ^^
I suck at explaining things, so if you have any questions/concerns, please, comment on this post and I will do my best to answer quickly!
#ts3#ts3 tutorial#the sims 3#sims 3 tutorial#rollo writes a tutorial#woah#it's almost 1:30 am#and i doesn't feel very good#so excuse low quailty of the turorial :<
99 notes
·
View notes
Text
ok might be taking advantage of all my classes being cancelled indefinitely because everything's underwater due to the biggest flood we've had in history to record my utau voicebank
... after I finish mourning my Pokémon White 2 cartridge that we found in the water and will not run anymore 😔
#my other cartridges I fixed its just this one#vocal synth#utau#pokemon#pokemon white 2#Nintendo ds#Nintendo 3ds#adding these tags in case I can find someone that can help me#not exactly easy to find turorials online on how to fix flood water damage on ds cartridge
7 notes
·
View notes
Note
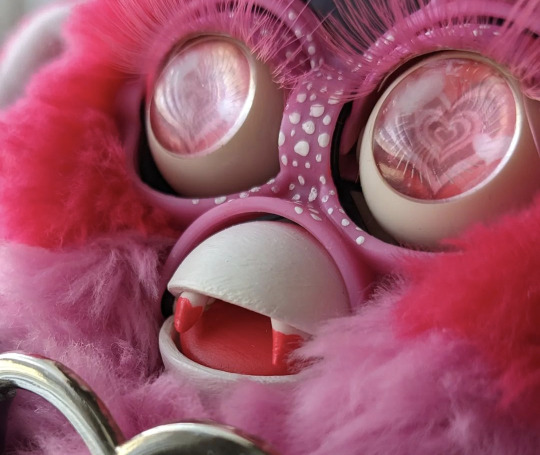
hi, i adore your customs so much! ^^ i've been having trouble finding clear eye chips that fit 1998 furbies properly (14mm ones weren't thick enough and fell off even with glue). i was wondering where you got your eye chips from, or if you have a different process
Hello! Thank you so much! That means a lot ❤️!
Unfortunately almost every glass eye chips I have found online have had some issues. 🫠🫠🫠 So there isn't a "perfect" purchase out there. They are either over priced, came broken, or were too thick where the eyelids couldn't shut.
However, these were the best and closest options on Amazon I could find, they are the closest size (they're a little small but it's not noticeable) and most weren't too thick, but it only is for about 20 of them/purchase and that's if all of them are the right height;
With glass bead replacements I always make sure to place the glass beads into the sockets before gluing just to make sure that they fit and aren't too thick. Typically though you can tell just by looking at them and I recommend always doing this even with the above link, because each piece is a different size and some may be a lil' too big!
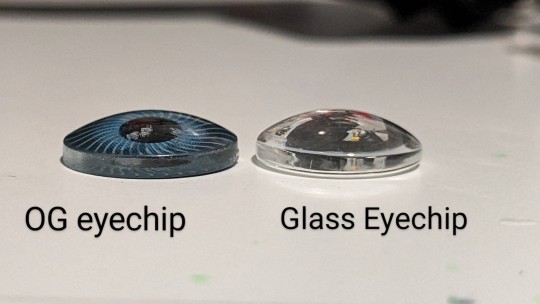
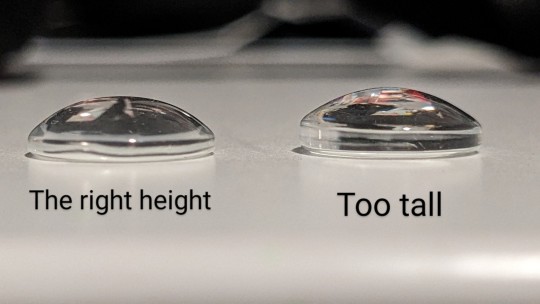
But honestly? Sometimes I don't want to bother using glass ones because like you had said they are hard to stay glued in. So what you can also do is soak the original eyecaps in some acetone! I soak mine for a few hours, take them out, and with a Qtip I lightly brush off the paint. Once the Qtip isn't releasing anymore of the paint you put it back in the acetone and wait. It takes some time and I learned there's about 4 layers of paint to go through. Then once it's all clear you just wash it with soap and water and let air dry. They should be clear and have some of the line engravings in them still which can make a cool eye texture for the furby! This also will reduce waste! So I highly recommend doing this method as well if the eyes weren't damaged by removal!
I did this method for my Succubus Furby Aggie and I absolutely love the line engravings;
And as for glue I am still figuring out the best method! I know that either glue you use you should always seal the eye design with something. Either clear spray paint finish or mod podge just to make sure that the design won't be damaged by the glue from the eyechip (Because no air can go between it so this sometimes causes the eye design to bleed and it makes for a mess under the eyechips).
Modpodge works great to attach the eyechip to the eye sockets however I have had better luck with either Super Glue GEL or Hot Glue for gluing the eye chips to the eye pattern! Hot glue it just hard to not make a mess with and you have to be fast or it'll dry and be too thick. I always place a small drop in the center of the eye design and then quickly put the eye chip ontop and push it down. This spreads the glue across the pattern for a clearer look. But be careful to not burn yourself and if you are using glass chips they also can get really hot. Also air bubbles can be your enemy so make sure there are enough glue sticks that won't cause it to sputter out and make air bubbles!
But realistically. My fav is still Super Glue Gel. It just gives a smoother look and dries quickly without moisture. So for me personally I do the following method;
Mod podge to seal the design -> Let Dry -> Super Glue Gel drop on design and then press eye chip onto it -> Let it dry over night -> Mod podge/Super Glue whole eye chip w/ design into sockets. -> Let cure for a day -> Use alcohol to clean off any clouding on top of eyechip that may occur from the super glue.
I hope this helps!!!!
#furby#i will not apologize for posting about furbys#furby talk#custom furby#asks#furby custom#fueby turorial
33 notes
·
View notes
Note
I love all your edits!
Do you have any favorite psds that you are willing to share? Or tips on how to make gif colorings looks as nice as yours? 🥹
Hi, anon! Thank you so much! I am really happy that you love my edits. I really appreciate it! (°◡°♡)
To answer your question, I only use one PSD file nowadays for all the edits I make so sharing this one PSD I got for myself would be a bit uncomfortable. I hope you understand. Hehe. ( ̄▽ ̄*)ゞ
But no worries, because I thought of sharing LUT files that you can use as a basis for your color grading. I will only share one LUT file for this post but I might try sharing other LUT files as well in the future. In that way, you can achieve coloring with your own style. I will also be sharing which adjustment layers I use and what are the typical settings I apply.
SOME REMINDERS THOUGH:
I use PS 2021 but all adjustment layers are also available on older versions.
I AM NOT A PS EXPERT. I learned to use PS by reading/watching tutorials. All the things I will include in this post are just my preferences for my coloring. Take anything I said with a grain of salt.
I applied and tested my coloring on anime edits only. You may use it for real-life GIFs/photos but you may want to reduce the opacity or use a different blending mode to make it work.
My coloring deviates a lot from the original coloring most of the time. Some people may find my coloring weird so always keep in mind that this is not the best coloring practice.
ALSO WARNING: BAD ENGLISH AND LENGTHY EXPLANATIONS XD
To start, you may download the LUT file HERE.
This file is basically a compilation of adjustment layers that you may want to apply to other images. So when you use it again on another project, you can simply load this single file instead of the multiple adjustment layers. The disadvantage of using LUT file is that there's no room for further adjustments of the colorings within that file. In my case, I used it as an advantage. You may call it my secret recipe for my coloring. LOL. You can use it but there's a limit to the modifications. Anyways, this LUT file contains multiple layers which is a product of my trials and errors for the past few years since I started editing again.
You may consider using this LUT file as your training wheels. Once you understand further the complexities of the adjustment layers, you may no longer rely on this coloring file. I also did this when I started wanting to develop my own coloring style. And once I understood the basics of the adjustment layers and how to replicate the colors that I had in mind, I got rid of the LUT files and started making my own.
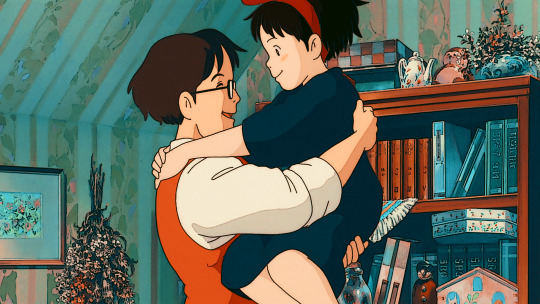
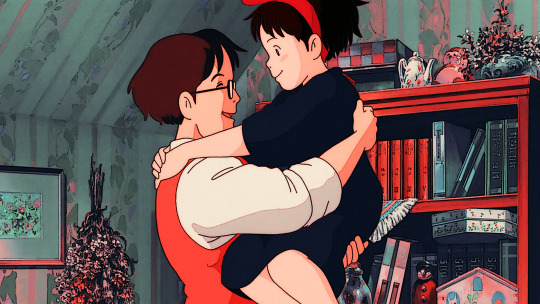
Now, let's use this image for coloring sample:
You can also download the image so you can follow my steps easily. This version is already sharpened.
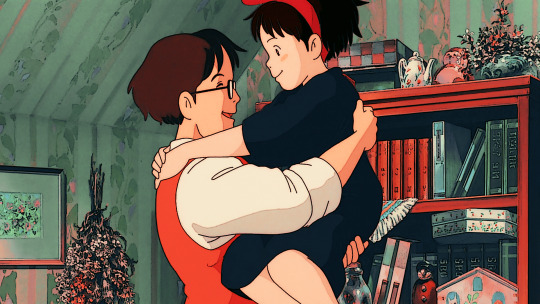
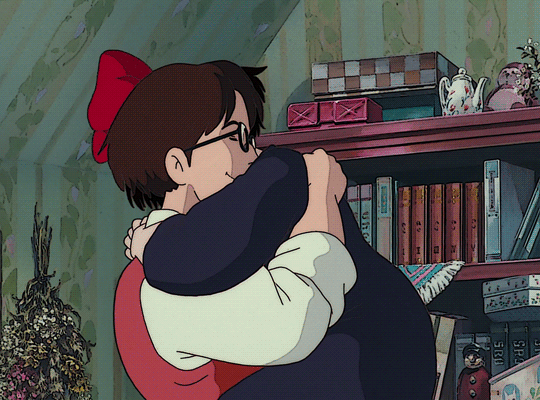
So when I apply the LUT file for this image, this is how it's going to appear.

This color grading has the teal & orange effect. Of course, this is not the final output. This will be the backbone of our coloring as we add more adjustment layers. In my case, I always start with cyan and orange and then make the necessary changes depending on the series and the atmosphere of the image used.
But before we proceed with the adjustment layers, I want to emphasize two things you can explore when it comes to adding adjustment layers. Being aware of these two features of PS actually expands your coloring options exponentially [don't get fooled, I may sound like an expert but this is just really based on my personal experience. XD] Anyways, below are the two:
Opacity - It doesn't have to be black and white when it comes to coloring. You may choose the grey side. If you think the adjustment layer you are trying to add is causing an unpleasant effect on your image, maybe try to lower the opacity first and see if that will help.
Blend Modes - you may want to explore blend modes other than the Normal mode. If you are not used to changing the blend modes, you can check videos posted by Unmesh Dinda on his YouTube Channel. He explains really well when it comes to Photoshop features. I learned a lot from his tutorials and I am now applying these learnings to my current coloring style. You may check this video for starters. He has other videos about blending modes, too.
ADDING ADJUSTMENT LAYERS:
Levels Adjustment Layer - this is always my first adjustment layer but I also modify this in the last part. There are presets available but I am not utilizing those. Instead, I go to Auto Options. This feature is very helpful in heavily dark or bright scenes. Depending on what color correction you used, you may have extremely varying results.
Once you click Auto Options, another dialogue box will appear:
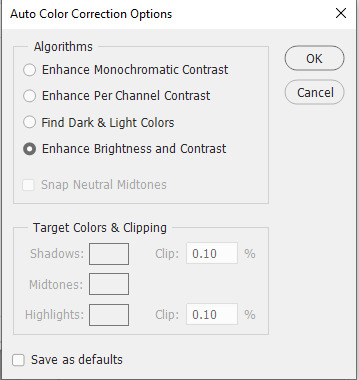
The default option is Enhance Brightness and Contrast. We will choose that option for now then click OK. [We will go back to this layer once we are done with the other layers.]

Color Lookup Adjustment Layer - this is where the LUT file comes in. Once you add the layer, click Load 3D LUT then click Load 3D LUT again on top.
Select the LUT file I shared.
Selective Color Adjustment Layer - for this layer, I always separate my adjustments for different colors and don't do the adjustments for all colors in one layer.
First Selective Color - I will rename the layer as RED and set the following values: CYAN: -100, MAGENTA: -11, YELLOW: -32, BLACK: 15
You can explore the levels of Magenta and Yellow but ultimately, I always set Cyan to -100 and Black is +15. Of course, you are free to change these two but these are my preferred coloring for shades of red. Setting -100 for Cyan gives this warm coloring.

Second Selective Color - I will rename the layer as YELLOW and set the following values: CYAN: -100, MAGENTA: +40, YELLOW: +30, BLACK: 40
Cyan is also set to -100. This adds more warmth to the tone of the image. Then you may change the remaining sliders to your preferred values.

Third Selective Color - I will rename the layer as CYAN and set the following values: CYAN: -60, MAGENTA: +20, YELLOW: +100, BLACK: +40
I don't have a rule for CYAN. This really depends on the color I want to achieve for the shades of blue. Depending on the values, you can make your color look blue/cyan/purple. In this case, I wanted to tone down the brightness of the cyan.

Fourth Selective Color - I will rename the layer as Black and White and set the following values: BLACK: +5
This is just to slightly darken the black shades of the image. I label it Black and White because I sometimes change the value of Black for White but in this case, adjusting the white doesn't help so no changes were made.
Gradient Map Adjustment Layer - I do not use this layer all the time. It really depends on the image. When I wanted to add another shade of colors to the image, that's the time I would use this. And I use a maximum of 2 gradients only.
The image looks okay now to me but let me add some gradient just to show how I use this layer. I use Gray_10 which is one of the preset gradients available in PS. Then I check the Reverse option to emphasize the contrasts of the colors. Then I set Blend Mode to Soft Light, Opacity at 100%.
Then I add another Gradient Map Layer. I use Purple_17. In this case, I didn't check the Reverse option.
Then I set Blend Mode to Soft Light, Opacity at 35%.

Hue/Saturation Adjustment Layer - this one is optional. I use this on my gifs to increase the warm tones of the image.
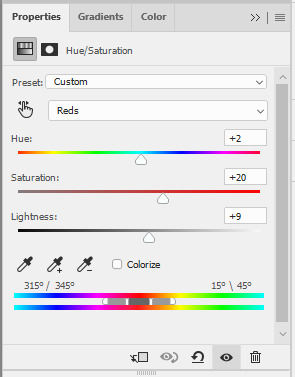
I only change the values of Red for additional warm tones.
At this point, I also wanted to make the cool colors lose saturation, so I added another Hue/Saturation layer. To have a grayish effect on cool colors and make the reds stand out even more.

Brightness/Contrast Adjustment Layer - you can use the Auto function and then just make the adjustments you want.
In my case, I set the Contrast to -50 most of the time, then the Brightness varies. For this example, I set Brightness to +8.

Then last but not least, I made some slight changes to the Levels Adjustment Layer and then adjusted Brightness to -3.

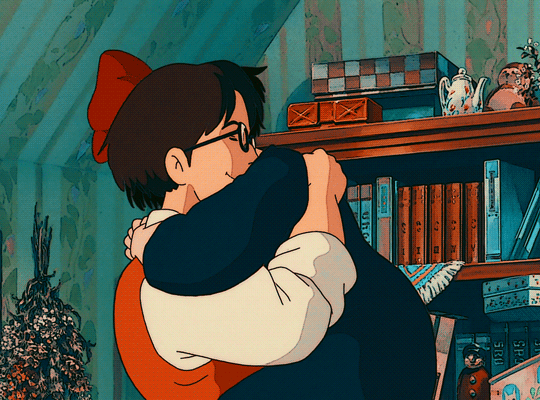
To compare, I will post the original GIF, with LUT file only, and the final GIF coloring respectively:
I hope this helps, anon!
I might create a specific tag for this kind of post and just include it on my master list pinned post so it's easy to find. Also, if you ever use this coloring style or the LUT file as part of your coloring, there is no need to credit but if possible, please tag me in your creations (#userartless) so I can see how you personalized the file and made it your own. ^^
10 notes
·
View notes
Text
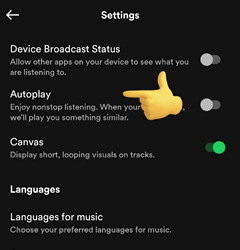
BTS Tutorial: SPOTIFY

Streaming on Spotify (whether it is via the web player on a laptop or tablet, the app on your phone, etc.) is a great way to help BTS members’ songs chart on Billboard and for other awards.
However, the rules about what qualifies keep changing, so it’s important to stay up to speed with what “counts” toward the charts and what simply counts towards streaming numbers.
First things first: It’s a good idea to make yourself at least three extra fandom-related emails. These will be useful for streaming, voting, and promoting things on social media to help your members’ work do well. It also puts another layer between you and an advertising spam from certain apps.
Just as some random examples:
YourRealName @ email.com
YourFandomName @ email.com
YourName . Stream @ email.com
YourName . Vote @ email.com
YourName . Promo @ email.com
Next up: If you don’t already have a premium Spotify account, by March 22nd, go ahead and sign up for a free 30-day trial for each of your emails. Spotify will remind you beforehand that it’s time to cancel or be charged. Premium account streams count THREE TIMES faster toward Billboard charts.
For every 1,250 streams on your premium account, it counts as 1 album sale. If you use a free account, it takes 3,750 streams to count as 1 album sale.
A premium account also means you can get through playlists faster, without having to sit through 90 seconds of commercials. That matters when we are trying to hit goal numbers in the first day and week that something drops.
Go ahead and follow Jimin on each of your Spotify accounts, and save Jimin-focused playlists (you can do that by searching for them, dragging them over to the sidebar in your LIBRARY, and clicking the like button <3). More on playlists in a bit.
There are some rules to follow, to make sure your streams don’t get filtered out of charting.
When it’s time to stream singles and all of FACE, you’re going to want to click on a playlist that has his songs listed in order about 20 times, with filler songs in between.
A great playlist will have a healthy amount of Jimin songs and BTS songs in general to help reach other milestones. You don’t have to mix songs from other artists in; we can keep these streams in the family.
After the 20th time you play a song in your account that day, it stops counting for a chart.
That’s when you logout of one Spotify account and login to your next. Repeat the playlist. Click around every 90 minutes so Spotify knows you’re not a bot.
Try to do this with, like, three or four accounts a day. If you can manage five accounts in the first 24 hour period, that’s 100 streams for Jimin’s songs. That's a goal I'm setting for myself because I also have to work that day.
If you can’t handle all that, and you can only use one account to chart because life is hectic—hey, it’s better than nothing. Also don’t despair: after the first 20 times you play a song, any other times you play it still counts as streams under the artist’s profile, but will be filtered out of chart data. So after the first week, feel free to put on a long playlist when you need to be away from keyboard.
If you have a desk job or can have your phone with you throughout the day, it’s just super easy to plug in some headphones and cycle through all your accounts while you get other shit done, so you capture unfiltered streams.
If you are celebrating Ramadan, please make choices that honor yourself and your beliefs--I think Jimin would want that. Some of my friends are choosing to stream with headphones and simply not listen until April 23rd. They have tremendous willpower and I give them mad respect. You do what you need to do, okay?
Try not to stress too much; just do your best.
If you are using Spotify, keep in mind that you need to immediately go into your settings and turn off Autoplay. Turn that sucker off in each of your accounts and keep it off.
Please always like and follow the artist’s profile page on Spotify. You will now count toward his “monthly listeners.” Here’s Jimin linked below (and follow the other members and BTS as a whole too while you’re at it!):
Third, if you’re on VPN, turn it off. I have a work computer I use for work on VPN and a home computer I use for streaming without a VPN.
If you have to use VPN on your only computer, then please use the Spotify app on your phone.
Now, to playlists:
When you are playing a song, keep the volume at 51% or higher. Stick some headphones into your device and that way the noise level won’t bother others.
(They SAY they aren’t tracking the volume on your devices, so much as the volume in the platform settings—I say why risk it? Stream at 51% volume inside the app and your device and rest easy.)
Second of all, let’s pretend we are trying to chart the song VIBE. You need to have at least 2-3 filler songs in between every time VIBE is in your playlist. Those songs need to be 60 seconds or longer. (On occasion, after 30 seconds, you can skip that song and get back to VIBE, but don’t do it too much or you look like a bot.)
You cannot just loop. You cannot just put VIBE VIBE VIBE VIBE VIBE back to back in your playlist. That is bot behavior and you will get filtered.
Don’t shuffle your songs or playlists. If you shuffle, you could end up playing songs back to back by accident and then they don’t count. Try to play an album in the order that the member created it.
The only exception to this is the first 24 hours; prioritize the lead track and singles if your time is limited and you must prioritize for Hot 100.
Every 90 minutes or so, you need to interact with your Spotify playlist. Click pause. Click a different song. Slide the volume bar (then put it back at 51%). Go forward and backward during a song. Like a song. Be a bit random. Try to act like a human, not a bot.
Not only are you wasting time if you get filtered as a bot, but the last thing we need is to damage Jimin's reputation by having antis scream we bought his streams. Act human.
Your playlists can be as long as you like; just keep in mind that after 20 plays of a song in that account, it will be filtered. I have a laptop I dedicate just to streaming and I have some playlists I put on for 9+ hours at night while I sleep, but that’s to help the number of streams; I know it won’t count towards charting. If I'm not sleeping, I'm cycling through accounts and streaming.
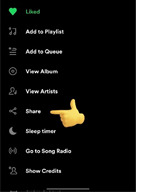
Sharing a song helps it chart on Spotify Viral. Play the song you want and then click on the three vertical dots next to it, click on Share, and put it on the social media app of your choice. Takes a few seconds. Encourage others to listen to Jimin and BTS and they just might become ARMY!
For more info and timely updates, follow these helpful accounts on Twitter:
PJM Streaming
Jimin ChartsPH
Huge shout-out to minieskies on Twitter for compiling the vast majority of this fantastic information. I confess I data-mined the hell out of their amazing quiz posts.
Here’s some good playlists to practice on until FACE drops:
SIDE NOTE:
For newer ARMY, it’s important to know this aspect of our history:
In the beginning, Big Hit, Hybe, and BTS were poor little nobodies going up against the Big 3 K-pop industry juggernauts. Going viral by putting their dance practices on YouTube and having ARMY stream their ignored songs like crazy is how BTS became the global phenomenon they are today.
Now, I’m not out to tell you how you should live your life or be a fan. But I will say that (in my opinion) helping BTS (and all their solo works) chart via streams is pretty much the minimum standard that separates being a casual fan and calling yourself ARMY. It's free and relatively easy.
“We have only each other.” That’s always been our unofficial motto. Yes, Jimin and BTS are becoming popular all over the world and going mainstream. Yes, they are multimillionaires. Yes, there are millions of ARMYS. But you have no excuses to slack, unless you're in a legit crisis of course. We are not charting BTS to put won in their pockets. We are doing this to show love and pride for their art.
We cannot expect locals, antis, multis, or cultists to roll up their sleeves and get to work. They won't. In fact, you can pretty much count on some of them actively working against Jimin, trying to chart milestones or pull focus during his charting period by stirring up drama. SO HELP ME IF ANYONE GETS DISTRACTED FROM OUR GOALS TO ENGAGE IN THEIR NONSENSE...
So if you do nothing else at all—no voting, no promo, no purchasing—PLEASE stream like your life depends on it the first week and even the first month that FACE drops. Get into this habit for all our members. It’s our legacy and our best, most accessible way to get behind our boys.
Okay? Okay. Thanks for coming to my TED Talk.
Please share this info with others so we can be prepared to help our IT BOY smash goals. If you know of better tips and tricks, I’m always eager to learn! Thank you!!
DISCLAIMER:
I am a Dope Old Person and have been ARMY since January 2022. So I still have a lot to learn.
I’m making mini-tutorials for people like me who are comfy with technology but totally new to voting, streaming, and buying Kpop stuff.
If you know of better, more up-to-date information, please comment or DM me so I can make sure I’m not spreading misinfo. Please be polite about it, though—we are on the same team!
Feel free to apply whatever you learn here to other BTS members and other artists; I’m Jimin-biased so I am focused on helping Jimin at this moment in time, but I’m OT7 so rest assured I’ll put my shoulder to the wheel for all our members!
57 notes
·
View notes
Text
tragic day for all the girlies who doodle eyeballs in their paper journals instead of taking notes in class
#if you dig into the site you’ll know why. I JUST GOT FREAKED THE HELL OUT EWWWWWWWWWW#welcome home#THANK YOU FOR THE FREE EYE DRAWING TURORIAL WALLY
21 notes
·
View notes
Text
What do we think of these arts?


Oh and this

Which is a reference to this

4 notes
·
View notes
Photo


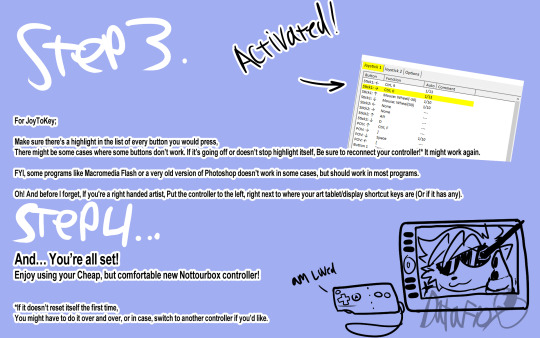
So i made a tutorial on how to turn your video game controller into an art tool if anyone’s interested.
https://joytokey.net/en/ <-- For PC
https://yukkurigames.com/enjoyable/ <-- For Mac
https://joystickmapper.com <-- Also for Mac
40 notes
·
View notes
Text

LISTEN THIS IS A TEST IS IT GOOD NO BUT AS SOON AS IM OFF WORK AND HAVE SLEPT TOMORROW AKA ON SUNDAY PROBABLY ACRUALLY IM GONNA BE THE MOST ANNOYING FUCKING SHIP EDIT MAKER EVER
#raiiot#I COULD NOT UNDERSTSND THE TURORIAL AT ALL BC IM ON WINDOWS NOT MAC#BUT I FIGURED IT OUT BITCH#I windowsfied it#IMA GENIUS#IM THAT BITCH#YES IM RBIGN THIS TO MY EP#THIS TOOK IVER AN HOUR TO FIGURE OUT AND THEN IFTHRRE THIS TESTER GIF TOGETHER IN 5 MINS AFTER I FIGURED IT OUT#IM THE BEST#FUCK WHOEVER THINKS OTHERWISE#I WON BITCHES
2 notes
·
View notes
Last Seen Blogs

tiffknights
Tiff knights

carserviceq8
Untitled

mayorlaurenn-blog
- acnl main blog-


wisedinosaurflower
Untitled