#witch DIY
Text
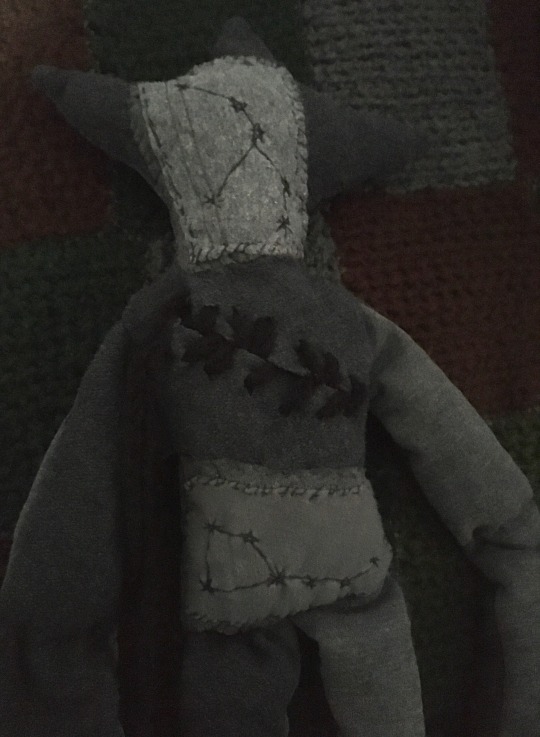


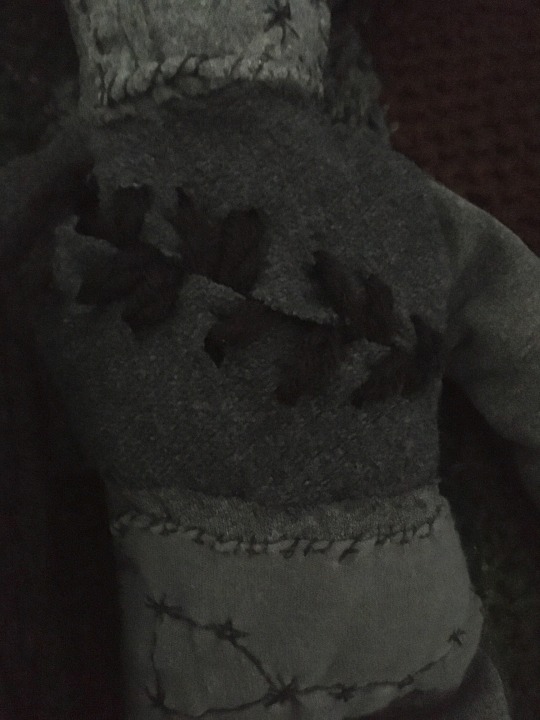
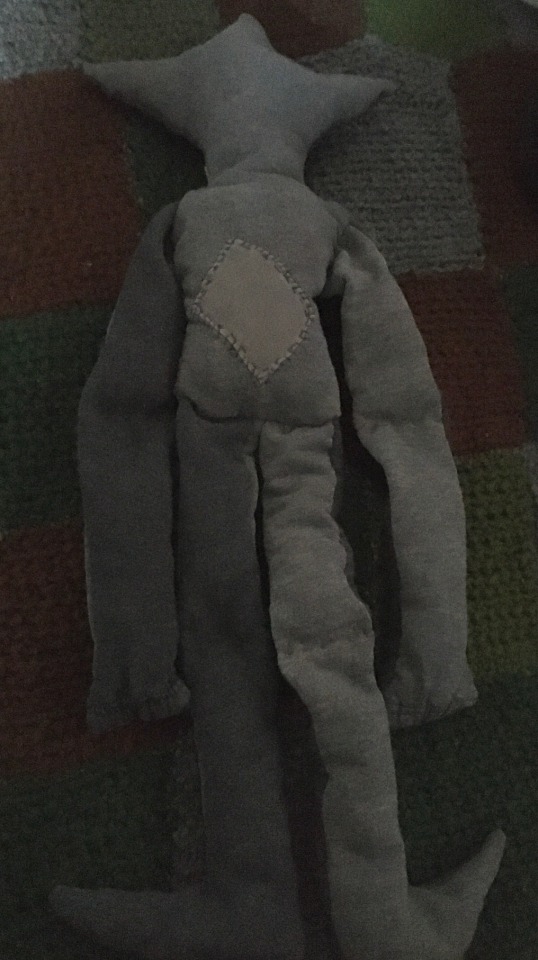
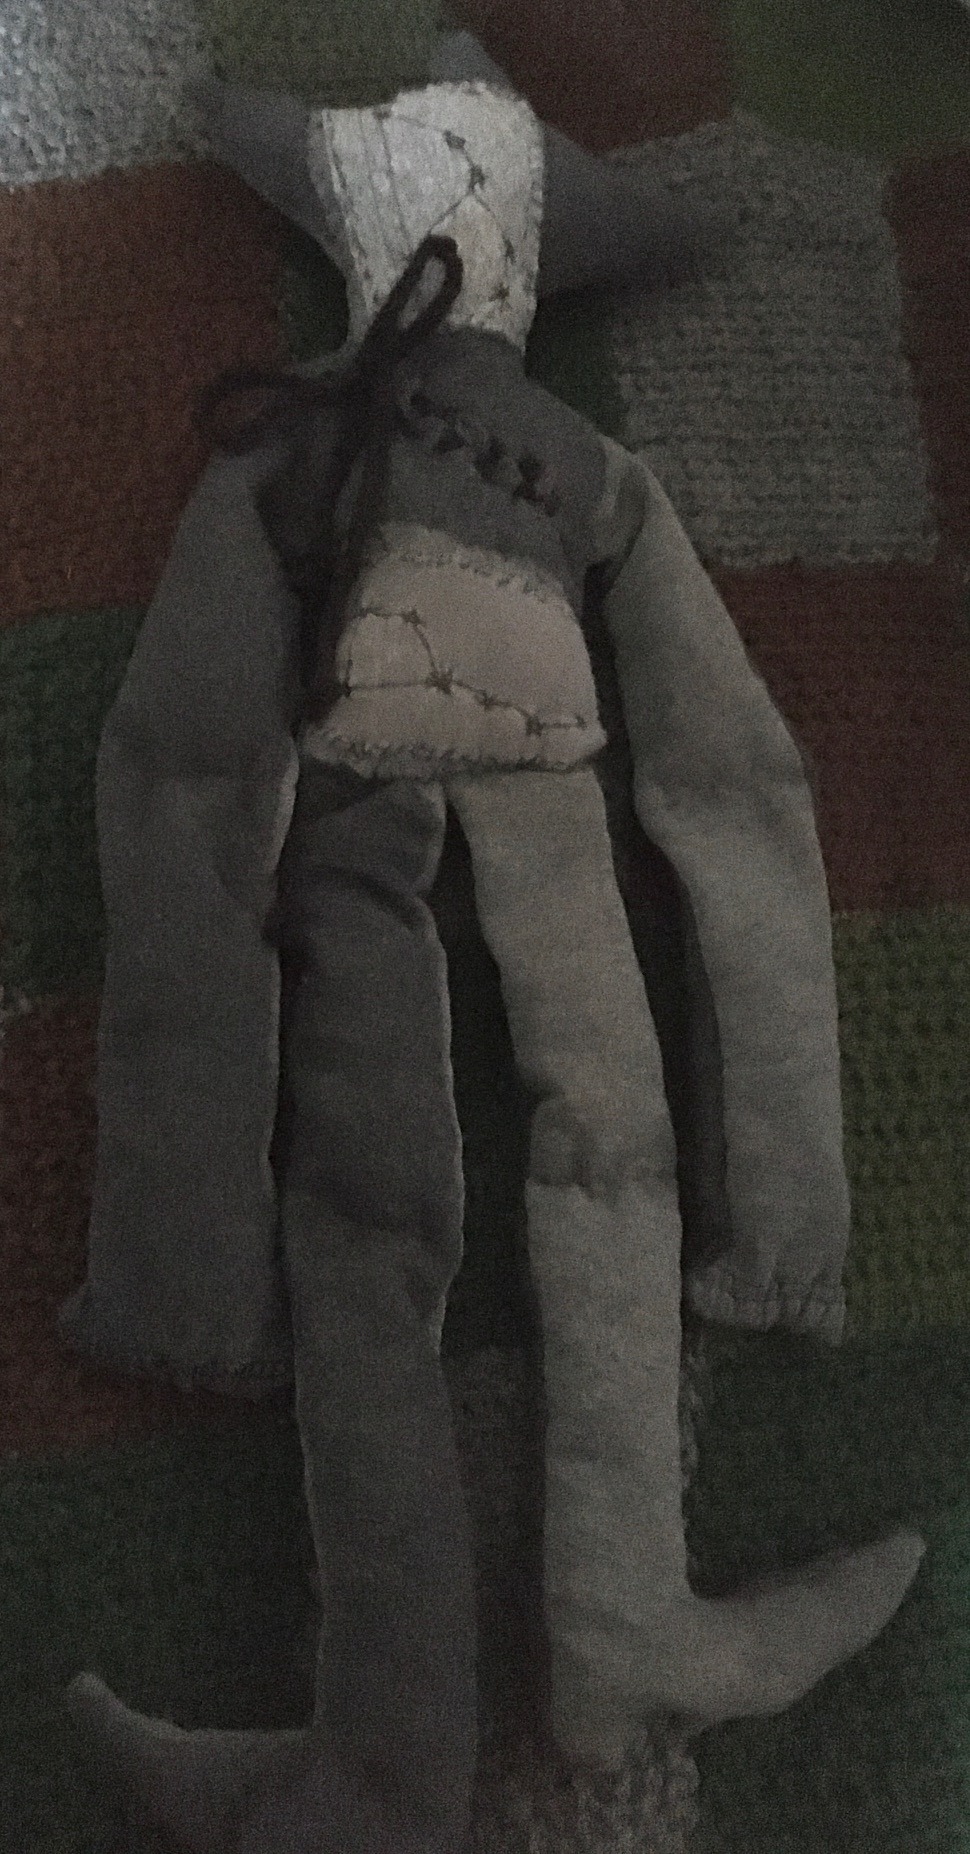
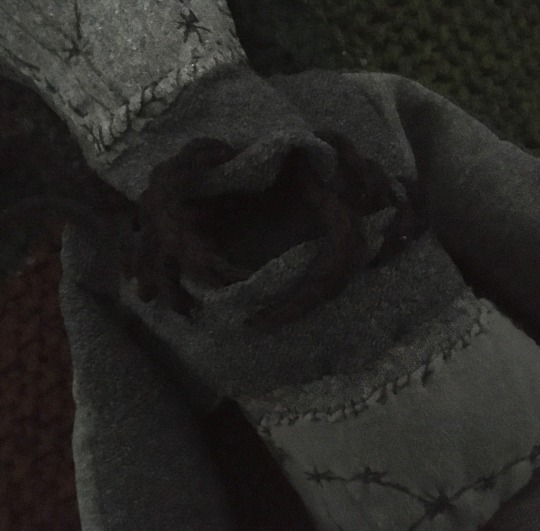
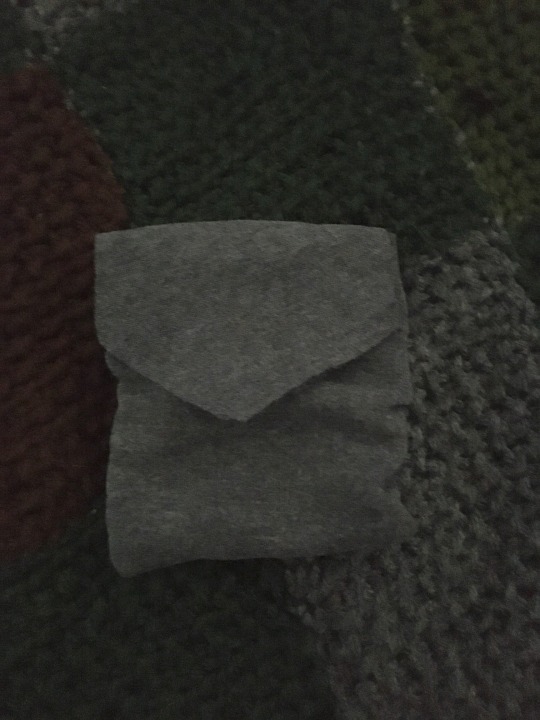
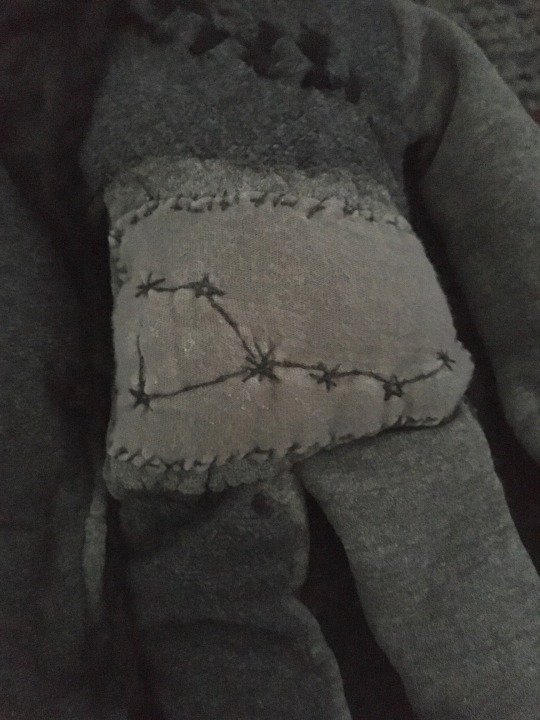
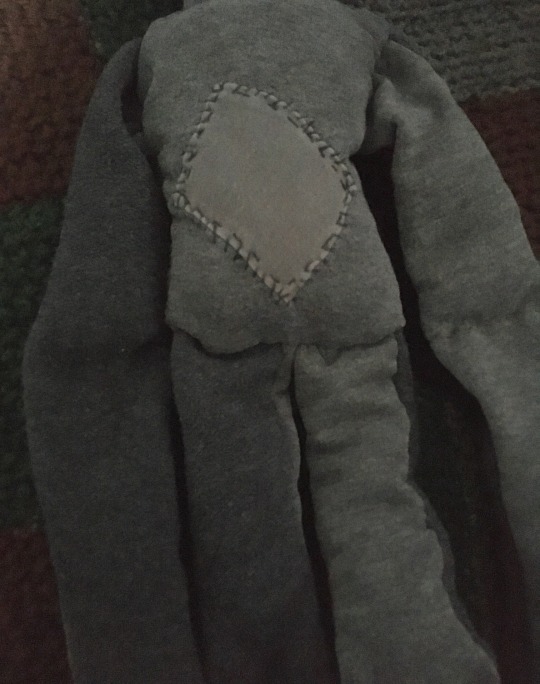
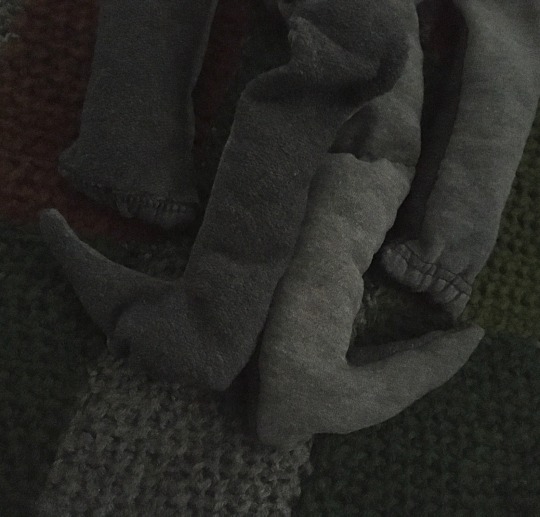

I finished this poppet a little bit ago <|:) It's made of an old pair of sweatpants that I had previously patched up a few times, but they weren't the most comfortable, so I used the fabric.
I kept the patches I had already made, two of which have constellations stitched on: the Big Dipper and Cancer (my sun sign). It's also got an opening in the chest with a drawstring, which fits the pouch I made for it :)
#poppet#witchcraft#my crafts#my post#my photos#handmade#hand sewing#witch#sewing#witch diy#witchblr#witches#crowcore#gremlincore#forestcore#handsewn#witchy#fairycore#mosscore#mothcore#witchcore#sea witch#goblincore#witchcraft poppet#cryptidcore#goblin culture#goblin aesthetic#witch community#weirdcore#oddcore
65 notes
·
View notes
Text
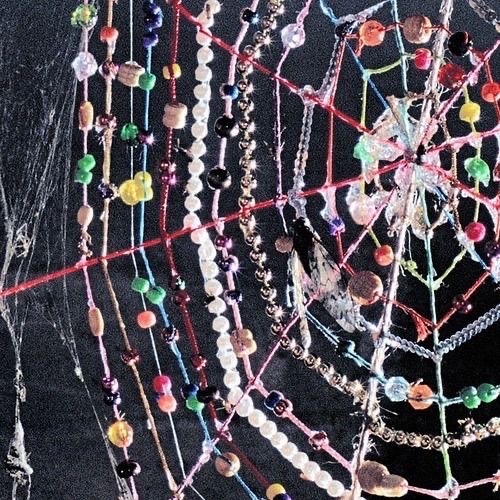
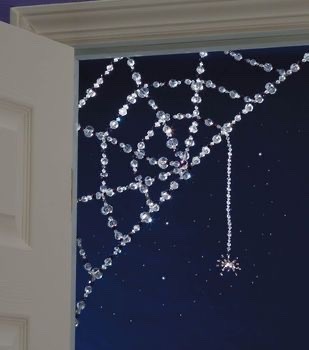
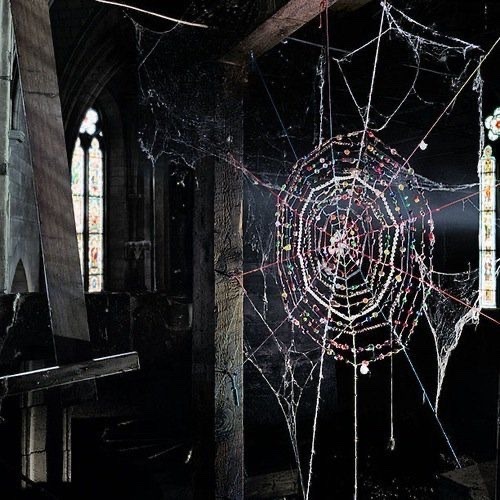
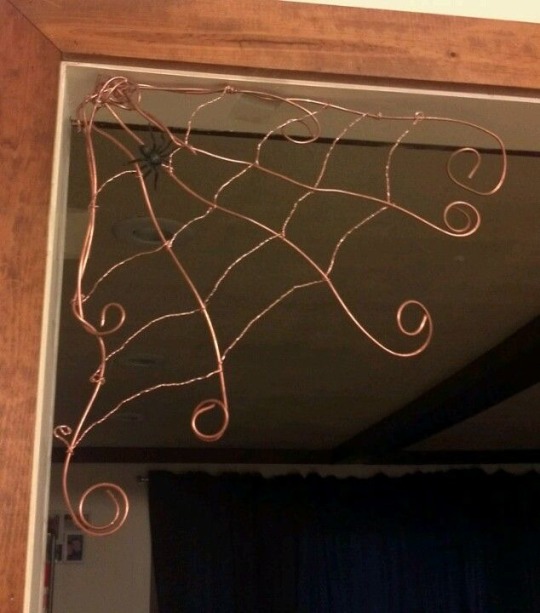
I've been seeing THESE photos and others like it floating around and other diy bead/wire/string spiderwebs and ooooh I wanna DIY one
Also I don't care that these are trending cause I wanna make one
(︶^︶)
{ I have no idea who made these because they're internet floaters so if y'all know or know how I can find them then please message me (〒▽〒)}
#babacore#goblincore#witchy#witchy things#witchythings#witchcore#witchyvibes#fairycore#dark fairytale#witchy vibes#witch DIY#witchy diy#hagcore#dark grandmacore
399 notes
·
View notes
Text
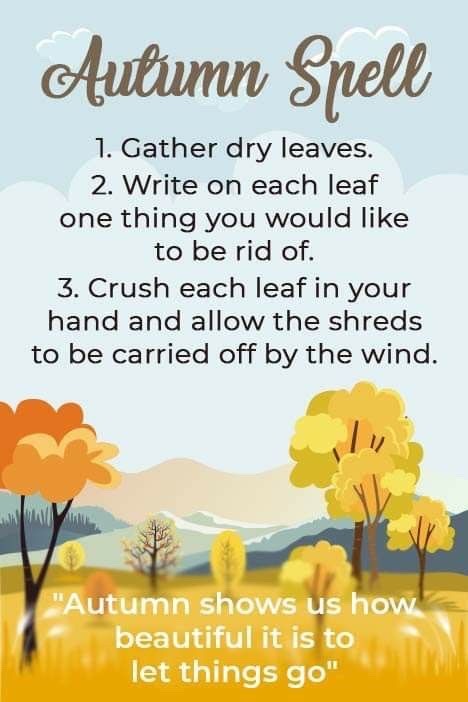
Simple autumn spell.
Let the trees show us how beautiful it is to let something go.
#witch#witchythings#witchcraft#budget witchcraft#autumn magic#nature witch#witch diy#baby witch#beginner witch#witchblr
36 notes
·
View notes
Text

Made a mini altar/casting cloth for my travel altar! The cloth is 11x11cm, and is white posca pen on repurposed suede fabric. I have a chessex mini dice set with which I will be doing divination ♡
#witchcraft#witch#art#witchblr#travel altar#travel altar challenge#altar#divination#casting cloth#witch diy#art witch
48 notes
·
View notes
Text

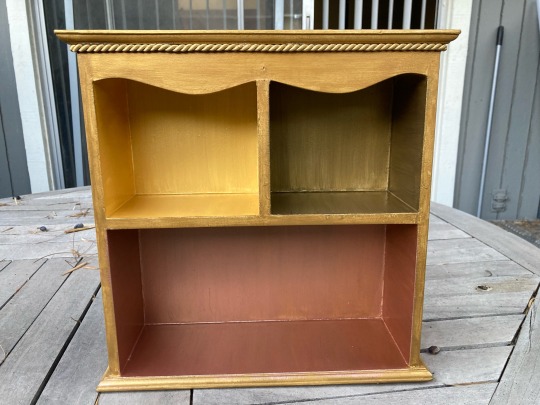
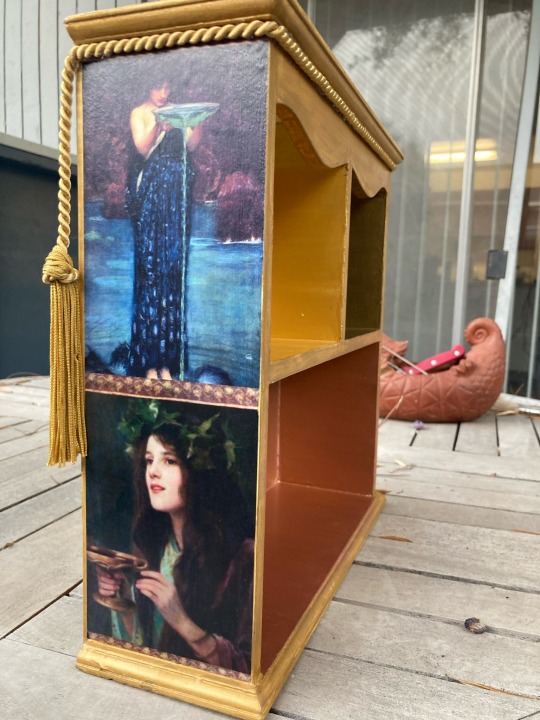

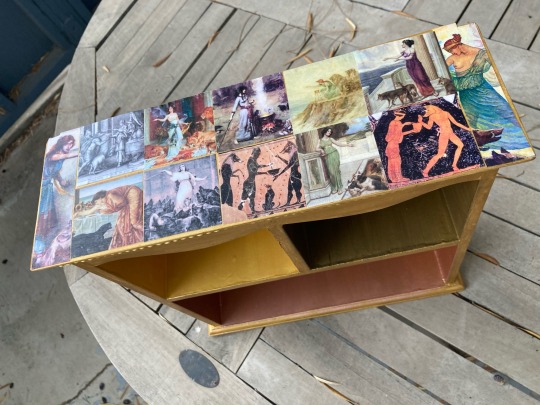
Before and after: Circe’s altar edition! I picked this up from a thrift store for five bucks and am really happy with the results. Used four shades of gold paint, a random gold tassel I had lying around, and decoupaged a ton of artwork depicting her! It was a lot of fun designing this! It’s not entirely done as I am going to rig something on the bottom to hang a rolled up altar cloth (made of pig suede of course) under. I don’t have a ton of space so this will be hung up on the wall and anything involving more complicated spell work or candles will be done on the cloth in the safety of my kitchen counter or outside.
#circe#altar#witchblr#witchcraft#hellenism#greek paganism#deity work#witch diy#beginner witch#my crafts#also anyone work w/ Circe?#I feel a lil intimidated starting with a diety that doesn’t seem to be worked with often#I’m doing my best!#already got confirmation she approves of it and any hand made offering so that’s good!#making stuff is within my comfort zone#altars
116 notes
·
View notes
Photo

⋆☆⋆ Shower Steamers ⋆☆⋆
Don’t have a bath and still want to relax? Want the spa-like experience without the high costs? Want a lovely way to pamper yourself? Then go ahead and try out this DIY bath steamer recipe.
Ingredients & Necessary Items:
❅ Silicone Mold
❅ Glass Bowl
❅ Whisk
❅ Measuring Utensils
❅ Face Mask
❅ Baking Soda (8oz or 1cup)
❅ Citric Acid (8oz or 1 cup)
❅ Polysorbate 80 (Can also use Sorbitan Oleate)(2.5oz or 1/3 cup)
❅ Essential Oils of Your Choosing (Minimum of 10 drops per scent, adjusted to your smell preference.)
❅ A Colorant of Choice (Plant Power, Flower Dye, etc)
❅ Dried Herbs and/or Flowers (Optional)
❅ Nitrile Gloves
Prep Work:
❅ Grab your gloves and mask. It’s not the best to inhale the dry ingredients so a well ventilated space (at least a window open) is needed. Gloves are necessary because direct contact with the dry ingredients can cause dryness in skin or irritate it.
Initial Instructions:
❅ Mix your dry ingredients together (Baking Soda & Citric Acid) into a class bowl. I recommend sifting the Baking Soda into the Citric Acid as it will combine better. Stir with a whisk to further combine. Add in half of the herbs and/or flowers you think you’ll want.
❅ If you choose to have colored steamers, stir in the Flower or Plant Powder. If you don’t add in a colorant, they’ll be white and can still be really pretty.
❅ Mix the wet ingredients together (Polysorbate 80/Sorbitant Oleate and Essential Oils) until the Essential Oils blend evenly with Polysorbate 80/Sorbitant Oleate. There should be little to no streaking of the Oils in the mixture.
❅Add the wet ingredients into the dry material little by little while mixing with a whisk. Once initially combined, begin to mix with your gloved hands, kneading until the liquids are nicely distributed. This mixture should have the consistency of wet sand-- just moist enough to hold its shape when pressed together.
❅ Adjust mixture as needed
Silicone Mold Usage:
❅ Add in herbs and/or flowers to mold before you add in mixture. Go lightly and be sure to avoid the edges of the mold.
❅ Fill the mold(s) with the mixture and press the mixture into the mold with your fingertips, paying attention to any edges in the mold. Fill and compress bit by bit until mold is completely full. Then take the bottom of something flat and hard (like a measuring cup) to further flatten and compress.
❅ Let dry overnight for a 24 hour period. Room temperature is OK and the mold can remain uncovered. Do not leave in a moist/humid area.
❅ Gently demold, tapping the mold to check if it sounds and feels solid. If so, continue with the demolding process. Very gently loosen the steamer from the mold by carefully pulling away the silicone while using your thumbs to gently push out the steamer.
Notes:
❅ Feel free to check out this post of mine for essential oil combinations to use. There’s more essential oils for those associations than I have in that post so if you have questions or want more options, feel free to ask.
❅ All ingredients can be found locally in grocery stores, in specialty shops or even online.
#witchcraft#witchy#witches#kitchen witch#green witch#baby witch#beginner witch#pagan#pagan witch#Pagan Community#witch community#witch diy#witchy diy#shower steamers#at home spa#herbal#herbs#herbalism#spell#spells#spellwork#spellbound#spellbook#book of shadows#book of secrets#witch blog#witchy blog#eclectic pagan#eclectic paganism#witches of tumblr
105 notes
·
View notes
Text
Happy New Year 2024! (Source)
#vogue#goth#gothic#happy new year#new years eve#happy new year 2024#tiktok#aesthetic#wicca#witchcore#witch#witchblr#beauty#alternative#punk#retro#fashion#makeup#love#diy
1K notes
·
View notes
Text

Just a quick mock up/lose sketch for a patch idea for my battle jacket I'm hoping to start soon inspired by Fenrir. Just got the basic idea and composition down so I have a reference for the real patch.
#punk#digital art#digital drawing#punk patches#diy#diy patches#diy punk#battle jacket#norse witch#neuropunk#queer punk#patches#patch ideas#fenrir#wolf art#norse mythology#folk punk
855 notes
·
View notes
Text


Witch Hat Pattern // Crafty Intentions
420 notes
·
View notes
Photo

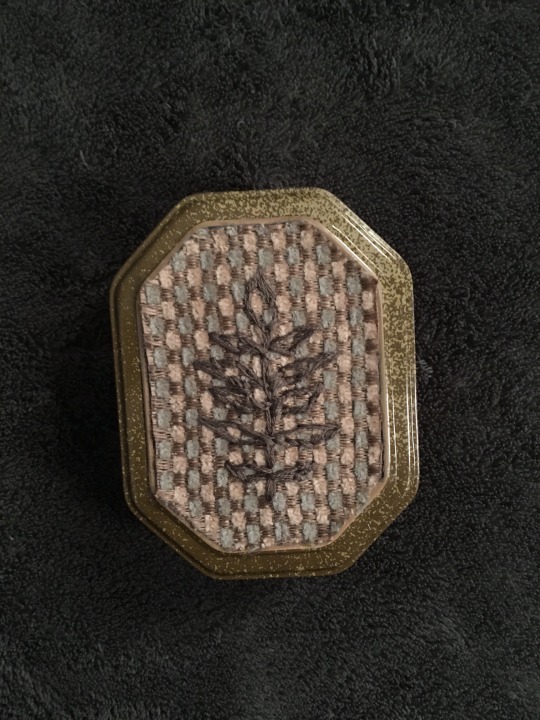

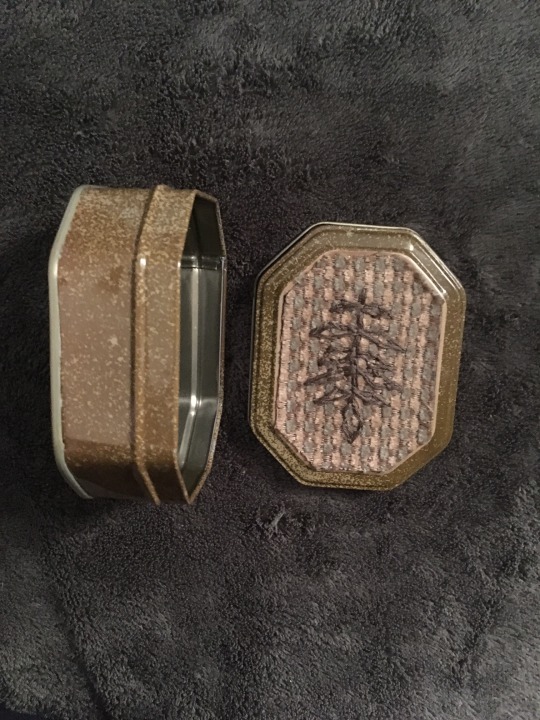

I’ve been looking for the perfect tin to keep a pocket altar in, and I finally found one at a thrift store! :) The tin originally had a candle in it, so I melted it out with hot water and kept the wax for later, since it smelled so nice.
I also covered up the picture that was on the tin. I embroidered a simple fern onto a scrap of fabric, cut it to size and used some super glue to attach it to the lid (I also roughed up the top of the lid a bit to make sure it sticks).
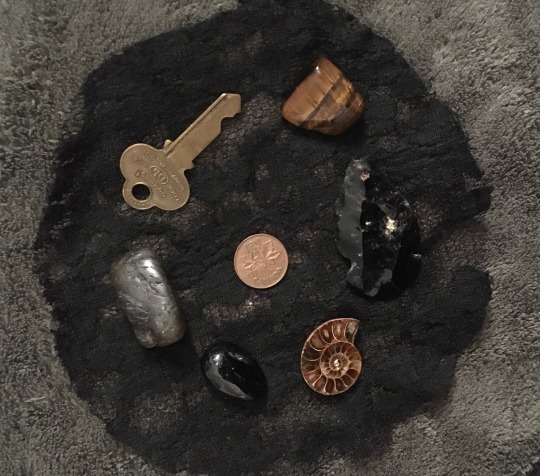
These are all the items I have inside so far: black tourmaline, a penny, tiger’s eye, labradourite, an ammonite fossil, obsidian and an old key. I also cut out a piece of black lacey fabric as an altar cloth (also for a bit of padding).
There’s definitely some other stuff I’d like to add, like some sort of candle with some matches, maybe some salt too.
But if anyone has suggestions on what else I should add, feel free to say so, I’d love some ideas and feedback! <|:^] <3
#pocket altar#travel altar#witchcraft#witch#witch altar#my post#my photos#my crafts#crystals#crystal witch#green witch#fossils#ammonites#ammonite#witchcore#witch diy#gremlincore#my hoard#shinies#crowcore#corvidcore#dragoncore#dragon hoard#goblincore#goblin hoard#crow hoard#death witch#forestcore#mosscore#fairycore
153 notes
·
View notes
Text

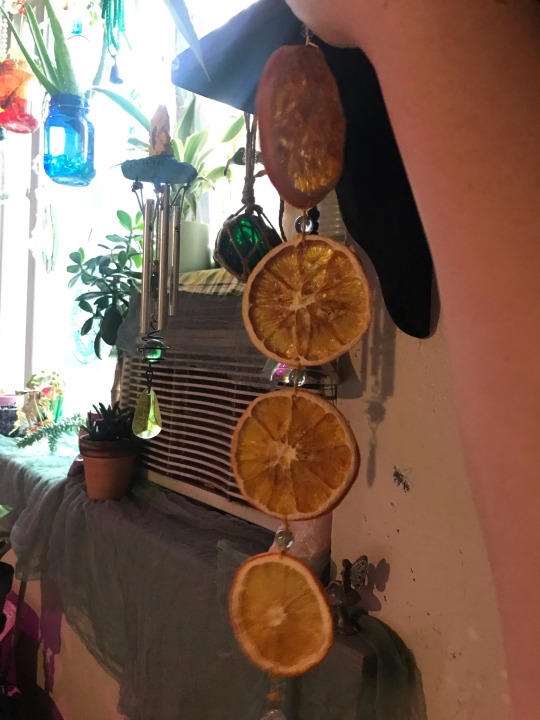
Dried orange sun catcher
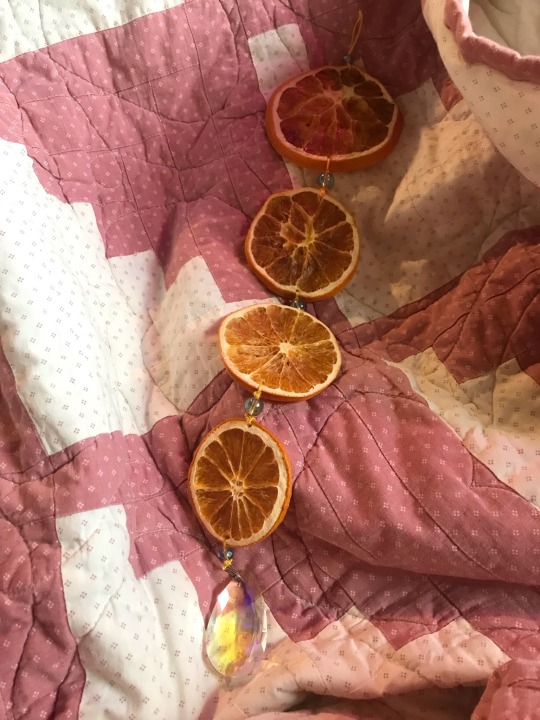
#babacore#cottagecore#witchcraft#witch#goblincore#naturecore#pagan witch#witchy#witchy things#witchythings#witchyvibes#witchcore#hedge witch#kitchen witch#witch diy
149 notes
·
View notes
Text

A Craft and Crochet Book for New Age Readers, Wiccans, and Neopagans to Assist with Spells and Spell-Work
Many students of New Age beliefs, from Wicca to Neopaganism, create items to assist with their work by managing energy and controlling spells. These homemade, hand-crafted materials have personal significance, beauty, and practical, useful effects.
A quick reference for people specifically looking to incorporate crochet into their craft, The Crocheting Witch is a guide to using different types of stitch pattern, materials, herbal and essential-oil infusions, beads, and charms to create a variety of crocheted crafts:
Wand cases
Tarot box
Candle cozy
Crystal-storage amulet
And many more!
The Crocheting Witch teaches readers—from fans of New Age practices, to Wiccans, to Neopagans—to create items themselves to control energies and channel them for personal use.
https://amzn.to/3GEfyEj
14 notes
·
View notes
Text
Sleepy time sachets
For a couple weeks now my family has been dealing with restless and loss of sleep. I decided to make some sachets to help get us to sleep. They can be placed under the pillow, bed, or even on your nightstand.
A page from my BOS
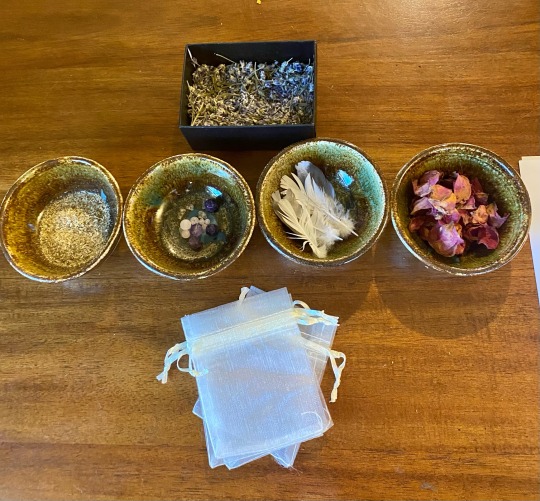
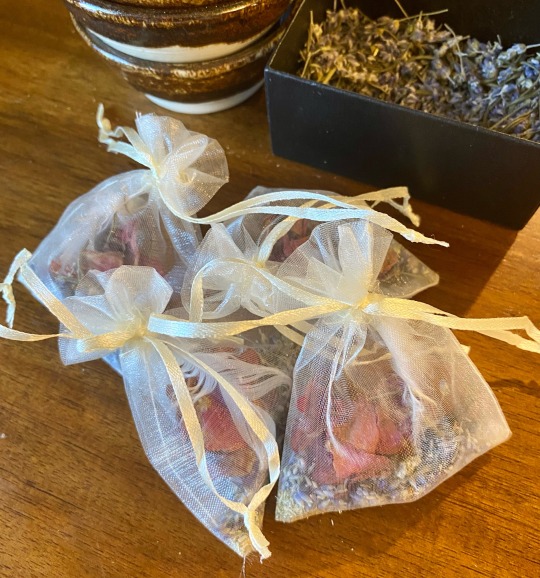
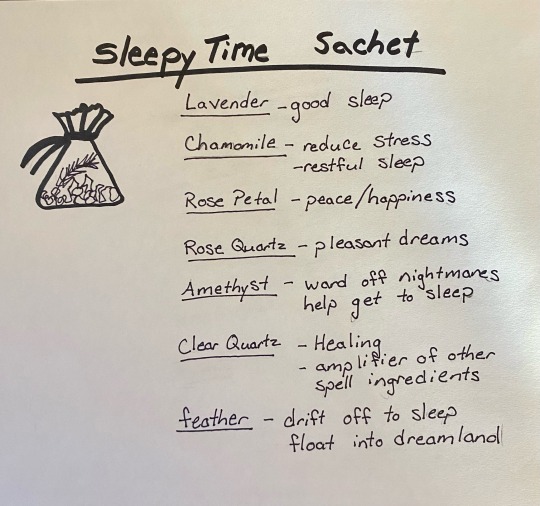
Lavender: good sleep
Chamomile: reduce stress and restful sleep
Rose petal: peace and happiness
Rose quartz: pleasant dreams
Amethyst: ward off nightmares and help get to sleep
Clear quartz: healing and amplify other spell ingredients
Feather: drift off to sleep and float into dreamland
#witch#witchythings#beginner witch#witchcraft#witchblr#budget witchcraft#magick#witch diy#spell work#spell jar#sleep magic#i need sleep#spell sachets
166 notes
·
View notes
Text
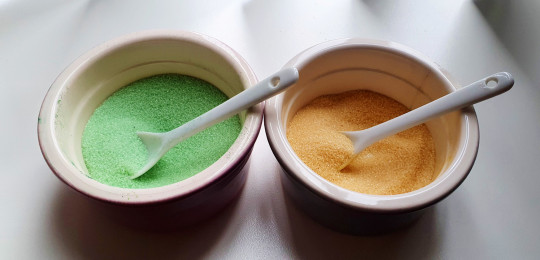
Spellsugars
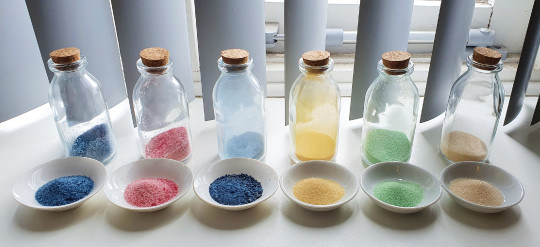
Do you want to make coloured sugars to use in your spellcraft, but don't know how? I experimented, so you don't have to!
Coloured spellsugars can be used in powders, jars, sachets, and since some of them are still food-safe, to put in your tea. I wanted to make a dark blue one for some sweet dreams, pink for self love, gold as a substitute for honey, and green for money/prosperity.
Methods under the cut:
Let me start with the TLDR; imo the best options to colour are food colouring or soft pastels. Food colouring will give you the brightest colours and it will still look like sparkly sugar. Soft pastel will give the most even colour and will be great in powder, but it's harder to get bright colours. Now, onto the long version!
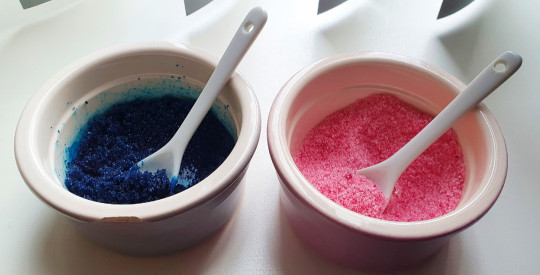
Method one: food colouring. Left is with liquid food colouring, four drops blue and one drop red to get a dark blue colour. Right is gel colouring, in which I used just the tiniest bit. Mix thoroughly! Since this is wet, it needs to dry, either lay it out on a plate and leave it for 24-48 hours or if you have cats like me, make a little plate out of aluminium foil and bake for 10 minutes at 350F. The blue one was a failure, since it turned into a caramel slab that I then had to break apart in the mortar and pestle, meaning it lost a lot of it's colour. But it got a redemption arc! Turns out one drop of colouring was enough (oops) so I mixed the same colour, put one drop in the sugar and repeated the process. Success!
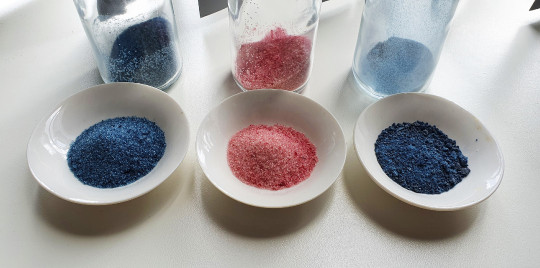
Left: redemption sugar. right: failed sugar.
I love this method because it still looks like sugar, but coloured, which is the effect I want. Also a lot of websites for baking supplies (like wilton) have charts on how to mix alllll the colours, making it extremely versatile
Left, Method two: soft pastel. Take a soft pastel chalk and grate a little into your bowl with a fine grater. Then add sugar and mix thoroughly. I love this method because it gives a very even coat, however it is very hard to get the colours right. I used a bright leafy green, but it came out so soft that I had to add a darker green, and even then it wasn't the colour I wanted.
Right, Method three: eyeshadow. Same method as above, except with eyeshadow! (don't use used eyeshadow, that is very much not hygienic). I wanted to try this because I wanted to see if the sugar retains the lustre of the gold eyeshadow. It does not, the spoon and the bottle do, but not the sugar. Also I took as much as I thought I needed, mixed, figured I needed to triple that to get any sort of colour. So this just isn't worth it.
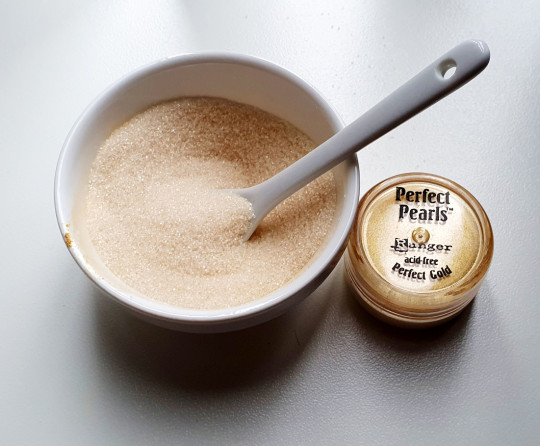
Method four: perfect pearls, or other crafting powder. Put a little bit into your bowl, mix thoroughly. Again, I was hoping that it would retain the lustre, but it didn't. And I ran into the same problem as with the eyeshadow, I would need a lot just to get a bit of colour.
So, for brightness, and edibility, use the (liquid) food colouring. For softness, use soft pastels. Happy crafting!
Also tagging @breelandwalker because I saw in her powders tag that people were asking how to make black sugar, which got me off my ass to finally try this.
264 notes
·
View notes

Last Seen Blogs
limelade
rem

attractdistract
good for health

charlandnhergenreter
Untitled

blackbox-sg
Player 1

bonheuru
I've brought you a star