#would be better highlighted with acrylic
Text

flesh <3
#this time with watercolours#should fix it up when I get home don’t like how the white gel pen looks#would be better highlighted with acrylic#but !#finally painted something again#my art
984 notes
·
View notes
Text
❝ 𝐖𝐇𝐀𝐓 𝐇𝐄 𝐆𝐄𝐓𝐒 𝐘𝐎𝐔 𝐅𝐎𝐑 𝐂𝐇𝐑𝐈𝐒𝐓𝐌𝐀𝐒.. .ᐟ ❞ Shall we look underneath the tree? And see what he got you..
GENDER NEUTRAL READER
A/N: Ortho's part is strictly platonic, each part is different. Also, I do not think I wrote the letters well, but I did smthing!!


— MALLEUS
Matching charm bracelets, engraved with the date the two of you first met. One of the greatest moments of his life. Small little dangling charms of Gargoyles attached to each bracelet. And if you squint your eyes, and check behind the heart charm, you'll find the engravings "M.Dracona +Y.L/n"
— LILIA
A scrapbook of all the memories he had shared with you, each page filled with your favorite colors and aesthetic. He put a lot of effort decorating everything just for you..
— SILVER
A small album, filled with all his favorite moments with you. He couldn't think of anything better, it seemed like the best gift.. A album of all the best memories he shared with you..
That's not to say that all the memories and moments he has created with you were bad, he loved all of them! But their are particular memories that fill him up with immeasurable warmth, and he hopes you'll feel the same.
— SEBEK
Sebek couldn't figure out what to give you, something that could highlight and really show you how much he loves you.. that's when Lilia pitched in a idea to him...
Sebek's gift was filled with multiple letters, in a handmade/hand painted box, the letters were filled with sweet messages for anytime he may have upset you.. He's not the best at expressing his love, but he hopes this gift could provide you some comfort..
— IDIA
He personally hands you the gift, it was a photo frame of sorts, a small blue bow displayed at it's front. The device flipped through photo's of the two of you together, and it held gif's and whatnot.. Attached with a audio box of your favorite songs.. "I made it myself.."
— ORTHO
A perfectly wrapped gift was displayed underneath the the tree, inside there's a small figure of you and Ortho holding hands, he didn't know what to give you, to be exact.. so, instead he choose to get you something sentimental.. He heard from a certain somewhere that sentimental gifts were much more thoughtful then others!
— KALIM
Kalim decided not to go too grand for the scenario, giving you a multitude of gifts would erase the sentiment of a gift in general..
Instead he choose to give you a few small handmade trinkets, and small things he saw you eyeing, efficiently showing that he pays attention to where your eyes travel when going out shopping or on dates.
— JAMIL
A small bracelet with your birthstone, he didn't quite know how to leave a lasting impression with his gift, but he knew he was happy for your birth.. so the aspect of a birth stone suited the scenario well..
— RIDDLE
A customized pen, with a small spell attached, so you can change the smoothness and colour, it's pretty friendly with people who want to learn cursive..
It'll have his name engraved, in a place where he assumes you wouldn't have noticed.. The gesture itself was lovely!
— TREY
A beautiful large basket, filled with all sorts of pastries.. Savory and spicy snacks. Everything specialized to your tastes, he paid close detail as to what you preferred eating when creating the basket, it was sure to last you for quite the while.
— CATER
A personalized acrylic map, it displayed the date of your first ever confession, and the place. The painting could have used a bit of work, but the gesture was filled with love..
— DEUCE
The gift box was black, with a blue spade on the top instead of a bow. The ribbon was carefully done, to have the gift look as pleasing as possible.. Inside you could find a music box, with a message! It read:
"To my dearest partner,
I can't really express how I feel within words
but you brighten up my day
Seeing you smile makes me smile..
I love you"
— ACE
Couples bracelets, that looks like handcuffs. It's a stupid joke, when you ask him he'll say, "Then we'll literally be attached together". The joke may have not been what you expected, but the gesture was cute.
— VIL
A personally hand picked and assorted candle set, he finds candles extremely calming, and uses them when he needs a light stress reliever, he's been noticing you felt a bit stressed lately.. maybe it was Crowley? Regardless.. he can't have you dying on him, can he!?
So, he took the time and effort to make you a personally assorted candle set.
— ROOK
A collection of small bow pins, and whatnot.. Things to go on your hair, etc.. Essentially, a box of trinkets, that follow a hunting theme, some were cute bunnies the others were a variety of things!
He hand picked the trinkets, to make it all the more meaningful!
— EPEL
And engraved wood sculpture of an apple, carved with beautiful details.. The wood work was utterly beautiful, the gift would be wrapped in a small white box, with a sparkly purple ribbon..
A small note would be at the front:
"Not to be sweet or anything..
The design is inspired by my heart racing..
Whenever I speak with you"
— AZUL
A mini piano, it's completely playable. Yet it seems like it came out of a doll house, it's custom made to match one similar to what Azul has.. Something you have witnessed Azul playing first hand..
— JADE
A small necklace, in the shape of a letter.. In the back of it a small note and declaration of love was written, signed off as J.Leech.. (Yes these exist)
— FLOYD
A stunning art piece of you.. in puzzle form.. The trick is that there are over 1000 pieces.. And the two of you will need to work together to put it together..
Halfway through he'll get slightly bored, but since he caused this mess.. and he's doing it with you.. He'll enjoy it.
Plus your focused face is cute.
— LEONA
He's not good at sentimental gestures and whatnot, and definitely sucks in this category of giving. So, he decided to give you a necklace, engraved with his name of course..
He is your al-mighty Leona Kingscholar. (Who will never be king)
— RUGGIE
A handmade 30 day, scratch off.. Each day, you'll scratch and find a goovy picture of you two together, or a sweet message he wrote to you..
At the very last day, you'll find a small letter, it'll be a letter where he expresses his more vulnerable side, writing down how he truly feels for you..
— JACK
A personalized gift box, once unfolding it there will be many compartments you can open up and read notes, letters, quotes, etc from your lover!... As for the gift, he had a given you a handmade candle!
© cupids-chamber, do not repost, plagiarize, translate, or adapt my work without prior permission and or confirmation from me.
#twisted wonderland#disney twisted wonderland#twisted wonderland x reader#twst#twst x reader#riddle rosehearts x reader#trey clover x reader#cater diamond x reader#ace trappola x reader#deuce spade x reader#malleus draconia x reader#lilia vanrouge x reader#silver x reader#sebek zigvolt x reader#kalim al asim x reader#jamil viper x reader#idia shroud x reader#ortho shroud x reader#leona kingscholar x reader#jack howl x reader#ruggie bucchi x reader#jade leech x reader#floyd leech x reader#azul ashengrotto x reader#vil schoenheit x reader#rook hunt x reader#epel felmier x reader#twst silver x reader
3K notes
·
View notes
Text
Ludmilla Vilisevic

Pastel pencils on black paper with metallic gold watercolor, white acrylic for the brightest highlights.
My take on Ludmilla under the cut, from Ireena's point of view (aka "the least sympathetic point of view in Barovia, probably")
Ludmilla still doesn’t look directly at you, but she touches your knee. She probably understands why you fear Strahd as well as anyone. Hells, she…
“Why did you marry him?” You ask, before you can think better of it. Ludmilla slumps slightly.
“You won’t believe me, but he isn’t the same without you. It’s difficult to describe. It helps, I think, that I was alone when I came here. I wanted to learn, and he is the most brilliant man I’ve ever met. He was also lonely.” She isn’t telling the whole story. You try to drag your mind out of your past lives enough to figure out what you might be missing. The fact that you’re trying to figure something out about Strahd makes it difficult after centuries of lies and flattery and, if you believe Ludmilla, only seeing him a certain way. Ludmila seems to notice the shift in your demeanor and forces a smile. You can see her fangs. You try not to shudder. You hate Strahd, and you intellectually know that she’s a monster, but it’s easy to forget that right now.
You look back out the window. “Were you only ever alive or a true vampire?” You ask. Ludmila doesn’t answer for a long time.
“No,” she says with a sigh. “I was spawn for decades. He didn’t know how to even create true vampires; how would he? He was the first.”
Your stomach twists. “That must have been horrible,” you say. You shouldn’t. You don’t want to sympathize with her. She’s a monster. She made and sacrificed plenty of her own spawn in Vallaki. She made Doru. You should not sympathize with her.
“It could have been worse,” she says. She’s gone still. You’re suddenly conscious of how much living things move. She no longer resembles a living thing. She resembles a statue. “I did love him, after all. In his own way, he loved me. He didn’t know to what extent I had to obey him.” Her voice is flat. You watch her with growing concern until she shakes herself a little and forces another smile. She doesn’t try to meet your gaze but looks back towards you. “He learned with us. He would never make you spawn. When you were Marina, you would have been a true vampire if your horrible burgomaster hadn’t staked you. You wouldn’t have ever been spawn, not for a moment.”
It isn’t comforting, not if you think about what that means you must have done. She can tell, because she apologizes. Then, abruptly, she’s gone.
The mist is rising again outside. You shudder and retreat to the fireplace. You are grateful that there are some things you cannot remember.
46 notes
·
View notes
Text
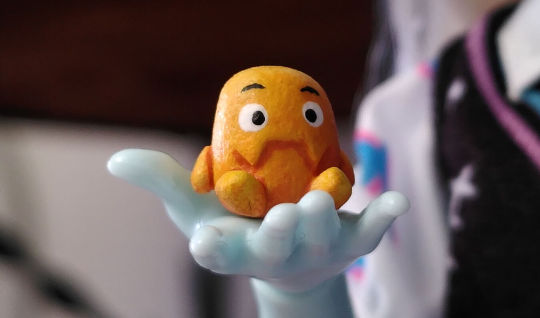
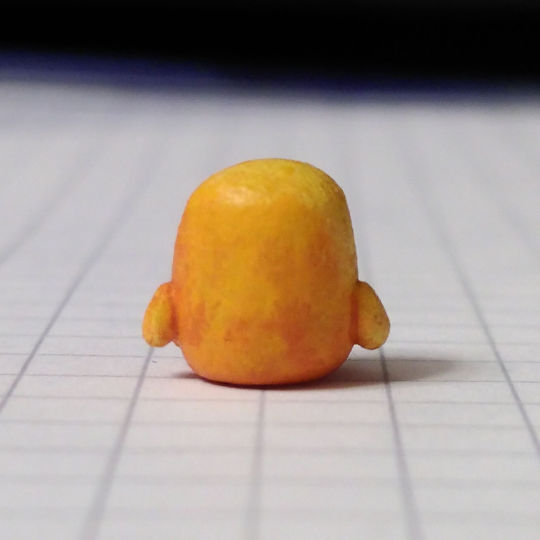
All right, here's a Making Of/How To for the Tater Tyke, since it's been requested.
I will try to explain everything as best as I can.
I'm sure you could use any clay, but I went with Super Sculpey specifically. An oven bake clay just gives you more control and time to work with it than air dry.
These are nine millimeters tall, so take a very small amount of clay, and form it into a smooth ball. If you want to make two, make one bigger ball and cut it in half, so you're left with about the same amount of clay for each Tater Tyke.

Now roll them, gently, against your work surface to shape them into a cylinder, but make sure the edges have a soft transition.
Don't forget to use a reference!

You'll see that he's a little thicker toward the bottom, important detail.
Next, I sculpted the mouth, for which I used this tool:

I do not what it's called, it just came with the set I have. You don't need this one specifically, the flat, somewhat pointed end is what matters. With it, I pressed the shape in to make the teeth a little 3d, and then smoothed out whatever areas lost their shape a little in the process.
Now the body is done! Onto the limbs.
Starting with the feet, take a tiny, and I do mean tiny, ball of clay. I used my fingernails to press them into triangles, where they will end up being a little bulky, so press them a bit flatter.
You should be left with something like this.
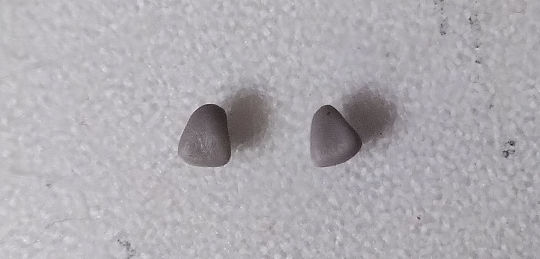
Repeat the same process for the hands, but make them slightly smaller, and rounder where the fingers would be, to form a teardrop-shape.
Now you can attach them. Apply a little liquid clay where they should go, which will function like glue. If you're using air dry clay, you can just attach them and glue them on more permanently after they've dried.

For the position, the angle is a bit difficult to explain. I put the base of the feet just slightly closer together than the tips of the teeth, and made them point outward, so they're just sitting comfortably. For the hands, I pressed them a little more firmly on where the arms would be, so that they look more natural going out from the body, and made the ends of them go outward a bit more.
And that's it for sculpting! Let them dry/ bake, and then you can move on to painting.
First, cover them in white paint as a base, because yellow is always rather translucent. But do so carefully, acrylic paint can leave texture, which would be quite noticeable at this scale.
Now, the paint colors I used are primary yellow, vermilion red, white, black, ivory and lavender.
I mixed yellow together with just a little red, to be left with a light orange. This, however, was too bright, so I added just a smidge of lavender to dull the color out a bit. This is the base color, which I fully painted the little guys in.
Then, I made a slightly lighter and darker version of this shade, by adding a little yellow or red respectively. I took my crappiest small brush and stippled these colors on somewhat randomly.
I made one even darker shade by adding just a little more red, and the lightest shade by adding ivory.
I used these colors to force/fake the lighting. Add the darkest shade on the bottom and right side of the Tater Tyke, and the lightest shade on the upper and left side. Again, stippling them on.
I also used the darker shade on the base of the feet, and then highlighted the edges of them and the hands with the lightest shade.
Like I said, yellow-ish colors like this are always rather translucent, so they blend together quite well. But if something looks too harsh, just brush some of it away with your finger, that should soften the transition.
Now, once again using the darkest shade, take your smallest detail brush and add a line right under the mouth, to make it pop more. You can also outline the limbs like this.
Here are more pictures to hopefully help you get a better idea of everything I'm trying to explain.
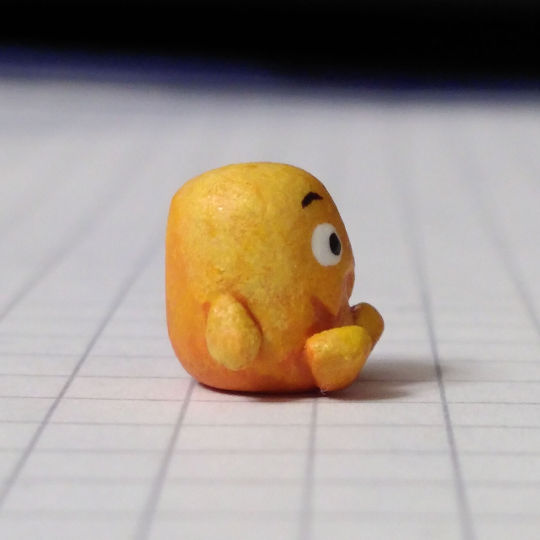

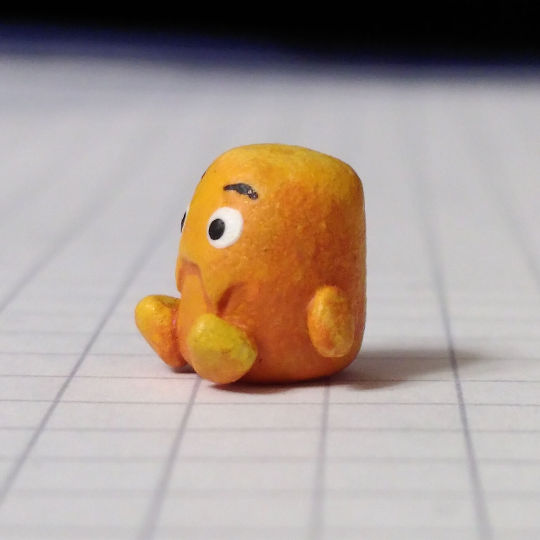
All that's missing now are the eyes and eyebrows.
For the eyes, I used a small dotting tool to archive that round shape more easily. I recommend trying this out on a different surface first, to get a feel for it.
If the eyes aren't perfect circles, you can push paint that juts out too far in with your fingernail, acrylic paint is pretty forgiving. Once they're dry, you can round out areas with your detail brush.
Use a smaller dotting tool for the pupils. I made them a bit cross eyed, because I noticed that in the show, and I think it looks cute. If you don't like the position of the pupils, wipe them off and let the remaining paint dry. Paint over with white again, and give it another shot.
Finally, the eyebrows. They're just a black line. Use your thin brush and reference the show. The eyebrows really influence the expression, so be careful. I recommend not placing them too high to avoid a spooked look.
That's it for painting! But we're not quite done. I covered them in a thin layer of Liquitex Matte Varnish, which really helps bring out the colors more. I painted most of them in a thin coat, let them dry for three hours, and then painted the areas I couldn't reach before.
But this varnish is never actually matte, so I also used a spray varnish (Molotov matte UV varnish). I bought it some time ago because it's the only one that seemed good that I could find for a decent price, and I like it a lot.
It dries fast and doesn't get moody depending on the temperature and humidity, and the results look great, in my experience. It leaves a very small amount of texture, which I like, because it makes my sculptures easier to photograph. My camera doesn't like to focus on anything too smooth. Im just mentioning the texture, because I'm not sure you'd want that for something like doll customisation. Especially because it can lighten colors if you add to many layers of it.
I was initially concerned about using spray varnish on something so small, but it wasn't an issue. i put the Tater Tykes on some aluminium foil outside, and put some rocks on it so it won't fly away.
Don't forget to wear protective glasses and a good mask! This stuff is toxic. That goes for any spray varnish, honestly.
And that's it! Really this time. Just let them fully dry and you've got yourself some adorable little fellas.
They took me around five hours to make, but that's mostly because I hadn't made something like them before. Figuring everything out eats up a lot of time. The process would go by quicker if I made them again.
I hope this helps if anyone is genuinely interested in making them, feel free to ask if you have questions. If you were just curious, I hope this was somewhat interesting.
On a final note, I'd just like to say that I'm really happy everyone likes them as much as I do, and I'm looking forward to making more doll accessories in the future.
Have a great day! And remember to drink some water, I seem to have forgotten to do so while writing this.
#monster high#monster high g3#tater tyke#tater tots#polymer clay#doll accessories#rätposting#rät's art shenanigans
89 notes
·
View notes
Text

This is Solarbourn from 2005.
I was in a very experimental mood when I made this. I colored the dracogryph with Prismacolors first, then painted in the background with acrylics. Unfortunately, I taped off the gryph before painting, and the masking tape took up quite a bit of the wax from the pencils when I removed it. I had to rework quite a bit, and I ended up punching the yellow highlights with acrylic to make them pop better.
The one thing I would have liked to do is hit all those yellows with UV-reactive paint. At the time I made this, that paint was still expensive and not readily available. So this is yet another idea that I want to try again one day with different materials and a more mature technique.
#gryphon#dracogryph#griffon#griffen#how many ways can we spell it?#mixed media#traditional media#acrylic painting#prismacolor#space#sky#stars#dragon
21 notes
·
View notes
Note
Hey there! I love you’re semi realistic, semi cartoonish art style bro! I hope you don’t mind me asking but what software/mediums do you use? I am trying to work on my lighting and shadows and textures but I have no clue how artists like you achieve such detail
First off- thank you so much! I truly appreciate it. And second- oh my goodness I am so sorry for how long this ask has sat in my inbox! I hope some of this can still help you :’D
As far as software goes, I’m almost exclusively working in procreate as of late. There’s plenty of great programs- if you need something free and desktop based, I highly recommend Krita. I have a few brushes from different packs that I often default to. You can see them all and links to said packs through this answer I gave to someone asking about my brushes earlier:
As far as detail in my work goes, that’s just through a loooot of practice and doodles and drawings. I’ve been drawing since I could pick up a pencil, so I’ve had a lot of time to figure out the way I like to do things- but even then I have so much to learn!
I do, however, work in many traditional forms of media as well! I haven’t done so as much lately since digital doesn’t require cleanup, but I honestly believe that working in traditional for my entire life up until 5 or so years ago has a hand in how I approach things digitally as well. I’ve done pen and marker illustration, pencil and colored pencil, acrylic painting, as well as 3D work. I’ve worked in a lot of media and I want to get around to trying as much as I can when I have the energy to! If you have questions specifically about what traditional media I use or work with let me know!
When it comes to improving on rendering, doing small studies of images you really like the lighting in helps a lot for me. Learning how to break light in a photo down to simple, blocky shapes helps to figure out getting an initial layer down to refine later when doing full pieces! When rendering a character, especially if drawing something that isn’t in a scene, I always recommend marking out the direction the light is coming from as well as color of the light before even starting, so that you can determine where highlights and shadows would be placed in an initial blockout. Keep in mind there’s different kinds of light in a piece- I would recommend looking into tutorials about direct light, indirect light, reflected light, etc to get a better feel for how it works- while I do my best, I don’t think I am quite skilled enough to explain those nuances.
When approaching most textures, especially unfamiliar ones, references are my best friend always. It might be a good idea to just do test sheets/practice making the textures that would be useful to you on occasion! And in the end, textures also tie into lighting as well, since a lot of what makes textures super distinct is how light hits them, especially when it comes to things like metal. It may be a bit of a hot take, but in a lot of cases I tend to avoid a lot of digital texture/object brushes, especially those meant to simulate natural textures like leaves, and I do those textures manually instead. I just personally like having more control over those shapes and feel it looks better when each texture is made intentionally by hand! Sometimes I do use texture brushes especially for backgrounds, abstract work or subtle layers, especially if I’m working on something very fast, but it’s not my first choice. However I do know there’s plenty of artists who use texture brushes in ways that look great, so that’s just personal preference. :)
I do apologize it took me so long to respond! But if you have any specific questions, my dms are open and I want to start replying to y’all more!
4 notes
·
View notes
Text
No matter how many times he saw one, a blank canvas was always like a portal to another world.
The empty plane of white was a fresh start, a new beginning, a chance to create something new—something that Will Byers never seemed to get. Maybe it was the lack of start-overs that made him relish the emptiness of that fresh cotton fabric, stretched to perfection between clean, thick wooden pegs, smooth and silvery staples hidden from view.
The look of an empty canvas on an easel was something to be admired. It was the painting before the paint, in how it told a story of its own—a story of the before.
But to Will, the sketch was even better.
Scratchy pencil marks against impossibly stiff fabric to create the beginnings of something he’d grow to love felt like the tip-top of a roller coaster—the tense realization that something big was happening, and that maybe you didn’t quite know where it was going but that it would damn sure be good.
And the under painting—god, the under painting. For the short while he worked on it, the under painting always seemed like the best part. Quick monochromatic brushstrokes set reminders of where the deep shadows of the undergrowth and the bright highlights of the dewdrops will soon go.
But the second the real color left his brush, Will knew that had to be his favorite moment ever.
It was stunning. There was no other way to put it. The way that the colors could blend and mix; the thousands of shades he was capable of creating; the gloopy texture of thick acrylic paint softening out to create solid, meaningful stroke; even the addition of shadows and highlights made his heart leap and dance and scream out in joy because god, god, he could create! He could make something from nothing and everything from something!
He felt like this every time he painted. From practice landscapes, to splashes of abstract color, to studies of plants and trees and animals and people—the subject didn’t matter; it was simply about the motion of it all.
But he’d never felt quite so sure about a painting the way he did with this one.
He took a step back, a paintbrush held hesitantly between his teeth as he examined the canvas propped up on his easel.
A pale sky with fluffy white clouds dotting the expanse of blue; a deep forest green forming the thick grass beneath each character's feet. Four figures, each draped in detailed costume—dark purple starred robes; thick furs and metal plates; two distinct sets of shining armor.
And best of all, a massive, three headed, blood-orange dragon, posed dramatically at the center of it all. A foe to go against, an enemy to defeat.
A unifier.
He nodded, confident in his work.
It was perfect.
And as he observed the painting, something inside of his chest leaped up high.
In two days, he’d see Mike.
In two days, he’d give Mike the painting.
In two days, he would see Mike for the first time in months, and in two days, he’d give Mike the painting he’d spent hours upon hours toiling over, and in two days, he’d get to see Mike’s reaction to his work.
And Will Byers was sure that in two days, Mike’s reaction would be the best birthday gift he could ever possibly ask for.
49 notes
·
View notes
Text
Your man and his friends <3

Okay but like this photo is so cute I love it-
You’re dating Riki- FLUFFY OH MY GOD THIS MAKES ME SO HAPPY. (Kinda long though)
TW:// Angst, self doubting, insecurities
“Hey, babe.” He greets through the phone, causing you to meekly smile even though he can’t see it. You attempt to breathe in to control the sniffles that threaten to ensue out of your throat.
“Hi, love.” You sigh in relief, sounding normal and not like you’ve been crying for the past 2 hours after coming back from shopping alone. “How’s Korea with your friends?” You ask, wanting to hear him so badly.
He gasps and you can feel his smile. “Oh my god. It’s so fun- we haven’t been in like forever so we went to our favourite spot to go to.”
“The festival that happens every month?”
“Yes! Anyways, Jake hyung and I went on this ride that spins upside down and it’s terrifying. Anyways- we’re going tomorrow again because Sunoo hyung wants to try the other rides we didn’t go on today.”
You try not to sob out loud while tears stream down your face. You miss Riki so bad. So bad, you feel like your heart is crushing, tearing and shrinking itself apart, and you always feel like crying now.
“Anyway, how was your day! Have fun shopping alone?” He asks, and you feel ruffling, so it’s probably him getting comfortable in his bed.
“oh, uh. It was good!” You lied.
It was horrible. Well, to be honest, you were having a good day. Y’know, walking around with your headphones in, full Max to your favourite songs with a milkshake in hand, smiling while you look at all the different stalls. You decide to go into Sephora for some more mascara, realising you’re running out.
You take your headphones off, having the cord hang on your shoulders while you proceed to take multiple items and place them into the basket. New highlight, more lip gloss, another eye shadow pallet. You go to the cashier and take your items out to scan and behind you, stood three young girls who decided they’d spend their short amount of time waiting by picking at you about everything, from your outfit down to your new set of acrylics you got that day.
It hurt you. So much. Normally you’d be fine with criticisms, note it never happens, but today, everything was going to make you sad. But, why would you ruin Riki’s mood by saying any of that? So, you stick with a lie,
“What did you do? Did you buy anything?”
“Yeah, I bought a few things. New perfume, clothes, makeup from Seph..-ora” your voice cracks at the mere though and tears stream down your face again. This time, you accidentally let out a quiet whimper and your mouth slaps across your mouth.
“Babe? You okay?” He asks, concern dripping in his voice so quickly you start outright sobbing. “Baby? Y/n!” He calls over the phone.
“I did ha-have a good day, but these three girls broke me apart, one insult after the other for no actual reason and I miss you so much and I went out today under the impression my mood would get better but I just wanna cry at everything because fuck I miss you so fucking much riki and I just want you to hold me but you can’t because you’re having a good time with your friends and fuck I just love you and I miss you.” You rant, everything coming out like vomit. But, can anyone blame you? No. Will they? NO.
“Oh, my love. My poor baby, I wish I was there too. All I want to do is hug you and tell you how much I love you, but I’ll be there next week. It’s okay. You’ll be okay, I promise.”
“Am I pretty? They said my makeup choices are outdated and ugly, they said my face won’t be pretty even with makeup and they said that I’m too overweight to have the right to be loved-“
“Im gonna stop you right there because you are so beautiful. You are everything to me, Y/n, and I wouldn’t choose anyone else to be my girlfriend and you’re so pretty to me. You’re so smart, so cute, so just- I love you with everything and you’re my favourite person in the world and I don’t want you to believe the shit they said to you because you are none of those things the liars said.” He doesn’t stop to breathe until he finishes. “I would hate for you to change yourself. Wear makeup. Dress how you want. Eat whatever you crave at the minute. Do those things for yourself because you have no one to impress but you. I’m so down bad for you and it hurts me to hear you ask me if you’re pretty, because it means you don’t see the beauty I do.”
“I love you riki.”
“I love you so much fucking more.”
In the mail a few days after the phone call with Riki, you were delivered three photo slips from a photo booth. One was with Riki and his three friends, Jake, Sunoo and Jungwon where they posed. On the back, it read little happy notes written by them four to you. The next one was two seperate pictures with Jake and Jungwon, and Sunoo and Riki where they drew little pictures on the back. And the third slip was just Riki, and on the back was a cute note of him telling you how much he loves you and you can’t help but grin widely at the thought of the four guys you’re so close to being kind to you.
You definitely owe them all big bear hugs.
5 notes
·
View notes
Note
Hi
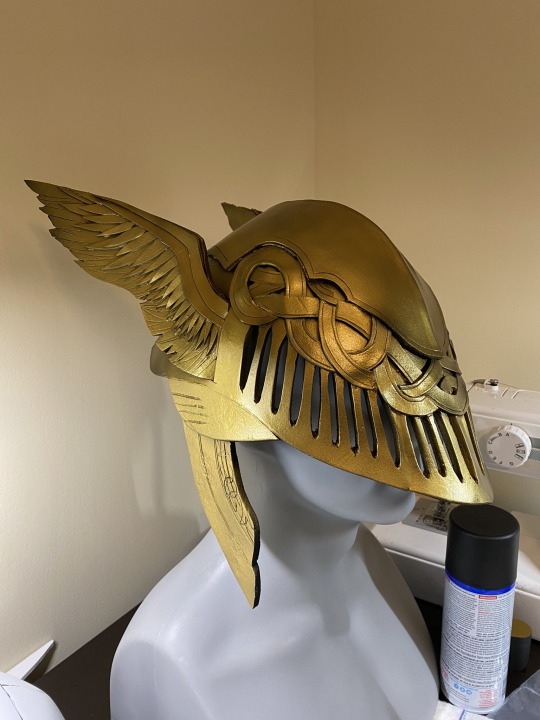
If it's not too much to ask, how did you manage to paint the gold on your Malenia cosplay that well?
With the ER boardgame coming out soon, I've been rather dreading the tree sentinel that comes with it as I often struggle with golds
hi!! ty for the ask! I’m not the greatest at teaching but I can try and explain what I did the best I can! And thank you so much!
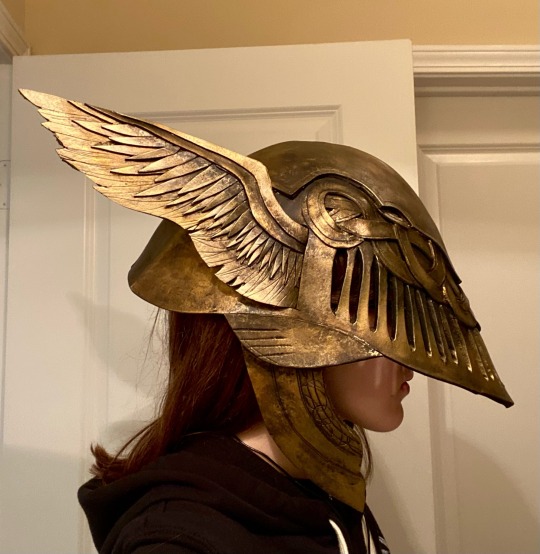
I’ll use the helmet as an example. All of the armor is painted this way save for the white parts of the legs.
So I started with a Vallejo airbrush base coat gold.
I then went in and did a little dry brushing with black acrylic/black acrylic diluted with a little water to add some basic shadows. I used a combination of soft brushes and a natural sponge to help blend it out.
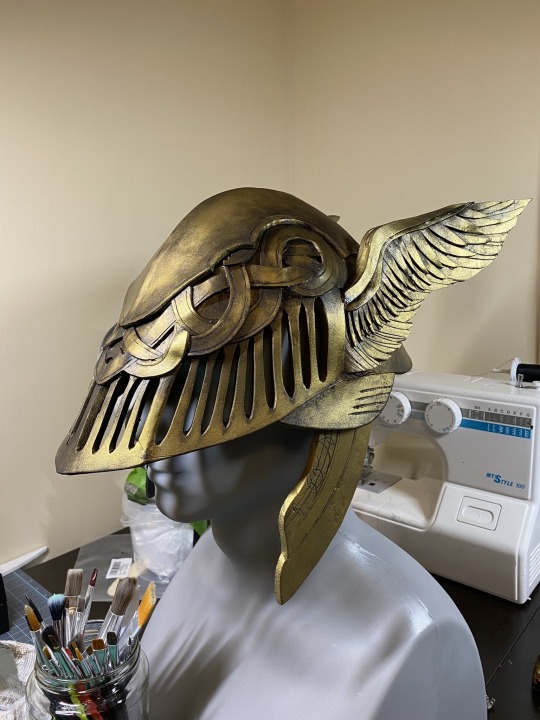
Next I sprayed the whole helmet at this point with a matte spray varnish to protect the paint so I could go in with water mixable oil washes in black and brown to make a dark brown grimy color. I did a few passes of the oil wash and let it sit for a few seconds before wiping it away with a paper towel. It mutes the shiny pristine gold really well and adds that extra layer of dimension to the piece, while also helping the shadows to look a little less uniform. In different areas I layered the wash more heavily to get a little more variation.
If you’re painting minis I would recommend an army painter or citadel brand wash for this part rather than water mixable oils, I think it’ll be way easier to control on a smaller scale! But here’s what it looked like after a few wash passes:
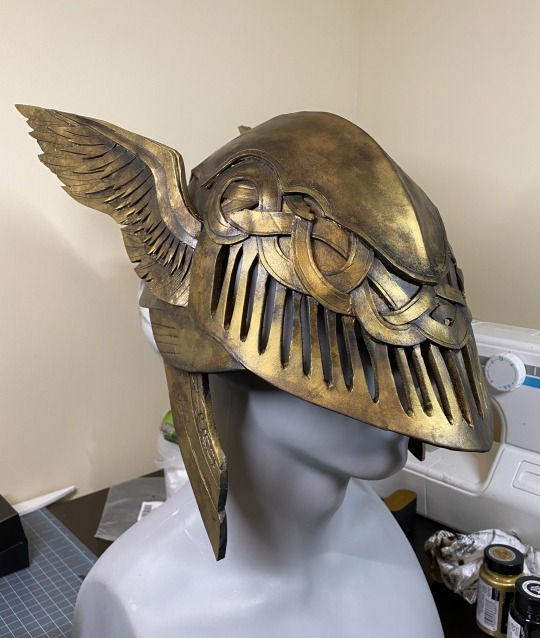
Then, I blended the shadows out further with more gold acrylic (mixed with a little black to make a nice darker gold color) using the same dry brushing/sponge method. To get that flecked gold texture over the dark spots, I just used my sponge with just the tiniest amount of paint on it and pressed it gently onto the surface in a couple areas. Again using a natural sponge will yield a better result. It looks like this after it’s all done:

I then added highlights with a lighter/less yellowy gold, but I went REALLY light on them. You really only want to hit the high spots here - for example the crest/point on the top of the helmet, the edges of the wings/wing details, etc. it REALLY helps pull the gold back from all of the shadows and weathering.
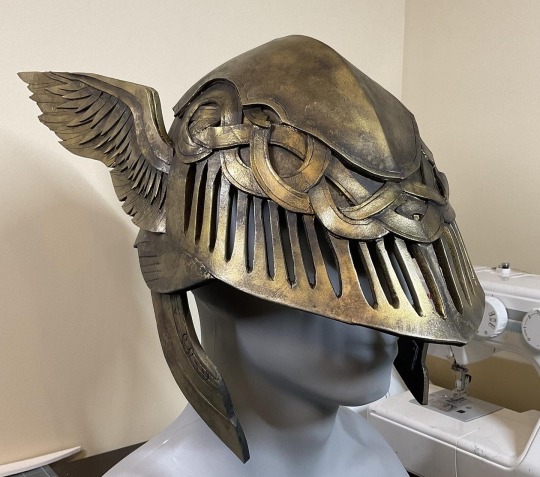
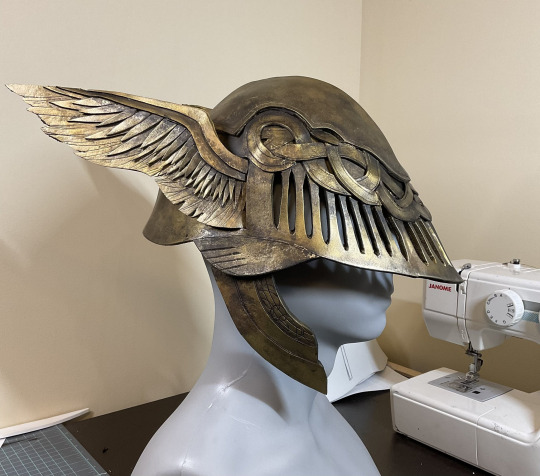
After that I sealed the whole thing in matte spray varnish one more time and the helmet was all finished!

Essentially it just involves carefully planning out how to layer your paints. I def recommend doing some tests if you can.
I know painting armor is a lot different than painting minis but I hope I was able to help at all! Good luck with your project, I’m sure it’ll turn out badass!!!
21 notes
·
View notes
Text
Art materials part one:
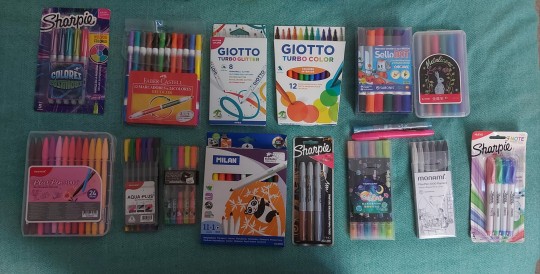
Since I'm having extra shaky hands these last weeks, and it's taking me more to finish drawings 😅, I would like to show to you the art and school materials I have 😁, some have spanish names, so I'd gladly explain every kind of material...

These are all the color fineliners I have, the first ones in the first row are "kawaii liners", the fourth ones in the first row are bright and vivid colors, the first ones in the second row are high quality color liners, the ones that are at it's side have 30 diferent colors, and the last ones are makers and liners at the same time, they have double tip..the rest are normal color liners.
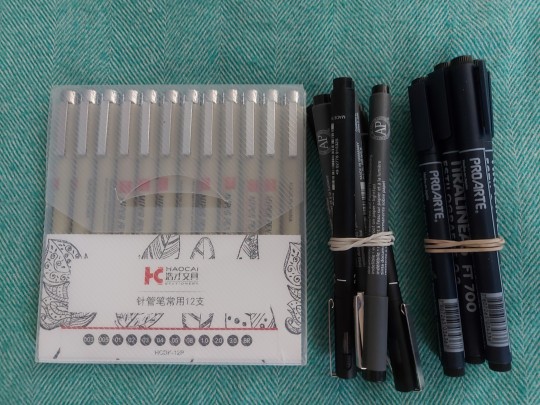
These are all the black fineliners I have, they have diferent numbers that indicate the thickness of the tip.
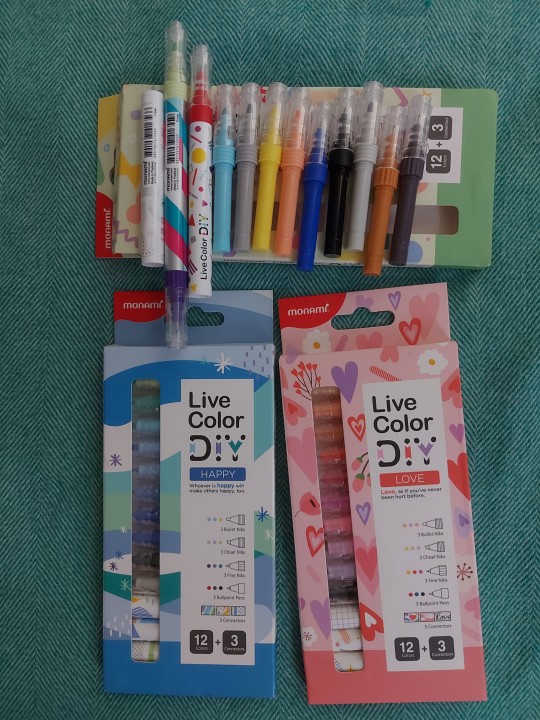
These ones are special tone markers, they have a base where you can exchange the tips, like is shown with the upper ones, every package has 3 fineliners tips, 3 markers tips and 3 pen tips.
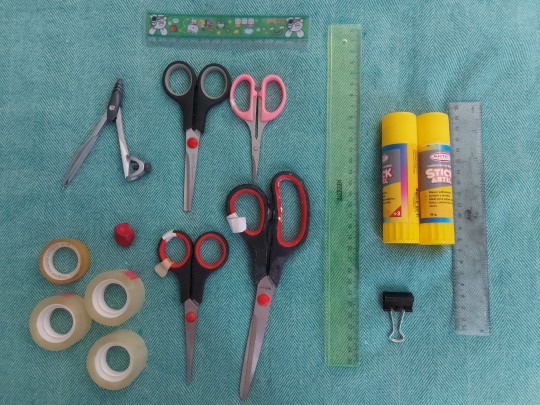
These are all the scissors, glue sticks, rulers and adhesive tapes I have. I have a a big paper clip too, and that thing you use for make circles and I don't know how is called 😅..finally, that red little thing is a rubber material that you put on pencils and help you to grab them better, I use it for extra support when I'm having shaky hands.
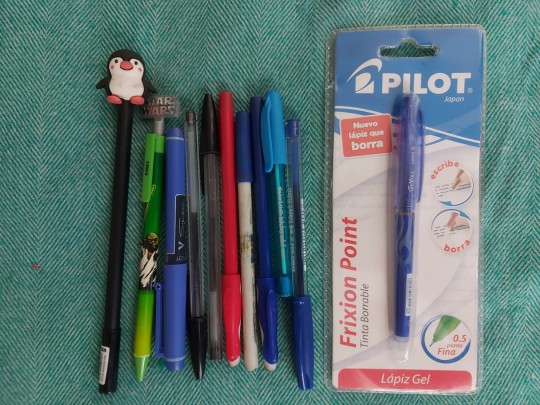
These are all the pens I have, the usual black, red and blue pens, one of them is a skyblue color pen, the penguin one is just a pen with a cute ornament, the blue and red ones at the sides of the white one are supposed to erase the ink with the white tips on the caps, but they leave a mark on the paper, same with the one that isn't open, but I haven't tried it yet, so I don't know if it leaves a mark 🤔.
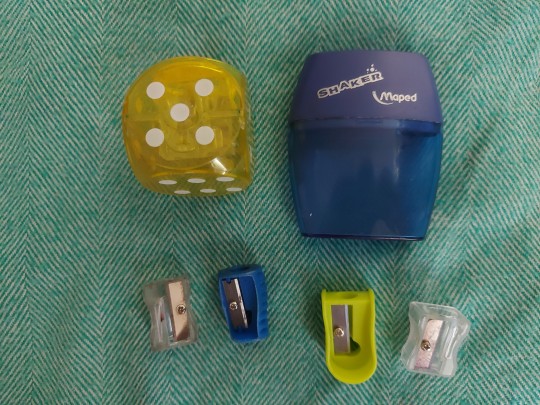
These are all the pencil sharpeners I have, the top ones have two diferent holes, one for the thin pencils and the other for the thick ones.

These are all the white-out or liquid correctors I have..you know, the thing you use when you want to cover an inky mistake 🙃.
These are all the markers I have, a lot as you can see 😅..The first ones on the first row are cosmic color markers, the third ones are glittery markers, the ones with the robot are markers with shaped stamps (or seals), and the bunny ones are metalized colors. In the second row there is the case with 24 diferent colors, the ones that has a drawing of pigs are scented, the sharpie ones in the middle are metalized (yeah, like the bunny ones 😶), the ones with a space drawing are neon color markers, the next ones are grey color tones markers and the last ones are mild color markers, the rest of the markers are just normal color markers. Finally, the two loose markers are highlighters, and the skyblue one has two tips, one of them has a star shaped seal.
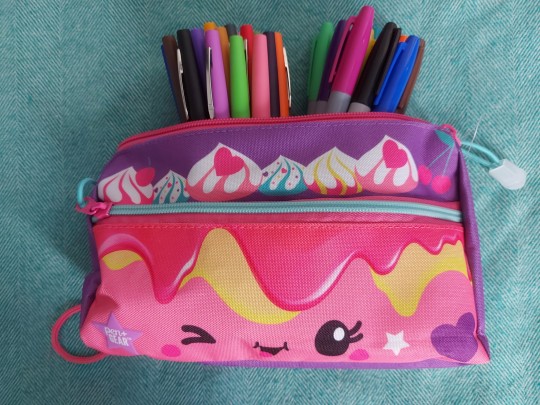
This pencil case has more markers I forgot to put in the last picture 🤭, normal markers by the way.
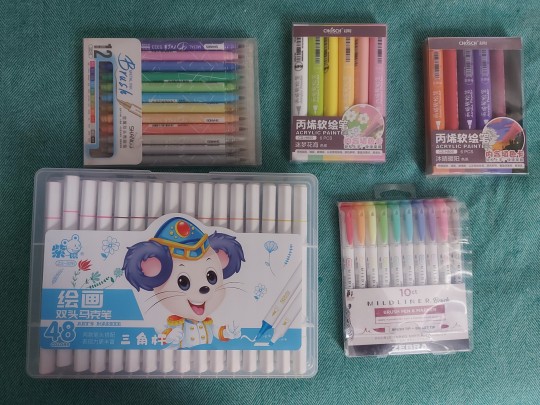
I had to separate these ones of the other markers, these ones have brush tips, the upper ones on the left side are metalized, the two next ones are acrylic markers, the one with the big case have 48 diferent color markers, each one with double tip, one is a brush tip and the other is a highlighter tip. The last ones are mild color markers with two tips, one of them is a brush tip and the other one is normal marker tip.
There are a lot more art and school materials I want to show, but Tumblr didn't let me put more than 10 pictures, so be prepared for part two 😁.
11 notes
·
View notes
Note
I would love to get better with my watercolor how do you do it? Is that colored pencils? Ink? Do you have any advice how to make it soft like that?
Hi! Personally, I usually use a mechanical pencil and blue or red coloured lead for the outlines, and then the rest is just regular watercolour with some white acrylic paint for highlights, mostly in the eyes and hair.
In terms of advice for how to make it look "soft," this might not be quite what you were looking for, but I usually try not to overdo it with how many layers I use for shading (I usually layer the colours about 3-4 times at most, and usually it's a slightly different hue and shade each time), and I tend to use a very light wash for the first layer of colour as that's generally what will eventually become the highlights. I also try to leave some white space on the areas I want to be lighter.
Also, gradients can help a lot in terms of making the shading look a bit more detailed while still limiting the amount of times you layer the paint, especially when it comes to hair.
Something else that may help is limiting your colour palette, as it can give your piece a more unified and clean look. I usually try to stick to 3 or so main colours per painting, and just use variations of those colours. This is where a good understanding of colour theory comes in handy, if that's something you're interested in.
In the end though, I think all it really comes down to is experimenting and trying out new things until you find some methods that work for you. It may take a while, but I'm sure you'll get there. Good luck!
Hopefully that helps, and just let me know if you have any other questions or if you need any clarification! ♡
8 notes
·
View notes
Text

Oh. February is over, huh. Sure was a short one! I feel like I didn't do too much to be honest. I saw The Squad™️which is always a highlight, but other than that? Finished a craft project (that I can't share) (it's a secret) which came out so adorable. I started doodling more and making art that isn't good nor bad but just is and that's been fun! Joined a discord server for other people trying to do more art where we do challenges each month and share our creations and I'm very excited about our first challenge. I don't know! I feel stagnant but also! I'm just vibing! I didn't read too much, but I'm not mad at that.
BOOKS
Middlegame by Seanan McGuire (reread) ⭐⭐⭐⭐⭐
She Who Became the Sun by Shelley Parker-Chan ⭐⭐⭐⭐
Ten Thousand Doors Of January by Alix E Harrow ⭐⭐⭐
OTHER MEDIA
Project Mirai
Good Mythical Morning
TAZ: Steeplechase
MBMBaM
FOOD
blueberry scones
coffee cake
I didn't make a whole lot of food this month. Most of my baking is done with flour and I've been avoiding wheat products in hopes my stomach would feel better. But the other night I saw a recipe for coffee cake that looked so delicious I nearly got out of bed and made it right then, so. I risked it.
I've been going through GMM's videos since over the summer and whoooboy there sure are a lot of them huh! They're fun and silly and very good at Yes And-ing each other. They make for good background noise when doing something else.
No idea what I want out of March. I have a baby blanket I need to make, the art challenge, I've been noodling on making some acrylic keychains, but lets be real that's probably just wishful dreaming haha
For once I do have books planned to read! Shocking!! But that's what library holds will do to you! The Unspoken Name and The Once and Future Witches are up next in my library queue, and I'm halfway through A Memory Called Empire. I think that's enough for someone who doesn't plan their reads. Very impressive on my part.
5 notes
·
View notes
Text
Art Update
Hi, guys! I haven’t blogged about my art journey all month, so I wanted to give you guys an update. I feel like I’ve sort of been in a funk, but, at the same time, I’ve gotten better? Anyway. Here are some highlights from the past month. (Confession: I’m only showing you the ones I’m happy with. I’ve actually made a lot of art that was rubbish too. XD Oh well. All part of the process, right?)
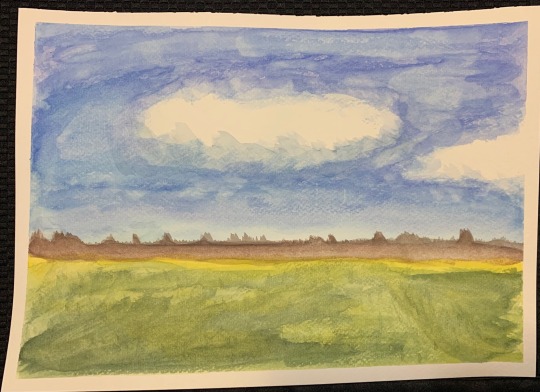
Above is a watercolor landscape that I did along with an instruction video series. I’m happy with the puffy cloud in the center. I also like the colors of the grass in the foreground and the mountains in the distance. In the video, the instructor said they were supposed to be a line of trees, but mine are mountains because I said so. I think mountains look better at the end of a vast grassland.

I also started doing acrylic. I think I’m kind of getting the hang of watercolor, but acrylic makes more sense in my head with putting the darker colors down first and adding the lights and highlights on top of that, so I’m giving it a try.
I have a video series for acrylic painting too, so in one of the lectures we painted an egg in black and white. For my first acrylic painting and not knowing what the heck I was doing, I think this turned out really well. I really like the shadows.
I’ve also been doing a lot of drawing. Below are two pumpkins. They make me happy. The real ones are sitting on our dinning room table now looking all festive for the autumn season.
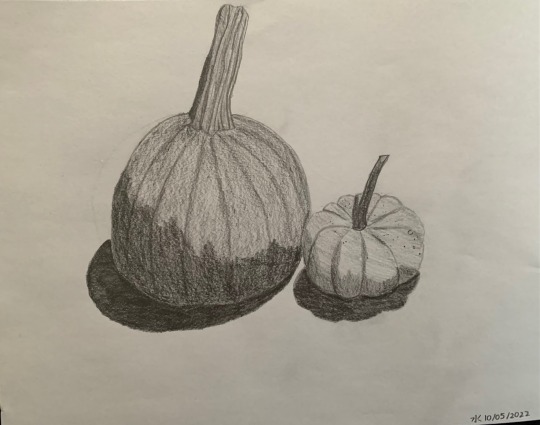
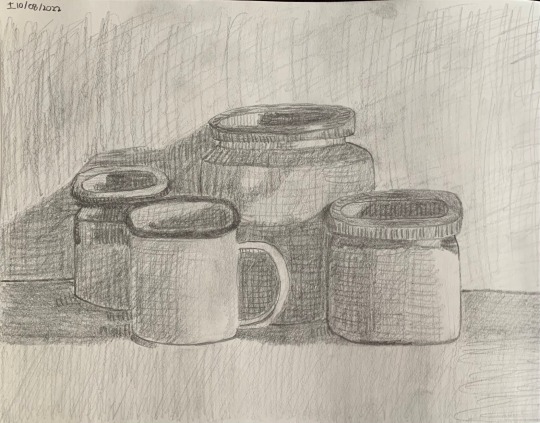
So, the below was actually a picture in a book I got from the library on drawing techniques. It’s three different ceramic kitchen jars and a coffee mug. It was featured in the lesson on hatching and crosshatching. I thought it looked cool, so I tried drawing it. It turned out really well! The image in the book is probably copyrighted, so I can’t show you a reference photo. You’ll just have to take my word for it that I did a good job with my reproduction.
It’s funny. It doesn’t look like I drew it. I feel like it’s too early for me to have a distinctive “style”, but when I look at the below, it’s obvious that this image didn’t come out of my head. So I must have some sort of basic, cohesive elements that characterize my work. I have no clue what those could possibly be. XD
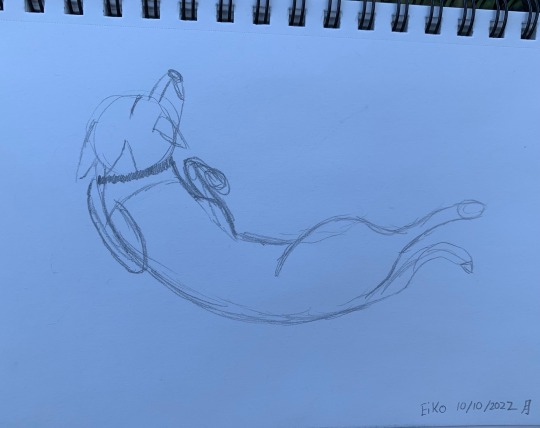
So, I’ve heard about this thing called “gesture drawing”, but I’ve never learned how one goes about doing it. ^.^; Below is a quick “gesture drawing” I did of my daughter Eiko as she was lying out in the yard. (Yes, she does lie with her leg sticking out in back like that. She also only eats lying down. She’s a strange, beautiful creature, and I love her.)
I tried to do one of my son Noiz too, but he didn’t stay still long enough for me to complete anything. XD
Lastly, here is the final project I did for my drawing class that just wrapped up. It’s my ocarina (dark blue), a tea mug (a slightly darker shade of blue), and a blue and white porcelain bowl containing three clementines. The colors are really pretty together. It doesn’t come across in my greyscale drawing, but know that I thought about the colors when making the composition.
The drawing turned out pretty okay. It’s a lot bigger than I usually work, so the size was a challenge. Looking at it after the fact, there are a lot of little things that I would finesse some more, but I kind of just worked on it for a few hours, got tired, and said, “Good enough. I’m going to bed now”.
There are things that I’m really happy with about this too. The mouthpiece of the ocarina looks really good in person. I also like the way the top of the tea mug turned out as well as the handle. The reflection of the bowl of clementines in the mug also looks pretty good. I think the right-most clementine turned out well. I had a little trouble with shading. It’s so hard for me to shade light, but I think the right-most clementine turned out well.

At the moment, I’m actually taking a portrait painting class. XD I’m super new to acrylic AND portraits, so I’m way out of my depth, but the instructor is very nice and supportive. (She’s the same one who did my drawing class.) All of the other students are way more advanced than I am, but that’s okay. We’ve only had one class, and I’ve already learned a lot. Maybe I’ll share my portrait with you guys at the end of the class. If it’s not too embarrassing. XD
Thanks for reading! <3
#Drawing#Graphite#Watercolor#Watercolor Painting#Watercolor Art#Acrylic#Acrylic Painting#Acrylic Art#Mikau's Art#Still Life#Landscape#Gesture Drawing
9 notes
·
View notes
Text
ART VS ARTIST!!!!
(little talk about my year, full illustrations below)

so this year has been hectic, as always! when summer came by, i decided to get better at digital art! which i'm not sure i achieved, but i sure learned a lot! i'll talk about some of my fav art from this year now :)

we'll go chronological. this is a piece of my pokemon sona and his team (if you look at my personal art you'll see him a lot)! this was actually my first time drawing the full 8 pokemon team! i really liked the rendering here, even if it's not a style i use anymore, good times all in all!

still pokemon, but journeys fanart! this one was a tooooooon of fun for me :) i don't think it's that good to be honest, but i still had a ton of fun on this one

this art retrospect will cover most of the hyperfixations i had this past year, so OF COURSE we'll have digimon showing up! this is a redraw of the "death of angemon" scene, i had a very vivid image in my mind of how it would look. i'm so proud of it

this one is way more casual, nothing fancy, but i love how simple and cute it looks!!!

this is the only traditional piece i'll feature (even though i'm actually prouder of my trad art, but it's more sketches and watercolors, but since this one is an acrylic painting it fits here) this was actually a commission!

one of the absolute highlights of the year : CHAIN JAIL !!!! if i ever do prints, this one is on top of my printing list

i actually made this one in like... less than an hour.. i was in a transe and was very sure where i wanted to go with this one. art journey wise, i'm very satisfied with the fact that i can now do in digital what i picture in my mind!

and i'll close this post with another highlight: my first community project! it's more of a twitter thing, but i'm participating in this french one piece event called "road to piece" i love what it did with the colors! i actually printed this one for my myself it's on my walls lol
5 notes
·
View notes
Text
Understanding the Process: What to Expect When Getting Dentures
Introduction
Dentures play a crucial role in restoring the function and aesthetics of your smile. They are custom-made prosthetic devices designed to replace missing teeth and are particularly beneficial for individuals who have lost teeth due to age, disease, or injury. This article aims to provide a comprehensive guide to understanding the process of getting dentures, from the initial consultation to the final adjustments, and highlight the importance of choosing professional dentures over natural remedies.
What Are Dentures?
Dentures are removable replacements for missing teeth and the surrounding tissues. There are two main types: complete dentures and partial dentures. Complete dentures are used when all teeth are missing, while partial dentures are used when some natural teeth remain.
Dentures are typically made from acrylic resin, sometimes combined with metal for added strength. Modern dentures are designed to look and feel like natural teeth, providing numerous benefits including improved appearance, better chewing ability, and enhanced speech clarity.
Initial Consultation
The first step in getting dentures is choosing the right dentist or prosthodontist. During the initial consultation, the dentist will conduct a thorough dental examination and review your medical history. This helps determine whether dentures are the best option for you and which type would be most suitable.
The dentist will discuss your expectations, explain the different types of dentures available, and provide a treatment plan. This is also a good time to ask any questions you may have about the process.
Preparatory Procedures
Before getting dentures, some preparatory procedures may be necessary. If you have remaining teeth that are damaged or decayed, they may need to be extracted. Tooth extraction is a common procedure, and the dentist will provide aftercare instructions to ensure proper healing. It usually takes a few weeks for the gums to heal completely.
Jaw measurements and impressions are essential steps in creating dentures that fit well. The dentist will take detailed impressions of your jaw and record the dimensions of your mouth. This information is used to create a precise mold for your dentures.
In some cases, temporary dentures may be provided while your permanent dentures are being made. These allow you to maintain functionality and appearance during the healing process.
Creating the Dentures
The creation of dentures is a meticulous process that takes place in a dental laboratory. Using the molds and measurements taken by your dentist, dental technicians create models of your dentures. These models are used to test the fit and function before the final dentures are made.
The materials used for dentures are selected based on durability and aesthetics. Acrylic resin is commonly used for the base, while the teeth can be made from resin or porcelain. The dentures are crafted to match the shape, size, and color of your natural teeth, ensuring a natural look and comfortable fit.
Fitting and Adjustments
Once your dentures are ready, you will have a fitting appointment with your dentist. During this visit, the dentist will place the dentures in your mouth and make any necessary adjustments to ensure a proper fit. It’s normal to experience some discomfort and pressure points initially as your mouth adjusts to the new dentures.
Common adjustments may involve reshaping the dentures to eliminate sore spots and improve comfort. Your dentist will provide guidance on how to deal with any initial issues such as soreness, difficulty speaking, and changes in eating habits. It may take a few weeks for your mouth to fully adapt to the dentures.
Caring for Your Dentures
Proper care and maintenance of your dentures are crucial for their longevity and your oral health. Here are some tips for daily care:
Cleaning: Brush your dentures daily with a soft-bristle toothbrush and non-abrasive denture cleaner to remove food particles and plaque.
Handling: Handle your dentures carefully to avoid dropping and damaging them. When cleaning, fill the sink with water or place a towel underneath to cushion any accidental drops.
Storage: When not in use, keep your dentures in water or a denture-soaking solution to prevent them from drying out and losing their shape.
Regular check-ups with your dentist are important to ensure your dentures remain in good condition and fit properly. Professional cleaning can help remove stains and tartar buildup.
Living with Dentures
Adapting to dentures can take time, but there are ways to make the transition smoother. Start with soft foods and gradually reintroduce harder foods as you become more comfortable. Practice speaking by reading aloud and repeating difficult words to improve your speech clarity.
Lifestyle considerations include avoiding foods that are excessively sticky or hard, as they can damage your dentures. Use both sides of your mouth to chew evenly, which helps stabilize the dentures.
Addressing common concerns and misconceptions is also important. Some people worry that dentures will look unnatural or be uncomfortable. However, modern dentures are designed to be both aesthetically pleasing and comfortable to wear. With proper care and regular adjustments, dentures can provide a highly satisfactory solution for missing teeth.
Choosing Professional Dentures Over Natural Remedies
While there are various natural remedies and DIY solutions available for missing teeth, choosing professional dentures offers significant advantages. Professional dentures are custom-made to fit your mouth perfectly, ensuring optimal comfort and functionality. They are crafted using high-quality materials that mimic the appearance and durability of natural teeth.
In contrast, natural remedies often lack the precision and effectiveness of professionally made dentures. They may not provide the same level of comfort or durability and can even lead to further dental issues if not properly fitted or maintained.
When considering dentures, it is advisable to seek treatment from a reputable dental clinic. For instance, professional dentures Chatham are known for their high standards of care and quality craftsmanship. Choosing a qualified dentist ensures that you receive personalized care tailored to your specific needs, resulting in a better overall experience.
Conclusion
Getting dentures is a multi-step process that involves careful planning, precise craftsmanship, and ongoing care. From the initial consultation to the final adjustments, understanding each stage can help you feel more confident and prepared. Remember, professional dentures offer numerous benefits over natural remedies, providing a reliable and effective solution for restoring your smile. If you have any questions or need further support, don’t hesitate to contact a trusted dental professional.
0 notes
Text
This stunning artwork is called stargazer and is a creation of Shinique Smith, it's done by incorporating a diverse array of materials including denim, cotton, sequined mesh, ribbon, wood, rope, dye, marker, acrylic, and poly. The diverse combination of elements adds depth and texture to the piece, resulting in a truly captivating composition. Its dimensions are equivalent to 7 basketballs stacked vertically and 3 basketballs placed side by side at the base. This design was made using a wide variety of clothing, joining them together to form a object with a similar shape as a human body.I would say the emphasis is on the piece of clothing, the rhythm of this piece is regular, its asymmetric and proportion wise s similar to that of a human. The artist's deliberate use of color within the same color scheme is truly effective. The harmonious combination of colors creates a sense of unity, while the occasional use of a different color draws attention to specific areas of the artwork, adding an element of intrigue and complexity. I find myself deeply drawn to this artwork and feel compelled to explore the artist's intention behind the use of clothing as a medium. I am particularly interested in understanding why the artist chose this specific medium rather than opting for a more conventional material. Smith associates it with the African slave trade. After seeing this artwork, I believe that the artist has a vivid imagination and is highly creative. Smith created this piece as a reminder that we all make wishes on the same stars, hoping that we, as a community, will honor each other and the challenging journeys of our ancestors. In my humble opinion, this piece doesn't quite align with the artist's description, but I can understand her perspective to some extent. I think this art work is amazing because it bring highlight to a period of time when the only light to a so called better future was just bright shining stars.


0 notes
Last Seen Blogs

piecesofneptune
queer media connoisseur

chatsworths-finest
Chatsworth's Finest

thisgirlwearsacrown
Aint no lie, baby bi bi bi
depressed-snowman
A crow who likes tigers, but is a cat.

angrytalebeliever
Just a Person