#you're the biggest bad in history so i go back in time to prevent you from betraying mankind
Text
bluepulse you will always be famous
#bart 'i can change him' allen#you're the biggest bad in history so i go back in time to prevent you from betraying mankind#but now that i'm back then i find out you're just a cool kind funny teenage boy#and i befriend you and fall in love despite the things you did to me and the world in the future#LIKE SOO ICONIC#young justice#jaime reyes#bart allen#bluepulse#blue beetle#impulse
108 notes
·
View notes
Text
Was The Finale of How I Met Your Mother Truly That Bad?
That title may come as a shock to any How I Met Your Mother fan, or even just anyone on social media when the finale aired, as the infamous ending is widely known as one of the worst endings in sitcom history. It was unanimously agreed that this finale was awful, so much so that the creators of the show immediately released an alternate ending to appease fan outrage. However, I would argue the ending truly does make sense in retrospect.

What Went Wrong?
As a huge fan myself, for many years I also held the belief that the ending was well...wrong. Being an avid Barney and Robin shipper, their divorce felt abrupt, especially considering the fact that the entire final season takes place over the weekend of their wedding. And losing the sweet, wonderful Mother mere moments after meeting her? Pure insanity.
The biggest fault in the finale however was the fact that it was fully planned during Season One. The plan was always for Ted and Robin to end up together. In order to prevent David Henrie (Luke) and Lyndsy Fonseca (Penny) visually aging over the course of the nine years the show spanned (which was canonically probably just a month or two) they filmed the iconic, "You're totally in love with Aunt Robin!" scene way before any of the natural character development occurred.
Because of this advanced planning, it denies the characters we had grown to love the ability to change at all during the course of the series, forcing them to morph back into odd, and now unfamiliar, Season One versions of themselves. It leaves a bitter feeling to the whole finale as:
Barney resorts back to his womanizing ways, neglecting his growth and change over the series. Almost completely flanderizing him in the final episode.
Robin is bitter and barely seen by the group anymore.
The entire group has separated, only catching up during holidays if at all.
The Mother dies episodes after we meet her.
And most controversially, Ted and Robin are endgame.

So seeing all of this, its may seem as though the finale managed to screw up nine years of character arcs and fan loyalty in only two minutes.
But,
Was the ending actually the perfect way to sum up this story?
What Went Right?
While the ending truly did reject viewers expectations, it was always supposed to end this way. It wasn't a cop out.
The story of How I Met Your Mother is about so much more than Ted meeting the Mother, it's about Ted's 20's and his friend group. But more importantly, it's about reality.
We see many times throughout the show that Ted is chasing this idealization of fate, he spends almost the entire show chasing Robin because he truly believes that she is his fate.

But the reality is, fate is messy. You may not always get what you thought was the perfect ending. There isn't always that pretty bow to put on top of life. More importantly, the ending you thought was perfect is simply not always the ending you get. Life is ever-changing.
Foreshadowing for finale (however much you hate it) is sprinkled throughout the series, and these moments remain some of the most impactful scenes in the entire show.
Let's break this down even further.
↳ For the sake of this argument we're going to revisit 8x20, The Time Travelers and the writers use of Ted's Favorite Book.
↳ While the foreshadowing that I am arguing is shown in many episodes and plots, I believe these encapsulate it the best.
The Time Travelers Episode
This episode is one of the most popular episodes of the series, as it is truly depressing. It is argued to be one of the saddest episodes in the show (although I would say Bad News is objectively the most heartbreaking).
In this episode we follow Ted recounting an average night in MacLaren's Pub with his friends until it is revealed the entire evening was all in his mind, and in reality he is all alone.

Following this realization we get a narration from Future Ted, that in hindsight should've been the biggest hint for the finale.
Future Ted tells us that instead of simply going home this night, he would instead go to the Mother's apartment and say this:
“Hi. I’m Ted Mosby. In exactly 45 days from now, you and I are going to meet. And we’re going to fall in love. And we’re going to get married and we’re going to have two kids. And we’re going to love them and each other so much. All that is 45 days away. But I’m here now, I guess, because I want those extra 45 days. With you. I want each one of them. And if I can’t have them, I’ll take the 45 seconds before your boyfriend shows up and punches me in the face. Because I love you. I’m always going to love you. Until the end of my days. And beyond.”
What a gut punch considering the fact that the Mother falls fatally ill in the finale. Someone play The Prophecy by Taylor Swift.
Seeing Ted beg for just 45 extra days knowing the Mother dies is honestly one of the clearest signs of her ending. Her fate. Her destiny. The Mother while insanely lovable and a quick fan favorite, was always written to die.
But, an even BIGGER piece of foreshadowing remains in Ted's Favorite Book.
Ted's Favorite Book
In the episode Matchmaker (1x7), we find out Ted's favorite book is Love in the Time of Cholera by Gabriel García Márquez. This book's plot focuses on a young couple in love who grew apart, one them goes on to get married and the others spouse eventually dies and the original couple finds one another. Sound familiar?
This is the exact plot of the Ted, Tracy, and Robin storyline.
We see Ted reading this book the exact moment he meets the Mother. This easter egg was planted in Season One.
I often times see people be critical of the shows finale as they view it as a cop out, a lazy ending to a show that was out of left field. But that purely isn't true.
As much as I love Swarkles, and as much as I love Ted and Tracy together, you cannot deny that sometimes stories just don't end perfectly. Life doesn't work that way.

So what does all of this mean?
Does foreshadowing excuse the ending? In my personal opinion I truly think it helps.
With a show like How I Met Your Mother that surrounds itself with themes of fate and destiny, you cannot be upset when these elements come into play. The Mother dying was her Fate. Ted and Robin ending up together was their Fate. This is always how the story was supposed to end, no matter how infuriating it is. This is their Fate.
Ultimately, I believe that if the creators fleshed out the ending across even just two episodes the fan reception would've been way better. The timing of it all causes a sort of whiplash feeling, leaving a bad taste in your mother when the How I Met Your Mother title-card flashes at the end.
So while personally I will continue viewing the alternate ending purely for mental health reasons, the original ending will always hold a special place in my heart.
TLDR:
The ending could've been way better, but this was always the fate of the show and characters and you truly cannot deny that.
Note: Sorry if this seems all over the place I feel very strongly about this show, prepare for a Swarkles rant next or maybe even a character analysis of Marshall Eriksen.
#himym#ted mosby#robin scherbatsky#barney stinson#marshall eriksen#lily aldrin#how i met your mother#show analysis#retrospective#himym spoilers
26 notes
·
View notes
Text
I’ve been seeing an increasingly large amount of people get into fic binding lately, which is fucking amazing! I love each and every one of you guerilla publishers! With the history of fandom takedowns, purges, and the bull shit legislation corporations try and start every few years, it’s so good that fics are being given permanency.
I’ve noticed that fic binders seem to be focused on longer fics, ones in the 50k onward range, which makes sense and is great because these fics absolutely deserve to be put into print! But, the thing is, my favorite fics have almost always been short one-shots, and no one seems to be talking about binding them.
So! I’m gonna show you how to bind short one-shots.
A couple of things before we get started, the method I’m going to show you is called saddle stitching, it works best for works between 5-20k. This method is affordable, utilizing things you most likely have already, and lasts years. (I have booklets that are literally a decade old and still holding strong.)
For longer works Coptic binding is my personal favorite, it’s not only affordable but also produces some beautiful spines. (Video talks about different types of string, but shows off some gorgeous spine work). If you have a little more money to spend on a project, I recommend hardcover binding. I don’t like perfect binding and while Japanese style binding is pretty it’s a nightmare on your margins.
@armoredsuperheavy has an amazing list and perfect tutorial that has everything you need to know about bookbinding and typesetting . The tutorial goes into in-depth detail on exactly what you need to do every step of the way. The only thing I do differently when printing one-shots is that I only have one signature so I print everything as one booklet. This orders the pages for you.
The most important thing you have to remember is to select flip on the short edge.
Also, add page numbers, trust me when I say it makes everything a world easier.
What I use:
Body text: Garamond 10.5
Meta information: Garamond 8
No gutter
A 1 inch top and bottom margin, and a .7 inch margin on both the inside and outside (Note: If your work is closer to 20k you’re going to need to account for page creep, so I recommend adjusting your outside margin to .9 and your inside margin to .5, this will even out when you cut)
What you’re going to need:
Mircosoft word—Sorry, I know everyone uses google docs now, but you’re going to need Word in order to print this as a booklet. If you have Adobe Indesign you can use that too, but it’s more expensive.
Card stock or craft paper—Anything 75lbs or more.
Embroidery Floss and Needle. Super cheap compared—and if you have beeswax on hand—the exact same as bookbinding string.
Ruler
Scissors
Craft Knife
Nail file
Index cards
Clips
Thumbtack
(Washi tape is an extra to add decoration and protect the string, though, if you really want to reinforce the spine duct tape is amazing.)
Okay! Now that that’s out of the way, let’s get started.
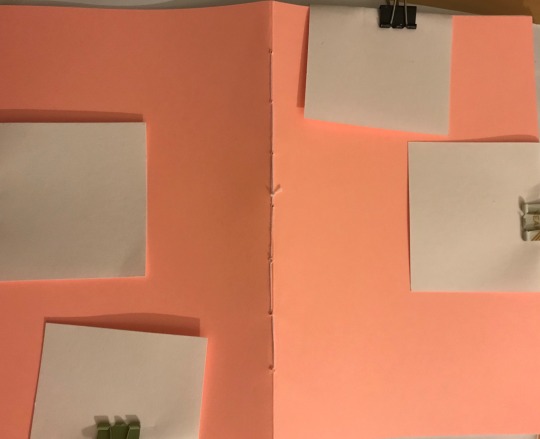
What you’re going to do is carefully fold your card stock and pages in half, ends flush together, running the edge of your ruler or bone folder, if you have one, over the crease. You’re then you’re going to start placing your pages inside the cover. To minimize page creep, each time you add a page, first push it in place with the needle, then go back over the crease with your ruler or bone folder. It should look like this when done—

You’re going to prep your booklet for sewing next.
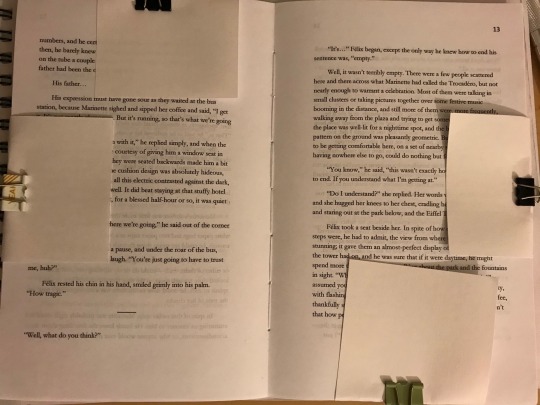
What you’re going to do first is open the booklet up, make sure everything lines up as close to perfect as you can, then fold the index cards over the side of the book, to prevent the pages from creasing due to the clips. Then clip them in place to prevent wiggling and make the hole punching easier. Do this to all four sides.
Traditional saddle stitching uses three holes, and you can too, but I like to use seven because it maintains better tension. For my hole guide, I measure 1 and 1/4th of an inch up to my first hole—this leaves me about 1 and 1/4th of an inch between the bottom of my page and the seventh hole. From the first hole, everyone after that is measured 1 inch apart.
After you’ve measured everything, it’s time to jam the thumbtack through the marks you’ve made. The pages have a tendency to move as you do this, so it’s vitally important that all four sides are being held in place with those clips. (If you have an awl, cool beans, they work better.)
For the love of God do not put the crease between your thighs when you start hole punching. I know it’s easier, but learn from my dumbassery and don’t do it bitch!
You should have something like this—

Now it’s time to sew. Which, because I’m weird and love hand stitching, is my favorite part.
I use one strand of floss, folded over for a double-stranded effect. I find this works best because each hole is gone through twice, leaving a four-ply binding. When measuring how much string to use, my rule is double the length of the spine, triple if you’re feeling unsure.
Now traditionally you’re going to start from the inside outward, leaving your tail within the book. I like to leave my tail on the outward spine because I cover it with washi tape. What you’re going to do now, is go in through your 4th hole(Leave around two inches for a tail, more if this is your first time), out through 5, back in through 6, like this—

When you get to seven you're going to follow the same pattern until you get to hole 1, where you will turn and sew toward the middle. When you get to hole 3 for the second time, you’re going to double knot the tail to your string and cut off the ends.
A note about tension, it’s important that you maintain even tension throughout each hole, this takes practice, but it gets loads easier the more times you do it. You want your string to be tight, with just enough give to make closing the book easy. If you have too much tension, over time the strings will wear through the pages. Too little and the pages will move around inside the binding.
Essentially your sewing pattern will be: in 4, out 5, in 6, out 7, in 6, out 5, knot the end, in 4, out 3, in 2, out 1, in 2, out 3, knot.
It should look like this when done—
Now you might notice this along the edge of your book—

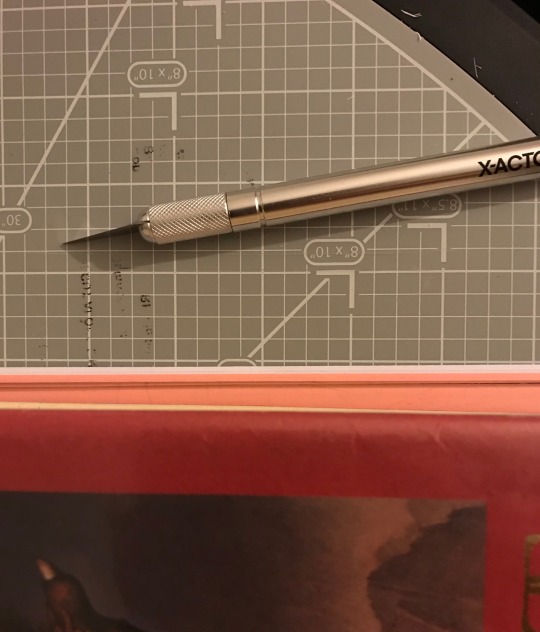
That’s page creep. Some people leave it, I cut it away. This is the biggest pain in the ass of the entire process, and I have yet to get a perfectly clean edge any time I’ve done. The only way to get that clean edge is with a guillotine, but I don’t have one, so this is where the craft knife comes in. (If you don’t have one, you can use a box cutter, provided the blade is fresh.)
What you’re going to do now is place your ruler along the edge of the paper you’re going to cut away. Pro-tip, I recommend cutting 1/16th of an inch into the card stock, 1/8th of an inch into the entire edge of the book so that each of your pages have the same starting point, like this—
Becuase my hands shake really bad when I apply tension to them, I stick my book under a sheet of glass, hold it down with a big old book, and use my body weight to keep everything in place.
It’s important that you go slow, cut page by page, and apply even tension from the top of the book down to the bottom.
Now if you’ve done this and still get these little fly aways—

Join the club! Fortunately, they’re really easy to get rid of and smooth out, just use your nail file to sand out the edge.
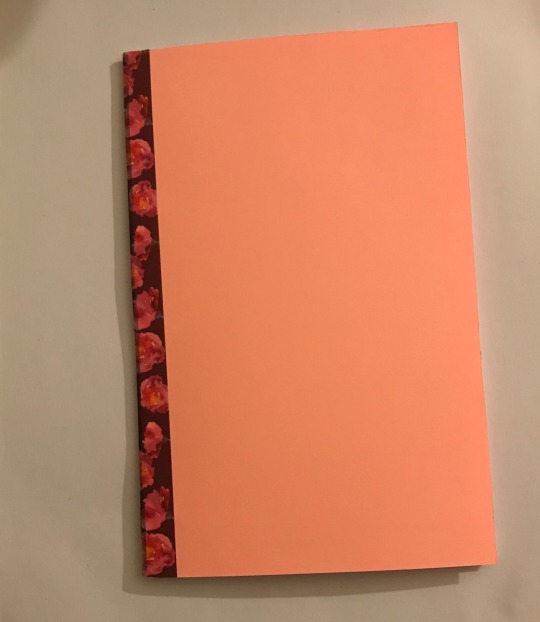
And that’s it! Congratulations, you’ve bound your very first book!! If you want to hide the spine add your tape, but if not, you’re done, my friend!
7K notes
·
View notes
Last Seen Blogs

thoraway125
aaaaa

nurakazoku-blog
Nura Family

lunacitysworld
LUNA city

cooksandkid
Cooks & Kid

overdubbedverse
Frankie