
Last Seen Blogs

de-gueules-au-lion-d-or
De plumes, de sang et d'acier

mother-of-wolves-angrboda-blog
Mother of Wolves

moreniita18-blog1
Little brunette-Beautiful-Eyes


mc619g
naked wonder
Photo

Natalie Portman during the Cold Mountain Los Angeles premiere at Mann National Theater in Los Angeles, California (December 7th 2003)
38 notes
·
View notes
Text
Make iTunes cross platform
For users that have converted from iOS to Android,one of the common problems they face is getting access to their iTunes library. However, a large number of cross-platform apps have recently hit the market, making it nice and easy to have access to your entire iTunes library. Of course, the quality isn’t as clear as what you’d expect from an iOS device, but it’s still a great solution. The best option to make iTunes cross platform is to use the Retune app (available from the Google Play Store on Android). Setting it up is easy and you’ll have instant access to your playlists, alongside all of your music library.
0 notes
Text
OS X: Using Spotlight’s Privacy Features
You know that folder you’ve got? That folder full of embarrassing files that have absolutely nothingto do with anyone being nude? Well, you may think that it’s hidden fourteen subfolders deep in your file system, but if someone does a Spotlight search for any terms that happen to be within that folder, you’re kind of hosed, privacy-wise.
I don’t even want to know why there’s a second hit for that phrase on my Mac.
Here’s the thing, though—Spotlight has a built-in way to exclude certain folders from its searches, so your embarrassing stuff will really, truly stay hidden. It’s simple to do, too. Just open System Preferences> Spotlight, select the “Privacy” tab, and then click the plus button at the lower-left to add a new folder to the list.
If you prefer, you can also drag items into that white box.
In either case, the folders you add and their contents will be excluded from your searches afterward.
0 notes
Text
Diigo Web Collector
Dubbed a "multi-tool for personal knowledge management," Diigo is a nice mix of social bookmarking (remember Delicious?) and full info grabber like Evernote. This extension puts it to work, letting you bookmark, archive, and annotate everything you see online.
Diigo Web Collector
0 notes
Text
dotEPUB
EPUB is an ideal format for ebook readers like the Nook or Kindle. When you find an article online you'd rather read later on your device, use dotEPUB to instantly translate the text to that format. (It's up to you to get the file on your device.)
dotEPUB
1 note
·
View note
Text
Clearly
Clearly, created by Evernote, makes sure the pages you read online are clean and clear. It takes the text of a main article and puts it on a customizable, distraction-free page. Better yet, if you like the article you can instantly save it to Evernote to read whenever you like.
https://chrome.google.com/webstore/detail/clearly/iooicodkiihhpojmmeghjclgihfjdjhj
0 notes

Text
Use Smart Folders on OS X To Put All Your Photos in One Convenient Place

Smart folders have been available in Mac OS X since 10.4, but if you're new to the platform—or haven't really explored it—then you might not know how useful they can be. These "saved searches" give you instant access to files matching a particular set of criteria, so they're perfect for picking out pictures taken with a certain camera on your Mac. Here's how to set it up.
Smart folders don't affect the location of any of the files on your computer, they just group them together for easy reference. They can come in handy whenever you have files spread out all over your system that you need to quickly sort through—so when you're hunting for photos across multiple folders, for example.
Put a smart folder in place by opening a Finder folder at the top of the level you want to search through (like the Desktop or your Dropbox). Choose File then New Smart Folder to bring up the search options. The plus icon to the right lets you add fields to your search, such as file type, the date the file was created, and so on. Select Other from the menu to see the full list of options available to you.
Here you'll find Device make and Device model, which let you search for all the pictures taken with your smartphone (or your expensive DSLR). If you're unsure about what these values should be, open up the Get Info dialog on an existing photo to check. Click Save to confirm your criteria and display a link to the folder (which is shaded purple). Every time you open this folder, the search runs again.
Of course, this is just one way of using smart folders; there are plenty of other possibilities to play around with.
0 notes
Text
What to do with an iPhone or iPad that refuses to switch on
There’s not always an obvious reason why your iPhone would fail to turn on (or turn itself off ). But before you panic too much, there’s some good news. The most common cause of an iPhone failing to start is a flat battery – even if you haven’t used it much since you last charged it, or it had plenty of charge left in it just a few minutes ago. Occasionally, batteries spontaneously lose their charge for no reason, so the first step to take is to plug your iPhone into a charger and leave it for a few hours. If it still doesn’t turn on, then you can panic. No, wait… not yet. There is one more thing you can do!
Restorative measures
First, reset it. Press and hold the Sleep/wake and Home buttons for at least ten seconds or until you see the Apple logo on screen. If it starts, you’re good to go. If not, you’ll need to try resetting it using iTunes. Connect the iPhone to your Mac with a USB cable and launch iTunes. If the iPhone appears in iTunes’ main window, select it and click Restore. Click Restore again in the dialog box that opens. Now wait while iTunes does its thing. When it’s done, your iPhone will be returned to its factory state, so you’ll need to re-install apps and data. Go through the set-up screens as normal and then choose either Restore from an iCloud Backup or Restore from an iTunes Backup, depending on which you use. If your iPhone doesn't appear in iTunes, force it into Recovery Mode. To do this, follow the steps for resetting an iPhone using iTunes, but hold down the Home button as you connect the USB cable (which is already plugged into your Mac) to it. When you see the ‘Connect to iTunes’ screen (a cable and the iTunes icon) release the Home button. iTunes should launch if it’s not already open and display the message: ‘iTunes has detected an iPhone in recovery mode. You must restore this iPhone before it can be used with iTunes.’ Restore the iPhone as above.
What else can you do?
If that doesn’t happen, and you still can’t connect the iPhone to iTunes, restart your Mac. When it’s restarted, check the USB connection between Mac and iPhone is secure. If it’s connected through a hub, remove it and connect it directly to your Mac. Disconnect all other USB devices from your Mac, just in case they’re causing a conflict. Try a different Lightning or Dock connector cable if you can. Make sure OS X and iTunes are up to date by running Software Update. If necessary, download and install any updates which appear. If none of that works, and your iPhone still won’t turn on or connect to iTunes, and you’re sure you’ve given it enough time to charge, it’s time to pay a visit to your local authorized service center or visit your Apple store’s Genius Bar.
0 notes
Text
I’ve forgotten an important password!
You need you make sure your password is complex enough to make it difficult to guess, while simultaneously ensuring it’s simple enough to remember. The solution? Let OS X remember it for you by storing passwords in your Keychain. Usually Safari will offer to save passwords for you, and will usually fill them in for you when you come back to the website. Occasionally it might not – but the password is still safely saved in your Keychain. Happily, you can retrieve it. Launch Keychain Access (in Applications/Utilities) and then search for the site from the field in the top-right, or browse Web form passwords. Find the one you want and either right-click and choose Copy Password to Clipboard, or double-click then check Show password. Either way, you’ll need to enter your login password.
0 notes
Text
Trashed files are not completely shredded; they can be recovered
Have youlost an important document? Did your Mac crash while you have a document open? Don’t worry: most software tools are able to recover documents automatically if this occurs. If you’ve trashed a file and then realized you need it, you can recover it if you haven’t emptied the Trash since you dragged the file there; just click the Trash icon in the Dock, and drag the file from the Trash folder to the Desktop. If you’ve emptied the trash and are using Time Machine to make regular backups, open Time Machine, use the arrows at the bottom-right of the screen to ‘go back’ to a point when you know you had the file.
Click on the file and hit Restore. For other back-up software, refer to that app’s manual to find out how to recover a file. Not running regular back-ups? Set up a regular schedule now. At least two: both on and off-site. It’s not time to panic yet. Trashed files aren’t deleted from your disk, but their entry in the directory is removed and the space made available to be over-written. So as soon as you realize you need the trashed file, stop using your Mac for anything that’s not necessary to recover the file. There are a number of software tools that can help recover trashed files. ProSoft’s Data Rescue is one; Clever Files’ Disk Drill another.
Both apps have free demo versions that allow you to scan a drive for trashed files. Start a scan; if it ‘finds’ your trashed file, you might be in luck. Depending on the size of the file and the tool you use, you might be able to use the demo version to recover it. If not, you’ll have to pay for the full version. If neither tool can find your file, the next step is to take your Mac to a specialist data recovery firm. (This is expensive.) If the document hasn’t been trashed but has been changed and you need an earlier version, OS X’s versioning may be able to help. The app you use to work on the document must support it, though. With the current version open, click on the File menu, then go to ‘Revert to’ and select ‘Browse all versions’. Use the checkmarks on the right to navigate to the version you want, and click Restore. Or, hold down a and hit ‘Restore a Copy’ to open the old version in a new document.

0 notes
Text
Share files with airdrop
The devices don’t need to be on the Same Wi-Fi netWork, they just need to be close
Wave goodbye to emailing documents and other files, because there’s now a better way: AirDrop. It sends files between nearby Macs and iOS devices over the air using an encrypted connection. What’s great is that unlike traditional methods of sharing files there’s no tricky setup – the devices involved in a transfer don’t need to be connected to the same Wi-Fi network (though AirDrop still works if they are), as it establishes a direct connection. They just have to be close. When you select AirDrop in a Finder window sidebar or choose Go > AirDrop, you’ll see a window with icons for nearby people who can receive files. Control your own visibility at the foot of the window. When you drag files and folders and drop them onto someone’s icon, the recipient is prompted to accept or reject the transfer. If their iOS device has no app capable of reading what you’re sharing, it will direct them to the App Store and a list of apps it thinks can handle the item. AirDrop is available in other places besides Finder. Click the Share button that appears in Safari, Preview, Maps and many other apps to share whatever it is you’re looking at. Using AirDrop in this way opens a sheet that again lists nearby people. Click one to send to them. Wherever you access AirDrop, the words “Don’t see who you’re looking for?” appear below the list of people. Clicking this and then “Search for an Older Mac” switches to an older AirDrop that works only between Macs running OS X Lion or later. This version of AirDrop can’t talk to iOS devices, but it works with many more models of Mac – you can check whether yours is compatible by referring to Apple’s list at support.apple.com/ kb/PH18947.
0 notes
Text
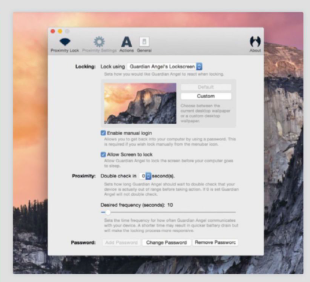
Guardian Angel
Use an iPhone to lock your Mac
We all want to keep our Macs secure when we’re away from them, and this app uses your iPhone as a tool to lock and unlock a Mac. It’s much like the Atama Sesame 2 wireless proximity lock (see right), just without the extra piece of hardware to keep in your pocket. If you have an iPhone and a Mac, then, Guardian Angel might seem like the better solution – it’s way cheaper, after all. But it isn’t better. Still, you can choose the lock range (much like Sesame), but the range map is a bit hit and miss, with your Bluetooth device (iPhone) struggling to be pinpointed. Forgot your phone? Your master password will get around that problem. The options to tweak are plentiful, but a little overblown for something that’s supposed to be mostly admin-free. Still, it works and is a very inexpensive solution. the bottom line. A useful proximity locking app, using your existing devices, but a few niggles prevent it from being the best solution.
0 notes
Text
EverMail - Evernote notes from email, fast
Evernote already lets you create notes from email, but can be a little clunky. EverMail is an Apple Mail plug-in that simplifies this process with two keyboard shortcuts that enable you to quickly generate notes from a selected mail: choose Quick to specify a notebook and add tags, and Full to edit the note before sending. EverMail also provides more control over what you include in the note, such as header information or the email itself as a .eml attachment – and, like Evernote’s email feature, file attachments are transferred and existing formatting preserved. The user interface is straightforward, and the app has other time-saving features too, such as remembering the last notebook selected. Notes also show up more quickly in Evernote when sent via EverMail, making it a good choice for Mail users who need to convert email to notes on a regular basis. It’s a small detail in the grand scheme of things but it’s also surprising how much difference a handy utility like this can make. the bottom line. A clever, fast alternative to Evernote’s built-in tool for generating notes from email.
0 notes
Text
Time Machine won’t restore to a new disk
I’ve just restored my Late 2012 (Yosemite) iMac. I was asked to restore from Time Machine, but I opted not to do this because I wanted to restore certain folders only, so I decided to reinstall the OS instead. After a few days, I noticed Time Machine had done a few backups, but now it won’t let me view nor restore any of my files from before my system restore. Time Machine says it has 41.9MB free of 1TB, so my data is still on there!
It’s on there, but Time Machine isn’t showing it because it thinks it belongs to a different Mac. Every disk volume has a unique number associated with it (a UUID). Time Machine separates backups according to the UUID of the source disk, and it only shows you backups that belong to the same UUID (otherwise you’d end up with a mess of files from two different disks getting merged in the same folder). When you deleted your old volume, you created a new one with a different UUID. In future, use Migration Assistant: this relaxes the UUID constraint, so that you can restore from one Mac to another. By skipping this step, Time Machine thought it was looking at a new Mac and created a new backup set. To get to your old data back, use the tmutil command in Terminal. First find the newest snapshot of the old backup set; click Go > Network in Finder and select your Time Capsule. Click the volume that appears. This shows the sparse bundle for Time Machine. Double-click this and ‘Time Machine Backup’ will appear in the Finder sidebar. When clicked, you’ll see a folder called Backups.backupdb. Inside that is a folder for the old backup set and one for the new set. Open Terminal and type sudo tmutil associatedisk -a / (with a space after ‘/’). Don’t hit R; in Finder, drag the folder for the most recent backup from the old set to the Terminal window. This will fill in the folder path to the tmutil command. Now hit R. Your current disk UUID is now associated with the old backups and you can restore your data from Time Machine.
0 notes