
Free VPN Service anonymous VPN servers account details here.
Don't wanna be here? Send us removal request.
Statistics
We looked inside some of the posts by temproxy-blog and here's what we found interesting.
Average Info
Notes Per Post
1
Likes Per Post
1
Reblog Per Post
0
Reply Per Post
0
Time Between Posts
7 days
Number of Posts By Type
Link
2
Text
1
Last Seen Tumblr Blogs


Fun Fact
Tumblr has 411 employees.
Link
0 notes
Text
How to Setup VPN on Mac Instantly (Step by Step Guide)
The growing mass surveillance, online censorship, and cybersecurity threats are issues that Mac users can no longer consider themselves safe from.
The need for an online privacy solution that is simple yet effective all at once is, therefore, naturally increasing for every concerned Mac user on the web.
If you use Windows, please read:Best VPN for Windows 7 (with Setup Guide)
1. Using VPN App
The simplest way to get a VPN up and running on your Mac is to download a VPN app from your provider.
These apps are optimized to ensure minimum installation time and feature an easily usable interface to tweak settings as per your requirements.
In addition, many features like split-tunneling and killswitch only work if you have a VPN client installed.
So here’s how to get a VPN app from your provider:
Visit the official page of your provider and subscribe to a plan suitable for your needs
Download Install the Mac VPN app of the provider on your system
Click on the VPN app logo after installation and enter your login details
Choose a server of your choice and connect
Congratulations! You now have a working VPN on your Mac
Note: Although all VPN providers mentioned in the list above have dedicated apps for Mac, this doesn’t apply to every VPN out there. If the VPN you want to use doesn’t have an app for Mac, you will have to set it up manually.
2. Instructions for Manual Setup
Mac OS natively supports L2TP/IPSec and IKEv2 protocols. Your options, therefore, are only confined to these tunneling protocols if you’ve decided to perform the manual setup.
The main steps for manual installation are as follows:
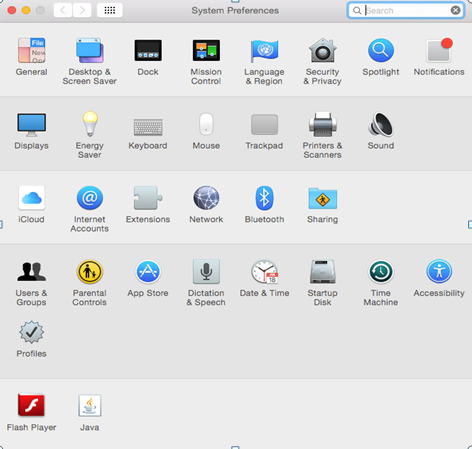
Step 1: From your home screen go to the System Preferences and locate Network settings icon and select it, as shown below.
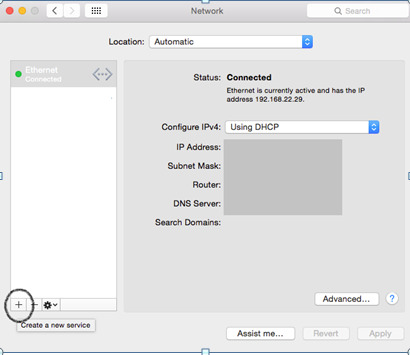
Step 2: Once you are inside the Network settings menu, click the “+” sign as shown below to enter the VPN connection wizard
Step 3: This will open a dialog box as shown below
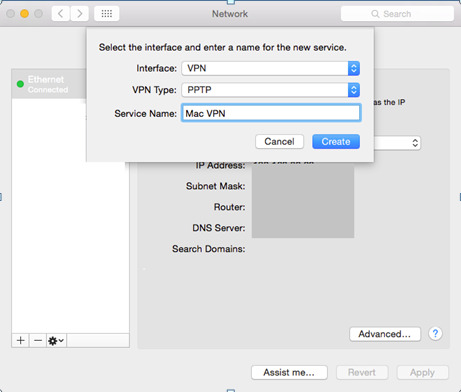
Step 4: Choose “VPN” in the “Interface” field
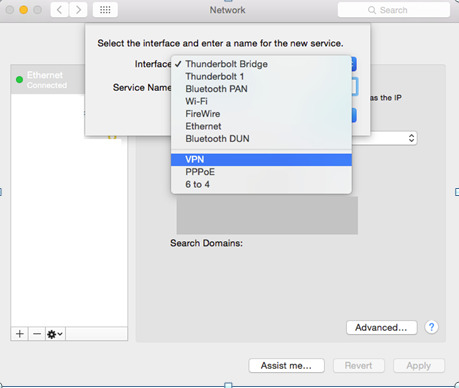
Step 5: Select a VPN type from PPTP, L2TP, or IKEv2 (preferably one of the latter two. Consult your specific VPN provider for more help)
Step 6: Give a suitable name in “Service Name” and press create
Step 7: The newly created VPN connection will now appear on the left-hand menu with the name that you gave. Click on it
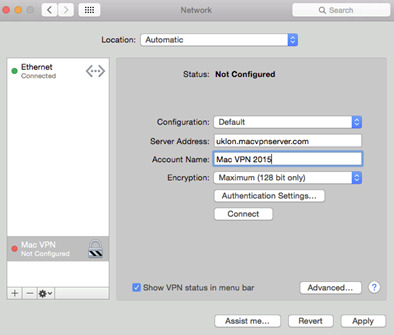
Step 8: Now, choose Default in the “Configuration” field
Step 9: For “Server Address”, visit your provider’s page or contact them. Every VPN server location has a unique address
Step 10: The “Account Name” is your VPN username which you use to login to the service. Enter it in this field.
Step 11: Click on “Authentication Settings” and enter your VPN password which you were provided by your provider
Step 12: Check “Show VPN status in menu bar” and click on “Advanced”
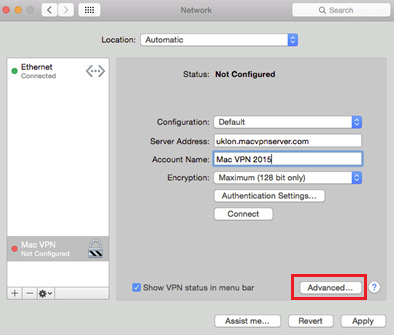
Step 13: Now check “Send all traffic over VPN connection” and press OK
Step 14: Click “Apply” and press “Connect” below “Authentication Settings”
If you set everything up correctly, you should now be connected to your VPN manually.
Well-done!
3. Third-Party VPN Client (Tunnelblick)
Tunnelblick is a third-GUI designed especially for Mac to enable OpenVPN support. It is basically a counterpart to OpenVPN GUI, which is a Windows-based client, and is open source.
With Tunnelblick, you can run OpenVPN protocol on Mac. You just need to download .ovpn configuration files, which you should find on your OpenVPN provider’s official website. If not, just contact them and they’ll help you out with this.
Once the config files are downloaded, you can choose a server from the main Tunnelbick client and this will connect you to the web via an OpenVPN tunnel from your VPN provider.
You can download Tunnelblick here.
I would suggest using either OpenVPN or IKEv2 VPN protocols because these use strong encryption and are free from the vulnerabilities associated with PPTP and L2TP.
Security, after all, is among the primary reasons we look towards VPN services for.
0 notes
Link
This Free VPN Service is Advertisement and Donation based, if you enjoy this service, please consider Donating so we can keep this as a free service and add more servers in the future.
1 note
·
View note